Go SE - Baby monitors Snuza - Free user manual and instructions
Find the device manual for free Go SE Snuza in PDF.
| Product Type | Portable Wireless Movement Monitor |
| Brand | Snuza |
| Model | Go SE |
| Category | Baby Monitors |
| Power Supply | CR2 or 14250 battery (3V 600mAh) depending on serial number |
| Estimated Battery Life | Varies depending on daily use and number of alarms |
| Detection | Abdominal Movements |
| Alarm Delay | Adjustable: 15, 18 or 20 seconds |
| Low Movement Alert | Alerts if fewer than 8 movements per minute (can be disabled) |
| Audible Tick | Optional with volume adjustment (medium/loud) |
| Movement Indicator Light | Green (normal), Orange (low movement), Red (alarm) |
| Battery Indicator | Green (OK), Orange (almost empty), Red (empty) |
| Attachment | On the folded edge of the diaper using an integrated clip |
| Usage | Monitoring abdominal movements during sleep |
| Precautions | Do not use with external movement sources (stroller, car) |
| Maintenance | Wipe with a damp cloth, mild soap if necessary |
| Resistance | Splash-proof, not waterproof |
| Storage | In a dry place |
| Warranty | 12 months |
| Estimated Weight | Approximately 50 g |
| Manufacturer | Biosentronics, designed in South Africa |
Frequently Asked Questions - Go SE Snuza
User questions about Go SE Snuza
0 question about this device. Answer the ones you know or ask your own.
Ask a new question about this device
Download the instructions for your Baby monitors in PDF format for free! Find your manual Go SE - Snuza and take your electronic device back in hand. On this page are published all the documents necessary for the use of your device. Go SE by Snuza.
USER MANUAL Go SE Snuza
Portable Baby Movement Monitor
Instruction Manual
READ INSTRUCTIONS IN FULL BEFORE USE
Important: Snuza Go! is a baby-care aid, not a medical device. It is not intended for the diagnosis, prevention or monitoring of a disease, injury or handicap, including SIDS.

SNUZA is a registered trademark of
Biosentronics
Made in South Africa
Patented


CONTENTS
- IMPORTANT - READ FIRST! 2
- Introduction 4
- Parts Identification 5
- Quick Start Guide 6
- Diaper (Nappy) Fitment 6
- Fitting your Go! 7
- Operation 7_
7.1 Startup 7
7.2 Monitoring 8
7.3 Travelling 9
7.4 Clothing 9
7.5 Baby Sound and Video Monitors 9
- Settings
8.1 Audible Tick
8.2 Alarm Activation Period
8.3 Movement-Rate Warning
- Battery
9.1 Battery Indicator
9.2 Battery Life
9.3 Replacing the Battery
9.4 Disposal
- Maintenance
10.1 Precautions
10.2 Cleaning and Storage
- Troubleshooting
- Disclaimer 14
- Guarantee
11
一
3
3
一
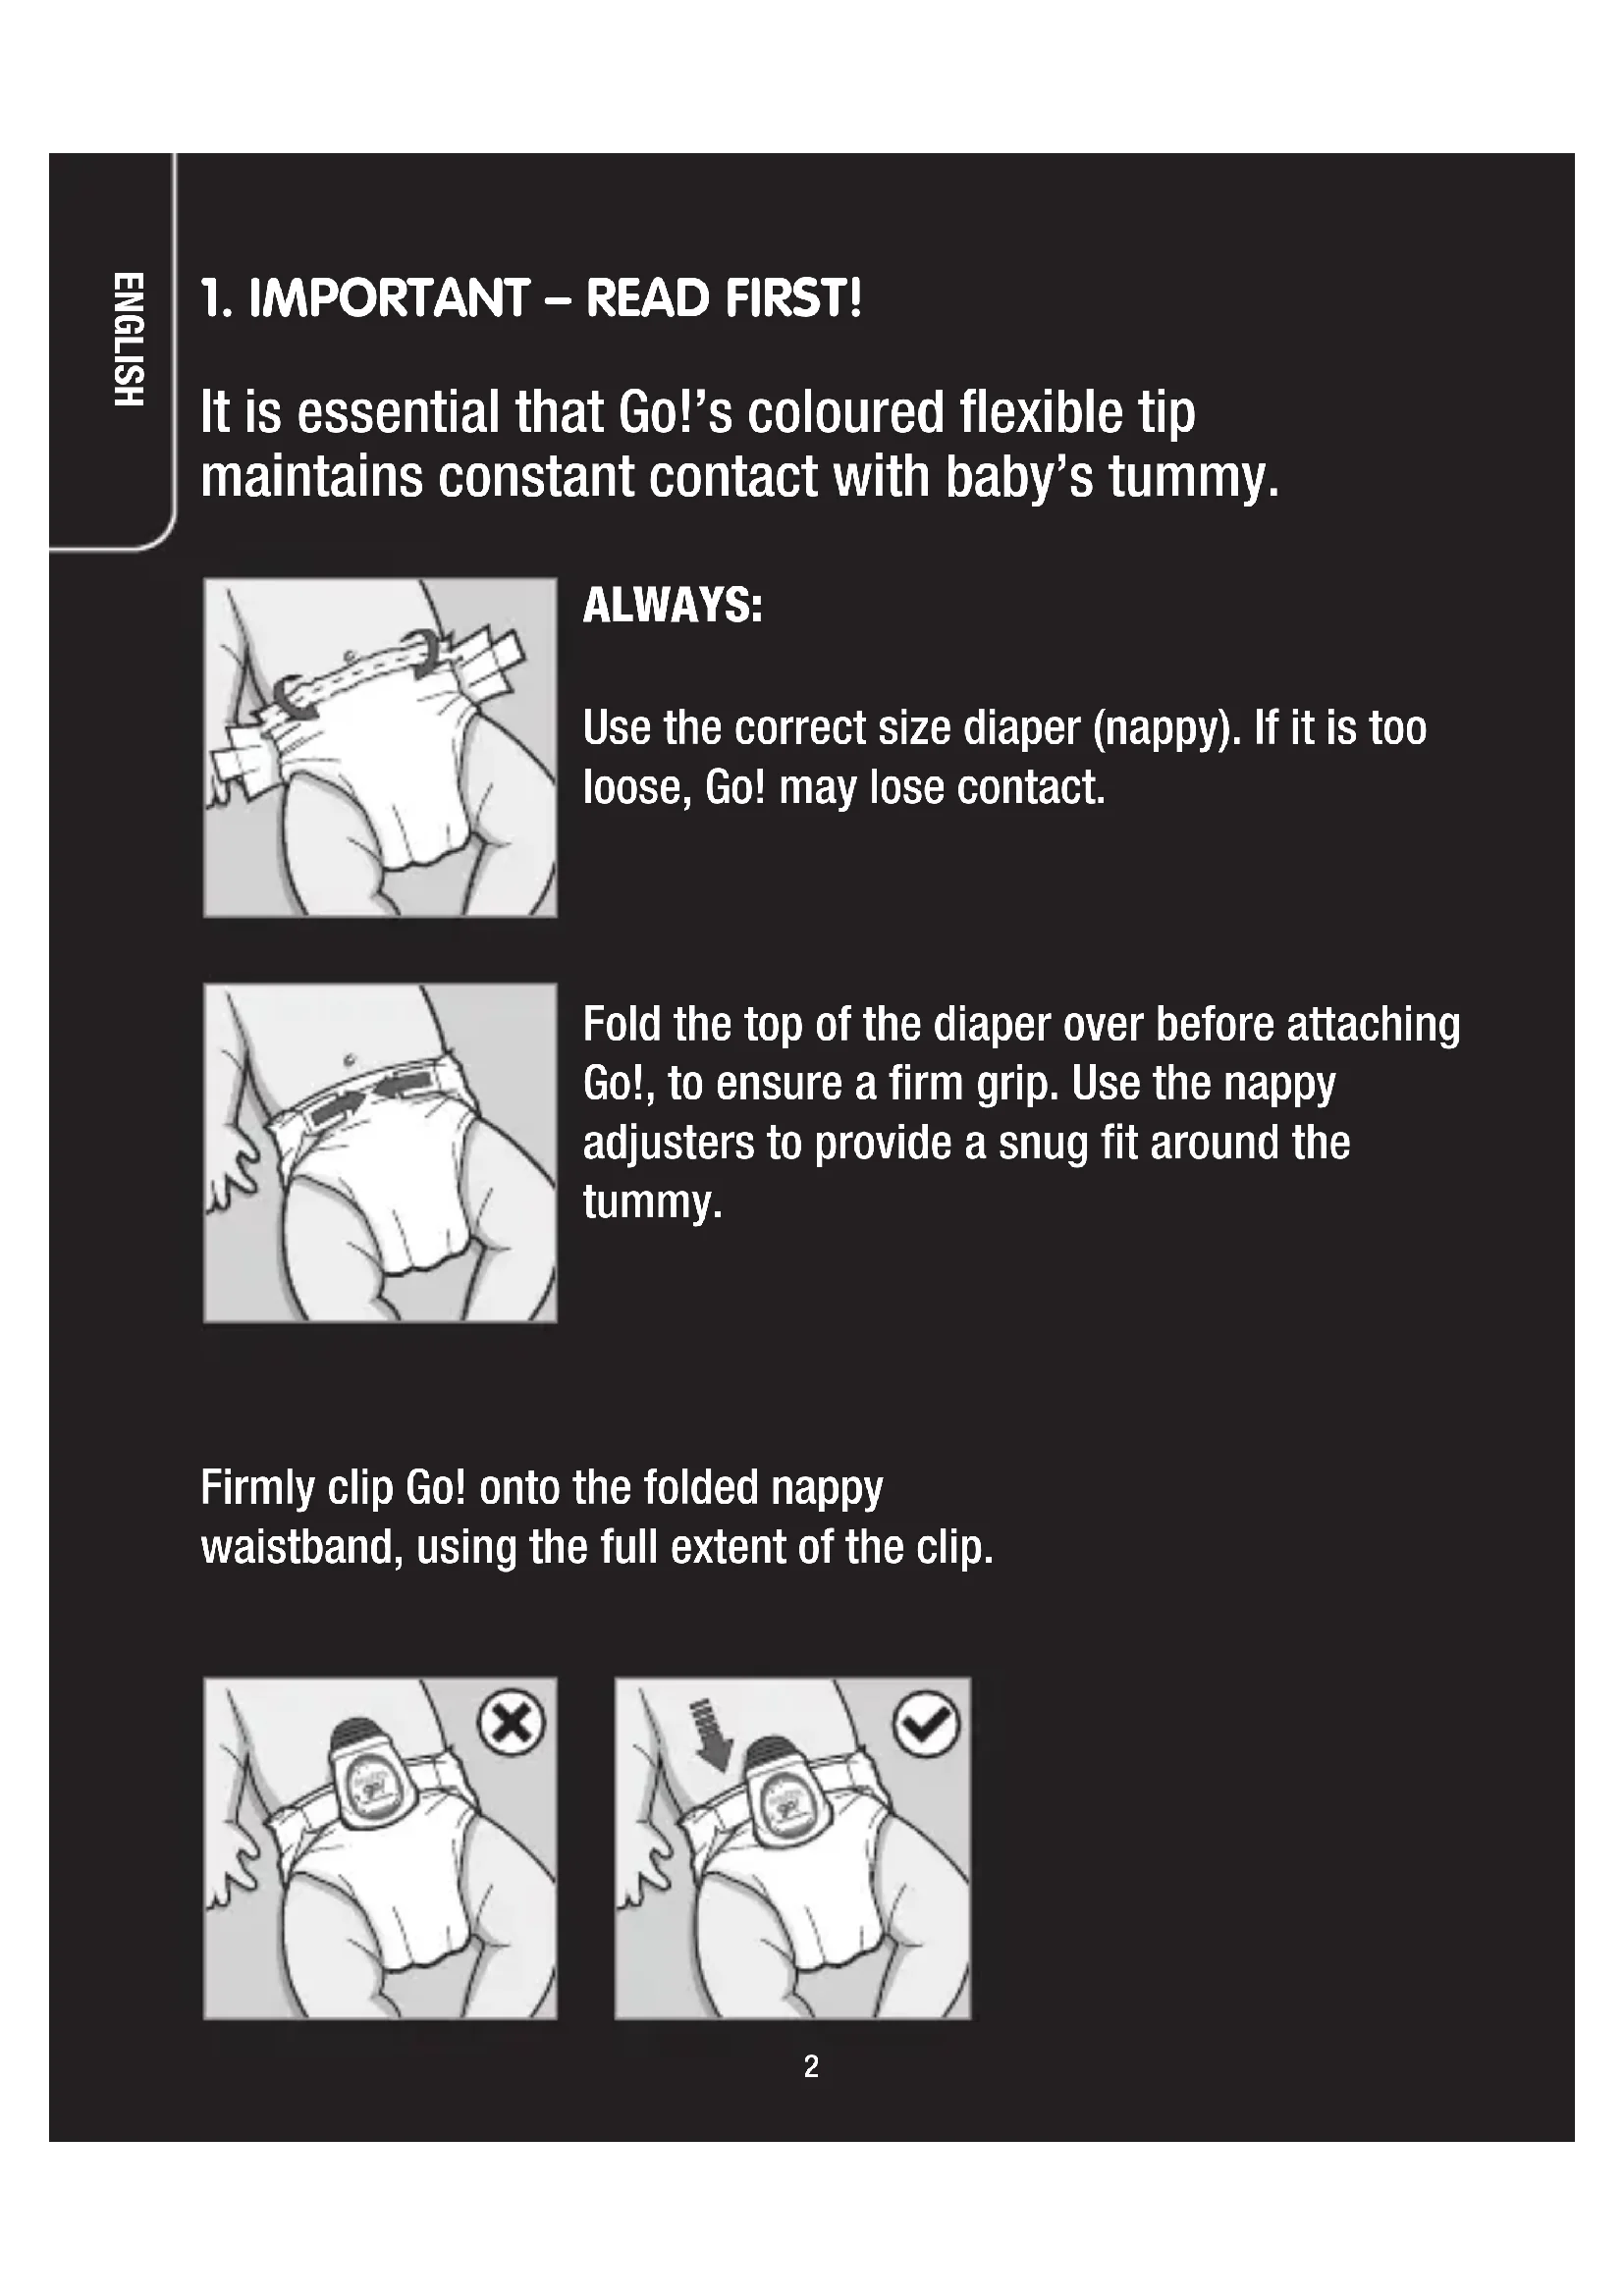
1. IMPORTANT - READ FIRST!
It is essential that Go!’s coloured flexible tip maintains constant contact with baby’s tummy.
ALWAYS:
Use the correct size diaper (nappy). If it is too loose, Go! may lose contact.

Fold the top of the diaper over before attaching Go!, to ensure a firm grip. Use the nappy adjusters to provide a snug fit around the tummy.
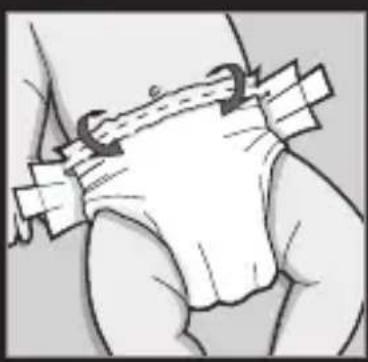
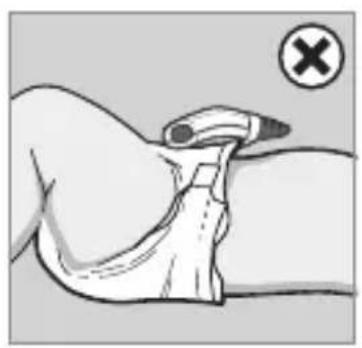
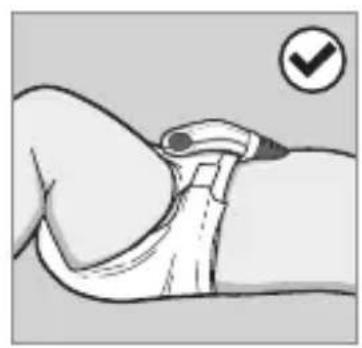
Firmly clip Go! onto the folded nappy waistband, using the full extent of the clip.
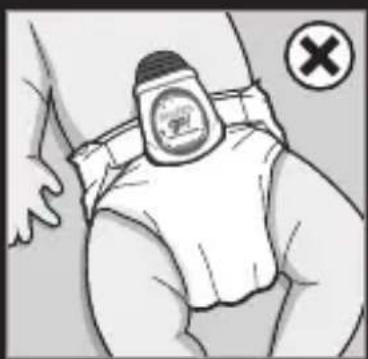
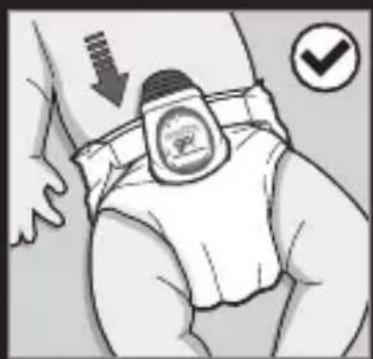

Ensure that Go! sits squarely on the nappy, and that the Movement Sensor (1) is in contact with baby's tummy.
Press the ON/OFF switch (5) to start monitoring.
Always follow the above procedure to ensure that your baby's abdominal movement is being monitored, and to prevent false alarms caused by lack of contact with the baby's tummy.
NOTE: Handle Go! with care to prevent damage to clip or sensor.

2. INTRODUCTION
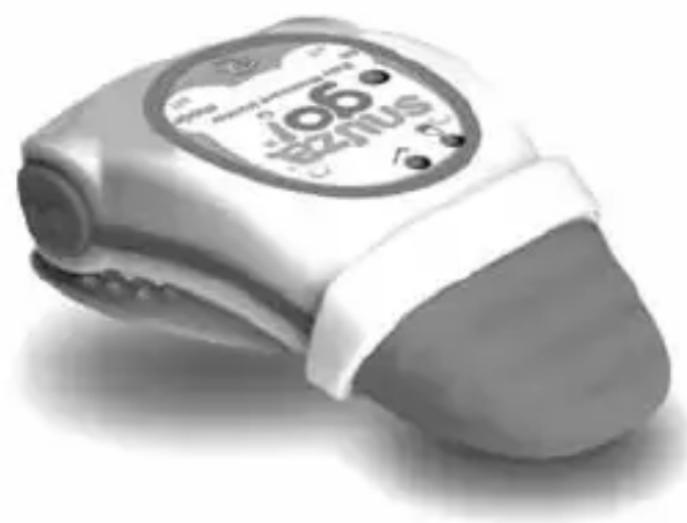
Snuza Go! is a portable baby movement monitor which safely and conveniently monitors your baby's abdominal movements while sleeping.
Go! can be clipped onto your baby's diaper (nappy) for total mobility.
No cords, wires, sensor pads or external power are required.
Clip on, switch on and relax.
Go! detects even the slightest abdominal movement. If no abdominal movement at all is detected for a period of 20 seconds, Go! will emit an audible alarm to alert you. The 20-second period can be reduced to 15 or 18 seconds if preferred (see Section 8.2 Alarm Activation Period).
Go! will also alert you if your baby's abdominal movements are very weak or fall to less than 8 movements per minute.
3. PARTS IDENTIFICATION
Front
(1) Movement Sensor
(2) Battery Indicator Light
(3) Movement Indicator Light
(4) Speaker Hole
(5) ON/OFF Button

(6) MODE/OFF Button
Reverse
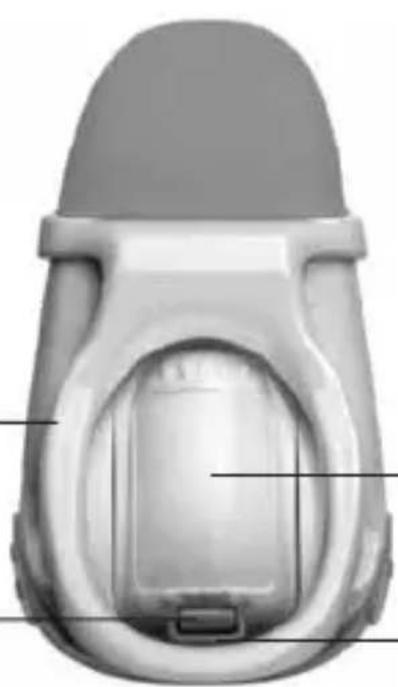
(8) Battery Cover
(7) Diaper (Nappy) Clip
(9) Battery Cover Release Clip
(10) Clip Guard Rail
4. QUICK START GUIDE
- Important: Use the correct diaper size and make sure it fits snugly (see Section 5 Diaper/Nappy Fitment).
- Switch on by briefly pressing the ON/OFF button (5).
- A start-up test will illuminate the indicator lights, play the start-up tone and perform a battery test.
- Clip Snuza Go! onto the diaper so that the Movement Sensor (1) is in direct contact with the baby's skin in the tummy area (see Section 6 Fitting your Go!).
- The Movement Indicator Light (3) flashes on each abdominal movement. See Section 7.2 Monitoring for a full description of what it signifies.
- If no abdominal movement is detected for a period of 20 seconds, the full audible alarm will sound and the Movement Indicator Light (3) will flash red. See Section 8.2 Alarm Activation Period for a description of how to reduce the time period to 15 or 18 seconds.
- The alarm can be deactivated by briefly pressing the MODE/OFF button (6) and monitoring will continue.
- To turn off the monitor, press both the ON/OFF (5) and MODE/OFF (6) buttons simultaneously. A shutdown tone will be heard.
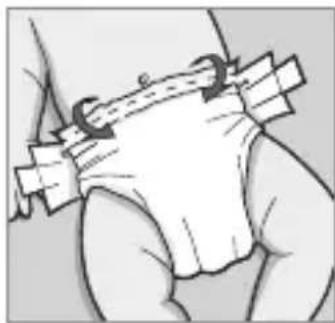
5. DIAPER/NAPPY FITMENT
Important: Correct diaper fitment is essential for the operation of Go!. The thin flap of material at the top of the diaper must be folded over the thicker part before the diaper is closed (this is the section to which Snuza Go! will be attached). The diaper should fit snugly on the baby with the top of the diaper just below the belly button. Loose fitting diapers will gape, causing the monitor to lose contact with the baby and false alarm. A very 'full' or wet diaper may also cause it to gape.
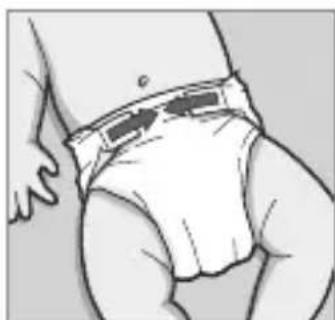
6. FITTING YOUR GO!
Ensure that the Battery Cover (8) is secure. Clip your Go! all the way onto the diaper to the full extent of the clip, as shown:-
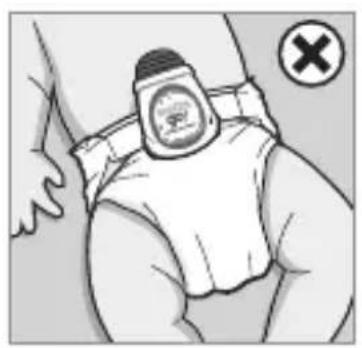
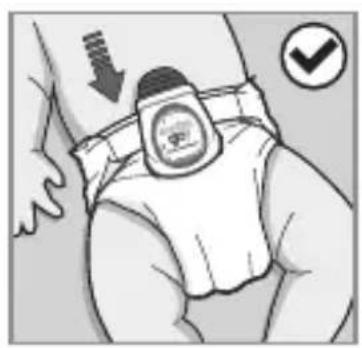
Make sure that the Movement Sensor (1) is in contact with the baby's tummy around the belly button area, although closer to the sides may suit different sleeping positions.
The World Health Organisation (WHO) recommends that babies be placed to sleep on their back unless advised otherwise by a doctor.
7. OPERATION
7.1 Startup
Switch on by briefly pressing the ON/OFF button (5).
A startup-test will run which will flash all indicator lights and briefly sound the audible alarm.
The Battery Indicator Light (2) will flash briefly as follows:
Green Battery OK
Orange Battery nearing depletion - replace battery
Red Battery flat - Go! will not monitor, replace battery
Warning: Ensure that indicator lights and alarm are working properly and that the battery level is high enough for proper operation (i.e. green or orange light). Otherwise, DO NOT use the monitor. If the battery is too flat to operate, the Battery Indicator Light (2) will flash red accompanied by a short
beep every second. Change the battery before further use (see Section
9.3 Replacing the Battery).
To switch OFF, press both the ON/OFF button (5) and the MODE/OFF button (6) simultaneously.
7.2 Monitoring
The Movement Indicator Light (3) flashes with each abdominal movement during monitoring:
Green Normal abdominal movements.
Orange Very small or weak abdominal movements (eg very shallow breathing).
Orange and Movement rate below 8 movements per minute Movement-rate If the abdominal movement rate increases to Warning sounds over 8 abdominal movements per minute, the (dual-tone beep Movement Indicator Light will reset to green every second) (normal) and the warning will stop. To disable this function, see Section 8.3 Movement-Rate Warning.
and full No abdominal movement at all has been audible alarm sounds detected for the selected time period (15, 18 or 20 seconds). You can select the alarm activation period (ie the period of no abdominal movement detection) to be 15, 18 or 20 seconds (see Section 8.2 Alarm Activation Period). The alarm can be deactivated by briefly pressing the MODE/OFF button (6) or by turning Snuza Go! off completely (press ON/ OFF (5) and MODE/OFF (6) buttons simultaneously). If the MODE/OFF button is used to deactivate the alarm, monitoring will continue.
7.3 Travelling
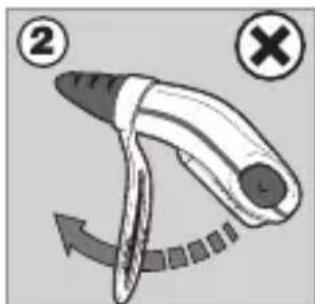
Movement from external sources such as being pushed in a pram or traveling in a vehicle or aircraft may be detected by Go!’s sensor. Snuza Go! should not be relied upon where external sources of movement are present.
7.4 Clothing
- Go! can be clipped onto the folded waistband of the diaper or the waistband of elasticated pants, as long as the Movement Sensor (1) touches the baby in the tummy area.
- There may also be a thin layer of clothing (eg a vest) between the Sensor and the skin, but ensure that the Sensor maintains contact.
- The monitor can also be used if baby is dressed in light clothing (for example, a Babygro) over the diaper or pants to which the Go! is attached.
- Too much clothing may attenuate or muffle the alarm. Make sure the alarm can be heard if baby is covered in clothing and/or blankets.
7.5 Baby Sound and Video Monitors (Optional)
Snuza Go! can be used together with a baby sound or video monitor to extend the distance at which the alarm can be heard.
8. SETTINGS
8.1 Audible Tick
This feature causes Go! to emit an audible 'tick' on each abdominal movement. To enable the Audible tick, ensure that Go! is switched ON, and press the MODE/OFF button (6) briefly (less than 1 second).
To increase the volume of the tick, press the MODE/OFF button once again for medium volume and again for high volume.
To turn off, briefly press the MODE/OFF button a fourth time - Go! will give a louder beep.
This feature may be used with a baby sound monitor to enable you to 'hear' baby's movements from a distance.
8.2 Alarm Activation Period
Decide whether you prefer the alarm to activate after 15, 18 or 20 seconds of no abdominal movement.
Ensure that Snuza Go! is switched OFF.
Press and hold the MODE/OFF button (6) for 5 seconds until the unit beeps and both indicator lights flash briefly.
The Movement Indicator Light (3) will then start flashing with a pause between flashes. The following number of flashes relate to the alarm activation period:
1 flash - 15 seconds
2 flashes - 18 seconds
3 flashes - 20 seconds
The factory pre-set value is for 20 seconds (3 flashes).
Each press of the ON/OFF button (5) will increase the number of flashes from 1 to 3. Press the ON/OFF button until the desired number of flashes (relating to the desired setting) is reached. Press the MODE/OFF button (6) to store the setting. Go! will be in the power OFF mode after the setting has been saved. If the settings mode is entered and no button presses are detected within 30 seconds, Go! will switch to the monitoring mode (as if the unit had been turned on using the ON/OFF button).
8.3 Movement-Rate Warning
The Movement-rate Warning alerts you if the baby moves less than 8 times per minute – the Movement Indicator Light (3) flashes orange and the Movement-rate Warning sounds (dual-tone beep every second). This feature is automatically enabled each time Go! is switched ON.
To disable this warning during monitoring, ensure that Go! is switched ON, and press and hold the MODE/OFF button (6) for more than 1 second until the unit beeps.
If you want to enable the warning again, switch Go! off completely (press both ON/OFF (5) and MODE/OFF (6) buttons simultaneously), then switch it ON again. The Movement-rate Warning is enabled by default when Go! is switched on.
9. BATTERY
9.1 Battery Indicator
If the battery becomes depleted during monitoring, the Battery Indicator Light (2) will flash as follows:
Red flash on each abdominal Nearing depletion - replace movement battery before further use.
ed flash on each abdominal Battery flat - no monitoring movement and the low battery will take place. Replace battery alarm beeps every 2 seconds before further use.
If the battery is nearing depletion or depleted, change the battery before further use of the monitor (see Section 9.3 Replacing the Battery).
9.2 Battery Life
The life of the replaceable battery depends entirely on usage. Battery life will vary significantly depending on the average daily duration of use and/or alarm duration and/or number of alarms. Turning on and off unnecessarily shortens the battery life. If the number of alarms is high, check diaper fitment. Please note that the product guarantee does not apply to the battery.
9.3 Replacing the Battery
For serial numbers beginning with 'B': use a CR2 (CR15270) battery available from most retail outlets.
For all other serial numbers: use only a 14250 battery that delivers 3V 600mAh, available from a specialist battery supplier or your national Snuza distributor (please see our website www.snuza.com for information about batteries and details of your national distributor).
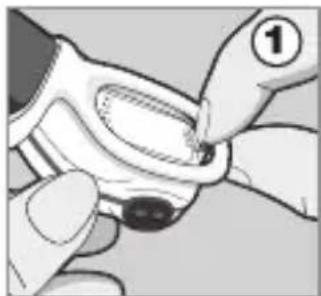
** The serial number is located inside the battery housing (it can also be found on the original Snuza packaging). To locate the serial number, remove the battery cover and battery as per the instructions below
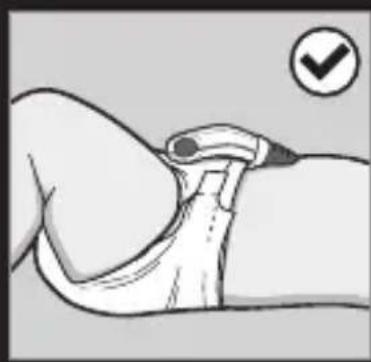
- Use your fingernail or a small flat implement. With a pinching action (Figure 1), gently pull back the Battery Cover Release Clip (9) on the underside of the monitor and lift the Battery Cover at the same time (Figure 2).
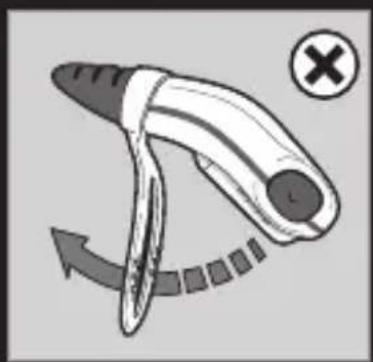
- The Clip Guard Rail (10) prevents the clip from bending too far. Do not try to bend the clip beyond this point.
- Remove the depleted battery. The serial number is located beneath the battery.
-
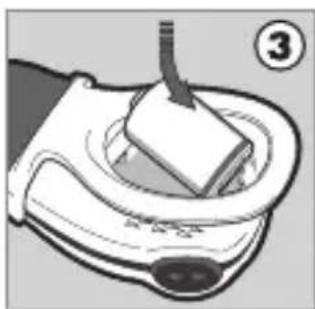
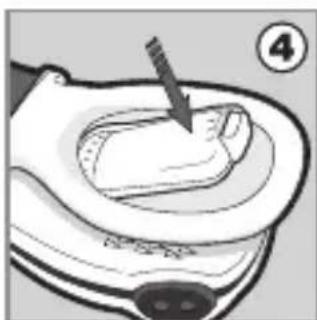
Insert the new battery, negative end first, as shown in Figure 3. Ensure that the polarity is correct (align the positive end +' of the battery with the +' symbol in the battery housing). Replace the Battery Cover and ensure that it is correctly closed (Figure 4).
-
Test the unit by switching on and ensuring that the Battery Indicator Light (2) flashes green.
- If the unit starts emitting a beep after the battery has been replaced, simply press the ON/OFF (5) and MODE/OFF (6) buttons simultaneously to turn it off.
9.4 Disposal
The battery must be disposed of in accordance with your country's laws governing the disposal and recycling of batteries.
10. MAINTENANCE
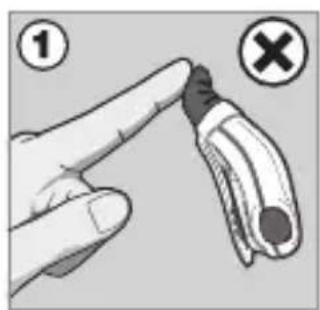
10.1 Precautions
- Do not insert anything into the Speaker Holes (4).
- Do not allow any liquid to enter the Speaker Holes.
- Avoid bending the sensor unnecessarily (fig 1).
- Do not use undue force to bend the clip (fig 2).
- Do not pull the Battery Cover Release Clip (9) beyond the Guard Rail (10).
10.2 Cleaning and Storage
- Gently wipe with a damp cloth to remove any dirt. A mild soap may be used for stubborn dirt.
- Do not use any other cleaning agents as they may contain damaging chemicals.
- The monitor is splash resistant, not waterproof. Do not immerse in water. If it gets wet, dry it off immediately.
- When changing the battery, dirt that is trapped between the battery replacement hatch and the case may be cleaned with a dry cotton bud once the Battery Cover (8) has been removed. Be sure that the rubber seal is free of dirt before replacing the Battery Cover, as this could compromise the seal.
- Do not store in a damp area.
11. TROUBLESHOOTING
- Check incorrect fitment and placing of Go! on baby's diaper (see Section 5 Diaper Fitment and Section 6 Fitting your Go!).
- Battery failure: The Battery Indicator Light (2) will show red (see Section 9.3 Replacing the Battery).
Please visit our website www.snuza.com for further information.
12. DISCLAIMER
Customers use this monitor at their own risk and Biosentronics cc, its members, employees, agents, contractors, representatives, manufacturers, distributors and associates ("SNUZA") shall not be held liable for any loss, damage or injury suffered by the customer or any other person arising from, or in connection with, the use or manufacture of the monitor, including loss, damage or injury suffered by the customer or any other person as a result of any defects in respect of the monitor, and all warranties, and any other liability from whatsoever cause arising, are hereby excluded and the customer hereby indemnifies Biosentronics cc in respect of any such liability.
13. GUARANTEE
Biosentronics cc guarantees this product to be free from defects in materials and workmanship for a period of 12 months from the original date of purchase, verified by a sales receipt.
Our guarantee liability shall be limited to replacing the unit free of charge and does not include transport costs. Our guarantee extends to all countries in which this product is supplied. By the act of operating this product, the user accepts all resulting liability. We reserve the right to modify the provisions of this guarantee at any time without notice. This guarantee does not cover the battery, incorrect application, tampering, misuse or transport damage.

Movement abdominal normal

Bewegungsfrequency-Warning.