
Architect KUWS24LSBS - Wine cellar KITCHENAID - Free user manual and instructions
Find the device manual for free Architect KUWS24LSBS KITCHENAID in PDF.

| Product type | Wine cellar |
| Brand | KitchenAid |
| Model | Architect KUWS24LSBS |
| Electrical supply | 115 V, 60 Hz, 15-20 A, 3-prong grounding plug |
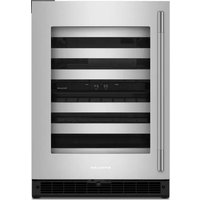
| Temperature zones | 2 zones (upper and lower) with digital display |
| Recommended temperature range | 55 °F (13 °C) for storage; individual settings |
| Capacity (number of bottles) | Not specified (small wine cellar) |
| Interior lighting | Yes, replaceable bulb, control on base grille |
| Adjustable feet | 4 leveling legs for balancing |
| Base grille | Removable for access to condenser coils |
| Condenser cleaning | Every 2 months, vacuum with long attachment |
| Bulb type | Standard (replace with bulb of same size, shape, and wattage) |
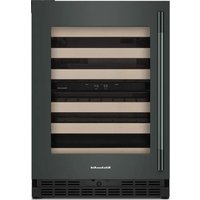
| Exterior material | Stainless steel |
| Noise level | Normal operating sounds (compressor, fans, refrigerant) |
| Installation - Clearances | 1/4 in (6.35 mm) on sides and top; 2 1/2 in (6.35 cm) on hinge side |
| Weight | Heavy, requires 2 people to move |
| Warranty | 1 year parts and labor; 2 to 5 years on liner and sealed refrigeration system |
| Customer service (United States) | 1-800-422-1230 |
| Customer service (Canada) | 1-800-807-6777 |
Frequently Asked Questions - Architect KUWS24LSBS KITCHENAID
User questions about Architect KUWS24LSBS KITCHENAID
0 question about this device. Answer the ones you know or ask your own.
Ask a new question about this device
Download the instructions for your Wine cellar in PDF format for free! Find your manual Architect KUWS24LSBS - KITCHENAID and take your electronic device back in hand. On this page are published all the documents necessary for the use of your device. Architect KUWS24LSBS by KITCHENAID.
USER MANUAL Architect KUWS24LSBS KITCHENAID
For questions about features, operation/performance, parts, accessories, or service, call: 1-800-422-1230 or visit our website at...
www.kitchenaid.com
In Canada, call: 1-800-807-6777, or visit our website at...
www.KitchenAid.ca
BODEGA
WINE CELLAR SAFETY 3
Proper Disposal of Your Old Wine Cellar 3
INSTALLATION INSTRUCTIONS 4
Tools and Parts 4
Location Requirements. 4
Electrical Requirements 4
Unpack the Wine Cellar 4
Door Closing. 5
BaseGrille 5
WINE CELLARUSE. 6
Normal Sounds 6
Using the Control 6
Wine Racks 6
Stocking the Wine Cellar. 7
Lighting the Wine Cellar 7
WINE CELLAR CARE 7
Cleaning. 7
Changing the Light Bulb. 8
Vacation and Moving Care. 8
TROUBLESHOOTING 9
ASSISTANCE OR SERVICE. 10
In the U.S.A. 10
In Canada 10
Accessories 10
WARRANTY 11
INDICE
ASSISTANCE OU SERVICE 30
Aux Etats-Unis. 30
Au Canada. 30
Accessoires 30
GARANTIE 31
WINE CELLAR SAFETY
Your safety and the safety of others are very important.
We have provided many important safety messages in this manual and on your appliance. Always read and obey all safety messages.
This is the safety alert symbol.
This symbol alerts you to potential hazards that can kill or hurt you and others.
All safety messages will follow the safety alert symbol and either the word "DANGER" or "WARNING."
These words mean:
ADANGER
You can be killed or seriously injured if you don't immediately follow instructions.
WARNING
You can be killed or seriously injured if you don't follow instructions.
All safety messages will tell you what the potential hazard is, tell you how to reduce the chance of injury, and tell you what can happen if the instructions are not followed.
IMPORTANT SAFETY INSTRUCTIONS
WARNING: To reduce the risk of fire, electric shock, or injury when using your wine cellar, follow these basic precautions:
Plug into a grounded 3 prong outlet.
Do not remove ground prong.
- Do not use an adapter.
- Do not use an extension cord.
Disconnect power before servicing.
Replace all parts and panels before operating.
Remove doors from your old wine cellar.
Use nonflammable cleaner.
- Keep flammable materials and vapors, such as gasoline, away from wine cellar.
Use two or more people to move and install wine cellar.
SAVE THESE INSTRUCTIONS
Proper Disposal of Your Old Wine Cellar
WARNING
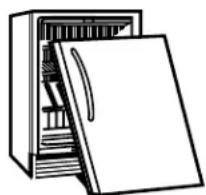
Suffocation Hazard
Remove door from your old wine cellar.
Failure to do so can result in death or brain damage.
IMPORTANT: Child entrapment and suffocation are not problems of the past. Junked or abandoned wine cellars are still dangerous - even if they will sit for "just a few days." If you are getting rid of your old wine cellar, please follow these instructions to help prevent accidents.
Before You Throw Away Your Old Wine Cellar:
Take off the door.
- Leave the racks in place so that children may not easily climb inside.
INSTALLATION INSTRUCTIONS
Tools and Parts
TOOLS NEEDED:
Gather the required tools and parts before starting installation.
Phillips screwdriver
Location Requirements
WARNING
Explosion Hazard
Keep flammable materials and vapors, such as gasoline, away from wine cellar.
Failure to do so can result in death, explosion, or fire.
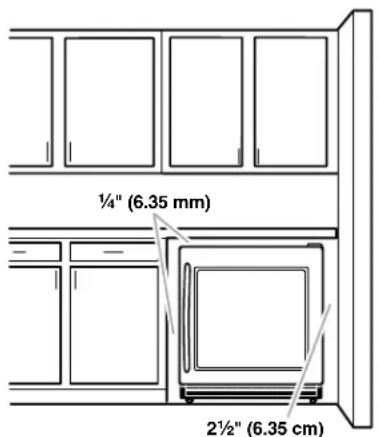
To ensure proper ventilation for your wine cellar, allow for a 1/4'' (6.35 mm) space on each side and at the top. When installing your wine cellar next to a fixed wall, leave 21/2'' (6.35 cm) minimum clearance on the hinge side to allow for the door to swing open.
NOTE: It is recommended that you do not install the wine cellar near an oven, radiator, or other heat source. Do not install in a location where the temperature will fall below 55^ (13^) . For best performance, do not install the wine cellar behind a cabinet door or block the base grille.
Electrical Requirements
WARNING

Electrical Shock Hazard
Plug into a grounded 3 prong outlet.
Do not remove ground prong.
Do not use an adapter.
Do not use an extension cord.
Failure to follow these instructions can result in death, fire, or electrical shock.
Before you move your wine cellar into its final location, it is important to make sure you have the proper electrical connection.
Recommended grounding method
A 115 Volt, 60Hz AC only, 15- or 20-amp fused, grounded electrical supply is required. It is recommended that a separate circuit serving only your wine cellar be provided. Use an outlet that cannot be turned off by a switch. Do not use an extension cord.
NOTE: Before performing any type of installation, cleaning, or removing a light bulb, unplug wine cellar or disconnect power.
Unpack the Wine Cellar
WARNING
Excessive Weight Hazard
Use two or more people to move and install wine cellar. Failure to do so can result in back or other injury.
Remove the Packaging
- Remove tape and glue residue from surfaces before turning on the wine cellar. Rub a small amount of liquid dish soap over the adhesive with your fingers. Wipe with warm water and dry.
- Do not use sharp instruments, rubbing alcohol, flammable fluids, or abrasive cleaners to remove tape or glue. These products can damage the surface of your wine cellar. For more information, see "Wine Cellar Safety."
Dispose of/recycle all packaging materials.
When Moving Your Wine Cellar:
Your wine cellar is heavy. When moving the wine cellar for cleaning or service, be sure to protect the floor. Always pull the wine cellar straight out when moving it. Do not wiggle or "walk" the wine cellar when trying to move it, as floor damage could occur.
Clean Before Using
After you remove all of the packaging materials, clean the inside of your wine cellar before using it. See the cleaning instructions in "Wine Cellar Care."
Door Closing
Door Closing
Your wine cellar has four leveling legs. If your wine cellar seems unsteady or you want the door to close more easily, adjust the wine cellar's tilt using the instructions below.
WARNING

Electrical Shock Hazard
Plug into a grounded 3 prong outlet.
Do not remove ground prong.
Do not use an adapter.
Do not use an extension cord.
Failure to follow these instructions can result in death, fire, or electrical shock.
- Plug into a grounded 3 prong outlet.
WARNING
Excessive Weight Hazard
Use two or more people to move and install wine cellar.
Failure to do so can result in back or other injury.
-
Move the wine cellar into its final location.
-
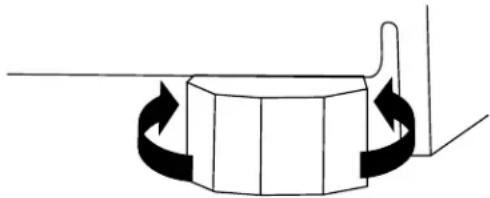
Turn the leveling legs to the right to lower the wine cellar or turn the leveling legs to the left to raise it. It may take several turns of the leveling legs to adjust the tilt of the wine cellar.
NOTE: Having someone push against the top of the wine cellar takes some weight off the leveling legs. This makes it easier to adjust the leveling legs.
- Open the door and check to make sure that it closes as easily as you like. If not, tilt the wine cellar slightly more to the rear by turning both front leveling screws to the right. It may take several more turns, and you should turn both leveling legs the same amount.
BaseGrille
Remove the Base Grill
- Open the wine cellar door.
- Using a Phillips screwdriver, remove the two screws. Push both tabs in toward the center to release the base grille from the wine cellar.

A. Tabs
B. Screws
- Remove the base grille.
Replace the Base Grille
- Open the wine cellar door.
- Position the base grille so that both tabs align and the base grille snaps into place. Replace the two screws. Tighten the screws.
WINE CELLARUSE
Normal Sounds
Your new wine cellar may make sounds that your old one didn't make. Because the sounds are new to you, you might be concerned about them. Most of the new sounds are normal. Hard surfaces, such as the flooring and surrounding structures, can make the sounds seem louder. The following describes the kinds of sounds and what may be making them.
■ Your wine cellar is designed to run more efficiently to keep your wine at the desired temperatures and to minimize energy usage. The high efficiency compressor and fans may cause your wine cellar to run longer than your old one. You may also hear a pulsating or high-pitched sound from the compressor or fans adjusting to optimize performance.
Rattling noises may come from the flow of refrigerant or items stored inside the wine cellar.
As each cycle ends, you may hear a gurgling sound due to the refrigerant flowing in your wine cellar.
You may hear water running into the drain pan when the wine cellar is defrosting.
You may hear clicking sounds when the wine cellar starts or stops running.
Using the Control
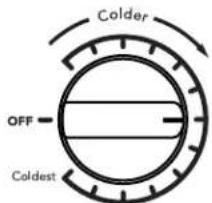
For your convenience, your wine cellar control is preset at the factory. When you first install your wine cellar, make sure that the control is still preset to the mid-setting as shown.
Adjusting Controls
The mid-setting indicated in the previous section should be correct for normal usage. The control is set correctly when beverages are as cold as you like.
If you need to adjust the temperature, wait at least 24 hours between adjustments and then recheck the temperature.
To make the wine cellar colder, adjust the control to the next higher setting. To make the wine cellar less cold, adjust the control to the next lower setting.
Temperature Separator (Temperature Display)
The temperature separator displays the current temperatures (Fahrenheit or Celsius) for the upper and lower zones (compartments) of the wine cellar. To adjust the temperature settings, see "Adjusting Controls" earlier in this section.
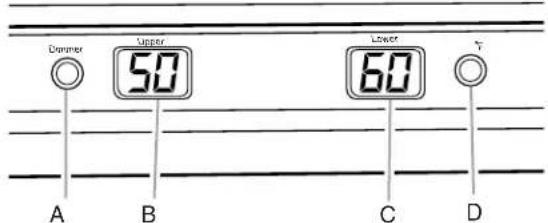
A. Dimmer
B. Upper zone display
C. Lower zone display
D. Fahrenheit/Celsius
Recommended Zone Storing Locations
For best storing and serving temperatures for your bottle of wine, use the wine producer's recommended temperature setting. See the wine's label for details. It is recommended to store wine for short-term (few months) at 55^ (13^) .
WINES ZONES
White Wine Upper zone
Lighter Red Wine Lower zone
Red Wine Lower zone
Wine Racks
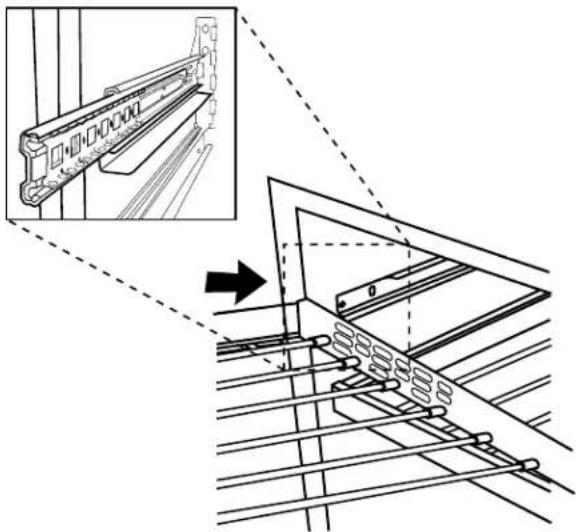
To Remove and Replace the Wine Racks
- Pull the rack forward until it stops. Push in on the tabs to release the rack. Continue pulling the rack forward and lift it up and out of the rack supports.
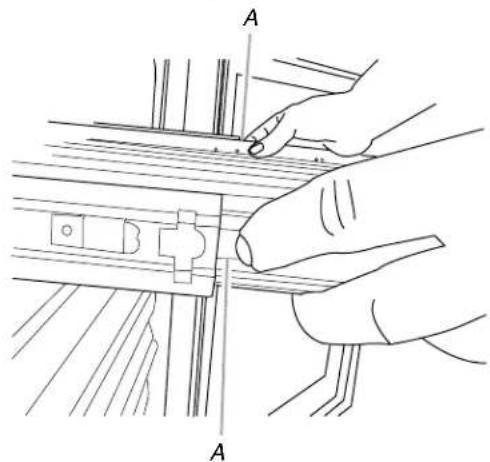
A. Tabs
- Replace the rack by inserting the rack into the supports and sliding it toward the rear of the wine cellar.
To Remove and Replace the Bottom Rack
- Lift the rack (front and back) up and pull straight out to remove.
- Replace the rack by pushing it straight back and over the stop. Continue pushing the rack straight back and evenly until it is in place.
Stocking the Wine Cellar
NOTE: For optimum wine storage, place white wines at the top of the wine cellar, light red wines in the center and red wines at the bottom.
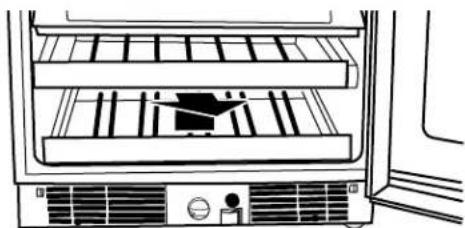
To Stock the Wine Cellar
- Start stocking the wine cellar with the bottom display rack.
- Starting on the left-hand side, place the first bottle on the bottom of the rack with the neck of the bottle facing the back of the wine cellar.
- Place the next bottle on its side with the neck of the bottle facing the front of the wine cellar.
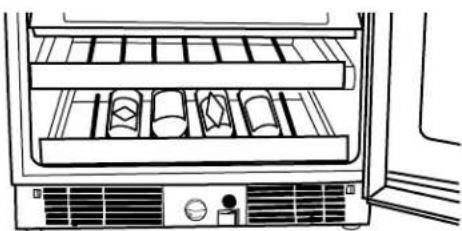
- Alternate in this manner until the display rack is full.
5.Pull the next rack forward. - Starting on the left-hand side, place the first bottle on the rack with the neck of the bottle facing forward.
- Place the next bottle on the shelf with the neck of the bottle facing the rear of the wine cellar.
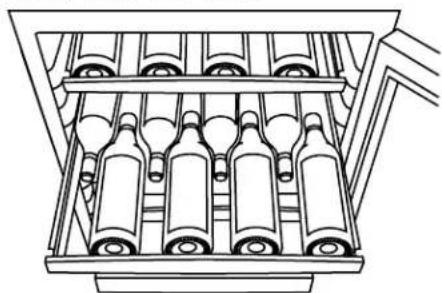
- Continue alternating in this manner until the rack is full.
- Slide the rack into place and continue stocking each remaining rack as described above.
Lighting the Wine Cellar
The wine cellar has an interior light that comes on any time the door is opened. You may also turn the light on at any time by opening the door and pressing the exterior switch located beside the temperature control knob on the base grille.
NOTE: Leaving the light on for an extended period of time will slightly increase the temperature of the wine cellar.
WINE CELLAR CARE
Cleaning
WARNING
Explosion Hazard
Use nonflammable cleaner.
Failure to do so can result in death, explosion, or fire.
Clean the wine cellar about once a month to avoid build-up of odors. Wipe up spills immediately.
To clean your wine cellar:
- Unplug wine cellar or disconnect power.
-
Remove all racks from inside the wine cellar.
-
Hand wash, rinse, and dry removable parts and interior surfaces thoroughly. Use a clean sponge or soft cloth and a mild detergent in warm water.
To protect wood trim pieces, do not immerse the entire rack into water when cleaning.
- Do not use abrasive or harsh cleaners such as window sprays, scouring cleansers, flammable fluids, cleaning waxes, concentrated detergents, bleaches or cleaners containing petroleum products on plastic parts, interior and door liners or gaskets. Do not use paper towels, scouring pads, or other harsh cleaning tools. These can scratch or damage materials.
To help remove odors, you can wash interior walls with a mixture of warm water and baking soda (2 lbs to 1 qt [26 g to 0.95 L] of water).
- Wash stainless steel and painted metal exteriors with a clean sponge or soft cloth and a mild detergent in warm water. Do not use abrasive or harsh cleaners, or cleaners containing chlorine. These can scratch or damage materials. Dry thoroughly with a soft cloth. For additional protection against damage to painted metal exteriors, apply appliance wax (or auto paste wax) with a clean, soft cloth. Do not wax plastic parts.
NOTE: To keep your stainless steel wine cellar looking like new and to remove minor scuffs or marks, it is suggested that you use the manufacturer's approved Stainless Steel Cleaner & Polish. To order the cleaner, see "Accessories."
IMPORTANT: This cleaner is for stainless steel parts only!
Do not allow the Stainless Steel Cleaner & Polish to come into contact with any plastic parts such as the trim pieces, dispenser covers or door gaskets. If accidental contact does occur, clean plastic part with a sponge and mild detergent in warm water. Dry thoroughly with a soft cloth.
-
Replace the racks.
-
Clean the condenser coils regularly. They are located behind the base grille. Coils may need to be cleaned as often as every other month. This may help save energy.
Remove the base grille. See "Base Grille."
Use a vacuum cleaner with an extended attachment to clean the condenser coils when they are dusty or dirty.
Replace the base grille.
- Plug in wine cellar or reconnect power.
Changing the Light Bulb
NOTE: Not all appliance bulbs will fit your wine cellar. Be sure to replace the bulb with one of the same size, shape, and wattage.
To change the light bulb:
- Unplug wine cellar or disconnect power.
- Using a Phillips screwdriver, remove the screw located at the back of the light shield. Pull the light shield back to remove the tabs from the appliance. Remove the light shield.
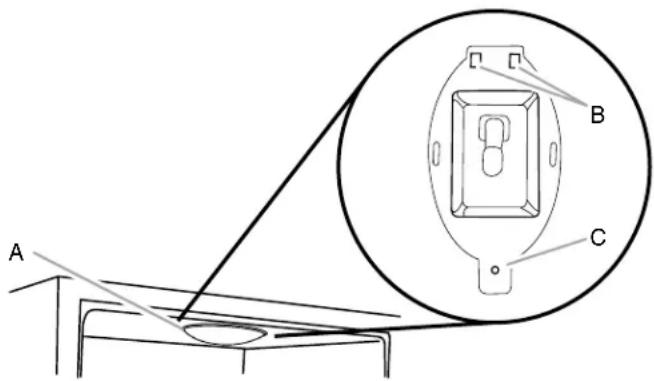
A. Light shield
B. Tabs
C. Screw
- Replace the bulb.
- Reinstall the light shield by inserting the tabs. Align the holes and insert the screw. Tighten the screw.
- Plug in wine cellar or reconnect power.
Vacation and Moving Care
Vacations
If you choose to turn the wine cellar off before you leave, follow these steps.
- Remove all wine bottles from the wine cellar.
- Unplug the wine cellar.
- Clean the wine cellar. See "Cleaning."
- Tape a rubber or wood block to the top of the door to prop it open far enough for air to get in. This stops odor and mold from building up.
Moving
When you are moving your wine cellar to a new home, follow these steps to prepare it for the move.
- Remove all wine bottles from the wine cellar.
- Unplug the wine cellar.
- Clean, wipe, and dry it thoroughly.
- Take out all removable parts, wrap them well, and tape them together so they don't shift and rattle during the move.
- Tape the doors shut and tape the power cord to the wine cellar.
When you get to your new home, put everything back and refer to the "Installation Instructions" section for preparation instructions.
TROUBLESHOOTING
Try the solutions suggested here first in order to avoid the cost of an unnecessary service call.
Your wine cellar will not operate
WARNING

Electrical Shock Hazard
Plug into a grounded 3 prong outlet.
Do not remove ground prong.
Do not use an adapter.
Do not use an extension cord.
Failure to follow these instructions can result in death, fire, or electrical shock.
Is the power supply cord unplugged? Plug into a grounded 3 prong outlet.
Has a household fuse blown, or has a circuit breaker tripped? Replace the fuse or reset the circuit.
■ Is the Wine Cellar Control turned to the OFF position? See "Using the Control."
The lights do not work
Is the power supply cord unplugged? Plug into a grounded 3 prong outlet.
Is a light bulb loose in the socket or burned out? See "Changing the Light Bulb."
The motor seems to run too much
Is the temperature outside hotter than normal? Expect the motor to run longer under warm conditions. At normal temperatures, expect your motor to run about 40% to 80% of the time. Under warmer conditions, expect it to run even more of the time.
■ Is the door opened often? Expect the motor to run longer when this occurs. In order to conserve energy, try to get everything you need out of the wine cellar at once, keep wine bottles positioned label side up so that they are easy to find, and close the door as soon as the wine is removed.
■ Is the control set correctly for the surrounding conditions? See "Using the Control."
Is the door closed completely? Push the door firmly shut. If it will not shut all the way, see "The door will not close completely" later in this section.
Are the condenser coils dirty? This obstructs air transfer and makes the motor work harder. Clean the condenser coils. See "Cleaning."
Temperature is too warm
■ Is the door opened often? Be aware that the wine cellar will warm when this occurs. In order to keep the wine cellar cool, try to get everything you need out of the wine cellar at once, keep wine bottles positioned label side up so that they are easy to find, and close the door as soon as the wine is removed.
■ Is the control set correctly for the surrounding conditions? See "Using the Control."
■ Is the base grille blocked? For best performance, do not install the wine cellar behind a cabinet door or block the base grille.
There is interior moisture buildup
■ Is the door opened often? To avoid humidity buildup, try to get everything you need out of the wine cellar at once, keep wine bottles positioned label side up so that they are easy to find, and close the door as soon as the wine is removed. When the door is opened, humidity from the room air enters the wine cellar. The more often the door is opened, the faster humidity builds up, especially when the room itself is very humid.
Is it humid? It is normal for moisture to build up inside the wine cellar when the air is humid.
■ Is the control set correctly for the surrounding conditions? See "Using the Control."
The door is difficult to open
WARNING
Explosion Hazard
Use nonflammable cleaner.
Failure to do so can result in death, explosion, or fire.
Is the gasket dirty or sticky? Clean the gasket and the surface that it touches. Rub a thin coat of paraffin wax on the gasket following cleaning.
The door will not close completely
Are the racks out of position? Put the racks back into their correct positions. See "Wine Cellar Use" for more information.
WARNING
Explosion Hazard
Use nonflammable cleaner.
Failure to do so can result in death, explosion, or fire.
Is the gasket sticking? Clean the gasket and the surface that it touches. Rub a thin coat of paraffin wax on the gasket following cleaning.
ASSISTANCE OR SERVICE
Before calling for assistance or service, please check
"Troubleshooting." It may save you the cost of a service call. If you still need help, follow the instructions below.
When calling, please know the purchase date and the complete model and serial number of your appliance. This information will help us to better respond to your request.
If you need replacement parts
If you need to order replacement parts, we recommend that you only use factory specified replacement parts. Factory specified replacement parts will fit right and work right because they are made with the same precision used to build every new KITCHENAID® appliance.
To locate factory specified replacement parts in your area, call us or your nearest designated service center.
In the U.S.A.
Call the KitchenAid Customer eXperience Center
toll free: 1-800-422-1230.
Our consultants provide assistance with:
Features and specifications on our full line of appliances.
Installation information.
Use and maintenance procedures.
■ Accessory and repair parts sales.
Specialized customer assistance (Spanish speaking, hearing impaired, limited vision, etc.).
Referrals to local dealers, repair parts distributors, and service companies. KitchenAid designated service technicians are trained to fulfill the product warranty and provide after-warranty service, anywhere in the United States.
To locate the KitchenAid designated service company in your area, you can also look in your telephone directory Yellow Pages.
For further assistance
If you need further assistance, you can write to KitchenAid with any questions or concerns at:
KitchenAid Brand Home Appliances
Customer eXperience Center
553 Benson Road
Benton Harbor, MI 49022-2692
Please include a daytime phone number in your correspondence.
In Canada
Call the KitchenAid Canada Customer Interaction Centre toll free: 1-800-807-6777.
Our consultants provide assistance with:
Features and specifications on our full line of appliances.
Use and maintenance procedures.
■ Accessory and repair parts sales.
Referrals to local dealers, repair parts distributors, and services companies. KitchenAid Canada designated service technicians are trained to fulfill the product warranty and provide after-warranty service, anywhere in Canada.
For further assistance
If you need further assistance, you can write to KitchenAid Canada with any questions or concerns at:
KitchenAid Canada
Customer Interaction Centre
1901 Minnesota Court
Mississauga, Ontario L5N 3A7
Please include a daytime phone number in your correspondence.
Accessories
To order accessories, call 1-800-442-9991 and ask for the appropriate part number listed below or contact your authorized KitchenAid dealer. In Canada, call 1-800-807-6777.
Stainless Steel Cleaner & Polish
Order Part #4396095
KITCHENAID® REFRIGERATOR WARRANTY
ONE YEAR LIMITED WARRANTY
For one year from the date of purchase, when this major appliance is operated and maintained according to instructions attached to or furnished with the product, KitchenAid or KitchenAid Canada (hereafter "KitchenAid") will pay for factory specified parts and repair labor to correct defects in materials or workmanship. Service must be provided by a KitchenAid designated service company.
SECOND THROUGH FIFTH YEAR LIMITED WARRANTY ON CAVITY LINER AND SEATED REFRIGERATION SYSTEM PARTS AS LISTED
In the second through fifth years from the date of purchase, when this refrigerator is operated and maintained according to instructions attached to or furnished with the product, KitchenAid will pay for replacement or repair of the refrigerator/freezer cavity liner (including labor costs) if the part cracks due to defective materials or workmanship. Also, in the second through fifth years from the date of purchase, KitchenAid will pay for factory specified parts and labor to correct defects in materials or workmanship in the sealed refrigeration system. These parts are: compressor, evaporator, condenser, dryer, and connecting tubing. Service must be provided by a KitchenAid designated service company.
ITEMS KITCHENAID WILL NOT PAY FOR
- Service calls to correct the installation of your major appliance, to instruct you how to use your major appliance, to replace or repair house fuses or to correct house wiring or plumbing.
- Service calls to repair or replace appliance light bulbs, air filters or water filters. Those consumable parts are excluded from warranty coverage.
- Repairs when your major appliance is used for other than normal, single-family household use.
-
Damage resulting from accident, alteration, misuse, abuse, fire, flood, acts of God, improper installation, installation not in accordance with electrical or plumbing codes, or use of products not approved by KitchenAid.
-
Any food loss due to refrigerator or freezer product failures.
- Replacement parts or repair labor costs for units operated outside the United States or Canada.
- Pickup and delivery. This major appliance is designed to be repaired in the home.
- Repairs to parts or systems resulting from unauthorized modifications made to the appliance.
- Expenses for travel and transportation for product service in remote locations.
- The removal and reinstallation of your appliance if it is installed in an inaccessible location or is not installed in accordance with published installation instructions.
DISCLAIMER OF IMPLIED WARRANTY; LIMITATION OF REMEDIES
CUSTOMER'S SOLE AND EXCLUSIVE REMEDY UNDER THIS LIMITED WARRANTY SHALL BE PRODUCT REPAIR AS PROVIDED HEREIN. IMPLIED WARRANTYES, INCLUDING WARRANTYES OF MERCHANTABILITY OR FITNESS FOR A PARTICULAR PURPOSE, ARE LIMITED TO ONE YEAR OR THE SHORTEST PERIOD ALLOWED BY LAW. KITCHENAID SHALL NOT BE LIABLE FOR INCIDENTAL OR CONSEQUENTIAL DAMAGES. SOME STATES AND PROVINCES DO NOT ALLOW THE EXCLUSION OR LIMITATION OF INCIDENTAL OR CONSEQUENTIAL DAMAGES, OR LIMITATIONS ON THE DURATION OF IMPLIED WARRANTYES OF MERCHANTABILITY OR FITNESS, SO THESE EXCLUSIONS OR LIMITATIONS MAY NOT APPLY TO YOU. THIS WARRANTY GIVES YOU SPECIFIC LEGAL RIGHTS AND YOU MAY ALSO HAVE OTHER RIGHTS, WHICH VARY FROM STATE TO STATE OR PROVINCE TO PROVINCE.
Outside the 50 United States and Canada, this warranty does not apply. Contact your authorized KitchenAid dealer to determine if another warranty applies.
If you need service, first see the "Troubleshooting" section of the Use & Care Guide. After checking "Troubleshooting," additional help can be found by checking the "Assistance or Service" section or by calling KitchenAid. In the U.S.A., call 1-800-422-1230. In Canada, call 1-800-807-6777. 1/06
Keep this book and your sales slip together for future reference. You must provide proof of purchase or installation date for in-warranty service.
Write down the following information about your major appliance to better help you obtain assistance or service if you ever need it. You will need to know your complete model number and serial number. You can find this information on the model and serial number label located on the product.
Dealer name.
Address
Phone number.
Model number
Serial number
Purchase date
Notes
La puerta no cierra Completely
KitchenAid Brand Home Appliances
553 Benson Road
Benton Harbor, MI 49022-2692
Customer Interaction Centre
1901 Minnesota Court
Mississauga, Ontario L5N 3A7
KitchenAid Brand Home Appliances
Customer eXperience Center
553 Benson Road
Benton Harbor, MI 49022-2692
1901 Minnesota Court
Mississauga, Ontario L5N 3A7


- BODEGA
- INDICE
- WINE CELLAR SAFETY
- Your safety and the safety of others are very important.
- ADANGER
- WARNING
- IMPORTANT SAFETY INSTRUCTIONS
- SAVE THESE INSTRUCTIONS
- Proper Disposal of Your Old Wine Cellar
- INSTALLATION INSTRUCTIONS
- Tools and Parts
- TOOLS NEEDED:
- Location Requirements
- Explosion Hazard
- Electrical Requirements
- WARNING
- Electrical Shock Hazard
- Recommended grounding method
- Unpack the Wine Cellar
- Excessive Weight Hazard
- Remove the Packaging
- When Moving Your Wine Cellar:
- Clean Before Using
- Door Closing
- BaseGrille
- Remove the Base Grill
- Replace the Base Grille
- WINE CELLARUSE
- Normal Sounds
- Using the Control
- Adjusting Controls
- Temperature Separator (Temperature Display)
- Recommended Zone Storing Locations
- WINES ZONES
- Wine Racks
- To Remove and Replace the Wine Racks
- To Remove and Replace the Bottom Rack
- Stocking the Wine Cellar
- To Stock the Wine Cellar
- Lighting the Wine Cellar
- WINE CELLAR CARE
- To clean your wine cellar:
- Changing the Light Bulb
- To change the light bulb:
- Vacation and Moving Care
- Vacations
- Moving
- TROUBLESHOOTING
- The lights do not work
- The motor seems to run too much
- Temperature is too warm
- There is interior moisture buildup
- The door is difficult to open
- The door will not close completely
- ASSISTANCE OR SERVICE
- If you need replacement parts
- In the U.S.A.
- Our consultants provide assistance with:
- For further assistance
- In Canada
- Accessories
- Stainless Steel Cleaner & Polish
- KITCHENAID® REFRIGERATOR WARRANTY
- ONE YEAR LIMITED WARRANTY
- SECOND THROUGH FIFTH YEAR LIMITED WARRANTY ON CAVITY LINER AND SEATED REFRIGERATION SYSTEM PARTS AS LISTED
- ITEMS KITCHENAID WILL NOT PAY FOR
- DISCLAIMER OF IMPLIED WARRANTY; LIMITATION OF REMEDIES
- La puerta no cierra Completely
Brand : KITCHENAID
Model : Architect KUWS24LSBS
Category : Wine cellar