
MultiBack Topclass 3in1 B7.001 - Bread maker BEEM - Free user manual and instructions
Find the device manual for free MultiBack Topclass 3in1 B7.001 BEEM in PDF.
| Product type | Automatic bread maker |
| Brand | BEEM |
| Model | MultiBack Topclass 3in1 B7.001 |
| Dimensions (H x W x D) | 310 x 290 x 380 mm |
| Weight | 5.7 kg |
| Power supply | 230 V AC, 50 Hz, 650 W |
| Protection class | I |
| Protection type | IP X0 |
| Number of programs | 11 (Basic, White bread, Whole wheat bread, Sweet bread, Quick, Gluten-free, Pizza dough, Pasta dough, Jam, Bake Only, Cake) |
| Bread sizes | 540 g, 680 g, 900 g |
| Browning degrees | 3 (light, medium, dark) |
| Timer | Up to 15 hours (delayed start) |
| Keep warm function | Yes, for programs 1-6, 10, 11 |
| Ingredient dispenser | Yes, for automatic addition (programs 1-7) |
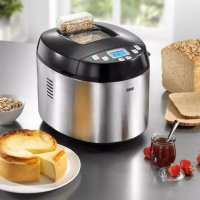
| Delivery contents | Machine, bread pan with kneading hook, cake pan with mixing hook, ingredient dispenser, measuring cup, measuring spoon, user manual, quick guide, recipe book |
| Pan material | Non-stick coating |
| Care and cleaning | Hand wash (not dishwasher), damp cloth for exterior, warm soapy water for accessories |
| Safety | Automatic shut-off, overheating protection, hot surfaces indicated |
| Spare parts and repairability | Spare parts available (pans, hooks, dispenser, cup, spoon). Repairs by authorized service. |
| Warranty | 2 years (domestic use), 6 months (professional use) |
| General information | Certifications GS, CE, RoHS. Manual available in FR, DE, EN, NL. |
Frequently Asked Questions - MultiBack Topclass 3in1 B7.001 BEEM
User questions about MultiBack Topclass 3in1 B7.001 BEEM
0 question about this device. Answer the ones you know or ask your own.
Ask a new question about this device
Download the instructions for your Bread maker in PDF format for free! Find your manual MultiBack Topclass 3in1 B7.001 - BEEM and take your electronic device back in hand. On this page are published all the documents necessary for the use of your device. MultiBack Topclass 3in1 B7.001 by BEEM.
USER MANUAL MultiBack Topclass 3in1 B7.001 BEEM
MULTI-BACK TOPCLASS 3 in 1

Brotbackautomat
Bread maker
Details of this instruction manual 4
Copyright 43
Warning statements 44
Intended use 45
Disclaimer 45
Safety 4
Fundamental safety precautions 46
Electric shock hazard 47
Danger of burns 47
Initial use 4
Safety tips 48
Unpacking 48
Scope of supply and transport inspection 4 9
Disposal of the packaging 49
Demands on the installation location 50
Electrical connection 50
Appliance overview 51
Inserting and removing baking form and dough hook/agitator . . . . 51
Before using for the first time 54
Control panel and display 55
Operation and function 57
Safety tips 57
Basic operation of the appliance 58
Timer 62
Holding function 63
Ingredients dispenser 64
EN
Cleaning and care 6
Safety tips 66
Cleaning 66
Troubleshooting 68
Safety tips 68
Faults - causes and remedies 68
Information on storage/disposal 6
Storage 69
Disposal 69
Annex 6
Technical data 69
Table of baking times 70
Certifications 74
Spare parts and other accessories 74
Guarantee, service and repairs 74
EC Declaration of Conformity 77
Index 7
Introduction
Dear customer,
With the purchase of the MULTI-BACK TOPCLASS 3 in 1 Bread Maker, you have chosen a quality product from BEEM. The MULTI-BACK TOPCLASS 3 in 1 Bread Maker allows you to easily make various types of bread. In addition you can use the MULTI-BACK TOPCLASS 3 in 1 to make tasty jams, pastas, pizza doughs and cakes.
Please read the information below to become familiar with your appliance fast and make a full use of its functions.
Your appliance will serve your needs for many years to come provided you handle it and maintain with due care.
We would like to wish you much pleasure while using it.
Details of this instruction manual
This instruction manual forms an integral part of the MULTI-BACK TOPCLASS 3 in 1 Bread Maker (hereinafter referred to as "appliance") and contains important information for the commissioning, safety, intended use and care of the appliance.
The instruction manual has to be kept near the unit at all times. It must be read and observed by all persons entrusted with operation, troubleshooting and/or cleaning of the appliance.
Keep this instruction manual in a safe place and pass it on with the unit to any future owners.
Copyright
This document is copyrighted.
Any duplication or reprinting, in whole or in part, as well as reproduction of the illustrations even in modified form is only permitted with the written approval of the manufacturer.
EN
j statements
The following warnings are used in the present instruction manual:
DANGER
A warning of this category draws attention to an impending dangerous situation.
If the dangerous situation is not avoided, it may lead to serious injury or even death.
Follow the instructions in this warning to avoid the danger of serious injury or even death.
WARNING
A warning statement for this safety risk class indicates a potentially dangerous condition.
If the dangerous condition is not prevented, it will cause injury.
Follow the instructions in the warning message in order to prevent injuries of people.
CAUTION
A warning statement for this safety risk class indicates a damage risk.
If the dangerous condition is not prevented, it will cause damage to objects.
Follow the instructions in the warning message in order to prevent such damage.
NOTE
A note contains additional tips to facilitate the use of the appliance.
Intended use
This appliance is intended for non-commercial use in closed rooms for baking different types of bread and cake and for making doughs, pastas and jams.
Use in any other or further way is not considered an intended use.

WARNING
Danger from use for other than the intended purpose!
If not used for its intended purpose and/or used in any other way, the appliance may be or become a source of danger.
Use the machine only for its intended purpose.
Observe the procedures described in this instruction manual.
No claims of any kind will be accepted for damage or injury resulting from use of the machine for other than its intended purpose.
The risk has to be borne solely by the machine owner.
If used commercially, please observe the conditions of the modified warranty period.
Disclaimer
All technical information, data and instructions on installation, operation and care of the appliance contained in this instruction manual represent the latest status at the time of printing.
No claims can be derived from the information, illustrations and descriptions in this instruction manual.
The manufacturer assumes no liability for damage or injury resulting from failure to observe the instruction manual, use for other than the intended purpose, unprofessional repairs, unauthorised modifications or use of non-approved spare parts.
EN
Safety
This unit complies with the prescribed safety regulations. Improper use can, however, result in personal injury and/or appliance damage.
For safe use of the appliance, observe the following fundamental safety precautions and the precautions described separately in the individual sections.
Fundamental safety precautions
Check up the appliance for visible outside damage. Do not use a damaged appliance.
Children must be supervised to ensure that they do not play with the appliance.
Do not leave the appliance unattended during operation.
Always pull the mains lead out of the plug socket at the plug, not at the mains lead.
This appliance is not intended for use by persons (including children) with restricted physical, sensory or mental capabilities or with insufficient experience and/or knowledge unless they are supervised by a person responsibly for their safety or have received instructions from such a person in the use of the appliance.
Do not use this appliance in conjunction with an external timer or a separate remote control system.
All repair of the appliance must be provided by authorized qualified service and/or manufacturer's customer service staff only. Unqualified repairs result in considerable danger for the user. In addition, the warranty will be void.
Repairs to the appliance during the warranty period may only be carried out by service centres authorised by the manufacturer as the warranty will otherwise be voided in the event of damage or subsequent damage.
Faulty parts must be replaced with original spare parts only. Only such parts can ensure that safety requirements will be honoured.
Electric shock hazard
DANGER
Electric shock hazard!
Contact with live leads or components poses a risk of serious injury or even death!
Observe the following safety precautions to avoid any electric shock hazard:
Do not use the appliance if the mains lead or plug is damaged.
Before using the appliance again, have a new mains lead installed by a qualified electrician.
On no account should the housing of the unit be opened.
Electric shock hazard if live connections are touched and/or the electrical and mechanical configuration is changed.
Never immerse the appliance or the mains plug in water or
other liquids.
Danger of burns
WARNING
The bread maker becomes very hot during operation!
Observe the following safety precautions to avoid burning yourself.
Do not open the appliance during the baking process.
Wear oven gloves when removing the baking form from the appliance.
Before any cleaning, make sure to cool down the appliance.
Initial use
EN
Safety tips
WARNING
Persons may be injured or material damage may be caused during commissioning of the appliance!
Observe the following safety precautions to avoid any danger:
Packaging must never be used to play with. A risk of asphyxia-tion is involved.
Observe the information on the demands on the installation location and on the electrical connection of the appliance to avoid personal injury and material damage.
Unpacking
Remove the appliance, all accessory parts, the instruction manual, the quick-start guide and the recipe book from the box.
Remove all packaging materials and protective foils from the appliance and the accessories before using them for the first time.
NOTE
Do not remove the rating plate or any warning signs on the appliance.
Scope of supply and transport inspection
As standard, the appliance is delivered with the following parts:
Bread Maker
Bread baking form with dough hook
Cake baking form with agitator
Ingredients dispenser
Measuring cup
Measuring spoon
Operating instructions
Quick-start guide
Recipe book
NOTE
Check if delivered complete and with no visible defects. Report an incomplete or damaged delivery to your supplier/dealer immediately.
Disposal of the packaging
The packaging protects the appliance from transport damage. The packaging material was chosen in consideration of the aspects of environmental friendliness and disposal technology involved, and thus is recyclable.

Recycling the packaging material for further use allows to save raw materials and reduces the waste generation. When no longer required, dispose of the packaging materials in accordance with the local regulations in force.
NOTE
Keep the original packaging, if possible, during the warranty period in order to be able to pack the appliance properly in the event of a warranty claim. Transport damage will lead to a void warranty.
EN
Demands on the installation location
For safe and trouble-free operation of the appliance, the installation location has to satisfy the following requirements:
Place the appliance on a dry, flat and heat-resistant surface.
Do not place the appliance in a hot, wet or very humid environment or in the vicinity of inflammable materials.
- Select the installation location such that children cannot touch the hot surfaces of the appliance.
The plug socket used must be easily accessible in order to be able to disconnect the appliance from the electric circuit quickly in the event of an emergency.
Electrical connection
For safe and trouble-free operation of the appliance, the following instructions have to be observed for the electrical connection:
Before connecting the appliance, compare the connection data (voltage and frequency) on the rating plate with those of your mains power supply. The data must correspond in order to avoid damage to the appliance. If in doubt, ask your electrical appliance retailer.
Ensure that the mains lead is undamaged and is not laid over hot surfaces and/or sharp edges.
The mains lead must not be strained, kinked or come into contact with the hot appliance.
Lay the mains lead in such a way that it does not pose a tripping hazard.
The electrical safety of the appliance is only assured when it is connected to a properly installed protective earth (PE) conductor system. Connection to a plug socket without PE conductor is forbidden. If in doubt, have the house installation checked by a qualified electrician. The manufacturer assumes no liability for injury or damage caused by a missing or interrupted protective earth conductor.
Appliance overview

1 Control panel and display 6 Dough hook
2 Cover 7 Cake baking form
3 Window 8 Agitator
4 Ingredients dispenser 9 Measuring spoon
5 Bread baking form 10 Measuring cup
Inserting and removing baking form and dough hook/agitator
NOTE
When the term "baking form" is used in this manual, the term refers to both the bread baking form and the cake baking form. For conciseness, the mention of both forms has been deliberately avoided. The form in question is only mentioned specifically when instructions refer only to this particular form.
EN
Inserting dough hook/agitator

Press the dough hook/agitator onto the driving pin in the middle of the baking form base. Hook and pin have flat surfaces and only fit together when these surfaces are aligned. The driving pin is held by a wing nut on the underside of the baking form.
Removing dough hook/agitator


Hold the wing nut on the underside of the baking form firmly with one hand and the dough hook/agitator firmly with the other.
Pull the dough hook/agitator off the driving pin with a slight turn- ing movement while turning the wing nut in the opposite direction at the same time.
NOTE
You can remove the dough hook/agitator after the last knead- ing cycle of the selected baking programme so that it does not leave a hole in the bread after baking.
Coat your hands with a little flour and lift out the bread dough in order to be able to pull the dough hook/agitator up out of the baking form.
Inserting the baking form


EN
First press the dough hook/agitator onto the driving pin of the baking form.
Lower the baking form into the appliance so that it is not quite straight.
Then turn the baking form in clockwise direction until it locks.
Removing the baking form


Open the appliance cover.
Turn the baking form at the handle in anti-clockwise direction as far as it will go.
Lift the baking form out of the appliance.
WARNING
Danger of burns! Housing, baking form and heater coil become very hot during operation!
Wear oven gloves when removing the baking form from the appliance at the end of the baking programme.
Before using for the first time
EN
CAUTION
Danger of damage to the appliance, individual parts or non-stick coating!
Do not wash the appliance or any of the individual parts in a dish washer.
Never use sharp objects or abrasive cleaning agents to clean the inside of the bread maker, the forms or the dough hook/agitator in order to avoid damaging the non-stick coating.
Ensure that all packaging materials have been removed from the appliance (protective films, etc.).
Check that all parts are present (see section Scope of supply and transport inspection).
Remove the baking form from the appliance together with the dough hook/agitator (see section Inserting and removing baking form and dough hook/agitator).
Wipe the inside and outside of the appliance with a damp cloth (use only a mild detergent).
Wash all the other individual parts (items 4 - 10 in the appliance overview) in hot water with a little added mild detergent.
Dry the appliance and the individual parts thoroughly and allow them to dry completely in the air.
Control panel and display

EN
NOTE
Press the buttons described below several times to try out all the setting possibilities. Each press of a button is followed by an acoustic signal. Observe the display; it changes at every press of the button.
Each combination of programme, degree of browning and weight is automatically displayed with the corresponding baking time.
This button is used to select from the eleven preset programmes. The set programme is shown in the displayed under Menu (baking programme 1 - 11).
This button is used to set the weight of the finished bread. You can choose from three different sizes: ± 540g
= 680g or ± 900g A line under the set weight on the display indicates your choice.
This button allows you to choose between three degrees of browning for programmes 1 - 4: = light, = medium,
= dark. In addition, you can shorten the baking time in baking programmes 1, 2 or 3 with the setting A line above the selected degree of browning indicates your choice.
This button is used to start the selected programme. To stop the programme, hold this button depressed for about two seconds.
EN
These buttons are used to increase or decrease the appliance timer settings in 10 minute steps. Note that the displayed time indicates when the baking process will be completed. A maximum setting of 15 hours is possible.
Example: On the display, the timer shows 6:30. This means that the baking programme will be finished in 6 hours and 30 minutes.
When you start the programme with the button, the timer starts to run down. Your bread will be ready in 6 hours and 30 minutes.
These buttons are also used to set the baking time for menu 10.
When the appliance is connected to the power supply, the following basic setting appears on the display:

The individual phases of the baking programmes are depicted to the left and right of the display. When the button is pressed, a triangle on the left or right side of the display indicates the momentary phase of the baking programme.

Timer (if starting delay is active)

Rising of the dough

Preheating of the bread maker

Baking of the dough

Kneading of the dough

Holding the finished product

Resting of the dough End

programme
Operation and function
This section contains important information on the operation of the appliance.
EN
Safety tips

DANGER
Electric shock hazard!
Ensure that the appliance is completely dry before use.

WARNING
Danger of burns!
Housing, baking form and heater coil become very hot during operation!
Do not touch any parts inside the appliance when the appliance is in operation.
Wear oven gloves when removing the baking form from the appliance at the end of the baking programme.

WARNING
Risk of injury from dough hook/agitator!
Dough hook and agitator are driven by a powerful motor!
Do not reach into the baking form when the appliance is in operation.
Basic operation of the appliance
EN
NOTE
Baking tips can be found in the recipe book supplied.
Remove the baking form from the appliance and if necessary push the dough hook/agitator onto the driving pin in the base of the baking form (see section Inserting and removing baking form and dough hook/agitator).
Pour the measured baking ingredients into the baking form. Orientate yourself here to the baking instructions in the recipe book or on the packaging of the selected bread baking mixture.
NOTE
You can use the measuring cup and measuring spoon supplied for measuring the baking ingredients. For liquids, place the measuring cup on a flat surface and check the filling level at eye level.
Place the baking form into the appliance (see section Inserting and removing baking form and dough hook/agitator).
Close the lid.
Insert the plug into a mains socket.
Select the desired baking programme with button
Set the bread weight with button
Select the degree of browning of the bread crust with button
If you do not wish to start the baking programme immediately, set the time after which the bread should be finished with the buttons and
Press button to start the programme.
NOTE
As soon as you press , all other button functions are blocked.
The appliance now starts to perform the selected baking programme. The progress of the baking program is indicated by the triangle on the left or right side of the display.
NOTE
You can interrupt a programme by holding the button pressed for about two seconds.
At the end of the baking time, an acoustic signal sounds several times. The holding phase starts (menus 1-6, 10 and 11 only).
NOTE
You can also take the baking form out of the appliance during the holding time. To do this, terminate the programme by holding the button pressed for about two seconds and pull the mains plug out of the plug socket.
At the end of the programme, the display shows the selected starting position. Lift the baking form out of the appliance using oven gloves. Allow the bread or cake to cool down slightly before removing from the form.
NOTE
Pull the dough hook/agitator out of the bread after baking before cutting the bread.
You can also remove the dough hook/agitator after the last kneading cycle of the selected baking programme so that it does not leave a hole in the bread after baking.
Coat your hands with a little flour and lift out the bread dough in order to be able to pull the dough hook/agitator up out of the baking form.
Further tips on an optimum baking result can be found in the recipe book supplied.
EN
Baking programmes
You can select from 11 preset baking programmes using the button

Menu 1 - Basic
Baking of brown bread. You can add other ingredients to improve the taste, e.g. pumpkin seeds, bacon or roasted onions. This is the most frequently used programme.
Menu 2 - White bread
Baking of white bread. The classic variant is wheat bread, a light bread with a crisp crust.
Menu 3 - Wholemeal bread
Wholemeal bread is made i.a. from crushed or ground wholemeal cereal. The programme starts with preheating, i.e. the ingredient are warmed before kneading.
NOTE

To shorten the menus 1, 2 or 3, select the setting with the
button In this case the water added should be lukewarm.
Menu 4 - Sweet bread Sweet breads are frequently made with milk and can contain ingredient such as chocolate shavings, raisins or nuts for added taste.
Menu 5 - Accelerated baking programme
This programme allows you to shorten the baking time for brown and white bread. For example, a brown bread with menu 1 and the
settings and takes 3 hours and 25 minutes, with menu 5 on the other hand only 1 hour and 20 minutes. The time is saved on the resting phases of the dough. We therefore recommend that the liquids used are heated in advance for this menu. If cold liquids are used, the dough cannot rise properly. If the liquid is too hot, the yeast cannot function.
Menu 6 - Gluten-free bread
For baking gluten-free products using gluten-free flours or flour blends.
Menu 7 - Pizza dough
For kneading pizza dough. Pour all the ingredients into the bread baking form and the appliance produces a smooth pizza dough. You then only have to roll it out, add the toppings and bake.
Menu 8 - Pasta dough
The programme produces a smooth pasta dough in a minimum of time.
Menu 9 - Jam
Preparation of jams. This programme allows you to produce individual jams. You then just have to pour the hot jam into the jars.
Menu 10 - Baking without kneading
Only for baking ready-mixed doughs; the dough is not kneaded in this programme. The baking time can be varied with the buttons and 1:20 ; 1:30 . You can interrupt the programme at any time by holding the button pressed for two seconds.
Menu 11 - Cake
For making sponge cake. Use the cake baking form with the agitator for this programme.
NOTE
The individual times for each programme can be found in the table in the Annex.
Recipes for bread, cakes, pasta, doughs and jams can be found in our recipe book.
If you wish to make bread or other bakeries using ready-to-use baking mixes, follow the baking instructions on the package.
Timer
EN
NOTE
The timer can be used for all menus except menu 10 (baking without kneading). There the baking time can be changed with buttons and (1:10, 1:20; 1:30).
First select the desired menu (button), the bread weight (button) and the degree of browning (button).
Example: You have selected the following setting:
Menu 1, bread weight, degree of browning.
The baking time shows 3:25.

Now set the desired delay time for the start of baking with but- tons and. Each press of the button changes the displayed time by 10 minutes. You can set a maximum time of 15 hours (including baking time).
Example: At every press of button displayed time changes: 3:25 - 3:30 - 3:40 - 3:50 - 4:00 etc. If you want your bread to be finished in 6 hours, press the button until 6:00 is displayed.
Start the programmed time with button. The two dots in the display flash and the set time starts to run down. The baking programme starts automatically when the start of the baking time is reached.
Example: The displayed time is 6:00, the two dots are flashing. When the setting 3:25 is reached, the baking programme starts automatically.
At the end of the set time, the bread is finished and the baking form can be removed from the appliance.
Example: After 6 hours incl. baking programme, the bread is finished. The display changes to 00:00, the holding phase starts. You can take the bread out of the appliance or leave it in the appliance to keep warm during the holding phase. At the end of the holding phase, the display returns to the original setting: Menu 1, bread weight degree of browning, 325
NOTE
In warm or humid weather, the dough may rise too quickly with a delay time of more than two hours.
To prevent the yeast rising too early, add the flour to the form last, form a small hollow in the flour and place the yeast into the hollow.
Do not set long delay times if you are working with perishable foodstuffs (milk, eggs, etc.).
Holding function
The holding function prevents, for example, the bread from absorbing moisture. At the end of programmes 1-6, 10 and 11 the finished product is kept warm for a given time. The display shows "00:00" and an acoustic signal sounds intermittently.
If you wish to take the bread out of the appliance during the holding time, switch off the appliance by holding the button pressed for two seconds.
NOTE
For details of the holding time, refer to the table with the individual programme phases in the Annex.
Ingredients dispenser
The ingredients dispenser allows you to add dry ingredients such as pumpkin seeds or raisins to the dough towards the end of the kneading process. The bottom flap of the dispenser opens automatically during baking programmes 1-7. The opening of the flap is signalled by a clearly audible clicking and several acoustic signals. The ingredients dispenser does not open during baking programmes 8-11 (pasta dough, jam, baking without kneading, cake).
NOTE
For details of the time when the ingredients dispenser opens in the individual programmes, refer to the table in the Annex.
Take care not to overfill the dispenser, as otherwise the ingredients may become wedged and not drop into the baking form. Observe the instructions in the recipes for the quantities.
Small ingredients such as sesame seeds can drop through the grille in the bottom of the dispenser. For such ingredients, open the cover of the bread maker briefly and add the seeds directly to the baking form when the acoustic signal for the opening of the dispenser sounds.
Proceed in the same way for ingredients that can melt or stick (chocolate, cheese, pieces of fruit, etc.).
Clean the dispenser after every use. Soiling can also prevent the flap in the bottom of the dispenser from opening.
NOTE
The appliance indicates with short acoustic signals when the flap in the bottom of the dispenser opens. At this point you can also open the cover of the bread maker briefly and add the ingredients directly to the baking form.
At the end of the baking process, pull the ingredients dispenser up out of the appliance, clean it, press the flap in the base closed and install the dispenser in the appliance again.
Removing the ingredients dispenser

EN
To remove the ingredients dispenser, pull it up firmly out of the appliance.
Inserting the ingredients dispenser


To insert the dispenser, first close the base flap with slight pressure until it locks.
Then press the ingredients dispenser into the appliance until it engages audibly.
EN
ng and care
This section contains important information on cleaning and care of the appliance.
Safety tips

WARNING
Observe the following safety precautions before starting to clean the appliance:
Always pull the plug out of the plug socket before cleaning the appliance.
Wait until the appliance has cooled down before you start to clean it.
Never immerse the appliance or the mains plug in water or other liquids.
CAUTION
Danger of damage to the appliance, individual parts or non-stick coating!
Neither the appliance nor any of the individual parts are suitable for washing in a dish washer.
Never use sharp objects or abrasive cleaning agents to clean the inside of the bread maker, the forms or the dough hook/agitator in order to avoid damaging the non-stick coating.
Cleaning
Clean the appliance after every use. For simple cleaning, the cover of the appliance can be removed (see following section Removing the cover).
Wipe down the appliance and the inside of the housing using a damp cloth.
The other individual parts used can be washed in hot water with a little added mild detergent.
Allow the appliance to dry completely for some time.
After cleaning, fit the cover again (see following section Fitting the cover).
Removing the cover

EN
Position the cover upright and pull it upwards off the appliance.
Fitting the cover

Hold the cover upright and press the lugs of the cover into the recesses of the housing (see marks in figure above).
Troubleshooting
EN
Safety tips
DANGER
Electric shock hazard!
Pull the plug out of the mains socket before starting trouble- shooting.
WARNING
Danger caused by unqualified repairs!
Unqualified repairs can pose considerable dangers for the user and serious damage to the appliance.
Repairs to electrical appliances may only be carried out by the works after-sales service or by specialists trained by the manufacturer.
Faults - causes and remedies
| Fault Possible cause Remedy | ||
| Display shows E00. | Appliance is too cold. | Wait until the appliance has reached room temperature. |
| Display shows E01. | Appliance is still too warm after the last baking programme. | Wait until the appliance has cooled down. |
| Display shows EEE. | Temperature sensor open. | Call After-sales Service. |
| Display shows HHH. | Short-circuit in temperature sensor. | Call After-sales Service. |
NOTE
If you cannot resolve the problem with the steps described above, please contact after-sales service.
For problems relating to the baking result, please refer to the notes in the recipe book supplied.
Information on storage/disposal
Storage
If you do not intend to use the appliance for a longer period of time, clean it as described in chapter Cleaning and care. Store the appliance and all the accessories in a dry, clean and frost-free place. Protect the appliance from direct sunlight.
EN
Disposal

Within the European Union, this product must not be disposed of in the domestic refuse.
Dispose of the appliance in accordance with the EU Directive 2002/96/EU-WEEE (Waste Electrical and Electronic Equipment). For additional queries, please contact the local authority in charge of waste disposal.
Annex
Technical data
| Model | Bread Maker MULTI-BACK TOPCLASS 3 in 1 |
| Type number B7.001 | |
| Operating voltage 230 VAC | |
| Mains frequency 50 Hz | |
| Power consumption 650 W | |
| Dimensions | 310 x 290 x 380 mm (H x W x D) |
| Approximate weight 5.7 kg | |
| Protection class I | |
| Type of protection IP X0 |
EN
Table of baking times
| Menu 1. Basic | |||||||||||
| Degree of browning | ☐ | ☐ | ☐ | ☐ | |||||||
| Weight | |||||||||||
| Preheating | ----- | ----- | |||||||||
| Kneading | 5 min 5 min 5 min 5 min 5 min 5 min 5 min 5 min 5 min 5 min 5 min 5 min 5 min 5 min 5 min 5 min 5 min 5 min 5 min 5 min 5 min 5 min 5 min 5 min 5 min 5 min 5 min 5 min 5 min 5 min 5 min 5 min 5 min 5 min 20 min 20 min 20 min 20 min 20 min 20 min 20 min 20 min 20 min 20 min 20 min 20 min 20 min 20 min 20 min 20 min 20 min 20 min 20 min 20 min 20 min 20 min 20 min 20 min 20 min 21 min 21 min 21 min 21 min 21 min 21 min 21 min 21 min 21 min 21 min 21 min 21 min 21 min 21 min 21 min 21 min 21 min 21 min 21 min 21 min 21 min 21 min 21 min 21 min 21 min 20 min 20 min 20 min 20 min 20 min 20 min 20 min 20 min 20 min 20 min 20 min 20 min 20 min 20 min 20 min 20 min 20 min 20 min 20 min 20 min 20 min 20 min 20 min 20 min 22 min 22 min 22 min 22 min 22 min 22 min 22 min 22 min 22 min 22 min 22 min 22 min 22 min 22 min 22 min 22 min 22 min 22 min 22 min 22 min 22 min 22 min 22 min 22 min 22 min 21 min 21 min 21 min 21 min 21 min 21 min 21 min 21 min 21 min 21 min 21 min 21 min 21 min 21 min 21 min 21 min 21 min 21 min 21 min 21 min 21 min 21 min 21 min 21 min 22 min 22 min 22 min 22 min 22 min 22 min 22 min 22 min 22 min 22 min 22 min 22 min 22 min 22 min 22 min 22 min 22 min 22 min 22 min 22 min 22 min 22 min 22 min 22 min 23 min 3:13 3:18 3:25 3:18 3:23 3:30 2:12 2:17 2:24 | ||||||||||
| Kneading | 10 s 10 s | 10 s 10 s 10 s 10 s 10 s 10 s 10 s 10 s 10 s 10 s 10 s 10 s 10 s 10 s 10 s 10 s 10 s 10 s 10 s 10 s 10 s 10 s 10 s 10 s 10 s 10 s | 10 s 10 s 10 s 10 s 10 s 10 s 10 s 10 s 10 s 10 s 10 s 10 s 10 s 10 s 10 s 10 s 10 s 10 s 10 s 10 s 10 s 10 s 10 s | 10 s 10 s | 10 s 10 s | 10 s 10 s | 10 s 10 s | 10 s 10 s | 10 s 10 s | 10 s 10 s | 10 s 10 s |
| Rising | 25 min 25 min 25 min 25 min 25 min 25 min 25 min 25 min 25 min 25 min 25 min 25 min 25 min 25 min 25 min 25 min 25 min 25 min 25 min 25 min 25 min 25 min 25 min 25 min 25 min 25 min | 10 s 10 s | 10 s 10 s 10 s 10 s 10 s 10 s 10 s 10 s 10 s 10 s 10 s 10 s 10 s 10 s 10 s 10 s 10 s 10 s 10 s 10 s 10 s 10 s 10 S | 10 s 10 s | 10 s 10 s | 10 s 10 s | 10 s 10 s | 10 s 10 s | 10 s 10 s | 10 s 10 s | 10 s 10 s |
| Kneading | 10 s 10 s | 10 s 10 s | 10 s 10 s 10 s 10 s 10 s 10 s 10 s 10 s 10 s 10 s 10 s 10 s 10 s 10 s 10 s 10 s 10 s 10 s 10 s 10 s 10 s 10 s 10s | 10 s 10 s | 10 s 10 s | 10 s 10 s | 10 s 10 s | 10 s 10 s | 10 s 10 s | 10 s 10 s | 10 s 10 s |
| Rising | 50 min 50 min 50 min 50 min 50 min 50 min 50 min 50 min 50 min 50 min 50 min 50 min 50 min 50 min 50 min 50 min 50 min 50 min 50 min 50 min 50 min 50 min 50 min 50 min 50 min 50 min | 10 s 10 s | 10 s 10 s 10 s 10 s 10 s 10 s 10 s 10 s 10 s 10 s 10 s 10 s 10 s 10 s 10 s 10 s 10 s 10 s 10 s 10 s 10 s 10 s 11 s | 10 s 10 s | 10 s 10 s | 10 s 10 s | 10 s 10 s | 10 s 10 s | 10 s 10 s | 10 s 10 s | 10 s 10 s |
| Baking | 46 min 51 min 58 min 48 min 53 min 60 min 53 min 58 min 65 min 48 min 53 min 60 min | 10 h 1 h | 1 h 1 h 1 h 1 h | 1 h 1 h 1 h | 1 h 1 h 1 h | 1 h 1 h 1 h | 1 h 1 h 1 h | 1 h 1 h 1 h | 1 h 1 h 1 h | 1 h 1 h 1 h | 1 h 1 h 1 h |
| Total programme time (h:min) | 13:31:36 | 3:13:38 | 3:18:32 | 3:18:32 | 3:30 | 3:2:12 | 2:17 | 2:24 | |||
| Holding | 1 h 1 h | 1 h 1 h 1 h | 1 h 1 h 1 h | 1 h 1 h 1 h | 1 h 1 h 1 h | 1 h 1 h 1 h | 1 h 1 h 1 h | 1 h 1 h 1 h | 1 h 1 h 1 h | 1 h 1 h 1 h | 1 h 1 h 1 h |
| Ingredients dispenser opens at (h:min) | 2:51 2:56 | 3:03 2:53 | 2:58 3:05 | 2:58 | 3:03 | 3:10 | 1:52 | 1:57 | 2:04 | ||
| Max. delay in the programme run (h:min) | 15:00 15:00 | 00:15:00 | 15:00 | 15:00 | 00:15:00 | 15:00 | 15:00 | 15:00 | 15:00 | 15:00 | 15:00 |
| Menu 2. White | bread | |||||||||||
| Degree of browning | ☐ | ☐ | ☐ | ☐ | ||||||||
| Weight | ||||||||||||
| Preheating | - - - - - - - - - - - - - - - - - - - - - - - - - - - - - - - - - - - - - - - - - - - - - - - - - - - - - - - - - - - - - - - - - - - - - - - - - - - - - - - - - - - - - - - - - - - - - - - - - - - - - | 5 min 5 min 5 min 5 min 5 min 5 min 5 min 5 min 5 min 5 min 5 min 5 min 5 min 5 min 5 min 5 min 5 min 5 min 5 min 5 min 5 min 5 min 5 min 5 min 5 min 5 min 5 min 5 min 5 min 5 min 5 min 5 min 5 min 5 min 10 s 10 s 10 s 10 s 10 s 10 s 10 s 10 s 10 s 10 s 10 s 10 s 10 s 10 s 10 s 10 s 10 s 10 s 10 s 10 s 10 s 10 s 10 s 10 s 10 s 10 S 10 S 10 S 10 S 10 S 10 S 10 S 10 S 10 S 10 S 10 S 10 S 10 S 10 S 10 S 10 S 10 S 10 S 10 S 10 S 10 S 10 S 10 S 10 S 10 S 10S 10 S 10 S 10 S 10 S 10 S 10 S 10 S 10 S 10 S 10 S 10 S 10 S 10 S 10 S 10 S 10 S 10 S 10 S 10 S 10 S 10 S 10 S 10 S 10 S 10 | 5 min 5 min 5 min 5 min 5 min 5 min 5 min 5 min 5 min 5 min 5 min 5 min 5 min 5 min 5 min 5 min 5 min 5 min 5 min 5 min 5 min 5 min 5 min 5 min 5 min 5 min 5 min 5 min 5 min 5 min 5 min 5 min 5 min | 5 min 5 min 5 min 5 min 5 min 5 min 5 min 5 min 5 min 5 min 5 min 5 min 5 min 5 min 5 min 5 min 5 min 5 min 5 min 5 min 5 min 5 min 5 min 5 min 5 min 5 min 5 min 5 min 5 min 5 min 5 min 5 min 5 min | ||||||||
| Kneading | 5 min 5 min 5 min 5 min 5 min 5 min 5 min 5 min 5 min 5 min 5 min 5 min 5 min 5 min 5 min 5 min 5 min 5 min 5 min 5 min 5 min 5 min 5 min 5 min 5 min 5 min 5 min 5 min 5 min 5 min 5 min 5 min 5 min | |||||||||||
| Resting | 5 min 5 min 5 min 5 min 5 min 5 min 5 min 5 min 5 min 5 min 5 min 5 min 5 min 5 min 5 min 5 min 5 min 5 min 5 min 5 min 5 min 5 min 5 min 5 min 5 min 5 min 5 min 5 min 5 min 5 min 5 min 5 min 5 min | 5 min 5 min 5 min 5 min 5 min 5 min 5 min 5 min 5 min 5 min 5 min 5 min 5 min 5 min 5 min 5 min 5 min 5 min 5 min 5 min 5 min 5 min 5 min 5 min 5 min 5 min 5 min 5 min 5 min 5 min 5 min 5 min 5 min | ||||||||||
| Kneading | 20 min 20 min 20 min 20 min 20 min 20 min 20 min 20 min 20 min 20 min 20 min 20 min 20 min 20 min 20 min 20 min 20 min 20 min 20 min 20 min 20 min 20 min 20 min 20 min 20 min 20 min | 20 min 20 min 20 min 20 min 20 min 20 min 20 min 20 min 20 min 20 min 20 min 20 min 20 min 20 min 20 min 20 min 20 min 20 min 20 min 20 min 20 min 20 min 20 min 20 min 20min 20 min 20 min 20 min 20 min 20 min 20 min 20 min 20 min 20 min 20 min 20 min 20 min 20 min 20 min 20 min 20 min 20 min 20 min 20 min 20 min 20 min 20 min 20 min 20 min 20min | ||||||||||
| Rising | 39 min 39 min 39 min 39 min 39 min 39 min 39 min 39 min 39 min 39 min 39 min 39 min 39 min 39 min 39 min 39 min 39 min 39 min 39 min 39 min 39 min 39 min 39 min 39 min 39 min 39 min | |||||||||||
| Kneading | 10 s 10 s 10 s 10 s 10 s 10 s 10 s 10 s 10 s 10 s 10 s 10 s 10 s 10 s 10 s 10 s 10 s 10 s 10 s 10 s 10 s 10 s 10 s 10 s 10 s | |||||||||||
| Rising | 31 min 31 min 31 min 31 min 31 min 31 min 31 min 31 min 31 min 31 min 31 min 31 min 31 min 31 min 31 min 31 min 31 min 31 min 31 min 31 min 31 min 31 min 31 min 31 min 31 min 31 min | |||||||||||
| Kneading | 10 s 10 s 10 s 10 s 10 s 10 s 10 s 10 s 10 s 10 s 10 s 10 s 10 s 10 s 10 s 10 s 10 s 10 s 10 s 10 s 11 s | |||||||||||
| Rising | 60 min 60 min 60 min 60 min 60 min 60 min 60 min 60 min 60 min 60 min 60 min 60 min 60 min 60 min 60 min 60 min 60 min 60 min 60 min 60 min 60 min 60 min 60 min 60 min 60 min 60 min | |||||||||||
| Baking | 48 min 50 min 53 min 50 min 52 min 55 min 55 min 57 min 60 min 52 min 55 min | |||||||||||
| Total programme time (h:min) | 3:30 3:33 3:30 3:32 3:35 3:35 3:37 3:40 | |||||||||||
| Holding | 1 h 1 h | 1 h 1 h 1 h | 1 h 1 h 1 h | 1 h 1 h 1 h | 1 h 1 h 1 h | 1 h 1 h 1 h | 1 h 1 h 1 h | 1 h 1 h 1 h | 1 h 1 h 1 h | 1 h 1 h 1 h | 1 h 1 h 1 h | |
| Ingredients dispenser opens at(h:min) | 3:08 3:10 | 3:13 3:10 3:12 | 3:15 3:15 | 3:17 3:20 2:15 | 3:20 2:17 | 2:20 | 2:20 | 2:20 | 2:20 | 2:20 | 2:20 | |
| Max. delay in the programme run(h:min) | 15:00 15:00 | 15:00 15:00 | 15:00 15:00 | 15:00 15:00 | 15:00 | 15:00 | 15:00 | 15:00 | 15:00 | 15:00 | 15:00 | |
EN
EN
| Menu 3. Wholemeal bread | |||||||||||
| Degree of browning | |||||||||||
| Weight | |||||||||||
| Preheating | 30 min 30 | min 30 min | 30 min 30 min | 30 min 30 min | min 30 min 30 | min 5 min 5 | min 5 min | ||||
| Kneading | 5 min 5 min | 5 min 5 min | 5 min 5 min | 5 min 5 min | 5 min 5 min | 5 min 5 min | |||||
| Resting | 5 min 5 min | 5 min 5 min | 5 min 5 min | 5 min 5 min | 5 min 5 min | 5 min 5 min | |||||
| Kneading | 15 min 15 | min 15 min | 15 min 15 min | 15 min 15 min | min 15 min 15 | min 15 min | 15 min 15 min | ||||
| Rising | 49 min 49 | min 49 min | 49 min 49 min | 49 min 49 min | min 49 min 49 | min 24 min | 24 min 24 min | ||||
| Kneading | 10 s 10 s | 10 s 10 s | 10 s 10 s | 10 s 10 s | s 10 s 10 s | ||||||
| Rising | 26 min 26 | min 26 min | 26 min 26 min | 26 min 26 min | min 26 min 26 | min 11 min | 11 min 11 min | ||||
| Kneading | 10 s 10 s | 10 s 10 s | 10 s 10 s | 10 s 10 s | s 10 s 10 s | ||||||
| Rising | 45 min 45 | min 45 min | 45 min 45 min | 45 min 45 min | min 45 min 45 | min 35 min | 35 min 35 min | ||||
| Baking | 48 min 50 | min 53 min | 50 min 52 min | 55 min 55 min | min 57 min 60 | min 50 min | 52 min 55 min | ||||
| Total programme time (h:min) 3:43 | 3:45 3:48 3:45 3:47 3:50 3:50 3:52 3:55 2:30 2:32 2:35 | ||||||||||
| Holding | 1 h 1 h | h 1 h 1 h 1 | h 1 h 1 h 1 | h 1 h 1 h 1 | |||||||
| Ingredients dispenser opens at (h:min) | 2:58 3:00 | 3:03 3:00 3 | 02 3:05 3:05 | 3:07 3:10 2:10 2:12 2:15 | |||||||
| Max. delay in the programme run (h:min) | 15:00 15 | 00 15:00 15:00 15:00 15:00 15:00 15:00 15:00 15:00 15:00 15:00 15:00 15:00 15:00 15:00 15:00 15:00 15:00 2:30 2:32 2:35 | |||||||||
Preheating of the bread maker
| Menu | 4. Sweet bread | 5. Ac-celerated baking programme | 6. Gluten-free bread | 7. Pizza dough | 8. Pasta dough | 9. Jams | 10. Bak-ing | 11. Cake | ||
| Weight | ||||||||||
| Preheating | ----- | ----- | ||||||||
| Kneading | 5 min 5 min 5 min 5 min 5 min 3 min 5 min - 5 min | |||||||||
| Resting | 5 min 5 min - 5 min - - - | |||||||||
| Kneading | 20 min 20 min 20 min 15 min 10 min 20 min 11 min 10 min - 15 min | |||||||||
| Rising | 39 min 39 min 39 min 12 min - 60 min - - - | |||||||||
| Kneading | 10 s 10 s 10 s - - - | |||||||||
| Rising | 26 min 26 min - - - - - - - - - - - - - - - - - - - - - - - - - - - - - - - - - - - - - - - - - - - - - - - - - - - - - - - - - - - - - - - - - - - - - - - - - - - - - - - - - - - - - - - - - - - - - - - - - - - - | |||||||||
| Kneading | 5 s | 5 s | 5 s | - - - - - - - - - - - - - - - - - - - - - - - - - - - - - - - - - - - - - - - - - - - - - - - - - - - - - - - - - - - - - - - - - - - - - - - - - - - - - - - - - - - - - - - - - - - - - - - - - - - - | - - - - - - - - - - - - - - - - - - - - - - - - - - - - - - - - - - - - - - - - - - - - - - - - - - - - - - - - - - - - - - - - - - - - - - - - - - - - - - - - - - - - - - - - - - - - - - - - - - | |||||
| Rising | 52 min 52 min 52 min - 60 min - - - - - - - - - - - - - - - - - - - - - - - - - - - - - - - - - - - - - - - - - - - - - - - - - - - - - - - - - - - - - - - - - - - - - - - - - - - - - - - - - - - - - - - - - - - - - - - - - - | - - - - - - - - - - - - - - - - - - - - - - - - - - - - - - - - - - - - - - - - - - - - - - - - - - - - - - - - - - - - - - - - - - - - - - - - - - - - - - - - - - - - - - - - - - - - - - - - - - | - | |||||||
| Baking | 50 min 55 min 60 min 48 min 55 min -- 70 min | 60 -90 min | 75 min | |||||||
| Total programme time (h:min) | 3:17 | 3:22 | 3:27 | 1:20 | 2:10 | 1:30 | 0:14 | 1:25 | 1:00-1:30 | 1:35 |
| Holding | 1 h | 1 h | 1 h | 1 h | 1 h | - | - | - | 1 h | 22 min |
| Ingredients dispenser opens at (h:min) | 2:57 | 3:02 | 3:07 | 1:10 | 2:05 | 1:10 | - | - | - | - |
| Max. delay in the programme run (h:min) | 15:00 | 15:00 | 15:00 | 15:00 | 15:00 | 15:00 | 15:00 | 15:00 | - | 15:00 |
Holding the finished product
EN
Baking of the dough


Resting of the dough
Rising of the dough


Kneading of the dough


Certifications
EN
| Symbol Meaning | |
| Intertek | The appliance B7.001 has been tested and certified by Intertek. |
| CE | The appliance conforms to the relevant EU Directives (see Declaration of Conformity). |
| RoHS | This appliance conforms to the Directives on the Restriction of Hazardous Substances in Electrical and Electronic Appliances (RoHS). |
| This appliance conforms to the provisions of the Waste Electrical and Electronic Equipment Directive (WEEE). |
Spare parts and other accessories
| Item* Article No. | Designation |
| 4 900 566 001 Ingredients dispenser | |
| 5, 6 900 566 006 Bread baking form with dough hook | |
| 7, 8 900 566 011 Cake baking form with agitator | |
| 9, 10 900 566 016 Measuring spoon and measuring cup | |
- according to the drawing in the description of the appliance
Guarantee, service and repairs
This is a quality product from BEEM and was produced using the latest manufacturing methods.
We guarantee the perfect condition of this quality product. We will remedy any faults due to material flaws or manufacturing faults free of charge within the warranty period.
The warranty period for this product is two years.
For commercial or equivalent use, e.g. in hotels, guest houses or communal premises, or if the customer is not a consumer as defined by the German Civil Code, the warranty period is 6 months. This does not infringe the warranty disclaimer.
Warranty disclaimer: The warranty does not cover faults caused in particular by improper use, failure to observe instructions in the instruction manual and safety precautions, use of force, modifications, unauthorised attempted repairs and attempted repairs by unqualified third parties. Faults caused by normal wear are also excluded.
If we are obliged by law to provide a warranty, we will comply with such obligation – to the exclusion of the right to cancellation or price reduction – and at our discretion, repair or replace the product free of charge. Should the remedy fail despite several attempts or should the replacement product exhibit faults attributable to us, the customer shall be entitled – at his/her discretion – to reduce the purchase price or to cancel the contract of purchase. Claims under warranty do not prolong the warranty period. For exchange or return of the appliance (withdrawal from the purchase contract) or reduction of the purchase price, the first contact is always the dealer from whom you purchased the product. This particularly applies to returning the appliance or the claim for reductions as these have to be settled with respect to the purchase price. Refunding the purchase price or a credit note in the event of a reduction of the purchase price can only be handled by the retailer from whom you purchased the appliance.
Should - contrary to expectations - faults occur, please try to resolve the matter by telephone first. Should this not be successful, please send the carefully packed appliance to your retailer or to the customer service address shown below. Please state your complete address, type and model number and the serial number of the appliance. This information can be found on the rating plate of the appliance. Please describe the fault or defect in as much detail as possible. The product or spare part order should be accompanied by a printed and dated receipt of purchase or invoice. Without a printed receipt of purchase or invoice, no services under warranty can be provided, whether for repairs, spare parts or other claims.
EN
Outside Germany and in particular in non-EU countries, you should send the article to your dealer or the local distributor. Information can be obtained - preferably by e-mail - from the After-sales Service address indicated below.
Repairs not covered by the warranty can also be performed against individual payment by customer service - outside Germany by the retailer from whom you purchased the appliance or by a service centre, if available.
Replacement parts and consumables can be ordered from your retailer or the stated customer service address. Please contact first your dealer or the local distributor if you live outside Germany.
For product information, accessory orders or questions on service handling, please contact your retailer or the stated customer service address. Outside Germany and in particular in non-EU countries, please contact your retailer or the local distributor first.
You can also use the Internet. You will find accessories and spare parts, as well as instruction manuals in various languages on our website www.beem.de. In addition you will find further product information.
EC Declaration of Conformity
| Name/address of manufacturer: BEEM Blitz-Elektro-Erzeugnisse Manufaktur Handels-GmbH Dieselstrasse 19-21 D-61191 Rosbach v.d.H. | |
| We hereby declare that the product | |
| Model: Bread Maker | MULTI-BACK TOPCLASS 3 in 1 |
| Type: B7.001 | |
| conforms to the following relevant regulations: EU Directive 2006/95/EU Electrical devices for use within certain voltage limits, EU Directive 2004/108/EU Electromagnetic Compatibility. | |
| The following harmonised standards were applied in whole or in part: EN 60335-2-9:2003+A1:04+A2:06+A12:07 EN 60335-1:2002+A11,A1:04+A12,A2:06+A13:08 EN 62233:2008 EN 55014-1:2006 EN 55014-2:1997+A1:2001 EN 61000-3-2:2006 EN 61000-3-3:1995+A1:2001+A2:2005 | |
| Rosbach, 15 April 2010 | BEEM. Bijan Mehshat (Legally binding signature of the issuer) |
Index
EN
A
Accessories 74
Appliance elements 51
B
Baking process 58
Baking programmes 60
Baking times 70
Before using for the first time 54
Bread weight. 55
C
Certifications 74
Cleaning 66
Control panel 55
Copyright 43
D
Damaged appliance 46
Danger of burns 47
Degree ofbrowning 55
Disclaimer 45
Display 55
Disposal 69
Disposal of the packaging. 49
E
EC Declaration of Conformity . . . 77
Electrical connection. 50
Electric shock hazard 47
F
Fundamental safety precautions. 46
G
Guarantee. 74
H
Holding 63
1
Ingredients dispenser 64
Initial use. 48
Installation location 50
Intended use 45
N
New owner 43
0
Operation 57
P
Packaging 49
R
Removing/inserting agitator 51
Removing/inserting dough hook . . 51
Repairs 74
S
Safety 46
Scope of supply 49
Service 74
Spare parts 74
Storage 69
T
Table of Contents 41
Technical data. 69
Timer. 62
Transport inspection 49
Troubleshooting 68
U
Unpacking. 48
W
Warning statements 44
Table des matieres
Avant-propos 8
Chere cliente, cher client,
Ingredient dispenser
Maatbeker
Maatlepel
Gebruiksaanwijzing
Ingredient dispenser
Elements of Lifestyle

BEEM GmbH


- MULTI-BACK TOPCLASS 3 in 1
- Details of this instruction manual 4
- Safety 4
- Initial use 4
- Operation and function 57
- EN
- Cleaning and care 6
- Troubleshooting 68
- Information on storage/disposal 6
- Annex 6
- Index 7
- Introduction
- Details of this instruction manual
- Copyright
- j statements
- DANGER
- WARNING
- CAUTION
- NOTE
- Intended use
- Danger from use for other than the intended purpose!
- Disclaimer
- Safety
- Fundamental safety precautions
- Electric shock hazard
- Electric shock hazard!
- Contact with live leads or components poses a risk of serious injury or even death!
- Danger of burns
- The bread maker becomes very hot during operation!
- Initial use
- Safety tips
- Unpacking
- Scope of supply and transport inspection
- Disposal of the packaging
- Demands on the installation location
- Electrical connection
- Appliance overview
- Inserting and removing baking form and dough hook/agitator
- Inserting dough hook/agitator
- Removing dough hook/agitator
- Inserting the baking form
- Removing the baking form
- Before using for the first time
- Danger of damage to the appliance, individual parts or non-stick coating!
- Control panel and display
- Operation and function
- Basic operation of the appliance
- Baking programmes
- Menu 1 - Basic
- Menu 2 - White bread
- Menu 3 - Wholemeal bread
- Menu 5 - Accelerated baking programme
- Menu 6 - Gluten-free bread
- Menu 7 - Pizza dough
- Menu 8 - Pasta dough
- Menu 9 - Jam
- Menu 10 - Baking without kneading
- Menu 11 - Cake
- Timer
- Holding function
- Ingredients dispenser
- Removing the ingredients dispenser
- Inserting the ingredients dispenser
- ng and care
- Cleaning
- Removing the cover
- Fitting the cover
- Troubleshooting
- Faults - causes and remedies
- Information on storage/disposal
- Storage
- Disposal
- Annex
- Technical data
- Certifications
- Spare parts and other accessories
- Guarantee, service and repairs
- Index
- A
- B
- C
- D
- E
- F
- G
- H
- 1
- N
- 0
- P
- R
- S
- T
- U
- W
- Table des matieres
- Avant-propos 8
- Ingredient dispenser
Brand : BEEM
Model : MultiBack Topclass 3in1 B7.001
Category : Bread maker