
C83 - Thermostat Fantini Cosmi - Free user manual and instructions
Find the device manual for free C83 Fantini Cosmi in PDF.
| Product type | Room thermostat |
| Brand | Fantini Cosmi |
| Model | C83 |
| Dimensions (L×H×D) | 111 × 81.9 × 26 mm |
| Power supply | 2 x 1.5 Vdc LR03 AAA batteries |
| Temperature control range | +5 °C to +35 °C |
| Temperature reading range | +0 °C to +40 °C |
| Setting step | 0.5 °C |
| Temperature accuracy | ±1 °C at 20 °C |
| Adjustable differential | 0.4 °C or 0.6 °C (via shunt + reset) |
| Contact rating (resistive load) | 6 A / 250 Vac 50 Hz |
| Contact rating (inductive load cosφ=0.6) | 2 A / 250 Vac 50 Hz |
| Automatic frost protection | Yes, below +5 °C |
| Night setback via remote control | Yes (via contacts S1-S2, reduction by 3 °C) |
| Operating mode | Heating (boiler control) |
| Display | Screen with blue backlight (15 s) |
| Reset function | Yes (reset without erasing the configured temperature) |
| Low battery indicator | Symbol on screen |
| Protection category | II |
| Protection rating | IP30 |
| Maintenance and cleaning | Soft dry or slightly damp cloth (warm water + mild detergent) |
| Spare parts and repairability | Replaceable batteries; for any repair, contact the technical assistance center |
| General information | Compliant with EMC and Low Voltage directives (EN 60730). Do not dispose of with household waste. |
Frequently Asked Questions - C83 Fantini Cosmi
User questions about C83 Fantini Cosmi
0 question about this device. Answer the ones you know or ask your own.
Ask a new question about this device
Download the instructions for your Thermostat in PDF format for free! Find your manual C83 - Fantini Cosmi and take your electronic device back in hand. On this page are published all the documents necessary for the use of your device. C83 by Fantini Cosmi.
USER MANUAL C83 Fantini Cosmi
Dear Customer, Thank you very much for having purchased our product. Please, kindly read this manual and keep it carefully, because it provides important information on safe use and maintenance.
SHORT DESCRIPTION
The room thermostat C83 allows comfortable room temperature control in heating mode, to save energy and to set the room temperature at a level that is just enough for you to feel comfortable. The automatic frost-protection function will operate at temperatures below +5^ , and will protect your heating system against damage from frost.
GeneralWarnings:
- After removing the packaging make sure the integrity of the unit. If in doubt do not use the equipment and contact our Technical Assistance Center. The elements of the packing (plastic bags, polystyrene, staples, etc.) must not be left within the reach of children. Attention: the appliance must only be used by responsible adults. For their own safety, children and persons with reduced mental capacities must not use the appliance unless under the supervision of responsible adults.
- This equipment will be intended only for use for which it was specifically built and that is how thermostat. The manufacturer cannot be held liable for any damages resulting from misuse or incorrect usage
- In case of failure and / or malfunctioning of the device, turn off it. For any repair only contact our Technical Assistance Center and ask for the use of original spare parts. Failure to comply with the above may compromise the device safety.
- Installation and mounting of electric appliances must be carried out only by skilled electricians. It is imperative to observe the generally applicable safety measures, such as: before starting any work on the appliance, switch off power supply and secure against switching on.
INSTALLATION
-
Unscrew front and back case with a screwdriver, than take off the front case (fig. 1)
-
Open relay case with screwdriver and take off the relay case (fig. 2)
-
Connect all wires properly (NC=normal close, NO=normal open, COM=common, S1-S2=terminals of the remote switch for the temperature reduction) (fig. 3, 8 e 9)
Cover the relay case and screw it properly with screwdriver (fig. 4)
- Mount and fix back case in the wall with screwdriver (fig. 5)
Install 2× 1,5 Vdc LR03 AAA (fig.6)
Cover front case and back case properly (fig. 7)

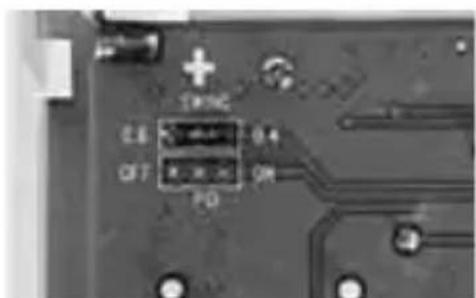
SWING
It's possible to choose two positions for the jumper pin which fix the swing: 0,4 or 0,6^ . The function is available only after RESET.

OPERATING MODES
The thermostat always work in the continuous operating mode to the comfort temperature in the heating mode (the thermostat switch on/off the boiler).
When the boiler is on, will appear on the display the symbol
TEMPERATURE SETTING
Set the comfort temperature through directly push on the display:
- Push the display, the display willa come blue back light for 15 seconds
C83
continue TEMPERATURE SETTING
- If during this 15 seconds you push once again the display then the number on the display will be blinking and you can set the temperature.
- Push on the left side if you want to increase the set temperature (fig. 10), and push the right side instead if you want to decrease the set temperature (fig. 11)
- Then wait 10 seconds and on the display will go back the room temperature
When the boiler is on, will appear on the display the symbol
TEMPERATURE REDUCTION BY REMOTE SWITCH
It's possible to connect to the input terminals S1-S2 of the thermostat a remote switch for having the function temperature reduction (fig. 12):
- Switch open (OFF): the working temperature is the setting temperature (ex.: 21^ )
- Switch close (ON): the working temperature is the setting temperature less 3^ (ex.: 21-3 = 18 °C).
It is not possible to connect multiple S1-S2 contacts in parallel.
Max length allowed 20m

LOW BATTERY INDICATOR
When low battery occur then appear on the display the symbol

RESET FUNCTION
When press the RESET KEY, on the electronic board (pcb), the thermostat will go on the basic conditions: the values of the temperature comfort will be as the user has programmed. Besides it will be switch on the right Swing mode as from the jumper pin (see pag. 10).
TECHNICAL DATA
Dimensions (LxHxW mm): 111x81,9x26
Operating voltage: 2x1,5 V LR03 AAA
Temperature control range: +5^ / +35^
Temperature display range: +0^ / +40^
Regulation step: 0,5^ C
Switching capacity (changeover contact)
-
at ohmic loads: max 6 A 250 Vac 50 Hz
-
at inductive loads = 0,6 : max 2 A 250 Vac 50Hz
Switching output: floating
Function modes: heat
Speed fan coil: -
Automatic anti-frost: +5^ C
Ambient temperature: +0^ C / +40^ C
Swing: 0.4 / 0.6^ C
Temperature accuracy: +/- 1°C a 20°C
Reading resolution: 0,1^
Displayed temperature update: every 10 seconds
Programming:
Class of protection: II
Index of protection: IP30
Comply with EMC and LV directives:
LVD: EN 60730-1, EN 60730-2-7, EN 60730-2-9. EMC: EN 55014-1, EN 55014-2, EN 61000-3-2, EN 61000-3-3.
ErP classification: ErP Class I; 1% (EU Reg. 811/2013 - 813/2013).
MAINTENANCE
The thermostat, normally, requires no special maintenance. If necessary, it's enough to remove dust with a soft, dry cloth or if necessary moistened with warm water and mild detergent.
We reserve the right to make, without notice and at any time, modifications to the product ascribed in this instruction manual, as a result of the constant research of technological development and regulatory production of the product. It's been given to the utmost care in the transcription of the technical features and product codes.
We cannot be held responsible for any errors.
C83

Résolution: 0,1^
DISPOSAL OF PRODUCTS
The crossed out wheeled dust bin symbol indicates that products must be collected and disposed of separately from household waste. Integrated batteries and accumulators can be disposed of with the product. They will be separated at the recycling centres. The black bar indicates that the product was placed on the market after August 13, 2005. By participating in separate collection of products and batteries, you will help to assure the proper disposal of products and batteries and thus help to prevent potential negative consequences for the environment and human health. For more detailed information about the collection and recycling programmes available in your country, please contact your local city office or the shop where you purchased the product
ELIMINACION DEPRODUCTOS
MISE AU REBUT DES PRODUITS
Brand : Fantini Cosmi
Model : C83
Category : Thermostat