Venedig - Stroller Bergsteiger - Free user manual and instructions
Find the device manual for free Venedig Bergsteiger in PDF.

| Product type | Combined stroller with bassinet, baby car seat and sport unit |
| Brand | Bergsteiger |
| Model | Venedig |
| Recommended age (stroller) | 6 to 36 months |
| Recommended age (baby car seat) | From birth to about 10 kg (up to 12 months) |
| Maximum child weight (stroller) | 15 kg |
| Maximum child weight (baby car seat) | 10 kg |
| Safety harness | 5-point |
| Recline positions | 3 positions (sitting, reclined, lying flat) |
| Reversible handlebar | Yes, with safety lock |
| Swivel wheels | Yes, with locking system for forward motion |
| Folding system | Compact with safety lock (locking lever) |
| Safety standards (baby car seat) | ECE R44/04 |
| Included accessories | Bassinet, baby car seat with reducer cushion, sport unit, safety bar, seat extension, all-season footmuff, mosquito net, rain cover, diaper bag, storage basket |
| Maintenance | Clean with lukewarm soapy water, dry in shade. Regular lubrication of moving parts |
| Repairability | Spare parts available (tires, brakes, etc.) via after-sales service |
| Usage | One child only. Do not use for jogging or roller skating |
| Material | Metal frame, washable outer fabric |
Frequently Asked Questions - Venedig Bergsteiger
User questions about Venedig Bergsteiger
0 question about this device. Answer the ones you know or ask your own.
Ask a new question about this device
Download the instructions for your Stroller in PDF format for free! Find your manual Venedig - Bergsteiger and take your electronic device back in hand. On this page are published all the documents necessary for the use of your device. Venedig by Bergsteiger.
USER MANUAL Venedig Bergsteiger
Congratulations on your new pram! We are confident that you will experience many years of joy with our model.
We know exactly how important it is to show the world your baby and for your baby to have a look around. That's why you and your baby are so important to us! Our prams combine safety, comfort and a modern design in order to completely meet your demands as modern parents. We want you to lead your new family life with every liberty and the same amount of satisfaction that you are used to.
Not using the pram properly can entail a considerable amount of risk. So please take the time to read this instruction manual carefully. Your pram will provide you with optimal safety, if you follow the instructions described here.
Important!
Please read this instruction manual carefully before using the pram for the first time. Failure to observe these instructions can lead to serious injury of your child or damage to the pram.
- Remove the packaging of the pram (danger of suffocation).
- Never leave the child in the pram unattended!
- The pram seat is suitable for children in the age group 6 to 36 months. For younger children, the seat unit must be used!
- The weight of the child must not exceed 15 kilograms.
- This pram is intended for one child only.
- If you put in an additional mattress, you do so at your own risk.
Overloading the chassis or folding it incorrectly can damage the pram. - Please to not place any objects on the canopy!
- Always use the 5-point harness when the child is able to sit up by itself.
- Make sure that the pram is assembled properly.
- Make sure that the brakes are always engaged before the child is placed in the pram or lifted out of it.
- When using escalators or stairs, the child must be taken out of the pram.
- Engage all brakes when parking the pram.
- Do not use the pram while running (jogging) or skating.
- Please keep the pram away from fire!
Care instructions
- This pram requires regular maintenance.
- Lubricating/greasing the movable components/parts (i.e. brakes) regularly prolongs the service life of the pram and makes folding and unfolding it easier.
- Please replace or repair damaged screws and parts.
- Carefully check the brake systems, safety harnesses, wheels, locking devices, the seat surface, and the click buckles. They must be in good condition at all times.
- The brake parts, wheels and tyres are wear parts and must be replaced if necessary.
- To prevent the fabric from bleaching, avoid parking the pram where it is exposed to direct sunlight.
- The pram must not be put into use if it is not working properly or if it is damaged.
- If a tyre is punctured, the inner tube can be repaired or replaced using a bicycle repair kit. The tyre should be replaced, if the tread is worn down.
Cleaning
- The exterior fabric and the chassis should be cleaned with lukewarm water and a mild soap. Use a soft cloth to do so.
- Please do not use abrasive cleaners, chlorine cleaning agents (bleaches) or spirits to remove dirt or sand.
- Please do not expose the pram to intense sunlight for drying.
- If the pram is used on the beach in the sand, please wash off all metal parts of the pram by hosing them down or using warm soapy water. Please dry the pram thoroughly afterwards.
Chere Cliente, Cher Client,
- Chassis
- Pushchair attachment
- Carrycot
- Seat unit (chassis)
-
Seat unit (sun protection)
-
Seat unit (footmuff)
- Pushchair (footmuff)
- Diaper bag
- Insect net
- Rain cover (carrycot)
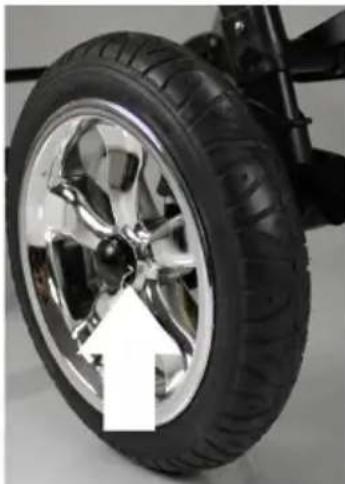
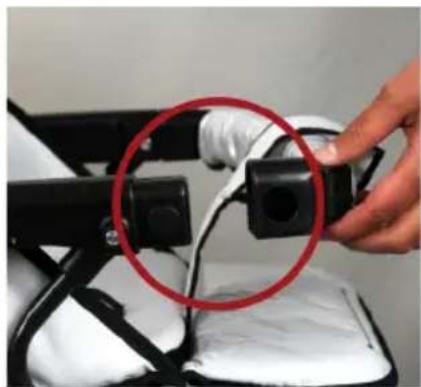
Attaching the wheels (rear) and locking the swivel wheels
To attach the rear wheels, slide them forcefully over the respective axles. To remove the wheels, pull them off the axles while simultaneously pressing the locking knob towards the axle (see Fig.1). The swivel wheels are lockable. To do this, position them parallel to the direction of travel and lock them using the plastic lever (see Fig. 2).
GB Inserting the seat unit
The seat unit can be attached in two directions. On the left and right side of the chassis there are two elongated openings into which the seat unit can be easily inserted. The seat unit is released from the chassis by means of two levers on the seat unit which must be pulled simultaneously in longitudinal direction.
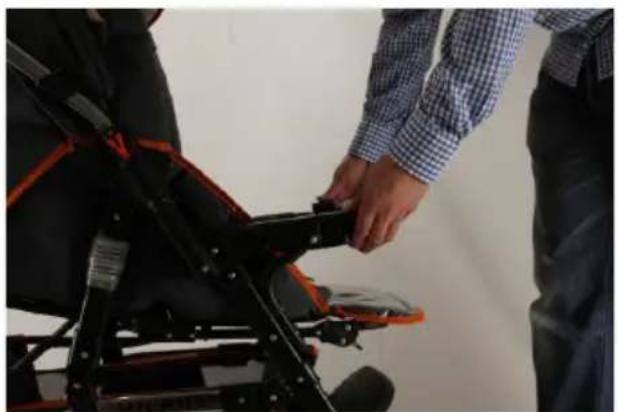
Adjusting the backrest (pushchair)
The backrest (only for pushchair attachment) can be gradually adjusted by pulling the metal lever located under the backrest.
Reglage du dossier (pousette sport)
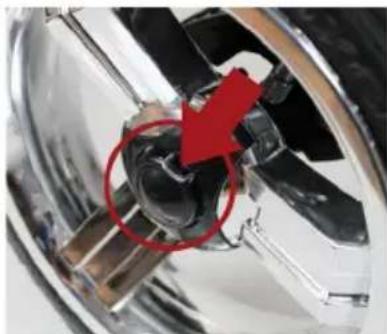
GB Inserting the pushchair attachment and the carrycot
The pushchair attachment and the carrycot are assembled by means of the clever one-click mechanism. For this purpose, first insert the two metal pins on the side of the carrycot or the pushchair attachment into the openings provided on the chassis (on front of chassis first - Fig. 2). Then you can slowly lower the attachment so that the metal pins also click into the chassis at the rear.
GB Removing the various attachments
Removing the attachment is just as simple.

Press the plastic lever downward until it locks into place. The lever is located at the position of the chassis where the two metal pins of the attachment are clicked into the rear of the frame.
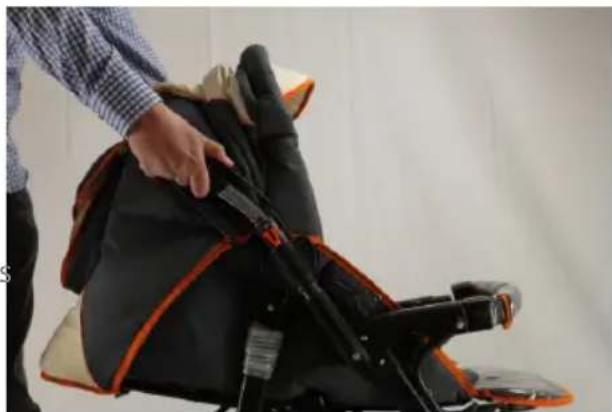
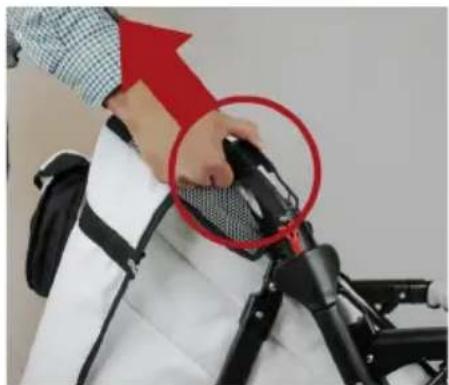
GB Unfolding and folding the pram
Take hold of the pram chassis on both sides. On the left side of the chassis, there is a lock that secures the pram against folding unintentionally. Take hold of the lock, press your index finger in the direction of the chassis and pull the lock towards your body. The chassis can now be carefully collapsed.
- Pram (chassis)
- Shopping basket
- Seat unit
- Safety bar
-
Diaper bag
-
Rain protection
- Weather footmuff
- Seat extension
- Soft changing bag
- Mosquito net
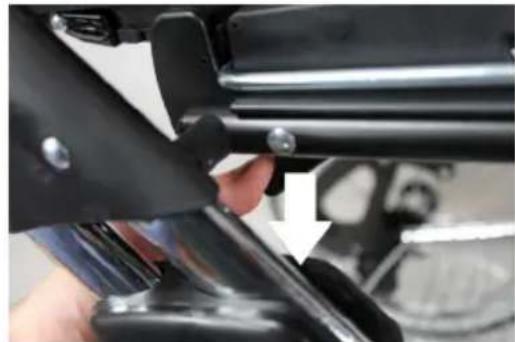
To unfold the pram, press your foot against the rear axle and pull the handlebar upward until the locking device visibly and audibly locks into place. Important: Only use the pram when the locking device (handle for assembly) has properly locked into place!
Please swivel the handlebar to the rear side of the pram first and then lower the backrest all the way down. Now pull the two locking levers (see arrow) upward and let the pram slide slowly downward.
To attach the wheels, slide them forcefully over the respective axle. To remove the wheels pull them off the axles while simultaneously pressing the locking knob towards the axle.
Adjusting the backrest
To adjust the backrest, please pull the metal lever located under the backrest and press it upward. The backrest can be adjusted to three positions.

Caution: The sitting position is not suitable for children under the age of 6 months.
Assembly the buggy bar and the seat extension
To assemble the buggy bar or the seat extension, please press the two buttons of the supports on the pram at the same time and push the respective bar
ends over them. Alternatively, you can also fasten one side first and then push the other side on.
To adjust the swivel handlebar, pull the two safety levers on the sides and swivel the bar completely to the opposite side until it locks into place again.
The position of the footrest can also be adjusted. For this purpose, press the two adjustment knobs below the footrest and move the footrest to the desired position. To bring the footrest back to the original position, pull it up until it locks into place again.
GB Unfolding and folding the pram
To unfold the pram, secure its position on the ground by pressing your foot against the rear axle and pull the handlebar upward until the locking device visibly and audibly locks into place. Important: Only use the pram when the locking device has properly locked into place! To fold the pram, please swivel the handlebar to the rear side of the pram and lower the backrest all the way down. Now pull the two locking levers (see Figure) towards you and let the pram slide slowly downward.
Attaching and removing the wheels
To attach the wheels, slide them forcefully over the respective axle. To remove the wheels, pull them off the axles while simultaneously pressing the locking knob towards the axle.
The seat extension converts the pushchair attachment into a pram. Simply insert it into the sockets of the safety bar until the plastic supports lock into place. Use the pushbuttons to attach the fabric. That way, the soft changing bag is protected against slipping out. The assembly is identical to that of the buggy bar.
Adjusting the backrest
To assemble the buggy bar or the seat extension, please press the two buttons of the supports on the pram at the same time and push the respective bar ends over them. Alternatively, you can also fasten one side first and then push the other side on.
To adjust the swivel handlebar, pull the two safety levers on the sides and swivel the bar completely to the opposite side
until it locks into place again. The swivel handlebar can be protected against swivelling unintentionally by means of the safety pins on both sides.
Adjusting the footrest
The position of the footrest can also be adjusted. For this purpose, press the two adjustment knobs below the footrest and move the footrest to the desired position. To bring the footrest back to the original position, pull it up until it locks into place again.
- Chassis
- Carrycot
- Pushchair attachment
- Seat unit (chassis)
-
Seat unit (sun protection)
-
Seat unit (footmuff)
- Pushchair (footmuff)
- Diaper bag
- Insect net
- Rain cover (carrycot)
To attach the wheels, slide them forcefully over the respective axle while simultaneously pressing the locking knob towards the axle.
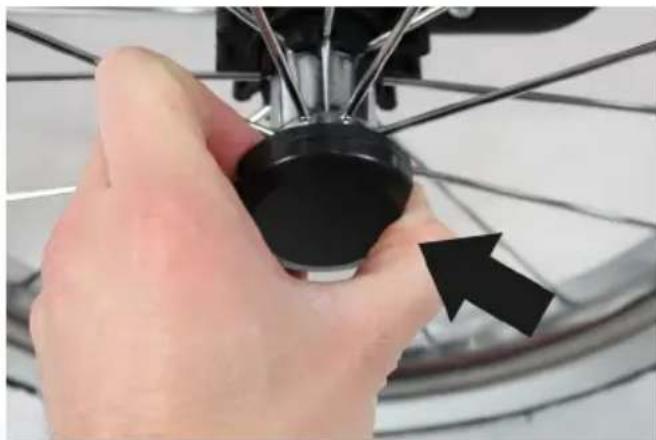
To remove the wheels, please press the locking knob again and pull the wheel off the axle.
F Montage des roues
GB Inserting the seat unit
The seat unit can be attached in two directions. On the left and right side of the chassis there are two elongated openings into which the seat unit can be easily inserted. The seat unit is released from the chassis by means of two levers on the seat unit which must be pulled simultaneously in longitudinal direction.
Adjusting the backrest
The backrest (only for pushchair attachment) can be gradually adjusted by pulling the metal lever located under the backrest.

GB Inserting the pushchair attachment and the carrycot
The pushchair attachment and the carrycot are assembled by means of the clever one-click mechanism. For this purpose, first insert the two metal pins on the side of the carrycot or the pushchair attachment into the openings provided on the chassis (on front of chassis first - Fig. 1). Then you can slowly lower the attachment so that the metal pins also click into the chassis at the rear.
Removing the various attachments
Removing the attachment is just as simple. Press the
plastic lever downward until it locks into place. The lever is located at the position of the chassis where the two metal pins of the attachment are clicked into the rear of the frame.
GB Unfolding and folding the pram
Take hold of the pram chassis on both sides. On the left side of the chassis, there is a lock that secures the pram against folding unintentionally. Take hold of the lock, press your index finger in the direction of the chassis and pull the lock towards your body. The chassis can now be carefully collapsed.
Congratulations on your purchase of the combination pram with seat unit. This seat unit complies with the strict standards of the ECE R44/04 certification and is suitable for children up to 10kg . So the seat unit can provide maximum protection, the seat has to be used as described in the instructions.
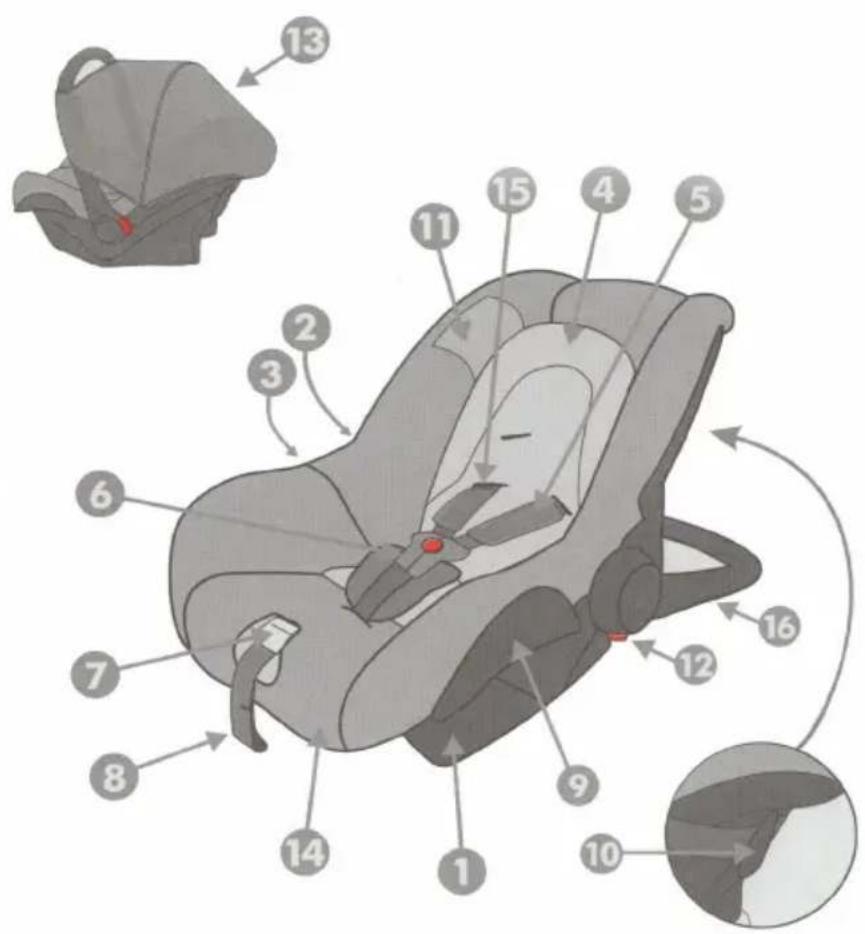
- Seat unit
- Information label
- Quick guide
- Support pillow
- Padding (safety harness)
- Harness buckle
- Adjustment buckle
- Harness tensioning
- Side belt guide
- Rear belt guide
- Warning label
- Release button
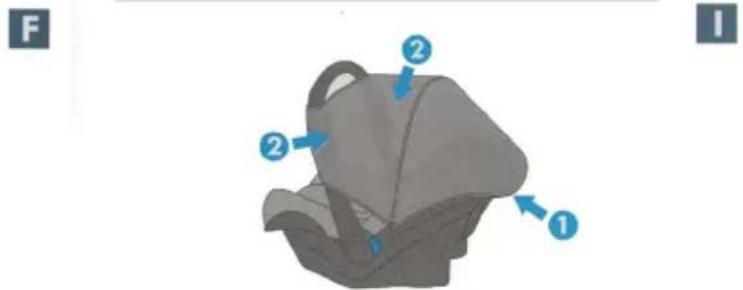
- Sunroof
- Cover
- Safety harness
- Transport handle
Instructions for use:
I) Positioning the child in the seat unit (Fig. A-F)
Never leave the child in the seat unit without the safety harness on, even if the seat unit is outside of the car!
- Press the red button to open the harness of the seat unit.
- Place the child into the seat unit, close the safety harness and adjust the tension.
- Make sure that the child is seated properly and its back rests against the seat unit.
- The safety harness should lay flat and firmly on the child's shoulders.
- Insert the two plastic hooks into the buckle together. An audible „click“ confirms that they have locked into place correctly.
- Tighten the front adjustment harness so that the safety harnesses of the child seat rest firmly on the child's body (harness system).
Adjusting the safety harness:
- The lengths of the harnesses (harness system) must be individually adjusted to fit the child.
- The harnesses should be in the position closest to the child's shoulders and not twisted.
You can adjust the safety harness system of the seat unit to fit the individual needs of the child in the following manner:
a) To loosen the safety harness, press the adjustment buckle on the front side of the seat unit and simultaneously pull both straps of the seat unit away from it (to the front).
b) To tighten the safety harness, please pull the part of the harness on the front side of the seat unit. Make sure that the belt is not twisted and rests gently (but firmly) on the child's body.
Support pillow:
This seat unit is equipped with a removable support pillow for babies. This offers optimal sleeping comfort and provides support for the baby's head. We recommend using the support pillow up to an age of 5 months.
II) Using the seat unit in a car
When using the seat unit in a car, always observe the following points:
- Never use the seat unit on car seats with activated airbag. The child could be severely injured if the airbag is triggered. Danger to life and limb!
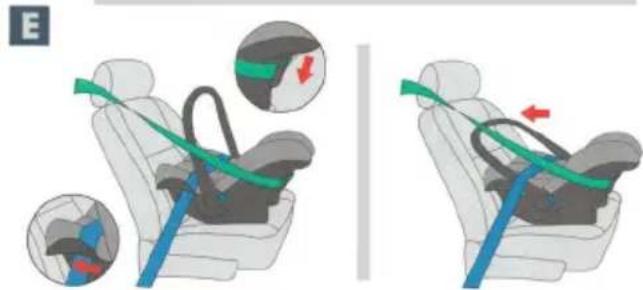
- Always attach the seat unit in the opposite direction of the vehicle.
- The passenger seat should be positioned all the way to the back.
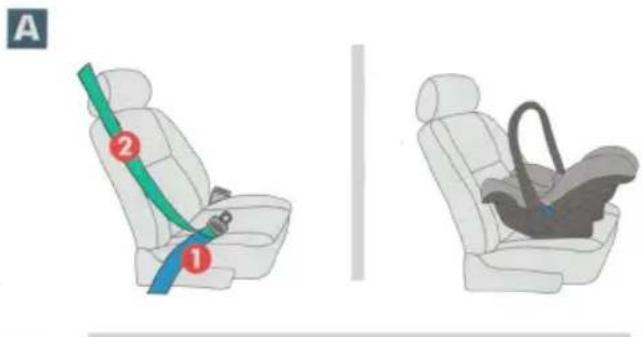
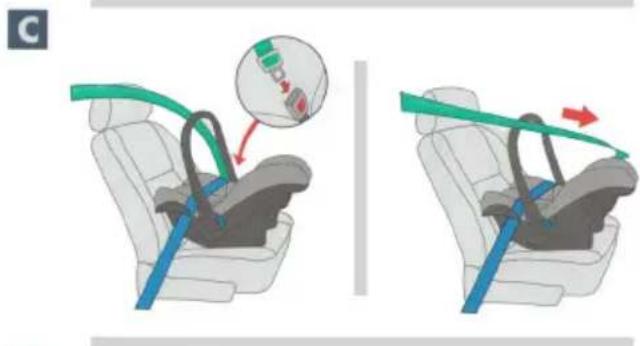
- Pull the seat belt of the car all the way out and pull it (lap belt) through the two belt guides located on the front side of the seat unit (see Fig. C).
- Buckle the seat belt of the car.
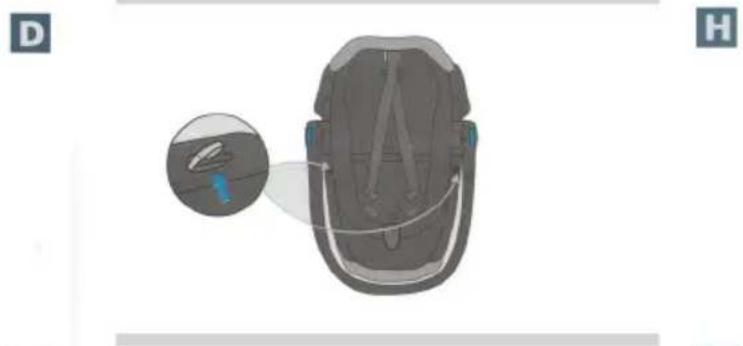
- Pull the diagonal strap of the car seat belt (shoulder belt) through the belt guide which is located on the back of the seat unit (see Fig. D & E).
- The transport handle of the seat unit must be correctly positioned for use in the car (see Fig. F).
- The seat unit is now correctly mounted.
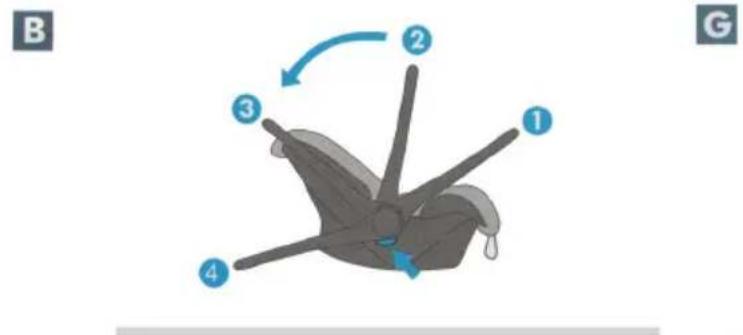
III) Adjusting the transport handle
To adjust the transport handle, please press the two red buttons on the sides of the transport handle with both hands at the same time and adjust it. The buttons lock into place as soon as the next position of the handle is reached. This is confirmed by an audible „click".
The handle can be adjusted to the following four different positions (see Fig. G):
- Use in the car
- Transport
- Sleep and cradle position
- Sitting position (no cradle function)
IV) Care instructions
- The fabric parts or the seat unit can be washed with warm soapy water.
- Hand washing at a temperature of 30^ is recommended.
- Never tumble dry in a clothes dryer.
Removing the fabric parts:
- Release the harness system.
- Remove the support pillow and harness pads.
- Pull the harnesses through the fabric.
- Lift off the fabric.
Attaching the fabric:
- Stick the harnesses back through the openings in the fabric.
Pull the fabric back onto the seat.
Pull the pads back onto the harnesses. - Insert the support pillow again.
Chers parents,
We recommend the following accessories for the Bergsteiger prams. The exact fit and opti mal functi on of these have been certi fi ed by us. That way, you can be sure that these accessories are tailored to optimally fit your pram.
© Accessoires
Prams manufactured by Bergsteiger are extremely low maintenance and are characterized by their quality and durability. Our designs are sturdy and carefully conceived. With the proper care, you will enjoy your pram for a very long time. However, should there be a defect of any kind, you can order the required spare parts. Wear parts such as hoses or tyres can also be purchased directly from your assigned sales representative.
Contact us at service@bergsteiger-kinderwagen.de and let us know if you have any concerns.
We will take care of everything else for you.