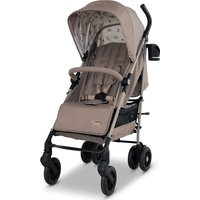
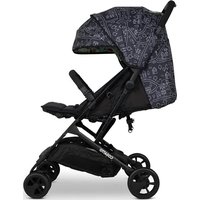
To & Fro - Stroller COSATTO - Free user manual and instructions
Find the device manual for free To & Fro COSATTO in PDF.

| Product Type | Reversible stroller (parent-facing or forward-facing) |
| Brand | Cosatto |
| Model | To & Fro |
| Recommended age | From birth up to 3 years (max 15 kg) |
| Maximum child weight | 15 kg |
| Stroller weight | Approximately 9 kg (estimated) |
| Unfolded dimensions (L x W x H) | Approximately 80 x 60 x 105 cm (estimated) |
| Folded dimensions (L x W x H) | Approximately 35 x 60 x 75 cm (estimated) |
| Number of backrest positions | 3 positions (parent-facing) + adjustable recline (forward-facing) |
| Reclined position | Yes, maximum recline in parent-facing mode recommended for newborns |
| Safety harness | 5-point, adjustable height on 3 levels |
| Brake | Foot brake on rear wheels |
| Swivel front wheels | Yes, with lockable |
| Height-adjustable handle | Yes, with adjustment buttons |
| Canopy | Removable, with extendable sun visor and back pocket (max 0.2 kg) |
| Cup holder | Included, max capacity 0.5 kg |
| Storage basket | Removable, max capacity 2 kg |
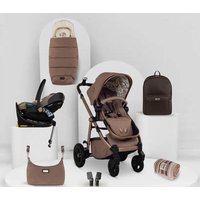
| Included accessories | Leg cover, headrest, canopy, rain cover, cup holder, changing bag |
| Car seat compatibility | Cosatto Hold car seat (sold separately) via included adapters |
| Safety standard | BS EN 1888:2012 |
| Maintenance | Clean with a sponge and soapy water; lubricate moving parts with silicone |
| Spare parts available | Contact Cosatto or your retailer (spares@cosatto.com) |
Frequently Asked Questions - To & Fro COSATTO
User questions about To & Fro COSATTO
0 question about this device. Answer the ones you know or ask your own.
Ask a new question about this device
Download the instructions for your Stroller in PDF format for free! Find your manual To & Fro - COSATTO and take your electronic device back in hand. On this page are published all the documents necessary for the use of your device. To & Fro by COSATTO.
USER MANUAL To & Fro COSATTO
baby stuff with personality
TO & FRO
reversible pushchair/travel system
NITTY GRITTY

IMPORTANT: KEEP THESE INSTRUCTIONS FOR FUTURE REFERENCE.
READ THESE INSTRUCTIONS CAREFULLY. YOUR CHILD'S SAFETY MAY BE AFFECTED IF YOU DO NOT FOLLOW THESE INSTRUCTIONS.
user guide
Thank you for choosing a Cosatto product. Please take a little time to read the important safety notes detailed below. This will ensure many years of happy, safe use.
safety: take note
WARNING: A CHILD'S SAFETY IS YOUR RESPONSIBILITY
• WARNING: Never leave your child unattended.
- WARNING: Ensure that all locking devices are engaged before use.
- WARNING: To avoid injury ensure that your child is kept away when unfolding and folding this product.
- WARNING: Do not let your child play with this product.
- WARNING: Always use the restraint system.
- WARNING: Any load attached to the handle affects the stability of the pushchair.
- WARNING: Check that the car seat attachment devices are correctly engaged before use.
- WARNING: This product is not suitable for running or skating.
- WARNING: To avoid risk of scolding, do not place hot beverage on drinks holder.
• This pushchair is intended for children from birth up to a maximum child weight of 15kg.
• This product is only compatible with Hold car seat (sold separately).
- The most reclined position is recommended for new born babies until ready to progress to more upright position. (e.g. this may be when they can sit up unaided.)
• Always ensure that the brake is engaged when placing and removing the child from the pushchair.
- Children should be harnessed in at all times and never left unattended. The child should be clear of moving parts while making adjustments. This vehicle requires regular maintenance by the user.
- Do not use replacement parts or accessories other than those approved by Cosatto as they may render the pushchair unsafe.
• Overloading, incorrect folding, and the use of non-approved accessories or spare parts may damage or break this pushchair and could render the product unsafe.
- Any additional load attached to the handle and/or on the back of the backrest and/or on the sides of the vehicle will affect the stability of the vehicle.
- A basket is provided for the carriage of goods, evenly distributed, up to a maximum weight of 2kg.
- Rear pocket on hood - maximum weight 0.2kg.
- Plastic cup holder -maximum weight 0.5kg.
- Never leave raincovers on indoors, in a hot atmosphere or near a heat source as the baby could overheat.
- Ensure all users are familiar with the products operation. It should always open and fold easy. If it does not, do not force the mechanism - stop and read the instructions.
- Do not use your pushchair in a manner for which it is not designed.
- Do not allow your child to climb unassisted into, play with or hang onto your pushchair.
- Do not use a platform with this pushchair as it may render the pushchair unsafe.
- Always apply the brakes when the pushchair is stationary. Hold on to your pushchair when close to moving road vehicles or trains. Even with the brake on the draught from the vehicle may move the pushchair.
- Exercise caution when mounting or dismounting a kerb. Remove your child and fold the push chair when ascending or descending stairs or escalators.
- Ensure the folded pushchair is stored away from children so that it does not fall and cause injury.
• Never carry a second child on your pushchair.
• This product complies with BS EN 1888:2012.
car seat (sold separately)
- When car seat is used in conjunction with the chassis, this product does not replace a cot or a bed. Should your child need to sleep, then it should be placed in suitable cot, bed or carry cot.
- Cosatto recommend that the child should always be facing the parent when the car seat is fitted to the chassis.
operation (see illustrations further on in this booklet)
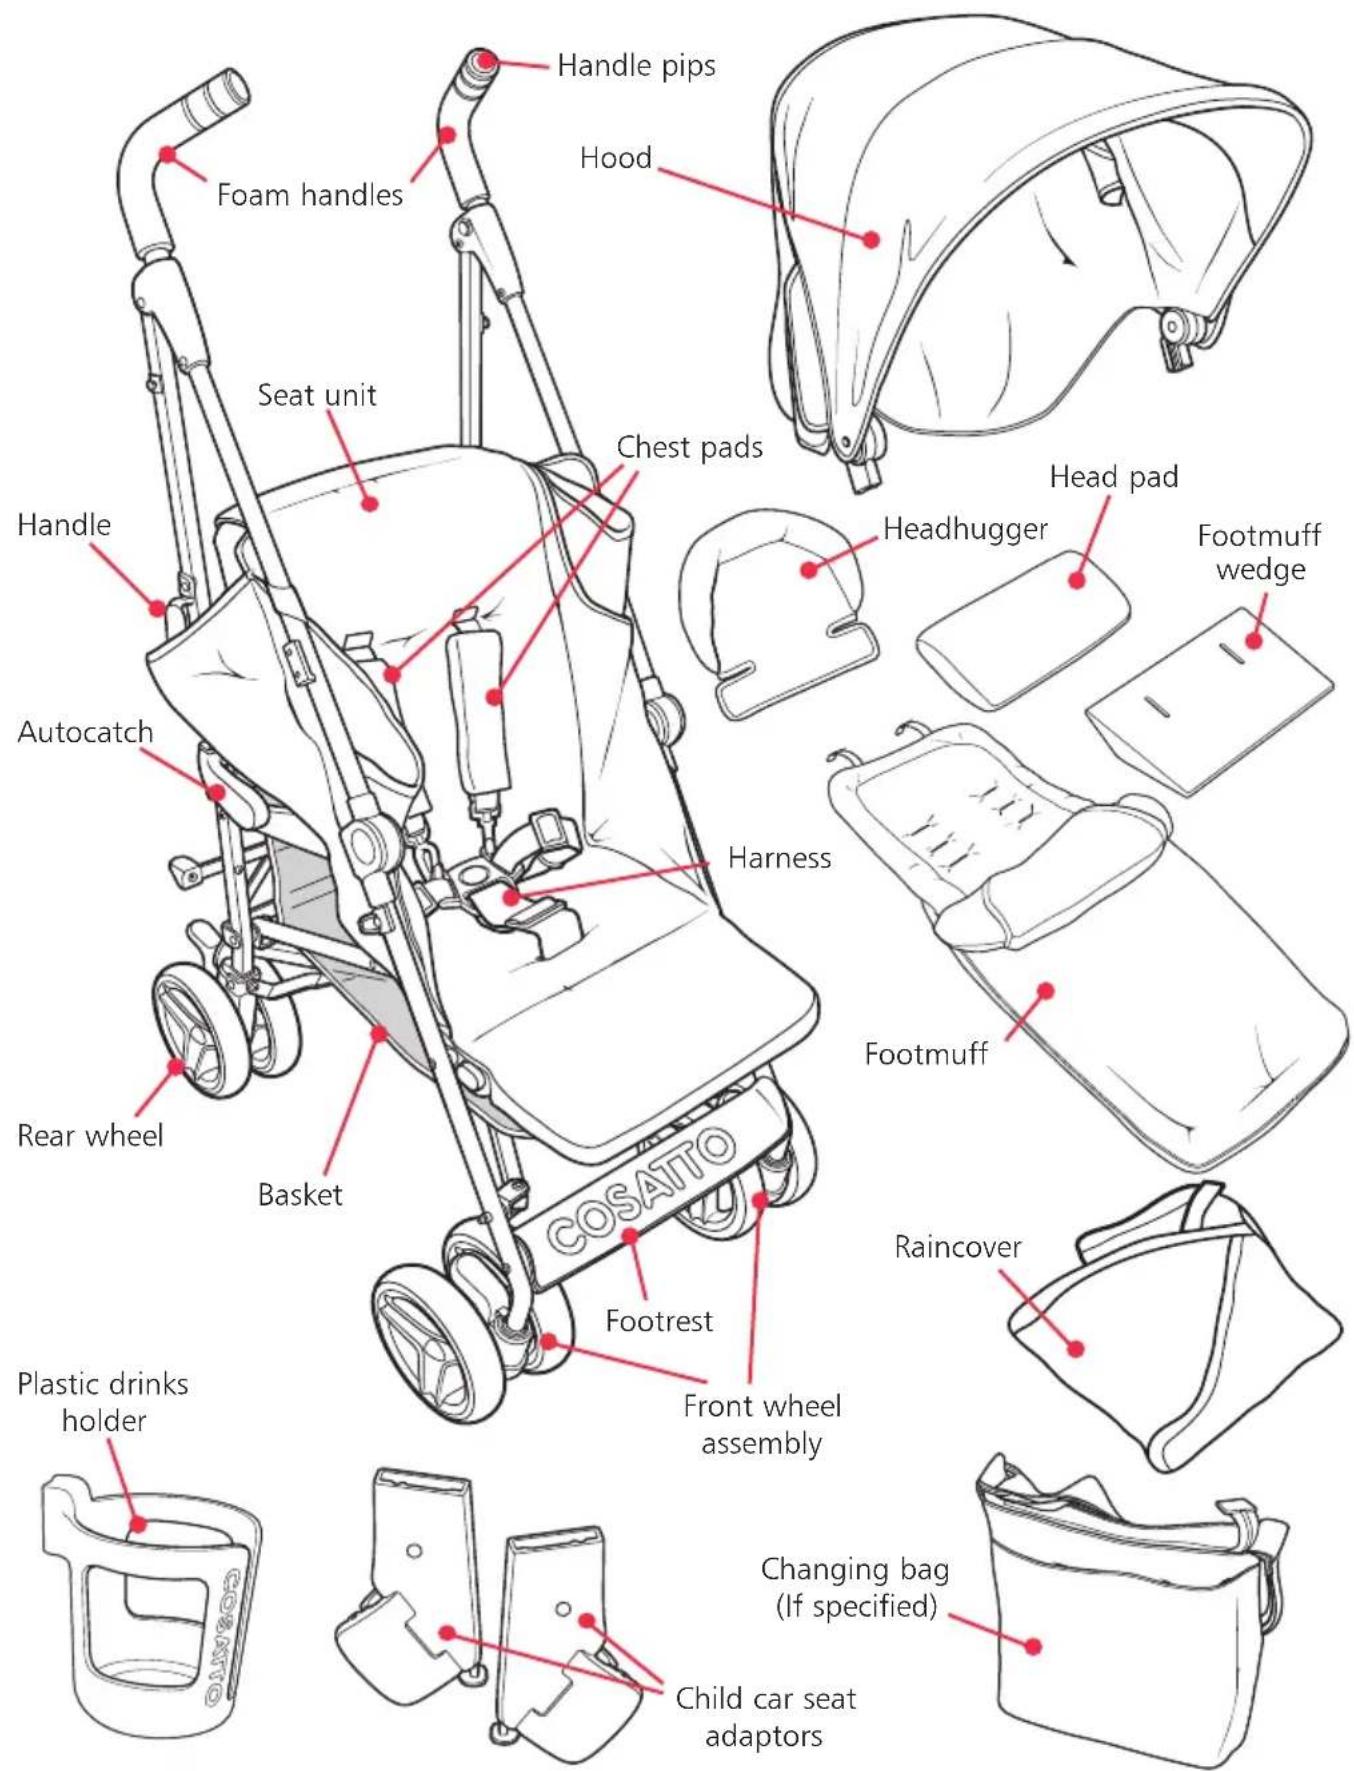
1 - list of parts
Your pushchair is supplied in one carton and contains:
- Pushchair (basket & chest pad attached, head pad inserted)
- Footmuff (Wedge inserted)
- Headhugger
- Hood
- Raincover
- Plastic drinks holder
- Changing bag (If specified)
- Child car seat mounting adaptors
2 - opening the pushchair
To open the pushchair, first release the autolock (a) which holds the pushchair in the umbrella position. Now holding the pushchair by its handles, gently lower the front. To complete the operation, press hard on the pedal (b), until you hear the 'click' from the secondary locking bar (c).
WARNING: Ensure that all locking devices are engaged before use.
3 - using the brake
To apply the brake, press either lever down firmly with your toe (a) until a 'click' is heard. Test the brake is engaged correctly by trying to push the pushchair forwards for a short distance. To release the brake, raise either of the levers (b).
NOTE: Always apply brake before placing and removing a child from the pushchair.
4 - using the front wheels
To allow the front wheels to swivel, push down on the locking lever as shown (a). To lock the wheels into position lift the locking lever up (b) with the wheels in any position and run the pushchair until you hear each wheel 'click' as they lock in position.
5 - adjusting the handle height
To raise the handles press the buttons (a) on the inside of each upper hinge. The handles will automatically spring to a higher position.
To lower the handles press the buttons again (b) then push the handles down (c). Release the buttons but keep pressing down on the handles until they lock in place.
6 - using the harness
A five point harness is provided to restrain your child. To fasten the harness push clips into buckle (a). To unfasten push the button in the centre of the buckle (b) and remove the clips.
Sliding adjusters are fitted on the waist strap (c) and should be carefully adjusted so the harness fits your child comfortably. The length of each strap can be changed by using adjusters (c), (d) & (e).
WARNING: Always use the crotch strap in combination with the waist belt
7 - adjusting and removing the harness
There are three different positions for the shoulder straps. To change the shoulder strap height remove the chest pads by releasing the fabric fastener along the length of the chest pad (a).
Unfasten the front buckle and disengage the shoulder strap clip from the buckle (b) and open seat retaining flap (c).
Flatten the retainer tab (d) and pull the shoulder strap away through shoulder strap slot (e) from the rear of backrest.
From behind, push the shoulder straps back through the desired slots in the backrest (f).
Refit the Shoulder strap clips to the waist strap clips and refit the chest pads.
Please ensure that after fitting there is one retainer tab on each side of the backrest for both shoulder and waist straps (g).
To remove the harness for cleaning unfasten the shoulder straps from both front & rear buckles and then push through the slots in the backrest (h).
Push the waist straps through the backrest (i).
Push the crotch strap clips through the slots under both side of the seat (j). Note: Pull the backrest further forward to access and remove the parent facing mode crotch strap.
Refitting the harness is a reversal of this process. Please ensure that after fitting there is one retainer tab on each side of the backrest for both shoulder and waist straps (g).
8 - preparing the pushchair for parent facing mode
The most reclined position in parent facing mode is recommended for new born babies until ready to progress to more upright position. (e.g. this may be when they can sit up unaided.)
If fitted, pull the seat retaining flap away from behind the top of the backrest (a).
Pull the seat back forwards until it rest on top of the calf support (b).
Note: Before proceeding, unfasten the zip and check that the head pad is fitted (c) in the correct position. The head pad should be on top of the support boards.
Fasten the seat retaining flap on the underside of the calf support (d).
Lift the lever (e) on the back of the backrest and lower the to form the foot section of parent facing mode (f).
When use in parent facing mode, this section must only be used in its lowest position.
9 - fitting the softgoods - parent facing mode
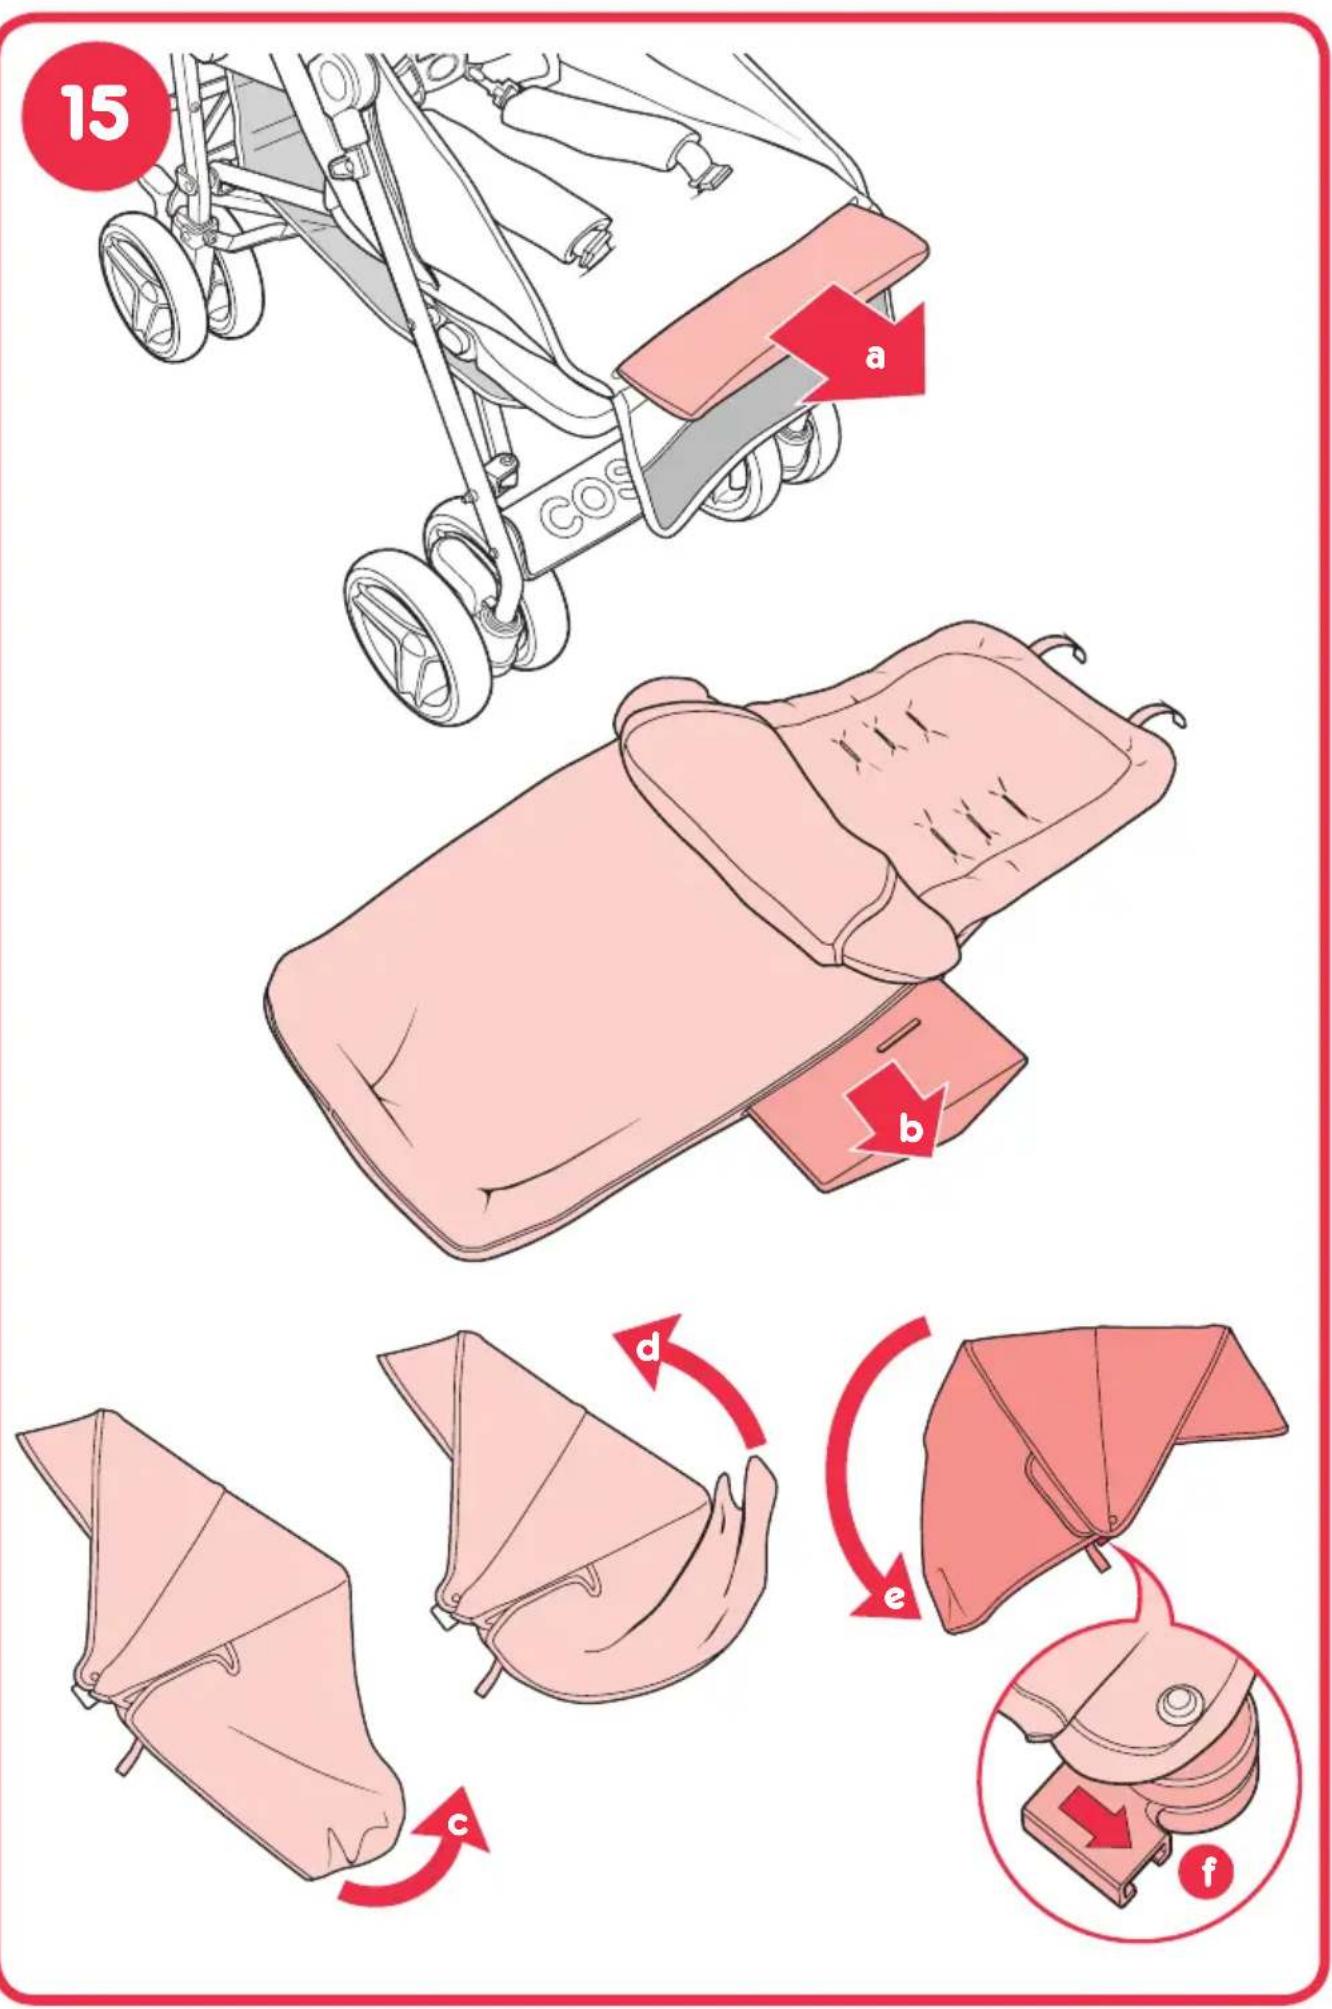
Note: Before fitting the footmuff check that the support wedge is fitted (a).
Remove the chest pads by releasing the fabric fastener along the length of the chest pad (b).
Unfasten the harness and unclip the shoulder straps from the waist strap clips by pressing the sprung arm (c) on the shoulder strap clip and unhooking the clip from the waist strap clip (d).
Pass the harness straps through the slots in the footmuff and seat liner (e, f & g) then attach the fasteners to the back of the seat (h).
Fit the headhugger, ensuring that the shoulder straps fit above the headhugger slots (i).
Refit the chest pads to the shoulder straps.
Removing the footmuff and headhugger is the reverse of this.
Note: Please note the seat liner, fitted with the support wedge, must be used in parent facing mode.
10 · using the back support · parent facing mode
In parent facing mode, there are 3 back support positions. The most reclined position in parent facing mode is recommended for new born babies until ready to progress to more upright position. (e.g. this may be when they can sit up unaided.)
Before adjusting the back support release the seat retaining flap at the rear of the backrest (a).
Press the buttons on both sides of the back support (b) and adjust the angle of the back support (c).
Release buttons (d) to lock the back support in position.
When the back support is in the desired position refasten the seat retaining flap to complete the process.
11 - using the basket - parent facing mode
Zip fasteners (a) on each side of the basket allow access to the basket when in parent facing mode.
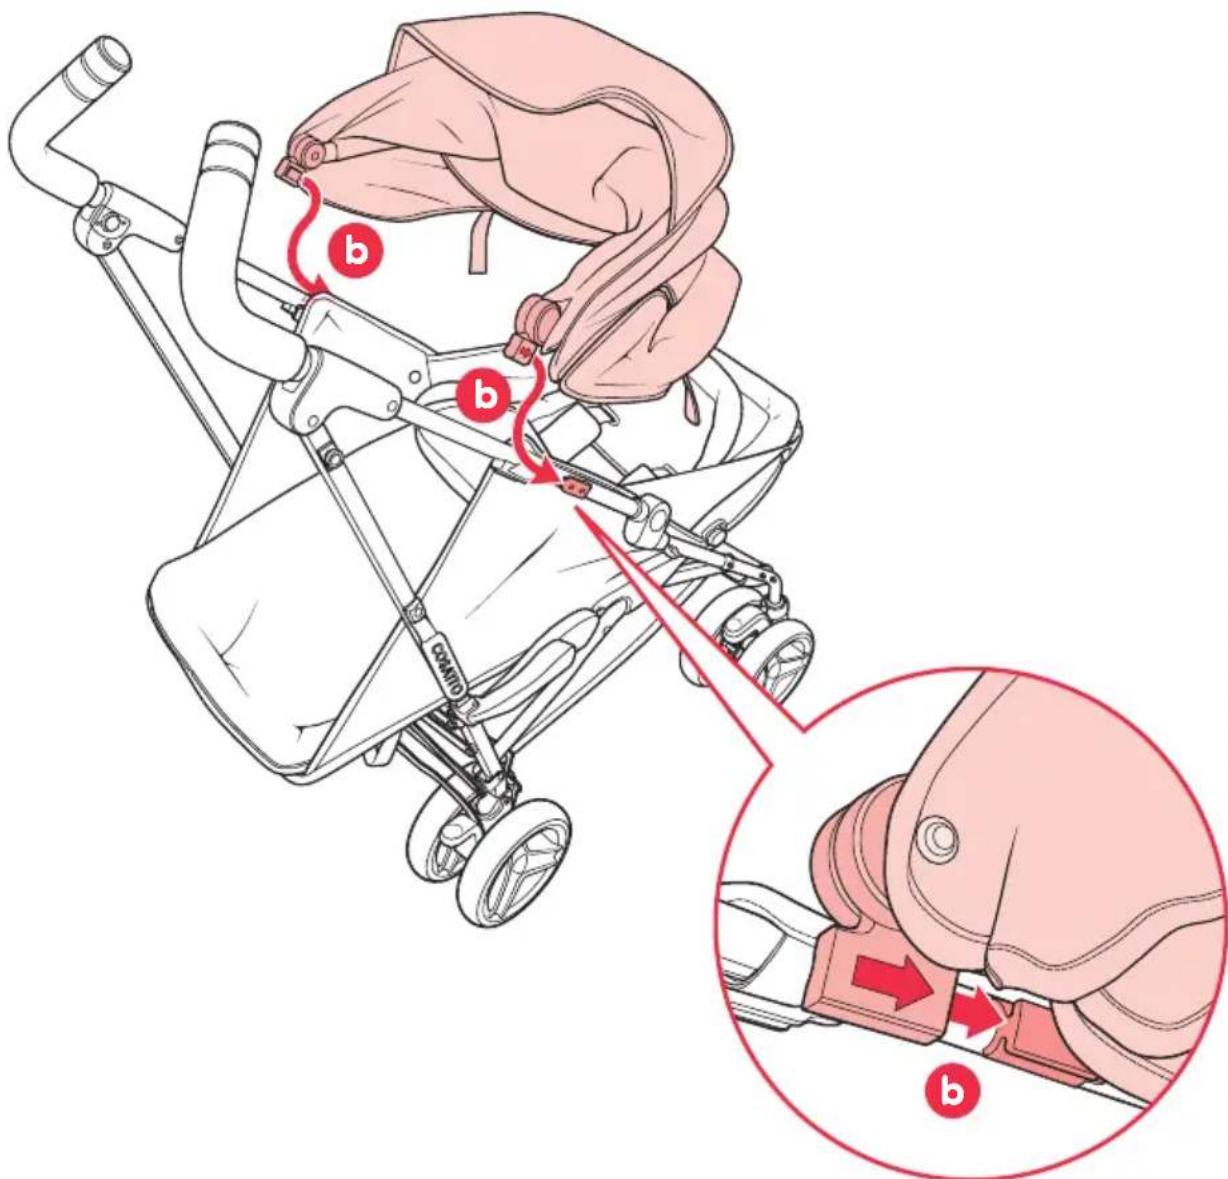
12 - fitting the hood - parent facing mode - 1
The supplied hood can be used for both parent and forward facing modes. The hood is pre-set for fitting in parent facing mode.
Noting the arrow on hood mount indicating the correcting alignment of the hood. In parent facing mode the arrows should point towards the hood (a).
Slide the hood mounts on to the fixing brackets on either side chassis (b).
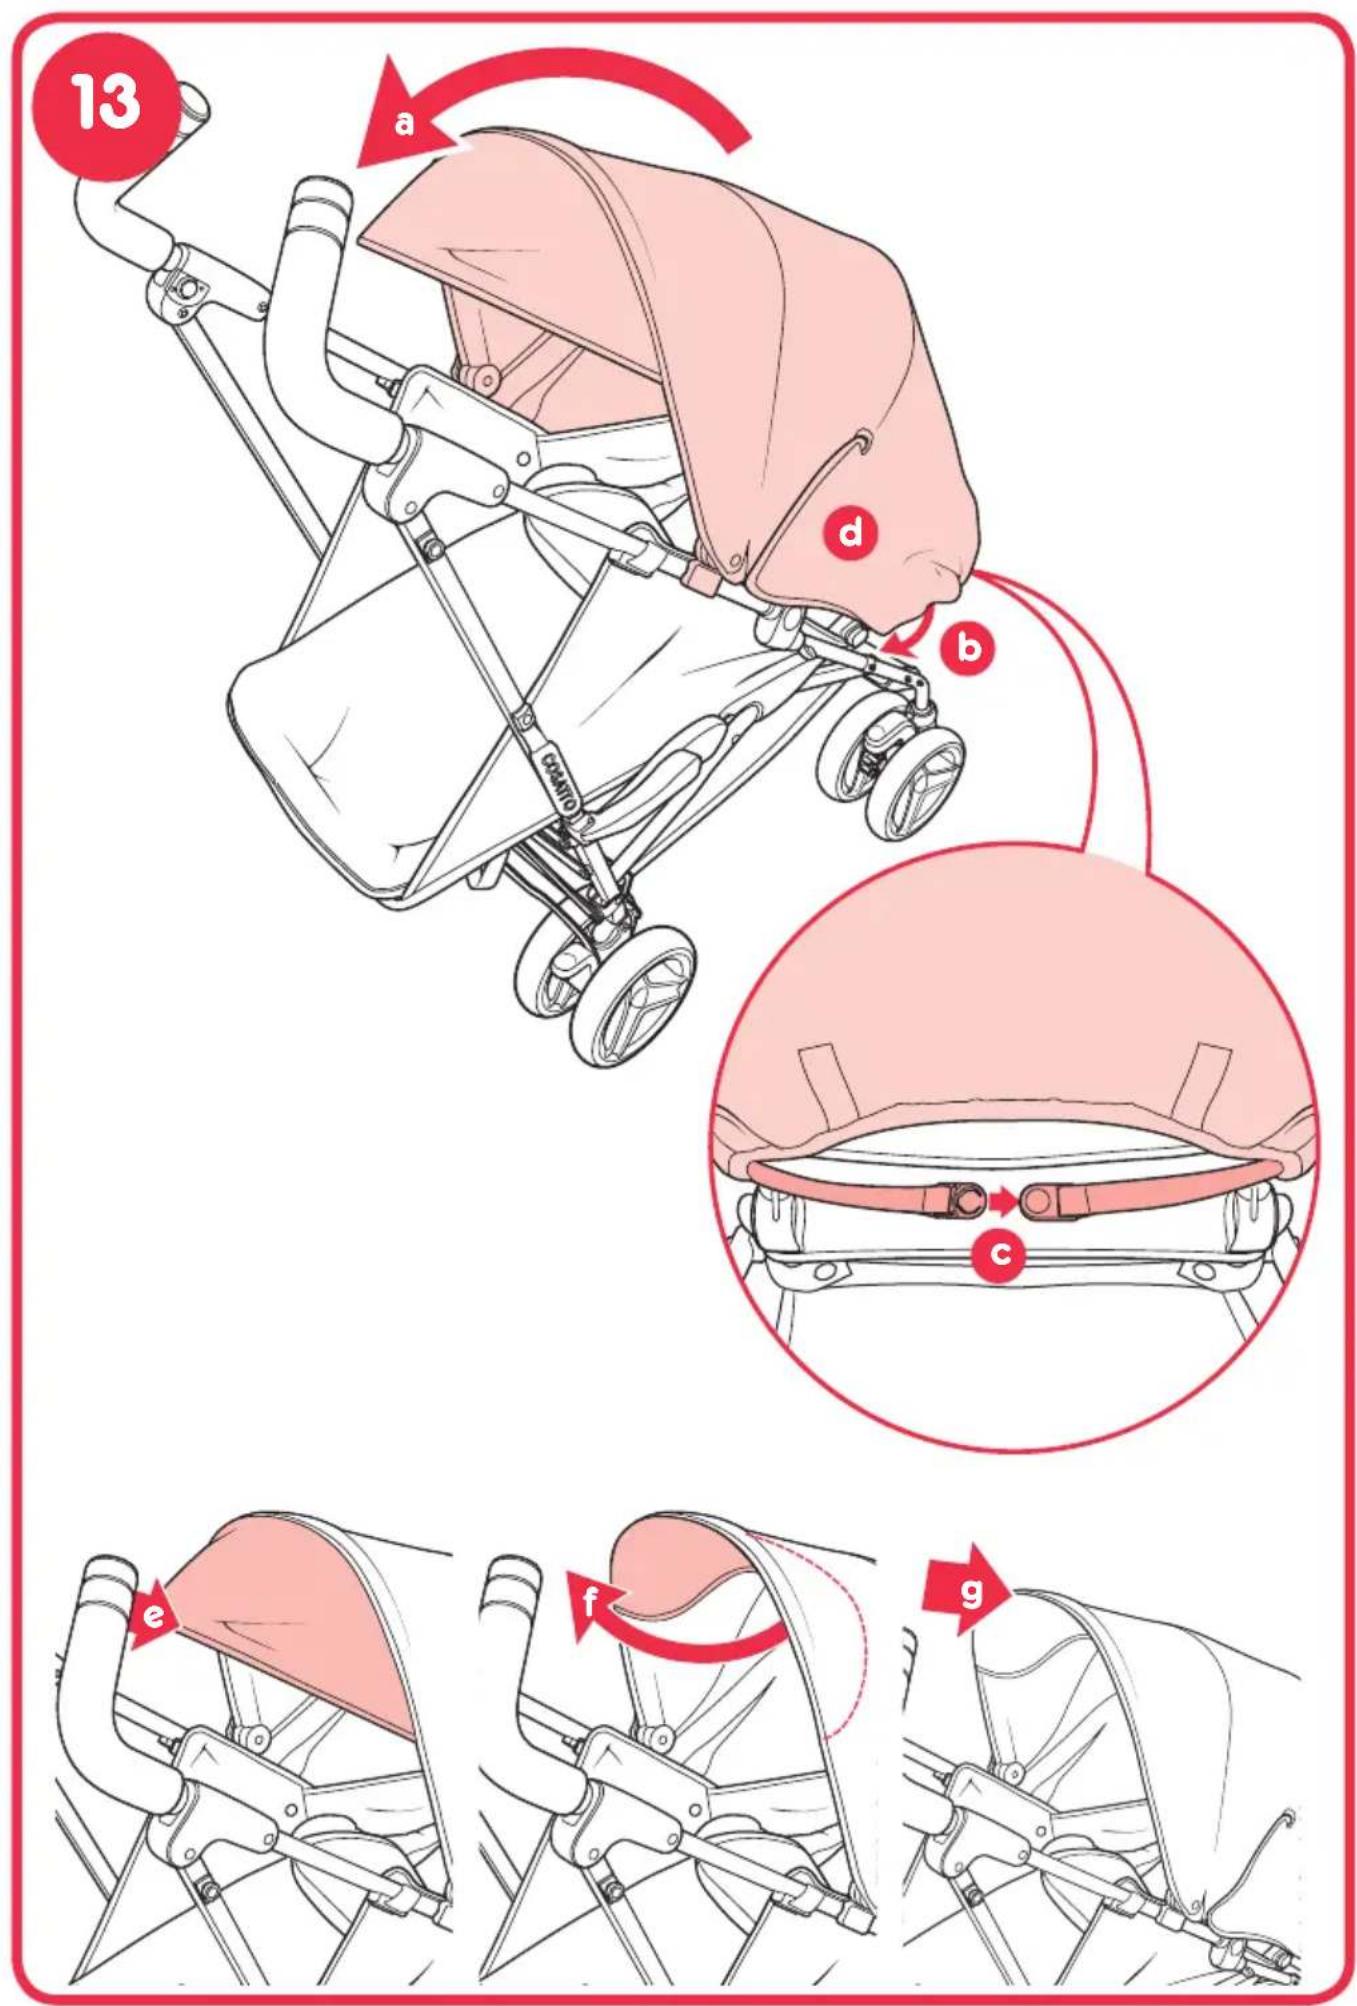
13 - fitting the hood - parent facing mode - 2
Open the hood fully (a).
Fit the back of the hood over the headrest (b).
Fasten the clip under the backrest (c).
Ensure the fastening strips of the each side of the hood are fastened (d).
To retract the sunvisor push it down & back into the hood (e). To extend is the reverse of this (f).
To lower the hood push back on the front top section (g).
Removing the hood is a reversal of steps 12 & 13.
14 - folding the chassis - parent facing mode
Note: If the hood is fitted, retract the hood completely before folding (a).
Raise the backrest (b).
To fold the chassis pull up the handle (c) and at the same time press down on the secondary lock (d).
Keeping the secondary lock pressed down, push the handles forward until the chassis is folded in half. Continue pushing until the autocatch engages.
Note: Take care not to damage the stand mechanism when folding. Pressing down too hard on the chassis can bend the stand arms (e).
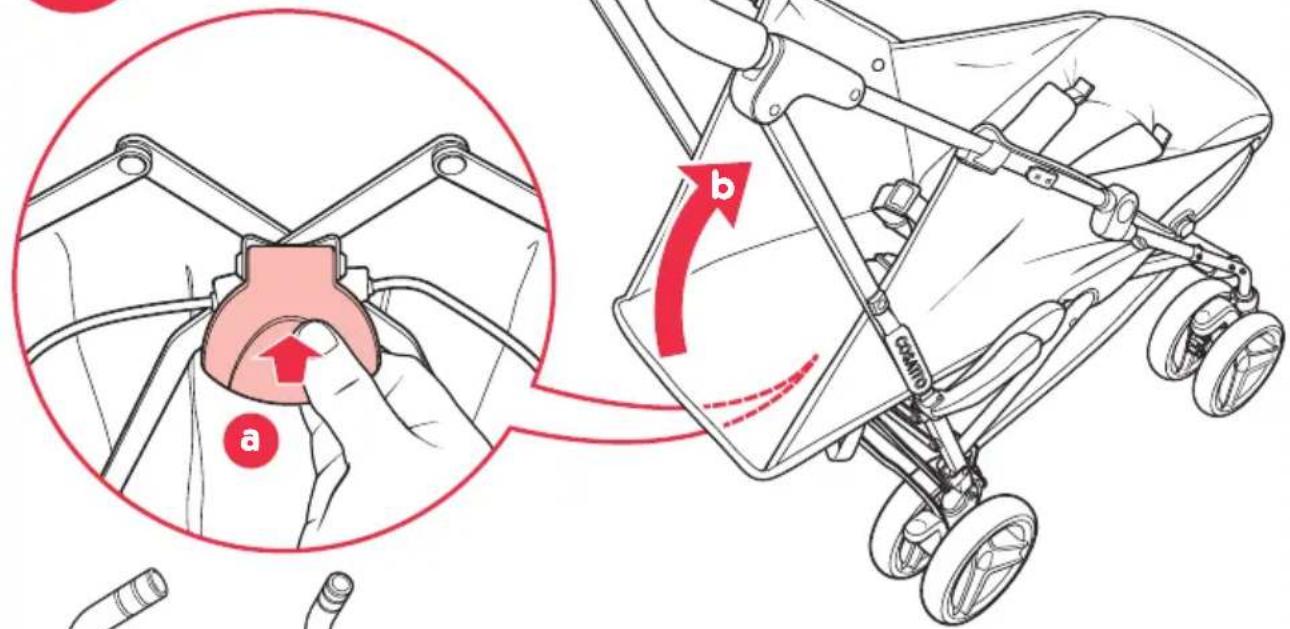
15 · converting from parent facing mode to forward facing mode - 1
Remove the chest pads, footmuff and headhugger (A reversal of the procedure in Step 9) and attach the harness.
Remove the head pad (a).
Remove the support wedge (b) from footmuff.
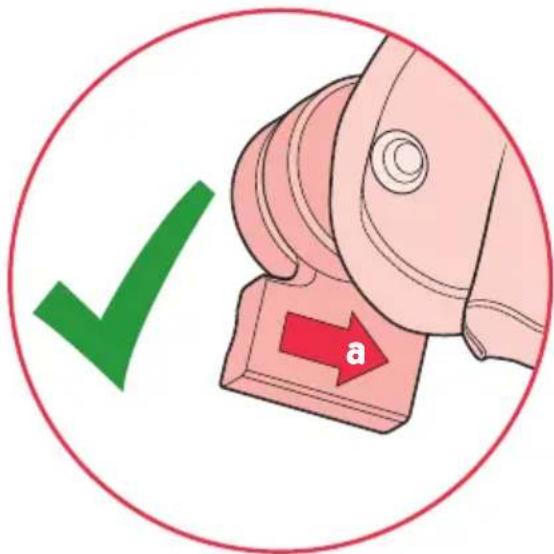
Reverse the hood by gripping the material at the base of the back of the hood and pull it up and over the top (c & d) until the inside of the hood has become the outside and the hood now faces in the opposite direction (e). The arrows on the hood mounts should now point away from the hood (f).
16 · converting from parent facing mode to forward facing mode · 2
Lift the lever (a) on the seat back and lift the seat upright (b).
Pull the seat retaining flap away from the underside of the calf support (c).
Lift the seat up until it swings up to the backrest (d).
Fasten the seat retaining flap to the rear of the backrest (e).
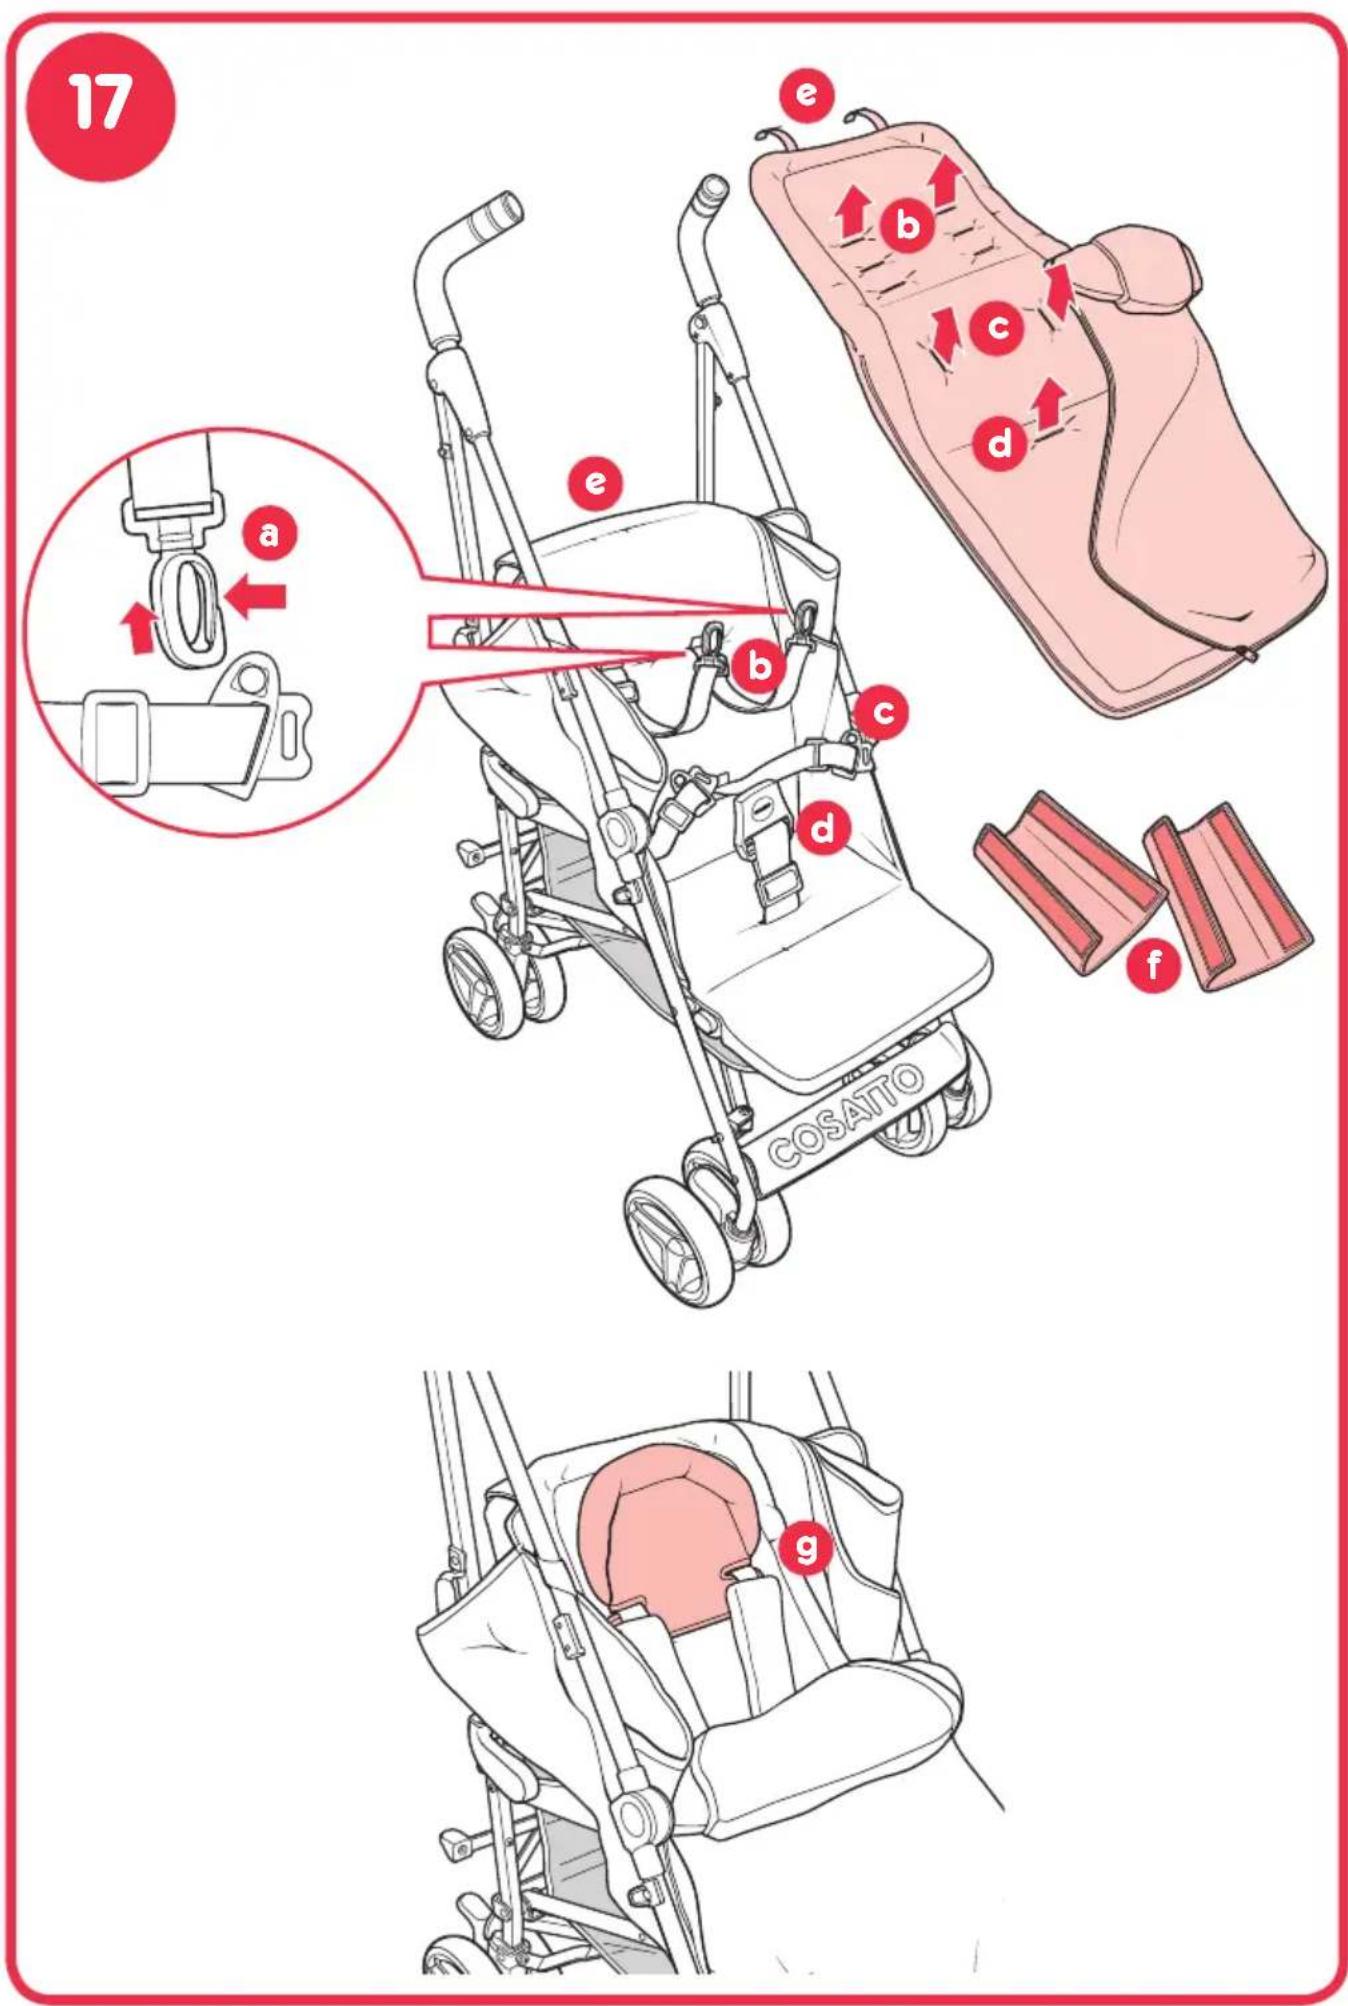
17 - fitting the softgoods - forward facing mode
WARNING: Do not use head pad & footmuff wedge in forward facing mode.
Unfasten the harness and remove the shoulder straps clips from the waist strap clips (a).
Pass the harness straps through the slots in the footmuff and seat liner (b, c & d) then attach the fasteners to the back of the seat (e).
Fit the headhugger, ensuring that the shoulder straps fit above the headhugger slots (f).
Refit the shoulder straps clips to the waist strap clips.
Refit the chest pads to the shoulder straps (g).
Removing the footmuff and headhugger is a reversal of this procedure.
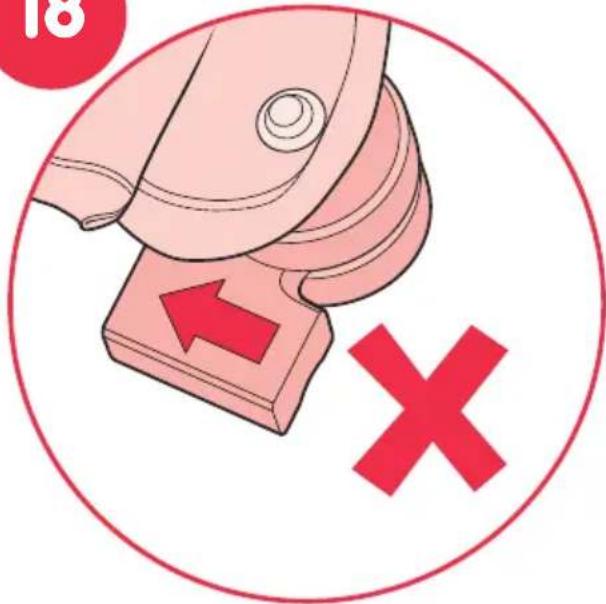
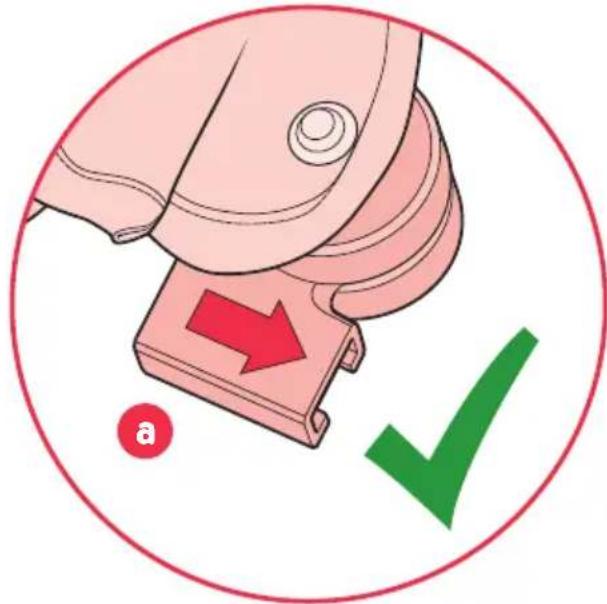
18 - fitting the hood - forward facing mode - 1
Before fitting check the hood is set for forward facing mode (See Step 15).
Noting the arrow on hood mount indicating the correcting alignment of the hood. In forward facing mode the arrows should point away from the hood (a).
Slide the hood mounts on to the fixing brackets on either side chassis (b).
Fit the back of the hood over and behind the backrest (c).
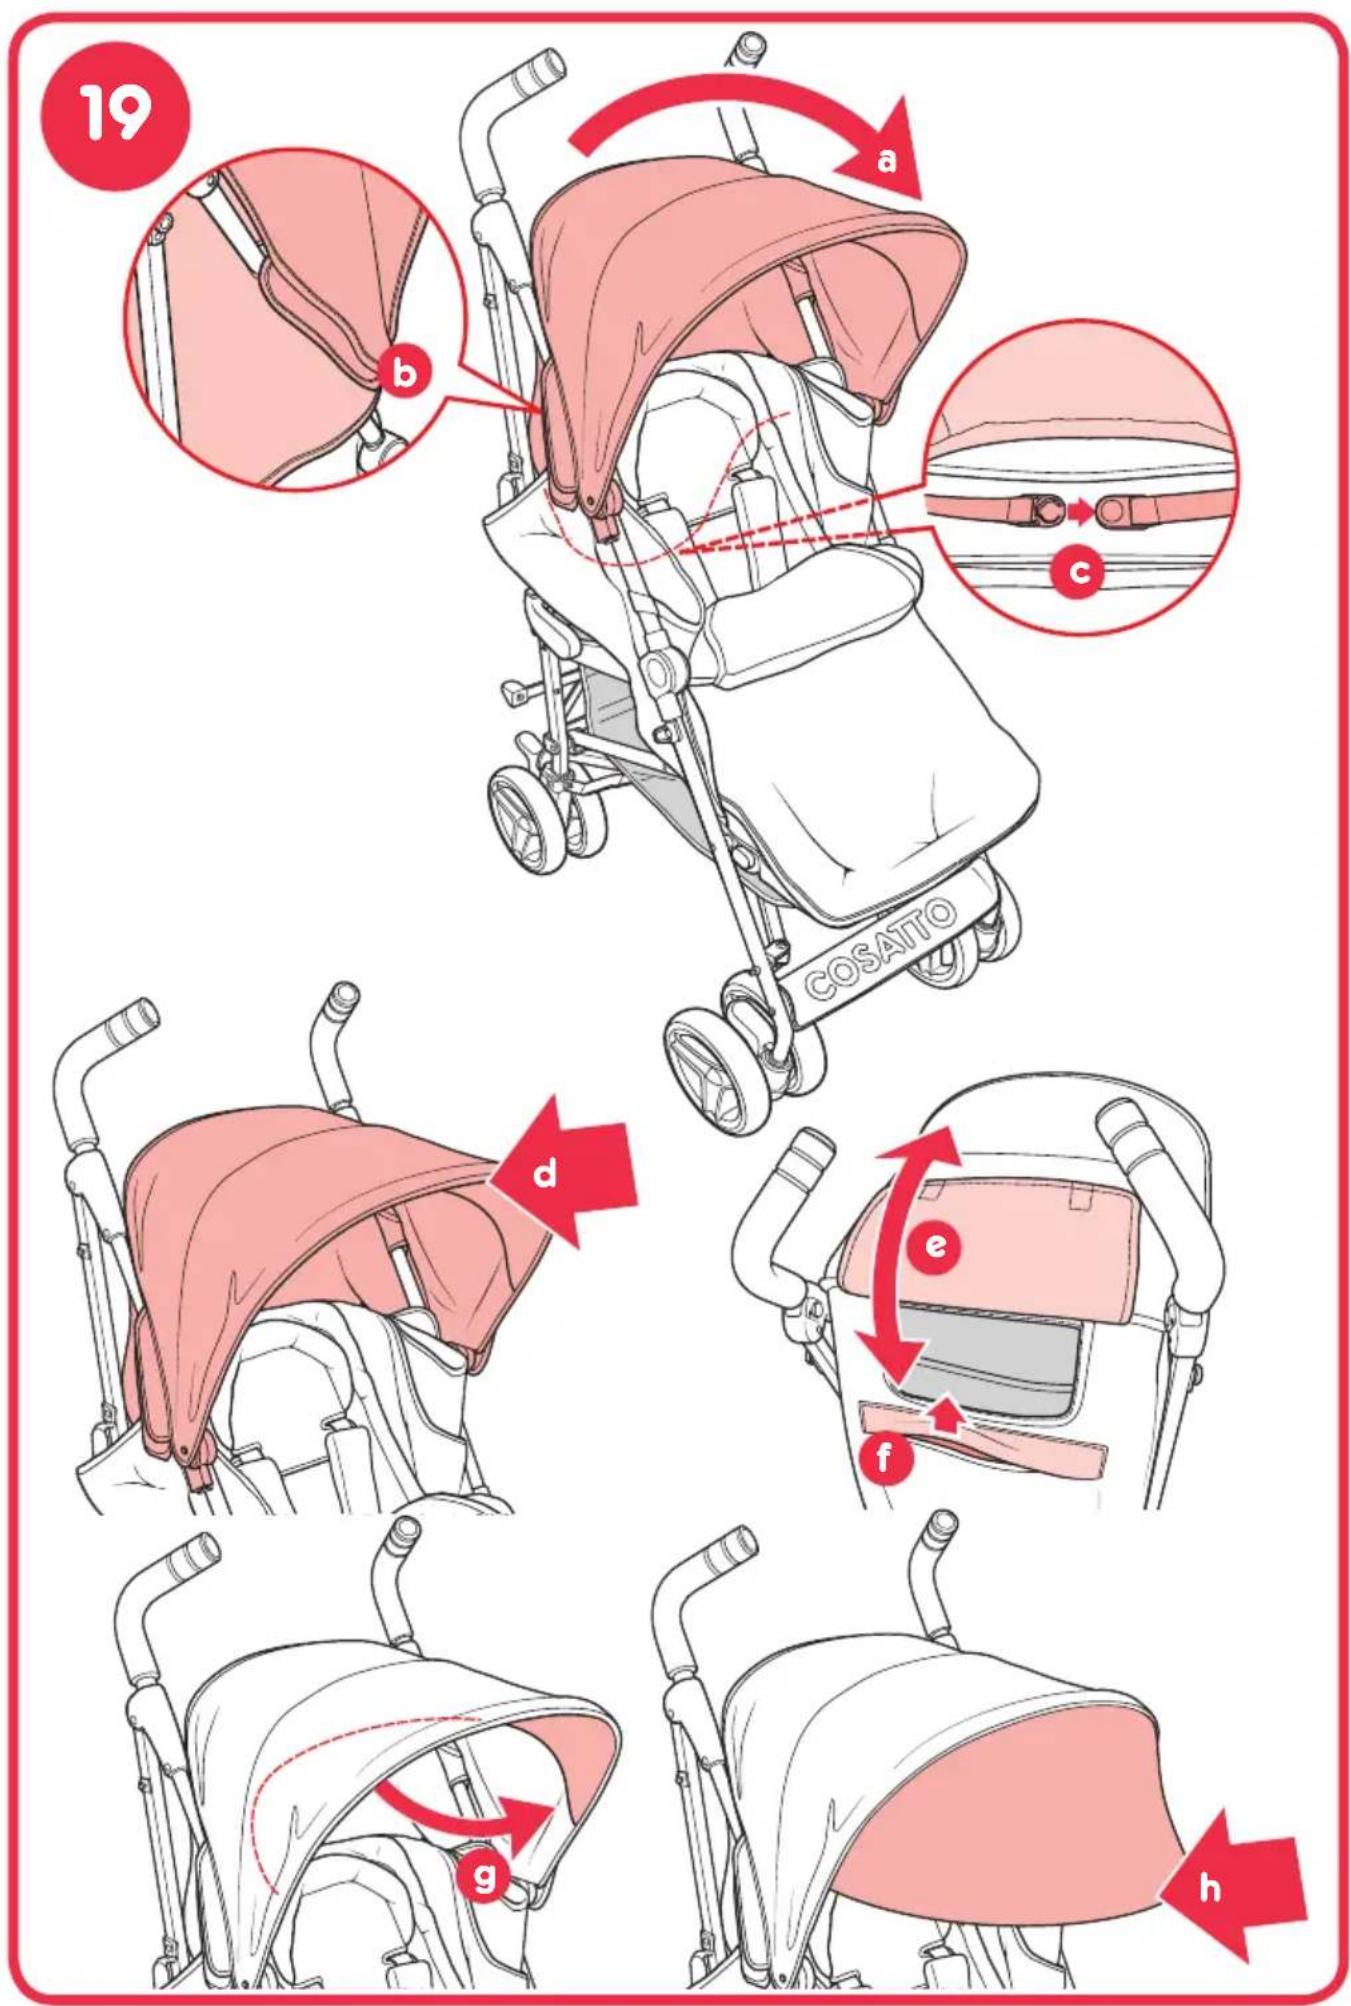
19 · fitting the hood · forward facing mode · 2
Raise the hood by pulling top front section forwards (a).
Fasten the fabric fastener around the front leg tubing (b)
Fasten the clip behind the backrest (c).
To lower the hood push back on the front top section (d).
There is a flap on the rear of the hood. Lift the flap to view inside the pushchair (e). Lower the flap to close.
There is a pocket on the rear of the hood. Lift the flap (f) to gain access to the pocket. Maximum weigh in hood pocket 0.2kg.
To extend the sunvisor pull the sunvisor forward from the hood (g). To retract is the reverse of this procedure (h).
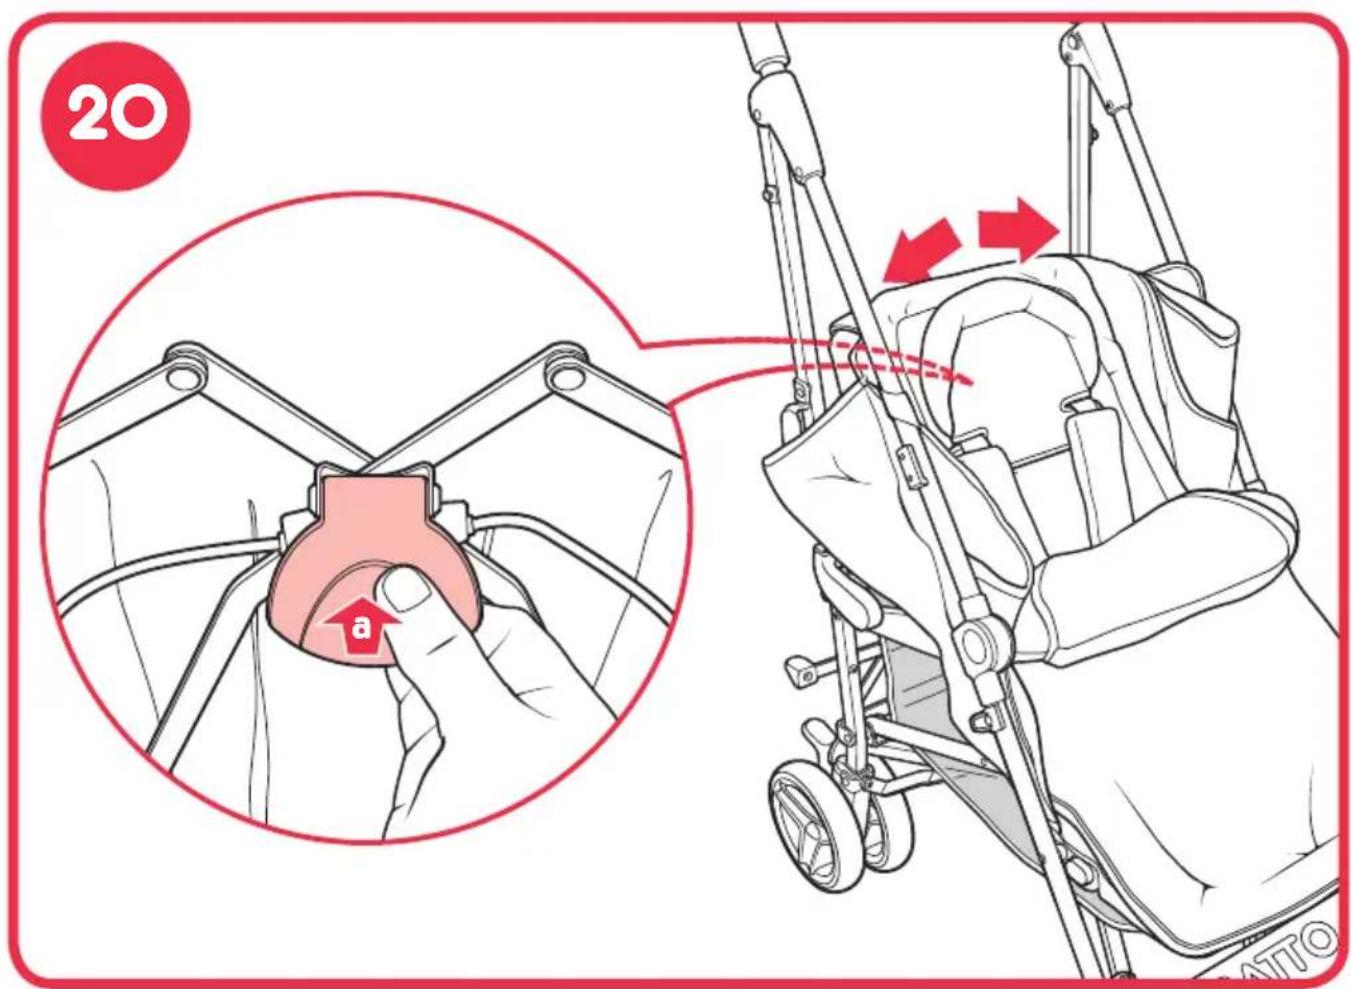
20 - positioning the backrest
The backrest can be adjusted. To lower, simply lift the lever behind the backrest (a) and release the lever at desired position. To raise the backrest is a reversal of this procedure.
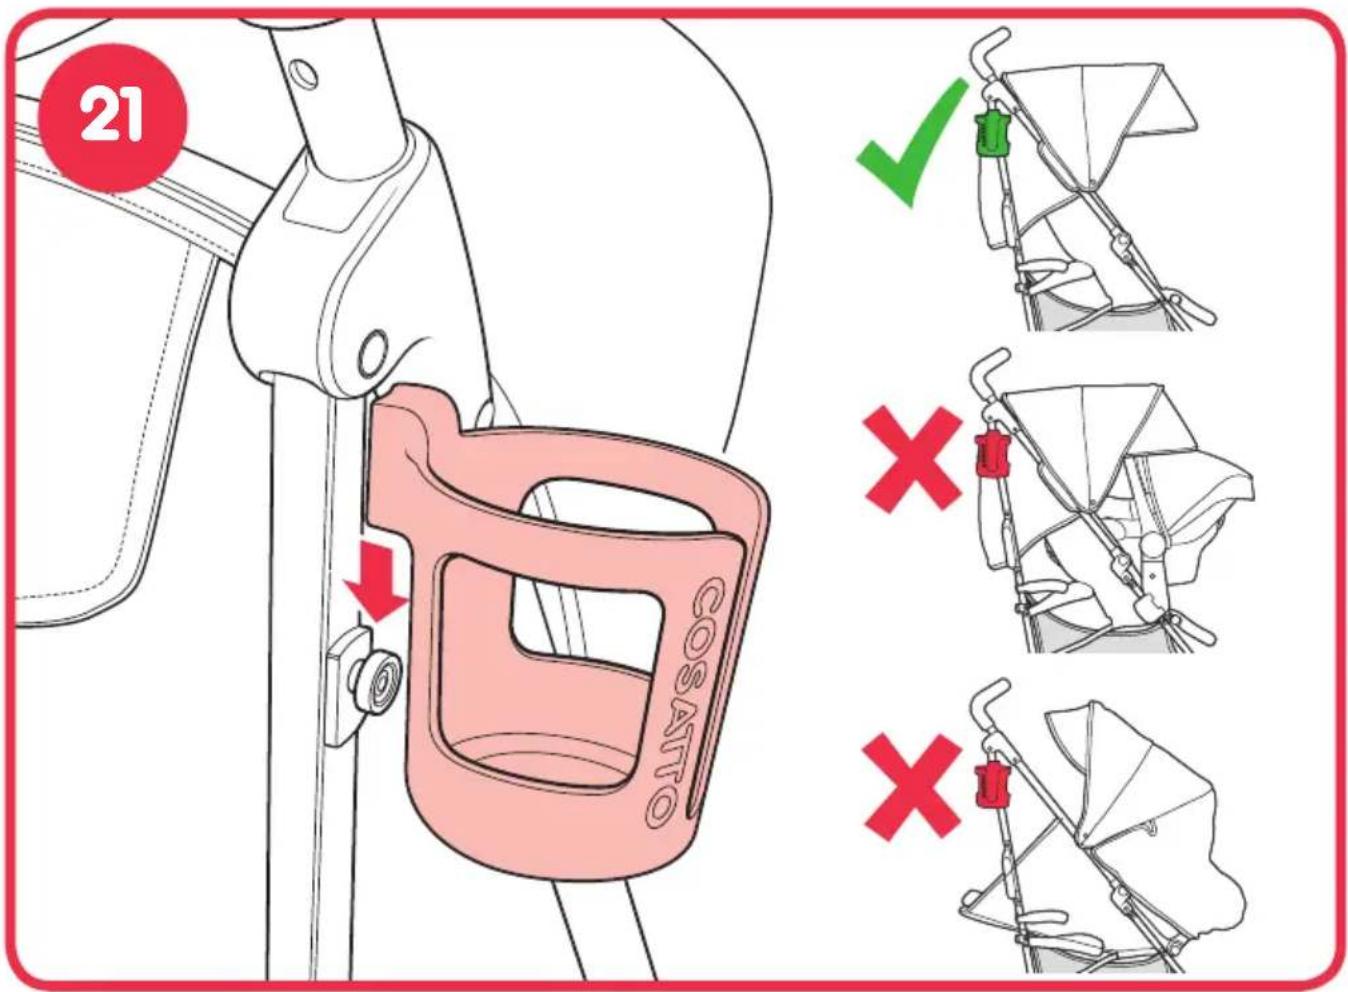
21 - fitting the drinks holder
Push the drinks holder down on to its mounting bracket until it locks in place.
Lift the drinks holder off the bracket to remove.
Note: The cup holder must only be used in forward facing mode.
22 - using the calf support - forward facing mode
Press the buttons on both sides of the calf support (a) and lift (b) or lower (c) the calf support to the desired position. Release buttons (a) to lock the calf support in position.
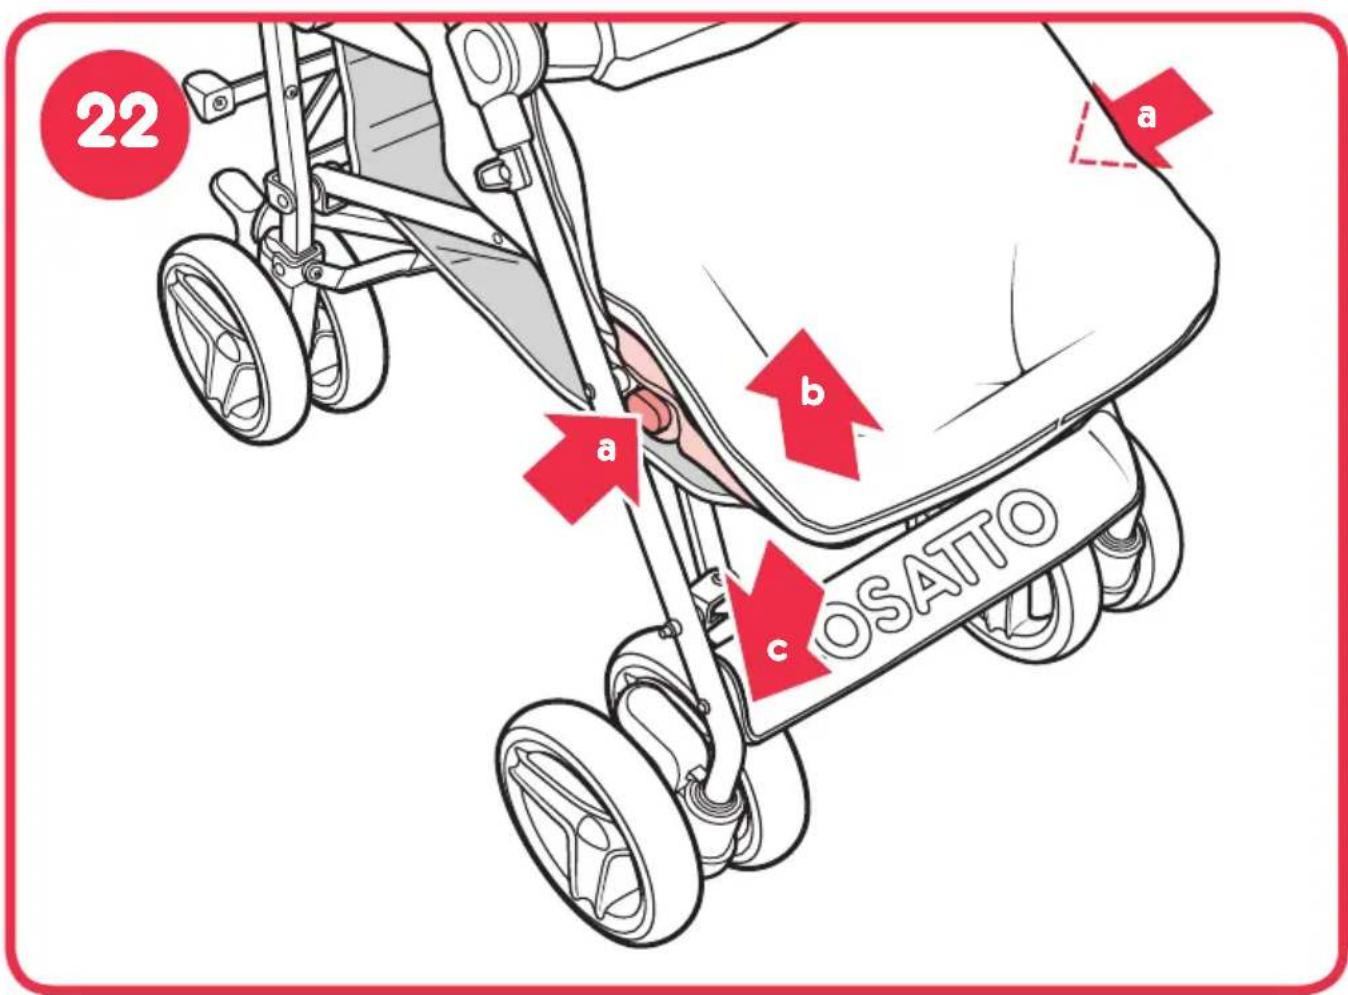
23 - removing the basket
The basket is removable for easier cleaning. To remove your basket, undo the poppers on the four straps, two at the back (a) on either side and two at the front behind the calf support hinges (b).
To re-fit your basket, simply reverse the above process. Maximum load 2kg of goods, evenly distributed.
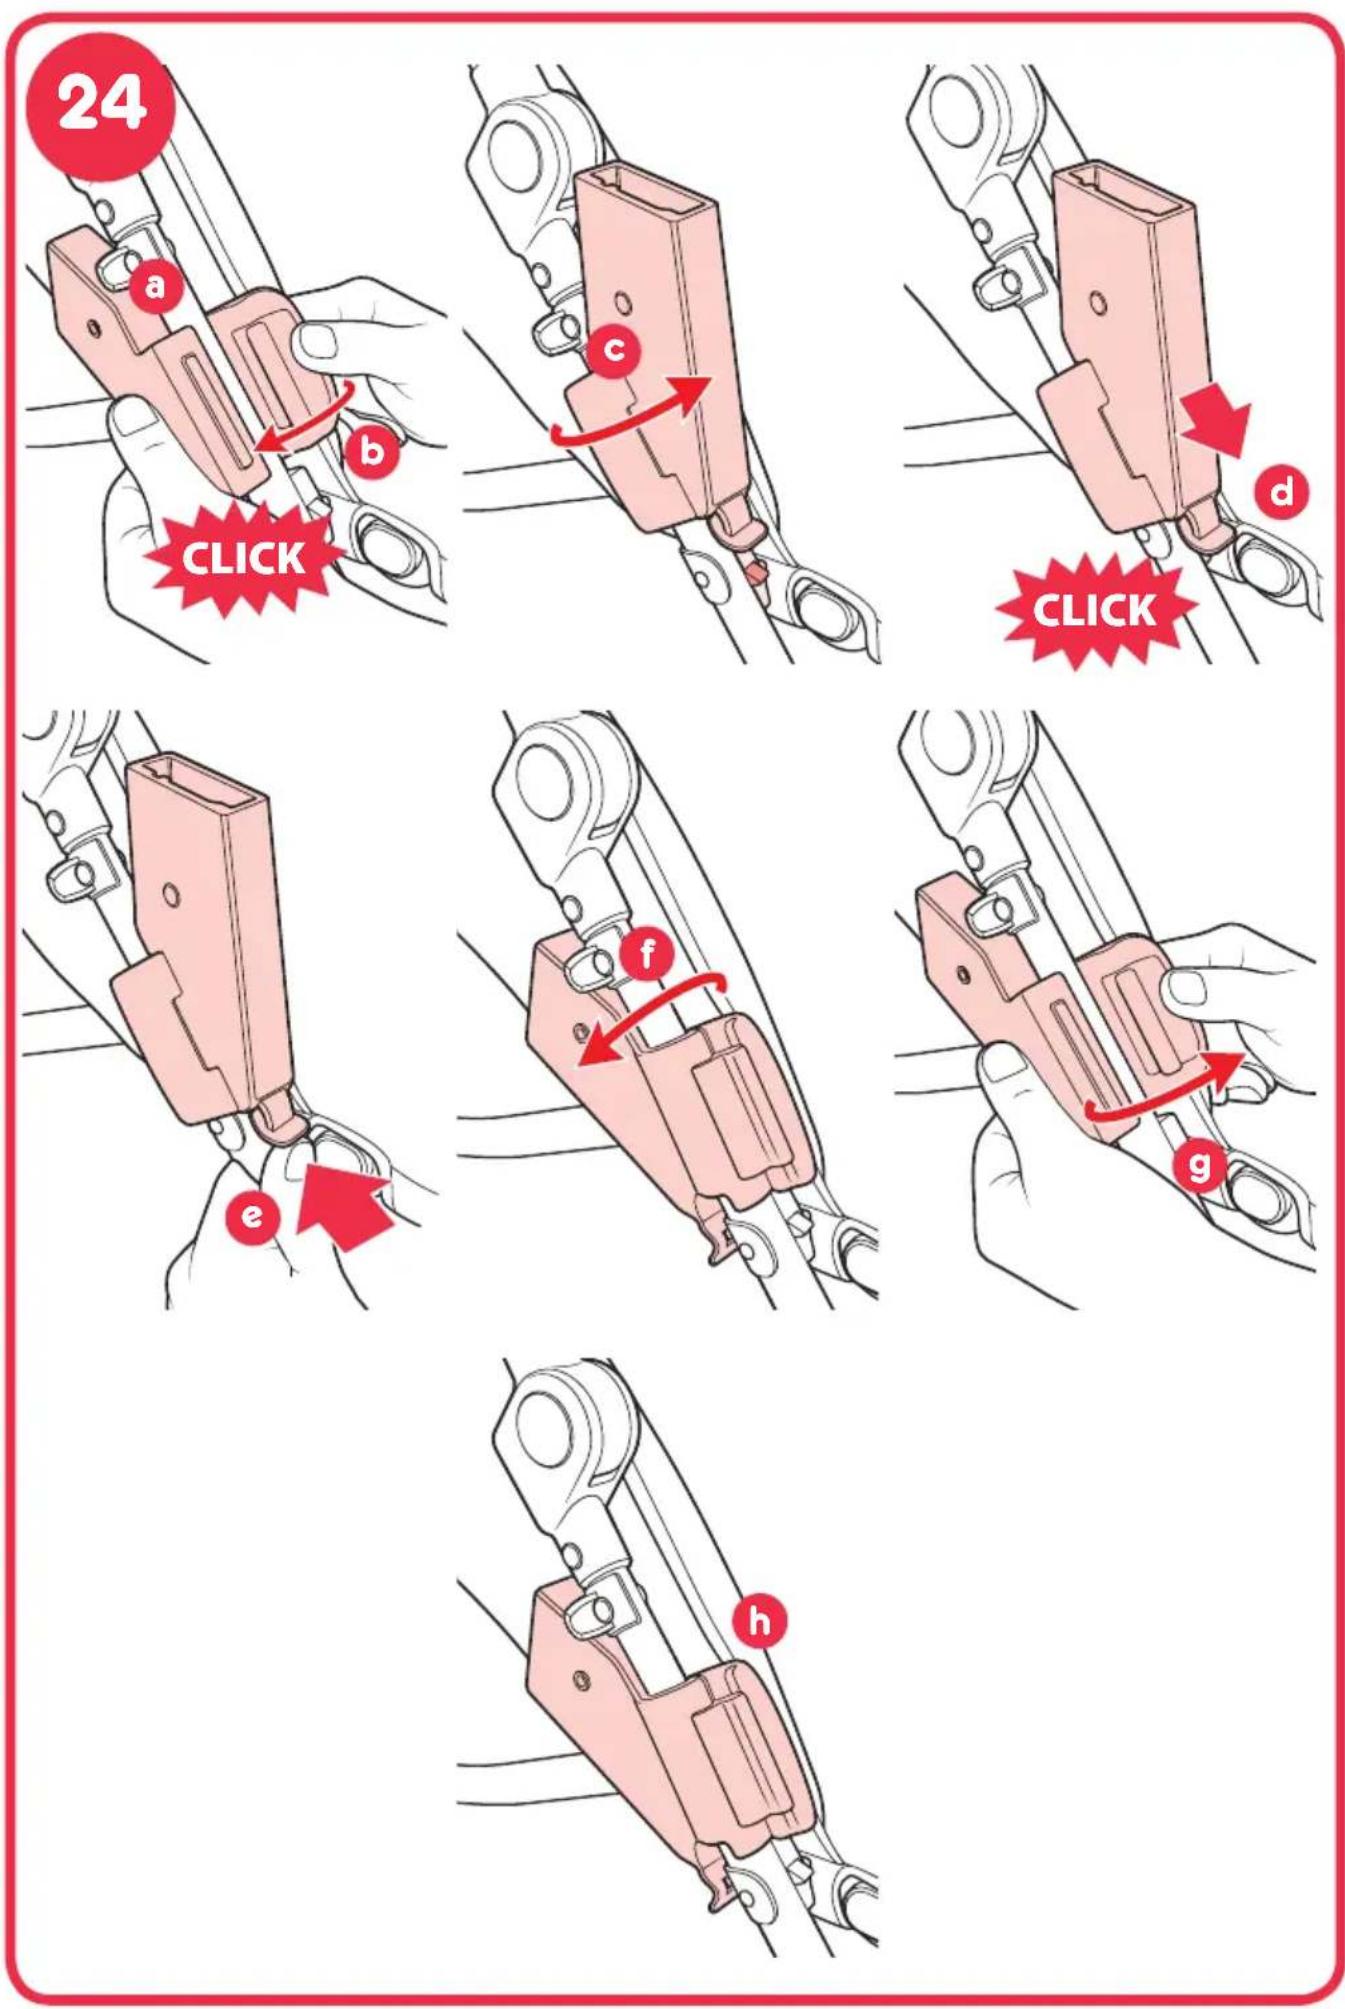
24 - using the child car seat adaptor
The child car seat adaptors are handed and can only be fitted in one direction. The hinged locking flap should be on the outside of the pushchair once fitted.
Open an adaptor and working from underneath wrap around the pushchair leg just under the hinge (a). Close the adaptor locking flap (b) to lock the adaptor to the pushchair leg. A 'click' should be heard when the flap locks.
Rotate the adaptor around the pushchair leg until the adaptor foot aligns with the locking pin (c) on the pushchair leg.
Slide down (d) until a 'click' is heard and the adaptor is locked in place. Repeat this procedure with the other side.
To release the adaptors press the levers underneath (e) to lift them off the locking pins. Open the locking flaps (f) and remove the adaptors from the pushchair (g).
The car seat adaptors can be folded down below the pushchair leg if the car seat is to be used regularly (h) and remain attached during folding of the chassis.
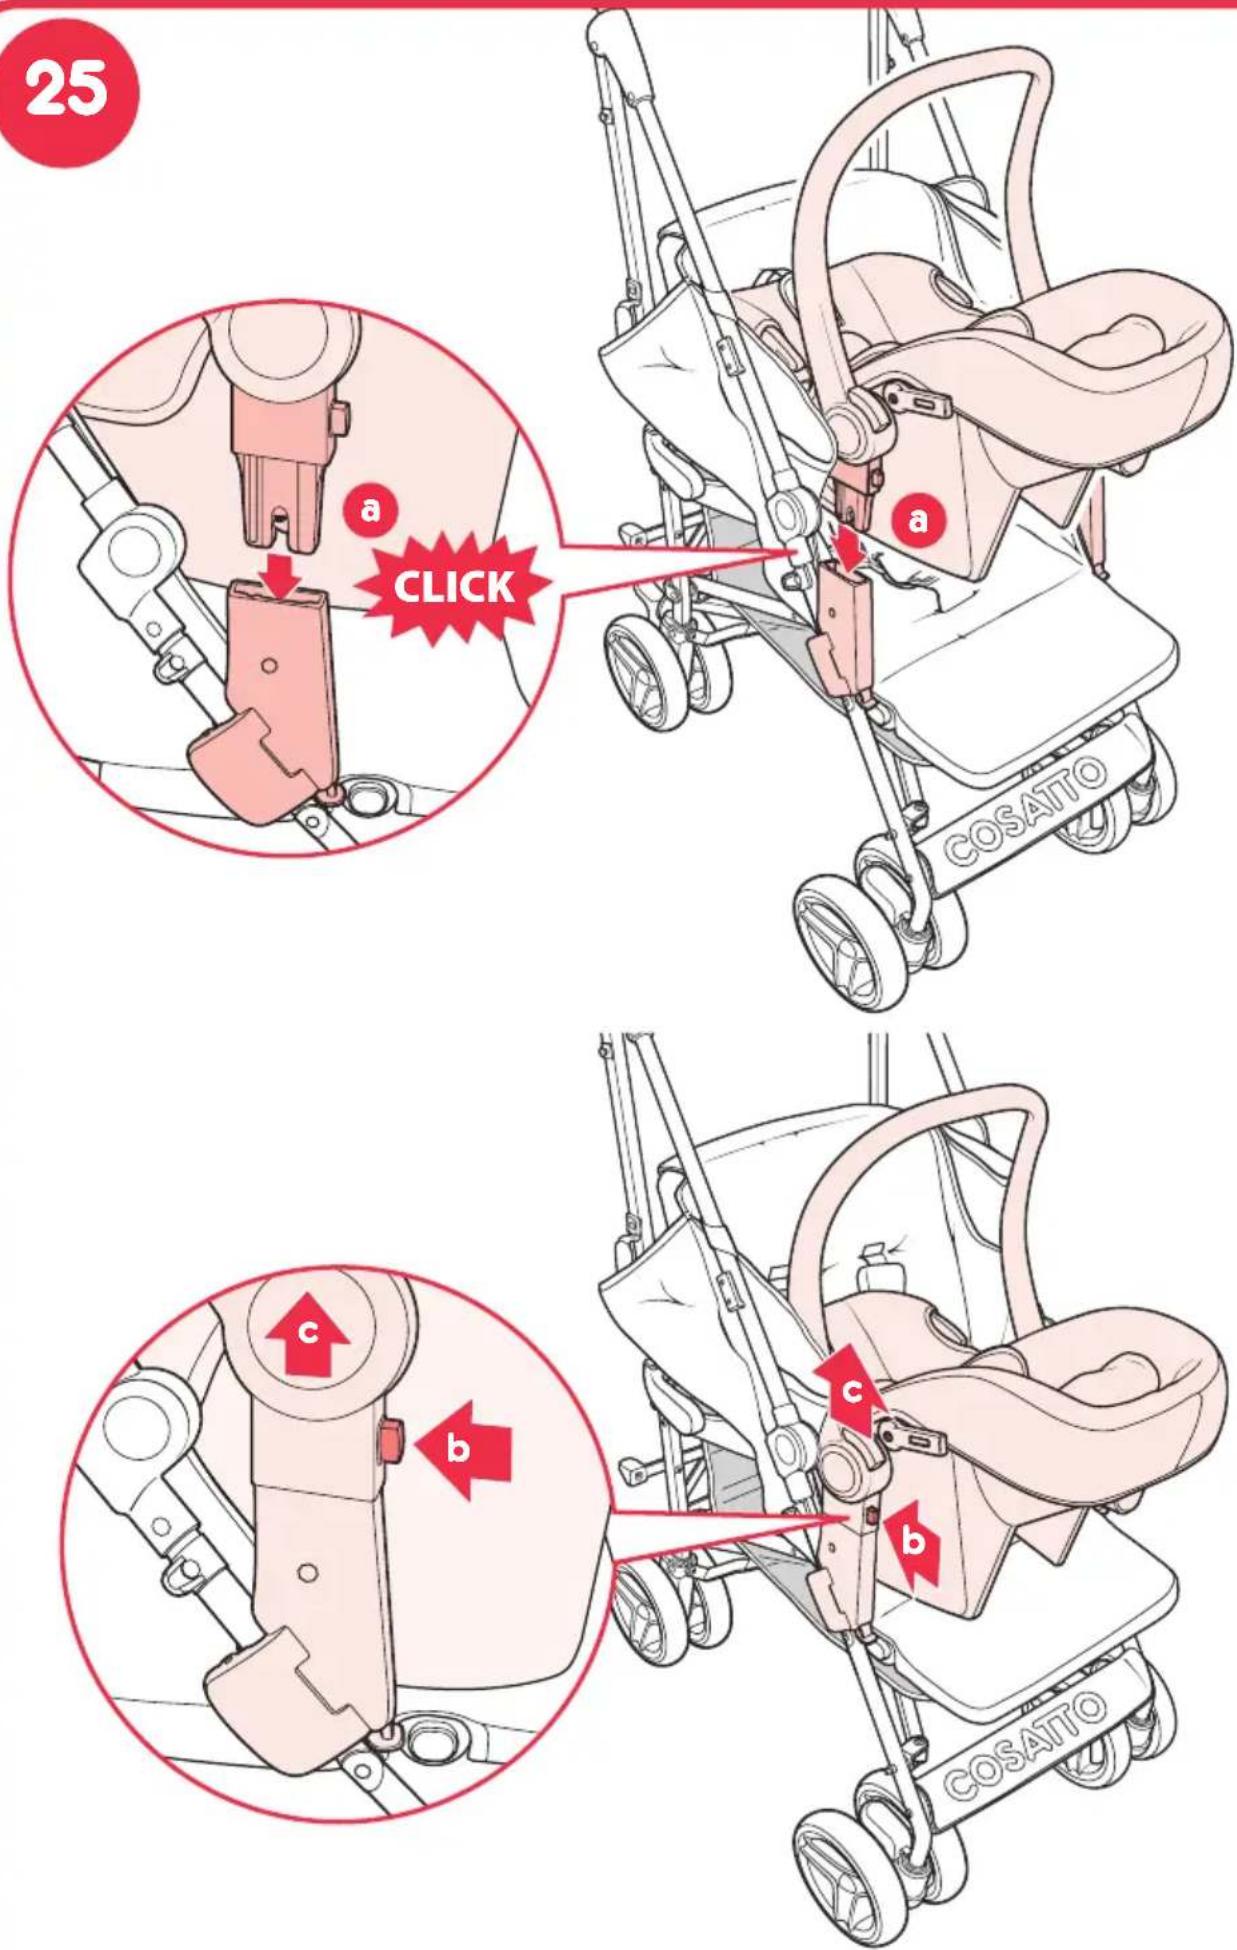
25 - using the pushchair with the Hold car seat (sold separately)
Fit the car seat adaptor to the chassis (See step 24)
Lift the child car seat on to the pushchair and align the car seat mounts with the adaptors on the pushchair. Push down firmly (a) until a 'click' is heard from both sides.
Before using the pushchair with the child car seat attached check that the child car seat and adaptors are firmly attached.
To remove the child car seat press the buttons on both car seat mounts (b) then lift the car seat off the car seat adaptors (c).
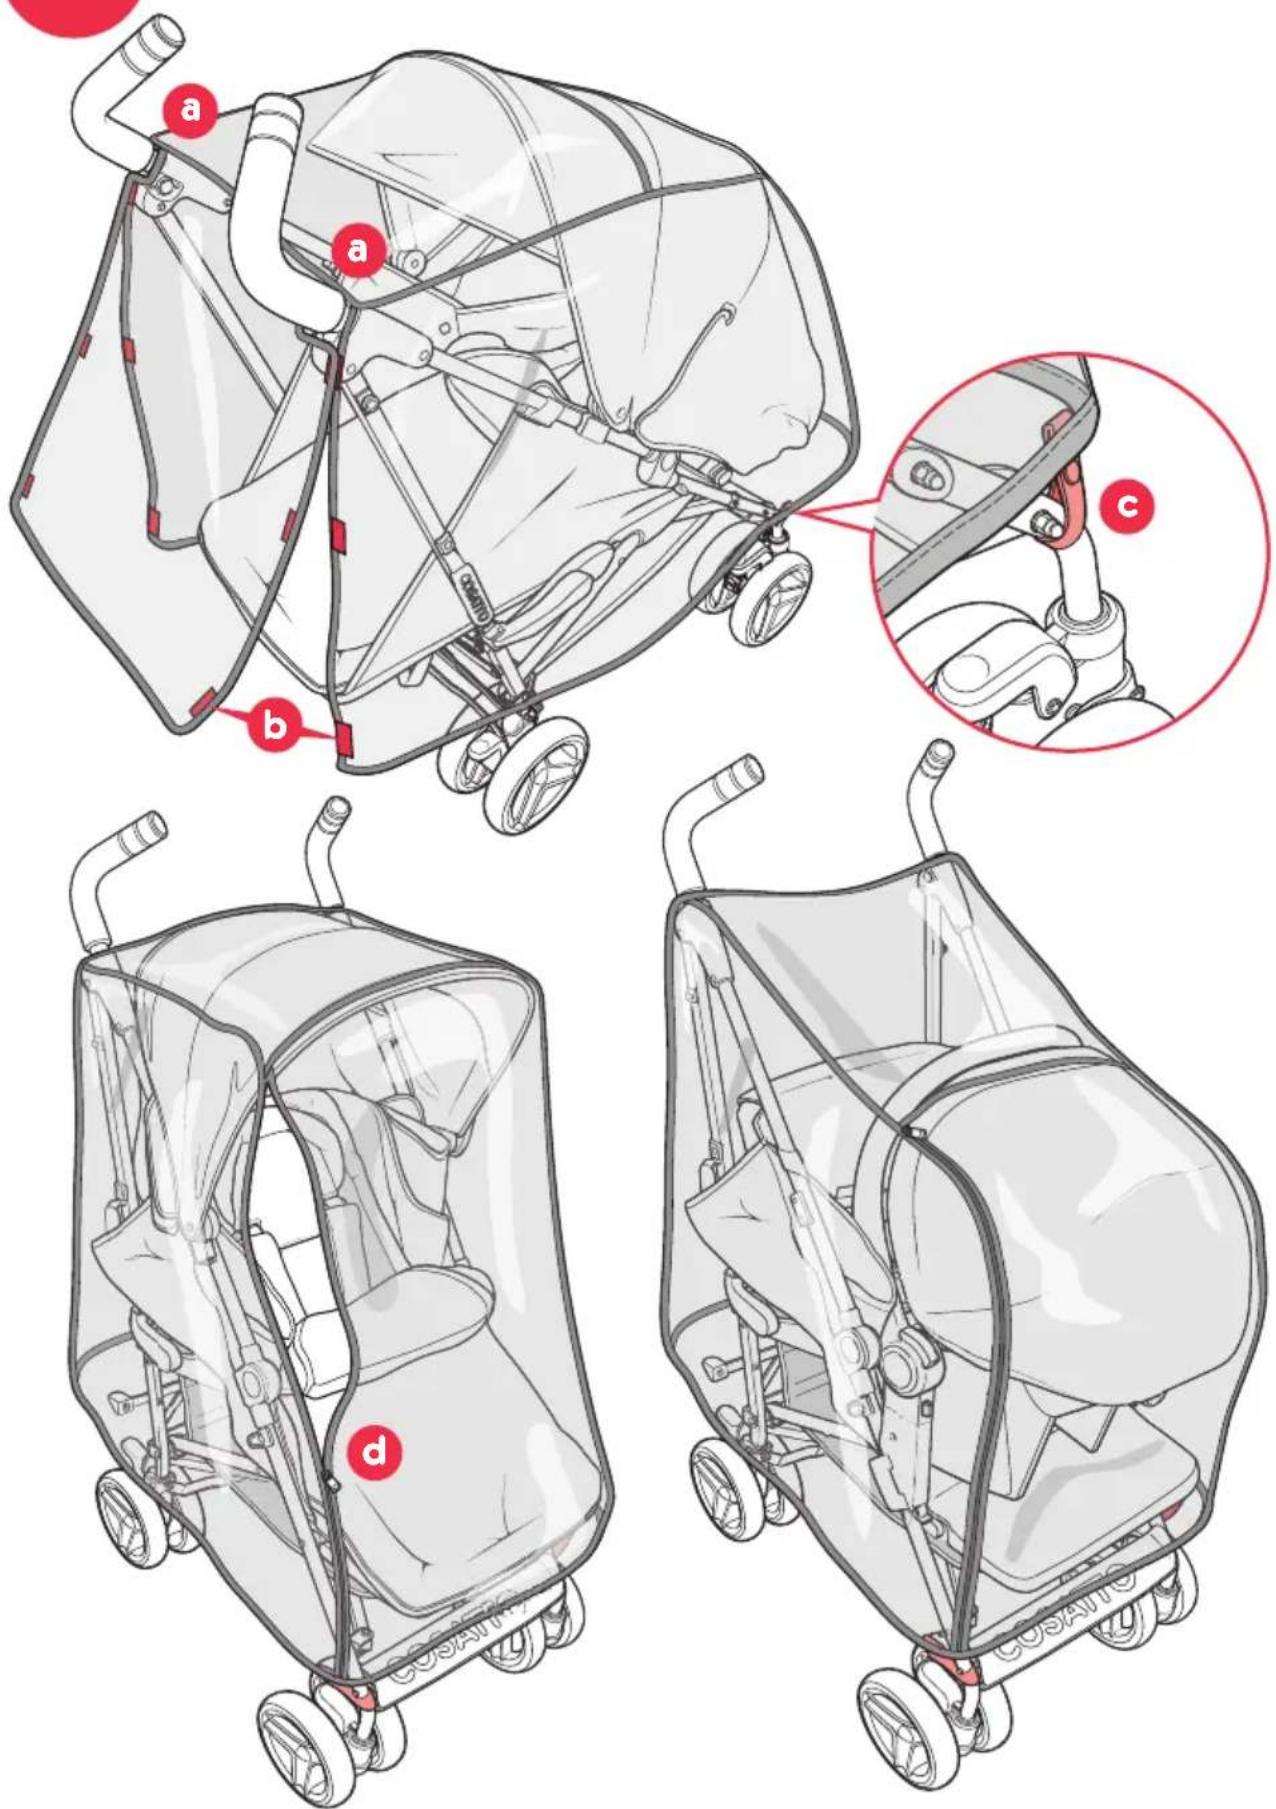
26 - fitting the raincover
The procedure for fitting the raincover is the same for parent facing, forward facing & car seat mode.
Fit the raincover over as shown.
The handles pass through holes in the raincover on each side (a).
Fasten the fasteners, three on each side at the back of the raincover (b).
At the front wrap the webbing straps around the chassis legs and fasten the popper (c).
A zip fastener along the front of the raincover can be opened to gain access to the inside of the raincover (d).
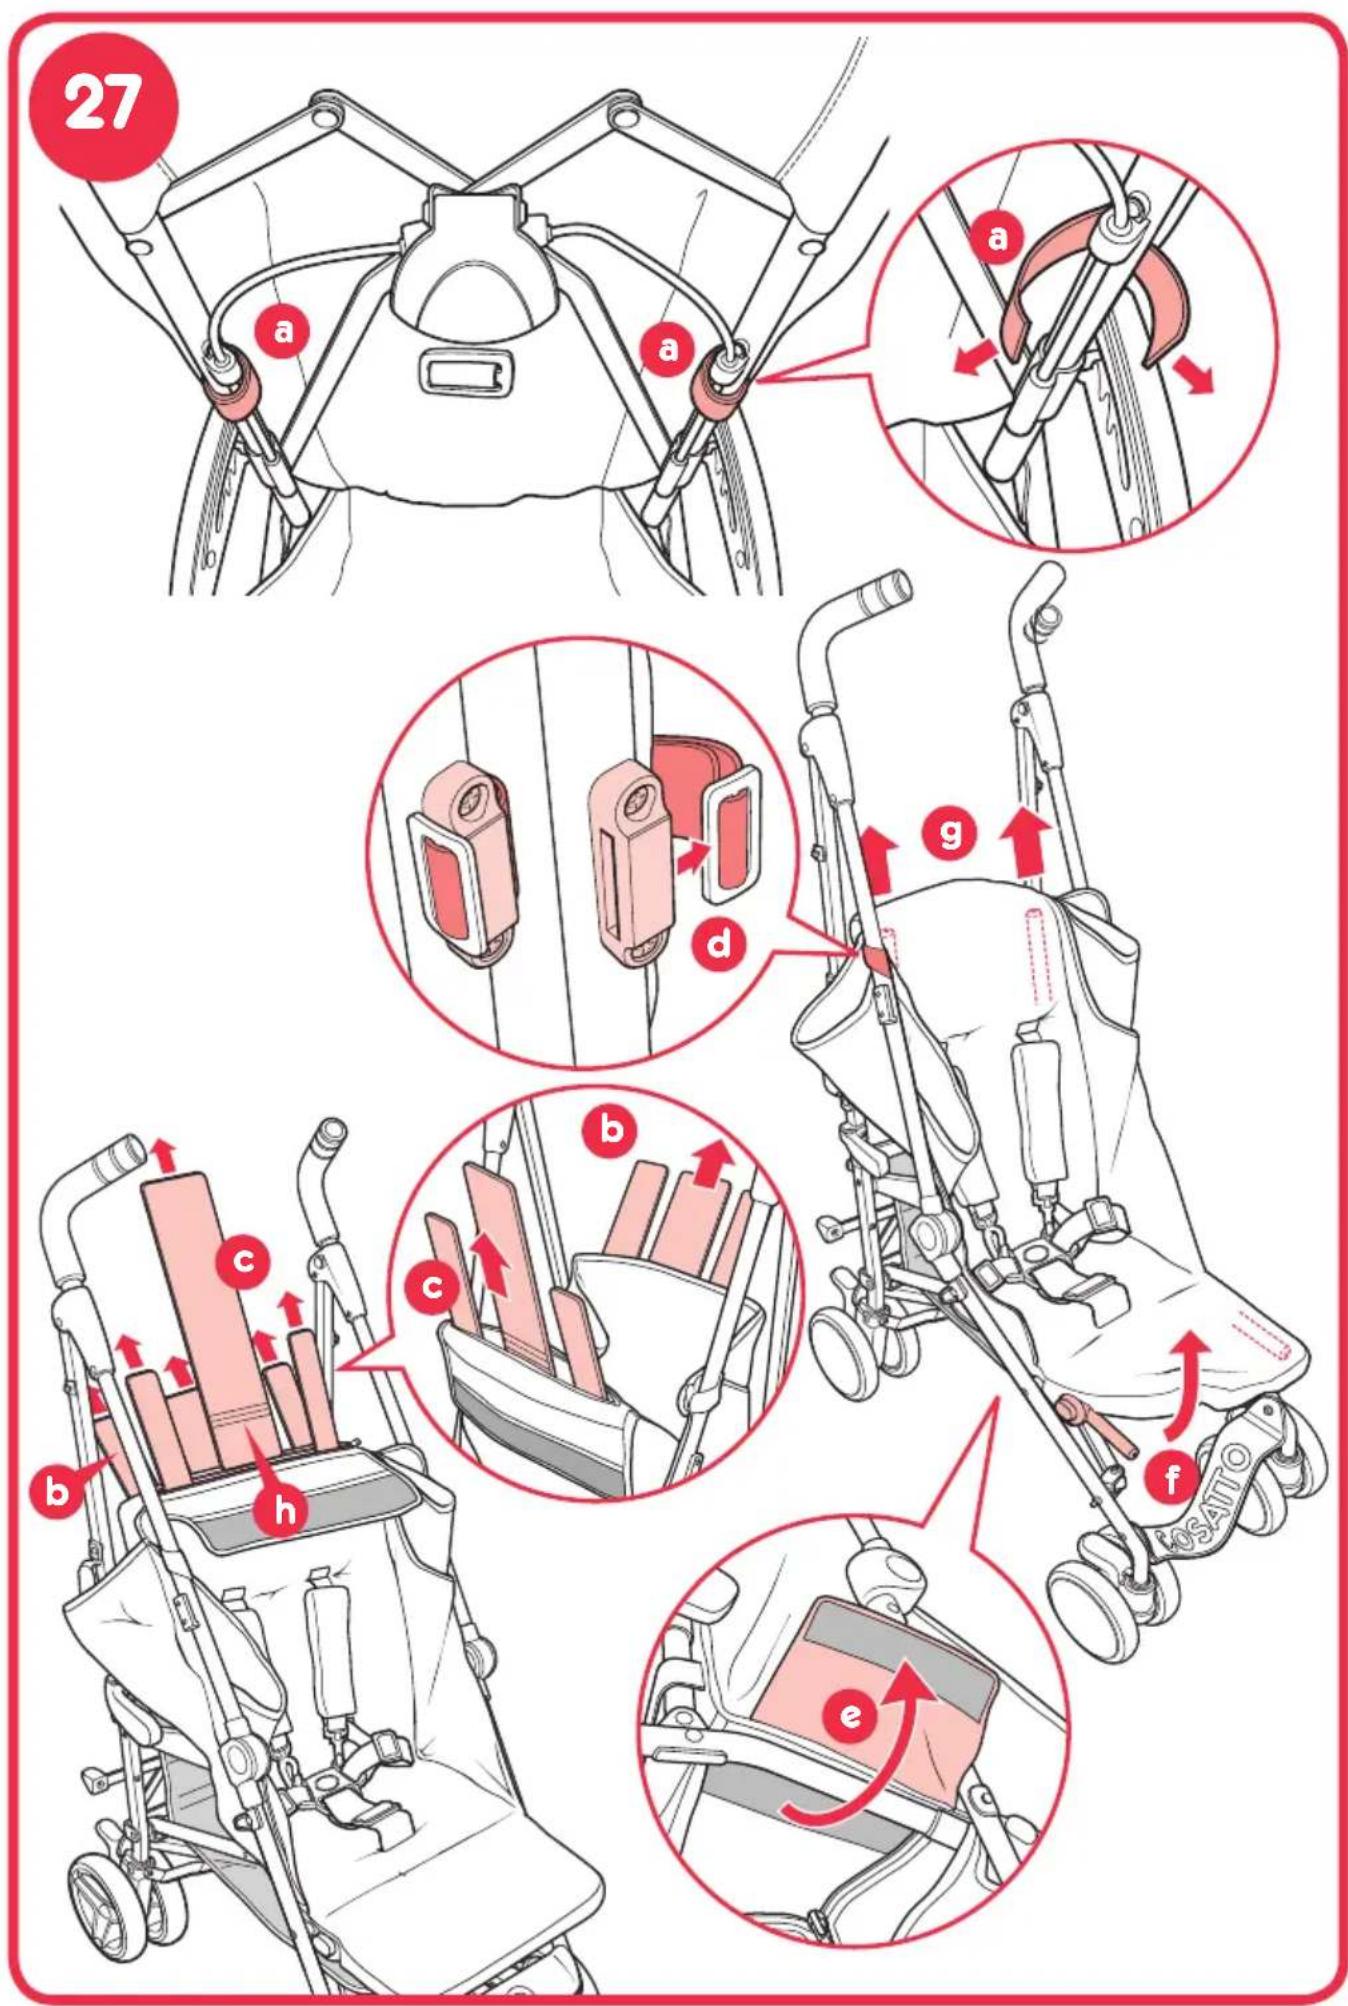
27 - removing the seat cover for cleaning
Secure attachment of the seat cover is critical to the safety performance of your pushchair.
Removing and re-fitting involves a series of fasteners as per instruction below – please follow this information carefully.
Tips:
- Having the pushchair semi-folded will release tension in the seat cover and make the fabric sections easier to remove
- When passing the buckle through the plastic slots, keep the curve of the buckle in line with the curve of the tubing and ease through the slot. If this is tight, use a blunt edge e.g. a coin or broad screwdriver blade to help.
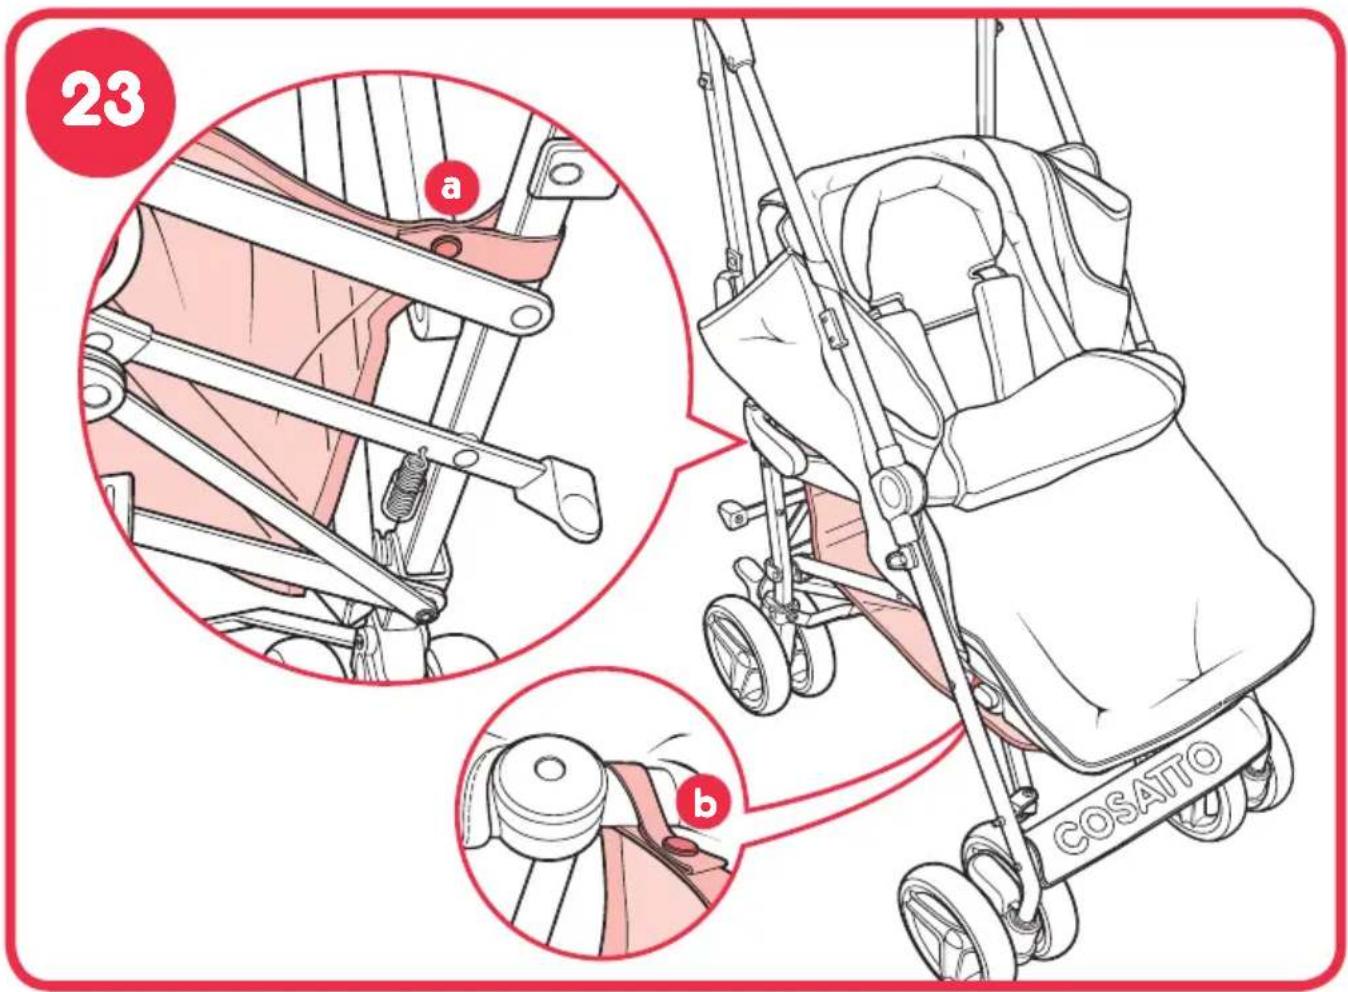
Behind the seat unfasten the fabric fasteners around the chassis tubes (a)
Unzip the top of the seat backrest and remove the three panels from inside (b).
Unzip the front of the fabric backrest and remove the three panels from inside (c).
Unclip the seat straps by folding the buckle flat and pushing it through the slot in the mounting block (d).
Unfasten the fabric fastener under the seat (e).
Slide the seat cover off the calf support legs (f).
Slide the seat cover off the backrest arms (g).
Reverse these steps to refit.
Please note that the middle panel for the fabric backrest must be inserted in the orientation as shown (h).
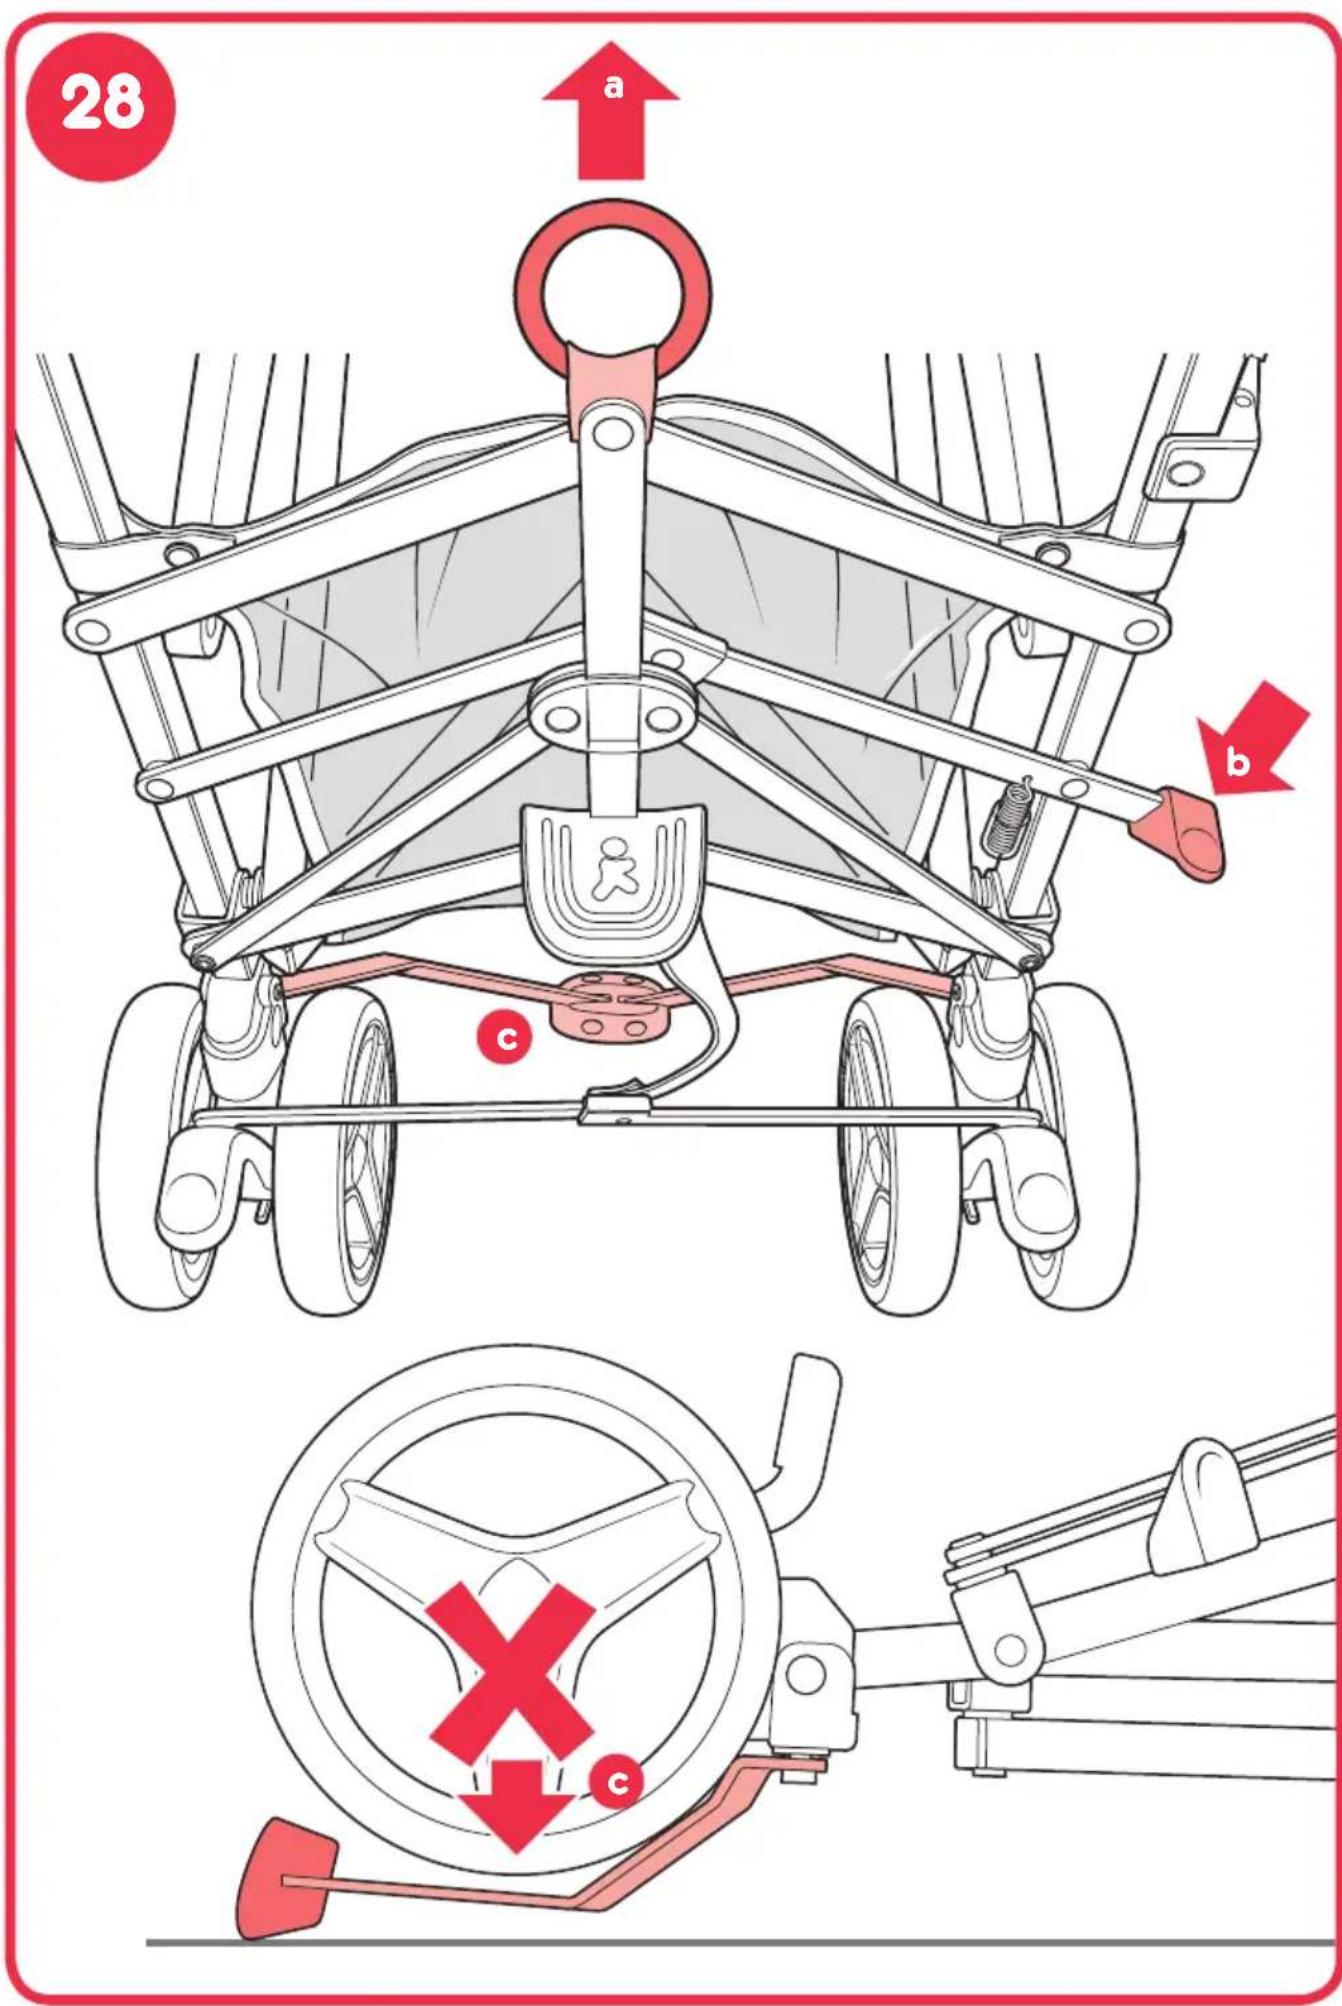
28 - folding the pushchair
Note: Before folding ensure the backrest is in the most upright position. Always remove the raincover and fold the hood completely back.
To fold your pushchair pull the handles (a) and at the same time pull down on the secondary lock (b).
Keeping the secondary lock pressed down, push the handles forward until the pushchair is folded in half. Continue until the pushchair is folded in half and the autocatch engages.
Note: Take care not to damage the stand mechanism when folding. Pressing down too hard on the pushchair can bend the stand arms (c).
Check the autocatch is securely engaged before lifting the pushchair.
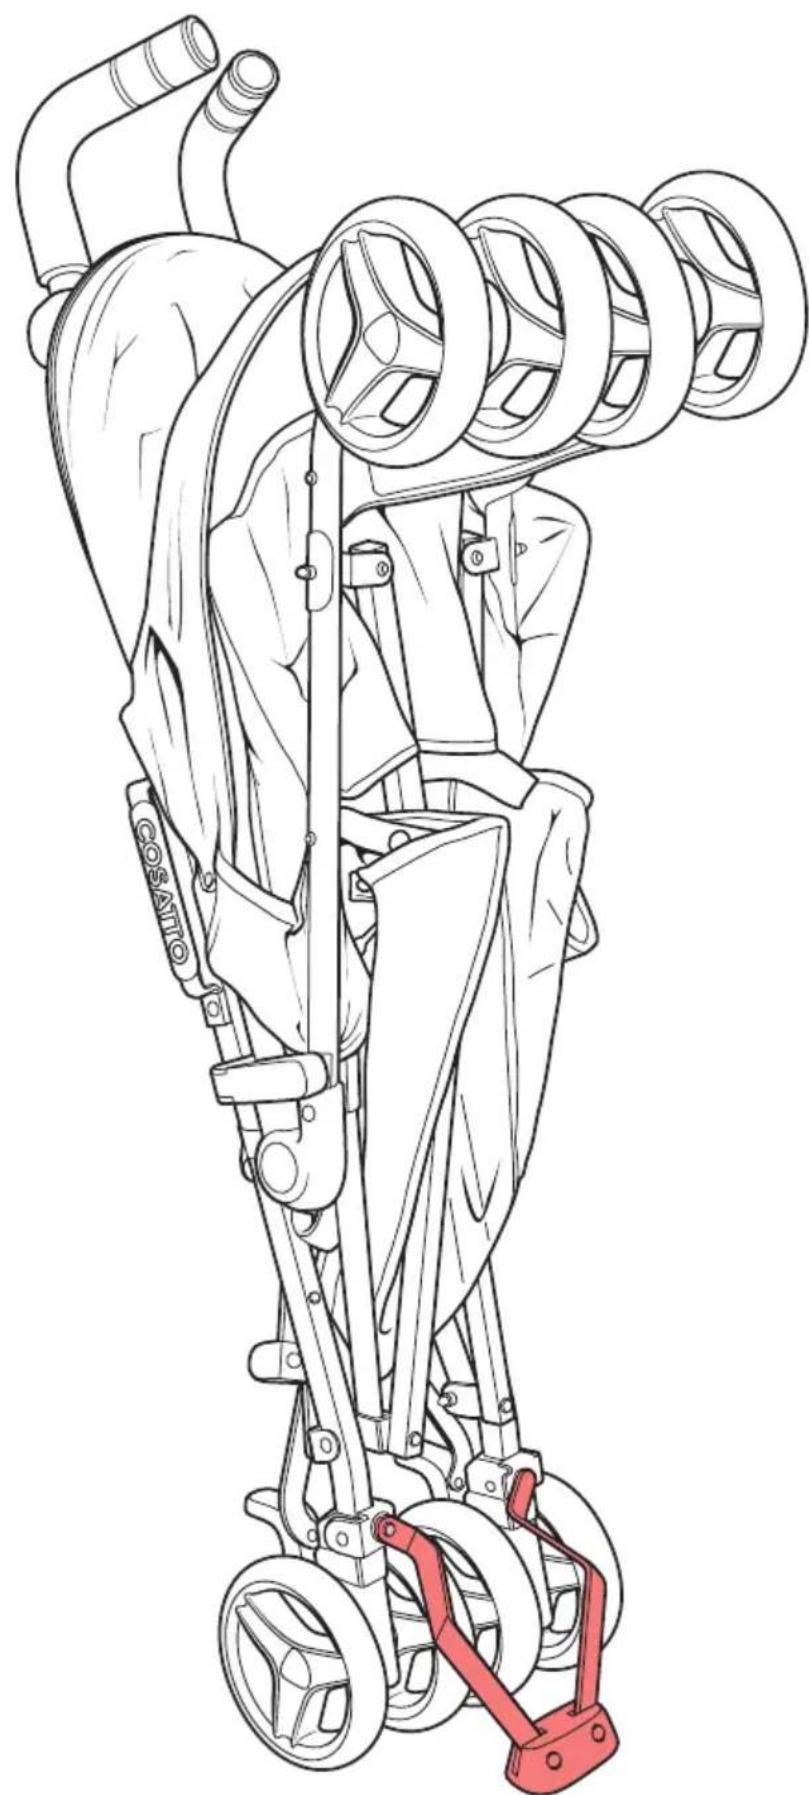
29 - using the pushchair stand
The stand automatically unfolds when the pushchair is closed.
Note: To avoid injury ensure that your child is kept away when the pushchair is used in free-standing mode.
Note: Any additional load attached to the pushchair will affect the stability of the pushchair.
care
Your pushchair has been designed to meet safety standards and with correct use and maintenance will give many years of trouble free performance.
The chassis is strong but will weaken should the back wheel be bumped down stairs or kerbs. Continual impact will cause damage.
If your child wears hard shoes these might damage the soft fabric.
Storing a damp pushchair will encourage mildew to form.
After exposure to damp conditions, dry off with a soft cloth, open fully and allow to dry thoroughly before storing.
Store your pushchair in a dry, safe place.
Do not leave the pushchair in sunlight for prolonged periods - some fabrics may fade.
maintenance
This pushchair requires regular maintenance by the user.
Cosatto products are designed to operate with minimum maintenance, however regular lubrication of moving parts will extend the life of your pushchair and make opening and folding easier.
Should parts of your pushchair become stiff or difficult to operate, apply a light application of a spray lubricant e.g. silicone. Do not use oil or grease.
Regularly inspect the locking devices, brakes, wheels, harness assembly, catches, seat adjusters, joints and fixtures to ensure they are secure and in full working order. They should be free to move at all times.
Brakes and wheels are subject to wear and should be replaced if necessary.
Your pushchair should be serviced and reconditioned before using it for a second baby, or after 18 months, whichever is the sooner.
cleaning
The hood may be cleaned by sponging lightly using warm water and a mild detergent.
Plastic and metal parts may be sponged clean with warm water and a mild detergent.
Never clean with abrasive, ammonia based, bleach based or spirit type cleaners.
For wash care instruction of the soft goods please refer to their respective wash care labels.
replacement parts
The replacement parts shown below are available for your product. In the event that you require any of these parts, please contact your local distributor. For the contact information for your local distributor please refer to http://www.cosatto.com/stockists
If you are a UK or Ireland customer, please contact us at spares@cosatto.com

16
natural_image
Line drawing of a stroller with wheels and seatbelt, showing no text or symbols
18
natural_image
Illustration of a hand pressing down on a pink mechanical component with a red arrow and green checkmark (no text or symbols)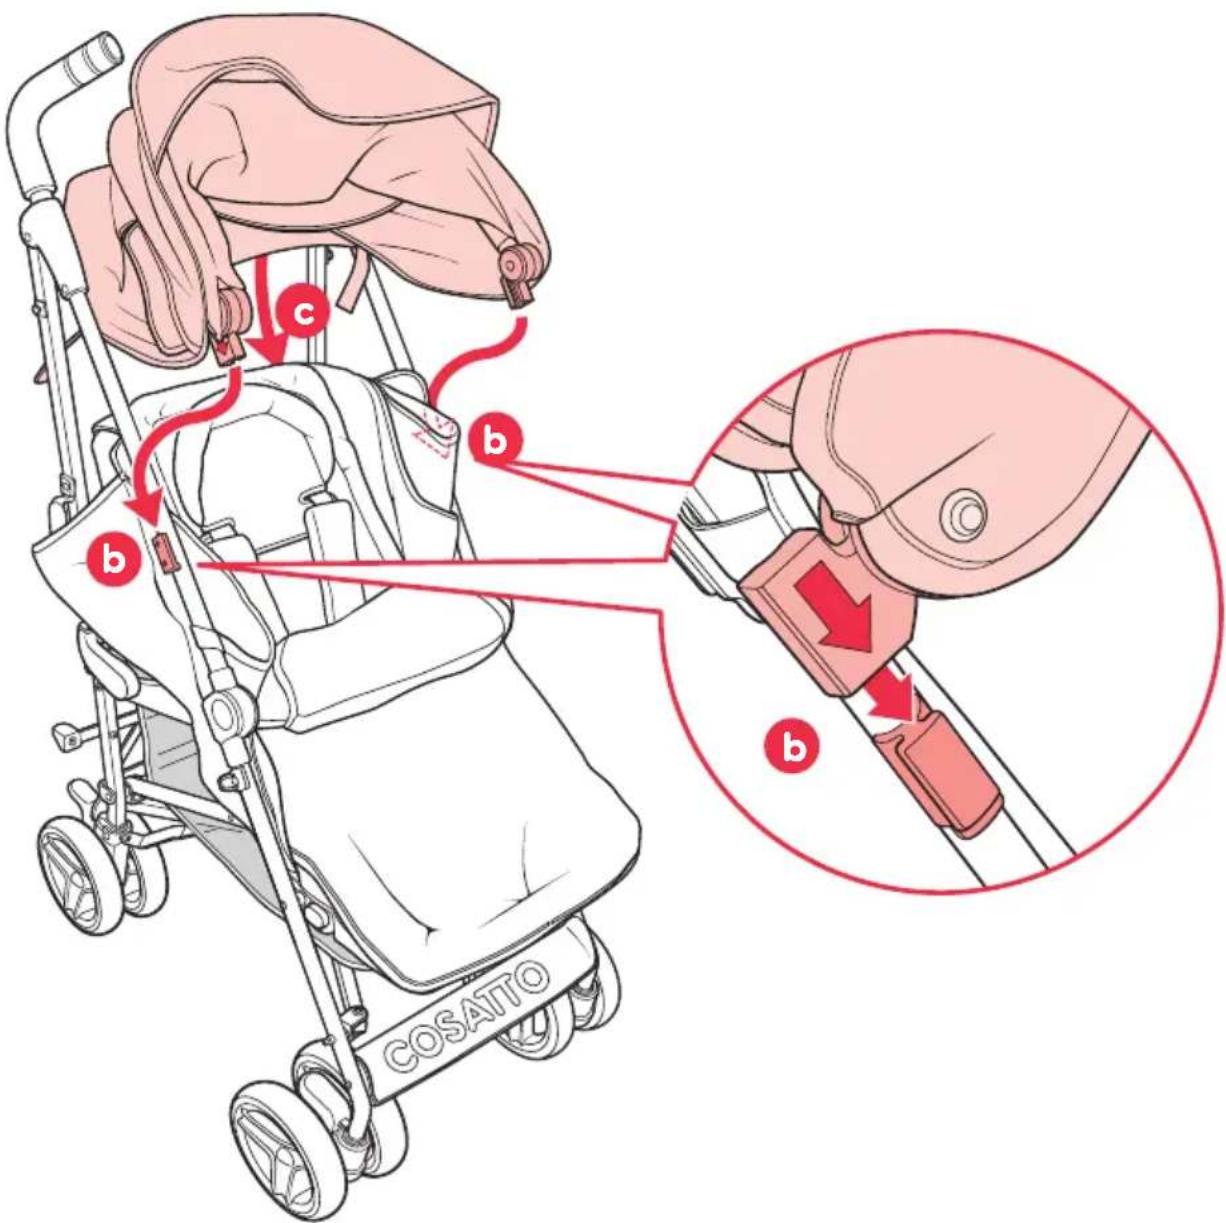
26
29
natural_image
Line drawing of a stroller with red and black components, no text or symbols presentwww.cosatto.com
Cosatto Ltd, Bentinck Mill, Bentinck Street, Farnworth, Bolton, BL4 7EP, England
UK FREEPHONE: 0800 014 9252* International T: +44 120 486 1007
Email: cuddle@cosatto.com
* Calls from BT landlines are free but calls from mobiles and other networks may vary
All the design and trademarks contained herein are the property of Cosatto Limited.
No part of this document may be reproduced without the permission of Cosatto Limited.