
Amphion - Electric bike Sparta - Free user manual and instructions
Find the device manual for free Amphion Sparta in PDF.
| Product type | Electric bicycle |
| Brand | Sparta |
| Model | Amphion |
| Category | Electric bicycle |
| Frame warranty | 10 years |
| Suspension fork warranty | 3 years |
| Warranty of other parts | 1 year (excluding normal wear) |
| Gear system | Derailleur or hub gear |
| Brake type | Backpedal brake, drum brakes, Rollerbrake, Cantilever-V brake, hydraulic brake |
| Lighting | Headlight and taillight (automatic or manual) |
| Tire pressure | Indicated on the tire (minimum and maximum or recommended) |
| Maintenance frequency | Monthly, semi-annually, annually |
| Cleaning | Liquid soap and warm water, do not use a high-pressure cleaner |
| Possible adjustments | Saddle height, saddle tilt, handlebar height and tilt, handlebar orientation |
| Lock | Use of a lock with additional cable |
| Frame number | Located under the bottom tube |
| Transporting children | Do not install a child seat on a maximum 10 kg or aluminum rear rack |
| Use on public roads | Observe traffic regulations, equipment compliant with standards |
Frequently Asked Questions - Amphion Sparta
User questions about Amphion Sparta
0 question about this device. Answer the ones you know or ask your own.
Ask a new question about this device
Download the instructions for your Electric bike in PDF format for free! Find your manual Amphion - Sparta and take your electronic device back in hand. On this page are published all the documents necessary for the use of your device. Amphion by Sparta.
USER MANUAL Amphion Sparta
1.1 About this booklet 29
2 Guarantee 30
2.1 Conditions 30
2.2 Guarantee period 30
2.3 No guarantee 30
2.4 Subject of the guarantee 30
3 Safety 31
3.1 Tips for safe cycling 31
3.2 Accident or fall 31
3.3 Transport of children 31
3.4 Parking the bicycle 32
3.4.1 Locks 32
3.4.2 Frame number 32
3.4.3 Handle bars lock 32
4 Settings 33
4.1 Torques 33
4.2 Saddle 33
4.2.1 Vertical 34
4.2.2 Horizontal 35
4.2.3 Direction 35
4.3 Saddle post with suspension 35
4.4 Handle bars 36
4.4.1 Fixed stem 37
4.4.2 Adjustable stem 38
4.4.3 Quick Release handle bars 39
4.5 Grips 40
5 Use 41
5.1 Gears 41
5.1.1 Gear ratio 41
5.1.2 Derailleur gears 42
5.1.3 Hub gears 43
5.2 Brakes 43
5.2.1 Back pedal brake 43
5.2.2 Drum brakes 43
5.2.3 Roller brake 43
5.2.4 Cantilever-V brake 44
5.2.5 Hydraulic brake 44
5.3 Lights 44
5.3.1 Headlamp 44
5.3.2 Automatic rear lamp 46
5.3.3 Batteries 47
5.3.4 Switch the dynamo on and off 48
5.3.5 Adjust the dynamo 48
5.3.6 Hub dynamo 49
5.3.7 Adjust the headlamp. 49
6 Maintenance. 50
6.1 Frequency 50
6.1.1 Monthly. 50
6.1.2 Every six months 50
6.1.3 Annually. 50
6.2 Tyre pressure 51
6.3 Lubricate the chain 51
6.4 Clean 51
1 Preface
1.1 About this booklet
This booklet will make you familiar with the most important parts of the bicycle. Besides, it contains instructions for carrying out some simple maintenance activities. For matters that need skill, you will be referred to the Sparta dealer.

Special points of interest have been marked with this icon.
Carry out the operations as described. With this you will avoid personal injury or damage to the bicycle.
2 Guarantee
The following guarantee conditions supplement the legal rights.
2.1 Conditions
Sparta will provide guarantee for any material or construction faults of your bicycle if the following conditions are met:
- You only have a right to the guarantee if you can provide a certificate of guarantee or a receipt.
Only the first owner is entitled to the guarantee. The guarantee is not transferable.
2.2 Guarantee period
Sparta gives guarantee for a period of 10 years concerning the frame + fixed fork and for 3 years for a front fork with suspension. A guarantee period of 1 year will be applicable to the other parts, insofar they are not subject to normal wear.
2.3 No guarantee
No guarantee will be given in the following situations:
- The bicycle has used improperly or carelessly.
The bicycle has been damaged by an accident or a fall. - The damage is caused by normal wear (parts such as tyres, chain, cables and brake pads).
The bicycle has not been maintained as indicated in this booklet (which has resulted in corrosion). -
Repairs have been carried out incompetently or not by a Sparta dealer.
Non-original parts have been used for repair. -
Parts have been mounted incorrectly.
The construction has been modified. - The bicycle has been used for rent.
2.4 Subject of the guarantee
Only defective parts which the Sparta dealer sends to Sparta B.V. for assessment.
Compensation of personal injury or damage to other goods than (original parts of) the Sparta bicycle is excluded, insofar legally allowed.
The labour costs for dismounting and mounting the bicycle are not included in the guarantee and will be at the expense of the owner.
- Transport costs of the bicycle and/or parts from and to Sparta B.V. are at the expense of the owner.
3 Safety
3.1 Tips for safe cycling
On public roads
Adhere to the traffic rules.
Make sure that the equipment of your bicycle complies with the legal minimum requirements.
In the mountains
Timely change down to a lower gear before you start climbing a slope.
- If the bicycle has drum brakes, alternately brake with the front and with the rear wheel when going down. This avoids overheating of the brakes.
Under poor weather conditions
- Keep in mind that the braking distance can be up to 40% longer on a wet road surface.
Lights
- Regularly check the operation of the lights.
3.2 Accident or fall
Have the bicycle checked after an accident or fall, even if there is no visible damage.
3.3 Transport of children
Never mount child's saddles on a luggage carrier with a maximum allowed weight of 10kg or on a luggage carrier or handle bars made of aluminium.

Make sure that dress guards (A) have been mounted.
- Cover the saddle spring (A).
3.4 Parking the bicycle
Use one or more good locks as recommended.
Take out an insurance for the bicycle.
- Have your bicycle registered. A clearly visible registration on your bicycle often has a preventive effect.
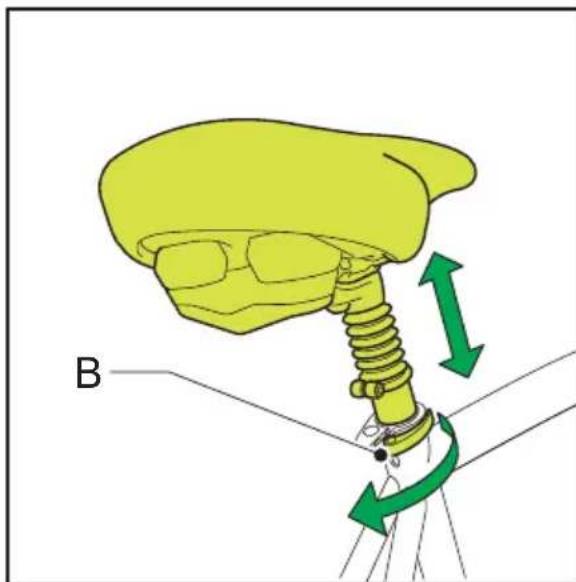
3.4.1 Locks
A lock can be combined with an extra cable in the following way:
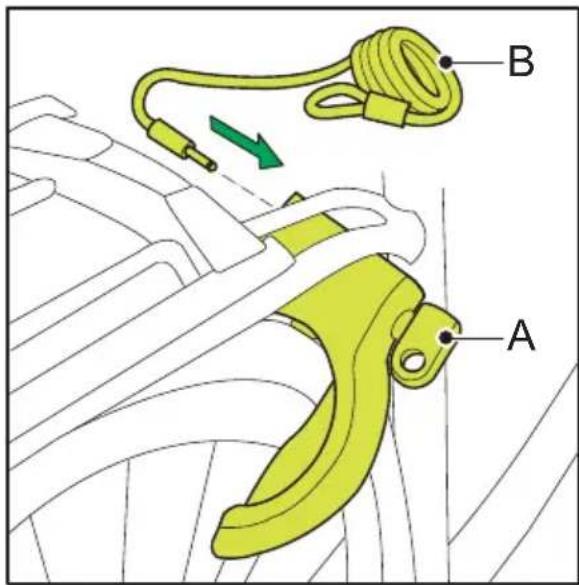
Fasten
- First lock the bicycle and take the key (A) from the lock.
- Put the cable (B) around a tree, fence or otherwise.
- Now snap the cable into the lock.

Preferably fasten the cable to the frame and to the wheels, especially when the bicycle has dropout hubs.
Loosen
- Open the lock.
- Turn the key (A) a bit and take the cable (B) from the lock.
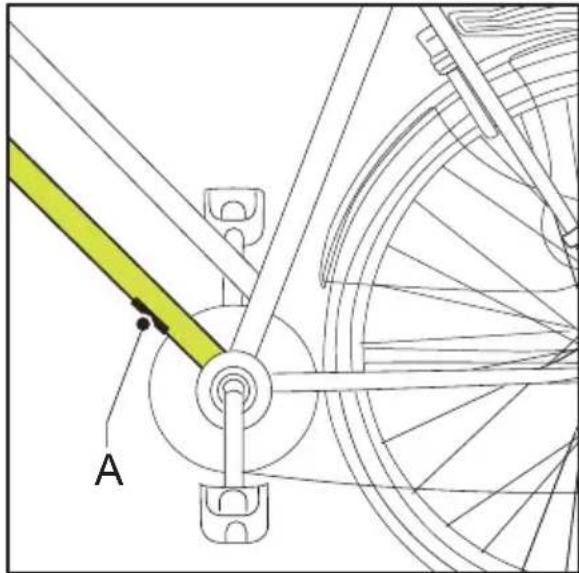
3.4.2 Frame number
The frame number is on the bottom side of the bottom tube (A). Write this number down on the guarantee card.
3.4.3 Handle bars lock
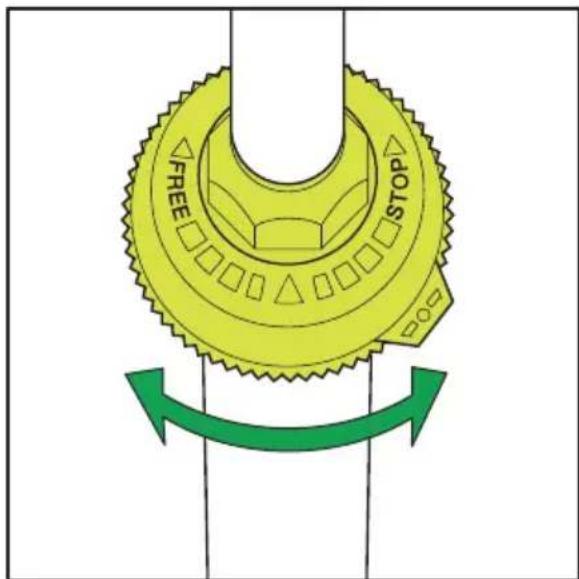
Some bicycles have a Shimano handle bars lock that secures the handle bars in a fixed parking position.
4 Settings
The riding comfort is mainly determined by the position of the saddle and the handle bars.
4.1 Torques
Apply the following torques when fastening the parts:
Part Torque [Nm]
Expander bolt 12-15
Nut for saddle 12 - 20 post bolt
Headset nut 15-20
Dynamo 8-12
Hub nuts front 20-27 wheels
Hub nuts rear 20 - 27 wheels
Handle bars
Grip 20 - 27
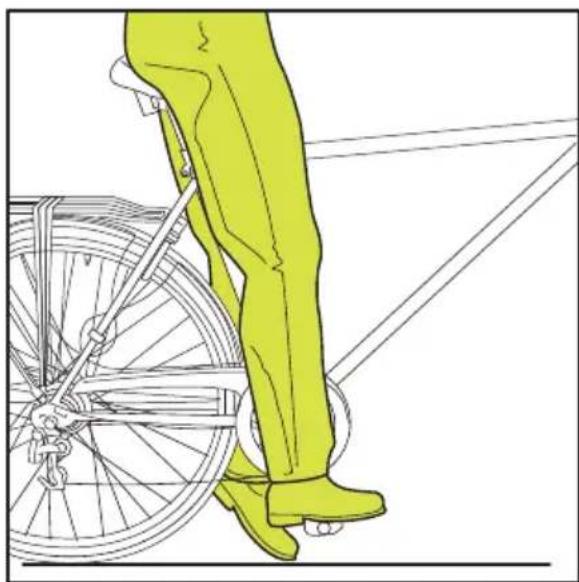
4.2 Saddle
A guideline for a good position is the following: sitting on the saddle you can
- rest your heel on the pedal when it is in the lowest position;
- touch the ground with the tip of your shoe.
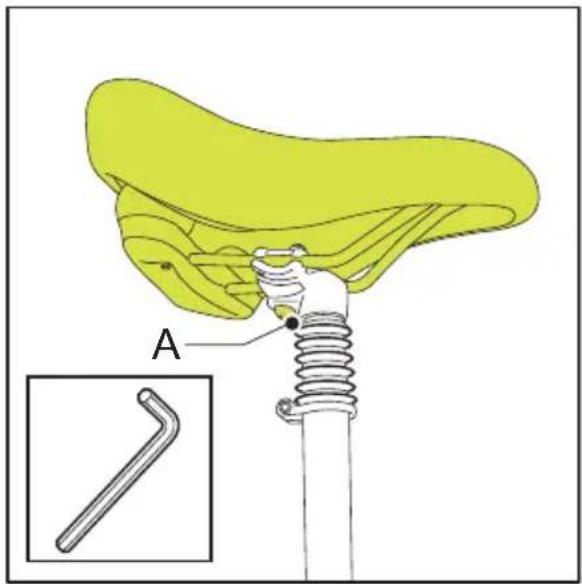
4.2.1 Vertical
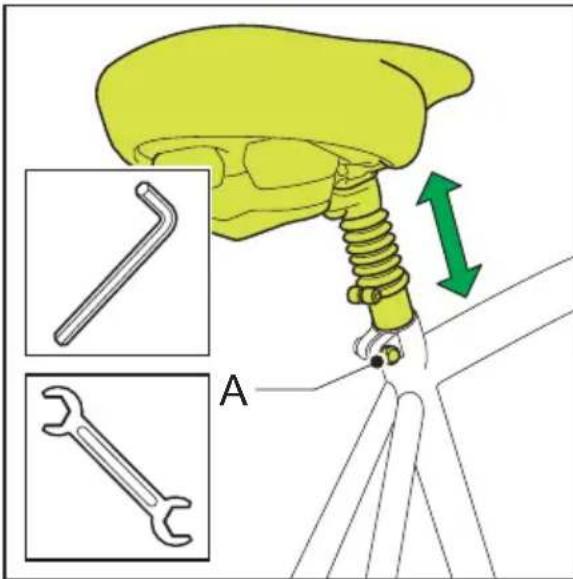
The saddle post must be inserted into the frame such, that the safety mark is not visible.
- Loosen the socket screw (A) or unlock the quick release (B).
- Position the saddle at the required height.
- Tighten the socket screw (A) or lock the quick release (B).
4.2.2 Horizontal

- Loosen the screw (A) or the lock nut (B).
- Put the saddle in the required position (forwards, backwards, tilt).
- Tighten the screw or the lock nut.
4.2.3 Direction
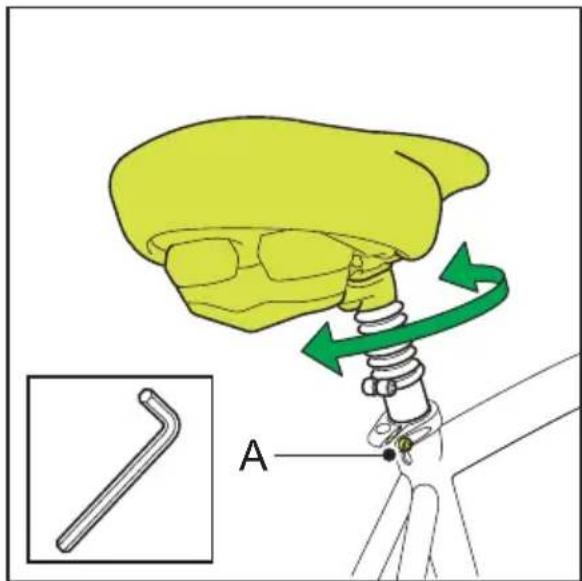
- Loosen the socket screw (A).
- Turn the saddle (to the left, right).
- Tighten the socket screw.
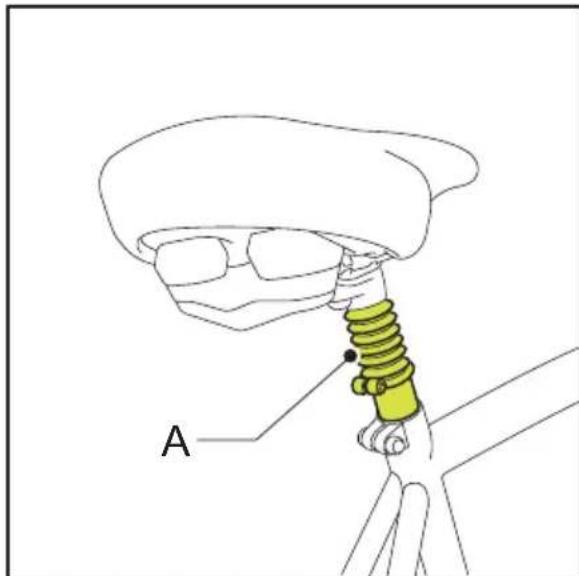
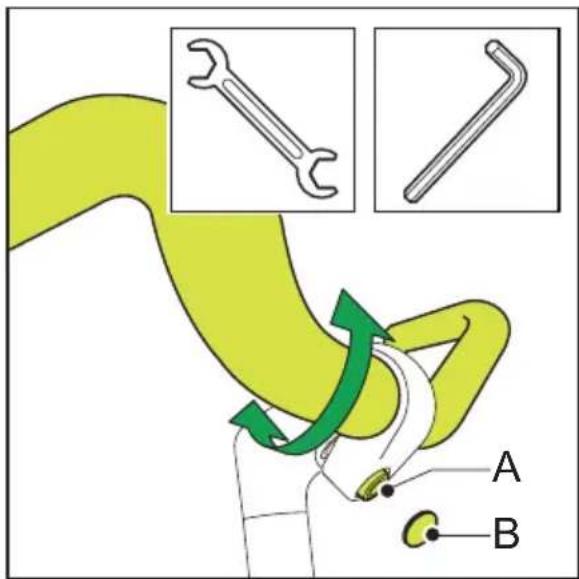
4.3 Saddle post with suspension
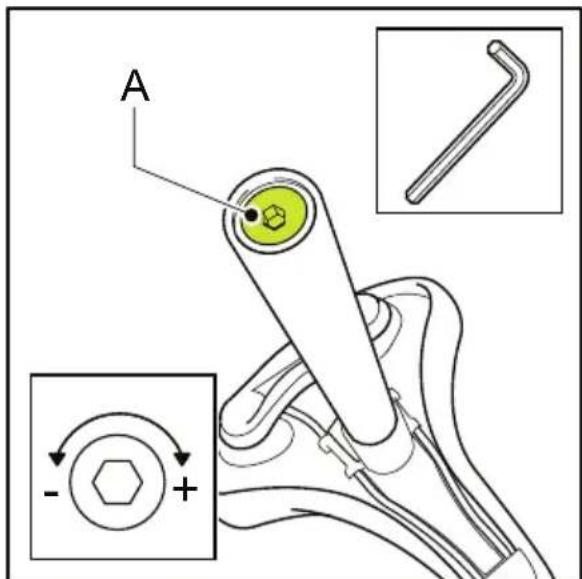
- Completely remove the saddle post from the tube.
-
Adjust the saddle post (A) using a socket head wrench:
-
turn clockwise to increase the tension;
-
turn counterclockwise to decrease the tension.
-
Re-insert the saddle post into the tube.
4.4 Handle bars
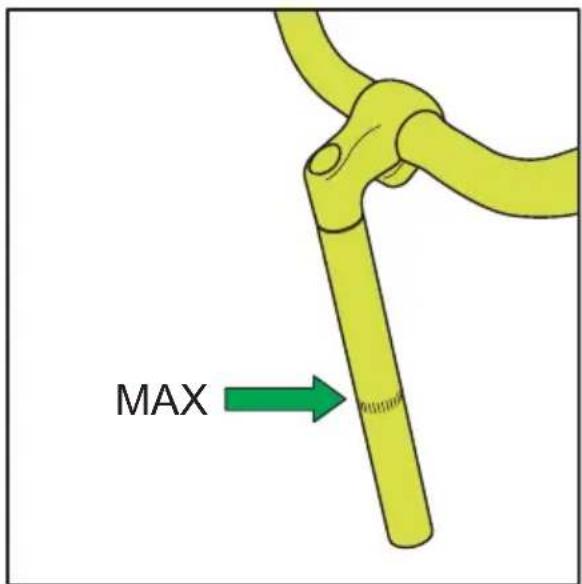
The stem must be inserted into the frame such, that the safety mark is not visible.
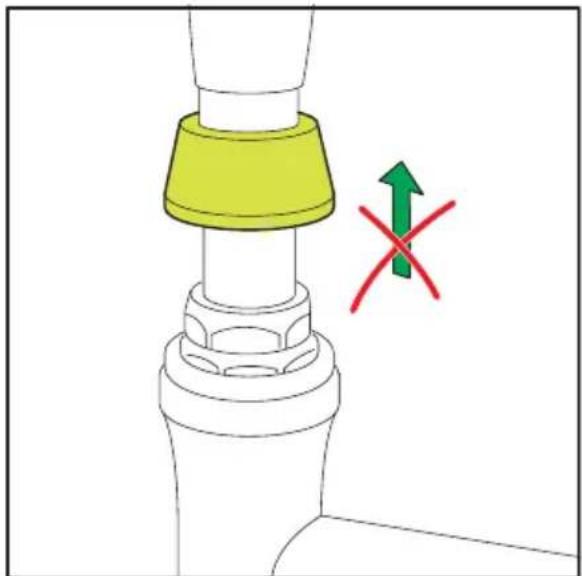

NEVER set the height of the stem by turning the headset nut.
- Some models have been provided with a stem that can be used to set the position of the handle bars. The position is usually indicated by a degree indicator on the front part of the handle bars.
- The bend in the handle bars can be adjusted with practically all models. This makes the grips point more upwards or downwards.
- Some models have multi-position handle bars. With this type of handle bars you can change your position during the trip.

Keep in mind that various functions, such as the brake grips and gear, cannot be operated optimally in every position.
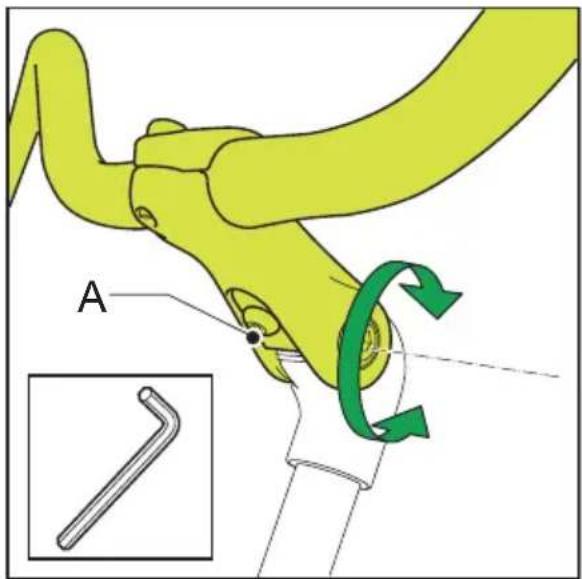
4.4.1 Fixed stem Handle bars height
- Loosen the expander bolt (A) above the handle bars about four turns.
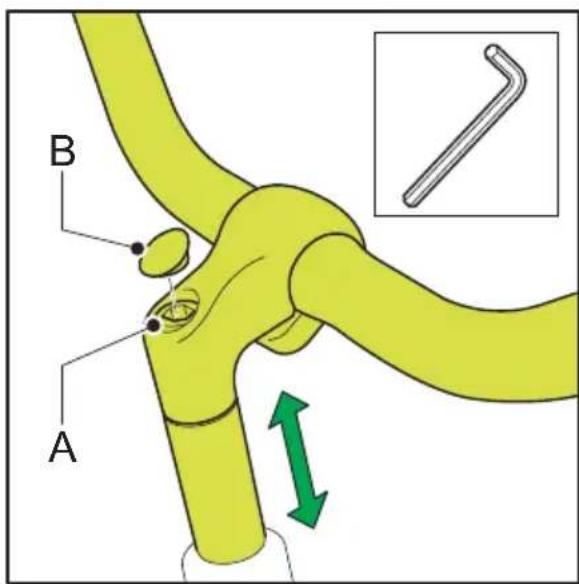
Sometimes the expander bolt (A) has a plastic cap (B). Remove this cap using a screwdriver.
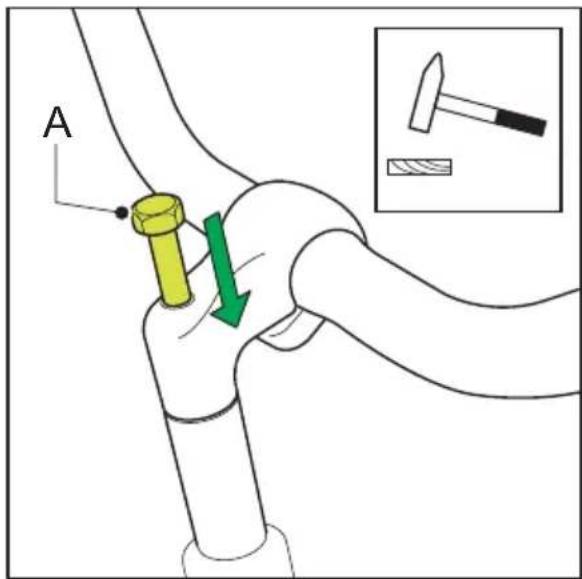
- Carefully tap down the expander bolt (A) using a plastic or wooden hammer until the bolt is loose.
- Put the handle bars into the required position by turning them left and right.
- Tighten the expander bolt (A) and place back the cap.
Check if the handle bars are perpendicular to the front wheel.
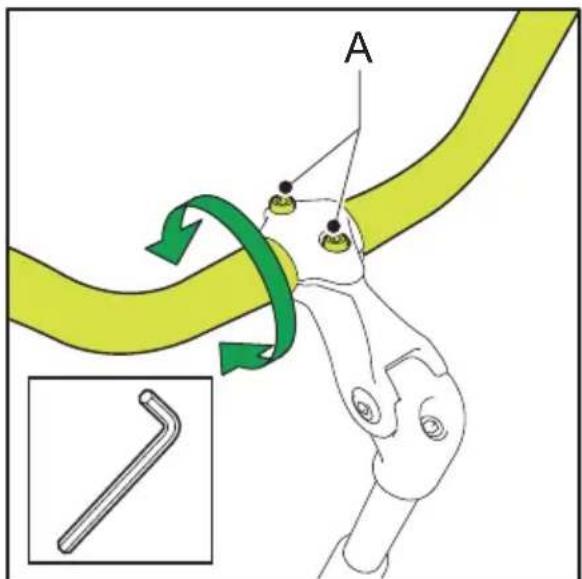
Bend in the handle bars
- Loosen bolt (A) in the front part of the handle bars. If necessary, first remove the cap (B).
- Tilt the bend in the handle bars to the required angle.
- Tighten bolt (A) and put back the cap (B).
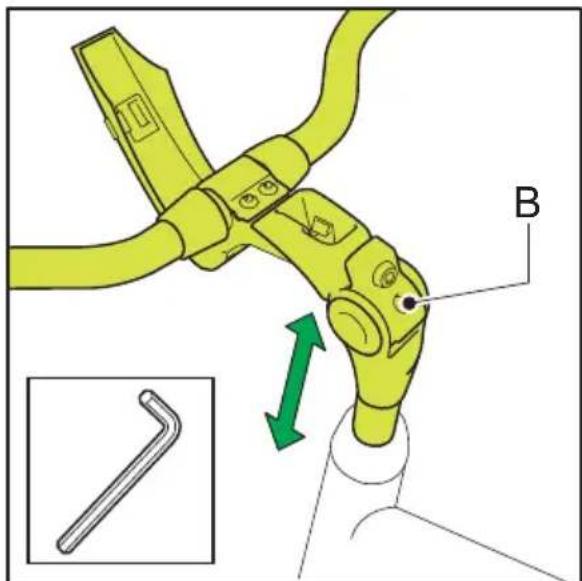
4.4.2 Adjustable stem Handle bars height
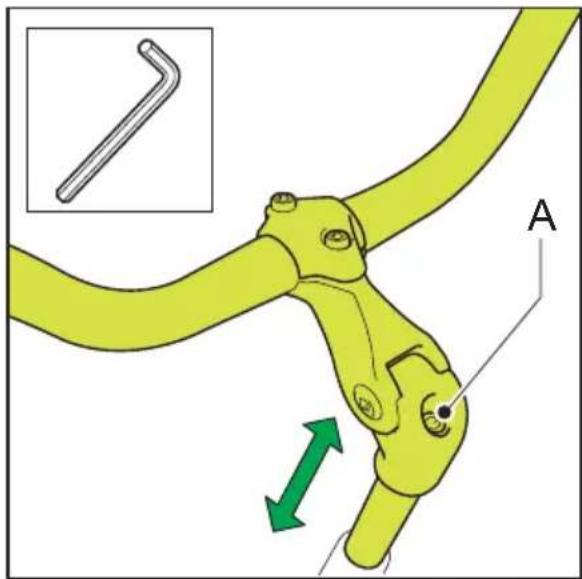
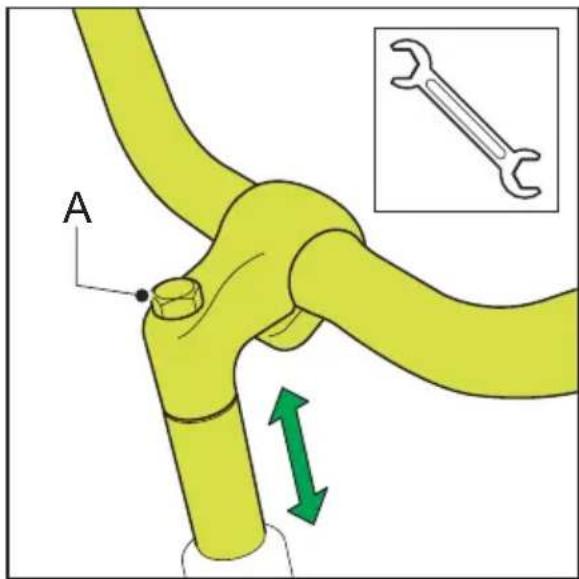
- Loosen the socket screw (A) on top of the handle bars.
- Put the handle bars into the required position by turning them left and right.
- Tighten the socket screw (A).
Make sure that the stem is inserted far enough into the frame tube.
Check if the handle bars are perpendicular to the front wheel.
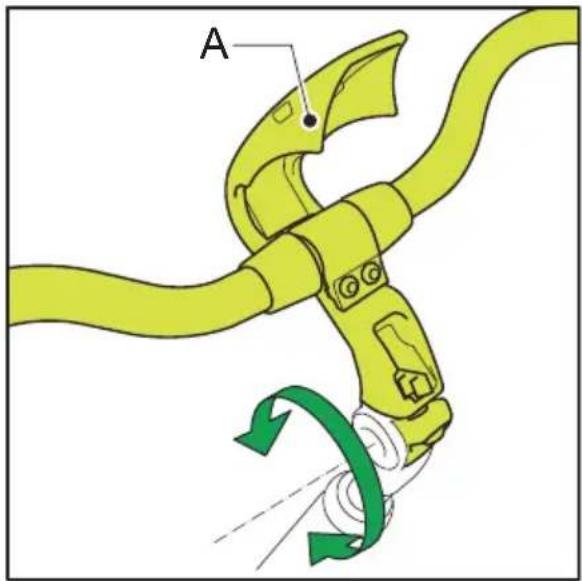
Front part of the handle bars
- Loosen the bolt (A).
- Tilt the front part of the handle bars to the required angle.
- Tighten the bolt (A).
Bend in the handle bars
- Loosen the bolts (A). If necessary, first remove the cap.
- Tilt the bend in the handle bars to the required angle.
- Tighten the bolt (A) and put back the cap.
4.4.3 Quick Release handle bars Handle bars height

- Pull the clamp (A) backwards.
- Loosen the socket screw (B).
- Put the handle bars into the required position by turning them left and right.
- Tighten the socket screw (B).
- Push back clamp (A) into its place.

Make sure that the stem is inserted far enough into the frame tube.
Front part of the handle bars
- Pull the clamp (A) backwards.
- Tilt the front part of the handle bars to the required position.
- The front part of the handle bars is fixed again by folding back the clamp.
Bend in the handle bars
- Pull the clamp (A) backwards.
- Tilt the bend in the handle bars to the required position.
- The bend in the handle bars is fixed again by folding back the clamp.
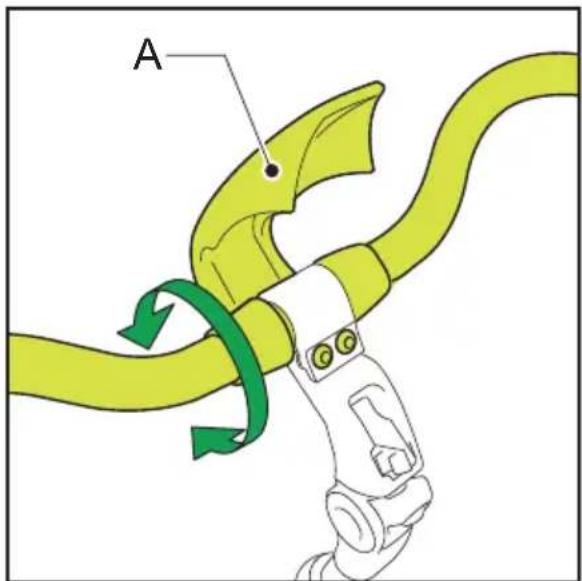
4.5 Grips
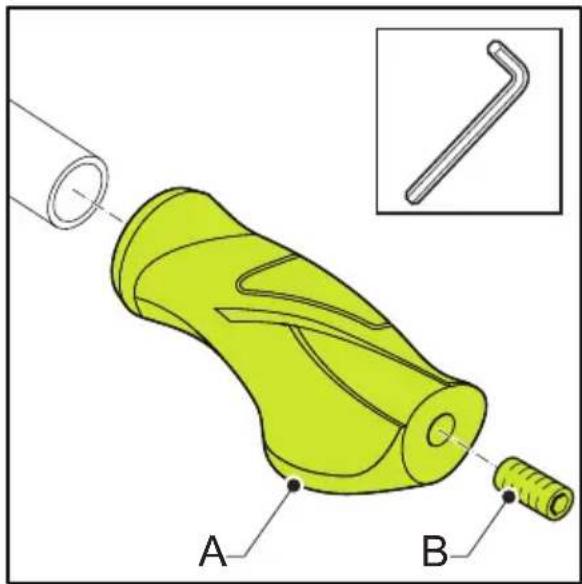
- Slide the grip (A) over the handle bars tube and turn it to the required angle.
- Tighten the socket screw (B) to fix the grip.
Never unscrew the socket screw (B) from the grip.
5 Use
5.1 Gears
The bicycle can be equipped with one of the types of gears mentioned below:
- Derailleur gear.
Hub gear.
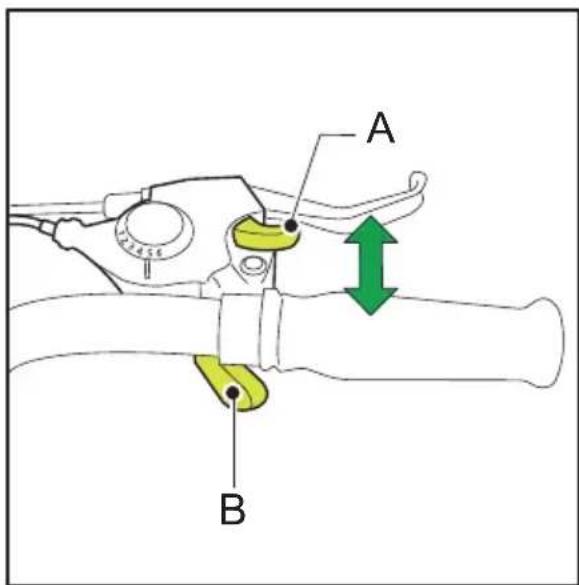
Operation:
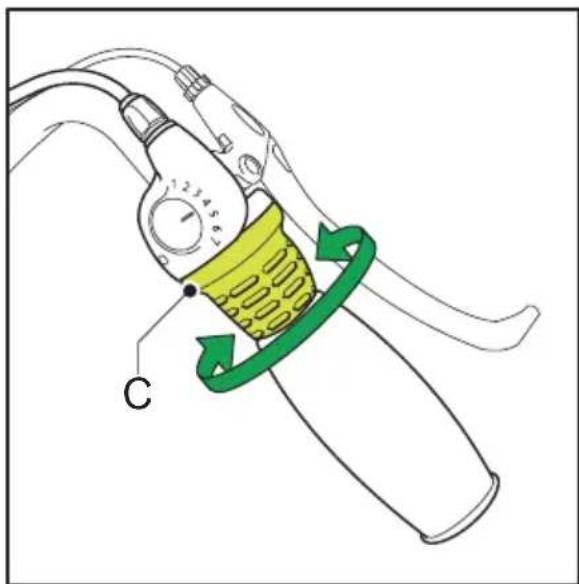
- Click switch (A & B)
- Twist grip shifter (C).
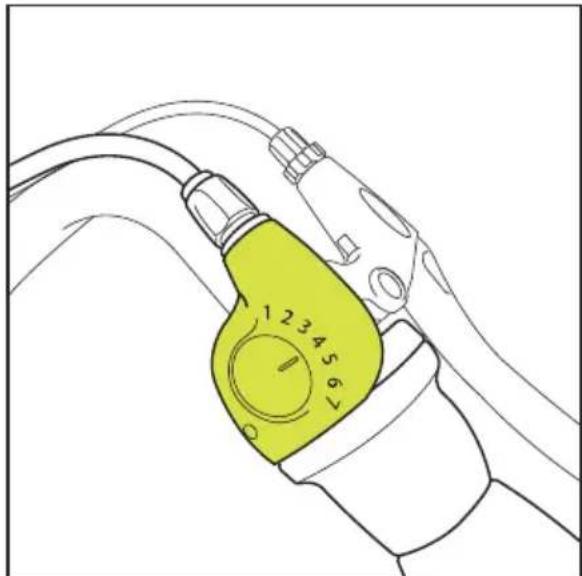
5.1.1 Gear ratio
The (lowest) figure 1 corresponds with the lowest gear ratio.
The highest figure (3, 7 or 8) corresponds with the highest gear ratio.
Shifting with a derailleur gear works as follows:
- Keep pedalling with a light pressure.
- Select another gear with the click switch(es).
difficult.
The requirement of the light pressure implies that shifting while climbing a slope is

The left handle bars switch operates the front derailleur; the right handle bars switch the rear derailleur.

Do not pedal in reverse while shifting.
The chain may end up on an undesired sprocket and block the gear.

Some shifting combinations are not advisable in connection with untimely wear; try to keep the chain parallel to the bicycle as much as possible.
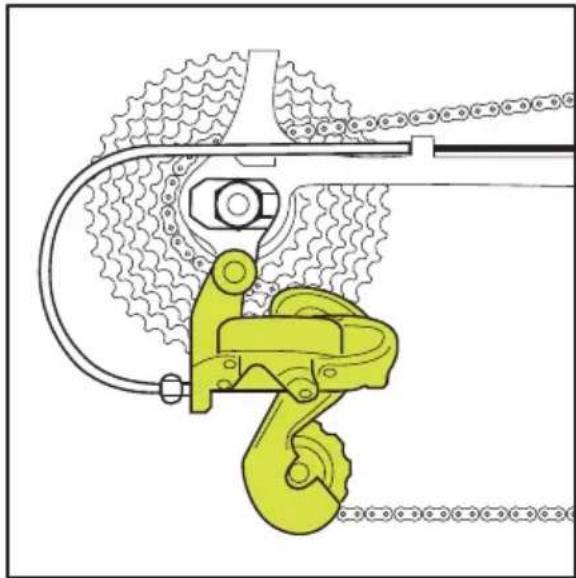
5.1.3 Hub gears
With a hub gear you can shift while pedalling, as well as when freewheeling or standing still. If the gear does not engage immediately, it is recommended to briefly interrupt the pedalling.
5.2 Brakes
5.2.1 Back pedal brake
The working principle of the back pedal brake is simple: pedalling backwards brakes the rear wheel. When going down, alternately apply the brakes to the front and the rear wheel. This prevents overheating. Brake less strongly on the front wheel.
5.2.2 Drum brakes
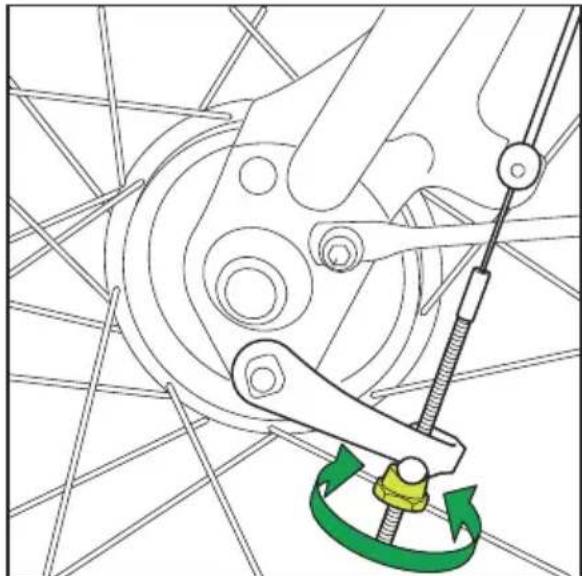
Adjust the brake using nipple (A). Tightening results in a tighter brake.
5.2.3 Roller brake
The roller brake has been provided with a braking power limit for extra safety. Adjust the limiter using the adjustment nipple (A) at the cable or the adjustment nipple at the brake lever.
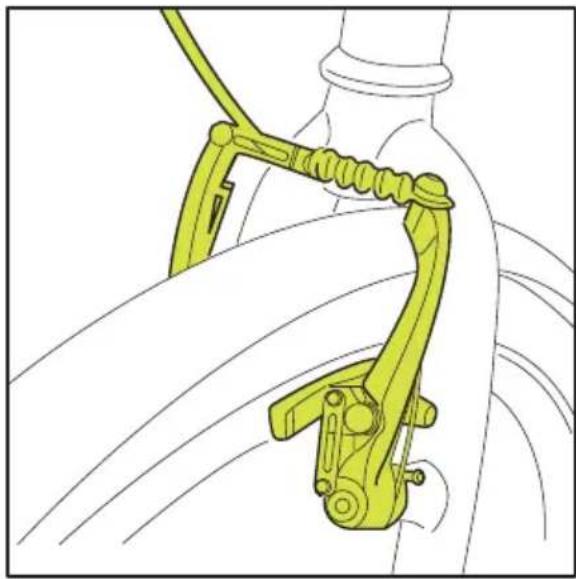
5.2.4 Cantilever-V brake
The brake calipers have been fastened onto the front and/or rear fork. Brake less strongly on the front wheel.
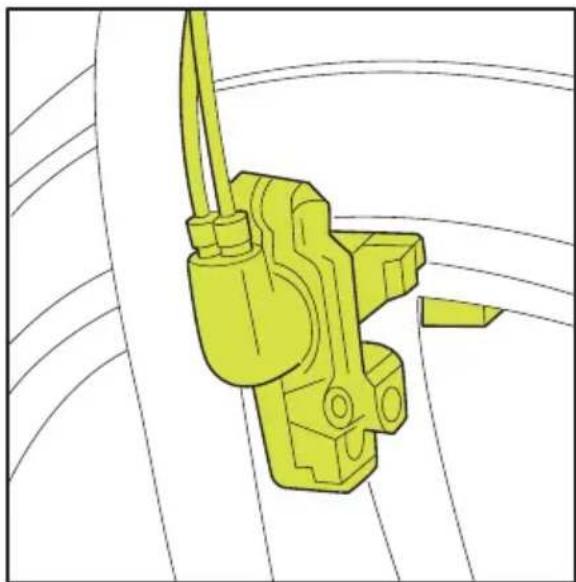
5.2.5 Hydraulic brake
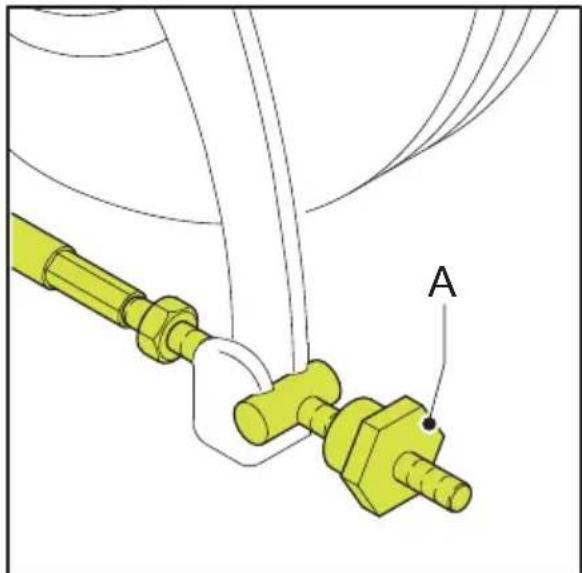
Sparta bicycles with hydraulic brakes have been provided with a brake tensioner. This allows for quickly changing a wheel.
5.3 Lights
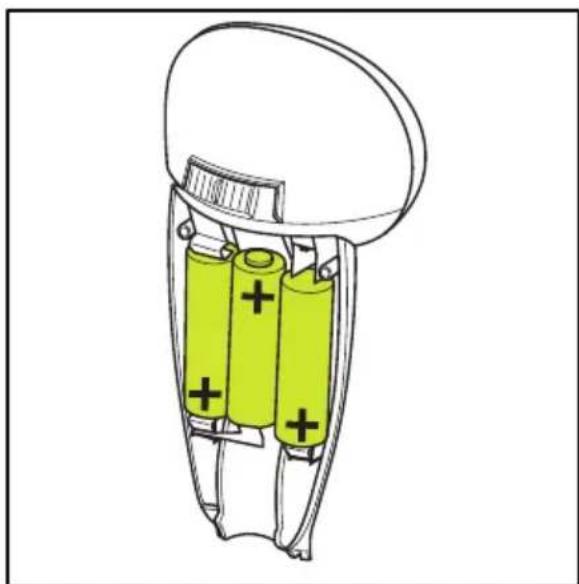
Headlamp (incandescent lamp, halogen lamp or LED).
- Rear lamp (incandescent lamp, halogen lamp or LED).
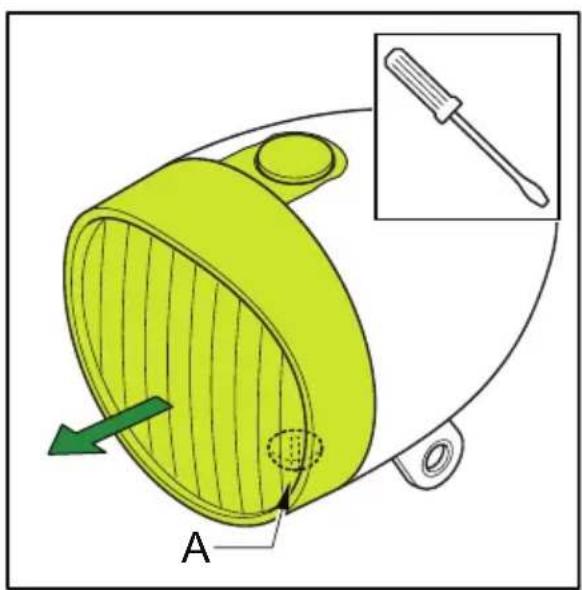
5.3.1 Headlamp
Type 1
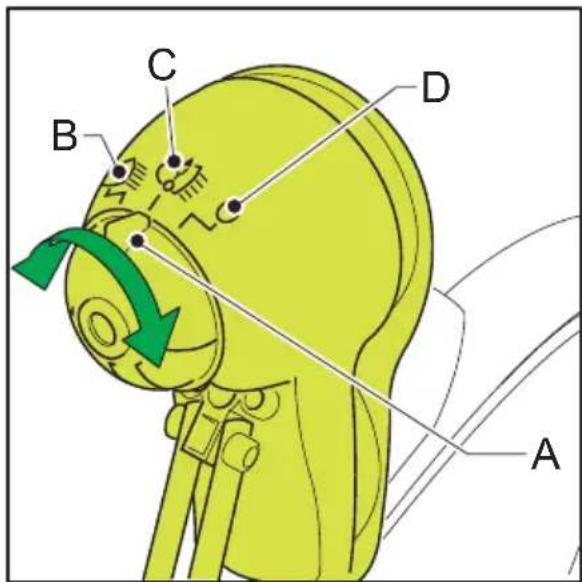
Turn the switch (A) to the required position:
- B: on
- C: automatic.
- D:off
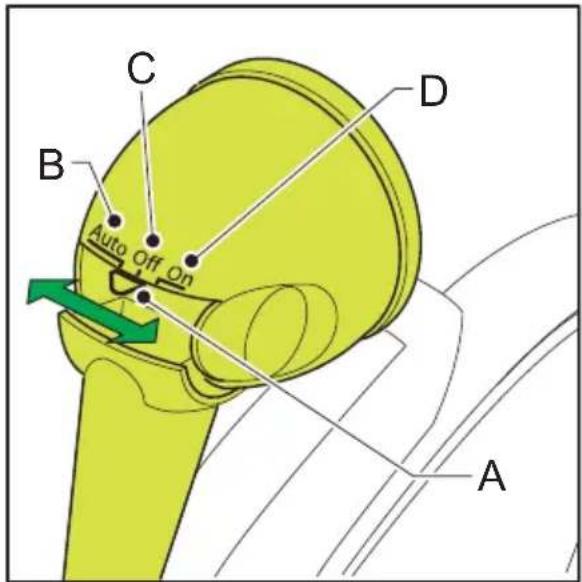
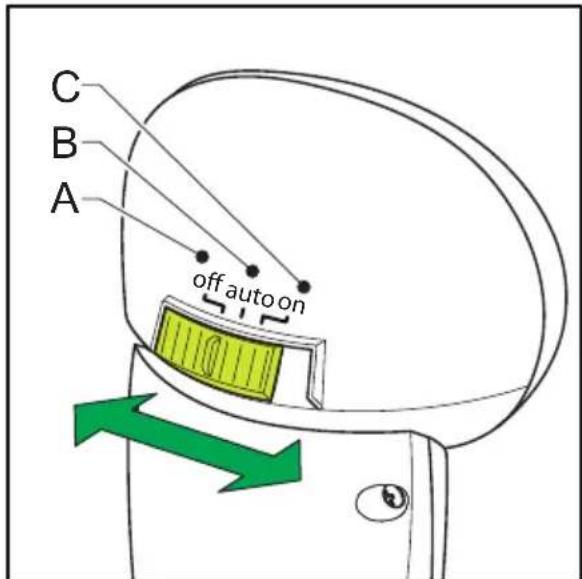
Type 2
Slide switch (A) to the required position:
- B: automatic.
- C:off.
- D: on.
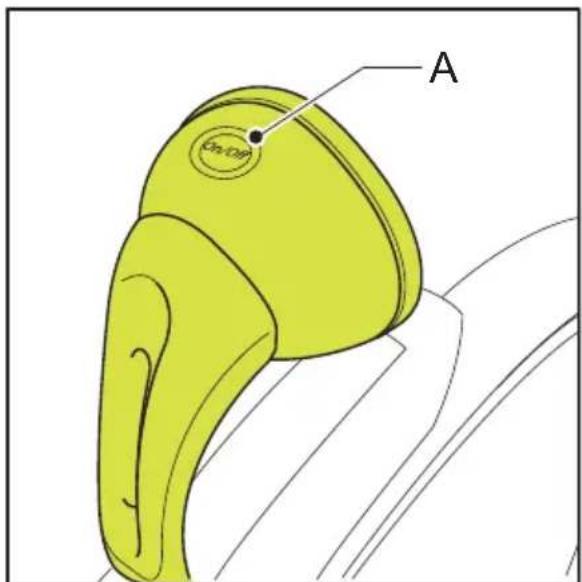
Type 3
Press the button (A) to switch the lamp on or off.
Type 4
Slide the switch to the required position:
-A:off
- B: automatic.
C:on
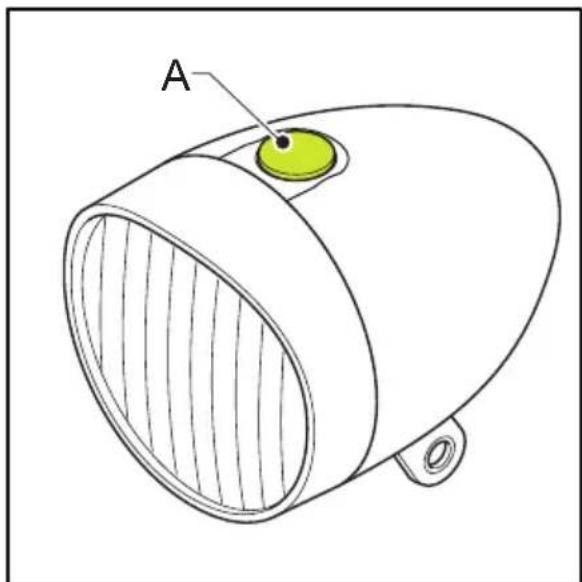
Type 5
Press the button (A) to switch the lamp on or off.
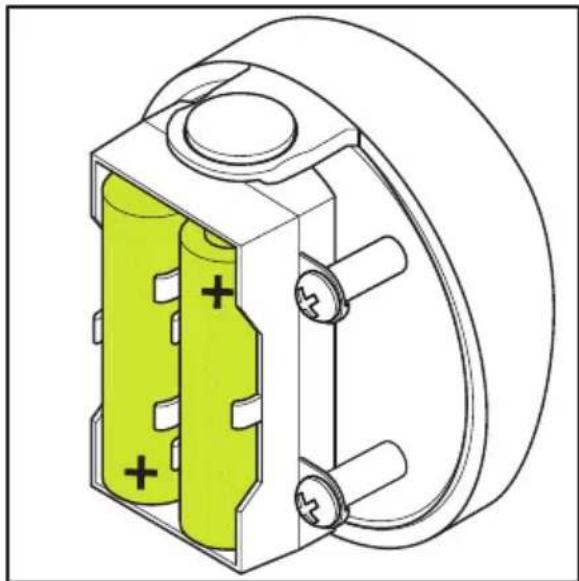
5.3.2 Automatic rear lamp
Some Sparta bicycles are equipped with a rear lamp that automatically lights up when the following conditions are met simultaneously:
- The lamp has been switched on.
It is dark.
The bicycle is moving.
Switching off is only required in special situations, for example when the bicycle is transported at the back of the car when it is dark.
The batteries will work for about 40 hours. When they are almost flat, a red light will start flashing on top of the lamp. Replace empty batteries as soon as possible by new alkaline batteries (1.5 V - 1500 mA).
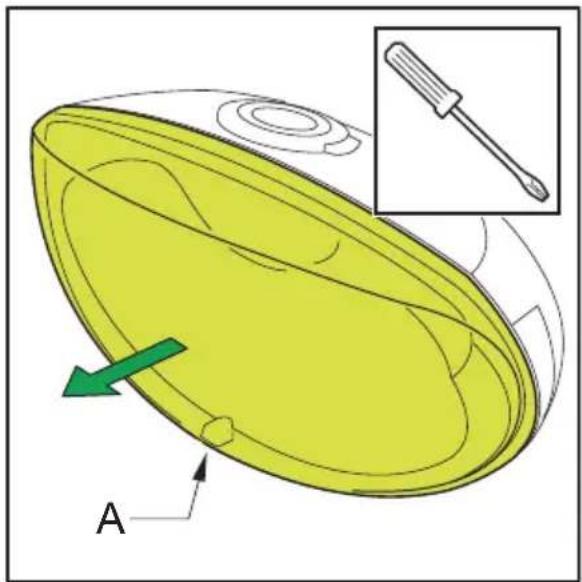
Type 1
Sliding button (A) to switch the lamp on or off.
Type 2
Press the button (A) to switch the lamp on or off.
5.3.3 Batteries
- Change the batteries when the light becomes insufficient.
- Remove the batteries when the lamp will not be used for a long time.
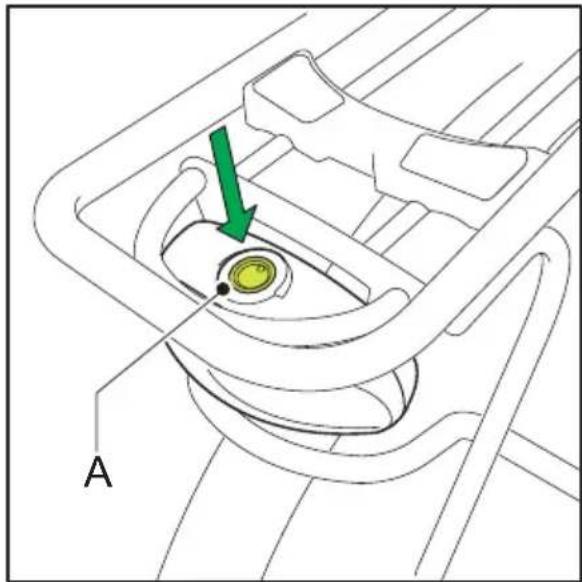
- Unscrew screw (A) from the cap of the lamp.
- Take the cap from the holder.
- Remove the batteries.

Batteries are a burden to the environment. Adhere to the local regulations for disposal.
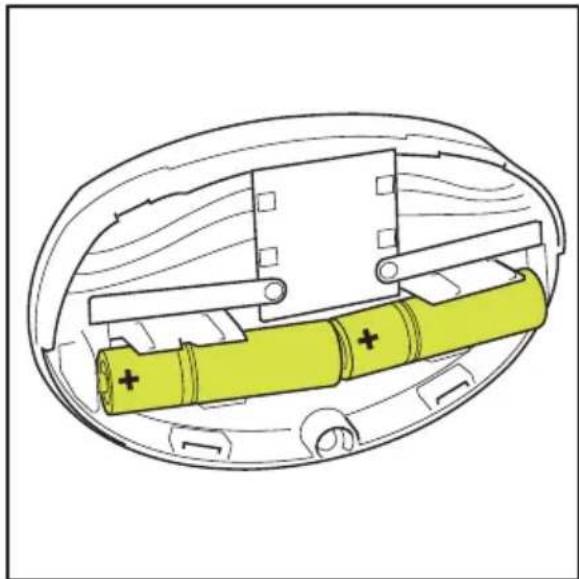
- Insert the new batteries as indicated on the holder.
- Fasten the cap onto the holder.
- Screw the screw into the cap of the lamp.
5.3.4 Switch the dynamo on and off
- Switch on: press the button.
- Switch off: pull the dynamo from the tyre until it clicks.
5.3.5 Adjust the dynamo
The dynamo has been correctly adjusted onto the tyre when the following conditions are met:
- The centre line of the dynamo runs through the wheel shaft.
- The drive wheel of the dynamo presses the profile of the tyre.
- The drive wheel is straight on the tyre.
The distance between the drive wheel and the tyre is about 1 cm when the dynamo is off.

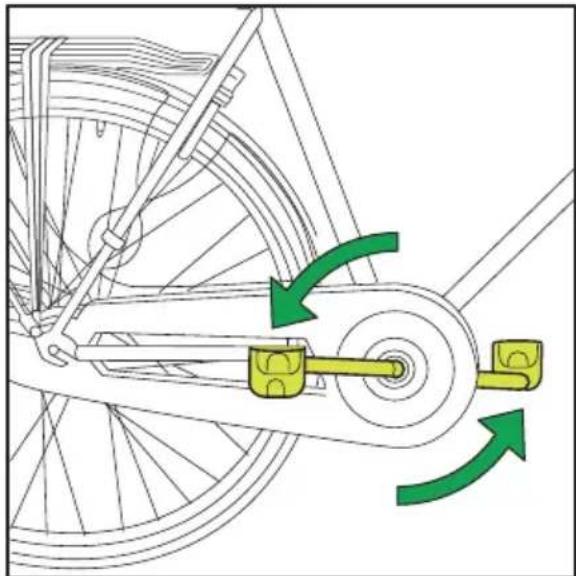
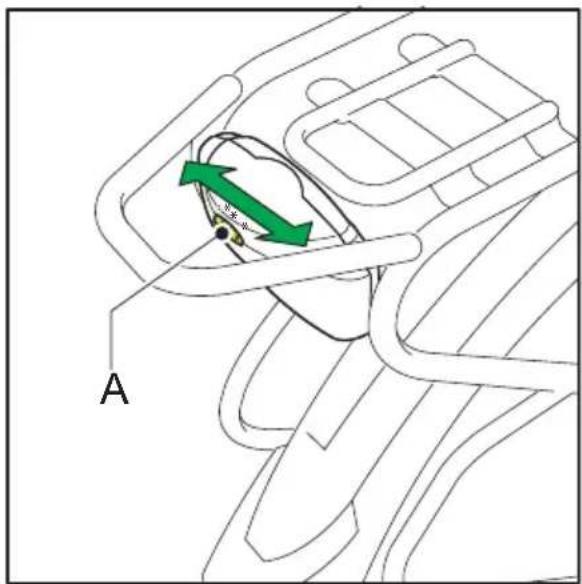
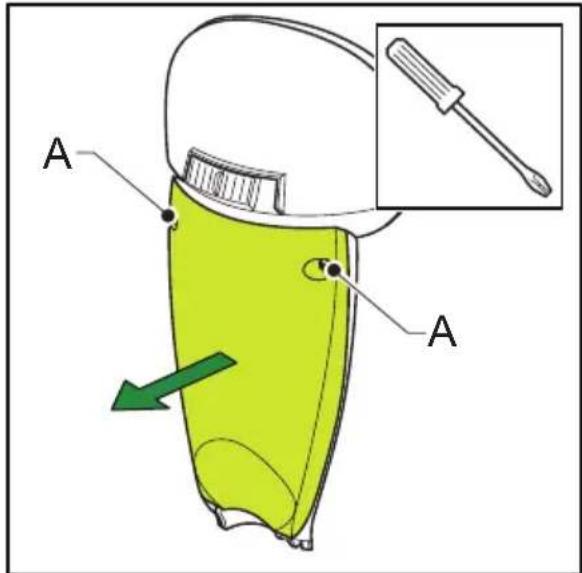
- Loosen the bolt (A).
- Put the dynamo into the correct position.
- Tighten the bolt (A).
5.3.6 Hub dynamo
Some Sparta bicycles have a hub dynamo in the front wheel.
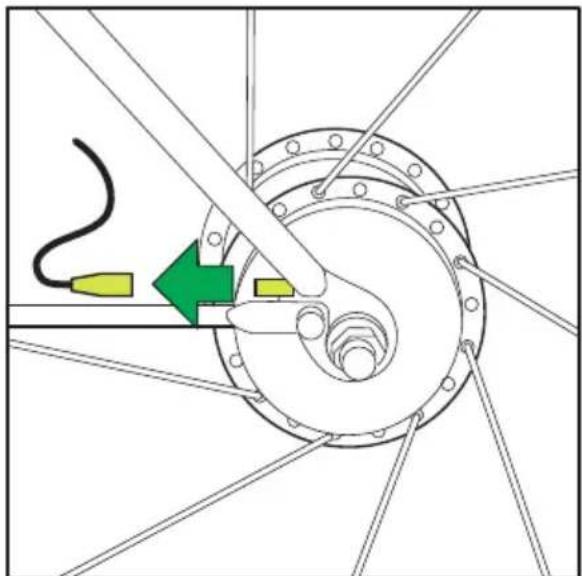

Remember to disconnect the plug at the hub when changing the front wheel.
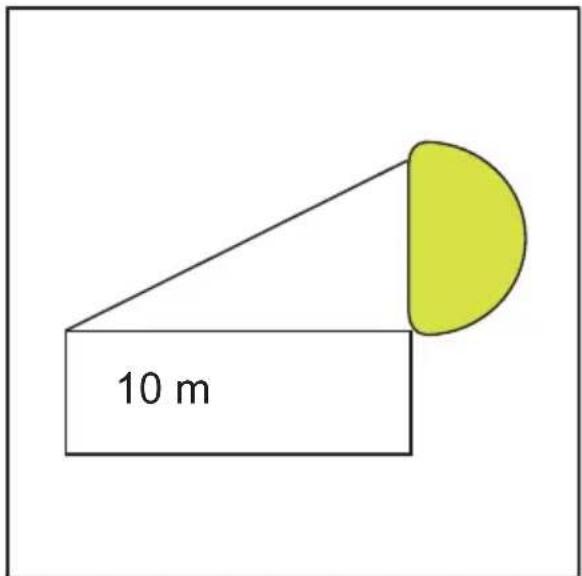
5.3.7 Adjust the headlamp
Adjust the angle of the headlamp such, that the centre of the light beam is about 10 metres in front of the bicycle.
6 Maintenance
6.1 Frequency
The frequency for inspection and maintenance differs per part. The indicated frequencies are based on regular use on normal roads and bicycle tracks.
6.1.1 Monthly
Checks:
- Are the quick releases of the dropout hubs or the shaft nuts of the wheels tightened well?
- Are the tyres in a good condition and do they have the right pressure?
Is the reflecting strip on the side of the tyres clean? - Are the front and rear brakes working optimally?
- Are the lights working well?
- Have the reflectors been fastened well and are they clean?
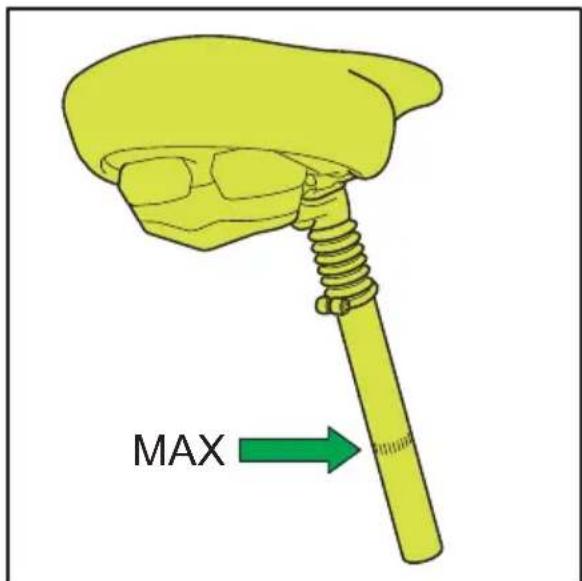
- Have the saddle post and the stem been fastened well in the frame and is the maximum marking not visible?
- Have the pedals been fastened well onto the cranks and have the cranks been attached properly to the bottom bracket?
- Does the headset not have any clearance?
Is the spoke tension correct and do the wheels not sway?
Clean:
- The hubs and the bottom bracket.
- The chain, the gear wheels, the rear derailleur and/or the freewheel hub. Then lubricate them with oil.
6.1.2 Every six months
Grease:
- Pedal shaft.
- Headset.
- Fastening bolts.
- Screws of the saddle and the handle bars.
- Check the shafts of the wheels and lubricate them with oil.
- Lubricate the saddle post and the stem with polishing oil.
Make sure that no oil is splattered on the rim or on the tyres. Oil on the rim strongly affects the working of the brakes; oil on the tyre shortens the lifespan.
6.1.3 Annually
Take the bicycle to the Sparta dealer for service at least once a year. The bicycle will particularly be inspected with respect to:
- Brakes.
- Lights.
- Spoke tension.
- Bearings.
Drive.
If the bicycle is used all year through, it is recommended to service twice a year: one extensive service in spring and a small service in the autumn.

In case of intensive use (e.g. cycling through mud and water), the rims will wear as well as the brake pads. In extreme situations this will lead to wear of the rim systems (V-brake and hydraulic brake) and possibly to a sudden break of the rim edge. Regularly check the thickness of the rim. In case of doubt, contact the dealer.
6.2 Tyre pressure
It is important that the tyres have the right pressure. Advantages:
- Better grip on the road surface.
Less wear. - Smaller chance of flat tyres.
- Brakes work quicker and better.
Rims are better secured against impact. - Cycling costs less energy.
On the side of the tyre the minimum and maximum pressures or the recommended pressure are given. The tyres have the correct pressure when they can just be pressed with the thumb.
Check the pressure with a tyre pressure gauge, if necessary.
If the tyre has the recommended pressure, it will have optimum rolling resistance and resistance to leaks.
When the tyre is burdened above normal, increase the pressure to a maximum of 1.5 times the recommended pressure for aluminium rims. The maximum tyre pressure for steel rims is 5 bars.
6.3 Lubricate the chain
- Thoroughly clean the chain with a hard brush and an environment-friendly degreaser. In necessary, use petroleum or diesel oil, but never use petrol.
- Lubricate the chain with special chain oil. Remove excessive oil with a cloth.

Make sure that no oil is splattered on the rim or on the tyres. Oil on the rim strongly affects the working of the brakes; oil on the tyre shortens the lifespan.
6.4 Clean
Tips for cleaning:
- Use liquid soap in lukewarm or hot water.
- Hose down the bicycle with the garden hose and dry it with a dry cloth or a shammy.

Never use a high-pressure cleaner. The steam or water jet is too powerful and may remove necessary grease.
- If necessary, treat the paintwork with liquid car wax after cleaning.
- Touch up any damage of the paintwork with a Sparta paint stick.
- Lightly lubricate the chrome parts with polishing oil.
Table des matières
1 Avant-propos 55
1.1 A propos de ce manuel. 55