USER MANUAL K5 Full Control Kärcher
natural_image
Exterior view of a modern compact water heater device (no visible text or symbols)
Deutsch 5
English 11
Français 17
Italiano 23
Nederlands 29
Español 35
Português 41
Dansk 47
Norsk 52
Svenska 57
Suomi 62
Ελληνικά 68
Türkçe 74
Русский 80
Magyar 87
Čeština 93
Slovenščina 99
Polski 105
Românește 111
Slovenčina 117
Hrvatski 123
Srpski 129
Български 135
Eesti 141
Latviešu 147
Lietuviškai 153
Українська 159
Register and win!
www.kaercher.com/register-and-win


59671450 (02/16)

natural_image
Illustration of an open book with grid pages and a curved arrow indicating rotation (no text or symbols)
natural_image
Diagram of a device with a handle and arrow indicating assembly or operation (no text or symbols present)
natural_image
Technical illustration of a mechanical component with a grid-patterned base and connecting rods (no text or symbols)
natural_image
Mechanical assembly diagram showing a tool inserted into a car's wheel (no text or symbols visible)

natural_image
Illustration of a hand holding a device with a cylindrical component inserted, showing a downward arrow (no text or symbols)
natural_image
Technical line drawing of a mechanical device with a tool and component, no visible text or symbols
Inhaltsverzeichnis
www.kaercher.com/dealersearch
Technische Daten
71364 Winnenden (Germany)
Tel.: +49 7195 14-0
Fax: +49 7195 14-2212
Winnenden, 2016/01/01
Contents
Proper use.....EN 5
Environmental protection....EN 5
Safety ...... EN 5
Description of the Appliance ..... EN 6
Scope of delivery....EN 6
Assembly.....EN 6
Start up ...... EN 7
Operation. E N
Transport E N
Storage....EN 8
Care and maintenance ..... EN 9
Troubleshooting.....EN 9
Warranty E N 1
Technical specifications....EN 10
Accessories and Spare Parts ..... EN 10
EC Declaration of Conformity ..... EN 10


Please read these original operating instructions and the enclosed safety in-
structions prior to the initial use of your device. Proceed accordingly. Keep both booklets for future reference or subsequent owners.
Proper use
Use this pressure washer for private households only:
– for cleaning machines, vehicles, buildings, tools, facades, terraces, gardening tools, etc. by means of a high-pressure water jet (if necessary, with additional cleaning agents).
– with accessories, replacement parts and cleaning agents approved by KÄRCHER. Please observe the information accompanying the cleaning agents.
Safety
Safety instructions
Prior to the first use of this device, the accompanying "Safety instructions for high-pressure cleaners" must be read.
Hazard levels
△DANGER
Pointer to immediate danger, which leads to severe injuries or death.
△WARNING
Pointer to a possibly dangerous situation, which can lead to severe injuries or death.
△CAUTION
Pointer to a possibly dangerous situation, which can lead to minor injuries.
ATTENTION
Pointer to a possibly dangerous situation, which can lead to property damage.
Safety Devices
△CAUTION
■ Safety installations serve the protection of the user and may not be modified or bypassed.
Appliance switch
The appliance switch prevents unintentional operation of the appliance.
Lock trigger gun
The lock locks the lever of the trigger gun und prevents the accidental start of the device.
Overflow valve with pressure switch
The overflow valve prevents the permissible working pressure from being exceeded.
If the lever on the trigger gun is released, the pressure switch turns off the pump, the high-pressure jet stops. If the lever is pulled the pump is turned on again.
Motor protection switch
7
8
The motor protection switch switches off the device if the power consumption is high.
Symbols on the machine

The appliance must not be directly connected to the public drinking water network.
The high pressure jet must not be directed at persons, animals, live electrical equipment or at the appliance itself.
Protect the appliance against frost.
Environmental protection
Notes about the ingredients (REACH)
You will find current information about the ingredients at:
www.kaercher.com/REACH

Old appliances contain valuable recyclable materials that should be recycled properly. Batteries and accumulators contain substances that must not enter the environment. Please dispose of old devices and batteries or accumulators in an environmentally friendly way.
Electrical and electronic devices often contain components which could potentially pose a danger to human health and the environment if handled or disposed of incorrectly. However, these components are necessary for the proper operation of the device. Devices marked with this symbol must not be disposed of with regular household rubbish.

The packaging material can be recycled. Please arrange for the environmentally appropriate disposal of the packaging.

Work with detergents must only be performed on liquid-tight work surfaces with a connection to the sewer system. Do not let release detergent into waters or earth.

Cleaning operations which produce oily waste water, e.g. engine washes, underbody washes, may only be carried out using washing stations equipped with an oil separator.

The extraction of water from public waters is prohibited in some countries.
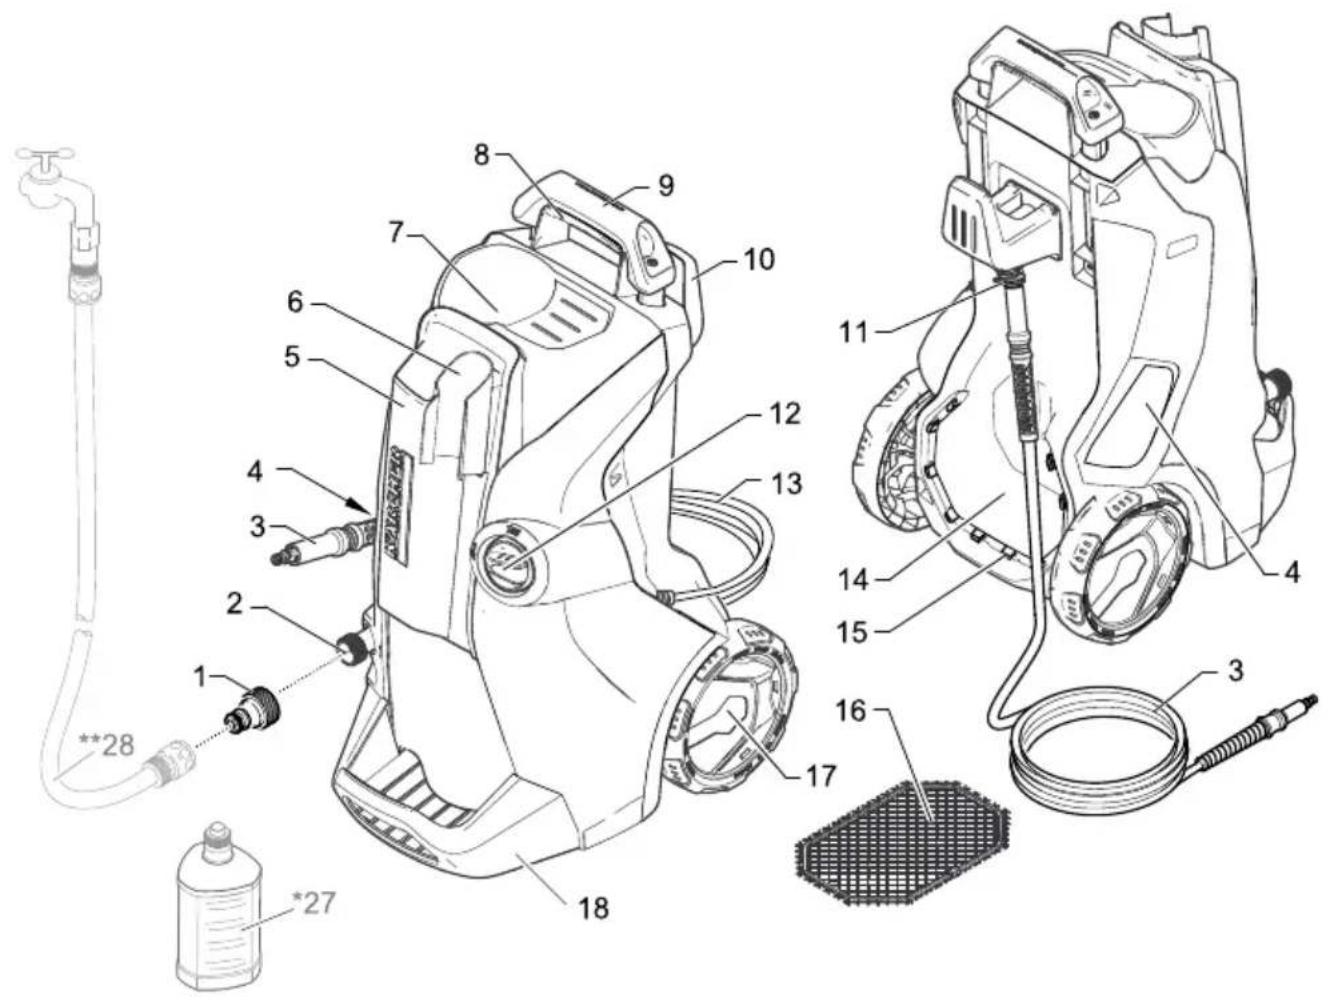
Description of the Appliance
These operating instructions describe the maximum equipment. Depending on the model, there are differences in the scopes of delivery (see packaging).
See fold-out page 4 for illustrations
1 Coupling element for water connection
2 Water connection with integrated sieve
3 High pressure hose
4 Hose guide
5 Storage for spray lances
6 Storage / parking position for trigger gun
7 Connection for Plug 'n' Clean detergent
8 Carrying handle
9 Transport handle, detachable
10 Hose switch
11 High pressure connection
12 Appliance switch „0/OFF“ / „I/ON“
13 Mains cable with mains plug
14 Accessory compartment
15 Hooks for fastening the net
16 Net for accessory compartment
17 Bearing wheel
18 Base with carrying handle
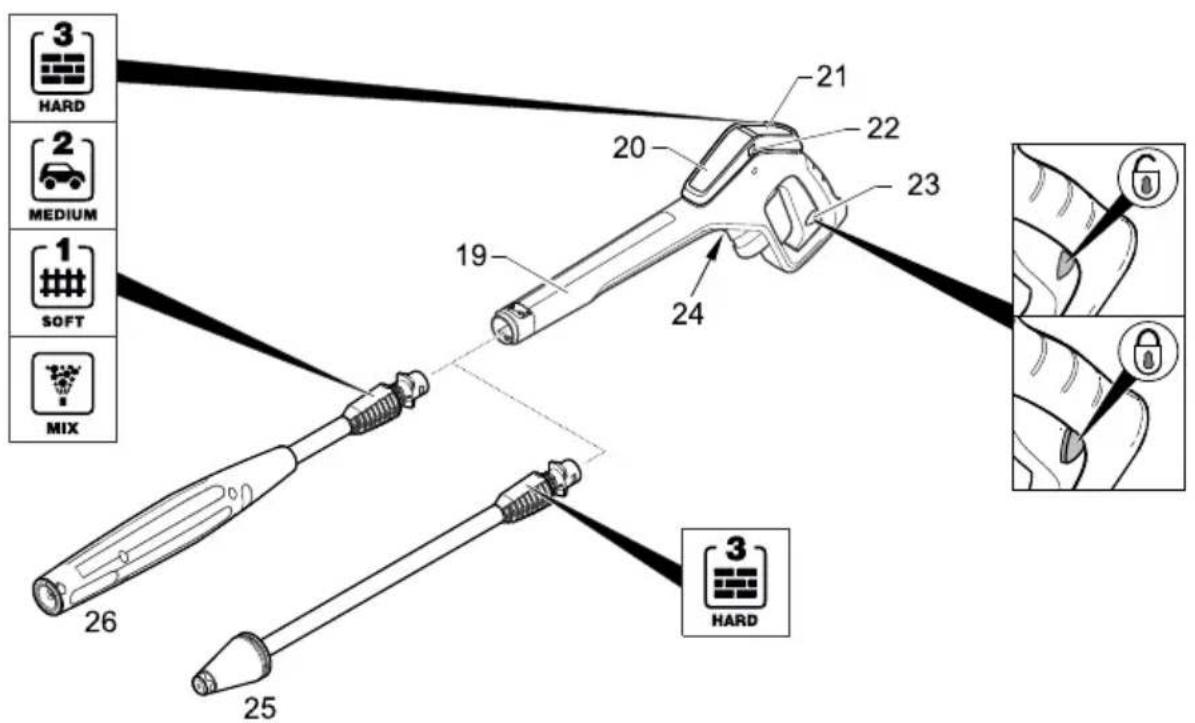
19 Full Control trigger gun
20 Battery compartment
21 LED pressure indicator
MIX / 1 - SOFT / 2 - MEDIUM / 3 - HARD
22 Battery compartment lock
23 Lock trigger gun
24 Button for detaching the high-pressure hose from the trigger gun
25 Full Control spray lance dirt grinder
For strong contaminations
Pressure level: HARD
26 Full Control spray lance Vario Power
Carrying out the most common cleaning tasks
Pressure levels: HARD / MEDIUM / SOFT / MIX
* Optional accessories
27 Plug 'n' Clean detergent bottle with locking lid
** not included in the scope of delivery
28 Water supply hose
Scope of delivery
The scope of delivery of the device is illustrated on the packaging. Check the content for completeness upon unpacking.
In the event of missing accessories or any transport damage, please contact your dealer.
Additionally required
→ Fabric-reinforced water hose with commercially available coupling.
– Minimum diameter, 1/2 inches (13 mm).
- Minimum length 7.5 m.
Special accessories
Special accessories expand the possibilities of using your appliance. Please contact your KÄRCHER dealer for further information.
Assembly
See fold-out page 3 for illustrations
Mount loose parts delivered with appliance prior to start-up.

You will need the 2 included screws as well as a Philips screwdriver PH 2.
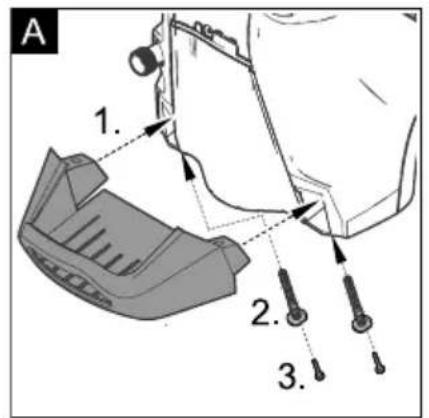
Installing the base
Illustration A
→ Insert base.
→ Insert the included dowels all the way into the holes.
→ Secure the base with the enclosed screws.
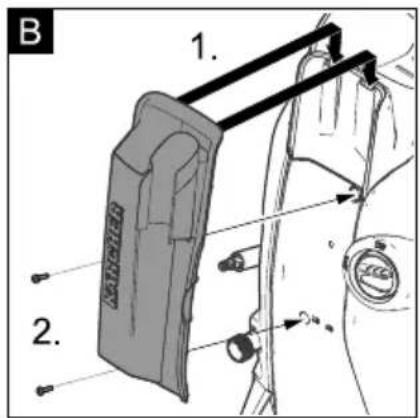
Install storage for spray lances
Illustration B
→ Hook in storage for spray lances.
→ Secure the storage for the spray lances by means of two screws.
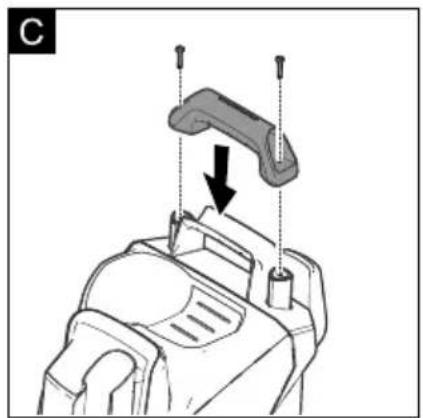
Install the transport handle
Illustration C
→ Attach the transport handle.
→ Secure the transport handle by means of two screws.
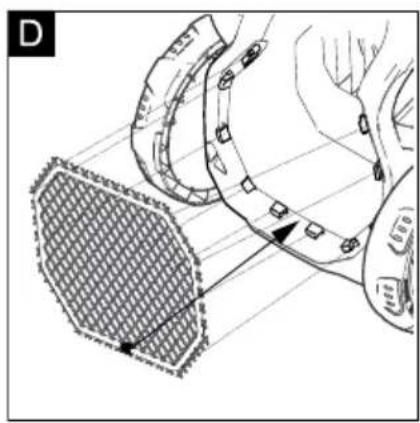
Attach the net to the accessory compartment
Illustration D
→ Hook the net into the hooks shown in the illustration.
Winding off the high pressure hose
→ Completely wind off the high-pressure hose and disentangle any loops and knots.
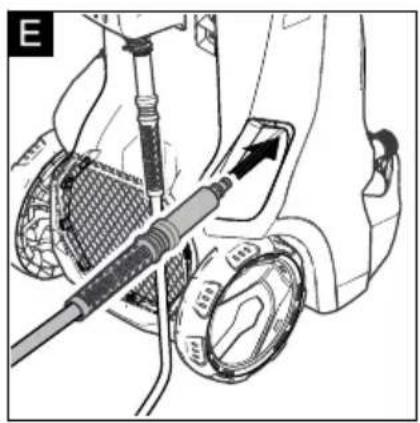
Putting the high pressure hose through the hose guide.
Illustration E
→ Put the disentangled high-pressure hose through the hose guide from the back.
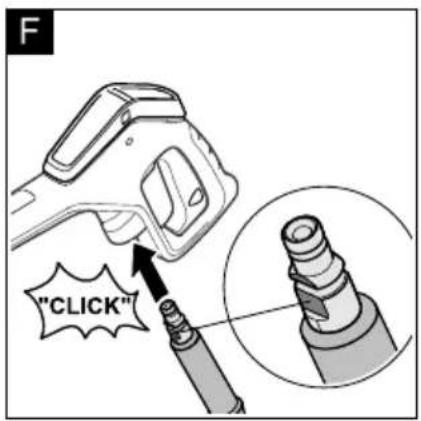
Connect the high pressure hose to the trigger gun
Illustration F
→ Push the high pressure hose into the trigger gun until it locks audibly.
Note: Make sure the connection nipple is aligned correctly.
→ Check the secure connection by pulling on the high pressure hose.
Start up
→ Park the appliance on an even surface.
→ Insert the mains plug into the socket.
Water supply
For connection values, see type plate/technical data.
ATTENTION
Impurities in the water can damage the high-pressure pump and the accessories. For protection, the use of the KÄRCHER water filter (optional accessory, order no. 4.730-059) is recommended.
Water supply from mains
Observe regulations of water supplier.
ATTENTION
Hose couplings made of metal with aquastop can damage the pump! Please use plastic couplings or KÄRCH-ER brass couplings.
Illustration G
→ Screw the coupling element to the water connection on the appliance.
→ Attach the water supply hose to the coupling on the water connection.
→ Connect the water supply hose to the water supply.
→ Completely open the water tap.
Drawing in water from open reservoirs
This high-pressure cleaner is suited to work with the KÄRCHER suction hose with backflow valve (Optional accessory, order no. 2.643-100) to draw in surface water, e.g. from water butts or ponds (see specifications for max. suction height).
Note: With vacuuming operation, the coupling for the water connection is not required.
→ Fill the suction hose with water.
→ Screw the suction hose into the water connection of the appliance and insert it into the water source (e.g. rainwater drum).
Bleed the device as follows prior to operation:
→ Turn on the appliance "I/ON".
→ Unlock the lever of the trigger gun.
→ Push the lever of the trigger gun, the device will switch on.
→ Let the device run (max. 2 minutes) until the water exits the trigger gun without bubbles.
→ Release the lever of the trigger gun.
→ Lock the lever of the trigger gun.
Operation
ATTENTION
Dry running of more than 2 minutes leads to damage of the high-pressure pump. If the appliance does not build up pressure within 2 minutes, switch the appliance off and proceed in accordance with the instructions in Chapter "Troubleshooting".
High pressure operation
△CAUTION
Keep a distance of at least 30 cm when using the jet for cleaning painted surfaces to avoid damage.
ATTENTION
Car tyres, paint or sensitive surfaces such as wood should not be cleaned with the dirt blaster, as there is a risk of damage.
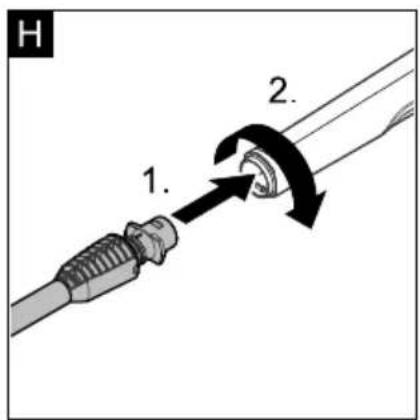
→ Select a spray lance suitable for the cleaning task. Illustration H
→ Push the spray lance into the trigger gun and fasten it by a 90° rotation.
→ Turn on the appliance "I/ON".
→ Unlock the lever of the trigger gun.
→ Push the lever of the trigger gun, the device will switch on.
Note: Release the lever of the trigger gun; the device will switch off again. High pressure remains in the system.
Full Control spray lance Vario Power
→ Turn the spray lance until the LED of the required pressure level is on at the pressure indicator of the trigger gun.
Full Control System
The pressure indicator on the trigger gun shows the currently set pressure level during operation with a Full Control spray lance.
Note: The pressure indicator is not significant during operation with the T-Racer and other accessories.
| Pressure level For example, recommended for |
 | HARD Stone terraces made of paving stones or exposed aggregate concrete, asphalt, metal surfaces, garden utensils (wheelbarrow, spade, etc.) |
 | MEDIUM Motorcar / motorcycle, brick surfaces, plastered walls, plastic furniture |
 | SOFT Wooden surfaces, bicycles, sand stone surfaces, rattan furniture |
 | MIX Operation with detergent |
ATTENTION
The sensitivity of the materials can strongly differ depending on the age and the condition. The so-called recommendations are non-binding.
Operation with detergent
Most KÄRCHER detergents can be bought ready to use in a Plug 'n' Clean detergent bottle.
Note: Detergent can only be added when the device is operated in low pressure mode.
△DANGER
When using detergents, the material data safety sheet issued by the detergent manufacturer must be adhered to, especially the instructions regarding personal protective equipment.
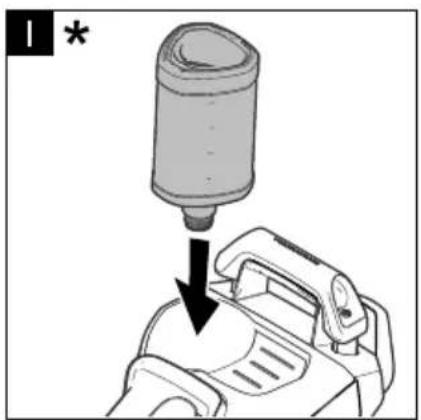
→ Remove the cap of the Plug 'n' Clean detergent bottle.
Illustration I
\* Optional accessories
→ Push the detergent bottle with the opening pointing downwards into the connection for the Plug 'n' Clean detergent.
→ Use Vario Power spray lance.
→ Turn the spray lance towards "MIX" until the LED "MIX" is on on the pressure indicator of the trigger gun.
Note: This will mix the detergent with the water stream.
Recommended cleaning method
→ Spray the detergent sparingly on the dry surface and allow it to react, but not to dry.
→ Spray off loosened dirt with the high pressure jet.
After operation with detergent
→ Remove the Plug 'n' Clean detergent bottle from the intake and close it with the lid.
→ For storage, put the detergent bottle into the retainer with the cap pointing up.
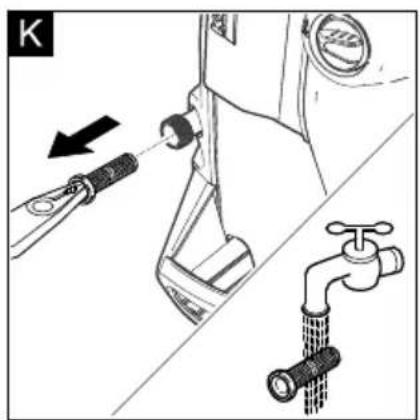
Interrupting operation
→ Release the lever of the trigger gun.
→ Lock the lever of the trigger gun.
Illustration K
→ Put the trigger gun with the spray lance into the parking position.
→ During longer breaks (more than 5 minutes), also turn the appliance off using the "0/OFF" switch.
Finish operation
→ Release the lever of the trigger gun.
→ Turn off the appliance "0/OFF".
→ Disconnect the mains plug from the socket.
△CAUTION
Only separate the high-pressure hose from the trigger gun or the device when there is no pressure in the system.
→ Turn off tap.
→ Press the lever of the trigger gun to release any remaining pressure in the system.
→ Release the lever of the trigger gun.
→ Lock the lever of the trigger gun.
ATTENTION
When disconnecting the supply or high pressure hose, warm water may leak from the connections after operation.
→ Detach the appliance from the water supply.
Transport
△CAUTION
Risk of personal injury or damage!
Mind the weight of the appliance during transport.
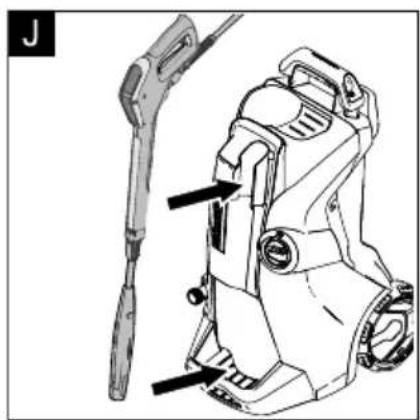
When transporting by hand
→ Lift appliance by the carrying handle and carry it.
→ Pull out the transport handle until it audibly snaps into place.
→ Pull the appliance by its transport handle.
When transporting in vehicles
→ Prior to horizontal transport: Remove the Plug 'n' Clean detergent bottle from the intake and close it with the lid.
→ Secure the appliance against shifting and tipping over.
Storage
△CAUTION
Risk of personal injury or damage!
Consider the weight of the appliance when storing it.
Storing the Appliance
→ Park the machine on an even surface.
→ Detach spray lance from the trigger gun.
→ Push the disconnect button on the trigger gun and pull the high-pressure hose out of the trigger gun.
→ Place the trigger gun into the storage for the trigger gun.
→ Put both spray lances into the storage for the spray lance.
– Dirt grinder spray lance: Nozzle towards the bottom.
- Vario Power spray lance: Nozzle towards the top.
→ Coil the high-pressure hose and hang it over the hose storage.
→ Store the mains connection in the accessory compartment.
Prior to extended storage periods, as during the winter, also observe the instructions in the Care section.
Frost protection
ATTENTION
Appliances and accessories that are not completely drained can be destroyed by frost. Completely drain appliance and accessories and protect them against frost. To avoid damage:
→ Detach the appliance from the water supply.
→ Detach spray lance from the trigger gun.
→ Turn on the appliance "I/ON".
→ Push the lever of the trigger gun until no more water is escaping (approx. 1 min).
→ Release the lever of the trigger gun.
→ Lock the lever of the trigger gun.
→ Turn off the appliance "0/OFF".
→ Store the appliance and the entire accessories in a frost free room.
Care and maintenance
△DANGER
Risk of electric shock.
→ Prior to all work on the appliance, switch off the appliance and pull the power plug.
Clean the sieve in the water connection
Clean the sieve in the water connection regularly.
→ Remove coupling from the water connection.
ATTENTION
The sieve must not be damaged.
Illustration K
→ Pull the sieve out using flat pliers.
→ Clean the sieve under running water.
→ Reinsert the sieve into the water connection.
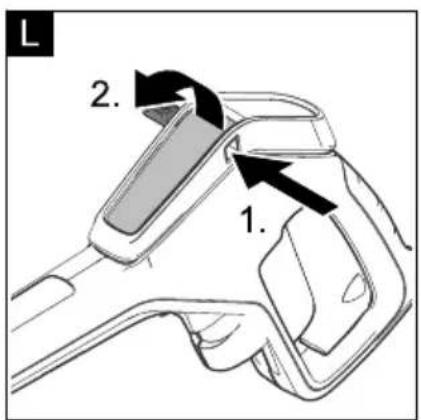
Changing the batteries of the trigger gun
The batteries are depleted if nothing is shown on the display of the trigger gun anymore.
Two batteries or accumulators of the size AAA are required.
Illustration L
→ Push the locking slide.
→ Open battery compartment.
→ Remove the batteries.
→ Insert new batteries and observe the correct orientation of the terminals.
→ Close battery compartment.
→ Dispose of the used batteries according to the local provisions.
Troubleshooting
⚠️DANGER
Risk of electric shock. Turn off the appliance and remove the mains plug prior to performing any care and maintenance work.
Repair work and work on the electrical components may only be performed by an authorised customer service. You can rectify minor faults yourself with the help of the following overview.
If in doubt, please consult the authorized customer service.
Appliance is not running
→ Push the lever of the trigger gun, the device will switch on.
→ Check whether the voltage indicated on the type plate corresponds to the voltage of the mains supply.
→ Check the mains connection cable for damages.
→ Motor overloaded, the motor circuit breaker has tripped.
– Turn off the appliance "0/OFF".
- Allow the device to cool down for one hour.
- Switch on the device and put it into operation again. If the malfunction occurs repeatedly, have the device checked by the customer service.
Appliance does not start, motor hums
Voltage reduction due to weak mains supply or when using an extension cable.
→ Upon switch-on, push the lever of the trigger gun first and then switch the power switch to "I/ON".
Pressure does not build up in the appliance
→ Check setting at the spray lance.
→ Check water supply for adequate delivery rate.
→ Pull out the sieve in the water connection using flat-nose pliers and clean under running water.
→ Remove air from appliance before operation.
Switch on the appliance without connection the HP hose (max. 2 minutes) and run it until the water discharging from the HP outlet is free of bubbles.
Switch off appliance and reconnect HP hose.
Strong pressure fluctuations
→ Clean high-pressure nozzle: Remove dirt and debris from the nozzle bore, using a needle and rinse through with water from the front.
→ Check water flow quantity.
Appliance is leaking
→ Dropwise leakage of the device is normal for technical reasons. If the leakage increases contact the authorized customer service.
No detergent infeed
→ Use Vario Power spray lance.
Turn the spray lance to "Mix" position.
→ Check whether the Plug 'n' Clean detergent bottle is placed into the detergent connection facing down.
No pressure indicator on the trigger gun
→ Check / replace the batteries
Warranty
The warranty terms published by the relevant sales company are applicable in each country. We will repair potential failures of your appliance within the warranty period free of charge, provided that such failure is caused by faulty material or defects in manufacturing. In the event of a warranty claim please contact your dealer or the nearest authorized Customer Service centre. Please submit the proof of purchase.
Addresses can be found under:
www.kaercher.com/dealersearch
Technical specifications
| Electrical connection |
| Voltage 230 | V1~50 Hz |
| Connected load 2,1 kW | |
| Protection class IP X5 | |
| Protective class I | |
| Mains fuse (slow-blow) 10 A | |
| Water connection |
| Max. feed pressure 1,2 MPa | |
| Max. feed temperature 40 °C | |
| Min. feed volume 10 l/min | |
| Max. Suction height 0,5 m | |
| Performance data |
| Working pressure 12,5 MPa | |
| Max. permissible pressure 14,5 MPa | |
| Water flow rate 7,5 l/min | |
| Max. flow rate | 8,3 l/min |
| Detergent flow rate | 0,3 l/min |
| Recoil force of the trigger gun | 20 N |
| Dimensions and weights |
| Length | 411 mm |
| Width | 305 mm |
| Height | 584 mm |
| Weight, ready to operate with accessories | 14,0 kg |
| Values determined as per EN 60335-2-79 |
| Hand-arm vibration value | 3,7 m/s2 |
| Uncertainty K | 0,9 m/s2 |
| Sound pressure level LpA | 76 dB(A) |
| Uncertainty KpA | 3 dB(A) |
| Sound power level LWA + Uncertainty KWA | 92 dB(A) |
Subject to technical changes.
Accessories and Spare Parts
Only use original accessories and spare parts, they ensure the safe and trouble-free operation of the device. For information about accessories and spare parts, please visit www.kaercher.com.
We hereby declare that the machine described below complies with the relevant basic safety and health requirements of the EU Directives, both in its basic design and construction as well as in the version put into circulation by us. This declaration shall cease to be valid if the machine is modified without our prior approval.
Product: High pressure cleaner
Type: 1.324-xxx
Relevant EU Directives
2000/14/EC
2014/30/EU
2006/42/EC (+2009/127/EC)
2011/65/EU
Applied harmonized standards
EN 50581
EN 55014-1: 2006+A1: 2009+A2: 2011
EN 55014-2: 1997+A1: 2001+A2: 2008
EN 60335-1
EN 60335-2-79
EN 61000-3-2: 2014
EN 61000-3-3: 2013
EN 62233: 2008
2000/14/EC: Appendix V
Sound power level dB(A)
Measured: 89
Guaranteed: 92
The undersigned act on behalf and under the power of attorney of the company management.
CEO

S. Reiser
Head of Approbation
Authorised Documentation Representative
S. Reiser
71364 Winnenden (Germany)
Phone: +49 7195 14-0
Fax: +49 7195 14-2212
Winnenden, 2016/01/01
Table des matières
www.kaercher.com/REACH

12 Interrupteur principal "0/OFF" / "I/ON"
www.kaercher.com/dealersearch
2006/42/CE (+2009/127/CE)
2011/65/UE
Responsable de la documentation:
S. Reiser
71364 Winnenden (Germany)
Winnenden, 2016/01/01
Indice
www.kaercher.com/REACH

www.kaercher.com/dealersearch
Dati tecnici
2006/42/CE (+2009/127/CE)
2011/65/UE
S. Reiser
Head of Approbation
71364 Winnenden (Germany)
Tel.: +49 7195 14-0
Fax: +49 7195 14-2212
Winnenden, 2016/01/01
Inhoud
www.kaercher.com/dealersearch
Technische gegevens
S. Reiser
Head of Approbation
71364 Winnenden (Germany)
Tel.: +49 7195 14-0
Fax: +49 7195 14-2212
Winnenden, 2016/01/01
www.kaercher.com/REACH

2006/42/CE (+2009/127/CE)
2011/65/UE
S. Reiser
Head of Approbation
71364 Winnenden (Germany)
Tele.: +49 7195 14-0
Fax: +49 7195 14-2212
Winnenden, 2016/01/01
Índice
www.kaercher.com/REACH

12 Interruptor do aparelho "0/OFF" / "I/ON"
→ Verificar/trocar as pilhas
Garantia
www.kaercher.com/dealersearch
Dados técnicos
2006/42/CE (+2009/127/CE)
2011/65/UE
71364 Winnenden (Germany)
Tel.: +49 7195 14-0
Fax: +49 7195 14-2212
Winnenden, 2016/01/01
Indholdsfortegnelse
| Bestemmelsesmæssig anvendelse. | DA 5 |
| Miljøbeskyttelse. | DA 5 |
| Sikkerhed | DA 5 |
| Leveringsomfang. | DA 5 |
| Beskrivelse af apparatet | DA 6 |
| Montering | DA 6 |
| Ibrugtagning. | DA 6 |
| Drift | DA 7 |
| Transport | D A |
| Opbevaring | DA 8 |
| Pleje og vedligeholdelse | DA 8 |
| Hjælp ved fejl. | DA 8 |
| Garanti. | DA 9 |
| Tekniske data. | DA 9 |
| Tilbehør og reservedele. | DA 9 |
| EU-overensstemmelseserklæring | DA 9 |
2006/42/EF (+2009/127/EF)
2011/65/EU

S. Reiser
Head of Approbation
71364 Winnenden (Germany)
Tlf.: +49 7195 14-0
Fax: +49 7195 14-2212
Winnenden, 2016/01/01
Innholdsfortegnelse
www.kaercher.com/REACH

12 Apparatbryter "0/OFF" / "I/ON"
13 Strømledning med støpsel
14 Tilbehørsrom
www.kaercher.com/dealersearch
Tekniske data
2006/42/EF (+2009/127/EF)
2011/65/EU
2000/14/EF: Vedlegg V
Lydeffektnivå dB(A)
Målt: 89
Garantert: 92

S. Reiser
Head of Approbation
71364 Winnenden (Germany)
Tlf: +49 7195 14-0
Winnenden, 2016/01/01
www.kaercher.com/REACH

www.kaercher.com/dealersearch
Tekniska data

S. Reiser
Head of Approbation
71364 Winnenden (Germany)
Tel.: +49 7195 14-0
Fax: +49 7195 14-2212
Winnenden, 2016/01/01
Sisällysluettelo

S. Reiser
Head of Approbation
71364 Winnenden (Germany)
Puh.: +49 7195 14-0
Winnenden, 2016/01/01
www.kaercher.com/REACH

71364 Winnenden (Germany)
Tηλ.: +49 7195 14-0
Φαξ: +49 7195 14-2212
Winnenden, 2016/01/01
İçindekiler
www.kaercher.com/REACH


S. Reiser
Head of Approbation
71364 Winnenden (Germany)
Tel.: +49 7195 14-0
Winnenden, 2016/01/01
Оглавление
www.kaercher.com/REACH

71364 Winnenden (Germany)
Тел.: +49 7195 14-0
Факс: +49 7195 14-2212
Winnenden, 2016/01/01
Tartalomjegyzék
www.kaercher.com/REACH

71364 Winnenden (Germany)
Tel.: +49 7195 14-0
Fax: +49 7195 14-2212
Winnenden, 2016/01/01
Obsah
www.kaercher.com/REACH

www.kaercher.com/dealersearch
Technické údaje
2006/42/ES (+2009/127/ES)
2011/65/EU
S. Reiser
Head of Approbation
71364 Winnenden (Germany)
Tel.: +49 7195 14-0
Fax: +49 7195 14-2212
Winnenden, 2016/01/01
Vsebinsko kazalo
2006/42/ES (+2009/127/ES)
2011/65/EU
S. Reiser
Head of Approbation
71364 Winnenden (Germany)
Tel.: +49 7195 14-0
Winnenden, 2016/01/01
Spis treści
www.kaercher.com/REACH

www.kaercher.com/dealersearch
Dane techniczne
2006/42/WE (+2009/127/WE)
2011/65/UE
71364 Winnenden (Germany)
tel.: +49 7195 14-0
faks: +49 7195 14-2212
Winnenden, 2016/01/01
Cuprins
www.kaercher.com/REACH

www.kaercher.com/dealersearch
Date tehnice
Directive EG respectate:
2000/14/CE
2014/30/UE
2006/42/CE (+2009/127/CE)
2011/65/UE
Norme armonizate utilize:
EN 50581
EN 55014-1: 2006+A1: 2009+A2: 2011
EN 55014-2: 1997+A1: 2001+A2: 2008
EN 60335-1
EN 60335-2-79
EN 61000-3-2: 2014
EN 61000-3-3: 2013
EN 62233: 2008
71364 Winnenden (Germany)
Tel.: +49 7195 14-0
Fax: +49 7195 14-2212
Winnenden, 2016/01/01
Obsah
www.kaercher.com/dealersearch
Technické údaje
2006/42/ES (+2009/127/ES)
2011/65/EÚ
Uplatňované harmonizované normy:
EN 50581
EN 55014-1: 2006+A1: 2009+A2: 2011
EN 55014-2: 1997+A1: 2001+A2: 2008
EN 60335-1
EN 60335-2-79
EN 61000-3-2: 2014
EN 61000-3-3: 2013
EN 62233: 2008
71364 Winnenden (Germany)
Tel: +49 7195 14-0
Fax: +49 7195 14-2212
Winnenden, 2016/01/01
Pregled sadržaja
www.kaercher.com/REACH

Stari uređaji sadrže vrijedne materijale koji se mogu reciklirati te bi ih stoga trebalo predati kao sekundarne sirovine. Primarne i punjive baterije sadrže tvari koje ne smiju dospjeti u okoliš. Stare uređaje kao i primarne odnosno punjive baterije odložite u otpad ekološki primjereno.
Električni i elektronički dijelovi često sadrže sastavne dijelove koji pri pogrešnom rukovanju ili pogrešnom zbrinjavanju mogu predstavljati potencijalnu opasnost za ljudsko zdravlje i okoliš. Ipak, ti sastavni dijelovi nužni su za propisani pogon uređaja. Uređaji označeni ovim simbolom ne smiju se odlagati u komunalni otpad.

Materijali ambalaže se mogu reciklirati. Ambalažu odložite na otpad u skladu s propisima o očuvanju okoliša.

www.kaercher.com/dealersearch
Tehnički podaci
| Električni priključak |
| Napon 230 | V1~50 Hz |
| Priključna snaga 2,1 kW |
| Stupanj zaštite IP X5 |
| Klasa zaštite I |
| Strujna zaštita (inertna) 10 A |
| Priključak za vodu |
| Dovodni tlak (maks.) 1,2 MPa |
| Dovodna temperatura (maks.) 40 °C |
| Dovodni protok (min.) 10 l/min |
| Maks. usisna visina 0,5 m |
| Podaci o snazi |
| Radni tlak 12,5 MPa |
| Maks. dozvoljeni tlak 14,5 MPa |
| Protok vode 7,5 l/min |
| Maksimalni protok | 8,3 l/min |
| Protok sredstva za čišćenje | 0,3 l/min |
| Povratna udarna sila visokotlačne pr-skalice | 20 N |
| Dimenzije i težine |
| Duljina | 411 mm |
| Širina | 305 mm |
| Visina | 584 mm |
| Težina u stanju pripravnosti za rad, s priborom | 14,0 kg |
| Utvrdene vrijednosti prema EN 60335-2-79 |
| Vrijednost vibracije na ruci | 3,7 m/s2 |
| Nepouzdanost K | 0,9 m/s2 |
| Razina zvučnog tlaka LpA | 76 dB(A) |
| Nepouzdanost KpA | 3 dB(A) |
| Razina zvučne snage LWA + nepouzda-nost KWA | 92 dB(A) |
2006/42/EZ (+2009/127/EZ)
2011/65/EU

S. Reiser
Head of Approbation
71364 Winnenden (Germany)
Tel.: +49 7195 14-0
Winnenden, 2016/01/01
Pregled sadržaja
Namensko korišćenje ....SR 5
Zaštita životne sredine. . . . . . . . . . . . . . . . . . . . SR 5
Sigurnost S R
Opis uređaja ....SR 6
Obim isporuke .... SR 6
Montaža. S R
Stavljanje u pogon. . . . . . . . . . . . . . . . . . . . . . . . . . . . . . SR 7
Rad SR 7
Transport S R
Skladištenje .... SR 8
Nega i održavanje ....SR 9
Otklanjanje smetnji .... SR 9
Garancija S R 1
Tehnički podaci .... SR 10
Pribor i rezervni delovi. SR 10
Izjava o usklađenosti sa propisima EZ ..... SR 10


Pre prve upotrebe Vašeg uređaja pročitajte ovo originalno uputstvo za rad i
priložene sigurnosne napomene i postupajte prema njima. Sačuvajte obe sveske za kasniju upotrebu ili za sledećeg vlasnika.
Namensko korišćenje
Ovaj uređaj za čišćenje pod visokim pritiskom koristite isključivo u domaćinstvu:
– za čišćenje mašina, vozila, zgrada, alata, fasada, terasa, baštenskih uređaja itd. mlazom vode pod visokim pritiskom (prema potrebi uz dodatak deterdženata).
- uz primenu pribora, rezervnih delova i deterdženata koje odobrava Kärcher. Obratite pažnju na napomene koje su priložene deterdžentima.
Sigurnost
Sigurnosne napomene
Pre prvog korišćenja ovog uređaja obavezno pročitajte priložene „Sigurnosne napomene za visokopritisne uređaje za čišćenje“.
Stepeni opasnosti
△OPASNOST
Napomena koja ukazuje na neposredno preteću opasnost koja dovodi do teških telesnih povreda ili smrti.
⚠UPOZORENJE
Napomena koja ukazuje na eventualno opasnu situaciju koja može dovesti do teških telesnih povreda ili smrti.
△OPREZ
Napomena koja ukazuje na eventualno opasnu situaciju, koja može izazvati lakše telesne povrede.
PAŽNJA
Napomena koja ukazuje na eventualno opasnu situaciju koja može izazvati materijalne štete.
Sigurnosni elementi
△OPREZ
■ Sigurnosna oprema služi zaštiti korisnika i ne sme se ni menjati niti zaobilaziti.
Prekidač uređaja
www.kaercher.com/REACH

Stari uređaji sadrže vredne materijale sa sposobnošću recikliranja i treba ih dostaviti na ponovnu preradu. Primarne i punjive baterije sadrže materije koje ne smeju dospeti u životnu sreditu. Stare uređaje kao i baterije ili akumulatore odložite u otpad ekološki primereno. Električni i elektronski uređaji sadrže često sastavne delove koji, u slučaju nepravilnog rukovanja ili nepravilnog odlaganja u otpad, mogu da predstavljaju potencijalnu opasnost za zdravlje ljudi i okolinu. Ipak, ovi sastavni delovi su neophodni za pravilan rad uređaja. Uređaji koji su označeni ovim simbolom ne smeju da se odlazu u kućni otpad.

Ambalaža se može ponovo preraditi. Ambalažu odložite u otpad ekološki primereno.

S deterdžentima se sme raditi samo na vodonepropusnim radnim površinama koje su priključene na kanalizacioni sistem. Ne dozvolite da deterdženti prodru u površinske vode ili tlo.

Radovi na čišćenju kod kojih nastaju uljne otpadne vode, kao što su pranje motora, pranje donjeg dela vozila, smeju da se izvode samo u perionicama sa separatorom ulja.

www.kaercher.com/REACH

71364 Winnenden (Germany)
Тел.: +49 7195 14-0
Факс: +49 7195 14-2212
Winnenden, 2016/01/01
Sisukord
Seisujala monteerimine
Joonis A
www.kaercher.com/dealersearch
Tehnilised andmed
Toode: Körgsurvepesur
Tüüp: 1 324-xxx
S. Reiser
Head of Approbation
71364 Winnenden (Germany)
Tel: +49 7195 14-0
Winnenden, 2016/01/01
Satura rādītājs
www.kaercher.com/dealersearch
Tehniskie dati
S. Reiser
Head of Approbation
71364 Winnenden (Germany)
Tālr.: +49 7195 14-0
Fakss: +49 7195 14-2212
Winnenden, 2016/01/01
Turinys
www.kaercher.com/REACH

www.kaercher.com/dealersearch
Techniniai duomenys

S. Reiser
Head of Approbation
71364 Winnenden (Germany)
Tel.: +49 7195 14-0
Faksas: +49 7195 14-2212
Winnenden, 2016/01/01
Зміст
www.kaercher.com/REACH

www.kaercher.com/dealersearch
71364 Winnenden (Germany)
Тел.: +49 7195 14-0
Факс: +49 7195 14-2212
Winnenden, 2016/01/01

natural_image
Icon of a gear and wrench inside a square frame (no text or symbols)