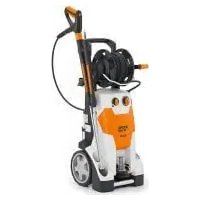
USER MANUAL RE 128 Plus STIHL
Guide to Using this Manual 2
Safety Precautions and Working Techniques 2
Assembling the Unit 6
Transporting the Unit 7
Fitting, removing spray lance 8
Fitting, removing high-pressure hose 8
Connecting the water supply 9
Connecting to a pressured water supply 10
Connecting to Power Supply 10
Switching On 11
Working 11
Adding detergent 12
Switching Off 13
Storing the Machine 13
Maintenance and Care 14
Maintenance 15
First use after long periods of storage 15
Main Parts 16
Specifications 17
Special Accessories 19
Troubleshooting 21
Maintenance and Repairs 23
Disposal 23
STIHL
RE 108, RE 118, RE 128 PLUS
Dear Customer,
Thank you for choosing a quality engineered STIHL product.
This machine has been built using modern production techniques and comprehensive quality assurance.
Every effort has been made to ensure your satisfaction and troublefree use of the machine.
Please contact your dealer or our sales company if you have any queries concerning your machine.
Your
hampehrer
Hans Peter Stihl
English
Guide to Using this Manual
Pictograms
All the pictograms attached to the machine are shown and explained in this manual.
Symbols in text

Warning where there is a risk of an accident or personal injury or serious damage to property.

Caution where there is a risk of damaging the machine or its individual components.
Engineering improvements
STIHL's philosophy is to continually improve all of its products. For this reason we may modify the design, engineering and appearance of our products periodically.
Therefore, some changes, modifications and improvements may not be covered in this manual.
Safety Precautions and Working Techniques

The high water pressure generated and the power connection are particular sources of danger.

It is important that you carefully read the entire Instruction Manual before using the machine for the first time and keep it in a safe place for future reference. Non-compliance with the Instruction Manual may cause serious or even fatal injury.

Warning!
- This appliance is not intended for use by children and other persons whose physical, sensory, or mental capabilities or lack of experience and knowledge prevents them from using the appliance safely without supervision or instruction by a responsible person.
- Minors should never be allowed to use the high-pressure cleaner - except for young trainees over the age of 16 when working under supervision.
-
Children should be supervised by responsible person to ensure that they do not play with the appliance.
-
The machine should only be provided or loaned to people familiar with this model and its operation. The instruction manual should always be handed over with the machine.
- Do not use the machine if anyone not wearing protective clothing is in the working area.
- Before starting any work on the machine, e. g., cleaning, servicing, replacement of parts - unplug the power plug!
Observe the national safety regulations issued, for example, by the employers' liability insurance association, social security institutions, occupational safety and health authorities or other organizations.
When not using the machine, it must be put down in such a way that it does not endanger anyone. Ensure that the machine cannot be used without authorization, unplug the power cord.
The user is responsible for accidents or risks involving third parties or their property.
If using the machine for the first time: Have your STIHL dealer or another expert show you how to use it safely.
In some countries, operation of machines that emit noise may be restricted by municipal regulations. Observe national regulations.
Unsuitable extension cords may be dangerous. When working outdoors, use only extension cords that are approved for this use and correspondingly marked and have a sufficient cross-section.
Never touch the power plug, power cord and extension cord and electrical plug connections with wet hands.
Always check that the machine is in good working order before starting work. Pay particular attention to the power cord, mains plug, high-pressure hose, spray attachment and safety mechanisms.
Never operate the machine with a defective high-pressure hose - ensure that it is replaced immediately.
The machine may only be used when all parts are in perfect working order.
The high-pressure hose must not be driven over, pulled, buckled or twisted.
Never pull the high-pressure hose or the power cord in order to move the machine.
The high-pressure hose must be approved for the permissible excess pressure of the machine.
The permissible excess pressure, the maximum permitted temperature and the date of manufacture are stated on the cladding of the high-pressure hose.
The permissible pressure and date of manufacture are specified on the fittings.
Accessories and spare parts

Warning!
- High-pressure hoses, fittings and couplings are important for machine safety. Only high-pressure hoses, fittings, couplings and other accessories which have been approved by STIHL for this machine
or technically equivalent parts may be mounted on the machine. Contact a servicing dealer if in doubt. Use only high-quality accessories, in order to avoid the risk of accidents or damage to the machine.
- STIHL recommends the use of genuine STIHL parts and accessories. These have been optimized for the product and the user's requirements.
Never modify the machine in any way, as this could be extremely dangerous. STIHL excludes all liability for personal injury and damage to property caused while using unauthorized attachments.
Physical suitability
The machine may only be operated by people who are fit, in good physical health and in good mental condition. If you have any condition that might be aggravated by strenuous work, check with your doctor before operating a machine.
Anyone who has consumed alcohol, medicines affecting their ability to react or drugs must not operate the machine.
Applications
The high-pressure cleaner can be used to clean motor vehicles, machines, tanks, facades or stables and to remove rust without dust or sparks.
Other uses are not permitted and may lead to accidents or damage to the machine.
Clothing and equipment
Wear shoes with non-slip soles.

Wear goggles and protective clothing. STIHL recommends that a boilersuit be worn in order to reduce the risk of injury due to accidental exposure to the high-pressure jet.
Transporting the machine
When transporting the machine in or on a vehicle, it must be secured, e.g. with straps, so that it cannot slip or tip over.
Antifreeze is recommended if the machine and accessories are to be transported at temperatures near or below 0^ (32°F) - see "Storing the Machine".
English
Detergents

Warning!
- Unsuitable detergents can cause damage to health, as well as to the machine and the object to be cleaned. Contact a servicing dealer if in doubt.
- STIHL recommends the use of genuine STIHL detergents. Follow the instructions for use.
Chemical detergents may contain physiologically harmful (toxic, caustic, irritant), flammable or explosive substances. In the event of skin or eye contact with detergent, flush the affected body parts with plenty of clean water immediately. If detergent is swallowed, seek medical attention immediately. Note the manufacturer's safety data sheets!
Detergents should always be used in the proportions specified by the manufacturer.
Before starting work
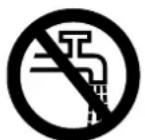
Do not connect the high-pressure cleaner directly to the drinking water main.
Only connect the high-pressure cleaner to the drinking water main in conjunction with a backflow preventer - see "Special accessories".

Warning!
- If drinking water has passed through the backflow preventer, it can no longer be regarded as drinking water.
Do not use the machine with dirty water. If there is a risk that dirty water will occur (e.g., flowing sand), an appropriate water filter must be used.
Inspecting the high-pressure cleaner

Warning!
- The high-pressure cleaner should only be used if it is in full working order - risk of accident!
- It must be possible to move the switch to the 0 position easily
- The switch must be in the 0 position
- Inspect the high-pressure hose, spray attachment and safety mechanisms for damage
- High-pressure hose and spray attachment in good condition (clean, moving easily) and correctly assembled
- For good control of the machine, the handles should be clean and dry with no oil or dirt on them
- Never attempt to modify the controls or safety devices
Electrical connection

Warning!
Minimize the risk of electrical shock:
-Voltage and frequency of the machine (see rating plate) must match the voltage and frequency of the mains supply
- Examine the power cord, power plug and extension cord for damage. Damaged cords, couplings and plugs or power cords that do not comply with the regulations must not be used
- Only connect the machine to a correctly installed power socket
The insulation on the power cord and any extension cord, the plug and the coupling must be fully intact

Warning!
Route the power cord and extension cord properly:
- Observe the minimum cross-section of the individual cords - see "Connecting the machine to the power supply"
- Route and mark the power cord so that it cannot become damaged and no one is endangered - danger of stumbling!
-
The connector and coupling of the extension cord must be waterproof or routed in such a way that they cannot come into contact with water - the connector and coupling of the extension cord must not lie in water
-don't let the cord rub against edges or pointed or sharp objects
-don't squeeze the cord under doors or windows
-
if cords become snarled - unplug the power plug and unsnarl the cord
- always unroll the power cord from the cable drum completely to avoid risk of fire due to overheating
During work

Warning!
- Never draw in fluids containing solvents or undiluted acids and solvents (e.g., gasoline, heating oil, paint thinner or acetone). These substances damage the materials used in the machine. The spray is highly combustible, explosive and poisonous.
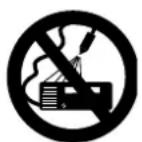
Never direct the high-pressure jet or water hose against the machine itself or against other electrical appliances and equipment - danger of short-circuiting!
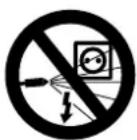
Never direct the high-pressure jet or water hose against electrical equipment, connections and power cords - danger of short-circuiting!
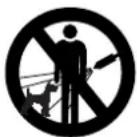
Never direct the high-pressure jet against yourself or other people, not even to clean clothing or shoes - risk of injury!
Ensure you always have a firm and safe footing.
Beware of slipping on ice, water, snow or uneven ground!
Keep the high-pressure cleaner as far away as possible from the object being cleaned.
The machine may only be operated in an upright position. Do not cover the machine and ensure adequate motor ventilation.
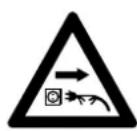
The plug must be disconnected immediately if the cord is damaged - danger of electrocution!
Do not direct the high-pressure jet against animals.
Do not direct the high-pressure jet onto places you cannot see.
Children, animals and bystanders must remain at a distance.
Hazardous substances (e.g., asbestos or oil) must not be allowed to escape into the environment unchecked when working with the machine. The applicable environmental regulations must be observed without fail.
Surfaces of asbestos cement must never be cleaned with a high-pressure jet. Hazardous, breathable asbestos fibers may be released in addition to the dirt. The danger is greatest when the washed surface has dried.
Delicate parts made of rubber, fabric or similar materials must not be cleaned with a pencil jet, e. g., from the rotary nozzle. Maintain a sufficient distance between the high-pressure hose and the surface when cleaning to avoid any damage to the surface being cleaned.
The trigger on the spray gun must move easily and automatically return to its starting position when released.
Hold the spray attachment firmly with both hands in order safely to withstand the kickback force and additional torque produced when using spray attachments with angled spray lance.
Ensure that the power cord and the high-pressure hose are not damaged by being driven over, squashed or pulled; protect them against heat and oil.
Do not touch the power cord with the high-pressure jet.
If the machine is subjected to unusually high loads for which it was not designed (e.g., heavy impact or a fall), always check that it is in good condition before continuing work - refer also to the chapter "Before starting work". Also make certain that the safety mechanisms are working properly. Never continue using a machine that is not in perfect working order. Consult a servicing dealer if in doubt.
Before leaving the machine: Switch off the machine - unplug the power cord.
Safety equipment
When the safety equipment is activated, excessive pressure is returned to the intake side of the pump via a safety valve. This safety feature has been set by the manufacturer and must not be adjusted.
English
After finishing work
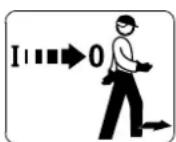
Switch off the machine before leaving it!
- Unplug the power plug from the socket
- Disconnect water intake hose between machine and water supply
Never unplug the power plug by pulling on the cord: always grip the plug itself.
Maintenance and repairs

Warning!
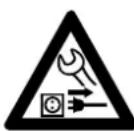
Before starting any work on the machine: always disconnect the machine from the mains power supply.
- Use only high-quality spare parts. in order to avoid the risk of accidents or damage to the machine. Contact a servicing dealer if in doubt.
- If the supply cord is damaged, it must be replaced by authorized STIHL dealers or qualified electricians in order to avoid a hazard.
Clean plastic parts with a cloth. Harsh detergents can damage the plastic.
Cleaning ventilation slots in motor housing as needed.
The machine must be serviced regularly. Do not attempt any maintenance or repair work not described in the Instruction Manual. All other work should be carried out by a servicing dealer.
STIHL recommends the use of genuine STIHL spare parts. Such parts have been optimized for the machine and the user's requirements.
STIHL recommends that maintenance and repair work be carried out only by authorized STIHL dealers. STIHL dealers receive regular training and are supplied with technical information.
Assembling the Unit
The following accessory parts must be fitted before using the machine for the first time.
Connector on water inlet
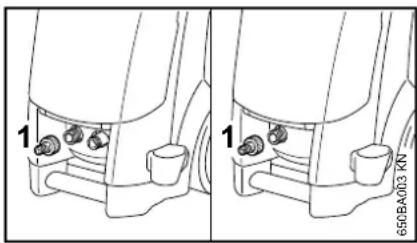
- Attach the connector (1) to the water inlet and tighten it by hand
RE 108, 118
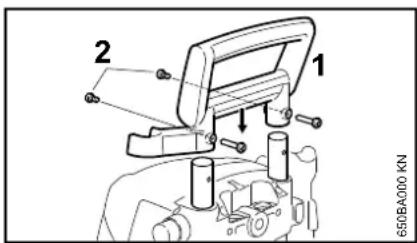
Handle
- Press the handle (1) onto the telescopic shafts from above and fasten it with the two bolts (2) and nuts
Holder for high-pressure hose
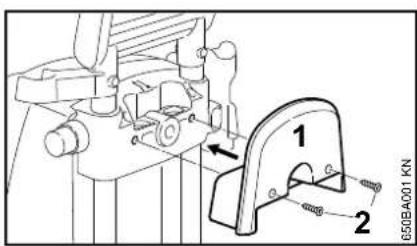
- Position the holder (1) for the high-pressure hose on the adjuster and fasten it with the screws (2)
RE 128 PLUS
Crank for hose reel
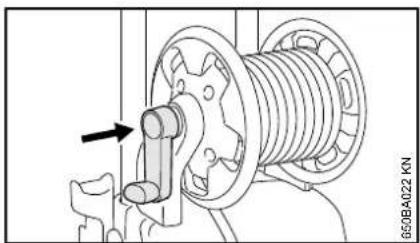
Engage crank handle in hose reel
Holder for flat hose cassette
A flat hose cassette is available as special accessory.
The holder for the flat hose cassette is included and can be installed as needed.
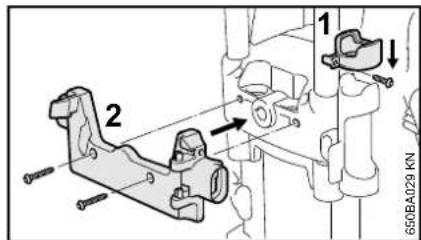
- Slide the locking ring (1) over the spray attachment holder
Fasten the holder (2) for the flat hose cassette with the included screws
Transporting the Unit
Height adjustable handle
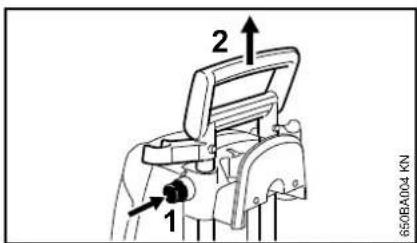
Press button (1) and pull handle (2) upward as far as it will go
Release button and pull/push on the handle again until the telescopic shafts engage
Transport handle (RE 118, 128 PLUS only)
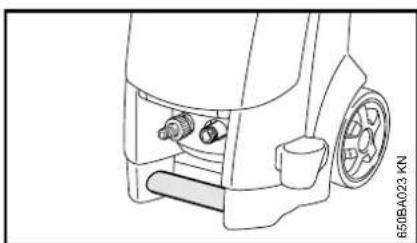
The machine can be carried using the transport handle.
English
Fitting, removing spray lance
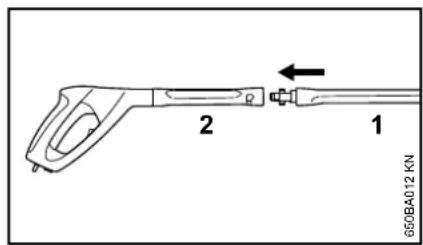
Spray lance
Press the spray lance (1) into the mount on the spray gun (2), turn it by 90^ so that it engages
Removing
Press the spray lance (1) into the mount on the spray gun (2), turn it by 90^ and pull it out of the mount
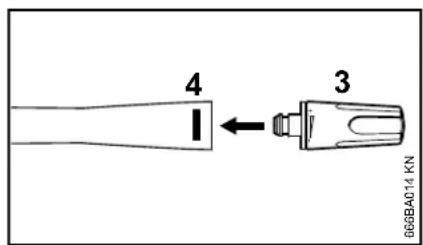
Nozzle
- Insert nozzle (3) in spray lance until the safety latch (4) engages – at which point the safety latch button will spring out again – the adjustable fan jet nozzle has an anti-twist device; orient this according to the groove on the spray lance
Removing
Press the safety latch (4) and pull out the nozzle (3)
Fitting, removing high-pressure hose
RE 108, RE 118
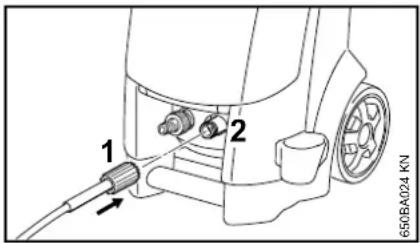
Connecting the high-pressure hose
Disconnecting the high-pressure hose
Unscrew the union nut (1)
Pull high-pressure hose off of connector (2)
RE 128 PLUS
The high-pressure hose is already connected.
Disconnecting the high-pressure hose
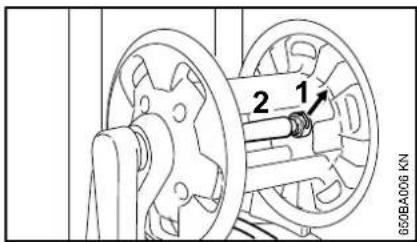
Pull out the spring clip (1) and pull the high-pressure hose (2) out of the connector
Connecting the high-pressure hose
-Push the high-pressure hose (2) onto the connector of the hose reel
- Push the spring clip (1) into the connector
Connecting the high-pressure hose to the spray gun
Fitting
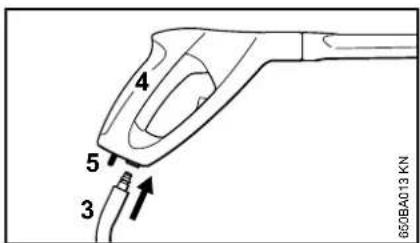
- Push the connector of the high-pressure hose (3) into the mount on the spray gun (4) – until it engages
Removing
- Actuate the safety catch (5) and pull the high-pressure hose (3) out of the mount on the spray gun
High-pressure hose extension
As a rule, always use only one high-pressure hose extension - see "Special accessories"
Connecting the water supply
In suction operation, the machine can also be connected to rivers, lakes, cisterns and tanks, etc. - see "Connecting to a pressured water supply".
Briefly rinse out the hose before connecting it to the machine to prevent sand and other particles from entering the machine.
Connect hose
Connect hose to water supply (1/2" diameter, length at least 10 m to absorb pressure surges. Maximum length 25 m)
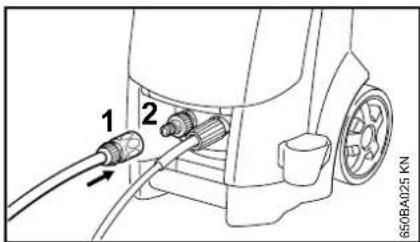
- Push the coupling (1) on to the hose connector (2)
- Turn on water supply
English
Connection to the drinking water main
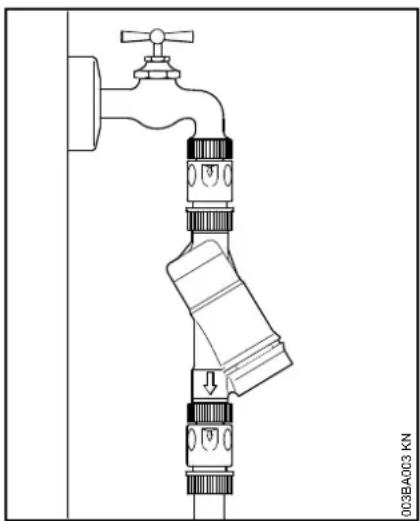
When hooking up to the drinking water main, a backflow preventer (Type BA in accordance with EN 60335-2-79) must be installed between the water tap and the hose.
If drinking water has passed through the backflow preventer, it can no longer be regarded as drinking water.
Follow the rules laid down by the local water supply company to prevent water flowing back from the high-pressure cleaner into the drinking water main.
Connecting to a. pressureless water supply
Connect the machine to the pressurized water supply and start it up briefly in accordance with the Instruction Manual
- Switch off machine
- Disconnect the spray attachment from the high-pressure hose
-Replace water intake hose with suction hose (special accessory)
Always use the connecting element supplied with the intake hose to connect the hose. The standard connecting elements are watertight only when used with a pressurized water supply and for this reason are not suitable for suction operation.
- Fill the suction hose with water and immerse the suction cup of the suction hose in the water tank - do not use dirty water
As a rule, it is advisable to use a water filter.
Hold down the high-pressure hose by hand
- Switch on the machine
Wait until a steady jet exits the high-pressure hose
- Switch off machine
Connect spray attachment
- Switch on the machine with the spray gun open
- Actuate the spray gun several times briefly in order to bleed the air out of the machine as quickly as possible
Connecting to Power Supply
The voltage and frequency of the machine (see rating plate) must match the voltage and frequency of the power connection.
The minimum fuse protection of the power connection must comply with the specifications - see "Specifications".
The machine must be connected to the power supply via an earth-leakage circuit breaker to disconnect the power supply if the differential current to earth exceeds 30mA for 30ms .
The power connection must correspond to IEC 60364-1 and relevant national regulations.
When the machine is switched on, voltage fluctuations that occur under unfavorable mains conditions (high power line impedance) may negatively affect other connected electrical appliances. Trouble is not anticipated at power line impedances less than 0.15 ohms.
Extension Cords
Make sure your electrical cord set is in good condition. When using an extension cord, be sure to use one heavy enough to carry the current your product will draw. An undersized extension cord may cause a drop in line voltage resulting in loss of power and overheating. The table below shows the correct size (AWG) to use for your machine (Cord types SJW or SJTW) depending on cord length and
nameplate ampere rating. If in doubt, use the next heavier gauge. The smaller the gauge number, the heavier the cord.
Cord length (ft) Wire gage (AWG)
5016
100 14
150 12
Appropriate extension cords are available in special stores for electrical equipment or from your STIHL dealer.
Connection to the power supply socket
Before connection to the power supply, check that the machine is switched off - see "Switching off the machine"
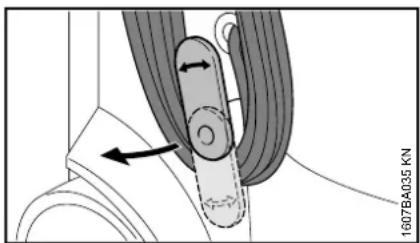
- Swivel the lower holder upward and remove the power cord
Plug the power cord or extension cord into a properly installed outlet
Switching On
- Turn on water supply
The machine may only be switched on when the water intake hose is connected and the water supply has been turned on. Otherwise the machine may be damaged due to lack of water.
Completely unroll the high-pressure hose
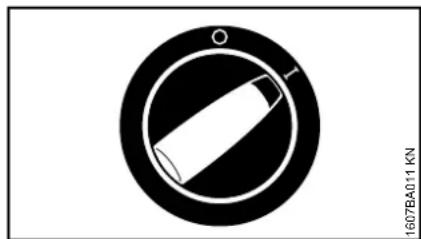
- Turn the master switch to I - now the machine is in standby mode
Working
Actuating the spray gun
- Point the spray gun at the object to be cleaned - never at persons!
- Point the rotary nozzle downwards when starting (if fitted)
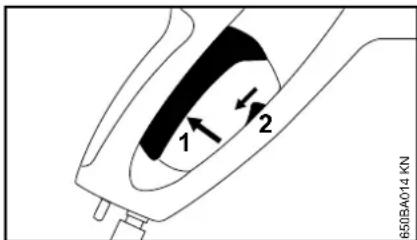
- Press the safety latch (2) downward - the lever (1) is unlatched
Squeeze the lever (1)
The motor stops when the lever is released.
Standby mode
The machine must not be operated in standby mode for more than 5 minutes. If work is interrupted for more than 5 min., during breaks or if the machine is left unattended, switch off the machine at the master switch - see "Switching off the machine".
English
High-pressure hose

Do not buckle or loop the high-pressure hose.
Do not place any heavy objects on the high-pressure hose, and do not drive any vehicles over it.
Nozzles
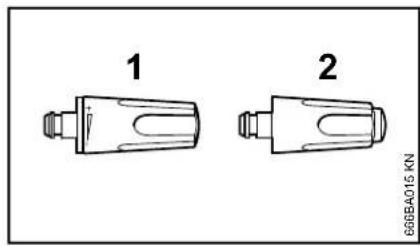
Fan-jet nozzle (1)
The operating pressure can be infinitely adjusted at the nozzle.
Jet angle 15^ , maximum effect at a distance of approx. 7 cm.
Rotary nozzle (2)
Nozzle with rotating jet for stubborn dirt on hard surfaces. Maximum effect at a distance of 10cm
The spray attachment can also be used without nozzles at low pressure, e.g., for rinsing with a large flow of water.
Storage compartment for nozzles
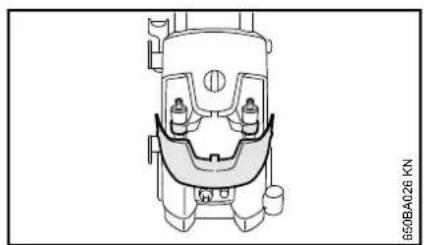
- Open the flap - the rotary nozzle and fan jet nozzle can be stored in the holders
Storing accessories
Spray gun, spray lance, detergent bottle and cleaning pin can be stored directly on the machine - see "Main Parts".
Adding detergent
Detergent must not be allowed to dry on the object to be cleaned.
- Remove nozzle from spray lance - see "Fitting, removing spray lance"
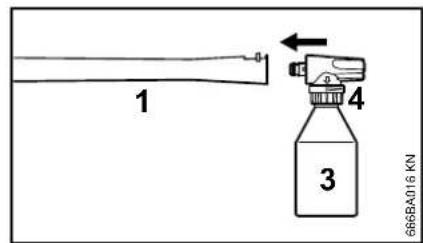
Install spray set (3) on spray lance (1)- the spray set has an antitwist device; orient this according to the groove on the spray lance
Fill the container of the spray set with STIHL detergent diluted as directed (approx. 0.5 liters).
Use the adjusting ring (4) to set the quantity of detergent to be added
- When applying detergent, start at the bottom and work upwards
Maximum effect at a distance of 1m
Switching Off
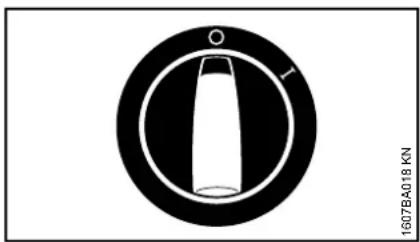
- Turn the master switch to 0 and turn off the water supply
- Actuate the spray gun until water only drips from the spray head (the machine is now depressurized)
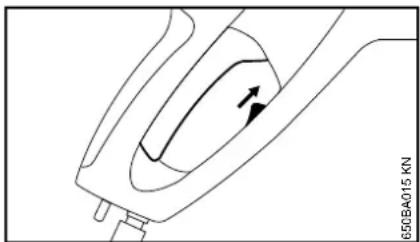
Release trigger
- Press the safety latch upward - the spray gun is locked to prevent inadvertent operation
- Unplug the power plug from the socket
- Disconnect hose from the water supply and from the machine
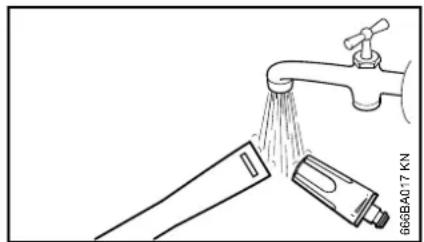
After use
Rinse the connection latches of the spray lance and nozzle with water so that no deposits form
Roll the high-pressure hose and power cable up on the holders provided for this purpose - see "Main Parts"
Storing the Machine
Store the machine in a dry room where it is protected from frost.
If protection from frost cannot be guaranteed, draw glycol-based antifreeze - like that used in motor vehicles - into the pump:
Insert water intake hose in container with antifreeze
-Insert spray gun without spray lance in the same container
- Switch on the machine with the spray gun open
- Actuate the spray gun until a uniform jet emerges
- Keep leftover antifreeze in a sealed container
Maintenance and Care
| The following maintenance intervals apply in normal operating conditions. The spec-ified intervals must be shortened accordingly for longer daily working hours. If the machine is only used occasionally, the intervals can be extended accordingly. | before starting work | at the end of work and/or daily | monthly | if damaged | as required |
| Complete machine | visual inspection (condition, leaks) X | | | | | |
| clean X | X | | | | |
| Connectors on high-pressure hose | clean X | X | | | | |
| grease X | | | | | |
| Plug-type coupling of the spray lance and the coupling sleeve of the spray gun | clean X | | X | | | |
| Water intake screen in the high-pressure inlet | clean X | X | | | | |
| replace X | | | | | |
| High pressure nozzle | clean X | | | | | |
| replace X | | | | | |
| Ventilation openings clean X | | | | | | |
| Machine supports | check X | | | | | |
| replace X | | | | | |
Maintenance
Always unplug the power cord before servicing or cleaning the machine.
In order to ensure trouble free operation, we recommend carrying out the following steps whenever the machine is used:
Rinse the water hose, high-pressure hose, spray lance and accessories with water before fitting them
- Remove all dust and sand from the couplings
Rinse out the spray set after use
Cleaning the nozzle
Since the pump pressure increases if the nozzle is clogged, it must be cleaned immediately.
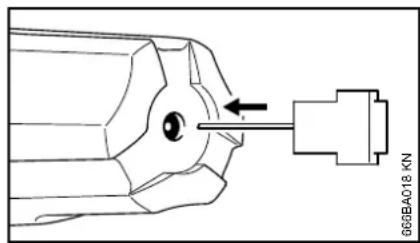
Switch off machine
- Actuate the spray gun until water merely drips from the spray head - the machine is now depressurized
- Remove the nozzle
Clean the nozzle with the cleaning pin

Always remove the nozzle before cleaning it
Rinse the nozzle with water from the front
Cleaning the water intake screen
The water intake screen must be cleaned once per month or more often if necessary.
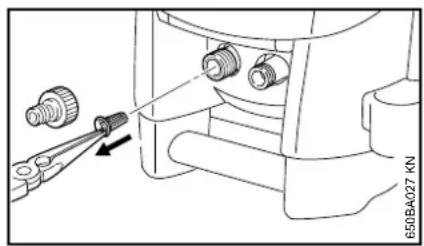
- Unscrew the hose connection
Carefully remove the screen with pliers and rinse it with water
Before refitting the screen, ensure that it is undamaged and replace if necessary
Cleaning the ventilation openings
The machine must be kept clean so that cooling air can flow freely through the openings in the machine.
Greasing couplings
The couplings on the spray gun for connecting the high-pressure hose and the spray lance must be greased as required.
First use after long periods of storage
During long periods of storage, mineral residue from the water may be deposited in the pump. This may cause the motor to start with difficulty or not at all.
Connect the machine to the water supply and flush thoroughly with tap water, leave the power cord unplugged while doing so
Plug the power plug into the wall socket
- Switch on the machine with the spray gun open
English
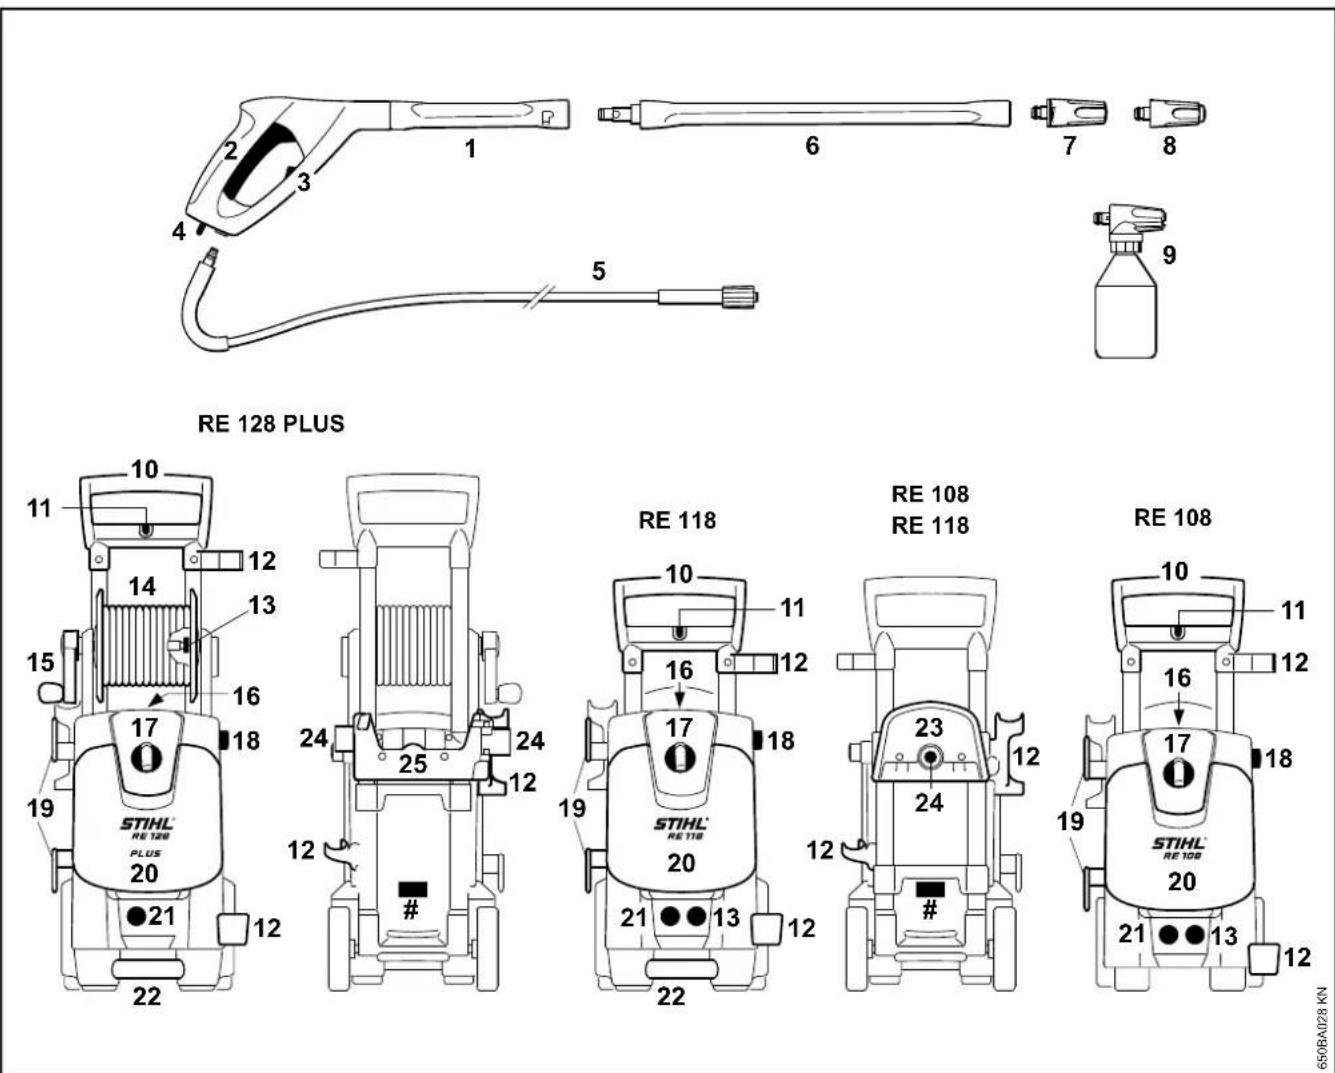
Main Parts
1 Spray gun
2 Lever
3 Safety catch
4 Trigger interlock
5 High-pressure hose
6 Spray lance
7 Fan jet nozzle, adjustable
8 Rotary nozzle
9 Spray set
10 Handle
11 Bracket for surface washing brush
12 Bracket for spray lance
13 High-pressure hose connection
14 Hose reel
15 Crank for hose reel
16 Bracket for cleaning pin
17 Machine switch
18 Button for height adjustment of handle
19 Bracket for power cable
20 Flap for storage compartment
21 Water attachment
22 Carrying handle
23 Hose holder
24 Bracket for spray set
25 Holder for flat hose cassette
Model plate
Specifications
Electrical Specifications
RE108
Power supply: 230V / 1 /50Hz^1)
$$
2 3 0 \mathrm {V} - 2 4 0 \mathrm {V}
$$
$$
1 \sim / 5 0 \mathrm {H z} ^ {2)}
$$
$$
2 2 0 \mathrm {V} / 1 \sim / 5 0 \mathrm {H z} ^ {3)}
$$
$$
1 1 0 \mathrm {V} / 1 \sim / 6 0 \mathrm {H z} ^ {4)}
$$
$$
1 2 0 \mathrm {V} / 1 \sim / 6 0 \mathrm {H z} ^ {(5)}
$$
Ampere rating: 7.5 A 3)
$$
9 A ^ {1) 2)}
$$
$$
1 3 \mathrm {A} ^ {4)}
$$
$$
1 1. 7 \mathrm {A} ^ {5)}
$$
Fuse: 10 A 1)2)3)
$$
1 5 \mathrm {A} ^ {(4) 5)}
$$
Protection class: I
Type of
protection: IP X5
RE118
Power supply: 230V / 1 /50Hz
$$
2 3 0 \mathrm {V} - 2 4 0 \mathrm {V}
$$
$$
1 \sim / 5 0 \mathrm {H z} ^ {2)}
$$
$$
1 1 0 \mathrm {V} / 1 \sim / 6 0 \mathrm {H z} ^ {4)}
$$
Power output: 2.1 kW
$$
1. 4 \mathrm {k W} ^ {4)}
$$
Ampere rating: 9.2 A 1)2)
$$
1 3 \mathrm {A} ^ {4)}
$$
Fuse: 10 A 1) 2)
$$
1 5 \mathrm {A} ^ {4)}
$$
Protection class: I
Type of
protection: IP X5
RE 128 PLUS
Power supply: 230V / 1 /50Hz
$$
2 3 0 \mathrm {V} - 2 4 0 \mathrm {V}
$$
$$
1 \sim / 5 0 \mathrm {H z} ^ {2)}
$$
$$
2 2 0 \mathrm {V} / 1 \sim / 6 0 \mathrm {H z} ^ {3)}
$$
$$
1 2 0 \mathrm {V} / 1 \sim / 6 0 \mathrm {H z} ^ {5)}
$$
Power output: 2.3 kW
$$
1. 4 \mathrm {k W} ^ {5)}
$$
Ampere rating: 10 A 1)2)
$$
1 3 \mathrm {A} ^ {3)}
$$
$$
1 3. 5 \mathrm {A} ^ {5)}
$$
Fuse: 10 A 1)2)
$$
1 5 \mathrm {A} ^ {(3) 5)}
$$
Protection class: I
Type of
protection: IP X5
1) 230V / 50Hz version
(2) 230 V - 240 V/50 Hz version
3) 220V / 50Hz version
4) 110 V / 60 Hz version
5) 120V / 60Hz version
English
Hydraulic specifications
RE108
pressure: 1 Mpa (10 bar)
Water throughput, as 380 I/h 1)2)3
Max. water feed temperature
With pressurized
water supply: 40^
Suction operation: 20^
Working pressure: 12.5 Mpa 1) 2)
(125 bar)
8.6 Mpa 4)
(86 bar)
Max. permissible 14 Mpa 1)2
pressure: (140 bar)
10 Mpa 4)
(100 bar)
Max. water feed 1 Mpa
pressure: (10 bar)
Water throughput, as 400 l/h 1)2
per EN 60335-2-79: 390 l/h4)
Max.suction lift:1 m 1)2)
0.5 m 4)
Max. water feed temperature
With pressurized water
supply: 60^
Suction operation: 20^
Max. kickback force: 17.7 N
14.2 N 4)
Working pressure: 13.5 Mpa 1)2)
(135 bar)
14 Mpa 3)
(140 bar)
9.5 Mpa 5)
(95 bar)
Max. permissible
15 Mpa
(150 bar)
11.1 Mpa 5)
(111 bar)
Max. water feed
1 Mpa
(10 bar)
Max. water throughput: 500 l/h
440 l/h 5)
Water throughput, as
420 l/h
355 l/h 5)
Max. suction lift: 1 m
0.5m^5)
Max. water feed temperature
With pressurized water
supply: 60^
Suction operation: 20^
Max. kickback force: 19.2 N
19.5 N 3)
13.6 N 5)
(1) 230V / 50Hz version
(2) 230V - 240V / 50Hz version
(3) 220V / 50Hz version
(4) 110V / 60Hz version
(5) 120V / 60Hz version
Dimensions
RE108
Length approx.: 360 mm
Width approx.: 340 mm
Height approx.: 610mm / 870mm
RE118
Length approx.: 360 mm
Width approx.: 340 mm
Height approx.: 640mm / 900mm
RE 128 PLUS
Length approx.: 319 mm
Width approx.: 366 mm
Height approx.: 696 mm / 900 mm
Weight
RE108
Device: 16 kg
Ready for operation: 18.3kg
RE118
Device: 17kg
Ready for operation: 18.8kg
RE 128 PLUS
Device: 17kg
Ready for operation: 20kg
High-pressure hose
RE 108:8m, textile braided 8m,steel braided
RE 118: 8 m, steel braided
RE 128 PLUS: 9m steel braided *) According to equipment version
Special Accessories
Notes and restrictions for use
Spray lance extension
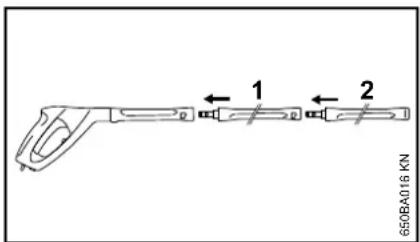
As a rule, only one spray lance extension (1) may be used between spray gun and standard spray lance (2).
RA 101
Use the RA 101 either directly or together with the included spray lance extension on the spray gun. Do not install any additional spray lance extension.
Wet sand jet-stream appliance
Use the wet sand jet-stream appliance either directly or together with a spray lance extension on the spray gun. Do not install any additional spray lance extension.
English
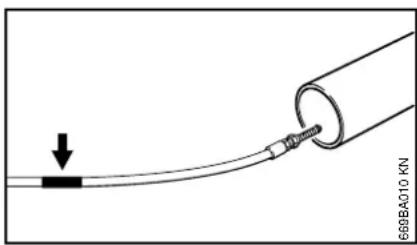
Pipe cleaning set, 15m
There is a mark on the cleaning hose underneath the nozzle (see arrow).
- Push the hose into the pipe to be cleaned until this mark is reached - then switch on the machine
When this mark appears as the hose is pulled out of the pipe:
- Switch off machine
- Actuate the spray gun until the machine has been depressurized
Pull the hose out of the pipe completely
The hose must never be pulled out of the pipe when the machine is switched on.
Flat textile hose with cassette
Low-pressure hose for connecting the high-pressure cleaner to the water supply. The cassette permits reeling in and unreeling of the flat textile hose as well as storage in a minimum of space right on the machine
High-pressure hose extensions
- 7 m, textile braided
-7m,steel braided
- 10 m, steel braided
Always connect only one high-pressure hose extension between machine and high-pressure hose.
Rotating washing brush
Use the rotating wash brush either directly or together with a spray lance extension on the spray gun. Do not install any additional spray lance extension.
Angled spray lance
Use the angled spray lance either directly or together with a spray lance extension on the spray gun. Do not install any additional spray lance extension.
The nozzle can be cleaned with the aid of the cleaning pin supplied.
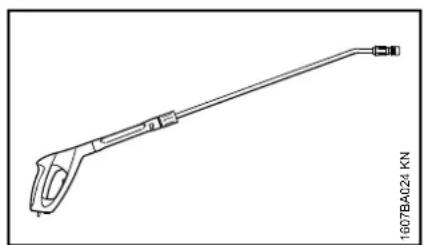
Angled spay lance, long
Use the long, angled spray lance only directly on the spray gun. Do not install a spray lance extension.
Do not aim around blind corners behind which people may be concealed. The nozzle can be cleaned with the aid of the cleaning pin supplied.
Water filter
For filtering water from the water main, as well as for use in pressureless suction operation.
Backflow preventer
Type BA in accordance with EN 60335-2-79: For connecting the high-pressure cleaner to the drinking water supply.
Other special accessories
-Wash brush
- Cleaning kit
Suction set
Detergents and care products for various spheres of application
Ask your STIHL servicing dealer for current information about this and other special accessories.
Troubleshooting
Before working on the machine, unplug the power cord, turn off the water supply and actuate the spray gun until the pressure has been relieved.
| Fault Cause Remedy | | |
| Motor does not run when switched on (hums when switched on) | Mains voltage is too low or improper Check e | electrical connection Check plug, cable and switch |
| Extension cord with wrong cross-section Use | an extension cord with a sufficient cross-section, see "Connecting the machine to the power supply" |
| Extension cord is too long Connect the machine | he without an extension cord or with a shorter one |
| Mains circuit-breaker has been tripped Switch | off the machine, actuate the spray gun until water only drips out of the head, engage the safety catch, reset the mains circuit-breaker |
| Spray gun not actuated Actuate spray gun when switching on the machine |
| Motor constantly switches on and off High-pressure pump or spray attachment is leaky | Have the machine checked by a servicing dealer 1) |
| Engine stops Machine switches off because the motor is overheating | Check whether the supply voltage and machine voltage match; let the motor cool down for at least 5 minutes |
| Weak, ragged, unclean jet Nozzle fouled Clean nozzle, see "Maintenance" | |
English
Before working on the machine, unplug the power cord, turn off the water supply and actuate the spray gun until the pressure has been relieved.
| Fault Cause Remedy | | |
| Pressure fluctuates or drops Shortage | of water Open water tap completely | Comply with permissible suction lift (suction mode only) |
| High-pressure nozzle in spray head is dirty | Clean high-pressure nozzle; see "Maintenance" |
| Water intake strainer in pump inflow clogged | Clean water intake strainer; see "Maintenance" |
| High-pressure pump is leaky, valves are defective | Have the machine checked by a servicing dealer 1) |
| Nozzle clogged Clean nozzle | |
| No supply of detergents Detergent tank | is empty Fill detergent tank | |
| Detergent intake is clogged Eliminate clog | |
| |
1) STIHL recommends STIHL servicing dealers
Maintenance and Repairs Disposal
Users of this machine may only carry out the maintenance and service work described in this user manual. All other repairs must be carried out by a servicing dealer.
STIHL recommends that you have servicing and repair work carried out exclusively by an authorized STIHL servicing dealer. STIHL dealers are regularly given the opportunity to attend training courses and are supplied with the necessary technical information.
When repairing the machine, only use replacement parts which have been approved by STIHL for this power tool or are technically identical. Only use high-quality replacement parts in order to avoid the risk of accidents and damage to the machine.
STIHL recommends the use of original STIHL replacement parts.
Original STIHL parts can be identified by the STIHL part number, the STIHL logo and the STIHL parts symbol (the symbol may appear alone on small parts).
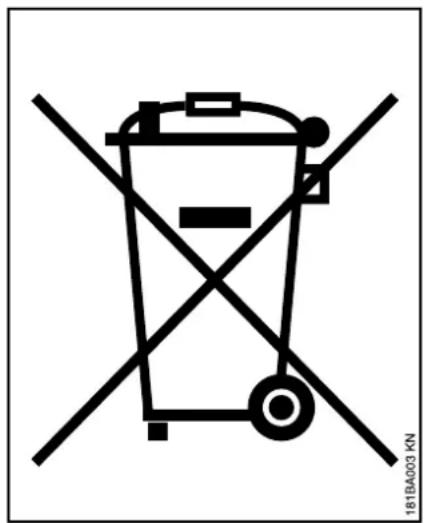
Electrical appliances must not be disposed of as household refuse. Machine, accessories and packaging must be collected and recycled in an environmentally beneficial manner.
English
Table des matieres
Indications concernant la presente
Notice d'emploi 26
Chere cliente, cher client,
Pression maxima 15 Mpa