MS5635 - Safe SentrySafe - Free user manual and instructions
Find the device manual for free MS5635 SentrySafe in PDF.



| Product Type | Safe |
| Brand | SentrySafe |
| Model | MS5635 |
| Power Supply | 4 AA alkaline batteries (not included) |
| Locking Type | Electronic keypad lock + backup key lock |
| Fire Protection | UL certified (1 hour at 927°C) and ETL certified (1 hour at 927°C) for digital media |
| Water Resistance | Tested (15-min water spray and 1-hour immersion in 2 inches of water) – model dependent |
| Code Capacity | Factory 5-digit code, administrator code (4-8 digits), up to 6 user codes |
| Combination Type | Programmable electronic (except fixed factory code) |
| Security Deterrent Mode | 2 minutes after 3 incorrect attempts |
| Warranty | Limited 2 years (structural or mechanical defects) |
| Maintenance | Replace batteries every 2 years or when indicator lights up |
| Cleaning | Do not use liquids on keypad; avoid sharp objects |
| Humidity Precautions | Do not discard desiccant packet; open regularly |
| Floor Anchoring | Possible (screw kit included) |
| Manual Available | French, English, German, Spanish, etc. |
Frequently Asked Questions - MS5635 SentrySafe
User questions about MS5635 SentrySafe
0 question about this device. Answer the ones you know or ask your own.
Ask a new question about this device
Download the instructions for your Safe in PDF format for free! Find your manual MS5635 - SentrySafe and take your electronic device back in hand. On this page are published all the documents necessary for the use of your device. MS5635 by SentrySafe.
USER MANUAL MS5635 SentrySafe
Owner's Manual FIRE SAFE. For information on using your safe's lock(s), please see pages 2-5. See back cover for Model and combination information.
FIRE SAFE
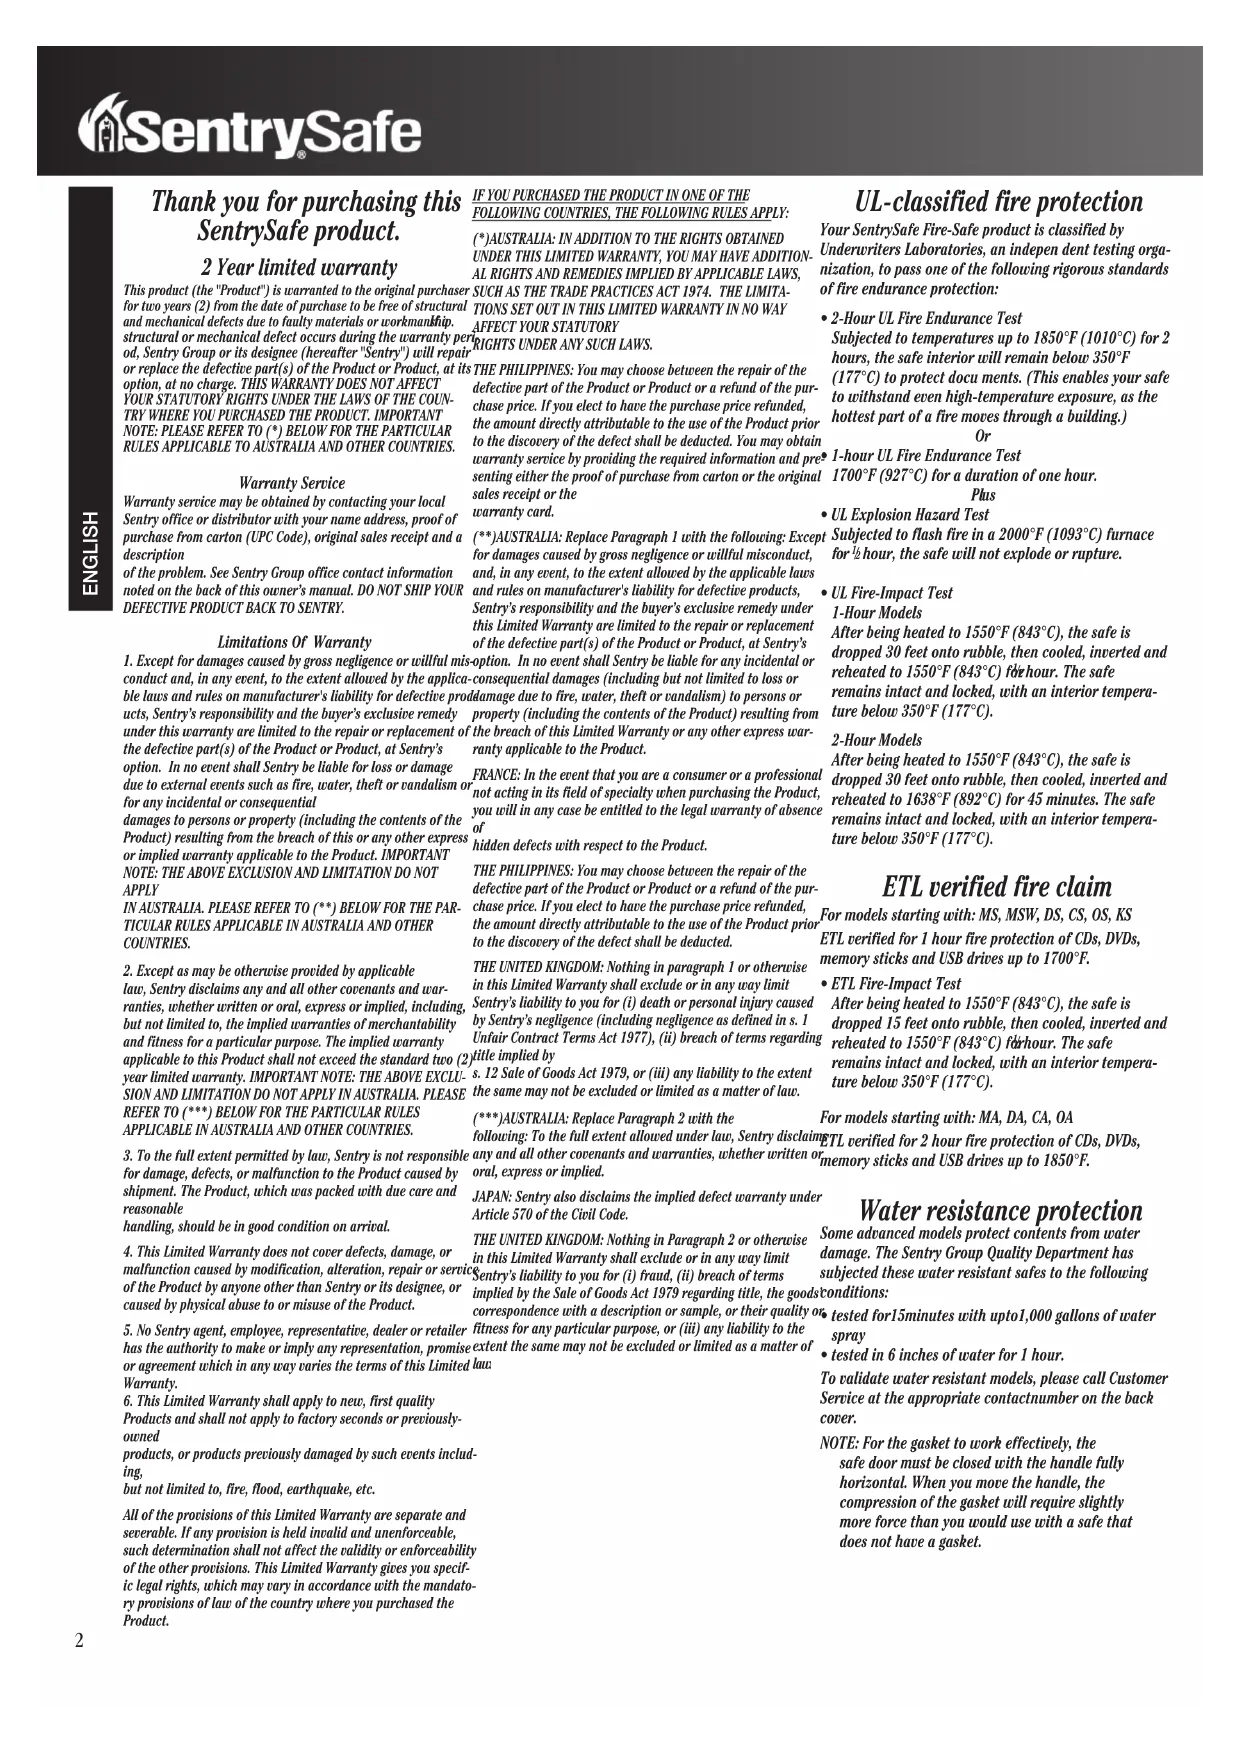
Thank you for purchasing this SentrySafe product. 2 Year limited warranty
This product (the "Product") is warranted to the original purchaser for two years (2) from the date of purchase to be free of structural and mechanical defects due to faulty materials or workmanship. If a structural or mechanical defect occurs during the warranty period, Sentry Group or its designee (hereafter "Sentry") will repair or replace the defective part(s) of the Product or Product, at its option, at no charge. THIS WARRANTY DOES NOT AFFECT YOUR STATUTORY RIGHTS UNDER THE LAWS OF THE COUNTRY WHERE YOU PURCHASED THE PRODUCT. IMPORTANT NOTE: PLEASE REFER TO (*) BELOW FOR THE PARTICULAR RULES APPLICABLE TO AUSTRALIA AND OTHER COUNTRIES.
Warranty Service
Warranty service may be obtained by contacting your local Sentry office or distributor with your name, address, proof of purchase from carton (UPC Code), original sales receipt, and a description of the problem. See Sentry Group office contact information noted on the back of this owner's manual. DO NOT SHIP YOUR DEFECTIVE PRODUCT BACK TO SENTRY.
Limitations Of Warranty
- Except for damages caused by gross negligence or willful misconduct and, in any event, to the extent allowed by the applicable laws and rules on manufacturer's liability for defective products, Sentry's responsibility and the buyer's exclusive remedy under this warranty are limited to the repair or replacement of the defective part(s) of the Product or Product, at Sentry's option. In no event shall Sentry be liable for loss or damage due to external events such as fire, water, theft, or vandalism, or for any incidental or consequential damages to persons or property (including the contents of the Product) resulting from the breach of this or any other express or implied warranty applicable to the Product. IMPORTANT NOTE: THE ABOVE EXCLUSION AND LIMITATION DO NOT APPLY IN AUSTRALIA. PLEASE REFER TO (**) BELOW FOR THE PARTICULAR RULES APPLICABLE IN AUSTRALIA AND OTHER COUNTRIES.
- Except as may be otherwise provided by applicable law, Sentry disclaims any and all other covenants and warranties, whether written or oral, express or implied, including, but not limited to, the implied warranties of merchantability and fitness for a particular purpose. The implied warranty applicable to this Product shall not exceed the standard two (2) year limited warranty. IMPORTANT NOTE: THE ABOVE EXCLUSION AND LIMITATION DO NOT APPLY IN AUSTRALIA. PLEASE REFER TO (***) BELOW FOR THE PARTICULAR RULES APPLICABLE IN AUSTRALIA AND OTHER COUNTRIES.
- To the full extent permitted by law, Sentry is not responsible for damage, defects, or malfunction to the Product caused by shipment. The Product, which was packed with due care and reasonable handling, should be in good condition on arrival.
- This Limited Warranty does not cover defects, damage, or malfunction caused by modification, alteration, repair or service of the Product by anyone other than Sentry or its designee, or caused by physical abuse to or misuse of the Product.
- No Sentry agent, employee, representative, dealer or retailer has the authority to make or imply any representation, promise or agreement which in any way varies the terms of this Limited Warranty.
- This Limited Warranty shall apply to new, first quality Products and shall not apply to factory seconds or previously-owned products, or products previously damaged by such events including, but not limited to, fire, flood, earthquake, etc. All of the provisions of this Limited Warranty are separate and severable. If any provision is held invalid and unenforceable, such determination shall not affect the validity or enforceability of the other provisions. This Limited Warranty gives you specific legal rights, which may vary in accordance with the mandatory provisions of law of the country where you purchased the Product.
IF YOU PURCHASED THE PRODUCT IN ONE OF THE FOLLOWING COUNTRIES, THE FOLLOWING RULES APPLY:
(*)AUSTRALIA: IN ADDITION TO THE RIGHTS OBTAINED UNDER THIS LIMITED WARRANTY, YOU MAY HAVE ADDITIONAL RIGHTS AND REMEDIES IMPLIED BY APPLICABLE LAWS, SUCH AS THE TRADE PRACTICES ACT 1974. THE LIMITATIONS SET OUT IN THIS LIMITED WARRANTY IN NO WAY AFFECT YOUR STATUTORY RIGHTS UNDER ANY SUCH LAWS.
THE PHILIPPINES: You may choose between the repair of the defective part of the Product or Product or a refund of the purchase price. If you elect to have the purchase price refunded, the amount directly attributable to the use of the Product prior to the discovery of the defect shall be deducted. You may obtain warranty service by providing the required information and presenting either the proof of purchase from carton or the original sales receipt or the warranty card.
(**) AUSTRALIA: Replace Paragraph 1 with the following: Except for damages caused by gross negligence or willful misconduct, and, in any event, to the extent allowed by the applicable laws and rules on manufacturer's liability for defective products, or Sentry's responsibility and the buyer's exclusive remedy under this Limited Warranty are limited to the repair or replacement of the defective part(s) of the Product or Product, at Sentry's pre-option. In no event shall Sentry be liable for any incidental or consequential damages (including but not limited to loss or damage due to fire, water, theft or vandalism) to persons or property (including the contents of the Product) resulting from the breach of this Limited Warranty or any other express warranty applicable to the Product.
FRANCE: In the event that you are a consumer or a professional not acting in its field of specialty when purchasing the Product, you will in any case be entitled to the legal warranty of absence of hidden defects with respect to the Product.
THE PHILIPPINES: You may choose between the repair of the defective part of the Product or a refund of the purchase price. If you elect to have the purchase price refunded, the amount directly attributable to the use of the Product prior to the discovery of the defect shall be deducted.
THE UNITED KINGDOM: Nothing in paragraph 1 or otherwise in this Limited Warranty shall exclude or in any way limit Sentry's liability to you for (i) death or personal injury caused by Sentry's negligence (including negligence as defined in s. 1 Unfair Contract Terms Act 1977), (ii) breach of terms regarding title implied by
s. 12 Sale of Goods Act 1979, or (iii) any liability to the extent the same may not be excluded or limited as a matter of law.
**AUSTRALIA: Replace Paragraph 2 with the following: To the full extent allowed under law, Sentry disclaims any and all other covenants and warranties, whether written or oral, express or implied.
JAPAN: Sentry also disclaims the implied defect warranty under Article 570 of the Civil Code.
THE UNITED KINGDOM: Nothing in Paragraph 2 or otherwise in this Limited Warranty shall exclude or in any way limit Sentry's liability to you for (i) fraud, (ii) breach of terms implied by the Sale of Goods Act 1979 regarding title, the goods' correspondence with a description or sample, or their quality or fitness for any particular purpose, or (iii) any liability to the
extent the same may not be excluded or limited as a matter of law.
UL-classified fire protection
Your SentrySafe Fire-Safe product is classified by Underwriters Laboratories, an independent testing organization, to pass one of the following rigorous standards of fire endurance protection:
2-Hour UL Fire Endurance Test: Subjected to temperatures up to 1850°F (1010°C) for 2
hours, the safe interior will remain below 350°F
(177°C) to protect documents. (This enables your safe to withstand even high-temperature exposure, as the hottest part of a fire moves through a building.)
Or
1-hour UL Fire Endurance Test
1700°F (927°C) for a duration of one hour.
- UL Explosion Hazard Test
Subjected to flash fire in a 2000°F (1093°C) furnace for 1/2 hour, the safe will not explode or rupture.
- UL Fire-Impact Test 1-Hour Models
After being heated to 1550°F (843°C) the safe is dropped 30 feet onto rubble, then cooled, inverted and reheated to 1550°F (843°C) for hour. The safe remains intact and locked, with an interior temperature below 350°F (177°C) .
2-Hour Models
After being heated to 1550°F (843°C) the safe is dropped 30 feet onto rubble, then cooled, inverted and reheated to 1638°F (892°C) for 45 minutes. The safe remains intact and locked, with an interior temperature below 350°F (177°C) .
ETL verified fire claim
For models starting with: MS, MSW, DS, CS, OS, KS ETL verified for 1 hour fire protection of CDs, DVDs, memory sticks and USB drives up to 1700° F.
- ETL Fire-Impact Test
After being heated to 1550°F (843°C) the safe is dropped 15 feet onto rubble, then cooled, inverted and reheated to 1550°F (843°C) for hour. The safe remains intact and locked, with an interior temperature below 350°F (177°C) .
For models starting with: MA, DA, CA, OA
ETL verified for 2 hour fire protection of CDs, DVDs, memory sticks and USB drives up to 1850°F
Water resistance protection
Some advanced models protect contents from water damage. The Sentry Group Quality Department has subjected these water resistant safes to the following conditions:
Tested for 15 minutes with up to 1,000 gallons of water spray
- Tested in 6 inches of water for 1 hour.
To validate water resistant models, please call Customer Service at the appropriate contact number on the back cover.
NOTE: For the gasket to work effectively, the safe door must be closed with the handle fully horizontal. When you move the handle, the compression of the gasket will require slightly more force than you would use with a safe that does not have a gasket.
Instructions for floor mounting
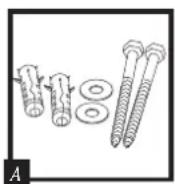
This kit contains:
(2) lag screws, (2) washers, (2) masonry anchors (Fig.
Tools needed for floor mounting: Drill, wrench,
7/16" (11.0 mm) drill bit, for wood anchoring; 9/32" (7.2 mm) drill bit, for masonry anchoring; 3/8" (9.50 mm) masonry drill bit.
Instructions:
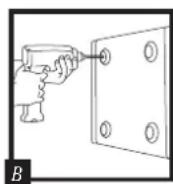
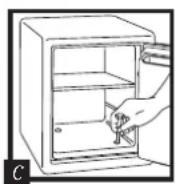
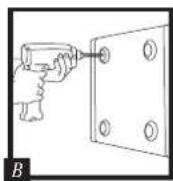
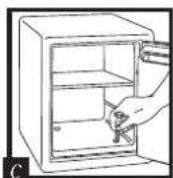
1. Tip the safe onto its right side. (Door hinges horizontal with the floor.) 2. Unlock the safe and open the door. 3. Look on the bottom of the safe for two indentations in opposite corners. Using the 7/16" (11.0 mm) bit, drill a hole through each indentation perpendicular to the bottom of the safe. (Fig. B) 4. Close the door and tip the safe upright. Place it where desired and reopen the door. 5. Use a screw or drill bit to mark the floor through both holes. (Fig. C) 6. Move the safe aside to clear both marked spots for drilling. 7. Drill into the floor:
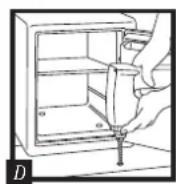
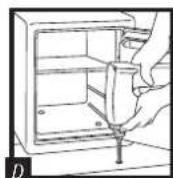
A. For wood: Using the 9/32" (7.2 mm) bit, drill a hole 2 1/2" (64 mm) deep in each marked spot. (Fig. D) B. For masonry:
Using the 3/8" (9.50 mm) masonry bit, drill a hole 2 1/2" (64 mm) deep in each marked spot. (Fig. D) Install a masonry anchor in each hole.
- Replace the safe in the desired position, with the holes in the safe aligned with those in the floor.
- Securing the safe:
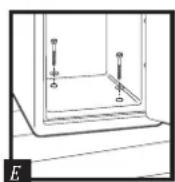
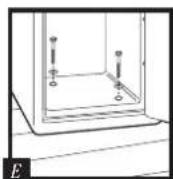
A. For wood: Pass each lag screw through a washer, then through the safe and into a hole. Tighten with the wrench. (Fig. E)
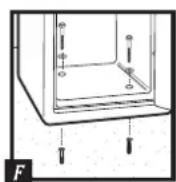
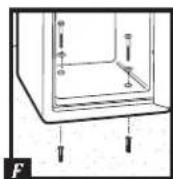
B. For masonry: Pass each lag screw through a washer, then through the safe and into a masonry anchor. Tighten with the wrench. (Fig. F)
NOTE: Drill holes through feet only, not through the back or sides. NOTE: Bolting/unbolting of the unit is at the consumer's expense and discretion. Sentry Group is not responsible for any costs incurred if the unit is to be replaced.
Lost combination or keys
IMPORTANT: Please read the following instructions carefully. For your protection, new keys CAN, and combinations CANNOT, be issued by telephone request. To order replacement keys and/or combinations, it is essential that you e-mail or fax to the Sentry Customer Service at the appropriate contact address or number on the back cover. If you need assistance in preparing your order, or wish to purchase via credit card (Visa/Mastercard only), please call Sentry Customer Service at the appropriate contact number on the back cover.
Lost combination: First, find your safe's Model and Serial Number, then call your local Sentry retailer. The Serial Number is on the back cover, and is also printed on the small label beside the door hinge (outside).
Lost keys: To obtain replacement keys, please contact your local Sentry retailer with the safe Serial Number. The Serial Number is on the back cover, and is also printed on the small label beside the door hinge (outside).

WARNING
This product is not intended for the secure storage of all materials. Items such as firearms, other weapons, combustible materials, or medication should not be stored in this unit.

WARNING
DO NOT store delicate items directly in your safe. SentrySafe products which offer fire protection have a patented insulation that has a high moisture content. In addition the SentrySafe advanced safes close airtight to offer water resistance, which may also cause moisture to accumulate inside your safe. The desiccant packet included in your safe during shipment, should be left in your safe. DO NOT DISCARD IT is intended to help absorb moisture which may accumulate inside your safe. Please open your unit periodically to avoid moisture accumulation.
If you choose to store delicate items such as jewelry with working parts, watches, stamps, or photos in your safe, we recommend putting them in an air-tight container, prior to placing them in the safe for storage.
NOTE: Sentry Group will not be responsible for any damage or loss of items placed in the unit due to moisture.

WARNING
DO NOT store pearls in this safe unit.
In the event of a fire, potential damage to delicate pearls occurs at temperatures much lower than the 350°F interior performance measure which the UL classification performance standard indicated guarantees. Therefore, DO NOT store pearls in your Sentry Safe product.

WARNING
No computer disks, audio-visual media, or photo negatives.
This product is not intended to protect computer floppy or 2-1/4" diskettes, cartridges and tapes, audio or video cassettes, or photo negatives. For fire-resistant storage of these materials, ask your retailer for the SentrySafe Fire-Safe Media storage products.
IMPORTANT
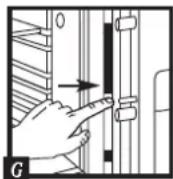
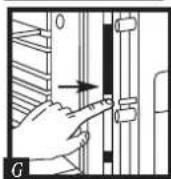
Using a mechanical combination lock. NOTE: It may be required to push the bolt button which in turn will throw the bolts to a locked position while the door is open (Fig. G). Proceed to test your combination. The handle should be all the way UP, in the horizontal position before attempting to dial out safe. Your combination lock is now ready to use. You will find your safe's combination on the sticker on the back of the owner's manual. Depending upon the mode you chose, you will have either a 3-number or 4-number combination.
Dual security combination and key lock safes
For added security, some safes have a dual locking system. Combination and key are required to unlock dual locking system locks. NOTE: The safe will lock with or without key.
To unlock and open: Insert the key in the lock and turn until the plunger pops out. Remove key.
Open first - test combination with door open!
3-NUMBER COMBINATION
See back cover of this manual for your combination.
NOTE: This combination cannot be changed.
Start at zero.

Turn dial right past ZERO 3 rotations. Stop at the first number of your combination after third rotation.

Turn the dial to left 2 rotations. Stop at second number on second rotation.

Turn dial to the right. Stop at third number on first rotation.
4-NUMBER COMBINATION
NOTE: Changing the combination voids your warranty. To reinstate your Limited 1-Year Warranty, (valid purchase dated receipt required) you must contact Sentry Customer Service at the appropriate contact number on the back cover to document your new combination.
Start at zero.

Turn dial to left 4 rotations past ZERO. Stop at the first number of your combination after the fourth rotation.

Turn the dial to the right 3 rotations. Stop at the second number on third rotation.

Turn the dial to the left 2 rotations. Stop at the third number on second rotation.

Turn the dial to the right. Stop at the last number on first rotation.
To close and lock
- Close door.
- Turn door handle to the horizontal position.
- Depress the key lock.
- Spin the combination dial for greatest security.
Electronic lock
Battery installation
Four alkaline AA batteries (not included) are required.
NOTE: Non-alkaline and rechargeable batteries are NOT RECOMMENDED.
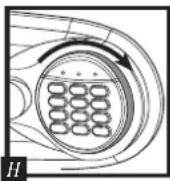
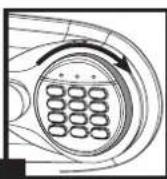
To install batteries: Turn the electric lock case to the right and remove. (Fig. H) Insert four new batteries as indicated, replace the electric lock case and turn to the left to reassemble.
Safes with an electronic and key lock
For added security, some models have a dual locking system. You MUST use both the electronic code and the key to open the safe.
To open your safe for the first time:
Install 4 AA batteries. (See instructions above.)
Turn the key to the right so that cylinder pops out. Enter the electronic lock code printed on the back cover. When the green PROCEED light comes on, you have four seconds to turn the handle down to open.
Open first - test combination with door open!
See back cover of this manual for your Factory Code. NOTE: This combination cannot be changed.
Using the keypad

Caution!
Liquids can damage the keypad!

Caution!
Pen points or other sharp objects can puncture the keypad membrane!
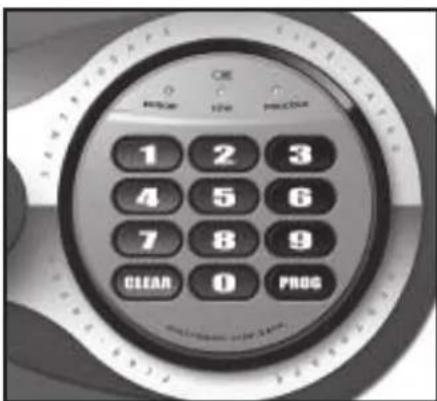
Only a light touch is needed. A green PROCEED light and a single beep indicate that the keypad "felt" your touch. The lock allows 5 seconds for each key press. After 5 seconds, 3 beeps will sound and a red light will blink. Start over if this occurs.
Basic electronic lock
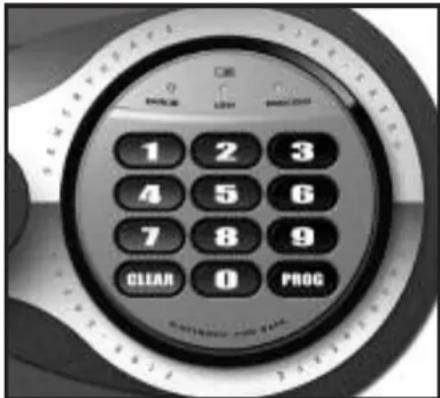
Access codes
There are three ways to unlock the safe.
- Enter the preset 5-digit electronic lock combination. This code cannot be deleted and can always be used to open the safe - keep it secure!
- A 5-digit User Code of your choice can be programmed and changed as needed.
- For temporary access to the safe, you can program a 5-digit User PIN that can be erased or changed.
NOTE: All zeros is an invalid code.
Programming a 5-digit User ID
- Press the Program key.
- Enter the electronic lock combination. The green LED remains ON while you enter the 5-digit User Code of your choice. After 5 digits are entered the green LED turns OFF.
To enter a new User Code, repeat these steps. To erase the User Code, press the Program key and enter your electronic lock combination twice.
Programming a 5-digit User PIN
NOTE: You must program a User Code before programming a User PIN.
- Press the Program key.
- Press it a second time.
- Enter your 5-digit User Code. The green LED remains ON.
- Enter the 5-digit User PIN of your choice. After 5 digits are entered the green LED turns OFF.
(To enter a new User PIN, repeat these steps. To erase the User PIN, press Program twice, enter your User Code and then enter 00000.)
Open first - test combination with door open!
Test your new electronic lock combination several times with the door open, to make sure you have recorded it correctly. Your new electronic lock combination is ready to use.
Record your User Code and User PIN here
User Code:
User PIN:
To unlock safe:
Enter the preset 5-digit electronic lock combination, a User Code, or a User PIN. When the green LED lights you have 4 seconds to turn the handle and open the safe.
To lock safe:
Close the door and return the handle to the horizontal position.
Battery replacement
The yellow LED will light when the batteries need to be replaced. No codes are erased when old batteries are removed for replacement. See "Battery installation" in the "Electronic lock" section for installation instructions.
NOTE: If your safe does not appear to be working, please check batteries before calling Sentry Customer Service.
NOTE: It is recommended you replace the batteries after two years, or when the yellow LED remains on.
Delay mode
The lock automatically enters a two-minute delay mode after an invalid code has been entered three consecutive times. In this mode, the lock cannot be activated and any key entry will generate an ERROR signal.
Advanced LCD electronic lock
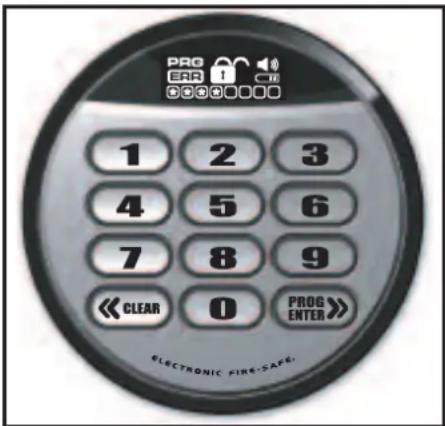
For safes with an electronic lock and a key lock
For added security, some models have dual locking system (electronic lock plus key lock). You MUST use both the electronic code and the key to open the safe.
To open your safe for the first time:
Install 4 AA batteries. (See instructions under "Electronic lock").
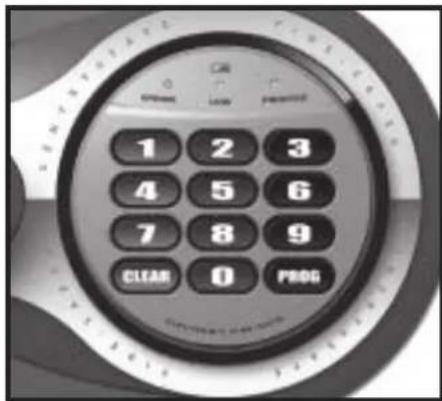
Turn the key to the right so that cylinder pops out. Enter the electronic lock code printed on the front cover, then press the Prog/Enter key. When the green PROCEED light comes on, you have four seconds to turn the handle down to open.
Using the keypad

Caution!
Liquids can damage the keypad!

Caution!
Pen points or other sharp objects can puncture the keypad membrane!
Only a light touch is needed. Press any button, the keypad lights up and a single beep will indicate that the keypad "felt" your touch. The lock allows 5 seconds for each key press. After 5 seconds, 3 beeps will sound and a red light will blink. Start over if this occurs.
Access codes
There are three ways to unlock and access the safe. Use one of the following, then press the Prog/Enter key:
- Enter the preset 5-digit electronic lock combination. This code cannot be deleted and can always be used to open the safe - keep it secure!
- A 4-8 digit Manager Code can be programmed and changed as needed.
- For temporary access to the safe, you can program up to six 4-8 digit User Codes that can be erased or changed.
NOTE: All zeros is an invalid code.
Open first - test combination with door open!
Test your new LCD electronic lock codes several times with the door open to be sure you have entered them correctly.
NOTE: To return to the beginning when inputting a programmed Manager, User or Factory Code, press CLEAR. You may then re-enter the Code.
NOTE: To turn the beeper on or off, press the 0 key and then the Prog/Enter key. (0, Prog/Enter)
Programming the Manager Code
NOTE: One (1) Manager Code is allowed. To add:
- Press the Prog/Enter key, then enter the 5-digit electronic lock combination and then press the Prog/Enter key.
- An empty lit box means no Manager Code is programmed. A boxed lighted * means a Manager Code is programmed.
- Enter a 4 to 8 digit code and press the Prog/Enter key to finish programming the code into the unit.
To delete:
- Press the Prog/Enter key, then enter the 5-digit electronic lock combination and then press the Prog/Enter key.
- A boxed lighted icon indicates there is a code programmed and can be deleted.
- Press 0, 0, 0, 0, then the Prog/Enter key to delete the Manager Code. (0, 0, 0, 0, Prog/Enter)
NOTE: To return to the beginning when programming a Manager or User Code, wait 5 seconds and the lock will time-out. You may then start over.
Programming User Codes
NOTE: Six (6) user codes are allowed.
To add:
- Press the Prog/Enter key 2 times, enter the Manager Code and then press the Prog/Enter key.
- Use the < > to scroll between the lighted boxes. An empty box means it is available for a code entry; a boxed lighted * means it is being used.
- Enter a 4 to 8 digit code in the selected position and press the Prog/Enter key to finish programming the code into the unit.
To delete:
- Press the Prog/Enter key 2 times, enter the Manager Code and then press the Prog/Enter key.
- Use the < > to scroll to the boxed lighted * icon to be removed.
- Press 0, 0, 0, 0, then the ProgEnter key to delete the selected user. (0, 0, 0, 0, ProgEnter)
NOTE: To return to the beginning when programming a Manager or User Code, wait 5 seconds and the lock will time-out. You may then start over.
To unlock safe:
Enter the preset 5-digit electronic lock combination, a Manager Code or a User Code and press the ProgEnter key. An asterisk will light each time a digit is entered. When the unlocked padlock icon appears you have 4 seconds to turn the handle and open the safe.
To lock safe:
Close the door and return the handle to the horizontal position.
Keep your Manager and User Codes secure
Maintain a record of your Manager and User Codes and store them in a secure location, other than in the safe.
Record your Manager and User Codes here
Manager Code:
User Code:
Battery replacement
The battery icon will light when the batteries need to be replaced. No codes are erased when old batteries are removed for replacement. See "Battery installation" in the "Electronic lock" section for installation instructions.
NOTE: If your safe does not appear to be working, please check batteries before calling Sentry Customer Service.
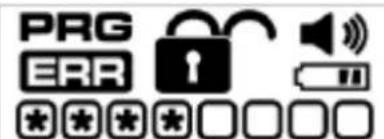
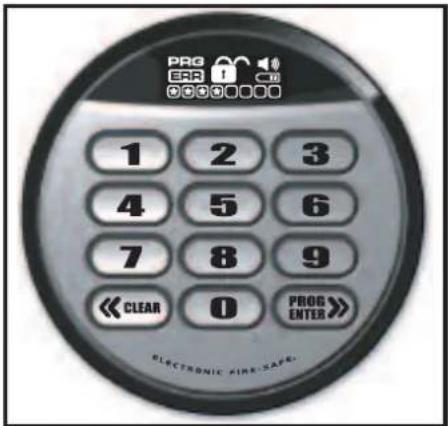
Icon identification
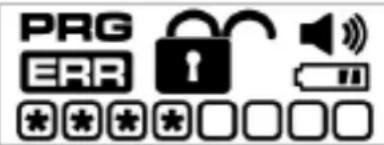
ERR (Error) indicates one of the following:
- You have pressed the Program key out of sequence.
- You have entered an invalid code.
- You have let 5 seconds elapse between key presses.
PRG (Program)
Lights after pressing the Program key and stays lit while programming a Manager or User Code.
* (Asterisk) indicates one of the following: 1. A number key has been pressed. 2. In Program mode, it signals a programmed code location.
Boxes
Light during programming and indicate code locations.
- An empty lit box means no code is programmed.
- A boxed lighted * means a code is programmed.
Padlock
Lights after three consecutive invalid codes are input and stays lit during the 2-minute delay mode.
Unlocked Lock
Lights when a valid code is entered. Indicates that the safe is unlocked and the door can be opened.
Battery
Lights when batteries are low indicating that the batteries need to be replaced soon.
Horn
Lights when the beeper is on.
Delay mode
The lock automatically enters a two-minute delay mode after an invalid code has been entered three consecutive times. In this mode, the lock can not be activated and the
PADLOCKED icon lights.
Edison Testing Laboratories (ETL)
Therefore, g'(x) = -1/4 x^2 + 5/4 x + 1
1

1
1

a 1
slll jaii aaiil aaiil jaiil aaiie iaiin jaiia gao jaii (PROCEED) jaiai iaii jaii gao jaii jaii jaii jaii jaii jaii jaii jaii jaii jaii jaii jaii jaii jaii jaii jaii jaii jaii jaii jaii jaii jaii jaii jaii jaii jaii jaii jaii jaii jaii jaii jaii jaii jaii
LwIg
211sgl5
aaii
LaaLoaLae! aill aaiagil plaaasll JsJ 1. gsiSJIJIzU
1 1
00 p13 2000000000000000000000000000000000000000
piai aoe 0gSo paoiell gay gaoa oai.


C
Therefore, cos α = 2/3 - (√3/2) sin α = - (√3/2) sin α
Instructions for installation
The kit includes: 260 mm with a drill, 2 washers, 2 screws (Fig. A)
Installation tools: drill, conical countersink, drill 11.0 mm (73), for countersinking: drill 7.2 mm (33), for stone drilling: drill for concrete 9.5 mm (34).
Instructions:
- Turn the drill to the right side (the drill bit turns correctly).
- Support the drill bit. 3. Find on the drill bit the recesses in the grooves. Drill 11.0 mm (%-) through the recesses to the holes, then drill the bottom of the bit (Fig. B). 4. Hold the drill bit and turn the drill vertically. Place it on the drilling spot and drill the bit.
- With a screw or drill, make the holes in the door through the drilled holes (Fig. C).
- Compare the bit with the side of the marked holes.
- Ropcaepnate OTsepcTm:
A. B depeeHHHOM nory: Caepn7,2 mm (%o)* npocepme orpncthe my6m8 64 mm (21/7) no kaxdoH3 cmETox (pHc. D).
B.B KAMHOMMOY: CEBPMNO 6897HY 5 MM (%)" iPOCEEPNTIOTBEPTME 6MHO4MM (21/2) NO KAKDOH3 OTMETOK (DHC.D). BCTABNEO6BENKAKDEH3 OTBEPTCH.
- NOCTABBE CENH HAM EMEO, COOMECTME OTBEPCTN 8 PAAE COTBEPCTNNM NAOY 9.3akpenme ceiΦ:
A. B depaehnnom nany: Bctaae arpyy mvepe 1 aai6 b oaepcnB eaepe m nany.3aannne kaoHOM (pnc.E).
B. B kameHHOM mony: BCTaBte uyyTm uepe3 wAeBb B OTBepCTM B oaeFe M E doBenX. 3aHnHrE KNOHOM (GNC.F).
BHMMHHE: CepnBt otepTME MOHO TOHNO HOMAX, NO RE CTREMAX.
BHIMAHHE: MomrAn H demovrak ceiHa apom3oB DATCR 3a CHET H no ycmotpemno 2a3a4Wka. KomnnaS Sentry Group Me Mecet otberctbH NOCTH 3a paocdno no 3aeme ceiHa.

Iotepa koda nn KnoueH
BAXHO: BMMATENHNO pOHTHE cAeYIOue HNCTpyuM. B qaRnX aauw SEzOnACoCTH MOaBHe KAAOM MOY, 2 KOy HE MOYT 6bIb 3K33AHNo TneTePOWy. IaI ZAMeWM XKoyE HN KOa npWIMnHMAO bAAHO oBpATbC C zAnpocom A KINHErCKyO cayxby kOMnAMm Senti ry no 3AeKPTPOHNO nOte HN no PAcY. (CM. 3aJMAKO CTOPOMy OBAaKK). EcAm sAM nOpe6yETCN NOMouB 8 3aONOWHM 3akzA3a NkB 3axOTHTe OTaTHAtB erO no KpeDTHMO Kapre (ToBaTO Visa/Mastevcard), m03BOWHTe B KAMENTCKyo cAYXbKO kOMnAMM Sentry no TnePcOHy M 3aJDAVH CTOpOE OBAQKE.
NotepKa:HaHJrmeMoAeBmKcepnHmHcmep CeHgMIO3BOHTMECHOMYTOPOBOMy npOCTaIeNIO KOMnAHsSentry.CepnHmHcmep HaneVATAN HA Zaehn CTpaHne OeNnKmHa aepnHoe pRacmC metn (chapx).
Norepa knovei: Dn sAmHcuKowc6oae MeCTHOmy TPOTOOM ppeTbAeTeKO kOmaHm Sertry cepHm KOpE cBda. CepHm HOpE Kanerata Hs 3dH e CTpAHue oBxnnn Hk nphe padom C met (chpy).

A INPEDyTNPEKDEHME
372 kogambe He npepnabnae hao dai kaidokoro xapnemk n650 kaepnakos. He npoeonk npanekno Oncetpnsne Hnpocp opyns. npoohm Mntipnbln 1MauKDMHt.

PNEyPEXKDEHNE
The fire-resistant containers of SentrySafe are designed to protect their contents from high temperatures. In addition, to further enhance the fire resistance of SentrySafe products, they are sealed with gaskets that also prevent moisture from entering. The desiccant packets included with the product should remain inside the safe. Do not discard these packets.
It is recommended to store fragile and delicate items (such as documents, disks, tapes, and photographs) in a sealed container.
WARNING: Sentry Group is not responsible for damage or loss of contents due to moisture.

WARNING
Do not store jewelry in this safe.
The interior temperature of the safe can reach high temperatures during a fire, up to 177°C (350°F). Therefore, do not store jewelry in the SentrySafe.

WARNING
Do not store computer disks, tapes, and photographic materials. This safe is not designed for storing disks, cartridges, tapes, and photographic materials. For proper storage of such materials, contact your SentrySafe Fire-Safe dealer.
IMPORTANT
Mechanical lock
CAUTION: It may be necessary to press the button, which in turn will move the locking bolt when the door is closed (Fig. G). Check that the locking bolt is fully engaged.
LOCKING POSITION. After this, the door should be in the correct working position. The handle should be turned to the left to lock the safe. Depending on the model, the locking bolts are 3-3 or 4-4 in number.
Safes with dual protection: combination lock and key
OONHHTBNN 38UHTA Hxotopk cefo 06eONeKBA DNOH CCKTcM 3aepnAH. JIN 00pAHN 3AMXo CHCm C DOHNAM 3aepnAHem HYHX KQ KOJ, TIK H KNOH. BHMAHME: 3anepeb CIOH MNOHO KAK KNOOM, TIK H 603 MHO.
OTTIPAHMeN OTKpbTHe
Bctane KNOH 3 2004 H NOOPHTE DO BWCKANBAHR nnoepa. BuHte KNOH.
Chayana npoBepbTe KoC OTKpbIToN DBepuen!
KoI H3 3-X UHΦP
HaepnncnKgHsapncrepOe600003rTOpyoBCCTBA.
BHMMHME:KMOWNTB 3OTKOGHO28
Hannane C. Wyne.

Pnepnne nckpeea HbKa 3 o6oata. Nocne npertero o6oata octanenrecb Ka nepea unpee kda.

Piopnme pnc npno ha 2 oobota. Octanrncb npm npom oobone ha npoe mnppe kpa.

Poeepnme pck eBc. Octanemrebc npn npaeom oobore ha terbien dnepe kda.
KoI N3 4-X UHΦP
BHUMAHNE: Cmena Koga anhynnyet rapaHTno. IINBocCTaHObENHn OOrpaHcyHNo roBOBn rapaTHn (npn HauNCH KNHTAHuN C datoN PnHO6peTHeN) Cneyert opaTntbcn B KHNENTCKYIO cLNY6 BY KomPAHHS Senti no COOTBETCTBYOcEMy KOHTAKTHOMY TeneFOHy Ha 3aNDHe CTOpOHE 0bNOxKn IIN DOKymeHTMPOBaHnHOBOrKOda.
HauHnTe C Hny.

NobepHnTE DnCK BnEBo Ype3 Hylb Ha 4 o6oPota. Pocne YetBepTorO o6oPota octaHOBNTecb Ha nepBoi UnFpe Koda.

TURN THE DIAL TO THE RIGHT 3 TURNS. STOP AT THE THIRD TURN ON THE SECOND CODE.

TURN THE DIAL TO THE LEFT 2 TURNS. STOP AT THE SECOND TURN ON THE THIRD CODE.

TURN THE DIAL TO THE RIGHT. STOP AT THE FIRST TURN ON THE LAST TURN.
CLOSING AND LOCKING
1. Close the door. 2. Turn the handle to the original position. 3. Press the lock. 4. Turn the dial to the right.
ELECTRONIC LOCK
BATTERY INSTALLATION
Four AA batteries are required (not included).
NOTE: Rechargeable batteries are not recommended.
BATTERY INSTALLATION: Turn the electronic lock cover to the right and remove it. (Fig. H) Insert, as shown, four new batteries, replace the electronic lock cover and turn it to the left until it closes.
SAFES WITH ELECTRONIC AND MECHANICAL LOCKS
Additional protection for some models is provided by a dual locking system. To open the safe, both the electronic key and the key are required.
OPENING THE SAFE FOR THE FIRST TIME:
Install the batteries. See instructions above.)
Turn the key to the right until the bolt retracts. Enter the code on the electronic lock, printed on the back of the cover. When the green signal PROCEED lights up, you have 5 seconds to turn the handle to open the door.
Check that the switch is open on the door!
Find the factory number on the back side of the cover of this manual. ATTENTION: Do not change this code.
Keyboard

Caution!
Liquid may damage the keyboard!

Caution!
Sharp objects and other pointed items may puncture the keyboard membrane!
The electronic lock emits a sound signal when the keypad is touched. Pressing the key lock button sounds for 5 seconds. After 5 seconds, the sound signal sounds and the red light turns on. If this happens, start again.
Main electronic lock
Access codes
There is a safe.
1. Enter the preset 5-digit code of the electronic lock.
This code cannot be deleted, and it can always be used to open the safe - keep it in a safe place!
2. The code you have chosen can be programmed and changed as needed. 3. For temporary access to the safe, you can program a 5-digit user code that can be erased or changed.
WARNING: A code consisting of only zeros is not allowed.
Programming the 5-digit user code
1. Press the Program key. 2. Enter the electronic lock code. The green LED will flash during entry of the selected 5-digit user code. After entering the 5 digits, the green LED goes out.
To set a new user code, repeat these steps. To delete the user code, press the Program key twice and enter the electronic lock code.
Programming the 5-digit user PIN code
ATTENTION: Before programming the PIN code, the user code must be programmed.
- Press the Program key.
- Press it again. 3. Enter your 5-digit user code. The green LED will flash. 4. Enter the 5-digit PIN code you have chosen. After entering the 5 digits, the green LED goes out.
(To set a new PIN, repeat these steps. To delete the PIN, press the Program key, enter your user code, then 00000.)
First check the door is open!
Test the new electronic lock code several times with the door open to ensure it is correctly recorded. The new electronic lock code is ready for use.
Write your user code and PIN here
User code:
PIN:
To open the safe:
Enter the preset 5-digit electronic lock code, user code, or PIN. When the green light is on, you have 4 seconds to turn the handle and open the safe.
To unlock the door:
Close the doors and return the handle to the horizontal position.
Battery replacement
When it is necessary to replace the battery, the indicator light flashes. When replacing the battery, all codes are preserved. See the installation instructions for battery installation. Electronic lock installation
WARNING: If the lock stops working, before contacting the Sentry company customer service, check the batteries.
WARNING: Battery replacement is recommended every two years or when the indicator light flashes.
Delay mode
After entering an incorrect code three times in a row, the lock automatically switches to a two-minute delay mode. In this mode, the lock cannot be activated, and any key press will trigger an ERROR signal.
Advanced electronic lock with liquid crystal display
UK line:
- THANK YOU FOR PURCHASING THIS SENTRYSAFE PRODUCT. 2 YEAR LIMITED WARRANTY
- WARRANTY SERVICE
- LIMITATIONS OF WARRANTY
- IF YOU PURCHASED THE PRODUCT IN ONE OF THE FOLLOWING COUNTRIES, THE FOLLOWING RULES APPLY
- UL-CLASSIFIED FIRE PROTECTION
- OR
- ETL VERIFIED FIRE CLAIM
- WATER RESISTANCE PROTECTION
- INSTRUCTIONS FOR FLOOR MOUNTING
- LOST COMBINATION OR KEYS
- WARNING
- IMPORTANT
- DUAL SECURITY COMBINATION AND KEY LOCK SAFES
- OPEN FIRST - TEST COMBINATION WITH DOOR OPEN
- 3-NUMBER COMBINATION
- 4-NUMBER COMBINATION
- TO CLOSE AND LOCK
- ELECTRONIC LOCK
- SAFES WITH AN ELECTRONIC AND KEY LOCK
- TO OPEN YOUR SAFE FOR THE FIRST TIME
- USING THE KEYPAD
- BASIC ELECTRONIC LOCK
- ACCESS CODES
- PROGRAMMING A 5-DIGIT USER ID
- PROGRAMMING A 5-DIGIT USER PIN
- RECORD YOUR USER CODE AND USER PIN HERE
- TO UNLOCK SAFE
- TO LOCK SAFE
- BATTERY REPLACEMENT
- DELAY MODE
- ADVANCED LCD ELECTRONIC LOCK
- FOR SAFES WITH AN ELECTRONIC LOCK AND A KEY LOCK
- PROGRAMMING THE MANAGER CODE
- PROGRAMMING USER CODES
- KEEP YOUR MANAGER AND USER CODES SECURE
- RECORD YOUR MANAGER AND USER CODES HERE
- ICON IDENTIFICATION
- ERR (ERROR) INDICATES ONE OF THE FOLLOWING
- PRG (PROGRAM)
- BOXES
- PADLOCK
- UNLOCKED LOCK
- BATTERY
- HORN
- A 1
- LWIG
- 211SGL5
- INSTRUCTIONS FOR INSTALLATION
- IOTEPA KODA NN KNOUEH
- A INPEDYTNPEKDEHME
- PNEYPEXKDEHNE
- SAFES WITH DUAL PROTECTION: COMBINATION LOCK AND KEY
- CHAYANA NPOBEPBTE KOC OTKPBITON DBEPUEN
- KOI N3 4-X UHΦP
- CLOSING AND LOCKING
- BATTERY INSTALLATION
- SAFES WITH ELECTRONIC AND MECHANICAL LOCKS
- OPENING THE SAFE FOR THE FIRST TIME
- CHECK THAT THE SWITCH IS OPEN ON THE DOOR
- KEYBOARD
- CAUTION
- SHARP OBJECTS AND OTHER POINTED ITEMS MAY PUNCTURE THE KEYBOARD MEMBRANE
- MAIN ELECTRONIC LOCK
- PROGRAMMING THE 5-DIGIT USER CODE
- PROGRAMMING THE 5-DIGIT USER PIN CODE
- FIRST CHECK THE DOOR IS OPEN
- WRITE YOUR USER CODE AND PIN HERE
- TO OPEN THE SAFE
- TO UNLOCK THE DOOR
- ADVANCED ELECTRONIC LOCK WITH LIQUID CRYSTAL DISPLAY
Brand : SentrySafe
Model : MS5635
Category : Safe