HL100ES - Safe Sentry - Free user manual and instructions
Find the device manual for free HL100ES Sentry in PDF.
| Product Type | Safe for residences and hotels |
| Brand | Sentry |
| Model | HL100ES |
| Power Supply | 4 AA alkaline batteries (not included) |
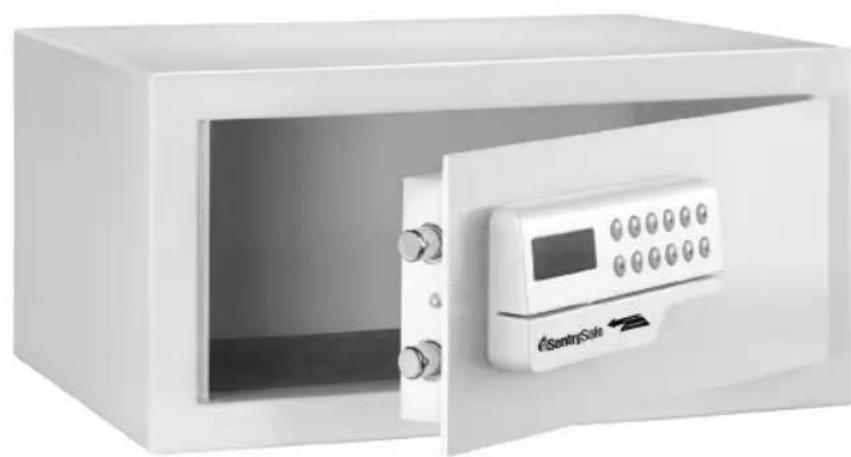
| Opening Methods | Magnetic card, 4-digit personal code, emergency key |
| Main Features | Locking by card or code, external auxiliary battery pack, temporary lockout after 3 incorrect attempts (15 min) |
| Bolting | Recommended to floor, screws provided |
| Box Contents | Safe, 4 bolting screws, external auxiliary battery pack, 2 emergency keys, owner's manual, registration card |
| Number of Batteries | 4 AA alkaline batteries (for lock) + 4 AA batteries in external battery pack |
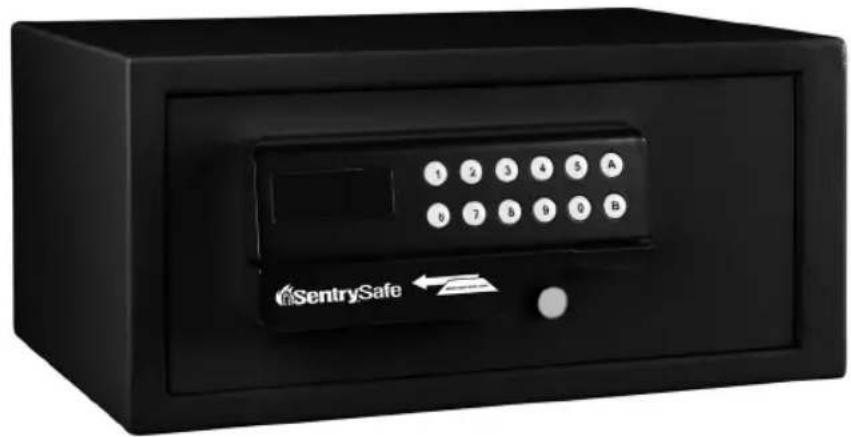
| Display | Digital screen showing status messages (OPEN, CLOSED, CARD, LO-BAT, etc.) |
| Keypad | Keys A (code confirmation), B (card selection), delete key |
| Error Messages | E-CARD, E-CODE, AGAIN, LO-BAT, b-LOC, HOLD + DIGIT |
| Battery Replacement | Use only AA alkaline batteries, do not mix old and new, do not use rechargeable batteries |
| Security | Automatic 15-minute lockout after 3 invalid codes or cards |
| Customer Service | www.sentrysafe.com, phone: 1-800-828-1438 (Mon-Fri 8am-6pm EST) |
| Warranty Registration | Recommended at www.sentrysafe.com/customercare/register-your-product or by mail |
| Country of Origin | United States (Sentry Group, Rochester, NY) |
Frequently Asked Questions - HL100ES Sentry
User questions about HL100ES Sentry
0 question about this device. Answer the ones you know or ask your own.
Ask a new question about this device
Download the instructions for your Safe in PDF format for free! Find your manual HL100ES - Sentry and take your electronic device back in hand. On this page are published all the documents necessary for the use of your device. HL100ES by Sentry.
USER MANUAL HL100ES Sentry
Residential/Hotel Safe Owner's Manual
Contents Include:
Residential/Hotel Security Safe (1)
- Bolt-Down Screws (4)
- Auxiliary Remote Battery Pack (1)
- Master Override Keys (2)
- Owners Manual
Registration Card
- 4 AA Alkaline Batteries required to operate lock (Batteries may not be included in certain models.)
General Instructions:
Your SentrySafe Residential/Hotel Security Safe can be operated with (1) a magnetic stripped card (example: most major credit cards, card not provided), (2) a personalized four-digit code, or (3) the master override key provided with the unit.
Important:
The method used to lock and unlock the safe must be the same unless using a master override key to unlock the safe.
Table Of Contents
English
Getting Started 2
Table of Contents 3
Preparing Your Safe for First Time Use 4-5
Operating Safe with Magnetic Stripped Card 6-7
Operating Safe with Personal Code 8-9
Operating the Safe if Batteries Die 10
Bolt Down Instructions 11
Customer Care 12
Troubleshooting 13
4556u3
IMPORTANT
If you experience problems or challenges with your safe, then please contact our customer care team. Many issues can be quickly resolved without the product being returned.
REGISTRATION
www.sentrysafe.com/customercare/register-your_product
Warranty Coverage Registration:
To aid with warranty coverage please visit www.sentrysafe.com/customercare/register_your_product to register your safe, or complete the enclosed registration card and mail to SentrySafe.
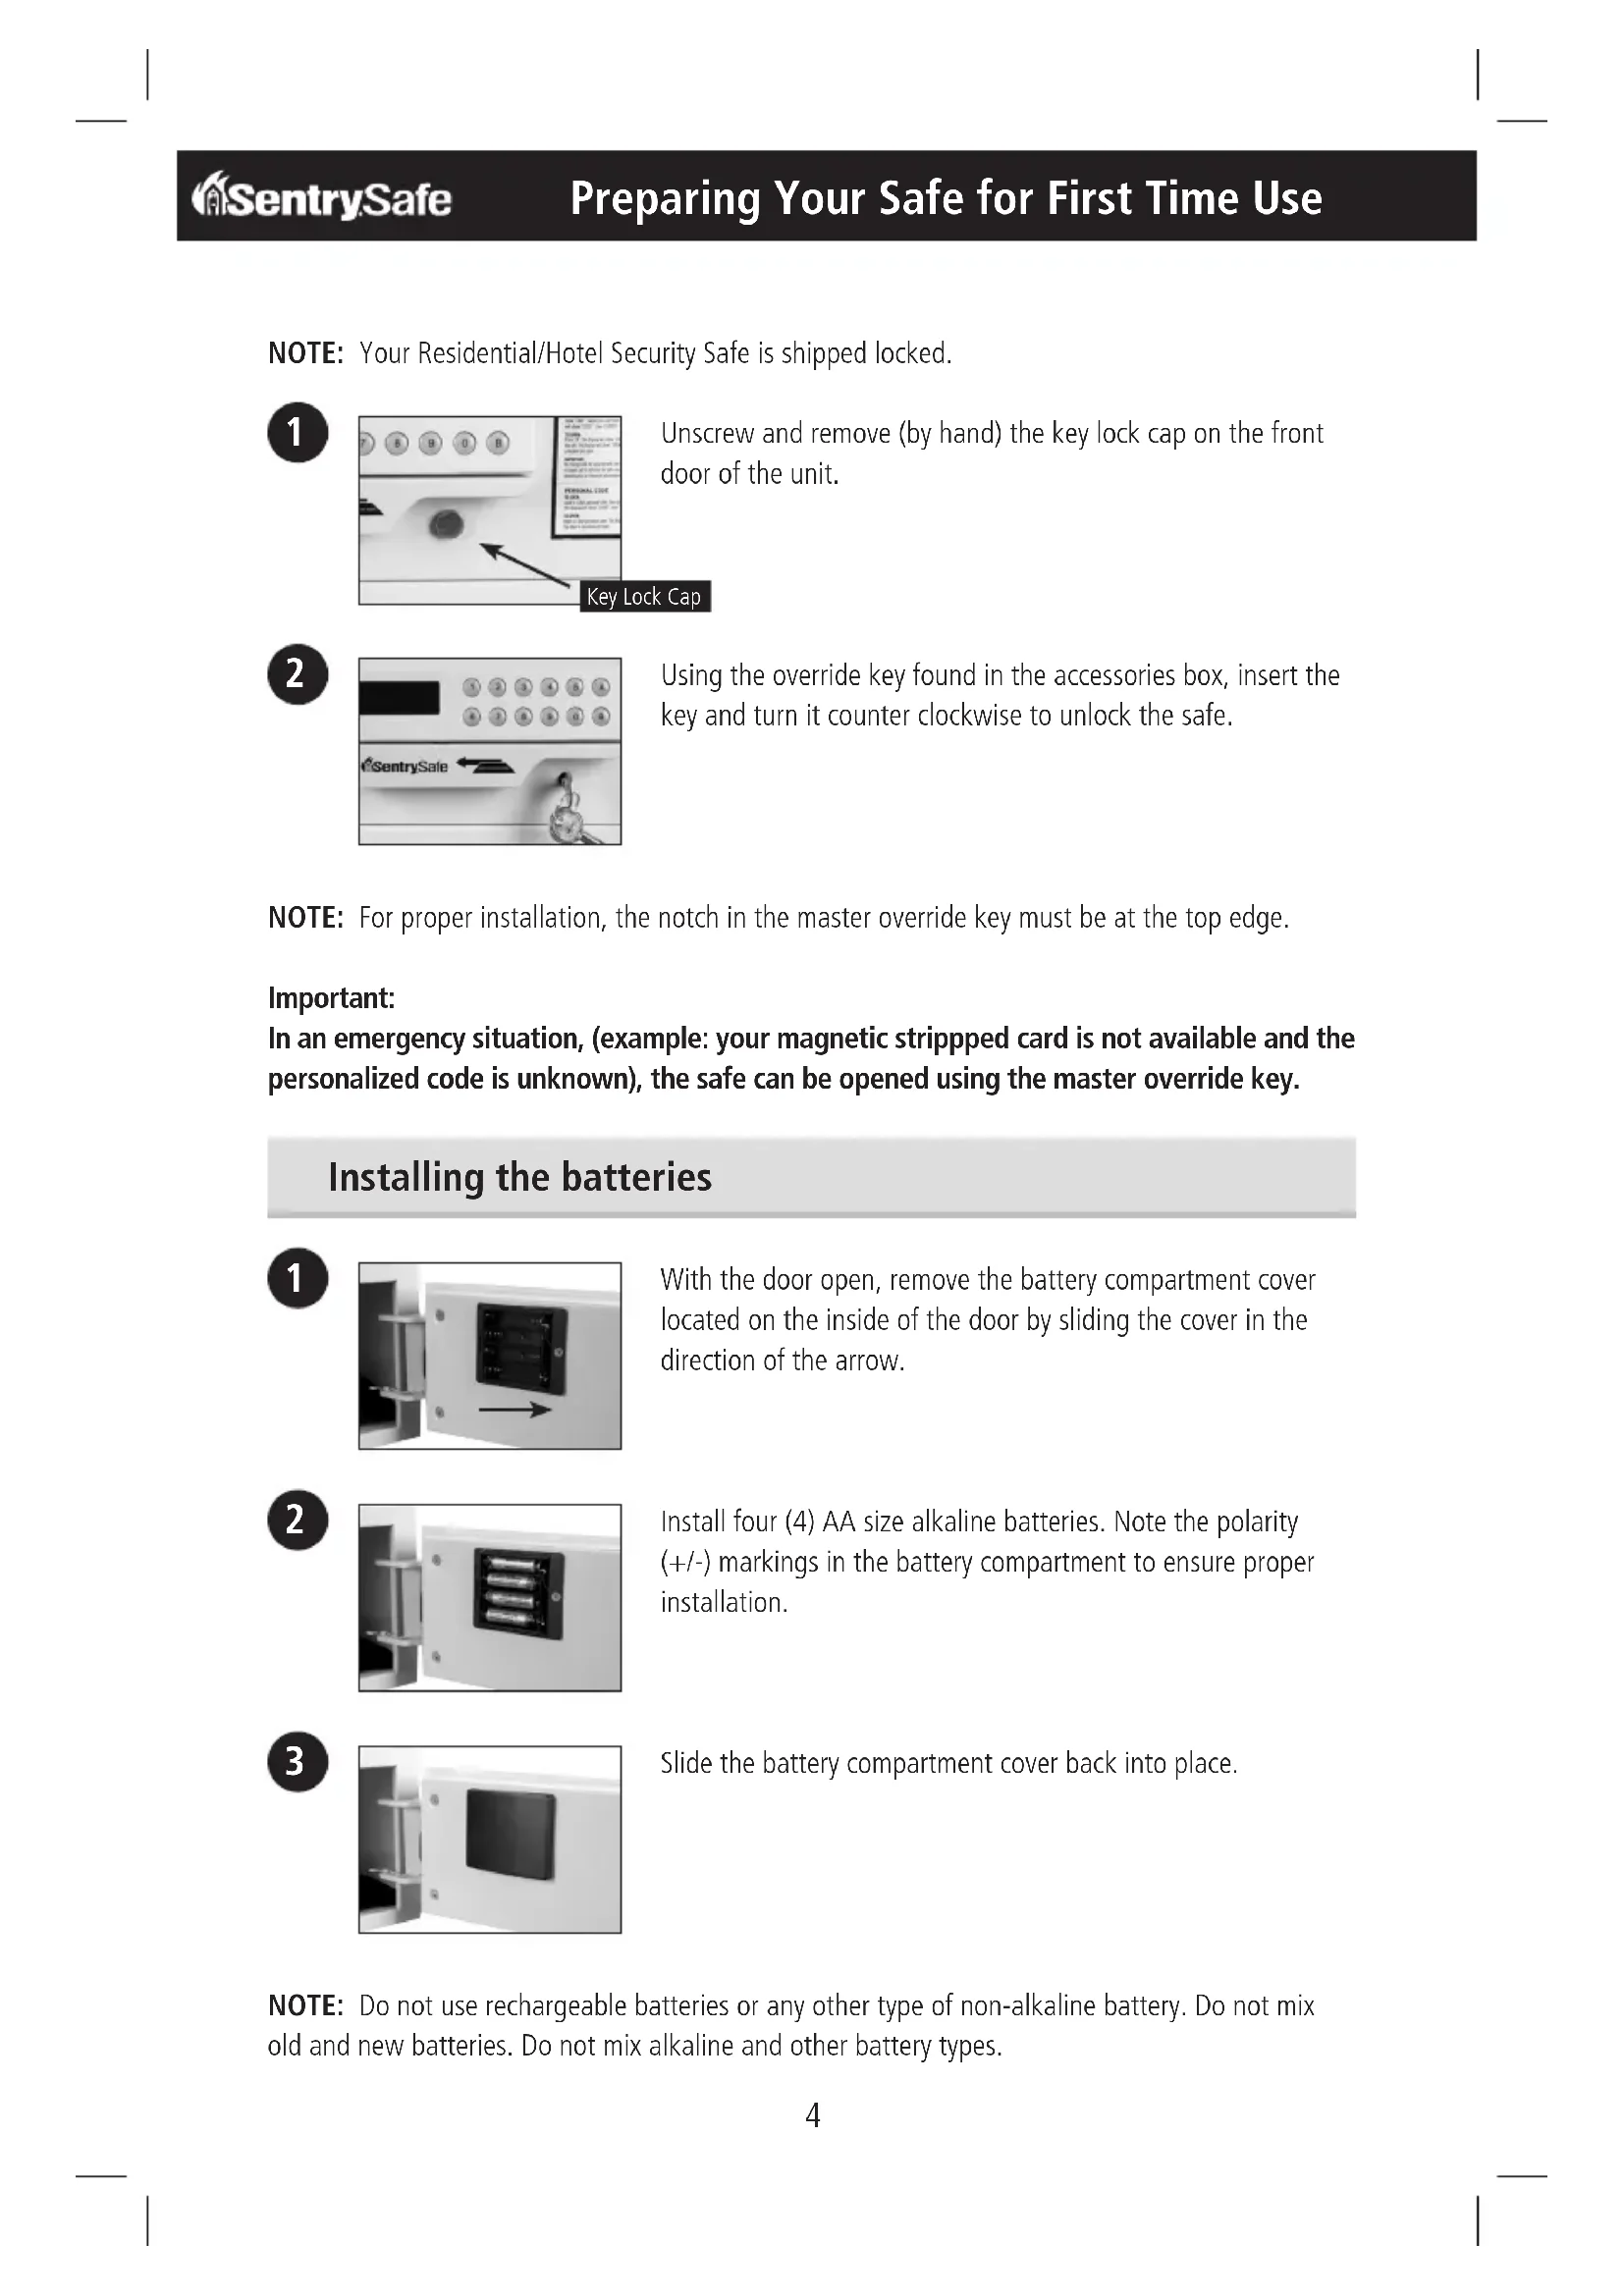
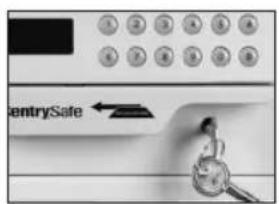
NOTE: Your Residential/Hotel Security Safe is shipped locked.

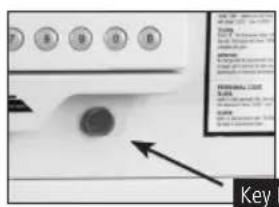
Unscrew and remove (by hand) the key lock cap on the front door of the unit.


Using the override key found in the accessories box, insert the key and turn it counter clockwise to unlock the safe.
NOTE: For proper installation, the notch in the master override key must be at the top edge.
Important:
In an emergency situation, (example: your magnetic stripped card is not available and the personalized code is unknown), the safe can be opened using the master override key.
Installing the batteries

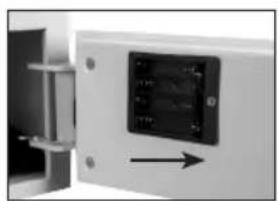
With the door open, remove the battery compartment cover located on the inside of the door by sliding the cover in the direction of the arrow.


Install four (4) AA size alkaline batteries. Note the polarity (+ / - ) markings in the battery compartment to ensure proper installation.

Slide the battery compartment cover back into place.
NOTE: Do not use rechargeable batteries or any other type of non-alkaline battery. Do not mix old and new batteries. Do not mix alkaline and other battery types.
Preparing Your Safe for First Time Use cont.
Programming The Safe Lock For Initial Use


Leave override key in the unlocked position. Press the "B" button. The safe lock will beep.


Close the door and lock it using the override key and remove the key from door. Punch in the code "1234" to open the safe door. The unit is ready for use with any four-digit code or magnetic stripped card. Reinstall lock cap.
NOTE: The safe can be operated with your personal magnetic stripped card (example: most major credit cards, card not included).
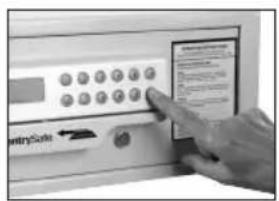
To lock the door

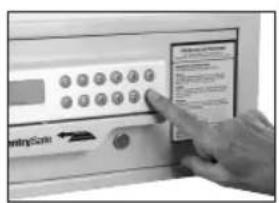
Push and hold the door in the closed position.
Press "B" on the keypad.
The display will show "CARD -".

Swipe the card from right to left.


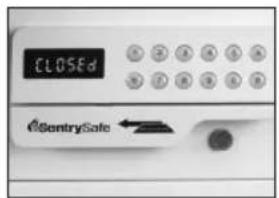
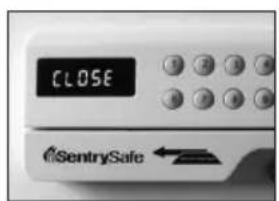
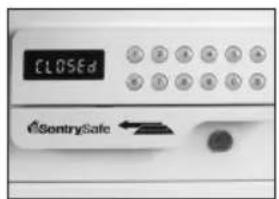
The display will show "CLOSE", immediately followed by "CLOSED" indicating that the bolts are extended and the door is locked.
Operating Safe with Magnetic Stripped Card
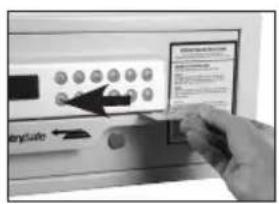
To unlock the door

Press "B" on the keypad.
The display will show "CARD -".

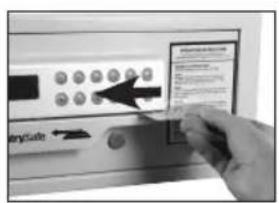
Swipe the card from right to left.
NOTE: The card must be firmly and evenly swiped from right to left.


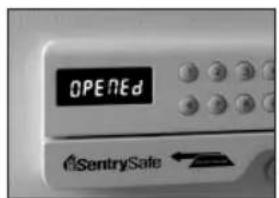
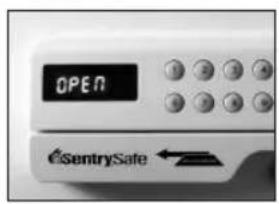
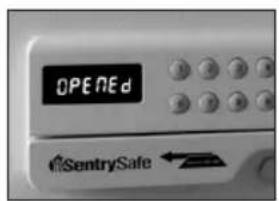
The display will show "OPEN", immediately followed by "OPENED" indicating that the bolts are retracted into the door.
The spring loaded feature will enable the door to open automatically.
NOTE: If the card was swiped incorrectly (from left to right) or at a pace that is too fast or too slow, the display will show "AGAIN" for two seconds followed by "CARD", indicating that the card must be swiped again.
- The card used to close the safe must be the same as the card used to open the safe.
Otherwise the display will show "E-CARD" and beep 3 times.
NOTE: The processes for locking the door with a personalized code and changing the personalized code are the same.
To lock the door

Push and hold the door in the closed position.
Input any four-digit, personalized code.

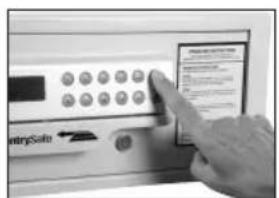
Press "A" on the keypad.

The display will show "CLOSE", immediately followed by "CLOSED" indicating that the bolts are extended and the door is locked.
The four-digit, personalized code will be displayed for two (2) seconds.
Operating Safe with Personal Code
To unlock the door

Input the correct personalized four-digit code.
The display will show "OPEN", immediately followed by "OPENED" indicating that the bolts are retracted into the door.

The spring loaded feature will enable the door to open automatically.
NOTE: If the code is incorrect, the display will show "E-CODE" and beep 3 times.
- "B" is a deletion key. Pressing it once will delete one character on the reader.
- In a low voltage condition, the display will show "LO-BAT" (in both a door open and door closed state).
- A "b-LOC" message on the display during a closed door or open door indicates that the door is not locked or will not lock. If this situation occurs, (1) unlock the unit; (2) hold the door closed and attempt to re-lock it.
IMPORTANT
Three (3) repeated attempts to open the door using an invalid code will result in the safe being automatically locked for 15 minutes. The safe will not respond to any code and the display will read "HOLD" + "DIGIT" where the "DIGIT" is the amount of minutes you must wait until the safe will respond to your code entry. After 15 minutes, the safe will return to normal operation.
Reprogramming the Safe Lock After Override Use


Leave override key in the unlocked position.
Press the "B" button.
The safe lock will beep twice and read "-CARD -".

Close the door and lock it using the override key and remove the key from the door.
Punch in the code "1234" to open the safe door. The unit has now been reprogrammed and is ready for use with any four-digit code or magnetic stripped card.
Using Auxiliary Remote Battery Pack
If the four (4) AA alkaline batteries installed in the door are insufficient to operate the card reader, keypad, and locking mechanism, the auxiliary remote battery pack (included) can be utilized as a temporary power source.

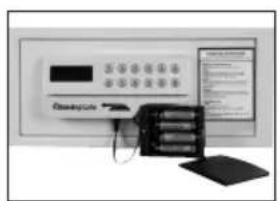
Install four (4) AA size batteries in the auxiliary remote battery pack. Note the polarity (+/-) markings in the battery compartment to ensure proper installation.

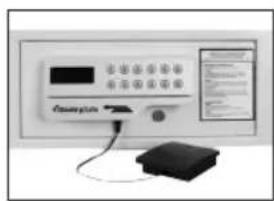
Plug the auxiliary remote battery pack on the underside of the keypad unit.
Plug in the auxiliary remote battery pack to enable temporary power using your magnetic stripped card or personal code to unlock the safe.
Replace the 4 AA sized alkaline batteries in the door (as described on page 5).
NOTE: The auxiliary remote battery pack is not a charger – batteries with insufficient strength must be replaced.
- The master override key can also be used to gain access to the safe.
- Do not use rechargeable batteries or any other type of non-alkaline battery. Do not mix old and new batteries. Do not mix alkaline and other battery types.
Bolt Down Instructions
To help provide maximum security, Sentry strongly recommends this safe be bolted down. Select a suitable and convenient location for your safe. Set the safe in place and use the holes provided in the bottom or back of the safe to mark the location of the holes to be drilled in the floor or wall. It is not recommended to attempt to bolt to both floor and wall. If bolting to a wall, please ensure that the safe is resting on a supporting surface, i.e. floor, table or shelf.
Move the safe away and drill holes of the appropriate diameter and depth for the type of hardware being used and the mounting surface (2 each — bolts, washers and masonry anchors).
Place the safe back over the holes and install the fasteners as required.
NOTE: For maximum security on models which have feet, remove feet before bolting to floor.
Customer Care
www.sentrysafe.com
Phone Number: 1-800-828-1438
Fax: 1-585-381-2940
882 Linden Avenue / Dept. 200 / Rochester, New York / 14625-2784 USA
How to obtain a replacement key
1 Please go to our website www.sentrysafe.com to find the necessary replacement form. If you are unable to use a computer, please call the number above or fax us for a copy of the replacement form.
2 Safes Serial number is located on left side of safe.
3 Please fill out the form in its entirety.
4 Send the following to Sentry Group: check or money order and replacement form. For current pricing, please go to www.sentrysafe.com/customercare. If you are unable to use a computer, then please call the number above or fax us.
Mail to: Sentry Group, 882 Linden Avenue, Dept. 200, Rochester, NY 14625-2784, USA -OR- fax statement (notary seal must be legible) to 1-585-381-2940.
Paying by credit card:
Payment may also be made using your credit card, by phone only.
Call 1-800-828-1438 to make a credit card payment. Do not fax credit card information.
NOTE: Prices subject to change without prior notification.
NOTE: Key orders may be placed on a Saturday or Sunday. However, those orders will not be processed until the following business day. Our Customer Care center is open Monday through Friday, 8:00 a.m. until 6:00 p.m. E.S.T.
Troubleshooting
| The Problem: Why It Is Happening: The Solution: | ||
| Display reads "E-code" Incorrect personal code entry Verify personal code and reenter | ||
| Display reads "AGAIN" followed by "CARD" | Card was swiped incorrectly from left to right -Or- Card was swiped too fast or too slow | Evenly re-swipe card from right to left |
| Display reads "E-Card" Not swiping the same card originally used to open safe | Swipe original card used to open safe | |
| Display reads "LO-BAT" when door open or closed | Low battery Replace old batteries | with (4) new AA size alkalkine batteries |
| Display reads "b-LOC" Door is not locked. Bolts are not able to extend. | Unlock the unit then hold the door closed and attempt to re-lock it | |
| Display reads "HOLD" + "DIGIT" | (3) repeated incorrect user attempts | Wait 15 minutes and then input correct user code or correct stripped card |
| Safe will not open when using auxiliary remote battery pack | Batteries in battery pack are insufficient | Replace old batteries with (4) new AA size Alkaline batteries |
SentrySafe
www.sentrysafe.com/customercare/register-your_product
www.sentrysafe.com/customercare/register-your_product
(8:00 a.m. - 6:00 p.m. E.S.T., Mon. - Fri.)
Fax: 585-381-2940
Telephone: 585-381-4900