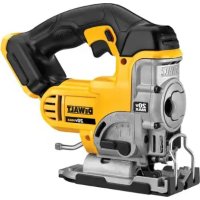
DW933K - Saw DEWALT - Free user manual and instructions
Find the device manual for free DW933K DEWALT in PDF.


Frequently Asked Questions - DW933K DEWALT
User questions about DW933K DEWALT
0 question about this device. Answer the ones you know or ask your own.
Ask a new question about this device
Download the instructions for your Saw in PDF format for free! Find your manual DW933K - DEWALT and take your electronic device back in hand. On this page are published all the documents necessary for the use of your device. DW933K by DEWALT.
USER MANUAL DW933K DEWALT
DEWALT Battery and Charger Systems
| Batt. Output Chargers/Charge Time - Chargeurs/Durée de charge (Minutes) - Cargadores de pilas/Tiempo de cargo (Minutos) | ||||||||||||
| Model# Volts 120 | Volts 230 Volts 12 Volts | |||||||||||
| DW9106 | DW9118 | DW9107 | DW9108 | DW9116 | DW9117 | DW911 | DW9245 | DW9246 | DW9108220 | DW9116220 | DW9109 | |
| DW0240 24 | X | X | X | X | X | X | X | 60 | 60 | X | X | X |
| DW0242 24 | X | X | X | X | X | X | X | 60 | 60 | X | X | X |
| DW9096 18 | X | X | X | 60 | 60 | 22 | 60 | X | X | 60 | 60 | 60 |
| DW9095 18 | X | X | X | 45 | 45 | 15 | 45 | X | X | 45 | 45 | 45 |
| DW9098 18 | X | X | X | 30 | 30 | 12 | 30 | X | X | 30 | 30 | 30 |
| DW9091 14.4 | 60 | 90 | 45 | 45 | 45 | 15 | 45 | X | X | 45 | 45 | 45 |
| DW9094 14.4 | 42 | 60 | 30 | 30 | 30 | 12 | 30 | X | X | 30 | 30 | 30 |
| DW9051 13.2 | 43 | X | X | X | X | X | X | X | X | X | X | X |
| DW9071 12 | 60 | 90 | 45 | 45 | 45 | 15 | 45 | X | X | 45 | 45 | 45 |
| DW9072 12 | 42 | 60 | 30 | 30 | 30 | 12 | 30 | X | X | 30 | 30 | 30 |
| DW9050 12 | 43 | X | X | X | X | X | X | X | X | X | X | X |
| DW9061 9.6 | 60 | 90 | 45 | 45 | 45 | 15 | 45 | X | X | 45 | 45 | 45 |
| DW9062 9.6 | 42 | 60 | 30 | 30 | 30 | 12 | 30 | X | X | 30 | 30 | 30 |
| DW9048 9.6 | 40 | X | X | X | X | X | X | X | X | X | X | X |
| DW9057 7.2 | 42 | 60 | 30 | 30 | 30 | 12 | 30 | X | X | 30 | 30 | 30 |
| DW9046 7.2 | 40 | X | X | X | X | X | X | X | X | X | X | X |
| X Indicates that the battery pack is not compatible with that specific charger. X indicate que le bloc-piles n'est pas compatible avec ce chargeur. Una "X" indica que el paquete de pilas no es compatible con ese cargador. All charge times are approximate. Actual charge time may vary. Read the instruction manual for more specific information. Les durées de charge sont approximatives; la durée de charge réelle peut varier. Lire le manuel d'utilisation pour obtenir des renseignements plus précis. Los tiempos de cargo son aapproximados. La duración de cargo real peut varier. Para Obtener una información más précisa, lea elmanual deutilización. | ||||||||||||
Dewalt Industrial Tool Co., 701 East Joppa Road, Baltimore, MD 21286
Printed in U.S.A. (XXX00-CD-1) Form No. 61115-01
Copyright © 2002
The following are trademarks for one or more DeWALT power tools: the yellow and black color scheme; the "D" shaped air intake grill; the array of pyramids on the handgrip; the kit box configuration; and the array of lozenge-shaped humps on the surface of the tool.
Questions? See us in the World Wide Web at www.dewalt.com
INSTRUCTION MANUAL GUIDE D'UTILISATIONMANUAL DE INSTRUCCIONES
INSTRUCTIVO DE OPERACION, CENTROS DE SERVICIO Y POLIZA DE GARANTIA. ADVERTENCIA: L'ASE ESTE INSTRUCTIVO ANTES DE USAR EL PRODUCTO.

DW933
Cordless Jig Saw
IF YOU HAVE ANY QUESTIONS OR COMMENTS ABOUT THIS OR ANY DEWALT TOOL, CALL US TOLL FREE AT:
1-800-4-DEWALT (1-800-433-9258)
General Safety Instructions for All Battery Operated Tools
WARNING! Read and understand all instructions. Failure to follow all instructions listed below, may result in electric shock, fire and/or serious personal injury.
SAVE THESE INSTRUCTIONS
WORK AREA
- Keep your work area clean and well lit. Cluttered benches and dark areas invite accidents.
- Do not operate power tools in explosive atmospheres, such as in the presence of flammable liquids, gases, or dust. Power tools create sparks which may ignite the dust or fumes.
- Keep bystanders, children, and visitors away while operating a power tool. Distractions can cause you to lose control.
ELECTRICAL SAFETY
- Never use the cord to carry the tool. Keep cord away from heat, oil, sharp edges or moving parts. Replace damaged cords immediately. Damaged cords may create a fire.
- A battery operated tool with integral batteries or a separate battery pack must be recharged only with the specified charger for the battery. A charger that may be suitable for one type of battery may create a risk of fire when used with another battery.
- Use battery operated tool only with specifically designated battery pack. Use of any other batteries may create a risk of fire.
PERSONAL SAFETY
- Stay alert, watch what you are doing and use common sense when operating a power tool. Do not use tool while tired or under the influence of drugs, alcohol, or medication. A moment of
inattention while operating power tools may result in serious personal injury,
- Dress properly. Do not wear loose clothing or jewelry. Contain long hair. Keep your hair, clothing, and gloves away from moving parts. Loose clothes, jewelry, or long hair can be caught in moving parts. Air vents often cover moving parts and should also be avoided.
- Avoid accidental starting. Be sure switch is in the locked or off position before inserting battery pack. Carrying tools with your finger on the switch or inserting the battery pack into a tool with the switch on invites accidents.
- Remove adjusting keys or wrenches before turning the tool on. A wrench or a key that is left attached to a rotating part of the tool may result in personal injury.
- Do not overreach. Keep proper footing and balance at all times. Proper footing and balance enables better control of the tool in unexpected situations.
- Use safety equipment. Always wear eye protection. Dust mask, non-skid safety shoes, hard hat, or hearing protection must be used for appropriate conditions.
TOOL USE AND CARE
- Use clamps or other practical way to secure and support the workpiece to a stable platform. Holding the work by hand or against your body is unstable and may lead to loss of control.
- Do not force tool. Use the correct tool for your application. The correct tool will do the job better and safer at the rate for which it is designed.
- Do not use tool if switch does not turn it on or off. Any tool that cannot be controlled with the switch is dangerous and must be repaired.
- Disconnect battery pack from tool or place the switch in the locked or off position before making any adjustments, changing accessories, or storing the tool. Such preventative safety measures reduce the risk of starting the tool accidentally.
-
Store idle tools out of reach of children and other untrained persons. Tools are dangerous in the hands of untrained users.
-
When battery pack is not in use, keep it away from metal objects like: paper clips, coins, keys, nails, screws, or other small metal objects that can make a connection from one terminal to the other. Shorting the battery terminals together may cause sparks, burns, or a fire.
- Maintain tools with care. Keep cutting tools sharp and clean. Properly maintained tools, with sharp cutting edges are less likely to bind and are easier to control.
- Check for misalignment or binding of moving parts, breakage of parts, and any other condition that may affect the tools operation. If damaged, have the tool serviced before using. Many accidents are caused by poorly maintained tools.
- Use only accessories that are recommended by the manufacturer for your model. Accessories that may be suitable for one tool may create a risk of injury when used on another tool.
SERVICE
- T ool service must be performed only by qualified repair personnel. Service or maintenance performed by unqualified personnel may result in a risk of injury.
- When servicing a tool, use only identical replacement parts. Follow instructions in the Maintenance section of this manual. Use of unauthorized parts or failure to follow Maintenance Instructions may create a risk of shock or injury.
Additional Specific Safety Instructions
- Hold tool by insulated gripping surfaces when performing an operation where the cutting tool may contact hidden wiring. Contact with a "live" wire will also make exposed metal parts of the tool "live" and shock the operator.
WARNING: Some dust created by power sanding, sawing, grinding, drilling, and other construction activities contains chemicals known to cause cancer, birth defects or other reproductive harm. Some examples of these chemicals are:
- lead from lead-based paints,
crystalline silica from bricks and cement and other masonry products, and - arsenic and chromium from chemically-treated lumber (CCA).
Your risk from these exposures varies, depending on how often you do this type of work. To reduce your exposure to these chemicals: work in a well ventilated area, and work with approved safety equipment, such as those dust masks that are specially designed to filter out microscopic particles.
- Avoid prolonged contact with dust from power sanding, sawing, grinding, drilling, and other construction activities. Wear protective clothing and wash exposed areas with soap and water. Allowing dust to get into your mouth, eyes, or lay on the skin may promote absorption of harmful chemicals.
CAUTION: Wear appropriate personal hearing protection during use. Under some conditions and duration of use, noise from this product may contribute to hearing loss.
The label on your tool may include the following symbols.
V.....volts A. .amperes
Hz.....hertz W.....watts
min.........minutes.........alterating current
direct current no .no load speed
Class II .eathing terminal
Construction... safety alert symbo
.../min.....revolutions per minute
Important Safety Instructions for Battery Chargers
- This manual contains important safety and operating instructions.
- Before using charger, read all instructions and cautionary markings on (1) charger, (2) battery pack, and (3) product using battery pack. DANGER: 120 volts present at charging terminals. Do not probe with conductive objects. Danger of electric shock or electrocution.
DANGER: If battery pack case is cracked or damaged, do not insert into charger. Danger of electric shock or electrocution.
- The charger and battery pack are specifically designed to work together. DO NOT attempt to charge the battery pack with any chargers other than the ones in this manual.
- Do not expose charger to rain or snow.
These chargers are not intended for any uses other than charging DeWalt rechargeable batteries. Any other uses may result in risk of fire, electric shock or electrocution.
- T to reduce risk of damage to electric plug and cord, pull by plug rather than cord when disconnecting charger.
- Make sure cord is located so that it will not be stepped on, tripped over, or otherwise subjected to damage or stress.
- A n extension cord should not be used unless absolutely necessary. Use of improper extension cord could result in risk of fire, electric shock, or electrocution.
An extension cord must have adequate wire size (AWG or American Wire Gauge) for safety. The smaller the gauge number of the wire, the greater the capacity of the cable, that is 16 gauge has more capacity than 18 gauge. When using more than one extension to make up the total length, be sure each individual extension contains at least the minimum wire size.
RECOMMENDED MINIMUM AWG SIZE FOR EXTENSION CORDS
Total Extension Cord Length (feet)
| 25 | 50 | 75 | 100 | 125 | 150 | 175 |
| Wire Gauge | ||||||
18 18 16 16 14 14 12
- The charger is ventilated through slots in the top and the bottom of the housing. Do not place any object on top of charger or place the charger on a soft surface that might block the ventilation slots and result in excessive internal heat. Place the charger in a position away from any heat source.
-
Do not operate charger with damaged cord or plug - have them replaced immediately.
-
Do not operate charger if it has received a sharp blow, been dropped, or otherwise damaged in any way; take it to an authorized service center.
- Do not disassemble charger; take it to an authorized service center when service or repair is required. Incorrect reassembly may result in a risk of electric shock, electrocution or fire.
- T to reduce risk of electric shock, unplug charger from outlet before attempting any cleaning. Removing the battery pack will not reduce this risk.
NEVER attempt to connect 2 chargers together.
DO NOT store or use the tool and battery pack in locations where the temperature may reach or exceed 105^ (such as outside sheds or metal buildings in summer). - The charger is designed to operate on standard household electrical power (120 Volts). Do not attempt to use it on any other voltage!
Important Safety Instructions for Battery Packs
The battery pack is not fully charged out of the carton! First read the safety instructions below. Then follow charging notes and procedures.
READ ALL INSTRUCTIONS.
- Do not incinerate the battery pack even if it is severely damaged or is completely worn out. The battery pack can explode in a fire.
- A small leakage of liquid from the battery pack cells may occur under extreme usage or temperature conditions. This does not indicate a failure. However, if the outer seal is broken and this leakage gets on your skin:
a. Wash quickly with soap and water.
b. Neutralize with a mild acid such as lemon juice or vinegar.
c. If battery liquid gets into your eyes, flush them with clean water for a minimum of 10 minutes and seek immediate medical attention. (Medical note: The liquid is 25 - 35% solution of potassium hydroxide.)
- Never attempt to open the battery pack for any reason. If the plastic housing of the battery pack breaks or cracks, immediately discontinue use and do not recharge.
- Do not carry extra battery packs in aprons, pockets, or tool boxes along with other metal objects. Battery pack could be short circuited causing damage to the battery pack and possibly causing severe burns or fire.
- Charge the battery packs only in DeWalt chargers.
NOTE: Review and observe all of the "Important Charging Notes" in the charger instruction section of this manual.
NOTE: The batteries in your battery pack are the nickel-cadmium type. Cadmium is considered to be a toxic material by the Environmental Protection Agency. Before disposing of damaged or worn out Nickel-Cadmium battery packs, check with your state Environmental Protection Agency to find out about special restrictions on the disposal of these battery packs or return them to a DeWALT certified service center for recycling.
NOTE: Battery storage and carrying caps are provided for use whenever the battery is out of the tool or charger. Remove cap before placing battery in charger or tool.
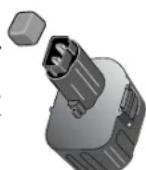
WARNING: Do not store or carry battery so that metal objects can contact exposed battery terminals. For example, do not place battery in aprons, pockets, tool boxes, product kit boxes,
drawers, etc. with loose nails, screws, keys, etc. without battery cap. Without cap in place, battery could short circuit causing fire or burns or damage to battery.
Battery Packs
Your tool uses a 14.4 Volt or an 18.0 Volt D2 WALT battery pack. When ordering replacement battery packs, be sure to include catalog number and voltage.
Extended Run-Time battery packs deliver more run-time than standard battery packs. NOTE: Your tool will accept either standard or Extended Run Time battery packs. However, be sure to select proper voltage.
The RBRC™ Seal
The RBRC™ (Rechargeable Battery Recycling Corporation) Seal on the nickel-cadmium battery (or battery pack) indicates that the costs to recycle the battery (or battery pack) at the end of its useful life have already been paid by DeWalt. In some areas, it is illegal to place spent nickel-cadmium batteries in the trash or municipal solid waste stream and the RBRC program environmentally conscious alternative.

RBRC in cooperation with DeWalt and other battery users, has established programs in the United States to facilitate the collection of spent nickel-cadmium batteries. Help protect our environment and conserve natural resources by returning the spent nickel-cadmium battery to an authorized DeWalt service center or to your local retailer for recycling. You may also contact your local recycling center for information on where to drop off the spent battery.
Chargers
Your battery can be charged in DeWALT 1 Hour Chargers or 15 Minute Chargers. Be sure to read all safety instructions before using your charger.
Charging Procedure
1 HOUR CHARGERS
- Plug the charger into an appropriate power outlet.
- Insert the battery pack into the charger, as shown in FIG.1, making sure the pack is fully seated in the charger. The red (charging) light will blink continuously indicating that the charging process has started.
- The battery pack will be fully charged in about 1 hour. The completion of charge will be indicated by the red light remaining ON continuously. The pack is fully charged and may be used at this time or left in the charger.
TROUBLE INDICATORS: These chargers are designed to detect certain problems that can arise with battery packs which would be
indicated by the red light flashing at a fast rate (and continuous beeping for 15 Minute Chargers). If this occurs, re-insert battery pack. If problem persists, try a different battery pack to determine if the charger is OK. If the new pack charges correctly, then the original pack is defective and should be returned to a service center for recycling. If the new battery pack elicits the same trouble indication as the original, have charger tested at an authorized service center.
PROBLEM POWER LINE
If your charger has a Problem Power Line indicator: When the charger is used with some portable power sources such as generators or sources that convert DC to AC, the charger may temporarily suspend operation, flashing the red light with two fast blinks followed by a pause. This indicates the power source is out of limits.
HOT PACK DELAY
If your charger has a Hot Pack Delay feature: When the charger detects a battery that is hot, it automatically starts a Hot Pack Delay, suspending charging until the battery has cooled. After the battery has cooled, the charger automatically switches to the Pack Charging mode. This feature ensures maximum battery life. The red light flashes long, then short while in the Hot Pack Delay mode.
15 MINUTE CHARGERS
- Plug the charger into an appropriate power outlet. The charger will beep twice, the red light will blink and go off.
- Insert the battery pack into the charger, as shown in FIG. 1, making sure the pack is fully seated in the charger. The red light will blink and the charger will beep once indicating the charging process has started.
- The battery pack will be fully charged in less than 15 minutes under most conditions. This will be indicated by the red light remaining ON and 3 beeps. The pack is fully charged and may be used at this time or left in the charger.
WEAK BATTERY PACKS: The charger can also detect a weak battery. Such batteries are still usable but should not be expected to perform as much work. In such cases, about 10 seconds after battery
insertion, the charger will beep rapidly 8 times to indicate a weak battery condition. The charger will then go on to charge the battery to the highest capacity possible.
ALL CHARGERS
Leaving the battery pack in the charger: When the red light remains ON, the charger has switched to its "equalize charge" mode which lasts approximately 4 hours, after which the charger will switch to "maintenance charge" mode. The battery pack can be removed at any time during these charge cycles, but will only be fully charged if the red light is continuously ON. The charger and battery pack can be left connected with the red light glowing indefinitely. The charger will keep the battery pack fresh and fully charged. A battery pack will slowly lose its charge when kept out of the charger. If the battery pack has not been kept on maintenance charge, it may need to be recharged before use. A battery pack may also slowly lose its charge if left in a charger that is not plugged into an appropriate AC source.
Important Charging Notes
- Longest life and best performance can be obtained if the battery pack is charged when the air temperature is between 65^ and 75^ (18^ - 24^) . DO NOT charge the battery pack in an air temperature below +40^(+4.5^) , or above +105^(+40.5^) . This is important and will prevent serious damage to the battery pack.
- The charger and battery pack may become warm to touch while charging. This is a normal condition, and does not indicate a problem.
- If the battery pack does not charge properly — (1) Check current at receptacle by plugging in a lamp or other appliance. (2) Check to see if receptacle is connected to a light switch which turns power off when you turn out the lights. (3) Move charger and battery pack to a location where the surrounding air temperature is approximately 65^ - 75^ (18^ - 24^) . (4) If charging problems persist, take or send the tool, battery pack and charger to your local service center.
- The battery pack should be recharged when it fails to produce sufficient power on jobs which were easily done previously. DO NOT
CONTINUE to use under these conditions. Follow the charging procedure. You may also charge a partially used pack whenever you desire with no adverse affect on the battery pack.
- Do not immerse charger in water or any other liquid.
WARNING: Don't allow any liquid to get inside charger. Electric shock may result. To facilitate the cooling of the battery pack after use, avoid placing the charger or battery pack in a warm environment such as in a metal shed, or an uninsulated trailer.
CAUTION: Never attempt to open the battery pack for any reason. If the plastic housing of the battery pack breaks or cracks, return to a service center for recycling.
Important!
This product is not user servicable. There are no user servicable parts inside the charger. Servicing at an authorized service center is required to avoid damage to static sensitive internal components.
READ ALL OF THE INSTRUCTIONS IN THE BATTERY CHARGER SECTION OF THIS MANUAL BEFORE ATTEMPTING TO CHARGE THE BATTERY PACK FOR YOUR TOOL.
Always use correct battery pack (pack supplied with tool or replacement pack exactly like it.) Never install any other battery pack. It will ruin your tool and may create a hazardous condition.
BATTERY PERFORMANCE
Some chargers have a tune-up feature optimizes battery pack performance. Your charger may provide Automatic Tune-Up™ Mode or manual (i.e. push button) Tune-Up™ mode. For information on this feature, please see the appropriate section below. Because batteries slowly lose their charge when they are not on the charger, the best place to keep your battery pack is on the charger at all times.
Using Automatic Tune-UpTM Mode
The Automatic Tune-Up™ Mode equalizes or balances the individual cells in the battery pack allowing it to function at peak capacity. Battery packs should be tuned up after every 10th charge/ discharge cycle or whenever the pack no longer delivers the same amount of
work. To use the automatic tune-up mode, simply place the battery pack in the charger and leave it for at least eight hours. The charger will cycle through the following modes.
- The red light will blink continuously indicating that the 1-hour charge cycle has started.
- When the 1-hour charge cycle is complete, the light will stay on continuously and will no longer blink. This indicates that the pack is fully charged and can be used at this time.
- Whenever the pack is left in the charger after the initial 1-hour charge, the charger will begin the Automatic Tune-Up™ Mode. This mode continues up to 8 hours or until the individual cells in the battery pack are equalized. The battery pack is ready for use and can be removed at any time during the Tune-Up™ Mode.
- Once the Automatic Tune-Up™ Mode is complete the charger will transition to a maintenance charge; no indicator light shows the completion of the Automatic Tune-Up™ Mode.
Using the Manual Tune-UpTM Mode
The manual Tune-upTM mode equalizes or balances the individual cells in the battery pack at its peak capacity. This mode takes up to 8 hours to complete. Battery packs should be tuned up weekly or after 10 to 20 charge/discharge cycles or whenever the pack no longer delivers the same amount of work.
- To tune up your battery pack, place the battery in the charger as usual. The red light will blink continuously indicating that the charge cycle has started.
- Press the Tune-UpTM Mode button any time after the charge cycle has started. The red light will stop blinking momentarily, blink quickly 3 times, and then resume blinking continuously. The charger is now tuning up the cells in your battery.
-
When the Tune-UpTM mode cycle is complete, the light will stay on continuously. The pack is fully charged and may be used at this time or left in the charger.
-
If you select Tune-Up™ Mode and then change your mind, remove the battery from the charger. After 5 seconds, insert the battery into the charger. The normal charge cycle will begin.
Installing and Removing the Battery Pack
NOTE: Make sure your battery pack is fully charged. To install the battery pack into the tool handle, align the base of the tool with the notch inside the tool's handle and slide the battery pack firmly into the handle until you hear the lock snap into place.
To remove the battery pack from the tool, press the release buttons and firmly pull the battery pack out of the tool handle. Insert it into the charger as described in the charger manual.
Important!
This product is not user servicable. There are no user servicable parts inside the charger. Servicing at an authorized service center is required to avoid damage to static sensitive internal components.
READ ALL OF THE INSTRUCTIONS IN THE BATTERY CHARGER SECTION OF THIS MANUAL BEFORE ATTEMPTING TO CHARGE THE BATTERY PACK FOR YOUR TOOL.
Always use correct battery pack (pack supplied with tool or replacement pack exactly like it.) Never install any other battery pack. It will ruin your tool and may create a hazardous condition.
Motor
Your DeWALT tool is powered by a DeWALT-built motor. Be sure your power supply agrees with the nameplate markings.
Voltage decrease of more than 10% will cause loss of power and overheating. All DeWALT tools are factory tested; if this tool does not operate, check the power supply.
Variable Speed Switch (Fig. 1)
(a) The trigger switch (A) governs the speed of the saw. (the further the trigger is depressed, the higher the S.P.M.).
(b) The safety lock button (B) should be depressed whenever the tool is not in use to eliminate the chance of accidental starting.
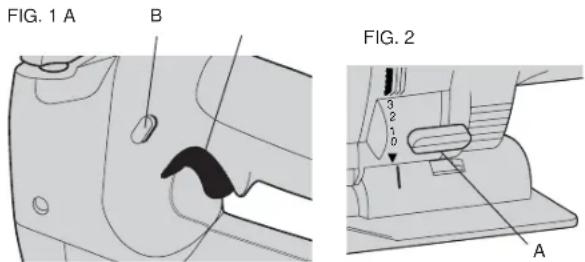
Straight Line or Orbital Cutting Action (Fig. 2)
For cutting softer materials your jig saw features orbital cutting action. Soft materials, like wood and plastic, permit deep penetration of individual saw teeth. The orbital action thrusts the blade forward on the cutting stroke and greatly increases cutting speed over conventional jig saws. Harder materials like metal should be cut using the straight line cutting action or a very low orbital setting. To select straight line or orbital cutting adjust the lever (A) on the saw as shown in Figure 2.
Bevel Cutting Adjustment (Fig. 3)
Bevel cuts may be made at any angle between 0^ and 45^ .
TO ADJUST THE SHOE:
a. Lift the shoe lever on the bottom of the tool (A).
b. Align the arrow on the housing and the shoe.
c. Rotate the shoe to the desired angle.
After setting the shoe, tighten it by returning the shoe lever to its original position. NOTE: The shoe will be difficult to bevel at first. Ensure the shoe lever is up and the two arrows shown are aligned. Gently rock the shoe from side to side to loosen.
At 0^ , the shoe may slide back to allow for cutting in tight work areas. Lift
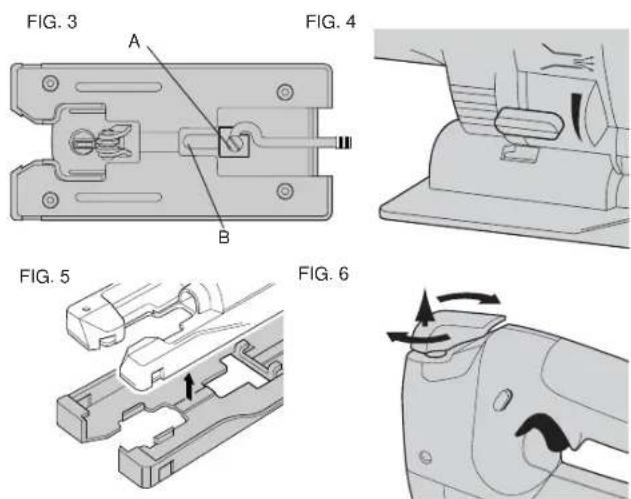
the shoe lever, slide the shoe back and depress the lever to lock. If necessary tighten the shoe lever with the screw (B).
Dust Blower (Fig. 4)
Your jig saw is equipped with a dust blower to clear the cutting area of saw dust. To turn on the blower, slide the switch to the upper position. Toturn it off, slide the switch to the lower position.
Removable Shoe Cover (Fig. 5)
A plastic shoe cover is included. Use this cover when cutting surfaces that scratch easily, such as laminates or veneer. Install the shoe as shown in Fig. 5. The tabs slide under the slots on the shoe. Place the shoe cover on the shoe and slide the cover toward the back of the tool to lock it in place.
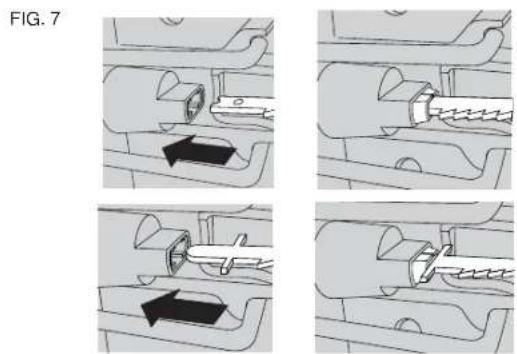
Attaching Blades (Fig. 7)
UNPLUG TOOL. To remove the blade, lift the knob (Figure 6) on the top of the jig saw approximately 1/2^ . Rotate the knob counterclockwise until the clamp is open. Do not force the knob once it stops. Insert the blade as shown. Make sure the back edge of the blade fits into the support roller. Tighten clamp by turning top knob clockwise until you hear a clicking sound. Push knob down.
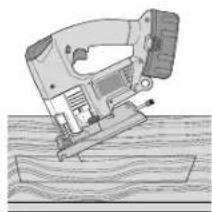
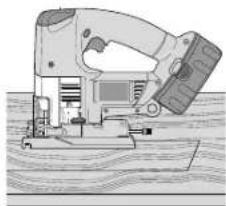
Pocket Cutting (Figs. 8)
A pocket cut is an easy method of making an inside cut. The saw can be inserted directly into a panel or board without first drilling a lead or pilot hole. In pocket cutting measure the surface to be cut and mark clearly with a pencil. Be sure the shoe is extended forward. Next tip the saw forward until the front end of the shoe sits firmly on the work surface. Switch the tool on and allow it to attain maximum speed. Grip the saw firmly and lower the back edge of tool slowly until the blade reaches its complete depth. Hold the shoe flat against the wood and begin cutting. Do not remove blade from cut while it is still moving. Blade must come to a complete stop.
FIG.8
Wood Cutting
Be sure board is firmly positioned. Don't attempt to turn on when blade is against material to be cut. This could stall the motor. Place front of shoe on material to be cut and hold jig saw shoe firmly against the wood while cutting. Don't force the tool; let the blade cut at its own speed. Whenever possible, clamp or support work close to the line of cut; when the cut is completed, shut off power, let blade come to a complete stop and then lay the saw aside before loosening the work. Use the higher speed setting for cutting wood.
Rip & Circle Cutting
Ripping and circle cutting without a pencil line are easily done with an accessory Rip Fence and Circle Guide (available at small extra cost). When using the Rip Fence and Circle Guide, the shoe must be in the Anti-Splintering position. When ripping: insert rip fence in either side of saw with cross bar facing down; adjust to width of cut and tighten screw. When circle cutting: Insert rip fence from either side with cross bar facing up; adjust rip fence so that distance from blade to hole in cross bar is the desired radius and tighten screw; place saw so that center of hole in cross bar is over center of circle to be cut (make pocket cut, drill hole for blade or cut inward from edge of material to get blade into position). When saw is properly positioned, drive a small nail through hole in cross bar into exact center of circle to be cut. Using rip fence as a pivot arm, begin cutting circle.
Rip Fence & Circle Guide
(AVAILABLE AT EXTRA COST)
Permits ripping without a penciled line and circle cutting with jig saws. CAUTION:Recommended saw blades and accessories for your saw are listed in this manual. The use of any other type of blade or accessory might be hazardous.
Lubrication
It is recommended that, at least once a year, you take or send the tool to a service center for a thorough cleaning, inspection and lubrication of the gear case.
Accessories
Recommended accessories for use with your tool are available at extra cost from your local service center.
CAUTION: The use of any non-recommended accessory may be hazardous.
A complete listing of service centers is included on the owner's registration card packed with your tool.
If you need assistance in locating any accessory, please contact DeWALT Industrial Tool Co., 701 East Joppa Road, Baltimore, MD 21286 or call 1-800-4-DeWALT (1-800-433-9258).
Important
To assure product SAFETY and RELIABILITY, repairs, maintenance and adjustment (including brush inspection and replacement) should be performed by authorized service centers or other qualified service organizations, always using identical replacement parts.
Full Warranty
DeWALT heavy duty industrial tools are warranted for one year from date of purchase. We will repair, without charge, any defects due to faulty materials or workmanship. For warranty repair information, call 1-800-4-DeWALT. This warranty does not apply to accessories or damage caused where repairs have been made or attempted by
others. This warranty gives you specific legal rights and you may have other rights which vary in certain states or provinces.
In addition to the warranty, DFWALT tools are covered by our:
30 DAY NO RISK SATISFACTION GUARANTEE
If you are not completely satisfied with the performance of your DEWALT heavy duty industrial tool, simply return it to the participating seller within 30 days for a full refund. Please return the complete unit, transportation prepaid. Proof of purchase may be required.
FREE WARNING LABEL REPLACEMENT: If your warning labels become illegible or are missing, call 1-800-4-DEWALT for a free replacement.
POUR TOUT RENSEIGNEMENT SUPPLEMENTaire SUR CET OUTIL OU TOUT AUTRE OUTIL DE WALT, COMPOSER SANS FRAIS LE NUMERO :
18004-DEWALT(1-800-433-9258)
Mode recharging (Tune-UpMC)
DEWALT Industrial Tool Co., 701 East Joppa Road, Baltimore, MD 21286
BOSQUES DE CIDROS ACCESO RADIATAS NO.42
COL. BOSQUES DE LAS LOMAS
05120 MEXICO, D.F.
TEL.326-7100