
XL 25 T - Grass trimmer Hanseatic - Free user manual and instructions
Find the device manual for free XL 25 T Hanseatic in PDF.

Frequently Asked Questions - XL 25 T Hanseatic
User questions about XL 25 T Hanseatic
0 question about this device. Answer the ones you know or ask your own.
Ask a new question about this device
Download the instructions for your Grass trimmer in PDF format for free! Find your manual XL 25 T - Hanseatic and take your electronic device back in hand. On this page are published all the documents necessary for the use of your device. XL 25 T by Hanseatic.
USER MANUAL XL 25 T Hanseatic
Operating Instructions
Read operating instructions before use!

GB - List of components
- Cord cutting head 9. Choke
- Cutting cord 10. Starter housing
- Protection cover 11. Fuel tank
- Shaft
- Handle
- Throttle lever
- Ignition switch
-
Locking lever
-
Air filter housing
- Starter handle
- Silencer cover
- Fuel pump
- Shaft coupling

Abb.1

Abb.2
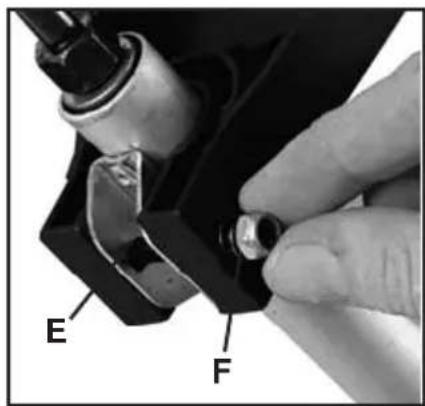
Abb.3
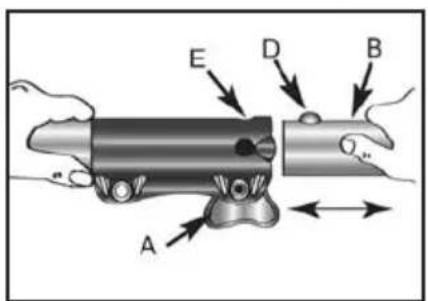
Abb. 4 Abb. 5
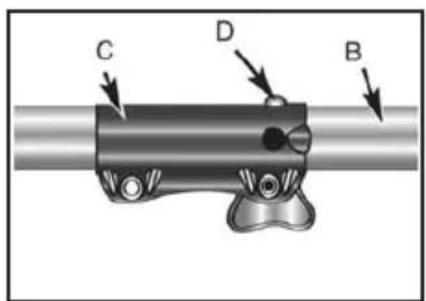
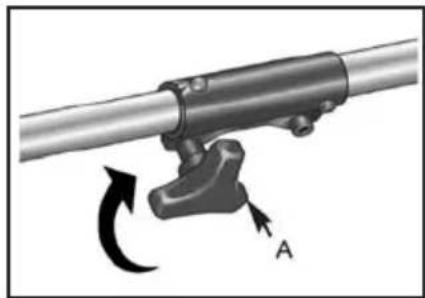
Abb.6
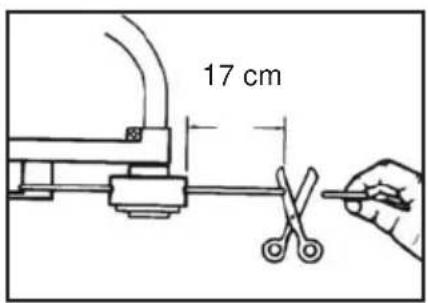
Abb. 7

Abb. 8 Abb.9

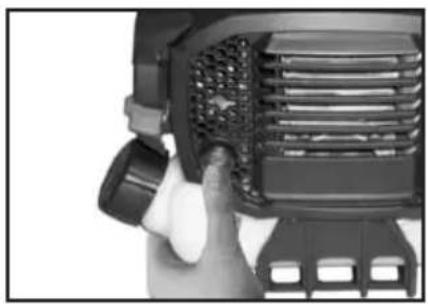
Abb.10
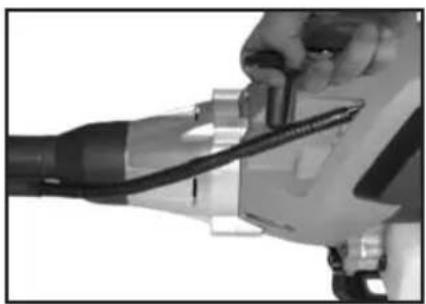
Abb. 11

Abb. 12
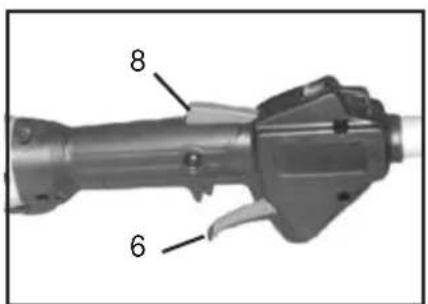
Abb. 13

Abb. 14
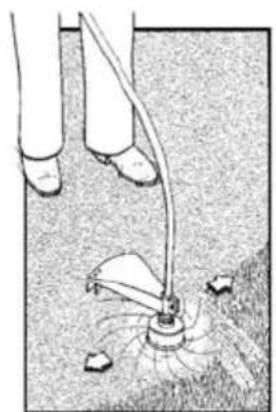
Abb. 15
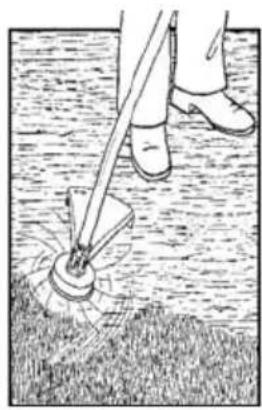
Abb. 16
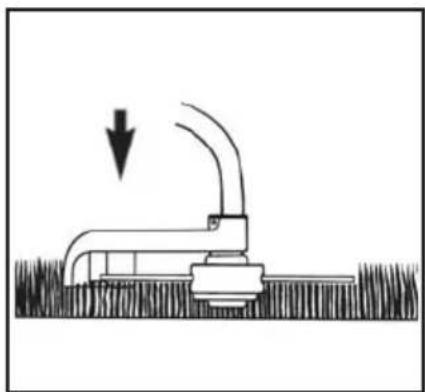
Abb. 17
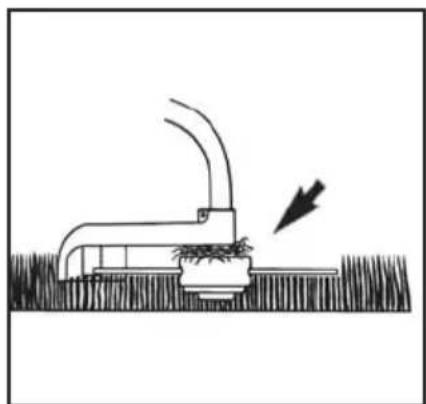
Abb. 18

Abb. 19 a

Abb. 19 b

Abb.20

Abb. 21

Abb. 22

Abb. 23

Abb. 24 Abb. 26 a

Abb. 25


Abb. 26 b Abb. 27

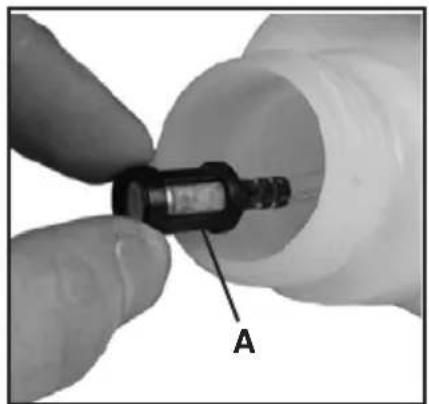
Abb. 28
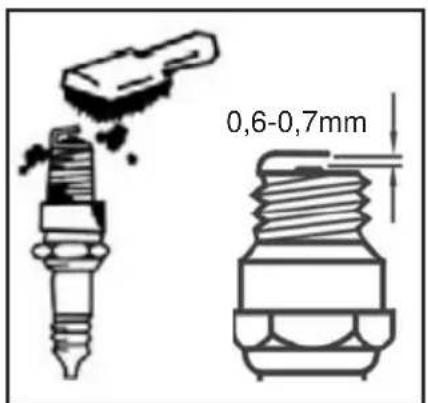
Abb. 29
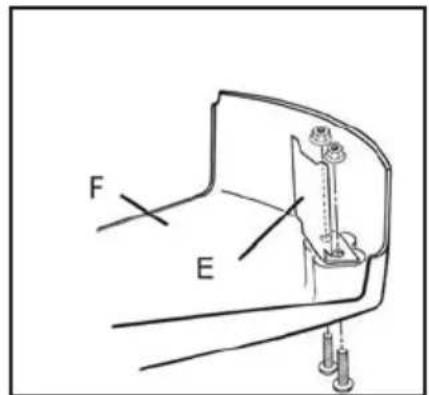
Abb. 30
SICHERHEITSSYMBOLE UND INTERNATIONALE SYMBOLE
CANDELA D'ACCENSIONE
SAFETY SIGNS AND INTERNATIONAL SYMBOLS
These Operating Instructions describe safety symbols and international symbols and pictographs that may be applied to the device. Read the Operating Instructions to familiarise with all information concerning safety, assembly, operation, maintenance and repair.
| SYMBOLS | MEANING |
| ·READ THE OPERATING INSTRUCTIONS If you do not adhere to the instructions and safety measures described in the Operating Instructions severe injuries may occur. Read the Operating Instructions before you start and operate this device. | |
| ·Wear HEAD, EYE AND EAR PROTECTORS WARNING: Hurlled-away objects may lead to serious injuries of the eyes, excessive noise may result in deafness. Wear eye and ear protection devices when operating this device. Falling objects may cause serious injuries of the head; wear a head protection when operating this device. | |
| ·KEEP OTHER PERSONS ON A DISTANCE WARNING: Take care that no other persons are standing within a radius of 15m around your working area. This particularly applies to children and animals. | |
| ·Wear FOOT PROTECTION AND GLOVES Always wear safety boots and gloves when operating the device. | |
| ·WARNING SYMBOL Points to danger, warnings or reasons for particular carefulness. May be used in connection with other symbols or pictographs. | |
| ·POSITION OF THE HANDLE Direction of arrow shows how to install the handle. Always keep the right position, you must never remain under the required distance! | |
| ·ATTENTION: HOT SURFACE Never touch a hot exhaust pipe, gear box or cylinder. Otherwise, you may suffer burns. These parts get extremely hot during operation and stay hot for some time after the device has been switched off. | |
| ·DANGER OF INJURY! Beware of hurled-away objects. | |
| ·DO NOT USE METAL BLADES WARNING: Do not use metal blades with this device to avoid serious injuries. | |
| ·MAXIMUM SPEED The maximum speed of the cutting unit. The device must not be operated at a speed higher than this. |
Petrol trimmer
Ratings
Model XL 25 T
| Engine output kW / HP 0.8 / 1.1 | |
| Engine type 2-stroke | |
| Cubic capacity cm3 25 | |
| Fuel lubricated petrol 40:1 | |
| Tank volume ml 600 | |
| Maximum engine speed min-1 10.500 | |
| Idling speed min1 3.000 | |
| Max. speed of the cutting tool min1 9.000 | |
| Fuel consumption kg/h 0.38 | |
| Cutting diameter cm 43 | |
| Cord diameter mm 2.0 | |
| Overall cord length m 2 x 3 | |
| Cord extension Tap'n go | |
| Weight kg 4,5 | |
| Acoustic capacity level dB(A) 112 | |
| Sound pressure level (acc. to EN 27917) dB (A) 98,2 | |
| Vibration - full throttle (acc. to EN ISO 7916) m/s2 6,35 | |
| Vibration - idling (acc. to EN ISO 7916) m/s2 9,57 | |
| Cutting attachments (type) Nylon line cutting head |
Technical changes reserved.
The devices are manufactured in accordance with the provisions of DIN EN ISO 11806 and fully comply with the provisions of the German Equipment and Product Safety Act.
SAFETY INSTRUCTIONS
Information on noise emission in accordance with "Machine Noise Information Ordinance 3. GPSGV and Machinery Directives: The noise level at the workplace may exceed 85 dB (A). In this case, noise protection measures for the operator are required (e.g., wearing of ear protection).

Attention: Noise protection! Please observe the local regulations when operating your device.
BEFORE OPERATION
- Always keep these Operating Instructions to hand together with your petrol trimmer.
- Read the instructions carefully. Familiarise with the control elements so that you are able to safely operate the device.
Children and juveniles are not allowed to operate the device - except for juveniles working with the device under the guidance and supervision of an adult who is familiar with the device. - Before each use of the device, check whether the cutting head is attached correctly and that the throttle lever returns to zero position automatically.
- All protection covers and safety devices must be correctly attached to operate the device.
- Thoroughly check the device for loose or defective parts before each use. Only start working with the device when all required repairs and settings have been effected.
- Use the device only during daylight or in sufficiently
strong artificial light.
Take care that no other persons are standing within a radius of 15m around your working area.
- Adjust the handle to your body height before starting the device and make sure that the cutting head is not in touch with any objects.
- Be aware of the possible dangers to your head, hands and feed that may develop.
- Carefully check the area to be cut down. Remove any fallen leaves that may get caught in the cutting cord. Also remove any objects that may be hurled away during cutting.
SAFETY INSTRUCTIONS FOR PETROL-POWERED TRIMMERS AND BRUSHCUTTERS

WARNING: Petrol is extremely flammable and its fumes may explode when ignited. Take care of the following:
1) Store petrol in containers designed and approved for the storage of such substances only.
2) Always switch off the engine and let it cool down before you refill the tank. As long as the engine is hot you must never remove the tank cap or refill the tank.
3) In the tank pressure may develop. Loosen the tank cap slowly to allow this pressure to gradually decrease.
4) Refuel the device in a clean, well-ventilated room only. Immediately wipe off spilled-over fuel. In such a case, you must keep all sources of ignition away from the device and wait with the starting of the engine until the fuel has evaporated.
5) Make sure that you use the right fuel or petrol/oil mix (lubricated petrol). To operate the device the tank cap must be closed tightly.
6) Start the device at least three meters away from the place where you fuelled it. Do not smoke during fuelling or operation and take care that no sparks or open flames reach into the working area.
DURING OPERATION
- Use this trimmer for its provided purpose only, i.e. for the cutting of grass, brushwood and weed.
- Avoid any inadvertent starting of the engine. Make sure, that the control lever is always in 'Start' position when you pull the starter rope.
- Always be attentive. To protect yourself and others from injuries you should not work with this device if you are tired.
- Do not work with this device under the influence of drugs, alcohol and medical drugs.
- Always wear protection goggles when operating this device.
- Wear appropriate clothes. Do not work with this device with bare feet or open sandals. Always wear robust footwear with rubber soles. We recommend to wear gloves, ear protection and long trousers.
- Do not wear wide clothing or scarves, chains, ties etc. These may get sucked into the air inlet. Do also take care that long hair does not get into the air inlet. Tie long hair together behind the head so that the neck and shoulders remain free from it.
- Keep your hands, face and feet away from any moving parts. Do not try to touch or stop the cutting cord as long as it is turning.
- Use this device in well-ventilated outdoor areas only. In closed rooms, exhaust gases containing carbon monoxide may have fatal effects.
- Do not bend forward too far. Always take care to have a safe stand and good balance.
- Do not touch the exhaust pipe or cylinder. These parts get extremely hot during operation and stay hot for some time after the device has been switched off.
- Always hold the trimmer with both hands during work. Hold on to both the front and back handle tightly.
- Check the condition of the cutting head regularly. All damaged parts must be replaced immediately. Follow the necessary safety measures when replacing any parts.
- If you touch an object or get caught (with the device) switch off the engine immediately and check the device for possible damage. Repair possibly existing damages before you try to continue your work. Do not operate the trimmer if it has loose or damaged parts.
- Do not run the engine faster than required for cutting, trimming or the clean-cutting of edges. Do not let the engine run on high speeds when you are not cutting.
- The cord protection cover must always be mounted when the trimmer is operated. If this should not be the case, the engine may overheat. OPERATE THE
DEVICE ONLY WITH THE PROTECTION COVER MOUNTED.
- The cutting diameter must not exceed the length of the protection cover stated in this manual.
- Make sure that the trimmer is not soiled by parts of plants or other materials.
- Always switch the engine off if you make a break or move to another area.
- Replace the exhaust pipe and (if necessary) the spark protector if these are not in proper working order any more.
- To keep the danger of fire as low as possible the engine and exhaust pipe must be free from grass, leaves and excess grease.
- For any interventions, whether maintenance or repair works, the changing the cutting head or installation of safety devices, the engine must be switched off.
- Use original spare parts only. These parts are available from your appointed retailer. The use of deviating parts or other parts, accessories or attachments that are not designed for this trimmer may result in serious injuries to the persons using it and your warranty will become void.
- Only use the trimmer with the right trimming cord installed and with both trimming cords being at the right length.
AFTER OPERATION
- Clean the trimmer from remainders of grass and dirt after use.
- Lock the device in a proper place to protect it from unauthorised use.
FURTHER SAFETY INSTRUCTIONS
- If there is still fuel in the device's tank do not store it in a building where the vapours may be ignited by open fire or sparks.
- Let the engine cool down, before you store the device in a closed room.
- Lock the trimmer in a proper, dry room to protect it from unauthorised use and damage.
ASSEMBLY
ASSEMBLY OF THE HANDLE (Fig. 1)
The petrol trimmer is fitted with an additional handle. You can adjust this handle to achieve a convenient working position:
Remove the lower handle bracket from the included additional handle. Put the lower handle bracket to the shaft (from below) and put the additional handle on the shaft exactly aligned with the bracket (from above). Connect the two parts with each other using screws. Position the handle according to the arrow - see warning label (B) (Fig. 1). Tighten the screw firmly.
ASSEMBLY OF THE CORD PROTECTION COVER (Fig. 2+3)
The protection cover must lock tightly into position at the tube. It may be required to strongly push it into position.
-
Put the protector (B) on the shaft mounting (C).
-
Use the included screw (E) and nut (F) to fix the protection cover (Fig. 3).

ATTENTION: Make sure that all components are mounted and assembled correctly and all screws properly tightened.

ATTENTION! - Do always act in accordance with the applicable safety instructions and apply all required safety measures. The trimmer may only be used to cut grass or smaller weeds. It is explicitly forbidden to cut any other kind of material. Do not use the trimmer as a lever to lift, remove or crush objects; do also not fix it to rigid holding devices. It is forbidden to mount any devices or supplements to the trimmer's drive unit that are not explicitly released for that purpose by the manufacturer.
MOUNTING THE ATTACHMENT (Fig. 4-6)

Attention: Switch off the device before mounting the attachment. DANGER OF INJURY!
Note: To facilitate mounting and dismounting the attachment put the tool on the ground or a workbench.
- Loosen the knob (A) by turning it anticlockwise (Fig. 4).
- Hold the attachment (B) and push it straightly into the quick-change coupling (C) until the release button (D) engages into the corresponding hole (E) of the coupling (Fig. 4+5).
- Turn the knob (A) clockwise to tighten it (Fig. 6).

Attention: Before operation, the release button must have engaged into the hole of the coupling and the knob must have been tightened firmly!
FUEL AND OIL
FUEL
For a maximum performance of your trimmer, use regular petrol (two-star, unleaded) mixed with a special 2-stroke engine oil (40:1). Please adhere to the mixing instructions.

ATTENTION : Do never use pure fuel without oil. This will damage the engine and you will loose your warranty rights. Do not use fuel mixtures that have been stored for more than 90 days.

ATTENTION: Only use high-quality 2-stroke mixing oil for air-cooled engines, mixture ratio 40:1.
FUEL MIXTURE
Mix the fuel with 2-stroke oil in an approved container. Refer to the mixing table to find the required mixture ratio for the fuel and oil. Shake the container to properly mix the two fluids.
Mixing table for fuel mixture
| Petrol 2-stroke oil / 40:1 | |
| litre 25 ml | |
| litres 125 ml | |

ATTENTION : If you should you use an improper mixture ratio you will loose your warranty rights.
STARTING THE ENGINE
Cold start
In order not to overtax the engine when starting it, cut the trimmer cord to 17cm (Fig. 7).
- Put the ignition switch in position 'I' (Fig. 8).
- Slide the choke to position 'Start' (Fig. 9). This is not required in case of a warm start.
- Push the fuel pump (A) 8 times (Fig. 10).
- Pull the starter rope 2-3 times (Fig. 11); to start the motor it is required to evenly, quickly pull the rope.
- Slide the choke to 'RUN' position (Fig. 12), slightly push the throttle lever (9) and pull the starter rope again until the motor starts running. (To push the throttle lever (6) it is necessary to first push the locking lever (8) (fig. 13).
- Let the motor idle for about 10 seconds to warm up.
- If the motor does not start repeat the steps 1-6.
NOTE: If the engine should not start after several tries proceed as described in the chapter 'Troubleshooting'.
NOTE: Always pull out the starter rope straight. If you do not pull straight the rope will chafe at the eyelet. This chafe will cause the rope to fan out and thus to a higher wear and tear. Always hold the starter rope handle when the rope is pulled back. Do not let the rope flick back when it is pulled out. This could lead to a hook-up of the rope and/or a damage to the starter housing.
STOPPING THE ENGINE (Fig. 14)
Release the throttle lever. Let the engine idle. Push the ignition switch to position "Stop". The motor will now stop.

Emergency stop: If it should be necessary to stop the tool immediately push the "STOP" button.
OPERATING ADVICE
- If you are not familiar with the trimmer train the handling of the device with the engine not running (AUS / OFF).
- Always check the territory; solid objects as metal parts, bottles, stones etc. may be hurled away and cause serious injuries or permanently damage the device. Should you touch a solid object with the trimmer shut the engine off immediately (AUS / OFF) and examine the trimmer for possibly existing damages. Do not use the device when it is damaged or shows sign of defects.
- Always trim and cut with the engine running in the higher speed range. Do not let the engine run at low speed at the beginning of or during the trimming.
- Use the device for its provided purpose only, i.e., trimming and cutting grass and weeds.
- Never hold the cutting head higher than your knees during operation.
- If working on a slope always stand with the cutting unit above you. Only work on sloping sites if you stand on firm ground.
TRIMMING
The trimmer - properly equipped with protection cover and cutting head - trims high grass, brushwood and weeds at places that are difficult to access along fences, walls, foundations and around tree trunks. The trimmer may also be used for cutting down to the ground (e.g., clean-out works in the garden and in broken, thickly covered areas).
NOTE: When trimming near foundations, stone walls etc., even extreme care cannot avoid an increased wear of the cutting cord.
TRIMMING/MOWING
Swing the trimmer in sickle-like movements from side to side. Always hold the cutting head parallel to the ground. Examine the territory and determine the desired cutting height. Lead and hold the cutting head in the desired height to achieve an even cutting result (Fig. 18).
TIGHT TRIMMING
Lead the trimmer straight with a slight angle in forward direction so that it moves just over the ground. Always trim away from your body, never lead it towards the operator (Fig. 15).
TRIMMING AT FENCES AND FOUNDATIONS
To trim at fences, posts, stone walls and foundations lead the device slowly and carefully without letting the cutting cord touch any obstacles. If the cutting tool encounters any solid obstacle (stone, wall, log etc.) there is the danger of a kickback and higher wear and tear of the cutting cord.
TRIMMING AROUND TREE TRUNKS
Lead the trimmer carefully and slowly around tree trunks so that the cutting cord does not touch the bark. Cut around trees from left to right. Capture grass and weeds with the tip of the cord and slightly tilt the cutting head in forward direction.
MOWING AWAY
When mowing away, you capture the whole vegetation down to the ground. To do so tilt the cutting head to the left with an angle of 30 degrees. Adjust the handle to the desired position. Be aware of the higher danger of injuries for the operator, surrounding persons and animals, and the danger of damages to property through hurled-away objects (e.g., stones) (Fig. 16).
Extending the cutting cord
To extend the cutting cord let the engine run at full throttle and bump the cutting head on the ground. The cord is automatically extended. The cutter at the protection cover cuts the cord to the required length (Fig. 17).
Important note: Do not use metal wire or plastic-sheathed metal wire of any kind in the cutting head. This may lead to serious injuries of the operator.
ATTENTION: Regularly remove any remainders of grass and weed to avoid an overheating of the shaft tube. Remainders of grass and weeds get caught under the protection cover (Fig. 17) avoiding a sufficient cooling of the shaft tube. Remove the remainders carefully with a screwdriver or a similar tool.
Replacing the cutting cord
- Remove the screw by turning it anticlockwise (Fig. 19).
- Remove the coil and spring from the spindle (Fig. 20).
- Remove the remaining cutting cord (Fig. 21).
- Fold a 6m× 2mm cord in half. Put the loop end into the slot of the spool (Fig. 21). The slot is located in the centre wall that divides the two cord chambers from each other.
- Roll both halves of the cord concurrently around the spool. The wrapping direction is engraved in the
spool: "Wind Cord". Make sure that the cord is always tensioned and that each half of the cord stays in the proper separate spool housing. Roll up the cord until 15cm of cord remain at each end (Fig. 22).
- Lead each cord end through the openings at the respectively opposite side of the coil (Fig. 23).
- Lead the spring over the spindle and thread the cord ends through the eyelets in the housing.
- Lead the coil into the housing while pulling the cord ends through the eyelets. Make sure that the spring is positioned correctly in relation to the coil and housing (Fig. 24).
- When the coil sits in its correct position in the housing, push it firmly into the housing so that the spring is tensioned. Firmly pull at both ends of the cord (H) so that the cord cannot be pinched between the coil and housing. Maintain the spring tension through continuous pressure on the coil in the housing and fix the screw by turning it clockwise. Fasten the screw fingertight only (Fig. 25).
- Cut the cord to about 17cm to avoid excessive load to the engine during the starting and warm-up phase (Fig. 7).
MAINTENANCE AND REPAIR
ATTENTION! Always wear protective gloves when carrying out maintenance work. Never perform maintenance works with the engine still being hot.
AIR FILTER
To clean the air filter:
- Remove the fixing screw 1 of the air filter cover (Fig. 26a + b
- Clean the filter using soap and water.
Never use petrol or benzene!
- Let the Filter dry in the air.
- Now put the filter in again proceeding the other way round.
NOTE: Replace the filter if it is worn out, damaged or too dirty.
TANK CAP / FUEL FILTER
ATTENTION: Please remove the fuel from the device and store it in an approved fuel can, before you start replacing these parts. Open the tank cap carefully to allow existing pressure to slowly decrease.
NOTE: Keep the ventilating valve and tank cap clean (Fig. 27).
- Pull the fuel suction head (A) out of the tank using a hook or similar tool (Fig. 28).
- Pull the suction head off by concurrently turning it (Fig. 28).
- Replace the filter.
NOTE: Never use the trimmer without a fuel filter. This may result in severe damage to the engine.
CARBURETTOR SETTINGS
The carburettor has an optimised setting 'ex works'. If any further adjustments should be required contact your competent customer service.
SPARK PLUG
- Spark plug air gap: 0,6-0,7 mm (Fig. 29)
- Tighten the spark plug with a torque of 12-15Nm. Put the spark plug connector on the spark plug.
ATTENTION: Any maintenance works that are not explicitly described in these Operating Instructions must be carried out by an authorized workshop. To ensure a consistent and proper operation use ORIGINAL SPARE PARTS only.
SHARPENING THE CORD CUTTER
- Remove the cutter (E) from the protection cover (F) (Fig. 30).
- Put the cutter into a vice and fix it firmly. Sharpen the cutter using a flat file. File with care and keep the sharpening angle. Always file in one direction only.
STORAGE
- Follow all aforementioned maintenance instructions.
- Thoroughly clean the trimmer and grease the metal parts.
- Empty the fuel tank and screw the tank cap back on.
- After the tank has been emptied, start the engine.
- Let the engine idle until it stops to free the carburettor from fuel.
- Let the engine cool down (about 5 minutes).
- Remove the spark plug using a spark plug wrench.
-
Fill a tea spoon of pure 2-stroke oil into the combustion chamber. Pull the starter rope several times slowly to distribute the oil inside the engine. Put the spark plug back in.
-
Store the device in a cool, dry place where it is protected from open flames and sources of heat as flow heaters, oil-fired boilers etc.
REOPERATION
- Remove the spark plug.
- Pull the starter rope quickly to its full extent to remove any remaining oil from the combustion chamber.
- Clean the spark plug and check the gap. Replace the plug if required.
- Prepare the device for operation.
- Fill the tank with the proper fuel/oil mixture. See chapter 'Fuels and lubricants'.
WASTE DISPOSAL AND ENVIRONMENTAL PROTECTION
Never pour remainders of chain lubricant or 2-stroke fuel mixture in the drain or sewerage system or soil, but dispose of it in a proper, environmentally friendly way, e.g., at a special collecting point or dump.
If your device should become useless somewhere in the future or you do not need it any longer, do not dispose of the device together with your domestic refuse, but dispose of it in an environmentally friendly manner.
Thoroughly empty the oil/lubricant and fuel tanks and dispose of the remainders at a special collecting point or dump. Please also dispose of the device itself at an
according collecting/recycling point. By doing so, plastic and metal parts can be separated and recycled. Information concerning the disposal of materials and devices are available from your local administration.
CORRECTING FAILURES OF THE ENGINE
| PROBLEM POSSIBLE CAUSE CORRECTION | |
| Engine does not start or starts, Wrong starting but does not run further. | process. Refer to the instructions in these operating instructions. |
| Wrong setting of the carburettor. | |
| Fouled spark plug. | |
| Clogged fuel filter. | |
| Engine starts, but does not run at full power. | Wrong choke lever position. |
| Dirty/clogged spark grid. | |
| Dirty/clogged air filter. | |
| Wrong setting of the carburettor. | |
| Engine splutters. | Wrong setting of the carburettor. |
| No power under load. | |
| Engine does not run smoothly. | Wrong setting of the spark plug. |
| Excessive exhaust gases (smoke). | Wrong setting of the carburettor. |
| Improper fuel mixture. |
DE
EC Declaration of Conformity
C
We, ikra GmbH, Schlesier Straße 36, D-64839 Munster / Altheim, declare under our sole responsibility that the petrol brushcutter XL 25 T to which this declaration relates correspond to the relevant basic safety and health requirements of Directives 98/37/EC (Machinery Directive - old, valid until 28.12.2009) and 2006/42/EC (Machinery Directive - new, valid from 29.12.2009), 2004/108/EC (EMV-Guideline), 97/68/EC as amended by 2004/26/EC (emmission directive) and 2000/14/EC (noise directive) incl. modifications. For the relevant implementation of the safety and health requirements mentioned in the Directives, the following standards and/or technical specification(s) have been respected: EN ISO 11806:1997, EN ISO 14982:1998.
measured acoustic capacity level 109,7 dB(A)
guaranteed acoustic capacity level 112,0 dB(A)
Conformity assessment method to annexe V / Directive 2000/14/EC
Munster, 22.09.2009

Gerhard Knorr, Technical Management Ikra GmbH
CE Conformity Officer Mogatec GmbH
Maintenance of technical documentation: Gerhard Knorr, Kärcherstraße 57, DE-64839 Münster
Serial-No. 30386xxxxxxxx - 30386xxxxxxxx
DE
Garantiebedingungen
For this petrol tool, the company provides the end user - independently from the retailer's obligations resulting from the purchasing contract - with the following warranties:
The warranty period is 24 months beginning from the hand-over of the device which has to be proved by the original purchasing document. For commercial use and use for rent, the warranty period is reduced to 12 months. Wearing parts and defects caused by the use of not fitting accessories, repair with parts that are no original parts of the manufacturer, use of force, strokes and breaking as well as mischievous overloading of the motor are excluded from this warranty. Warranty replacement does only include defective parts, not complete devices. Warranty repair shall exclusively be carried out by authorized service partners or by the company's customer service. In the case of any intervention of not authorized personnel, the warranty will be held void.
All postage or delivery costs as well as any other subsequent expenses will be borne by the customer.