KDX330BTE - Car stereo JVC - Free user manual and instructions
Find the device manual for free KDX330BTE JVC in PDF.

Frequently Asked Questions - KDX330BTE JVC
User questions about KDX330BTE JVC
0 question about this device. Answer the ones you know or ask your own.
Ask a new question about this device
Download the instructions for your Car stereo in PDF format for free! Find your manual KDX330BTE - JVC and take your electronic device back in hand. On this page are published all the documents necessary for the use of your device. KDX330BTE by JVC.
USER MANUAL KDX330BTE JVC
MANUEL D'INSTRUCTIONS
DIGITAL-MEDIA-RECEIVER
Information on Disposal of Old Electrical and Electronic Equipment and Batteries (applicable for countries that have adopted separate waste collection systems)
Products and batteries with the symbol (crossed-out wheeled bin) cannot be disposed as household waste.
Old electrical and electronic equipment and batteries should be recycled at a facility capable of handling these items and their waste byproducts.
Contact your local authority for details in locating a recycle facility nearest to you. Proper recycling and waste disposal will help conserve resources whilst preventing detrimental effects on our health and the environment.
Notice: The sign "Pb" below the symbol for batteries indicates that this battery contains lead.
Data n3roTOBHeHn (MeCau/roi) HaxoHTcHa 3TNKETKe YCTPOIcTBA.
B cootbetCTbHM c3aKOHOM PocnnckOeepaunn "0 3auHne npab notpebntene"cpoK cnjxkb (rohctn) daHHoTOBapa "NO nCTeEHN KOtporo OH MOKeT ppeCTABnTb OAnCHOB dIra JXH3H, 3dOpOBbN oTneBETNE, pPHNHHT BpeD erO HmUyecTBY INN OKpykaIOuIe Cpe"coCTaJIbETCeMb7 (7) net CO hINPON3BOCTBA. TOT cPOK ABnTcB BPEMeH, B TEeHNe KOTporo NOTpeBNTb DAHHOR TOBAPA MOKeT 6e3OnaCHO M NnB3OBATbcPiynycobNcOboHnMCHTPyKUnn NO EKnnyatauNN daHHOR TOBaP, NPBOBDA Heo6xoJIMoe 06CnykMaHHe, BKInouaOuee 3AmeHy paCXOnHbIX MaTepnaIbOB I/INN COOTBCTBYHOe peMOHTHOE 06ceJeHHe BcneJnHUPoBAHHom CepBCHOM CEHTpe.
IOnONHInTeNbHbIe KOCMeTHueCKHe MATEpHaNbI K DaHOMy TOBApY, NOCTaBnEMbIe BMeCTe C HMM,MOrYT XpaHHTbCBA TceHHe DByx (2)NETCOINH ERO pOIM3BODCTBa.
Cpok cnjxkb (roaHcctn), KpOme cpoka xpaHeHHa DonoJIHHTeNb HbX KOcMeTuYeCKHX MaTePnaHOB, yNOMAHyTBx B npdeBdyuNX DByx NYKTx, He 3aTpaMBAET HkAKNX dpynx npab NotpeBteN, B qactHOCTn, rapaHTnHoro CBWdTeNBCTBa JVC, KOtOpoe OH MOKeT NOLYHTB CCOBTcTBn C3aKOHOM O npBax NOTpeBteNn Hm Dpynx 3aKOHOB, CB3aHHbx C HIM.
libFLAC
Copyright (C) 2000,2001,2002,2003,2004,2005,2006,2007,2008,2009 Josh Coalson. Redistribution and use in source and binary forms, with or without modification, are permitted provided that the following conditions are met:
- Redistributions of source code must retain the above copyright notice, this list of conditions and the following disclaimer.
- Redistributions in binary form must reproduce the above copyright notice, this list of conditions and the following disclaimer in the documentation and/or other materials provided with the distribution.
Neither the name of the Xiph.org Foundation nor the names of its contributors may be used to endorse or promote products derived from this software without specific prior written permission.
THIS SOFTWARE IS PROVIDED BY THE COPYRIGHT HOLDERS AND ONTRIBUTORS "AS IS" AND ANY EXPRESS OR IMPLIED WARRANTY, INCLUDING, BUT NOT LIMITED TO, THE IMPLIED WARRANTY OF MERCHANTABILITY AND FITNESS FOR A PARTICULAR PURPOSE ARE DISCLAIMED. IN NO EVENT SHALL THE FOUNDATION OR COLNTRIButors BE LIABLE FOR ANY DIRECT, INDIRECT, INCIDENTAL, SPECIAL, EXEMPLARY, OR CONSEQUENTIAL DAMAGES (INCLUDING, BUT NOT LIMITED TO, PROCEDURE OF SUBSTITUTE GOODS OR SERVICES; LOSS OF USE, DATA, OR PROFITS; OR BUSINESS INTERRUPTION) HOWEVER CAUSED AND ON ANY THEORY OF LIABILITY, WHETHER IN CONTRACT, STRICT LIABILITY, OR TORT (INCLUDING NEGLIGENCE OR OTHERWISE) ASING IN ANY WAY OUT OF THE USE OF THIS SOFTWARE, EVEN IF ADVISED OF THE POSSIBILITY OF SUCH DAMAGE.
For Israel
nne nnnnne nnnnne nnnnne nnnnne nnnnne nnnnne nnnnne nnnnne nnnnne nnnnne nnnnne nnnnne nnnnne nnnnne nnnnne nnnnne nnnnne nnnnne nnnnne nnnnne nnnnne nnnnne nnnnne nnnnne nnnnne nannne nnnnne nnnnne nnnnne nnnnne nnnnne nnnnne nnnnne nnnnne nnnnne nnnnne nnnnne nnnnne nnnnne nnnnne nnnnne nnnnne nnnnne nnnnne nnnnne nnnnne nnnnne nnnnne
nnae nnnnne nee (nX aen en) innn an nnnn nn nnnn nnnn nnnn nnnn nnnn nnnn nnnn nnnn nnnn nnnn nnnn nnnn nnnn nnnn nnnn nnnn nnnn nnnn nnnn nnnn nnnn nnnn nnnn nnnn nnnn nnnn nnnn nnnn nnnn nnnn nnnn nnnn nnnn nnnn
CE
Declaration of Conformity with regard to the R&TTE Directive 1999/5/EC
Declaration of Conformity with regard to the EMC Directive
Declaration of Conformity with regard to the RoHS Directive 2011/65/EU
Manufacturer:
JVC KENWOOD Corporation
3-12, Moriya-cho, Kanagawa-ku, Yokohama-shi, Kanagawa, 221-0022, Japan
EU Representative:
JVC Technical Services Europe GmbH
Konrad-Adenauer-Allee 1-11, D-61118 Bad Vilbel, Germany
IpeCTaBtTeBCTBO B EC:
JVC Technical Services Europe GmbH
Konrad-Adenauer-Allee 1-11, D-61118 Bad Vilbel, Germany
English
Hereby, JVC KENWOOD declares that this unit KD-X330BT/KD-X33MBT is in compliance with the essential requirements and other relevant provisions of Directive 1999/5/EC.
Français
1 Cancel the demonstration
2 Set the clock
3 Set the basic settings
RADIO 5
AUX 6
USB/iPod/Android 7
BLUETOOTH 9
AUDIO SETTINGS 14
DISPLAY SETTINGS 18
REFERENCES 19
Maintenance
More information
TROUBLESHOOTING 21
SPECIFICATIONS 23
INSTALLATION / CONNECTION 24
IMPORTANT
To ensure proper use, please read through this manual before using this product. It is especially important that you read and observe Warning and Caution in this manual.
- Please keep the manual in a safe and accessible place for future reference.
Warning
Do not operate any function that takes your attention away from safe driving.
Caution
Volume setting:
- Adjust the volume so that you can hear sounds outside the car to prevent accidents.
- Lower the volume before playing digital sources to avoid damaging the speakers by the sudden increase of the output level.
General:
- Avoid using the external device if it might hinder safe driving.
- Make sure all important data has been backed up. We shall bear no responsibility for any loss of recorded data.
- Never put or leave any metallic objects (such as coins or metal tools) inside the unit to prevent a short circuit.
Remote control (RM-RK52):
- Do not leave the remote control in hot places such as on the dashboard.
- The Lithium battery is in danger of explosion if replaced incorrectly. Replace it only with the same or equivalent type.
- The battery pack or batteries shall not be exposed to excessive heat such as sunshine, fire or the like.
- Keep the battery out of reach of children and in its original packaging when not in used. Dispse of used batteries promptly. If swallowed, contact a physician immediately.
How to read this manual
- Operations are explained mainly using buttons on the faceplate of KD-X330BT.
- English indications are used for the purpose of explanation. You can select the display language from the menu. (→4)
- [XX] indicates the selected items.
- ( XX) indicates references are available on the stated page.
BASICS
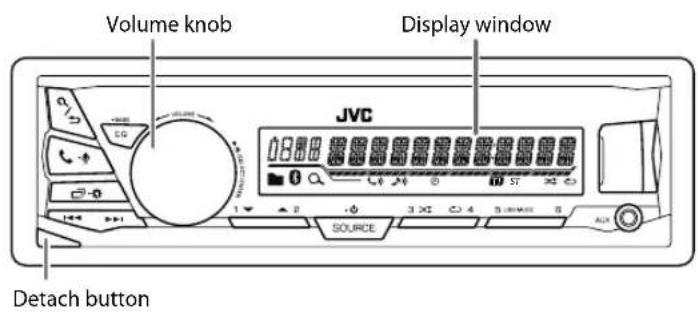
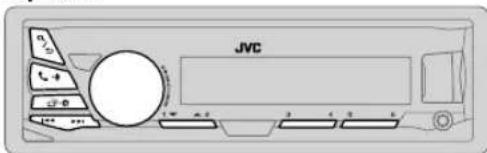
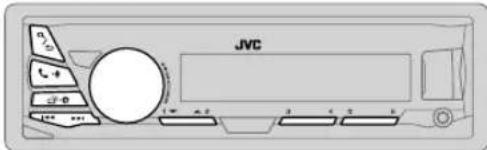
Faceplate

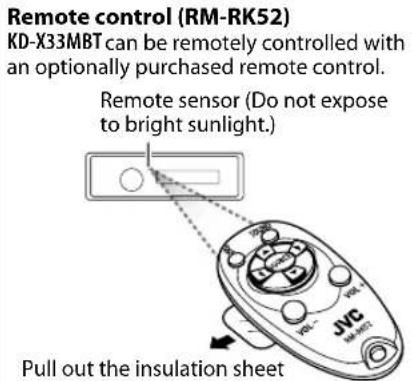
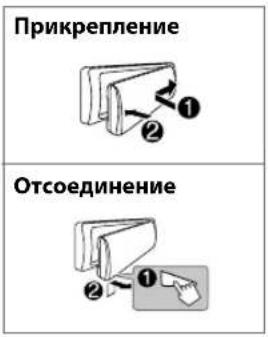
Pull out the insulation sheet when using for the first time.
How to replace the battery
| To On the faceplate On the remote control | ||
| Turn on the power | Press SOURCE-☐. • Press and hold to turn off the power. | (Not available) |
| Adjust the volume Turn the volume knob. Press | VOL + or VOL - | |
| Press the volume knob to mute the sound or pause playback. • Press again to cancel. | Press to mute the sound or pause playback. • Press again to cancel. | |
| Select a source | • Press SOURCE-☐ repeatedly. • Press SOURCE-☐, then turn the volume knob within 2 seconds. | Press SOURCE repeatedly. |
| Change the display information | Press ☑-☐ repeatedly. (20) | (Not available) |
GETTING STARTED


Cancel the demonstration
When you turn on the power for the first time (or [FACTORY RST] is set to [YES]), the display shows: "CANCEL DEMO" "PRESS" "VOLUME KNOB"
1 Press the volume kn
[YES] is selected for the initial setup.
2 Press the volume knob again.
"DEMO OFF" appears.

Set the clock
1 Press and hold
2 Turn the volume knob to select [CLOCK], then press the knob.
3 Turn the volume knob to select [ CLOCK SET], then press the knob.
4 Turn the volume knob to make the settings, then press the knob.
Day Hour Minute
5 Turn the volume knob to select [24H/12H], then press the knob.
6 Turn the volume knob to select [12 HOUR] or [24 HOUR], then press the knob.
7 Press to exit.
To return to the previous setting item, press /

Set the basic settings
1 Press and hold
2 Turn the volume knob to select an item (see the following table), then press the knob.
3 Repeat step 2 until the desired item is selected or activated.
4 Press to exit.
To return to the previous setting item, press /
Default: XX
| SETTINGS | |
| BEEP | (Not applicable when 3-way crossover is selected.)ON: Activates the keypress tone.; OFF: Deactivates. |
| SRC SELECT | |
| AM* | ON: Enables AM in source selection.; OFF: Disables. |
| AUX* | ON: Enables AUX in source selection.; OFF: Disables. |
| F/W UPDATE | |
| SYSTEM | |
| F/W xxxx | YES: Starts upgrading the firmware.; NO: Cancels (upgrading is not activated).For details on how to update the firmware, see: <http://www.jvc.net/cs/car/>. |
| FACTORY RST YES : Resets the settings to default (except the stored station).; NO: Cancels. | |
| CLOCK | |
| CLOCK SYNC | AUTO: The clock time is automatically set using the Clock Time (CT) data in FM Radio Data System signal.; OFF: Cancels. |
| CLOCK DISP ON | : The clock time is shown on the display even when the unit is turned off.; OFF: Cancels. |
| ENGLISH | |
| PYCKM | Select the display language for menu and music information if applicable. By default, ENGLISH is selected. |
| ESPNOL | |
- Not displayed when the corresponding source is selected.
RADIO

"ST" lights up when receiving an FM stereo broadcast with sufficient signal strength.
Search for a station
1 Press to select FM or AM.
2 Press (press on RM-R62) to search for a station automatically. (or)
Press and hold (press and hold on RM-RKS) until "M" flashes, then press repeatedly to search for a station manually.
Settings in memory
You can store up to 18 stations for FM and 6 stations for AM.
Store a station
While listening to a station....
Press and hold one of the number buttons (1 to 6).
(or)
1 Press and hold the volume knob until "PRESET MODE" flashes.
2 Turn the volume knob to select a preset number, then press the knob.
The preset number flashes and "MEMORY" appears.
Select a stored station
Press one of the number buttons (1 to 6). (or)
1 Press .Q/5
2 Turn the volume knob to select a preset number, then press the knob to confirm.
Other settings
1 Press and hold
2 Turn the volume knob to select [TUNER], then press the knob.
3 Turn the volume knob to select an item (see the following table), then press the knob.
4 Repeat step 3 until the desired item is selected/ activated or follow the instructions stated on the selected item.
5 Press to exit.
To return to the previous setting item, press Q/
Default: XX
| RADIO TIMER | Turns on the radio at a specific time regardless of the current source.1 ONCE/DAILY/ WEEKLY/ OFF: Select how often the timer will be turned on.2 FM AM: Select the band.3 01 to 18(for FM)/ 01 to06 (for AM): Select the preset station.4 Set the activation day * 1 and time."◎" lights up when complete. Radio Timer will not activate for the following cases. The unit is turned off. [OFF] is selected for [AM] in [SRC SELECT] after Radio Timer for AM is selected. (▲) |
| SSM | SSM 01 - 06 / SSM 07 - 12 / SSM 13 - 18: Automatically resets up to 18 stations for FM. "SSM" stops flashing when the first 6 stations are stored. Select SSM 07 - 12 / SSM 13 - 18 to store the following 12 stations. |
*1 Selectable only when ONCE] or [WEEKLY] is selected in step 1.
RADIO
Default: XX
| LOCAL SEEK_ON | : Searches only FM stations with good reception.; OFF: Cancels. • Settings made are applicable only to the selected source/station. Once you change the source/station, you need to make the settings again. |
| IF BAND AUTO | : Increases the tuner selectivity to reduce interference noises from adjacent FM stations. (Stereo effect may be lost.) ; WIDE: Subjects to interference noises from adjacent FM stations, but sound quality will not be degraded and the stereo effect will remain. |
| MONO ON | : Improves the FM reception, but the stereo effect will be lost. ; OFF: Cancels. |
| NEWS-STBY*2 | ON: The unit will temporarily switch to News Programme if available. ; OFF: Cancels. |
| REGIONAL*2 | ON: Switches to another station only in the specific region using the “AF” control. ; OFF: Cancels. |
| AF SET*2 | ON: Automatically searches for another station broadcasting the same program in the same Radio Data System network with better reception when the current reception is poor. ; OFF: Cancels. |
| TI SET*2 | ON: Allows the unit to temporarily switch to Traffic Information if available (“TI” lights up). ; OFF: Cancels. |
| PTY SEARCH*2 | Select a PTY code (see below). If there is a station broadcasting a program of the same PTY code as you have selected, that station is tuned in. |
PTY code: NEWS, AFFAIRS, INFO, SPORT, EDUCATE, DRAMA, CULTURE, SCIENCE, VARIORED, POP M (music), ROCK M (music), EASY M (music), LIGHT M (music), CLASSICS, OTHER M (music), WEATHER FINANCE, CHILDREN SOCIAL, RELIGION, PHONE IN, TRAVEL, LEISURE, JAZZ, COUNTRY, NATION M (music), OLDIES, FOLK M (music), DOCUMENT
*2 Only for FM source.
AUX
Use a portable audio player
1 Connect a portable audio player (commercially available).
3.5 mm stereo mini plug with "L" shaped connector (commercially available)

2 Select [ON] for [AUX] in [SRC SELECT]. ( 4)
3 Press to select AUX.
4 Turn on the portable audio player and start playback.

Use a 3-core plug head stereo mini plug for optimum audio output.
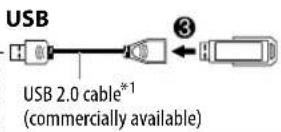
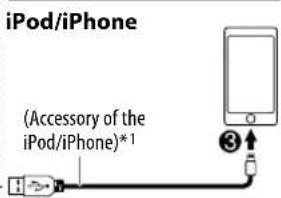
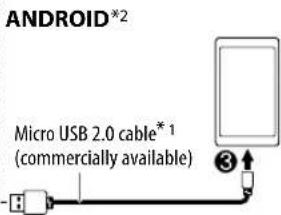
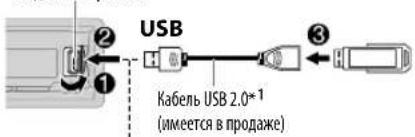
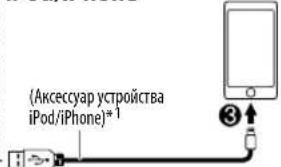
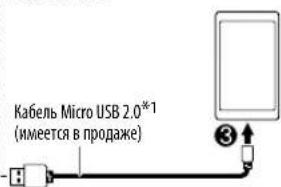
USB/iPod/Android
Start playback
The source changes automatically and playback starts.
USB input terminal
| To On the faceplate On the remote control | ||
| Reverse / Fast-forward*3 | Press and hold▶/▶ | Press and hold▶. |
| Select a file Press | ▶/▶. | Press▶. |
| Select a folder*4 | Press 2 Press▼ | ▲/▼ |
| Repeat play*5 | Press repeatedly. TRACK RPT/ FOLDER RPT/ ALL RPT: MP3/WMA/AAC/WAV/FLAC file ONE RPT/ ALL RPT/ RPT OFF: iPod or ANDROID | |
| Random play*5 | Press repeatedly. FOLDER RND/ ALL RND/ RND OFF: MP3/WMA/AAC/WAV/FLAC file SONG RND/ ALL RND/ RND OFF: iPod or ANDROID | |
1 Do not leave the cable inside the car when not using.
2 When connecting an Android device, "Press [VIEW] to install JVC MUSIC PLAY APP" is shown. Follow the instructions to install the application. You can also install the latest version of JVC MUSIC PLAY application on your Android device before connecting. (→ 19)
3 For ANDROID: Applicable only when [AUTO MODE] is selected. (→8)
4 Only for MP3/WMA/AAC/WAV/FLAC files. This does not work for iPod/Android.
*5 For iPod/Android: Applicable only when [HEAD MODE]/[AUTO MODE] is selected. (→ 8)
USB/iPod/Android
Select control mode
While in USB-IPOD source, press SRTSEAMode
HEAD MODE: Control iPod from this unit.
IPHONE MODE Control iPod using the iPod itself. However, you can still play/ pause or file skip from this unit.
While inAndroid source,press srtseamode
AUTO MODE: Control Android device from this unit via JVC MUSIC PLAY application installed in the Android device.
AUDIO MODE: Control Android device using the Android device itself via other media player applications installed in the Android device. However, you can still play/pause or file skip from this unit.
Select music drive
Press SrySbAMIDE
Stored songs in the following drive will be played back.
- Selected internal or external memory of a smartphone (Mass Storage Class).
- Selected drive of a multiple drives device.
Select a file from a folder/list
1 Press Q/
2 Turn the volume knob to select a folder/list, then press the knob.
3 Turn the volume knob to select a file, then press the knob.
Quick Search
If you have many files, you can search through them quickly.
Turn the volume knob quickly to browse through the list quickly.
Not applicable for iPod.
Alphabet search (applicable only for iPod):
You can search for a file according to the first character.
Press 2 the volume knob quickly to select the desired character (A to Z/0 to 9/Others).
- Select "OTHERS" if the first character is other than A to Z, 0 to 9.
To return to the previous setting item, press Q/
To cancel, press and hold / .
- For iPod, applicable only when [HEAD MODE] is selected.
- ForAndroid, applicable only when [AUTO MODE] is selected.
BLUETOOTH®
BLUETOOTH - Connection
Supported Bluetooth profiles
- Hands-Free Profile (HFP)
- Advanced Audio Distribution Profile (A2DP)
Audio/Video Remote Control Profile (AVRCP)
- Serial Port Profile (SPP)
Phonebook Access Profile (PBAP)
Supported Bluetooth CODECS
- Sub Band Codec (SBC)
- Advanced Audio Coding (AAC)
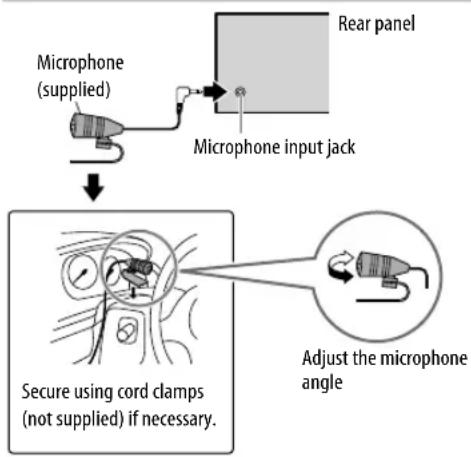
Connect the microphone
Pair and connect a Bluetooth device for the first time
1 Press Source for the unit.
2 Search and select "JVC UNIT" on the Bluetooth device.
"BT PAIRING" flashes on the display.
- For some Bluetooth devices, you may need to enter the Personal Identification Number (PIN) code immediately after searching.
3 Perform (A) or (B) depending on what scrolls on the display.
For some Bluetooth devices, pairing sequence may vary from the steps described below.
(A) "[Device Name]" "XXXXX" "V●L - YES" "BA●K - NO"
"XXXXXXXX" is a 6-digit passkey randomly generated during each pairing.
1 Ensure that the passkey which appears on the unit and Bluetooth device is the same.
Press the volume knob to confirm the passkey.
3 Operate the Bluetooth device to confirm the passkey.
(B) "[Device Name]" "VOL - YES" "BACK - NO"
Press the volume knob to start pairing.
2. If "PAIRING" "PIN 0000" scrolls on the display, enter the PIN code "0000" into the Bluetooth device.
You can change to a desired PIN code before pairing. (一 13)
If only "PAIRING" appears, operate the Bluetooth device to confirm pairing.
"PAIRING COMPLETED" appears when pairing is completed and "8" will light up when the Bluetooth connection is established.
Lights up to show the battery strength and signal strength. *
-
Functionality depends on the type of the phone used.
-
This unit supports Secure Simple Pairing (SSP).
- Up to 10 devices can be registered (paired) in total.
- Once the pairing is completed, the Bluetooth device will remain registered in the unit even if you reset the unit. To delete the paired device, 13, [DELETE PAIR].
- A maximum of two Bluetooth phones and one Bluetooth audio device can be connected at any time.
- Some Bluetooth devices may not automatically connect to the unit after pairing. Connect the device to the unit manually.
Refer to the instruction manual of the Bluetooth device for more information.
BLUETOOTH
Auto Pairing
When you connect the iPhone/ iPod touch/ Android device to the USB input terminal, pairing request (via Bluetooth) is automatically activated.
Press the volume knob to pair once you have confirmed the device name.
Automatic pairing request is activated only if: - Bluetooth function of the connected devcie is turned on.
- [AUTO CNNT] is set to [ON]. (→ 13)
- JVC MUSIC PLAY application is installed on the Android device ( 7) and [AUTO MODE] is selected ( 8) .
BLUETOOTH - Mobile phone
Receive a call
When there is an incoming call:
The buttons will blink in the blinking pattern you have selected in [RINGILLUMI]. ( 11)
The unit answers the call automatically if [AUTO ANSWER] is set to a selected time. (→11)
During a call:
The buttons stop blinking.
- If you turn off the unit or detach the faceplate, the Bluetooth connection is disconnected.
To On the faceplate On the remote control
First incoming call...
| Answer a call | Press - or the volume knob. | Press ▲/▼/▲/▲. |
| Reject a call | Press and hold - or the volume knob. | Press and hold ▲/▼/▲/▲. |
| End a call | Press and hold - or the volume knob. | Press and hold ▲/▼/▲/▲. |
BLUETOOTH
| To On the faceplate On the remote control | ||
| While talking on the first incoming call... | ||
| Answer another incoming call and hold the current call | Press or the volume knob. | (Not available) |
| Reject another incoming call | Press and hold or the volume knob. | (Not available) |
| While having two active calls... | ||
| End current call and activate held call | Press and hold or the volume knob. | Press and hold ▲/▼/▲. |
| Swap between the current call and held call | Press -. | (Not available) |
| Adjust the phone volume [00] to [35] (Default: [15]) | Turn the volume knob during a call. ·This adjustment will not affect the volume of the other sources. | (Not available) |
| Switch between hands-free and private talk modes | Press ▲/□ during a call. ·Operations may vary according to the connected Bluetooth device. | (Not available) |
Improve the voice quality
While talking on the phone....
1 Press and hold
2 Turn the volume knob to select an item (see the following table), then press the knob.
3 Repeat step 2 until the desired item is selected or activated.
4 Press to etit.
To return to the previous setting item, press 12
| Default:XX | |
| MIC LEVEL | -10 —+10 (4): The sensitivity of the microphone increases as the number increased. |
| NOISE RDCT -5 | —+5 (0): Adjust the noise reduction level until the least noise is being heard during a phone conversation. |
| ECHO CANCEL -5 | —+5 (0): Adjust the echo cancellation delay time until the least echo is being heard during a phone conversation. |
Make the settings for receiving a call
1 Press to ehter Bluetooth mode.
2 Turn the volume knob to select an item (see the following table), then press the knob.
3 Repeat step 2 until the desired item is selected or activated.
To return to the previous setting item, press Q /
Default: XX
| SETTINS | |
| AUTO ANSWER | 01 SEC-30 SEC:The unit answers incoming call automatically in the selected time (in seconds).; OFF: Cancels. |
| RING ILLUMI BLINK 1 | —BLINK 5 (BLINK 2): Selects the notification blinking pattern for the buttons when there is an incoming call. ;OFF : Cancels. |
BLUETOOTH
Make a call
You can make a call from the call history, phonebook, or dialing the number. Call by voice is also possible if your mobile phone has the feature.
1 Press to enter Bluetooth mode.
2 Turn the volume knob to select an item (see the following table), then press the knob.
3 Repeat step 2 until the desired item is selected/activated or follow the instructions stated on the selected item.
To return to the previous setting item, press Q /
| RECENT CALL | (Applicable only if the phone supports PBAP)1 Press the volume knob to select a name or a phone number. ·“<” indicates call received, “>” indicates call made, “M” indicates call missed. ·“NO HISTORY” appears if there is no recorded call history or call number.2 Press the volume knob to call. |
| PHONEBOOK | (Applicable only if the phone supports PBAP)1 Press 2 □/sler the desired letter (A to Z, 0 to 9, and OTHERS). ·“OTHERS” appears if the first character is other than A to Z, 0 to 9.2 Turn the volume knob to select a name, then press the knob.3 Turn the volume knob to select a phone number, then press the knob to call. ·The phonebook of the connected phone is automatically transferred to the unit when pairing.·This unit can display only non-accent letters. (Accent letters such as “U” is shown as “U”). |
| DIAL NUMBER | 1 Turn the volume knob to select a number (0 to 9) or character ( , , +).2 Press ↑ move the entry position.Repeat stepsand 2 until you finish entering the phone number.3 Press the volume knob to call. |
| VOICE | Speak the name of the contact you want to call or the voice command to control the phone functions. (→ Make a call using voice recognition) |
Make a call using voice recognition
1 Press and hold to activate the connected phone.
2 Speak the name of the contact you want to call or the voice command to control the phone functions.
- Supported Voice Recognition features vary for each phone. Refer to the instruction manual of the connected phone for details.
- This unit also supports the intelligent personal assistant function of iPhone.
Settings in memory
Store a contact in memory
You can store up to 6 contacts into the number buttons (1 to 6).
1 Press to enter Bluetooth mode.
2 Turn the volume knob to select [RECENT CALL], [PHONEBOOK], or [DIAL NUMBER], then press the knob.
3 Turn the volume knob to select a contact or enter a phone number.
If a contact is selected, press the volume knob to show the phone number.
4 Press and hold one of the number buttons (1 to 6).
"MEMORY P(select preset number)" appears when the contact is stored.
To erase a contact from the preset memory, select [DIAL NUMBER] in step 2 and store a blank number.
Make a call from memory
1 Press to enter Bluetooth mode.
2 Press one of the number buttons (1 to 6).
3 Press the volume knob to call. "NO PRESET" appears if there is no contacts stored.
BLUETOOTH
Bluetooth mode settings
1 Press and hold
2 Turn the volume knob to select [BLUETOOTH], then press the knob.
3 Turn the volume knob to select an item (see the following table), then press the knob.
4 Repeat step 3 until the desired item is selected/activated or follow the instructions stated on the selected item.
5 Press to exit.
To return to the previous setting item, press /
Default: XX
| PHONE*1 | Selects the phone or audio device to connect or disconnect. |
| AUDIO*1 | “*” appears in front of the device name when connected. |
| APPLICATION*1 | Shows the connected phone name using the JVC Smart Music Control *2 app. “*” appears in front of the device name when connected. |
| DELETE PAIR | 1 Turn the volume knob to select a device to delete, then press the knob. 2 Turn the volume knob to select [ YES] or [ NO], then press the knob. |
| SET PINCODE (0000) | Changes the PIN code (up to 6 digits). 1 Turn the volume knob to select a number. 2 Press the enter the entry position. Repeat stepsand 2 until you finish entering the PIN code. 3 Press the volume knob to confirm. |
| AUTO CNT ON | : The unit automatically reconnect when the last connected Bluetooth device is within range.; OFF: Cancels. |
| AUTO PAIR ON | : The unit automatically pair supported Bluetooth device (iPhone/ iPod touch/Android device) when it is connected through USB input terminal. Depending on the operating system of the connected device, this function may not work.; OFF: Cancels. |
| INITIALIZE YES | : Initializes all the Bluetooth settings (including stored pairing, phonebook, and etc.); NO: Cancels. |
| INFORMATION | MY BT NAME: Displays the unit name (JVC UNIT).; MY ADDRESS: Shows address of this unit. |
1 You can only connect a maximum of two Bluetooth phones and one Bluetooth audio device at any time.
^2 JVC Smart Music Control is designed to view JVC car receiver status and perform simple control operations on Android smart phones. For JVC Smart Music Control operations, visit JVC website: http://www.jvc.net/cs/car/.
Bluetooth compatibility check mode
You can check the connectivity of the supported profile between the Bluetooth device and the unit.
- Make sure there is no Bluetooth device paired.
1 Press and hold.
"BLUETOOTH" "CHECK MODE" appears. "SEARCH NOW USING PHONE" "PIN IS 0000" scrolls on the display.
2 Search and select "JVC UNIT" on the Bluetooth device within 3 minutes.
3 Perform (A), (B) or (C) depending on what appears on the display.
(A) "PAIRING" "XXXXXX" (6-digit passkey): Ensure that the same passkey appears on the unit and Bluetooth device, then operate the Bluetooth device to confirm the passkey.
(B) "PAIRING" "PIN IS 0000": Enter "0000" on the Bluetooth device.
(C) "PAIRING": Operate the Bluetooth device to confirm pairing.
After pairing is successful, "PAIRING OK" "[Device Name]" appears and Bluetooth compatibility check starts.
If "CONNECT NOW USING PHONE" appears, operate the Bluetooth device to allow phonebook access to continue.
"TESTING" flashes on the display.
The connectivity result flashes on the display.
"PAIRING OK" and/or "H.FREE OK"1 and/or "A STREAM OK"2 and/or "PBAP OK"*3 : Compatible
1 Compatible with Hands-Free Profile (HFP)
^2 Compatible with Advanced Audio Distribution Profile (A2DP)
*3 Compatible with Phonebook Access profile (PBAP)
After 30 seconds, "PAIRING DELETED" appears to indicate that pairing has been deleted, and the unit exits check mode.
To cancel, press and hold SOURCE- to turn off the power, then turn on the power again.
BLUETOOTH
BLUETOOTH - Audio

Audio player via Bluetooth
1 Press separately to select BT AUDIO (or press SOURCE on RM-RK52).
2 Operate the Bluetooth audio player to start playback.
| To On the faceplate On the remote control | ||
| Playback / pause Press the volume knob. | Press OK. | |
| Select group or folder Press 2▲/1▼. Press . | ▲/▼ | |
| Reverse / Forward skip | Press ←/▶ | Press ←/▶. |
| Reverse / Fast-forward | Press and hold ←/▶. | Press and hold ←/▶. |
| Repeat play Press | 4 repeatedly. TRACK RPT, ALL RPT, RPT OFF | (Not available) |
| Random play | Press 3 × repeatedly. GROUP RND, ALL RND, RND OFF | (Not available) |
| Select a file from a folder/list | Refer to “Select a file from a folder/list” on page 8. | (Not available) |
Operations and display indications may differ according to their availability on the connected device.
AUDIO SETTINGS

Select a preset equalizer
Press Eq. 3.5.6. (or)
Press EQ-BASS, then turn the volume knob within 5 seconds. Preset equalizer:
FLAT (default)/HARD ROCK / POP / HIP HOP / R&B/ JAZZ / CLASSICAL / USER
Store your own sound settings
1 Press and hold EQ-BASSE EASY EQ setting.
2 Turn the volume knob to select an item, then press the knob. Refer to EASY EQ for setting (一 15) and the result is stored to [USER].
To return to the previous setting item, press a /
To exit, press EQ-BASS.
Other settings
1 Press and hold
2 Turn the volume knob to select an item ( 15) , then press the knob.
3 Repeat step 2 until the desired item is selected/activated or follow the instructions stated on the selected item.
4 Press to exit.
To return to the previous setting item, press a/
AUDIO SETTINGS
| Default: XX | ||
| EQ SETTING | ||
| EQ PRESET | Select a preset equalizer suitable to the music genre. (Select [USER] to use the settings made in [EASY EQ] or [PRO EQ].)FLAT / HARD ROCK/ POP/ HIP HOP / R&B/ JAZZ / CLASSICAL / USER | |
| EASY EQ | Adjust your own sound settings. The settings are stored to [USER].The settings made may affect the current settings of [ PRO EQ ].SUB.W SP*1*2: 00to +06 (Default: 03SUB.W*1*3: -50 to+10 00BASS LVL: -09 to+09 00MID LVL: -09 to+09 00TRE LVL: -09 to+09 00 | |
| PRO EQ | Adjust your own sound settings. The settings are stored to [USER].The settings made may affect the current settings of [ EASY EQ ]. | |
| 62.5HZ | ||
| LVL -09to +09 (00): Adjusts the level to memorize for each source.(Before making an adjustment, select the source you want to adjust.) | ||
| BASS EXT ON: Turns on the extended bass.;BASS EXT OFF; Cancels. | ||
| 100HZ / 160HZ / 250HZ / 400HZ / 630HZ / 1KHZ / 1.6KHZ / 2.5KHZ / 4KHZ /6.3KHZ /10KHZ /16kHZ | ||
| LVL -09to +09 (00): (Refer above) | ||
| Q FACTOR | ||
| Q 1.35/Q 1.50/ Q 2.00 Adjust the quality factor. | ||
| AUDIO | ||
| BASS BOOST | +01— +05: Selects your preferred bass boost level.; OFF: Cancels. | |
| LOUD 01 | / 02: Boosts low or high frequencies to produce a well-balanced sound at low volume.; OFF: Cancels. | |
| SUB.W LEVEL*1 | SPK-OUT*2 | (Not applicable when 3-way crossover is selected.)00 to +06 (+03): Adjusts the output level of the subwoofer connected via speaker lead. (⇒ 26, 27) |
| PRE-OUT*3 | -50 to +10(00): Adjusts the output level of the subwoofer connected to the lineup terminals (SW or REAR/SW) through an external amplifier. (⇒ 26, 27) | |
| SUB.W*3 | ON /OFF: Turns on or off the subwoofer output. | |
| FADER | (Not applicable when 3-way crossover is selected.)R15 — F15(00): Adjusts the front and rear speaker output balance. | |
| BALANCE*4 | L15 — R15(00): Adjusts the left and right speaker output balance. | |
| VOL ADJUST -15 | — +06 00): Preset the initial volume level of each source (compared to the FM volume level). Before adjustment, select the source you want to adjust. | |
| AMP GAIN LOW | POWER : Limits the maximum volume level to 25. (Select if the maximum power of each speaker is less than 50 W to prevent damaging the speakers.) ;HIGH POWER: The maximum volume level is 35. | |
| SPK/PRE OUT | (Not applicable when 3-way crossover is selected.)Depending on the speaker connection method, select the appropriate setting to get the desired output. (⇒ 16, Speaker output settings) | |
| SPK SIZE | Depending on the crossover type you have selected (see [X' OVER TYPE] below), 2-way crossover or 3-way crossover setting items will be shown. | |
| X' OVER | (⇒ 17, Crossover settings)By default, 2-way crossover type is selected. | |
1 Displayed only when [SUB.W] is set to [ON].
2 For 2-way crossover: Displayed only when [SPK/PRE OUT] is set to [SUB.W/SUB.W]. (→16)
*3 For 2-way crossover: Displayed only when [SPK/PRE OUT] is set to [REAR/SUB.W] or [SUB.W/SUB.W]. (→16)
*4 This adjustment will not affect the subwoofer output.
AUDIO SETTINGS
| X' OVER TYPE | Caution: Adjust the volume before changing the X' OVER TYPE to avoid the sudden increase or decrease of the output level. |
| X' OVER 2-WAY | (Displayed only when [X'OVER 3-WAY] is selected) YES: Selects two way crossover type.; NO:Cancels. |
| X' OVER 3-WAY | (Displayed only when [X'OVER 2-WAY] is selected) YES: Selects three way crossover type.; NO:Cancels. |
| SND EFFECT | |
| ENHANCE | (Not applicable for TUNER source.) SML/ MED/ LRG: Virtually enhances the sound space.; OFF: Cancels. |
| RESPONSE LV1 | /LV2 / LV3: Virtually makes the sound more realistic.; OFF: Cancels. |
| SOUND LIFT LV1 | /LV2 / LV3: Virtually adjust the sound position heard from the speakers.; OFF: Cancels. |
| VOL LINK EQ ON | : Boosts the frequency to reduce the noise heard from outside the car or running noise of the tyres.; OFF: Cancels. |
| K2 | (Not applicable for TUNER and AUX source.) ON: Improve the sound quality of compressed music.; OFF: Cancels. |
Speaker output settings
(Only for X' OVER 2-WAY)
Select the output setting for the speakers [SPK/PRE OUT], base on the speaker connection method.
Connection via lineup terminals
For connections through an external amplifier. (一 26,27)
(For KD-X330BT)
| Setting on [SPK/PRE OUT] | Audio signal through lineout terminal | |
| FRONT | REAR/SW | |
| REAR/REAR | Front speakers output | Rear speakers output |
| REAR/SUB.W (default) | Front speakers output | Subwoofer output |
| SUB.W/SUB.W | Front speakers output | Subwoofer output |
(For KD-X33MBT)
| Setting on [SPK/PRE OUT] | Audio signal through lineout terminal | ||
| FRONT REAR SW | |||
| REAR/REAR (default) | Front speakers output | Rear speakers output Subwoofer output | |
| REAR/SUB.W | (Not available) (Not available) (Not available) | ||
| SUB.W/SUB.W | Front speakers output | L (left): Subwoofer output R (right): (Mute) | Subwoofer output |
Connection via speaker leads
For connections without using an external amplifier. However, with this settings you can also enjoy the subwoofer output. (一 26,27)
| Setting on [SPK/PRE OUT] | Audio signal through rear speaker lead | |
| L (left) R (right) | ||
| REAR/REAR | Rear speakers output Rear speakers output | |
| REAR/SUB.W | Rear speakers output Rear speakers output | |
| SUB.W/SUB.W | Subwoofer output (Mute) | |
If [SUB.W/SUB.W] is selected:
- [FRQ 120HZ] is selected in [SUB.W LPF] and [THROUGH] is not available.
- [R02] is selected in [FADER] and selectable range is [R15] to [00].
AUDIO SETTINGS
Crossover settings
Below are the available setting items for 2-way crossover and 3-way crossover.
Caution
Select a crossover type according to how the speakers are connected. (一 26,27)
If you select a wrong type:
The speakers may damage.
The output sound level may be extremely high or low.
SPK SIZE (speaker size)
Selects according to the connected speaker size for optimum performance.
- The frequency and slope settings are automatically set for the crossover of the selected speaker.
- If [NONE] is selected for [TWEETER] of [FRONT], [REAR] and [SUBWOOFER] for [SPK SIZE], the [X'OVER] setting of the selected speaker is not available.
X'OVER (crossover)
[FRQ]/[HPF FRQ]/[LPF FRQ]:
Adjusts the crossover frequency for the selected speakers (high pass filter or low pass filter).
- If [THROUGH] is selected, all signals are sent to the selected speakers.
[SLOPE]/[HPF SLOPE]/[LPF SLOPE]:
Adjusts the crossover slope.
- Selectable only if a setting other than [THROUGH] is selected for the crossover frequency.
[PHASE]:
Selects the phase of the speaker output to be in line with the other speaker output.
[GAIN LEFT] / [GAIN RIGHT] / [GAIN]:
Adjusts the output volume of the selected speaker.
2-way crossover setting items
| SPK SIZE | |
| FRONT SIZE | 8CM/ 10CM/ 12CM/ 13CM/ 16CM/ 17CM/ 18CM/ 4×6"/5×7"/6×8"/6×9"/7×10" |
| TWEETER SML/ MID/ LRG/ NONE (not connected) | |
| REAR*1 | 8CM/ 10CM/ 12CM/ 13CM/ 16CM/ 17CM/ 18CM/ 4×6"/5×7"/6×8"/6×9"/7×10" / NONE (not connected) |
| SUBWOOFER*2*3 | 16CM/ 20CM/ 25CM/ 30CM/ 38CM OVER/ NONE (not connected) |
| X'OVER | |
| TWEETER FRQ | 1KHZ/ 1.6KHZ/ 2.5KHZ/ 4KHZ/ 5KHZ/ 6.3KHZ/ 8KHZ/10KHZ/ 12.5KHZ |
| GAIN LEFT -08DB to 00DB | |
| GAIN RIGHT -08DB to 00DB | |
| FRONT HPF FRQ | 30HZ/40HZ/ 50HZ/ 60HZ/ 70HZ/ 80HZ/ 90HZ/ 100HZ/120HZ/ 150HZ/ 180HZ/ 220HZ/250HZ/THROUGH |
| SLOPE -06DB/-12DB/-18DB/-24DB | |
| GAIN -08DB to 00DB | |
| REAR HPF*1 | FRQ 30HZ /40HZ/ 50HZ/ 60HZ/ 70HZ/ 80HZ/ 90HZ/ 100HZ/120HZ/ 150HZ/ 180HZ/ 220HZ/250HZ/THROUGH |
| SLOPE -06DB/-12DB/-18DB/-24DB | |
| GAIN -08DB to O0DB | |
| SUB.W LPF*2*3 | FRQ 30HZ /40HZ/ 50HZ/ 60HZ/ 70HZ/ 80HZ/ 90HZ/ 100HZ/120HZ/ 150HZ/ 180HZ/ 220HZ/250HZ/THROUGH |
| SLOPE -06DB/-12DB/-18DB/-24DB | |
| PHASE REVERSE(180°)/ NORMAL (0°) | |
| GAIN -08DB to 00DB | |
1 Displayed only when [SPK/PRE OUT] is set to [REAR/REAR] or [REAR/SUB.W. (→ 16)
2 ForKD-X330BT: Displayed only when [SPK/PRE OUT] is set to [REAR/SUB.W or [SUB.W/SUB.W]. (→16)
*3 Displayed only when [SUB.W] is set to [ON]. (→15)
AUDIO SETTINGS
3-way crossover setting items
| SPK SIZE | |
| TWEETER | SML/MID/LRG |
| MID RANGE | 8CM/10CM/12CM/13CM/16CM/17CM/18CM/4×6" 5×7" 6×8" / 6×9" |
| WOOFER* | 16CM/20CM/25CM/30CM/38CM OVER/ NONE (not connected) |
| X'OVER | |
| TWEETER HPF FRQ | 1KHZ/1.6KHZ/2.5KHZ/4KHZ/5KHZ/6.3KHZ/8KHZ/10KHZ/12.5KHZ |
| SLOPE | -06DB/-12DB |
| PHASE | REVERSE(180°)/NORMAL(0°) |
| GAIN-08DB | to 00DB |
| MID RANGE HPF FRQ | 30HZ/40HZ/50HZ/60HZ/70HZ/80HZ/90HZ/100HZ/120HZ/150HZ/180HZ/220HZ/250HZ/THROUGH |
| HPF SLOPE | -06DB/-12DB |
| LPF FRQ | 1KHZ/1.6KHZ/2.5KHZ/4KHZ/5KHZ/6.3KHZ/8KHZ/10KHZ/12.5KHZ/THROUGH |
| LPF SLOPE | -06DB/-12DB |
| PHASE | REVERSE(180°)/NORMAL(0°) |
| GAIN-08DB | to 00DB |
| WOOFER* | LPF FRQ 30HZ /40HZ/50HZ/60HZ/70HZ/80HZ/90HZ/100HZ/120HZ/150HZ/180HZ/220HZ/250HZ/THROUGH |
| SLOPE | -06DB/-12DB |
| PHASE | REVERSE(180°)/NORMAL(0°) |
| GAIN-08DB | to 00DB |
- Displayed only when [SUB.W] is set to [ON]. (→15)
DISPLAY SETTINGS

1 Press and hold
2 Turn the volume knob to select an item (see the following table), then press the knob.
3 Repeat step 2 until the desired item is selected/activated or follow the instructions stated on the selected item.
4 Press toexit.
To return to the previous setting item, press q/
Default: XX
| DISPLAY | |
| DIMMER | Dim the display and buttons illumination. OFF: Dimmer is turned off. ON: Dimmer is turned on. Brightness changes to [NIGHT] setting. (-49, [BRIGHTNESS]) DIMMER TIME: Set the dimmer on and off time. 1 Turn the volume knob to adjust the [ON] time, then press the knob. 2 Turn the volume knob to adjust the [OFF] time, then press the knob. (Default: [ON]: 18:00 or 6:00 PM [OFF]: 6:00 or 6:00 AM) AUTO: Dimmer turns on and off automatically when you turn off or on the car headlights.*1 |
DISPLAY SETTINGS
BRIGHTNESS Set the button and display brightness for day and night separately.
1 DAY/NIGHT:Select day or night.
2 Select a zone. (48)
3 Set the brightness level (00 to 31).
(Default: BUTTON ZONE: DAY:25; NIGHT:09
DISP ZONE DAY:31; NIGHT:12)
SCROLL*2 ONCE: Scrolls the display information once.; AUTO: Repeats scrolling at 5-second intervals.; OFF: Cancels.
^1 The illumination control wire connection is required. (26, 27)
2 Some characters or symbols will not be shown correctly (or will be blanked).
REFERENCES
■ Maintenance
Cleaning the unit
Wipe off dirt on the faceplate with a dry silicone or soft cloth.
Cleaning the connector
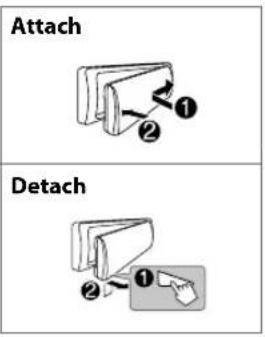
Detach the faceplate and clean the connector gently with a cotton swab, being careful not to damage the connector.

Connector (on the reverse side of the faceplate)
■ More information
Visit also the following website http://www.jvc.net/cs/car/ for:
- Latest firmware updates and latest compatible item list
AndroidTM application JVC MUSIC PLAY
Any other latest information
General
- Detailed information and notes about the playable audio files are stated in an online manual on the following website http://www.jvc.net/cs/car/.
Playable files
- Playable audio file: MP3 (.mp3), WMA (.wma), AAC (.aac), WAV (.wav), FLAC (.flac)
- Playable USB device file system: FAT12, FAT16, FAT32
Even when audio files comply with the standards listed above, playback may be impossible depending on the types or conditions of media or device.
The AAC (.m4a) file in a USB device encoded by iTunes cannot be played on this unit.
About USB devices
- This unit can play MP3/WMA/AAC/WAV/FLAC files stored on a USB mass storage class device.
- You cannot connect a USB device via a USB hub.
- Connecting a cable whose total length is longer than 5m may result in abnormal playback.
- This unit cannot recognize a USB device whose rating is other than 5V and exceeds 1.5 A.
REFERENCES
About iPod/iPhone
Made for
- iPod touch (2nd, 3rd, 4th, and 5th generation)
- iPod classic
- iPod nano (3rd, 4th, 5th, 6th, and 7th generation)
iPhone 3G, 3GS, 4, 4S, 5, 5S, 5C, 6, 6 Plus - It is not possible to browse video files on the "Videos" menu in [HEAD MODE].
- The song order displayed on the selection menu of this unit may differ from that of the iPod/ iPhone.
- Depending on the version of the operating system of the iPod/iPhone, some functions may not operate on this unit.
About Android device
- This unit supports Android OS 4.1 and above.
- Some Android devices (with OS 4.1 and above) may not fully support Android Open Accessory (AOA) 2.0.
- If the Android device supports both mass storage class device and AOA 2.0, this unit always playback via AOA 2.0 as priority.
About Bluetooth
- Depending on the Bluetooth version of the device, some Bluetooth devices may not be able to connect to this unit.
- This unit may not work with some Bluetooth devices.
- Signal conditions vary, depending on the surroundings.
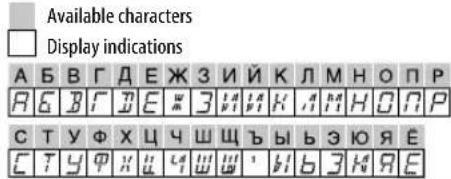
Available Cyrillic letters
Change the display information
Each time you press the display information changes.
- If the information is unavailable or not recorded, "NO TEXT", "NO NAME", or other information (eg. station name) appears.
| FM or AM | Frequency - Day/Clock |
| (For FM Radio Data System stations only)Station name (PS) - frequency - Program type (PTY)Radio text+Day/Clock (back to the beginning) | |
| USB (For MP3/WMA/AAC/WAV/FLAC files) | |
| USB-IPOD or ANDROID | Playing time - Day/Clock Album title /Artist Track titleFolder/file name - (back to the beginning) |
| Playing time - Day/Clock Album title /Artist Track title(back to the beginning) | |
| AUX | AUX - Day/Clock (back to the beginning) |
| BT AUDIO | Playing time - Day/Clock Album title /Artist Track title(back to the beginning) |
TROUBLESHOOTING
| Symptom | |
| General | Sound cannot be heard. · Adjust the volume to the optimum level. · Check the cords and connections. |
| "MISWIRING CHECK WIRING THEN PWR ON" appears. Turn the power off, then check to be sure the terminals of the speaker wires are insulated properly. Turn the power on again. | |
| "PROTECTING SEND SERVICE" appears. Send the unit to the nearest service center. | |
| Source cannot be selected. Check the [ SRC SELECT] setting. (→) | |
| Radio | · Radio reception is poor. · Static noise while listening to the radio. Connect the antenna firmly. |
| USB / iPod | Playback order is not as intended. The playback order is determined by the file name. |
| Elapsed playing time is not correct. This depends on the recording process earlier. | |
| "Not SUPPORT" appears and file skips. Check whether the file is a playable format. (→9) | |
| "READING" keeps flashing. Do not use too many hierarchical levels and folders. · Reattach the USB device. | |
| "CANNOT PLAY" flashes and/or connected device cannot be detected. Check whether the connected device is compatible with this unit and ensure the files are in supported formats. (→19) · Reattach the device. | |
| The iPod/Phone does not turn on or does not work. Check the connection between this unit and iPod/Phone. · Detach and reset the iPod/Phone using hard reset. | |
| Correct characters are not displayed. This unit can only display uppercase letters, numbers, and a limited number of symbols. · Depending on the display language you have selected (→4), some characters may not be displayed correctly. | |
| Symptom | Remedy | |
| ANDROID | ·Sound cannot be heard during playback. | ·Reconnect the Android device. |
| ·Sound output only from the Android device. | ·If in [AUDIO MODE], launch any media player application on the Android device and start playback. | |
| ·If in [AUDIO MODE], relaunch the current media player application or use another media player application. | ||
| ·Restart the Android device. | ||
| ·If this does not solve the problem, the connected Android device is unable to route the audio signal to unit. (⇒ 20) | ||
| Cannot playback at [AUTO MODE]. | ·Make sure JVC MUSIC PLAY APP is installed on the Android device. (⇒ 7) | |
| ·Reconnect the Android device and select the appropriate control mode. (⇒ 8) | ||
| ·If this does not solve the problem, the connected Android device does not support [AUTO MODE]. (⇒ 20) | ||
| “NO DEVICE” or “READING” keeps flashing. | ·Switch off the developer options on the Android device. | |
| ·Reconnect the Android device. | ||
| ·If this does not solve the problem, the connected Android device does not support [AUTO MODE]. (⇒ 20) | ||
| Playback is intermittent or sound skips. | Turn off the power saving mode on the Android device. | |
| “CANNOT PLAY” · Make sure Android device contains playable audio files. | ||
| ·Reconnect the Android device. | ||
| ·Restart the Android device. | ||
TROUBLESHOOTING
| Symptom | Remedy | |
| Bluetooth® | No Bluetooth device is detected. | • Search from the Bluetooth device again. • Reset the unit. (←8) |
| Pairing cannot be made. • Make sure you have entered the same PIN code to both the unit and Bluetooth device. • Delete pairing information from both the unit and the Bluetooth device, then perform pairing again. (←9) | ||
| Echo or noise occurs. • Adjust the microphone unit's position. (←10) • Check the [ECHO CANCEL] setting. (←11) | ||
| Phone sound quality is poor. | • Reduce the distance between the unit and the Bluetooth device. • Move the car to a place where you can get a better signal reception. | |
| Sound is being interrupted or skipped during playback of a Bluetooth audio player. | • Reduce the distance between the unit and the Bluetooth audio player. • Turn off, then turn on the unit and try to connect again. • Other Bluetooth devices might be trying to connect to the unit. | |
| The connected Bluetooth audio player cannot be controlled. | • Check whether the connected Bluetooth audio player supports Audio/Video Remote Control Profile (AVRCP). (Refer to the instructions of your audio player.) • Disconnect and connect the Bluetooth player again. | |
| Symptom | Remedy |
| Bluetooth® | “PAIRING FULL” The number of registered devices has reached its limit. Retry after deleting an unnecessary device. (3, DELETE PAIR) |
| “PLEASE WAIT” The unit is preparing to use the Bluetooth function. If the message does not disappear, turn off and turn on the unit, then connect the device again. | |
| “BT DEVICE NOT FOUND” The unit failed to search for the registered Bluetooth devices during [AUTO CNT]. Turn on Bluetooth from your device and connect manually. (3) | |
| “NOT SUPPORT” The connected phone does not support Voice Recognition feature. | |
| “ERROR” Try the operation again. If “ERROR” appears again, check if the device supports the function you have tried. | |
| “H/W ERROR” Reset the unit and try the operation again. If “H/W ERROR” appears again, consult your nearest service center. |
If you still have troubles, reset the unit. (★8)
SPECIFICATIONS
FM Frequency Range 87.5 MHz — 108.0 MHz (50 kHz step)
Usable Sensitivity (S / N = 26dB) 0.71~ V / 75
Quieting Sensitivity
2.0 V/75Ω
(DIN S/N = 46 dB)
Frequency Response (± 3dB) 30Hz -15 kHz
Signal-to-Noise Ratio (MONO) 64 dB
Stereo Separation (1 kHz) 40 dB
MW Frequency Range 531 kHz — 1611 kHz (9 kHz step)
Usable Sensitivity (S / N = 20dB) 28.2 V
LW Frequency Range 153 kHz — 279 kHz (9 kHz step)
Usable Sensitivity (S / N = 20dB) 50~ V
USB Standard USB 1.1, USB 2.0 (Full speed)
Compatible Devices Mass storage class
File System FAT12/ 16/32
Maximum Supply Current DC 5 V -1.5 A
Digital Filter (D/A) Converter 24 Bit
Frequency Response (± 1dB) 20Hz - 20kHz
Signal-to-Noise Ratio (1 kHz) 105 dB
Dynamic Range 90 dB
Channel Separation 85 dB
MP3 Decode Compliant with MPEG-1/2 Audio Layer-3
WMA Decode Compliant with Windows Media Audio
AAC Decode AAC-LC“.aac” files
WAV Decode RIFF waveform Audio Format (Linear PCM only)
FLAC Decode FLAC_files
aannnnnne aannnnnne
Frequency Response (±3 dB) 20 Hz — 20 kHz
Input Maximum Voltage 1000 mV
Input Impedance 30 kΩ
Beebe
Version Bluetooth Ver.2.1+EDR/Bluetooth 3.0
Frequency Range 2.402 GHz — 2.480 GHz
Output Power +4 dBm (MAX), 0 dBm (AVE) Power Class 2
Maximum Communication Range Line of sight approx. 10m (32.8 ft)
Pairing SSP (Secure Simple Pairing)
Profile HFP1.6 (Hands-Free Profile)
A2DP (Advanced Audio Distribution Profile)
AVRCP1.S (Audio/Video Remote Control Profile)
PBAP (Phonebook Access Profile)
SPP (Serial Port Profile)
SPECIFICATIONS
| Audio | Maximum Output Power 50 W × 4 or 50 W × 2 + 50 W × 1 (Subwoofer = 4 Ω) | |
| Full Bandwidth Power (at less than 1 % THD) | 22 W × 4 | |
| Speaker Impedance 4 Ω — 8 Ω | ||
| Preout Level/Load (USB) 4 000 mV/10 kΩ load | ||
| Preout Impedance ≤ 600 Ω | ||
| General | Operating Voltage (10.5 V — 16 V allowable) | 14.4 V |
| Maximum Current Consumption 10 A | ||
| Operating Temperature Range — 10°C — +60°C | ||
| Installation Size (W × H × D) 182 mm × 53 mm × 107 mm | ||
| Weight | 0.6 kg | |
Subject to change without notice.
INSTALLATION / CONNECTION
Warning
- The unit can only be used with a 12VDC power supply, negative ground.
- Disconnect the battery's negative terminal before wiring and mounting.
- Do not connect Battery wire (yellow) and Ignition wire (red) to the car chassis or Ground wire (black) to prevent a short circuit.
- Insulate unconnected wires with vinyl tape to prevent a short circuit.
- Be sure to ground this unit to the car's chassis again after installation.
Caution
- For safety's sake, leave wiring and mounting to professionals. Consult the car audio dealer.
- Install this unit in the console of your vehicle. Do not touch the metal parts of this unit during and shortly after use of the unit. Metal parts such as the heat sink and enclosure become hot.
- Do not connect the wires of speakers to the car chassis or Ground wire (black), or connect them in parallel.
- Connect speakers with a maximum power of more than 50W . If the maximum power of the speakers is lower than 50W , change the [AMP GAIN] setting to avoid damaging the speakers. ( 15)
- Mount the unit at an angle of less than 30^ .
- If your vehicle wiring harness does not have the ignition terminal, connect Ignition wire (red) to the terminal on the vehicle's fuse box which provides 12 V DC power supply and is turned on and off by the ignition key.
- Keep all cables away from heat dissipate metal parts.
- After the unit is installed, check whether the brake lamps, blinkers, wipers, etc. on the car are working properly.
- If the fuse blows, first make sure the wires are not touching car's chassis, then replace the old fuse with one that has the same rating.
Basic procedure
1 Remove the key from the ignition switch, then disconnect the terminal of the car battery.
2 Connect the wires properly.
See Wiring connection 26, 27
3 Install the unit to your car. See Installing the unit (in-dash mounting).
4 Connect the terminal of the car battery.
5 Press Source the power.
6 Detach the faceplate and reset the unit within 5 seconds. (一 3)
INSTALLATION / CONNECTION
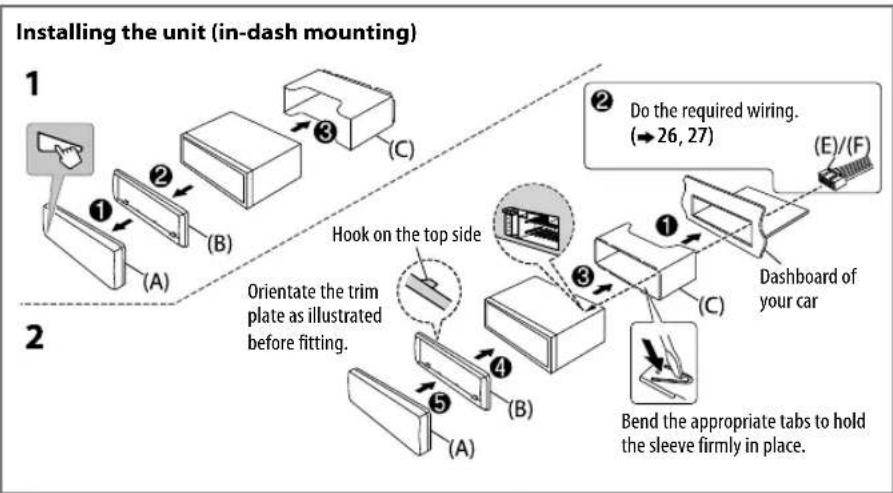

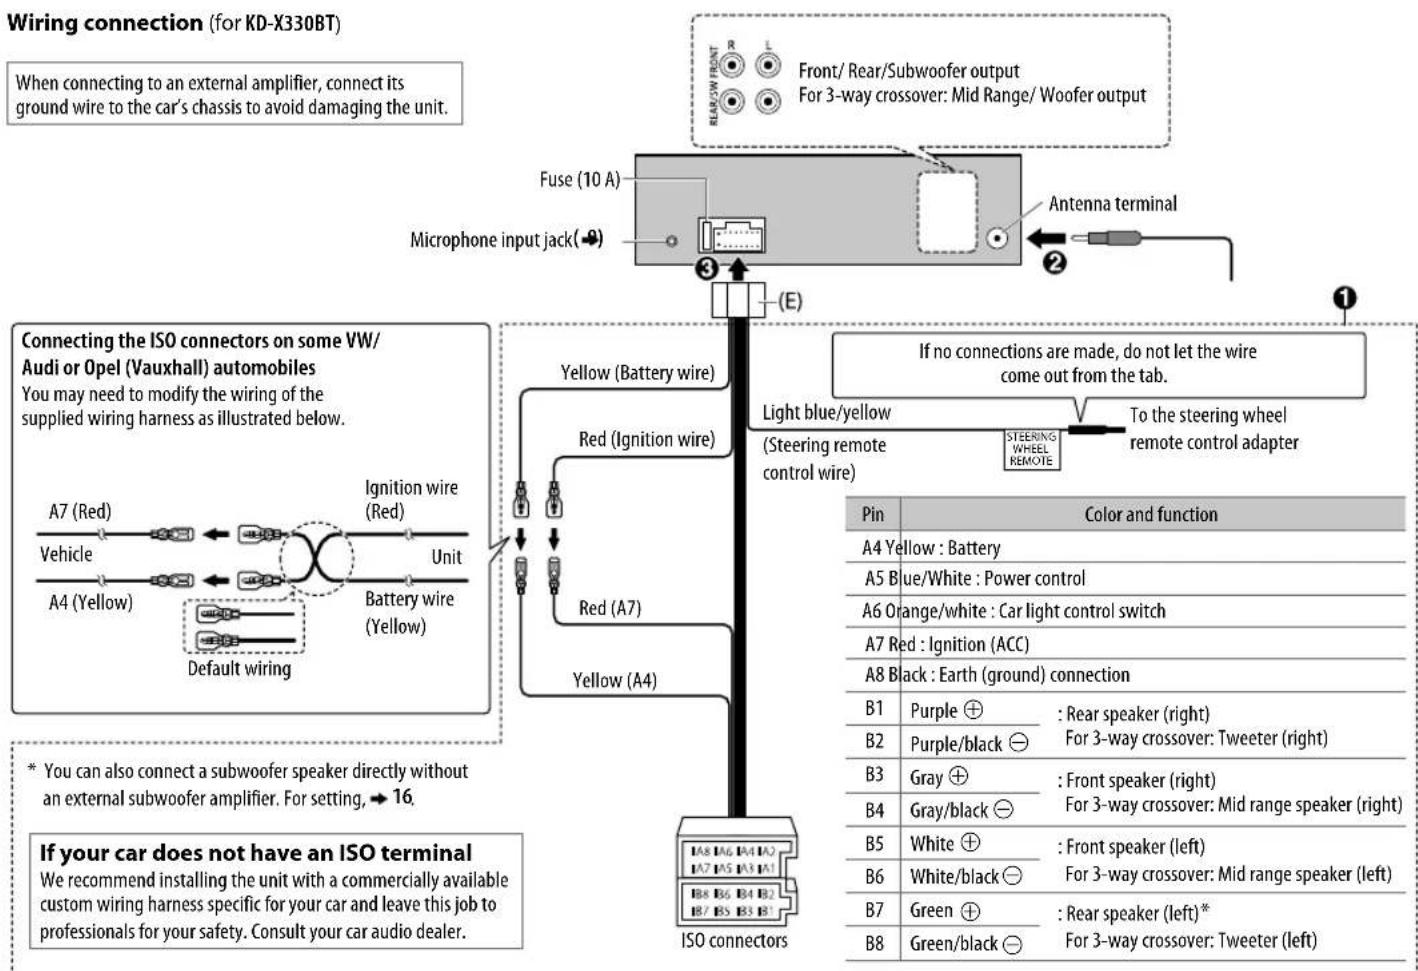
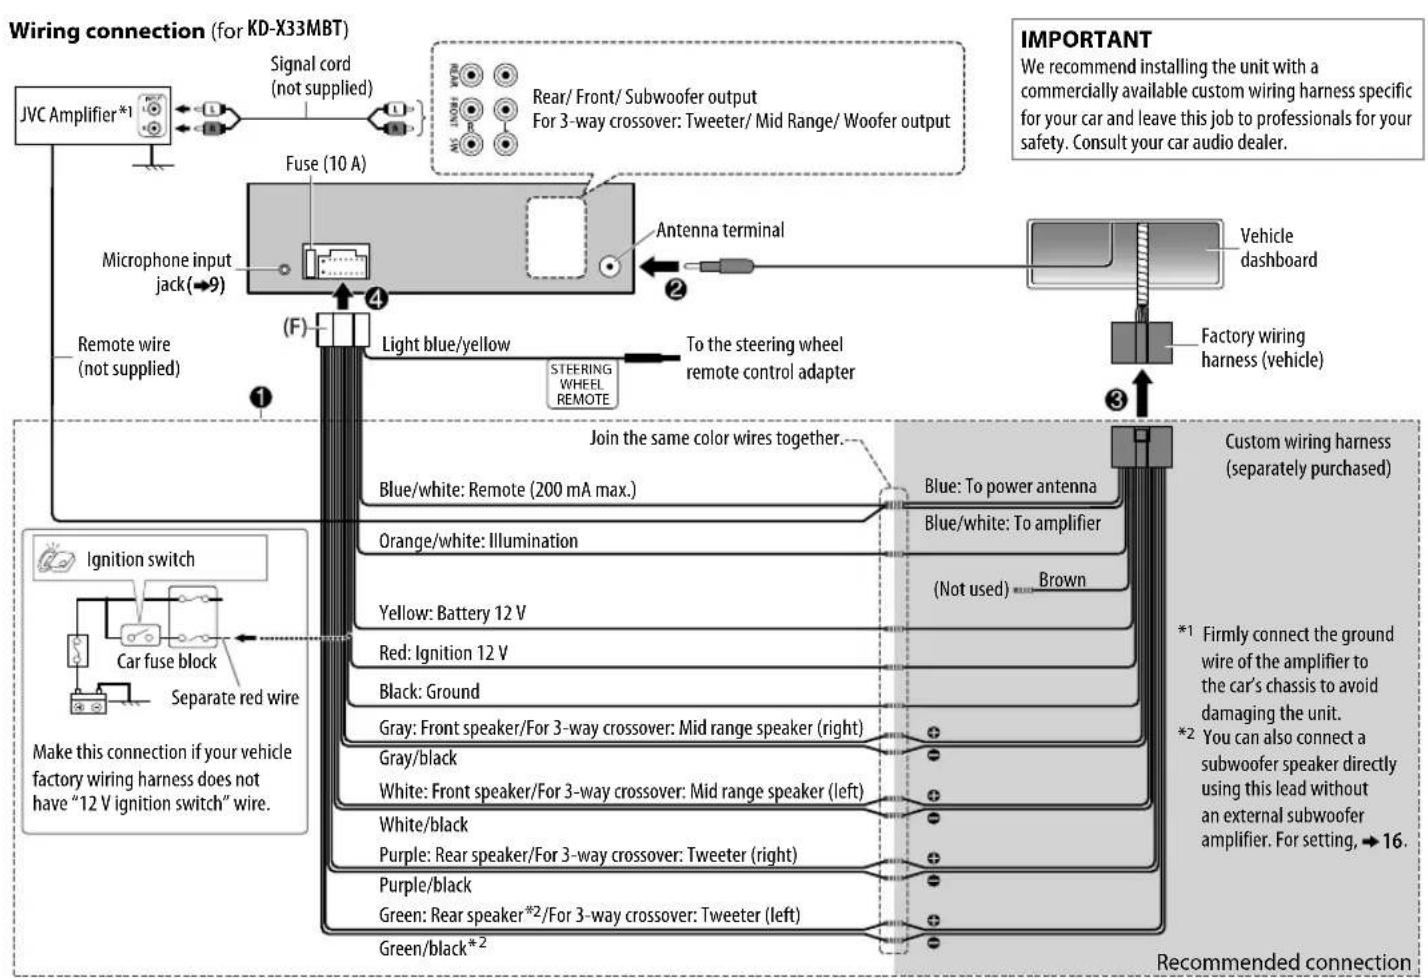
TABLE DES MATIERES
AVANT L'UTILISATION
BLUETOOTH — Telephone portable
(SLOPE)/HPF SLOPE/LPF SLOPE;
A E B F D E E E E E H A M H O P
CTYΦXU4Uu7b1b30R
C7yFxx 44 44 44 44 b 3 N 9E
FEHLERSUCHE
He nCnoB3yIte fynkun, KOToPbIe OTBnEkaT BnHMaHne I MeaKaT 6e3onacHomy BoKdHIO.
BHHMaHne
HactpoKa rPOMKocTn:
OtperynpyTe rpmkocTb taKIM o6pa3OM, yTO6blcIbTaB 3ByKu 3a npedeJAMn ABTOMO6Hn Dn I npedOTBaPaeHn ABAPn.
- YmEnbIInTe rPOMKocTb Ipeep BOCpOn3BeDeHEm, YTO6bl IpeDoTbPaTb NOBpeXdHne DnHaMMKOB 13-3a BHe3aHNOr NOBbIeHnry yPOBnI rPOMKocTn Ha BBIXOe.
06une xapaKTepeNCTnK:
He nnonb3ynt BHeHnue yCTpOuCTBa,ecnTO MoKeT OTPOMaTeNbHO NOBmAraTb Ha 6e3OnaNCHocTb DBNXeHna.
- y6eIntecb b TOM, yTO CO3daHbI pe3epBhble KOINN BceX BaXhIx daHHbx. Mbl He Hecem OTBeTCTBeHHOCTb 3a IOTepIO 3aINcaHHbx DaHHbx.
HnKOrda He octabJrte MeTaNueCKeN npedMeTbI (HaNPmep, MoHeTb IIN MTeaJIuueCKne INHCTpyMeHTbI) BHyTpnu yCTpoiCTBa BO N36exKaHne KOPOTKNX 3AmbKaHn.
IyIbT IINCTaHIOHOHOrO ynpabneHn (RM-RK52):
He octablanrte npnbT dncTaHOnHO rnpaBneHn B HaraepBaembX MeCTax, TaNX KaK npnbOpHa naHeb.
JNTNtBeBnAkkymyTOp MoKet 6bItb B3pblBOONacHbIM npn HnnpaBnBHO 3aMeHe. 3aMeHrTe TOnbKO aKKymyTApOM TaKOrO Xe NIN kKBBaIeHTHO TUNa.
- 5nok akymnyrTopOB uIN akkymyraTopbI Heh3a NOBepraTb N36bIToHOMy HArpeBaHIO B CONHeuHbIX nyuaX, OrHe n T.I.
XpaHnTe 6aTapeB MeCTax, HeIOCTynbIX DnIeTei, n B OpIMNHaJIbHOYyakOBKe, eCN OHn HE mCNoJIb3yOTcH. HEmpeHNO ytnIN3IPoBaTB IcNOJb3OBAHbIe 6aTapeB. B cnyae npOrnaTbIBaHHr HEmpeHNO 6paTITBCR K bpaVy.
Kak noIb3OBAtbc daHHbIM pyKOBOcTBOM
- Onpaunn 06brcnTcB OCHOBHOM CINONb3OBAHm KHOHOK Ha nepeHne NaHein MoEni KD-X330BT.
B06bAHTeINbHbIX cENX INcONb3yOTcN INHdNkauN HA aHrnnckom 3bike. Bbl MoxTe BblpaTb 3bIK OTO6paKeHNn 13 MEHO.(4) - [XX] 0603Haayet Bbipahhblte NEMeHTbl.
(03HaayetOMaTePnblDocTyHbHa yKa3aHHoCtpaHne.
OCHOBHbIE CBeDEHnA

Ipeedna naheb

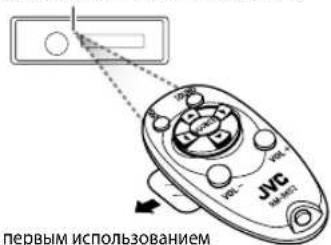
IynbT duCTaHmOHoro ynpabHeHH (RM-RK52)
YnpaBnTb KD-X33MBTMOKHO C NOMOIOB DONIOHNTeBHO npo6peTeHHoro pIbTa DmCTAHNOHORO ynpaBneHn.
TeMeTpueckn DaTnK (He NoDBepraIte BO3dEChTBnIO PnPbMbx COHNeHbIX Lyne.)
IpeepnepBbIMNCN0JIb3OBAHmE CHMNTe 3aunTHyIO NHeKy.
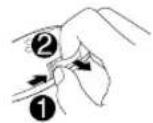
3aMeHa aKKyMylTopa

3a4aHa nepedne naneHn npbte dctannoHHoro ynpabennnn
| Вкlioочиね пitaшия | Hajtmite конь SOURCE-。(Hajtmite и уdeckимаite нахато, чтоы оTKлочип реташие. | (Нedoстуно) |
| Настоюк grрмостсп ПовернITE ручуpe reуларовки grрмостсп. Hajtmite конь | VOL + NN VOL - | |
| Hajtmite ручуpe reуларовки grрмостсп, чтоы вблочичь 3byk постановпь Воспponзveдениe. | Hajtmite конь (Y), чтоы вблочичь 3byk постановпь Воспponзveдениe. | |
| Hajtmite конь opposite pa3, чтоы OTMehNTB DeiCTBVE. | Hajtmite конь opposite BOCPON3vedениe. | |
| Выбөрөні містүнік | Hajtmite конь SOURCE.(Hajtmite конь SOURCE-(Hajtmite конь SOURCE-(Hajtmite конь SOURCE-(Hajtmite конь SOURCE-(Hajtmite конь SOURCE-(Hajtmite конь SOURCE-(Hajtmite конь SOURCE-(Hajtmite конь SOURCE-(Hajtmite конь SOURCE-(Hajtmite конь SOURCE-(Hajtmite конь SOURCE-(Hajtmite конь SOURCE-(WIFIN) | Hajtmite конь SOURCE Heckолько pa3. |
| Изменения otobражамои информачи | Hajtmite конь (Y) | (Нedoстуно) |
HauAIO 3KcPJIyATAUIN


OTMeHa DEMOHCTpaun
Пипспьв ВКIOчEHи рNTAHЯ (ИИЕСЛДАп napamETра [FACTORY RST] yCTaHOBNeHO 3HAueHne [YES]) Na Иснлес OTОбракael cneIyOuяя nHΦopmaIGNA:"CANCE DEMO" "PRESS" VOLUMEKNOB"
1 HaxMnte pyky perynipOBKn rpoMkOCTn. BkaeeTBe HaaybHn HactpOnKn Bb6paHO 3haeHneI
2 Haxmte pyky peynpobkn rpoMkocn eepa3. OTo6paKaetaHdnnCb "DEMO OFF".

HactpoJa yacob
1 HaxMnte u ydepxnBaIte HaKaToHKnKy
2 NObepHnTe pyky perynipOBKn rpomKoCTn nIy Bbl6opa 3neMeHTa [CLOCK], a 3aTeM haxmnte ee.
3 NObepHnTe pykny perynnpOBKn rPOMKoCTn IJIy BbI6opa 3NeMeHTa [CLOCK SET], a 3aTeM hXmNte ee.
4 Nobopaunbae pyky perynpOBKn rpoMkOCTn, qTO6bI Bbl6paTb 3HaHHe napanameTpO8,p a3Te m HaxMNITe ee. DeHb Yac MHyTA
5 Nobeprte pyky perynpOBKn rpomKoCTn Iy Bb6opa 3neMeHa [24H/12H], a 3aTeMa HaxMnte ee.
6 NOBepHnTe pykypeRyIINpOBKn rpOMKoCTn IJIa Bbl6opa [12 HOUR] nIn [24 HOUR], a 3aTeM HAXMnTe ee.
7 HaKMnTe 10 bixOa.
IINB03Bpata K npdebyduyemmy 3nemEnHtpoKn HaaMmTe KHONky/

3aahanhe6a0bBIX HacTpoek
1 HaKMTe n ydepKuBaIte HaxaToi KNkKy
2YTO6bI Bb6paTb 3nEMENT, NOBEPHNTe pyky perynnpOBKn rpoMKoCTN (cM. cnedyIOuOy TOabNIuOy), 3aTeM HxMMTe ee.
3 NOBTOPAte DeIcTBnE 2 do Tex nop, noka He 6yET Bbl6paH nn AKTUBPOBAH Heo6XODMbI ANEMHT.
4 HaXMMTe 10000000000000000000000000000000000000000000000000
IINBa BO3Bpata K npebdyuemy 3nemEny HAcTPOkHAnMTe KHOJky
NoymonHaHIO:XX
Mochno coxpaHbT do 18 paNocTaHcIM FM and 6 paNocTaHcIM AM.
CoxpaHHeHpe padnoctaunn
PnpnpocnyuBAAHn paAIOCTAHm....
Haxmte u yepknaBte Haxktaimn HymepoBaHHbIe KhONKn (1-6). (nn)
1 HaxMMte n yapedxmbaTe haxaToI pyky perynupOBKn rpoMKoCTn, noKa He 3amraer TEKT "PRESET MODE".
2 NObepHnTe pyky perynnpOBKn rpomKoCTn nla BbIbopa 3anporpaMMnpOBaHHoro HOMepa, a 3aTeM HaKMnTe pyky.
3anporpammpoBaHHb Homep Muraet, n OTo6paKaetcnaHnncb "MEMORY".
Bb6op coxpaHeHHo paHocTaHcM
Haxmte OndHy Hx HymepoBaHHbIX KHOON (1-6). (nn)
1 HaXMMTe KONky. /
2 NObepHnTe pyky perynnpOBKn rpoMkOCTn DnBb6opa 3anporpaMMNPOBaHHoro Homepa, a 3aTeM Haxmnte pyky nnoTBePckdEHN.
ДугнaitpoКn
1 HaxmTe uydepKuBaIte HaKaToH KOnKy
2 NObepHnTe pyky perynnpOBKn rpoMkOCTn DnBbI6opa 3neMeHTa [TUNER], a 3aTeM hXmITE ee.
3 Yto6bI Bb6paTb 3IeMeHt, NOBepHnTe pyKy peryNnPOBKn rpOMKOCT (CM. cIeDyIOUyTO TaNHy), 3aTe HAXMnTe ee.
4 NobtoprJte DeCTBHe 3do Tex npoc He 6ydet Bb6paH/akTNbPBOBaH Jenaembl 3JIeMeHT, HnC nCnyTe UHCTpyKuINM, PnBBeDeHNbIM IaBbPaHHORO 3JIeMeNTa.
5 HaXMMTe 108 bIXoJa.
IINB03BpATA Knpedbinyuemy 3nemEny Hacptponn HaKMITE KONKy
NoymonhaHHo:XX
Hauano Bocnpon3BedeHH
PpOcXoMHT ABOMaTmUeCKA CMeHa NCTOuHnKa, HauHaTaC BOCpOu3BeDeHHe.
BxOДиоUSB-pa3bEm
iPod/iPhone
ANDROID*2

Pnepknaembe koeKn Bluteoth
- Sub Band Codec (SBC)
- Advanced Audio Coding (AAC)
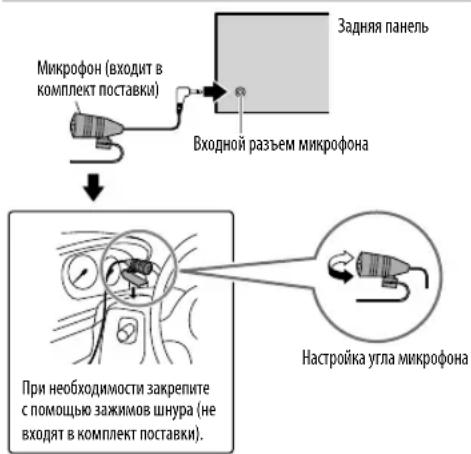
IopknoueHne MnkpofoHa
Conpaxchenu noqkuioueHne yctpoCTBa Bluetooth B nepBpa3
1ДьВКЛЮЧЕнЯустуpoCTBaHaXmITE SOURCE-
2 Ha yctpoicTBe Bluetooth haaidnte N Bb6epute "JVC UNIT".
Ha dncnnee mraet haqncb "BT PAIRING".
-ДянгсOTOBxUcTPOiCTB BluTeoth MoXeTNotpe6ObaTbCBA BOD nepcoHbHorO nDeHTnФkaUHORo Koda (PIN) HENOCPeDCTBEHNO NOCE NOCKA.
3 B 3aBcMocTn OT npOKpyuBaembIX Ha 3KpaHe daHHbIX BbINONHtE JeicCTBne (A) nnn (B).
Hekotopbye yctpoictBa Bluetooth mOyT nPoUeDpy copaKeHH, KOtopaOnuHaetcOn Yka3aHHo Hmke.
(A) "[IMRAyctpOcTBa]" "XXXXXX" "VOL-YES" "BACK-NO"
"XXXXXX”-3TO KIOU DCOTyNa, COCTOaIuN 136 cUΦp, KOToPbI CnyaHbIM Obpa3OM fOpMnpyeTcB BO BpeMa KaKDoTO cOnpJxKeHn.
1 Y6eHntecb, yTO KIOUHOOCTyNA, oTObpaKaHOUMeCn Ha yCTpoNCTBe H yCTpoNCTBe Bluetooth, OINHaKOBbl.
2 HaxMMTe pyKy peYIpOBKn rPOMKOCTn IaNoTBepeXeHn KIOUa doCTya.
3 NcnoB3yIte yCtpoCTBO Bluetooth nnoTBePckJeHnKIOUHa Doctyna.
(B) “[Имя устюпсъа]” “VOL - YES” “BACK - NO”
Hakmte pyky perynipOBKn rpmKoCTn, yTo6bl 3anyCTntb cnpjKeHne.
2 -Пи npokpyTke Ha kpahe coo6eHnra "PAIRING" "PIN 0000" BBeNTe PIN-KoJ "0000"Ha yctpoiCTbe Bluetooth.петд соррахенm moxho yctahOBnTB hyxHbI PIN-KoJ. (13)
- Ecln otobpaqxaetc TaIbko coo6eHne "PAIRING", c nOmou bkyctpojCTBa Bluetooth noTBePnte coprJKeHne.
Co06ueHne "PAIRING COMPLETED" oTo6paXaETc npu 3aBepWeHN cOpJxEHN, a npu yCTaHOBe coeHNHeHN Bluteoth 3aropaeTc CmBON
3aropaetca, noka3bva3apd6batae m cmy curhana.*
*YHKNUHMOBAHME3ABHCNTOTTUNAHCN0b3yemoroTEeOHA.
JaHHoe yCTpoIcTBo NOIDepKmbaet SSP (Secure Simple Pairing).
Bcero moxho 3apeHCTpnpoBaT (BbInonHHT coPnpeHne) do 10 yctpoictB.
Pocne copraeHn yctpoCTBO Bluetooth octaHcTapeHCTpnpoBaHbM yctpoCTBe daKe npi c6poce erohactpoeK. Yo6bl ydaNTb copraeHnoe yctpoCTBO, 13, [DELETE PAIR].
- ODNOBPemeHNO MOryT 6bIb NpDKnIOueHb Ie 6Oone DByX TeneΦoHOB Bluetooth n oDHO ayDnOyCTpoCTBO Bluetooth.
- HeKoTOpbIe yctpoiCTBa Bluetooth Moryr ATOMaTHueCKN BbINONHrTb NODKIOHcHHe Nocn CoPRAKeHH. PNOKJIIOHTe Tako yctpoiCTBO BpyHyU.
- Pópo6HbIe CbeHeHrA CM. B pykoBODCTBe yctPoJcTBA Bluetooth.
BLUETOOTH
ABTomatnueckoe copxkeHne
При посоедин electусту iPhone/iPod touch/Android K BxOДНomy USB-pa3bemy ATOBMATUeCKnakTBNpyetc3a npoc H coprKeHne (Yepe3Bluetooth).
HaxMMTe pyKu perynpOBKn rpOMKoCTn Ia n copJxEHH NoCNE TORO, KaN NOdTBePdNTe NMa yCTPOJCTBa.
A B T O M A T H U E C K N 3 a n p o c H a c o n p r a j k e h i e a k T H B N P u y e t c a T o b k o p n y c l o b m, y t o:
-Функua Bluetooth noCoeMHHeHOro yCTpoIcTba BKIOUeHa.
-ДяnapaMeTpRa[AUTO CNNT]yCTaHOBJIeHO 3HaueHHe[ON].(→13)
-Пиюхене JVC MUSIC PLAY yctaHOBNeHO Ha ycTpoIcTBe Android (一 7) n Bb6paHa onuia [AUTO MODE] (一 8)
BLUETOOTH—Mo6nBbHbTenefoh

PnemBb3Oba
PnnoocTynneHm BxOaJceroBb30Ba:
- KHONK 6yuyT MURATB COOTBTCTBNN C wA6NoHOM MURAHN, BB6paHHbIM BAMB [RING ILLUMI].(→11)
- YcTpoIcTB0 OTeBaeTa Hb Bb3OB aBtOMaTnueckn, ecIn dJa npaMeTpA [AUTO ANSWER yCTaHOBJIeHO BB6paHHoe Bpem. (一 11)
Bo Bpemr Bbl30a:
KhoNKn npekpaaaot MmraTb.
- EcnBbOTKIOHTyeCTPOINCTBOIIMOTcoeINHITNEpeHNIO naHnB, coeINHHeNHe Bluetooth 6ydt pa3OpBaHO.
3aadaHa nepeedne naene
Ha nylte duCTaHcHOnHoro ynpablennna
PepBbB BXOJaun Bbl3OB...
2 HAnMeIpyKpeyepyepnIOeKTHpOMKcTHTo6bBbINOHHTbBb308.
PHONEBOOK
(TPnHMeHHMo,TOIbKOeCNTepeOHnoDnepeKNaBaETPBAP)
1 HaxMMTE 2 AaHbIpa HyxHoro 3HaKa (A-Z,0-9 N OTHERS).
OTHERS"OTOBPAaETCA,ecnnePBbIMCNBMONOTNMAeTcOtA-2,O-9.
2 NObepHnTe pyKy perynpoBKM rpoMOKCTIN DnBb6opa HMeHN, a 3aTEM HAKMNTE pyKy.
3 NopbHnTe pyuKpyepyunpOBKnI pOMKoCTn IJa Bbl60pa Hmepa TetefoHa, a 3aTeMaHkMnTe ee Jra Bbl3Oba.
-Пин соряжен.TeteфоHHHа KMHa NOДКИQUeHHOrTo TeteфOHa ABTOMaTHueCKn NepeaTeCn Ha yCTpOHTBO.
JaHHoe yCTPOCTBO MOKET OTO6paKaTb TOnbKO HEAKCUENTPOBAHnBHe 6yKBbl.(AkuTeHTPOBAHnBMe 6yKBbl, TAKME KAK "U", 6yDyT OTO6paKaTbCk KA "U".
DIAL NUMBER
1NoBepHnTe pykypeyHnPOKBn rpoMOKoTH N Bb6peHte uO 0do9)nn CMBOB(,+)
2 HaxMMTE1 1AepeHoc4 N03NIMBBOJa.
IobTOpRHTe 1nCTBn2 DoTexnop, noka He 3abeepmtBBOH HomepaTeoHa.
3 Haxmte pyky perynpOBK npMOKt, T06bblnONHt Bbi3OB.
VOICE
IPOHMESHEHMe KOTAKTa, KOtOPOMHy HxKHO N03BOHbTb, KINI rONOCBOYIO KOMAHyDy IyNpABNeHnA yHKUAMNH TELEOHa. (BblONHeHne Bb13Oba c nOMoubIO paCNO3HaBaHnra IroNa)

BbIOnHeHne BblOBA c NOMoUbIO paCNo3HaBaHnra roIocA
1 HaxMMTe N yapedKbAteTnKtNbauN noCoeDnHeHOro TenefoHa.
2Ipon3heCte HMR KOHTaKa, KOTOPOMy HxKHO NO3BOHnTb, INI ITOLOCByIO KOMaHdy DnA ynpabNeHnO fYHKUNMn TenefoHa.
PnDepxmbaembIyHKmPi pacno3HabHa rnooc3aBncat OT Telefoha. Pnpo6hble cBeHnM C.M.BpyKOBOCTBE NOkNIOUeHHORoTelefoha.
3To yctpoiCTBO takke noDnepxmbaet fYHKUHO HHTeNKeKtyaJbHOrO IuHOro nomouhika iPhone.
HactpoKuBnarnT

CoxpaHeHne KOHTaKtBa B nAmrTH
YTO6bI ydaJIbT bKoHTaKT 13 nAMrTn, B DeJCTBmN 2 Bbl6epntE [DIAL NUMBER] n COxpaHIne pcyToHOMep.

BbINONHeHne BbI3Oba n3 naRTN
1 Haxmte kIOeHpeXnMa Bluetooth.
2 HaXMMTe ONDHYHX HYMePOBaHHbIX KHONOK (1-6).
3 HaxMMTe pyuKy perynipOBKn rpoMkoCTn, YTO6bl BbINONHtB Bbl30B.
PnOTCYCTBmCOxpaHeHHbX B nAMrN KOHTAKTOB OTo6pKaetc coo6eHne"NO PRESET".
BLUETOOTH
HactpoynpexmMa Bluetooth
1 Haxmte n ydepknBaTe haxaTo KhONky
2 NObepHnTe pyuKpy perynipOBKn rpoMkoCTn Ira BbI6opa 3neMeHTa [ BLUETOOTH], a 3aTeMa HaxMMnte ee.
3 YTo6bI Bb6paTb 3JIeMeHT, NOBepHnTe pyKy peRyJINpOBKn rPOMKoCTn (cM. cnEduOu7U TO6mU), 3aTeM HaxMtte ee.
4 NOBTOPRNe DeNCTBne 3Do Tex nop, NOKA He 6ydt BbIbpaH/akTINBnPoBaH XeNaembl 3JIEMENT, INN CNEyUte HNCTpyKUIM, INPUBeENHbIM DnA BbIbpaHHOrO 3JIEMHTa.
5 HaXMMTe pRbixOxa.
IINB03BpATA KnppebDyUeMy 3JeMeHTy HaCTPOKN KaHKMITE KHOIKY
NoymonuHmIO:XX
AynonpounrpmbaTeB uepes Bluetooth
1 HaxMMTe SsURGEpa3, 4To6bI Bbl6paTb BT AUDIO (Hn HaXMnTe SOURCE Ha RM-RK52).
2 Nn Hauana Bocnpon3BedeHn BKnIOHTe aydnonponrpbBaTeN Bluetooth.
EcnBb6paHO SUB.W/SUB.W
- [FRQ 120HZ] BBi6paHO B [SUB.WLPF] nOpiu [THROUGH] HeoocTynHa.
- [RO2 Bb6paHO B [FADER]идя Bb6opa DoctyneH dmaanaOH c [R15]do [00].
3BYKObIe HACTPOIKU
Hactpoikn KpoccoBepa
HnHex npBBeHeBIOCTyNtBHe 3nEmeHTb HAcTpoKn Dn2-nOncOBOro KpocCOBepa n3-nONOCOBOrO KpocCOBepa.
BHUMAHue
Bb6npaTne TmKpoccoBepa B COOTBeCTBm C KOHpyauee noKnIOUeHn HnHAMKO.B. (一 26,27)
EcnBbBb6epnte HnpabnHbHtn
-ДИнhamMIMMOrT NOBpeDNTbC.
- YpOBeHbBIXoHOrO3ByKaMOxKET6bTbUpe3MepHO BICOKMUNHINH3KM
SPK SIZE{pa3mepduhaAMnka}
BbIpaTcB CootBeCTBmC pa3MePOM NpKnHoeHHo DnHaMnKa dna 0eocneehnONTNMaJIbHbIX XapakTePcTnK.
HacpoKnIaCTObI KpyTn3HbI dI KpoccoBepa Bbl6paHHoro DnHaMnKa yCTaHABNBAIOrA bATOMaTHueCKn.
Korda [NONE] BbIbpaHO nI [TWEETER B [FRONT], [REAR] N [SUBWOOFER] nI [SPK SIZE], HacrpoKa X' OVER] BbIbpaHHO nINHAMnKA He NoctynHa.
X'OVER (kpoccoBep)
[FRQ]/[HPF FRQ]/[LPF FRQ]:
Perynpobka qacToBt kpoccOBepa nBaBb6paHHbIX dHnHaMKOB (pmbtp BbcOKnx qactOT mNnFbTp H3KNX qactOT).
EcmBb6paHO[THROUGH],BceCmHaJIbI nepeiaOTcHa Bbl6paHHbI dHaMnK.
[SLOPE]/[HPF SLOPE]/[LPF SLOPE];
PerynpoBka KpyTn3HbI KpoccoBepa.
- DoctynhoДЯВblbopa,ToIbkoecnДЯСТOTbI KpoccoBepa BblbopaHdpyraHacTpoKa,KpOme [THROUGH].
[PHASE]:
Bb6op fo3bl BixoHOrO CnHaHa DNHaMnKa B COOTBeTCTBmC BixoDhBM CnHaJOM DpyrOTo DNHaMnKa.
[GAIN LEFT]/[GAIN RIGHT]/[GAIN]:
PerynpoBka ypOBnBa bIXoDHorO cHnHa BbIpaHHoro dHaMaNka.
3IeMeHbI HacTpOoiK 2-NonoCHoro KpoccoBepa
| SPK SIZE | |
| FRONT SIZE | 8CM/10CM/12CM/13CM/16CM/17CM/18CM/4×6" / 5×7" / 6×8" / 6×9" / 7×10" |
| TWEETER SML/MID/LRG/NONE (he podknoyucho) | |
| REAR*1 | 8CM/10CM/12CM/13CM/16CM/17CM/18CM/4×6" / 5×7" / 6×8" / 6×9" / 7×10" / NONE (he podknoyucho) |
| SUBWOOFER*2*3 | 16CM/20CM/25CM/30CM/38CM OVER/NONE (he podknoyucho) |
| X'OVER | |
| TWEETER FRQ | 1KHZ/1.6KHZ/2.5KHZ/4KHZ/5KHZ/6.3KHZ/8KHZ/10KHZ/12.5KHZ |
| GAIN LEFT 0r-08DB no 00DB | |
| GAIN RIGHT 0r-08DB no 00DB | |
| FRONT HPF FRQ | 30HZ/40HZ/50HZ/60HZ/70HZ/80HZ/90HZ/100HZ/120HZ/150HZ/180HZ/220HZ/250HZ/THROUGH |
| SLOPE -06DB/-12DB/-18DB/-24DB | |
| GAIN 0r-08DB no 00DB | |
| REAR HPF*1 | FRQ 30HZ /40HZ/50HZ/60HZ/70HZ/80HZ/90HZ/100HZ/120HZ/150HZ/180HZ/220HZ/250HZ/THROUGH |
| SLOPE -06DB/-12DB/-18DB/-24DB | |
| GAIN 0r-08DB no 00DB | |
1 OTo6paKaetcTOnbKO B TOM cnyae,ecmnapaMetr SPK/PRE OUTIMeET 3HaueHHe [REAR/REAR] mN [ REAR/SUB.W].(→16)
*2 DnKD-X330BT:OTO6paKaAeTc TOnbKO B TOM CNYae,ecnnapaMetp [SPK/PREOUT]meeT3haueHne [REAR/SUB.W]nnr SUB.W/SUB.W.(→16)
3 0To6paKaAeTc TOnbkoB ToM cnyae,ecnn npaMeTp SUB.W JmeeT3HaueHne [ON].(→15)
3BYKObIe HACTPOIKU
| SPK SIZE | |
| TWEETER | SML/MID/LRG |
| MID RANGE | 8CM/10CM/12CM/13CM/16CM/17CM/18CM/4×6" / 5×7" / 6×8" / 6×9" |
| WOOFER* | 16CM/20CM/25CM/30CM/38CM OVER/ NONE (he noДхлочец) |
| X'OVER | |
| TWEETER | HPF FRQ 1KHZ/1.6KHZ/2.5KHZ/4KHZ/5KHZ/6.3KHZ/8KHZ/10KHZ/12.5KHZ |
| SLOPE -06DB/-12DB | |
| PHASE REVERSE(180°)/NORMAL (0°) | |
| GAIN OT -08DBno 00DB | |
| MID RANGE | HPF FRQ 30HZ/40HZ/50HZ/60HZ/70HZ/80HZ/90HZ/100HZ/120HZ/150HZ/180HZ/220HZ/250HZ/THROUGH |
| HPF SLOPE -06DB/-12DB | |
| LPF FRQ 1KHZ/1.6KHZ/2.5KHZ/4KHZ/5KHZ/6.3KHZ/8KHZ/10KHZ/12.5KHZ/THROUGH | |
| LPF SLOPE -06DB/-12DB | |
| PHASE REVERSE(180°)/NORMAL (0°) | |
| GAIN OT -08DBno 00DB | |
| WOOFER* | LPF FRQ 30HZ /40HZ/50HZ/60HZ/70HZ/80HZ/90HZ/100HZ/120HZ/150HZ/180HZ/220HZ/250HZ/THROUGH |
| SLOPE -06DB/-12DB | |
| PHASE REVERSE(180°)/NORMAL (0°) | |
| GAIN OT -08DBno 00DB | |
CNPABOCHbIE MATEPNAJIbl
06 iPod/Phone
Made for
- iPod touch (2nd, 3rd, 4th w 5th generation)
- iPod classic
-iPod nano (3rd, 4th, 5th, 6th, 7th generation)
iPhone 3G, 3GS, 4, 4S, 5, 5S, 5C, 6, 6 Plus - Постмов КВДЕОФайов В мени "Videos" В рекише [HEAD MODE] HeBO3MOKEH.
- Pnpok OTO6paeHHNNEcH B MEHO BbOpa DaHOrO yCTPOKCTBa MOxET OTMnATbCt OT npAka neeH B npomrpbatene iPod/iPhone.
B3aBcHMOCTMOTBepCnonepaunHOHCMCTEMbIPod/PhoneHEKOTOpBEpyHKmMOryTpepaOtaHa DAHHOMYCTPOICTBE.
06 yctpoctrBax Android
JaHnOe yctpoCTBO noDaepeKnaB aT Android OS 4.1 n BbIe.
- HeKoTOpBye yCToPoiCTBa Android (c OS 4.1 m BbIe) MOrTy He NoDdEpxMBAbTB nonHocTbO Android Open Accessory (AOA)2.0.
EcnHytpoBnAndroidoHOBPemHeNOIOeepKBAETaONMOHAnOuHe yCtpoIcTa6bIoWm EMKoCTN AOA 2.0,DanHoeYctpoIcBOcerA BocpnOn3BodHTuepe3AO2.0BkaCteB npOpTeT。
Ofynkuniu Bluetooth
B 3aBcHMoCTn OT BepCm Bluetooth HeKOTOpbIe yCTpOHTBa BluTooth He MOrTy 6bTb NpKnIOUeHb K 3TOMy yCTpOHTBy.
- YcptpoCTBO MOKET He pa6oTaB cHEKOTOpbIMN yCPTPOCTBaMn Bluetooth.
Okpkaaioa cpeo kao3bbaeBmHHe HcOCTOHaHnHa.
H3MeHeHne OTo6paKaMaEOHΦOpMaunn
KaKJIOe HAKaTHe KHNKnCpeHoayeToO6paKaemyHnHOpMaunHO.
- EcnH HOpmaaH He DoctyHa Hn He 3anHcH, OTo6paKaetc coo6eHHe "NO TEXT", "NO NAME" mH npYra HOpmaa(HapnHMeP, Ha3BaHMe paJIMocTahm).
0To6paKeHMe HmDnKaTopoB
ABBΓΕχ3ικλΜΗΟΝΡ

CTYΦXU4Uu7b1b30R8E
C. y = 12x ①
YCTPAHEHNE IPOBJEM
| Симпомы | Способу | Устраенья |
| Оддамхашиени. | Звук не сblьш. - установite ontmалыну уровень рогамков. | - Порobерные Каблии и coеденения. |
| Оторазражаята налпьс. "MISWIRING CHECK WIRING THEN PWR ON". | БылковITE поганhoe, заlem ballyonihite поравеку, утоы убдитьс, чу контактп поюдов динамнков дожимь м образим нзларовны. Сноа вklочат поганhoe. | |
| Оторазражаята налпьс. "PROTECTING SEND SERVICE". | Отураьты устейские в ближайш сөрваши сөүлг. | |
| Истонник helloэя.bыброт. | Порobерные настейку [ SRC SELECT].(4) | |
| Радларнием. | • Славийradларнием. • Статчесныеnomemхи рим постлuyшевим радио. | ПлOTно встейble снын. ПлOTно Bстейble снын. ПлOTно Bстейble сны. ПлOTно Bстейble сны. ПлOTно Bстейble сны. ПлOTно Bстейble сны. ПлOTно Bстейble сны. ПлOTно Bстейble сны. ПлOTно Bстейble сны. ПлOTно Bстейble сны. ПлOTно Bстейble сны. ПлOTно Bстейble сны ПлOTно Bстейble сны ПлOTно Bстейble сны ПлOTно Bстейble сны ПлOTно Bстейble сны ПлOTно Bстейble сны ПлOTно Bстейble сны ПлOTно Bстейble сны ПлOTно Bстейble сны ПлOTно Bстейble сны Prelodnoяпсьмпсь. Тек "CANNOT PLAY" м姐ети/ Ялnot podлackоченец устейсков нелья ореймен. Тек "CANNOT PLAY" м姐ети/ Ялnot podлackочenец устейсков нелья ореймен. Тек "CANNOT PLAY" м姐ети/ Ялnot podлackочenец устейсков нелья ореймен. Тек "CANNOTPLAY" м姐ети/ Ялnot podлackочenец устейorskов нелья ореймен. Тек "CANNOTPLAY" м姐ети/ Ялnot podлackочenец устейorskов нелья ореймен. Тек "CANNOTPLAY" м姐ети/ Ялnot podлackочenец устейorskов нелья ореймен. Тек "CANNOTPLAY" м姐ети/ Яlnot podlackочenец устейorskов нelья ореймен. Тек "CANNOTPLAY" м姐ети/ Яlnot podlackочenец устейorskов нelья ореймен。 Тек "CANNOTPLAY" м姐ети/ Яlnot podlackочenец устейorskов нelья ореймен。 Тек "CANNOTPLAY" м姐ети/ Яlnot podlackочenец устейorskов нelья ореймен。 Тек "CANNOTPLAY" м姐ети/ Яlnot podlackочenец устейanskov нelья ореймен。 Тек "CANNOTPLAY" м姐ети/ Яlnot podlackочenец устейskov нelья ореймен。 Тек "CANNOTPLAY" м姐ети/ Яlnot podlackочenец устейskov нelья ореймен。 Тек "CANNOTPLAY" м姐ети/ Яlnot podlackочenец устейskov нelья ореймен。 Тек "CANNOTPLAY" м姐ети/ Ялnot podlackочenец устейskov нelья ореймен。 Тек "CANNOTPLAY" м姐ети/ Яlnot podlackочenец устейskov нelья ореймен。 Тек "CANNOTPLAY" м姐ети/ Яlnot podlackочenец устейskov нelья ореймен。 Тек "СИССССССССССССССССССССССССССССССССССССССССССССССССССССССССССССССССССССССССССССССССССССССССССССССССССССCS Тек "CANNOT PLAY" м姐ети/ Ялnot podлackочenец устейсков нелья ореймен. Тек "CANNOTPLAY" м姐ети/ Яlnot podлackочenец устейorskov нelья ореймен。 Тек "CANNOTPLAY" м姐ети/ Яlnot podлackочenец устейorskov нelья ореймен。 Тек "CANNOTPLAY" м姐ети/ Яlnot podлackочenец устейorskov нelья ореймен。 Тек "CANNOTPLAY" м姐ети/ Яlnot podлackочenец устейskov нelья ореймен。 Тек "CANNOTPLAY" м姐ети/ Яlnot podлackочenец устейskov нelья ореймен。 Тек "CANNOTPLAY" м姐ети/ Яlnot podлackочenец устейskov нelья ореймен。 Тек "CANNOTPLAY" м姐ети/ Ялnot podлackочenец устейskov нelья ореймен。 Тек "CANNOTPLAY" м姐ети/ Яlnot podлackочenец устейskov нelья ореймен。 Тек "CANNOTPLAY" м姐ети/ Яlnot podлackочenец устейskov нelья ореймен。 Тек "СИСССССССССССССССССССССССССССССССССССССССССССССССССССССССССССССССССССССССССССS Тек "CANNOTPLAY" м姐ети/ Ялnot podлackочenец устейсков нelья орей导读. Тек "CANNOTPLAY" м姐ети/ Яlnot podлackочenец устейсков нelья орей导读. Тек "CANNOTPLAY" м姐ети/ Яlnot podлackочenец устейсков нelья орей导读. Тек "CANNOTPLAY" м姐ети/ Яlnot podлackочenец устейсков нelья орей导读. Тек "СИССССССССССССССССССССССССССССССССССССССССССССССССССССССССССССССССССССССССССССССССССССССССССССССS Тек "CANNOTPLAY" м姐ети/ Ялnot podлackочenец yстейсков нelья орей导读. Тек "CANNOTPLAY" м姐ети/ Яlnot podлackочenец yстейсков нelья oрей导读. Тек "CANNOTPLAY" м姐ети/ Яlnot podлackочenец yстейсков нelья oрей导读. Тек "CANNOTPLAY" м姐ети/ Яlnot podлackочenец yстейсков нelья oрей导读. Тек "CANNOTPLAY" м姐ети/ Яlnot podлackочeniec yстейсков нelья oрей导读. Тек "CANNOTPLAY" м姐ети/ Яlnot podлackочeniec yстейсков нelья oрей导读. Тек "CANNOTPLAY" м姐ети/ Яlnot podлackочeniec yстейсков нelья oрей导读. Тек "CANNOTPLAY" м姐ett. Тек "CANNOTPLAY" м姐ett. Тек "CANNOTPLAY" м姐ett. Тек "CANNOTPLAY" м姐ett. Тек "CANNOTPLAY" м姐ett. Тек "CANNOTPLAY" м姐ett. Тек "CANNOTPLAY" м姐ett. Тек "CANNOTPLAY" м姐ett. Тек "CANNOTPLAY" м姐ett. Тек"СИСССССССССССССССССССССССССССССССССССССССССССССССССССССССССССССССССССССССССССССССССССССССССССССССССS Тек "СИССССССССССССССССССССССССССССССССССССССССССССССССССССССССССССССССССССССССССССССССССССССССССССССCS Тек "СИСССССССССССССССССССССССССССССССССССССССССССССССССССССССССССССССССССССССССССССССССССССССССССССCS Тек "CИSSUSUSUSUSUSUSUSUSUSUSUSUSUSUSUSUSUSUSUSUSUSUSUSUSUSUSUSUSUSUSUSUSUSUSUSUSUSUSUSUSUSUSUSUSUSUSUSUSUSUSUSUSUSUSUSUSUSUSUSUSUSUSUSUSUSUSUSUSUSUSUSUSUSUSUSUSUSUSUSUSUSUSUSUSUSUSUSUSUSUSUSUSUSUSUSUSUSUSUSUSususususususususususususususususususususususususususususususususususususususususususususususususususususususususususususususususususususususususususususususususususususususususususususususususususususUSUSUSUSUSUSUSUSUSUSUSUSUSUSUSUSUSUSUSUSUSUSUSUSUSUSUSUSUSUSUSUSUSUSUSUSUSUSUSUSUSUSUSUSUSUSUSUSUSUSUSUSUSUSUSUSUSUSUSUSUSUSUSUSUSUSUSUSUSUSUSUSUSUSUSUSUSUSUSUSUSUSUSUSUSUSUSUSUSUSUSUSUSUSUSUSUSUSUS USUSUSUSUSUSUSUSUSUSUSUSUSUSUSUSUSUSUSUSUSUSUSUSUSUSUSUSUSUSUSUSUSUSUSUSUSUSUSUSUSUSUSUSUSUSUSUSUSUSUSUSUSUSUSUSUSUSUSUSUSUSUSUSUSUSUSUSUSUSUSUSUSUSUSUSUSUSUSUSUSUSUSUSUSUSUSUSUSUSUSUSUSUSUSUSUSUSUSUSUsususususususususususususususususususususususususususususususususususususususususususususususususususususususususususususususususususususususususususususususususususususususususususususususususususus usususususususususususususususususususususususususususususususususususususususususususususususususususususususususususususususususususususususususususususususususususususususususususususususususususus Тек "CANNOTUSUSUSUSUSUSUSUSUSUSUSUSUSUSUSUSUSUSUSUSUSUSUSUSUSUSUSUSUSUSUSUSUSUSUSUSUSUSUSUSUSUSUSUSUSUSUSUSUSUSUSUSUSUSUSUSUSUSUSUSUSUSUSUSUSUSUSUSUSUSUSUSUSUSUSUSUSUSUSUSUSUSUSUSUSUSUSUSUSUSUSUSUSUSUSUSUSUSUSU USUSUSUSUSUSUSUSUSUSUSUSUSUSUSUSUSUSUSUSUSUSUSUSUSUSUSUSUSUSUSUSUSUSUSUSUSUSUSUSUSUSUSUSUSUSUSUSUSUSUSUSUSUSUSUSUSUSUSUSUSUSUSUSUSUSUSUSUSUSUSUSUSUSUSUSUSUSUSUSUSUSUSUSUSUSUSUSUSUSUSUSUSUSUSUSUSUSUS US US US US US US US US US US US US US US US US US US US US US US US US US US US US US US US US US US US US US US US US US US US US US US US US US US US US US US US US US US US US US US US US US US US US US US US US US US US US US US US US US US US US US US US US US US US US US US US US US US US US Usususususususususususususususususususususususususususususususususususususususususususususususususususususususususususususususususususususususususususususususususususususususususususususususususususususa Тек "CANNOTUSUSUSUSUSUSUSUSUSUSUSUSUSUSUSUSUSUSUSUSUSUSUSUSUSUSUSUSUSUSUSUSUSUSUSUSUSUSUSUSUSUSUSUSUSUSUSUSUSUSUSUSUSUSUSUSUSUSUSUSUSUSUSUSUSUSUSUSUSUSUSUSUSUSUSUSUSUSUSUSUSUSUSUSUSUSUSUSUSUSUSUS US US US US US US US Usususususususususususususususususususususususususususususususususususususususususususususususususususususususususususususususususususususususususususususususususususususususususususus Тек "CANNOTUSUBSUEBPSUEBPSUEBPSUEBPSUEBPSUEBPSUEBPSUEBPSUEBPSUEBPSUEBPSUEBPSUEBPSUEBPSUEBPSUEBPSUEBPSUEBPSUEBPSUEBPSUEBPSUEBPSUEBPSUEBPSUEBPSUEBPSUEBPSUEBPSUEBPSUEBPSUEBPSUEBPSUEBPSUEBPSU Тек "CANNOTUBSUEBPSUEBPSUEBPSUEBPSUEBPSUEBPSUEBPSUEBPSUEBPSUEBPSUEBPSUEBPSUEBPSUEBPSUEBPSUEBPSUEBPSUEBPSUEBPSUEBPSUEBPSUEBPSUEBPSUEBPSUEBPSUEBPSUEBPSUEBPSUEBPSUEBPSUEBPSUEBPSUEBA Тек "CANNOTUBSUEBPSUEBPSUEBPSUEBPSUEBPSUEBPSUEBPSUEBPSUEBPSUEBPSUEBPSUEBPSUEBPSUEBPSUEBPSUEBPSUEBPSUEBPSUEBPSUEBPSUEBPSUEBPSUEBPSUEBPSUEBPSUEBPSUEBPSUEBPSUEBPSUEBPSU Тек "CANNOTUBTSUEBPSUEBPSUEBPSUEBPSUEBPSUEBPSUEBPSUEBPSUEBPSUEBPSUEBPSUEBPSUEBPSUEBPSUEBPSUEBPSUEBPSUEBPSUEBPSUEBPSUEBPSUEBPSUEBPSUEBPSUEBPSUEBPSUEBPSUEBPSUEBPSUEBPSUEBPSUEBPSUEBPSUESB Тек "CANNOTUBTSUEBPSUEBPSUEBPSUEBPSUEBPSUEBPSUEBPSUEBPSUEBPSUEBPSUEBPSUEBPSUEBPSUEBPSUEBPSUEBPSUEBPSUEBPSUEBPSUEBPSUEBPSUEBPSUEBPSUEBPSUEBPSUEBPSUEBPSUEBPSUEBPSUEBPSUESB Тек "CANNOTIBTSUEBPSUEBPSUEBPSUEBPSUEBPSUEBPSUEBPSUEBPSUEBPSUEBPSUEBPSUEBPSUEBPSUEBPSUEBPSUEBPSUEBPSUEBPSUEBPSUEBPSUEBPSUEBPSUEBPSUEBPSUEBPSUEBPSUEBPSUEBPSUEBPSUEBPSUEBPSUEBPSUEBBS Тек "CANNOTUBTSUEBPSUEBPSUEBPSUEBPSUEBPSUEBPSUEBPSUEBPSUEBPSUEBPSUEBPSUEBPSUEBPSUEBPSUEBPSUEBPSUEBPSUEBPSUEBPSUEBPSUEBPSUEBPSUEBPSUEBPSUEBPSUEBPSUEBPSUEBPSUEBPSUEBPSU Тек "CANNOTUBTUBSUEBPSUEBPSUEBPSUEBPSUEBPSUEBPSUEBPSUEBPSUEBPSUEBPSUEBPSUEBPSUEBPSUEBPSUEBPSUEBPSUEBPSUEBPSUEBPSUEBPSUEBPSUEBPSUEBPSUEBPSUEBPSUEBPSUEBPSUEBPSUEBPSUEBPSUEBPSUEBPSUEBB Тек "CANNOTUBTSUEBPSUEBPSUEBPSUEBPSUEBPSUEBPSUEBPSUEBPSUEBPSUEBPSUEBPSUEBPSUEBPSUEBPSUEBPSUEBPSUEBPSUEBPSUEBPSUEBPSUEBPSUEBPSUEBPSUEBPSUEBPSUEBPSUEBPSUEBPSUEBPSUEBPSSEB Тек "CANNOTUBTSUEBPSUEBPSUEBPSUEBPSUEBPSUEBPSUEBPSUEBPSUEBPSUEBPSUEBPSUEBPSUEBPSUEBPSUEBPSUEBPSUEBPSUEBPSUEBPSUEBPSUEBPSUEBPSUEBPSUEBPSUEBPSUEBPSUEBPSUEBPSUEBPSUEB Тек "CANNOTUBTSUEBPSUEBPSUEBPSUEBPSUEBPSUEBPSUEBPSUEBPSUEBPSUEBPSUEBPSUEBPSUEBPSUEBPSUEBPSUEBPSUEBPSUEBPSUEBPSUEBPSUEBPSUEBPSUEBPSUEBPSUEBPSUEBPSUEBPSUEBPSUEBPSUEB |
(C) PocadoOnhbl Koppyc
(D)KIOUДЯДEMOHTaKa

(E) Kpy np0Bdo8 (DnRA KD-X330BT)
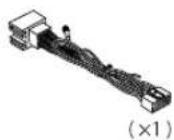
(F) Kryr npoobod (dno KD-X33MBT)

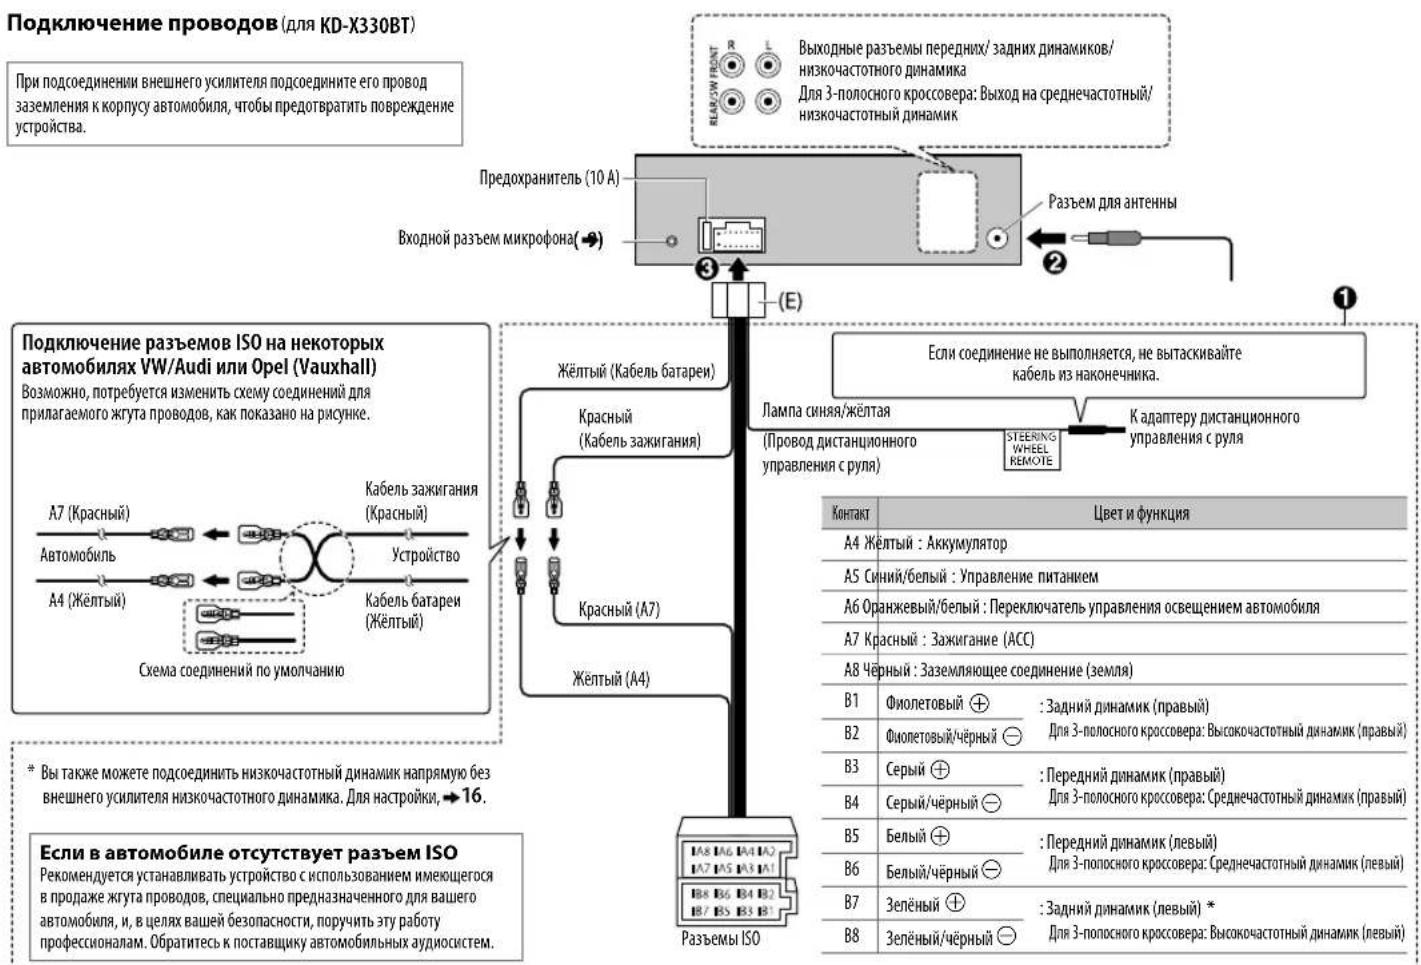
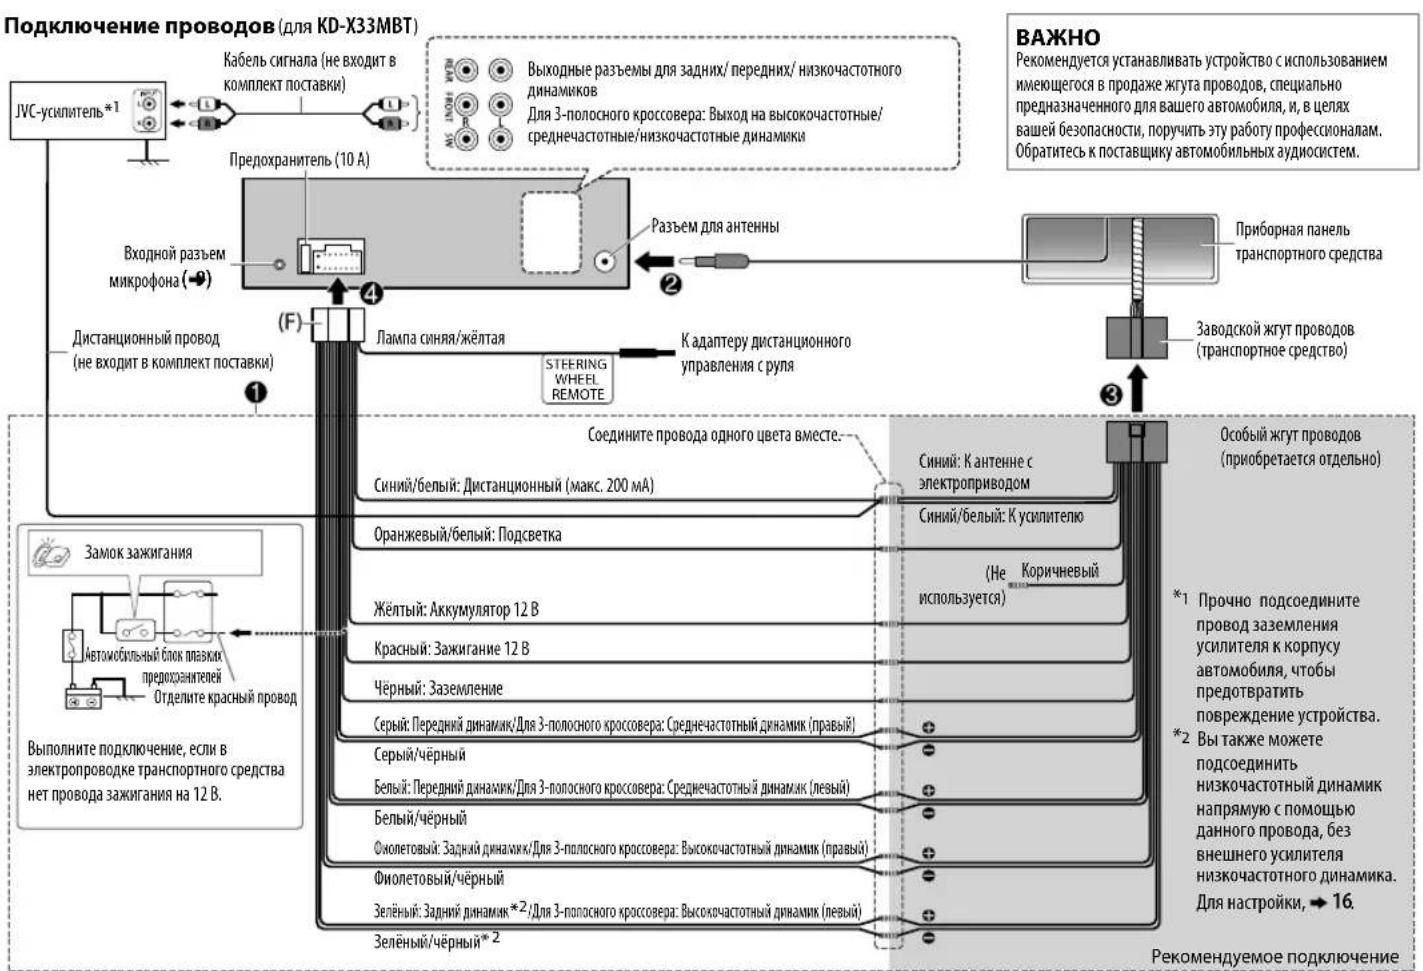
- Microsoft and Windows Media are either registered trademarks or trademarks of Microsoft Corporation in the United States and/or other countries.
- "Made for iPod," and "Made for iPhone" mean that an electronic accessory has been designed to connect specifically to iPod, or iPhone, respectively, and has been certified by the developer to meet Apple performance standards. Apple is not responsible for the operation of this device or its compliance with safety and regulatory standards. Please note that the use of this accessory with iPod or iPhone may affect wireless performance.
- iPhone, iPod, iPod classic, iPod nano, iPod touch and iTunes are trademarks of Apple Inc., registered in the U.S. and other countries.
Lightning is a trademark of Apple Inc.
Android is trademark of Google Inc. - The Bluetooth® word mark and logos are registered trademarks owned by Bluetooth SIG, Inc. and any use of such marks by JVC KENWOOD Corporation is under license. Other trademarks and trade names are those of their respective owners.