
SC322TI - Television Seiki - Free user manual and instructions
Find the device manual for free SC322TI Seiki in PDF.
| Product Type | 32-inch LED TV |
| Brand and Model | Seiki SC322TI |
| Screen Size | 32 inches (81 cm) |
| Screen Resolution | 1920 x 1080 (Full HD) |
| Panel Type | TFT LCD |
| Aspect Ratio | 16:9 |
| Power Supply | AC 100-240 V, 50/60 Hz |
| Power Consumption | 110 W |
| TV System | ATSC (digital), NTSC (analog) |
| Input Video Formats | PAL, NTSC |
| Audio Power | 2 x 8 W (stereo) |
| Connectors | RF Antenna, AV (RCA), YPbPr (component), HDMI (x3), VGA (PC), PC audio input, coaxial audio output, USB (service) |
| Dimensions with stand | 782 x 238 x 558 mm (W x D x H) |
| Dimensions without stand | 782 x 85 x 603 mm (W x D x H) |
| Net Weight | 9.48 kg |
| Gross Weight | 12.65 kg |
| Wall Mount (VESA) | 400 x 200 mm, M5 x 12 screws |
| Main Features | Multilingual OSD menu, programmable remote control, V-Chip parental control (US and Canada), subtitles, sleep timer, picture modes (Economy, Dynamic, Standard, Movie, User), sound modes (User, Dynamic, Standard, Soft), equalizer, auto power off without signal or operation |
| Care and Cleaning | Unplug before cleaning. Use a soft, dry cloth. Do not use solvents or liquids. |
| Safety | Do not expose to rain or moisture. Do not block ventilation openings. Use only recommended accessories. Have repairs carried out by qualified personnel. |
| Spare parts and repairability | AAA batteries for remote (not included). HDMI cable, quick connection guide, warranty card included. For repairs, contact an authorized service center. |
| General Information | ENERGY STAR certified. User manual available in French, English, Spanish. |
Frequently Asked Questions - SC322TI Seiki
User questions about SC322TI Seiki
0 question about this device. Answer the ones you know or ask your own.
Ask a new question about this device
Download the instructions for your Television in PDF format for free! Find your manual SC322TI - Seiki and take your electronic device back in hand. On this page are published all the documents necessary for the use of your device. SC322TI by Seiki.
USER MANUAL SC322TI Seiki
Flat Panel LCD Television
SC322TI
Instruction Manual
En
1 2
2 PREFACE 4
3 SAFETY PRECAUTIONS 4
4 IN THE CARTON 6
5 CONNECTIONS 7
6 TV INSTALLATION DRAWINGS
7 REMOTE CONTROL
8 MENU OPERATION
9 TROUBLESHOOTING 34
10 SPECIFICATIONS 35


The lightning flash with arrowhead symbol, within an equilateral triangle, is intended to alert the user to the presence of un-insulated dangerous voltage within the products enclosure that may be of sufficient magnitude to constitute a risk of electric to persons.

The exclamation point within an equilateral triangle is interded to aler the user to the presence of important operating and maintenance (servicing) instruction the literature accompanying the appliance.
CAUTION: USE OF ANY CONTROLS, ADJUSTMENTS, OR PROCEDURES OTHER THAN THOSE SPECIFIED HEREIN MAY RESULT IN HAZARDOUS RADIATION EXPOSURE.
CAUTION: These servicing instructions are for use by qualified service personnel only. To reduce the risk of electric shock, do not perform any servicing other than that contained in the operating instructions unless you are qualified to do so.
Refer to service manual for servicing instructions.

ENERGY STAR® Qualification.
This SEIKI product has earned the ENERGY STAR for meeting U.S. Federal energy efficiency guidelines as set by the Department of Energy and Environmental protection agency.
The ENERGY STAR program exists to provide energy saving guidelines and help promote energy efficient products and practices. Changes to certain features, settings and functions of this TV can change and/or increase its power consumption.
Home Mode is the mode in which the product qualifies for ENERGY STAR
Retail Model optimizes the video effects when use at a retail showroom or demo environment. This mode the video setting may increase energy consumption beyond the limits required for ENERGY STAR® qualification.
Important Safety Instructions
Note:
1.Read these instructions.
2. Keep these instructions.
3.Heed all warnings.
4. Follow all instructions.
5.Do not use near water.
6.Clean only with dry cloth.
7.Do not block any ventilation openings. Install in accordance with the manufacturer's instructions.
8.Do not install near any heat sources such as radiators, heat registers, stoves, or other apparatus (including amplifiers) that produce heat.
9. Do not defeat the safety purpose of the polarized or grounding-type plug. A polarized plug has two blades with one wider than the other. A grounding type plug has two blades and a third grounding prong. The wide blade or the third prong are provided for your safety. If the provided plug does not fit into your outlet, consult an electrician for replacement of the obsolete outlet.
10. Protect the power cord from being walked on or pinched particularly at plugs, convenience receptacles, and the point where they exit from the apparatus.
11.Only use attachments / accessories specified by the manufacturer.
12. Use only with the cart, stand, tripod, bracket, or table specified by the manufacturer, or sold with the apparatus. When a cart is used, use caution when moving the cart / apparatus combination to avoid injury from tip-over.

- Unplug this apparatus during lightning storms or when unused for long periods of time.
14.Refer all servicing to qualified service personnel. Servicing is required when the apparatus has been damaged in any way, such as power-supply cord or plug is damaged, liquid has been spilled or objects have fallen into the apparatus, the apparatus has been exposed to rain or moisture, does not operate normally, or has been dropped. - Apparatus shall not be exposed to dripping or splashing and that no objects filled with liquids, such as vases, shall be placed on the apparatus.
16.WARNING:To reduce the risk of fire or electric shock, do not expose this apparatus to rain or moisture.
17.Mains plug or appliance coupler is used as the disconnect device, shall be readily operable. - The apparatus shall be connected to a MAINS socket outlet with a protective earthing connection.
2. PREFACE
Thank you for buying this Please read this manual thoroughly before operating the TV. Make sure the TV was not damaged in transit. Should the TV be damaged, do not install it and contact your dealer. Check that you have all the accessories according to the model.
3. SAFETY PRECAUTIONS

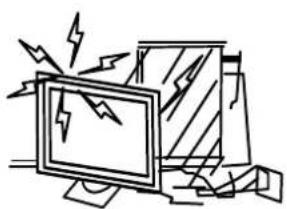
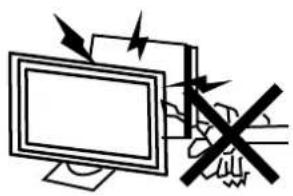
Put the TV on a stable surface.

Do not place any material on the TV.
Do not use the TV with fixtures other than those provided or suggested by the manufacturer.
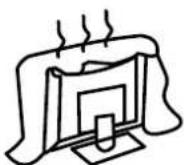
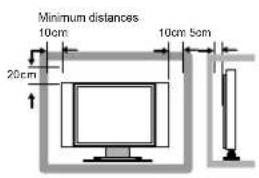
Do not block or cover the ventilation openings on the TV. If you have a wall mount, check that it is steady.

Power cord and cables must be properly routed and protected to prevent people from stepping on them and causing the TV to fall.
Keep the TV dry and away from humidity.
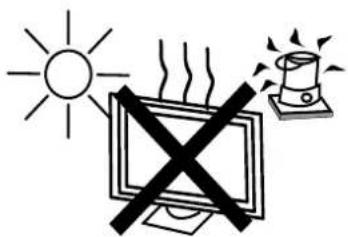
Keep the TV away from heat sources.
Unplug the TV before cleaning it. Do not use solvent or liquid to clean the TV.
Only clean the TV with a soft and dry cloth.

In case of troubleshooting, do not use spare parts other than those suggested by the manufacturer. Using inadequate spare parts can lead to electric shocks, short-circuits, fire or other incidents.

Unplug the TV during lightning storms or when unused for long periods of time.
4. IN THE CARTON
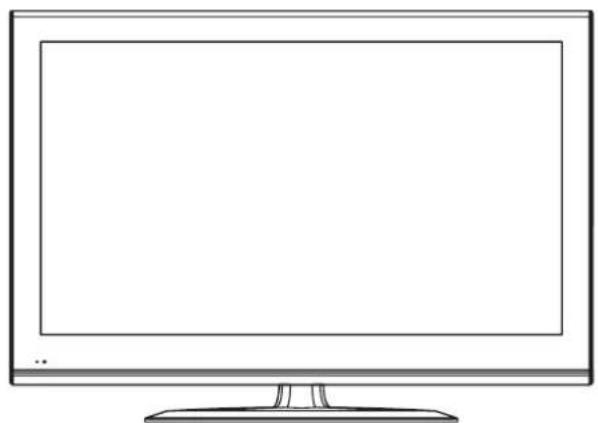
HD TV SET

Remote Control
1.5V
1.5V
Warranty Card
AAA Batteries
USER'S MANUAL
USER'S MANUAL
Warranty Card
Quick Connect Guide

HDMI Cable
Quick Connect Guide
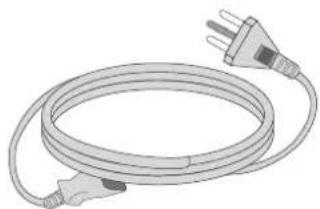
Power Cable
5. FRONT/BACK CONNECTIONS OF L D C V
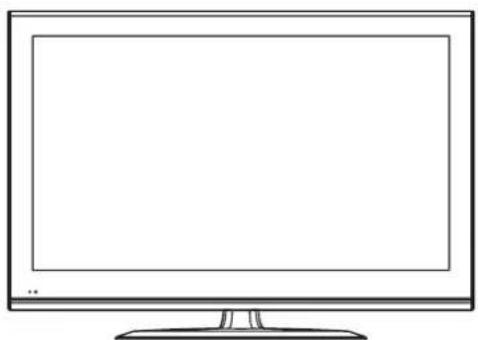
Front View

- Press "VOL+ or "VOL-" to increase or decrease the volume.
- Press "CH" or "CHV" to scan through channels.
- Press "MENU" to bring up the main menu on the screen.
- Press "SOURCE" to select the input source.
4 5. Press "STANDBY" button to turn the TV on or off.
5 6. POWER INDICATOR: Shows red in standby mode. Shadues or green when your TV is switched on. - REMOTE SENSOR: infrared sensor for the remote control.
ON/OFFLED-7
IR-6
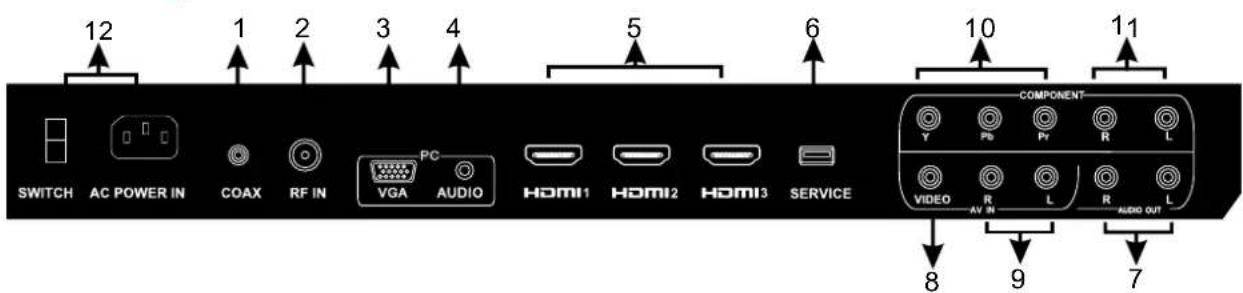
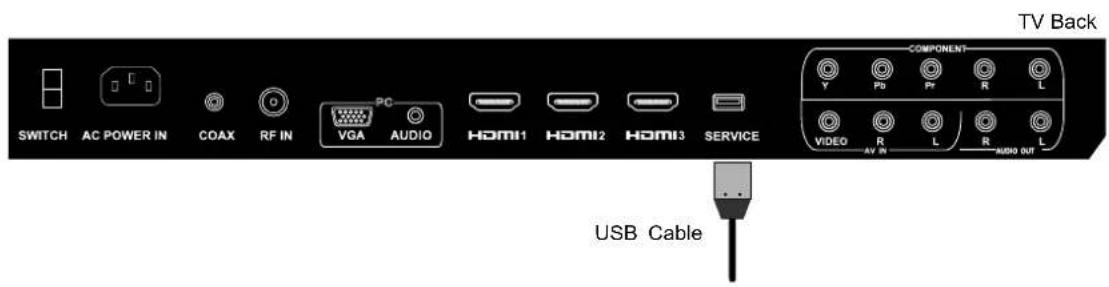
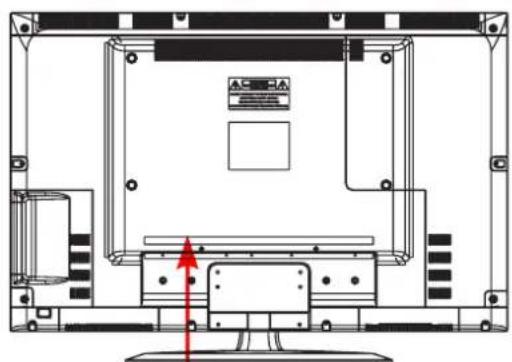
Back View and Control Connections

- COAX:Connect the COAX receiver.
- RF IN: Connect the antenna.
- VGA(PC): Connect the PC-RGB output jack of PC.
- PC AUDIO: Connect the Audio output jack of PC.
- HDMI1/HDMI2/HDMI3: Connect the HDMI output jack of DVD.
- USB SERVICE: USB Port for Factory Use Only.
- L-OUT/R-OUT: Connect to Audio Amplifier device.
- VIDEO: Connect the Video input jack of DVD or VCR.
- L/R: For VIDEO audio.
- YPbPr: Connect the YPbPr output jack of DVD or VCR.
- L/R: For YPbPr audio
- AC IN and POWER SWITCH: Main power input.
6. ATV INSTALL TION DRAWINGS
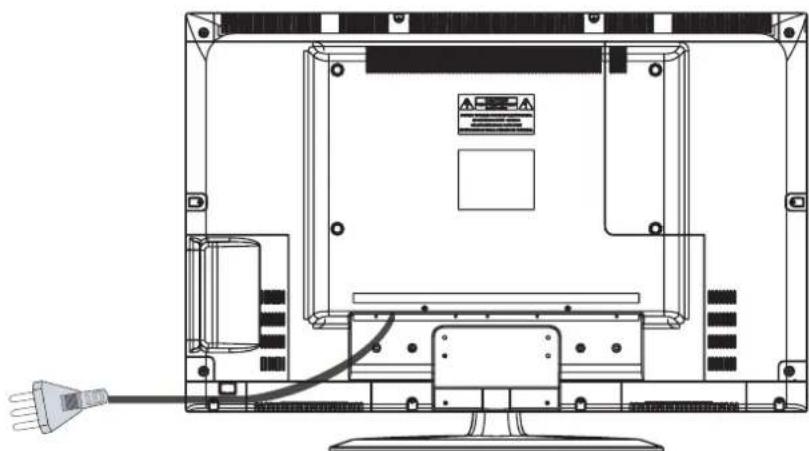
Power Cord Connection
- Connect the power cord correctly as shown.
- Press the STANDBY switch of your D TVto switch on. The power indicator on the front panel lights up in. blue
Antenna Connection
To ensure good picture and sound, TV antenna system needs to be installed. The antenna system as shown can be sourced from TV equipment shops, which will provide service for correct installation and connection. After installation, insert the 75-ohm antenna plug into the antenna jack as shown.
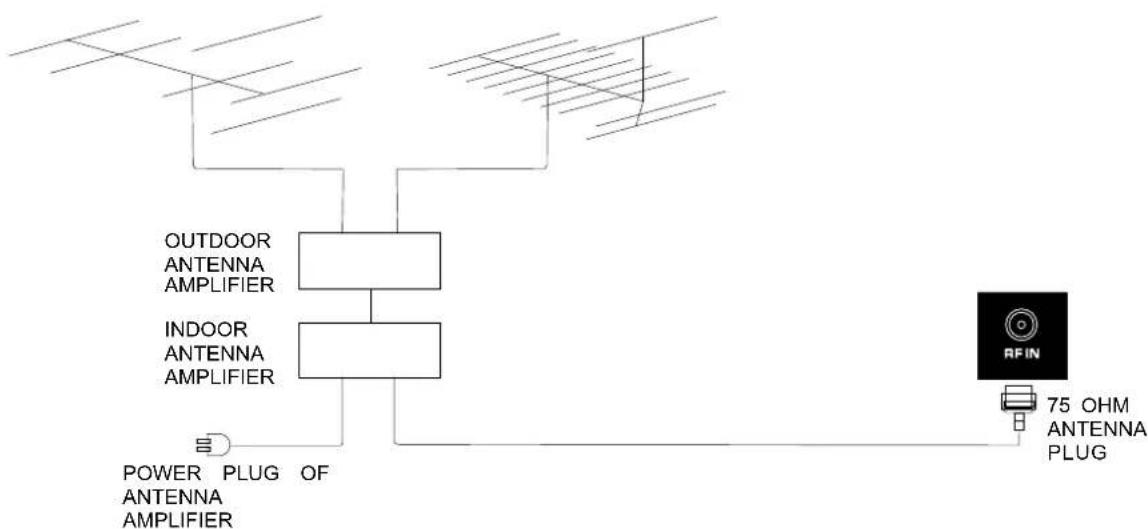
VHF ANTENNA UHF ANTENNA
AV Connection
Connect the Video and AUDIO output jack of the DVD or VCR to the VIDEO jacks on the set using the RCA cable. Match the jack colors: Video is yellow, Audio left is white, and Audio right is red. Select the AV input source using the SOURCE button on the remote control.


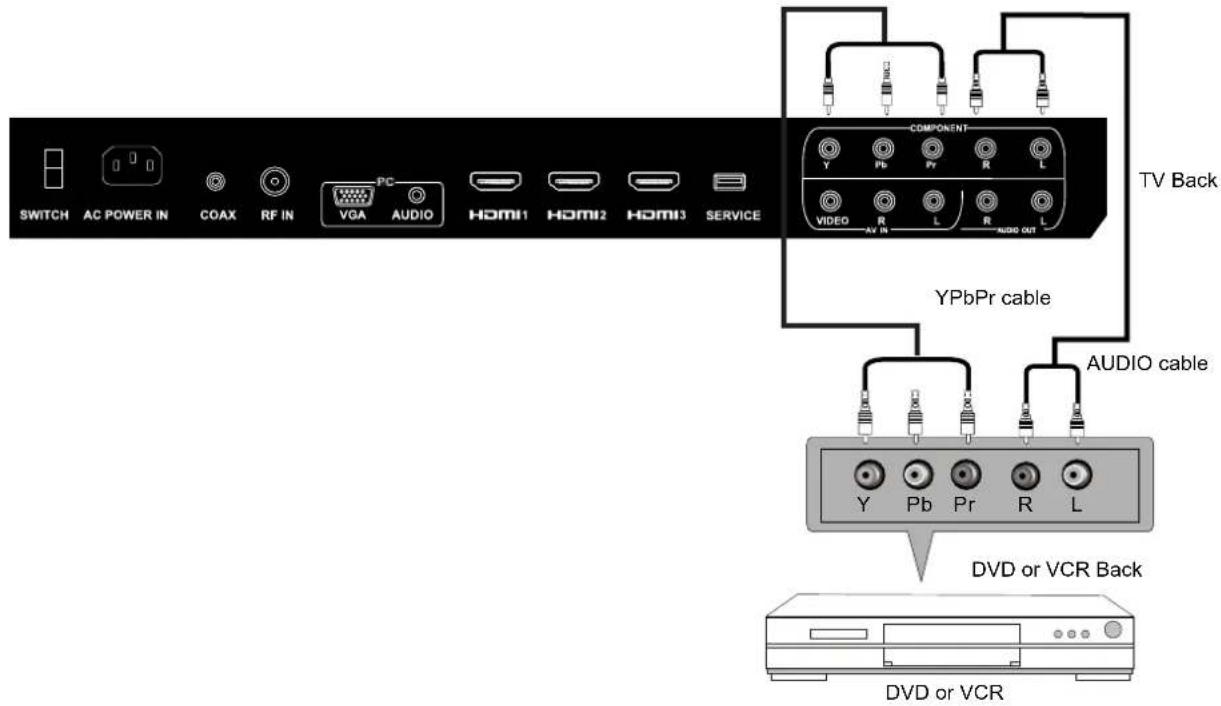
YPbPr(Component) Connection
Connect the YPbPr output of the DVD or VCR to the YPbPr input on the set. The picture quality is improved; compared to connecting a regular VCR to the video input. Connect the Audio output of the DVD or VCR to the Audio input jacks on the set using the RCA cable. Match the jacks colors :Y is green,Pb is blue,Pr is red,Audio left is white and Audio right in red. Select component input source using the SOURCE button on the remote control.
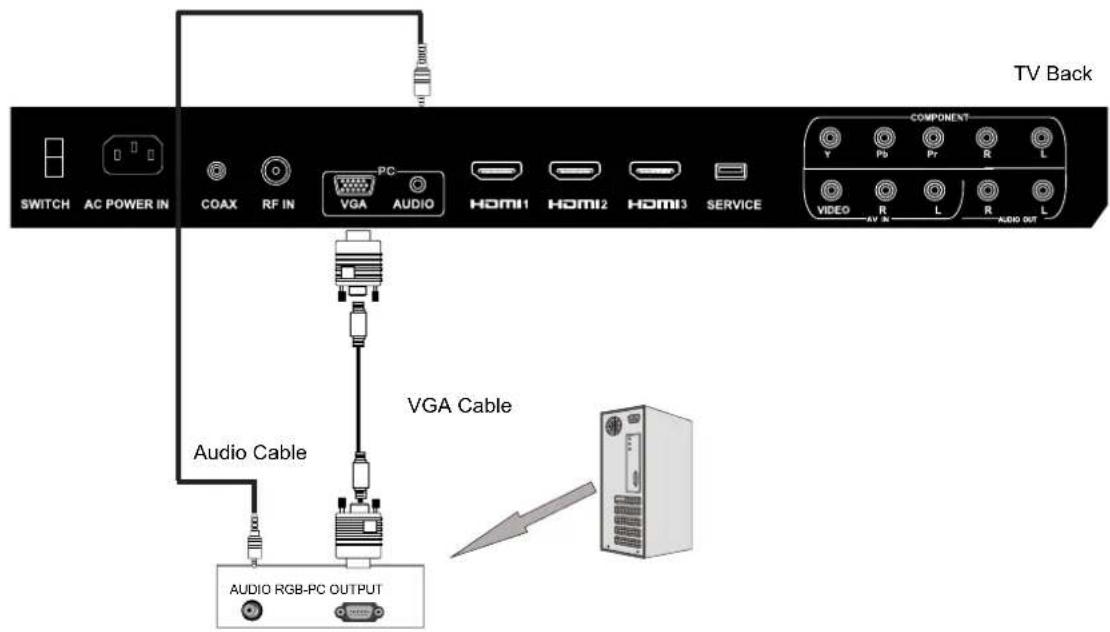
VGA(PC) Connection
Connect the RGB output of the PC to the VGA(PC) jack on the set. Connect the AUDIO output of The PC to the PC AUDIO jack on the set. Select the RGB input source with using SOURCE button on the remote control.
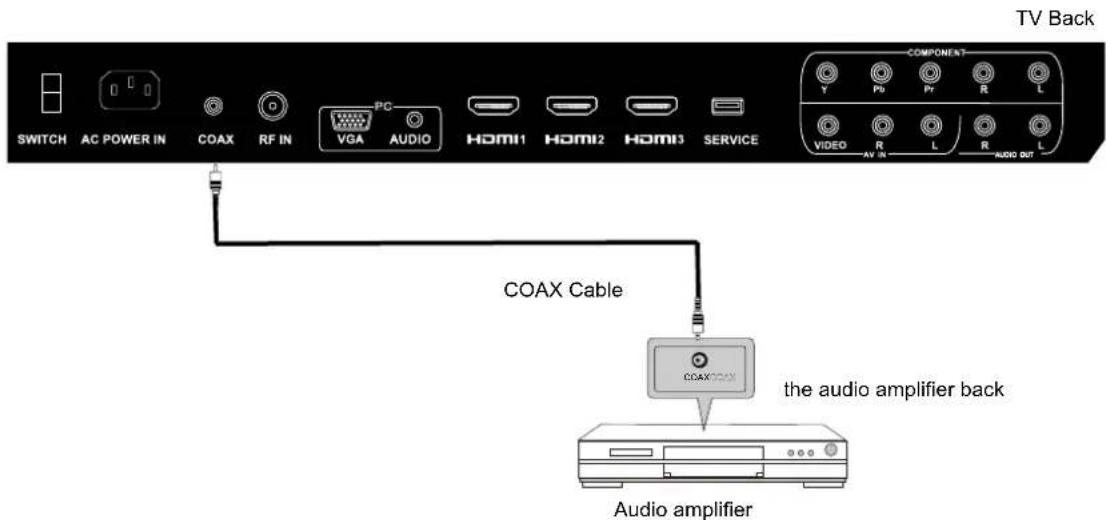
COAX Connection
Connect to Audio Amplifier device to the COAX output jack on the TV.
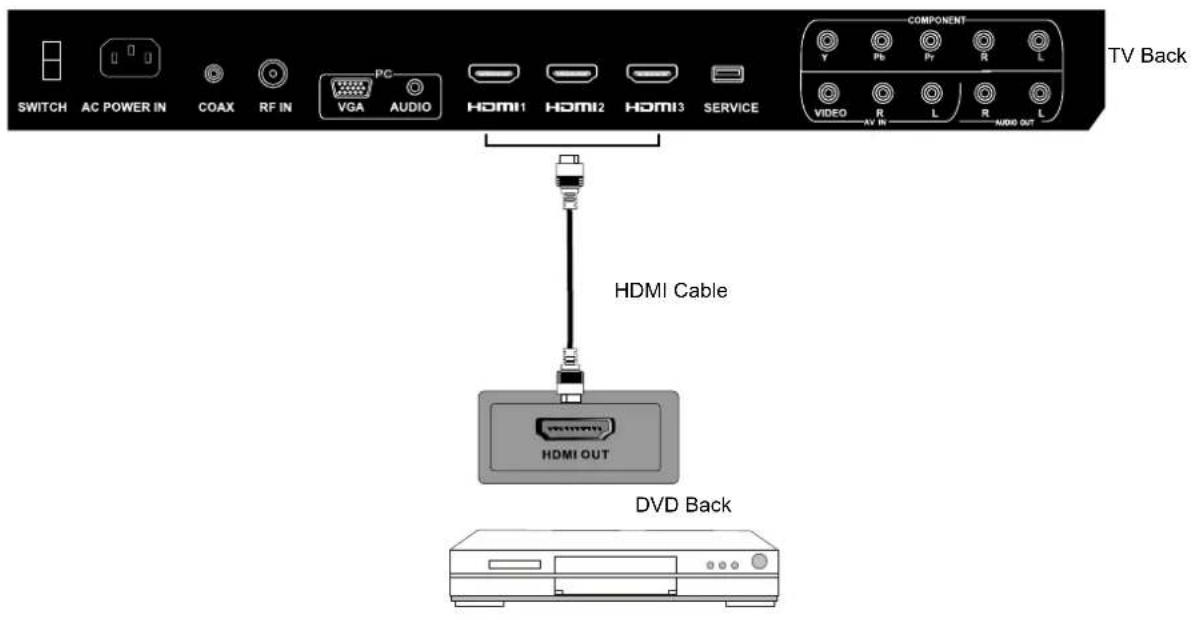
HDMI Connection
HDMI plug which replaces the HDMI connection allows transfer of all audio/video/control signals through one cable only. These signals are transferred in digital.
Service Port Function
Service port: (For factory uses only.)
7 REMOTE CONTROL.
Remote control instructions in TV mode
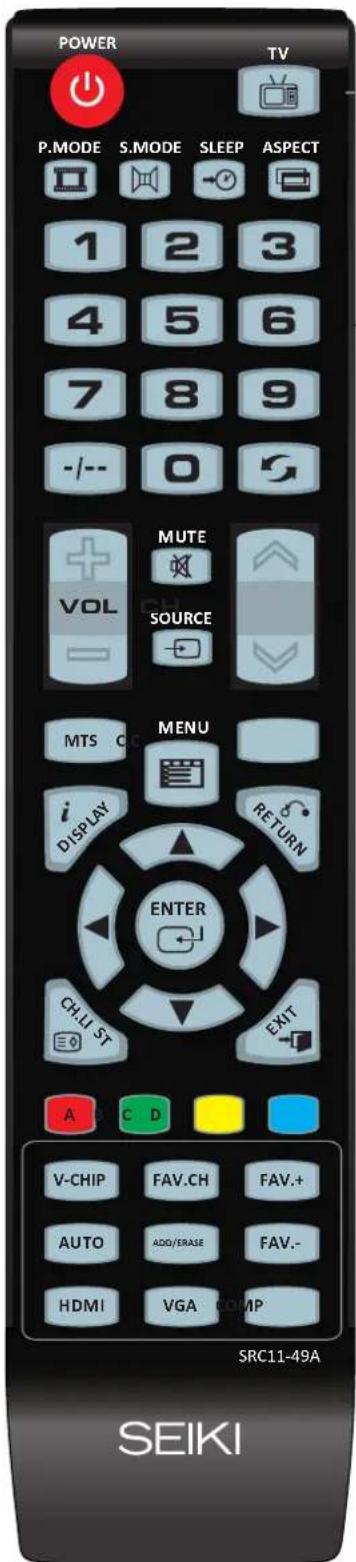
POWER
Turn the LCD TV ON or OFF.
TV
Press this button, turn to TV source.
P MODE
Select the picture mode.
S.MODE
Select the sound mode.
SLEEP
Set the Sleep Timer.
ASPECT
Press to select Aspect ratio
(As follow Standard,Wide,Wide Zoom,Zoom,etc.)
NUMBERBUTTONS
Press 0-9 to directly change the TV channel.
一
Press this button to enter a program number for
multiple program channel such as 2-1,etc.
Return to the previous channel viewed
VOL+/VOL-
Press to increase/decrease the sound level.
MUTE
Press to mute the sound. Press again or press VOL+ to
un-mute the TV
SOURCE
Press Source to display the OSD input source.
press to select an input source, and then press
ENTER to confirm
CH+/CH
Press to scan through channels.
MTS
Choose Mono, stereo or sap for analog TV input.
Choose English, French or Spanish for DTV input.
MENU
Displays the main TV menu.
CC
Press to set the closed caption
as follow cc mode on,cc mode off,cc mode on mute
DISPLAY
Displays the source and channel information
RETURN
Return to previous chanel.
THUMBSTICK(▲/▼/▲/▶/ENTER)
Allows you to navigate the on-screen menus and adjust the
system settings to your preference
CH.LIST
Press to display the channel list.
EXIT
Exit the main TV menu.
A,B,C,D
Push and hold 3 second then store current channel in A, B, C, D.
V-CHIP
Switch to V-CHIP input.
FAV.CH
Press to display the favourite program list.
FAV+/FAV-
Press these two keys to switch to your favourite programs.
AUTO
Automatically adjust Horizontal / Vertical position (in PC Mode)
ADD/ERASE
Add/Erase channel to favourite program list.
HDMI
Switch to HDMI input.
VGA
Switch to VGA input.
COMP
Switch to COMP input.
Remote control setup
- Open the cover.
- Uses three A size batteries. When inserting the batteries, make sure correct polarities "+"and "-" marks on the batteries line up correctly with compartment markings.
- Replace the battery cover.
To prevent battery leakage which may result in bodily injury or damage to the remote:
- Install all batteries correctly, and as marked on the remote control.
- Do not mix batteries: (OLD and NEW or CARBON and ALKALINE, etc)
Remove batteries when the remote is not used for a long period of time.

8.Menu Operation
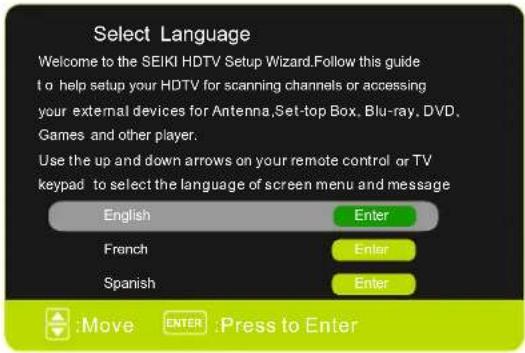
SETUP WIZARD
Select Language
Select the language you want.
Select Time Zone

Power On Mode
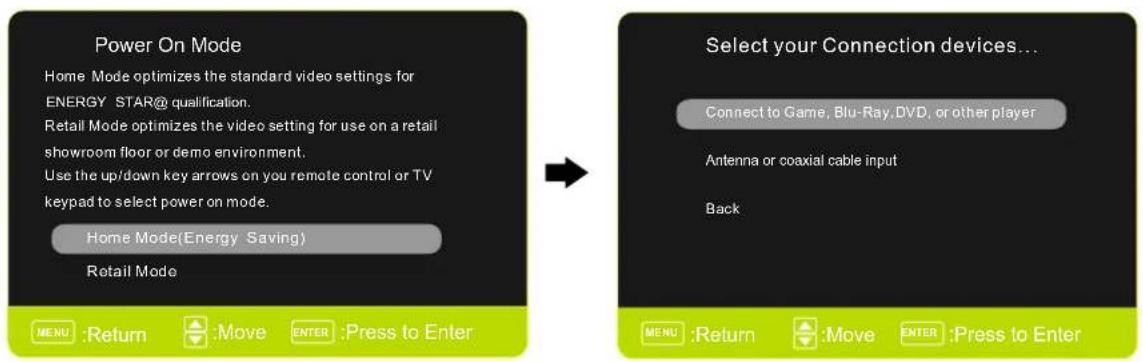
Select Input Source
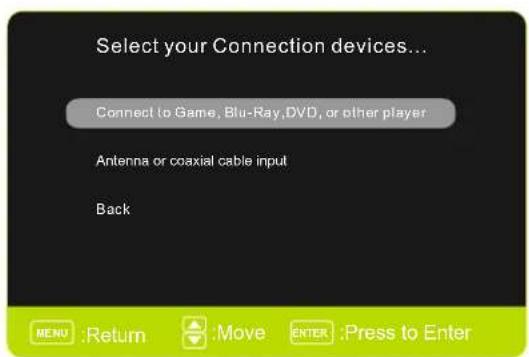

Select the TV (or the Antenna or coaxial cable input).

Under "Setup Wizard", the buttons' function:
"Menu"-----Enter
"CH/√"-Up/Down
"Vol+/-----Left/Right
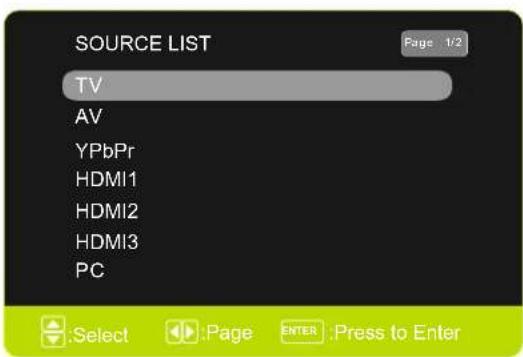
SELECT INPUT SOURCE
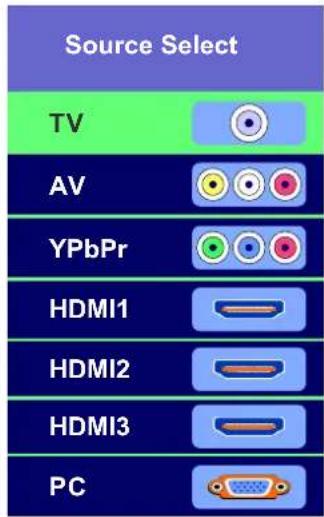
- Press SOURCE button to display the input source list.
- Press / button to select the input source you want to watch.
- Press OK button to enter the selected source.
BASIC OPERATION

- Press MENU button to display the MAIN OSD MENU.
- Press button to select the MENU you want.
- Press OK button to enter the sub menu.
- Press / button to select the option and then press / to adjust the value in the sub menu.
- You can press MENU button to go back to the upper menu or EXIT button to close the OSD.
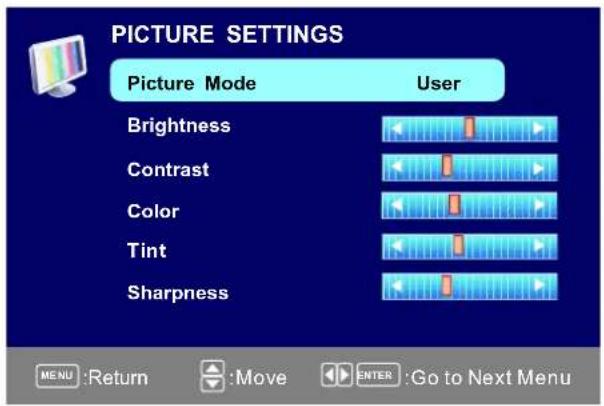
PICTURE MENU
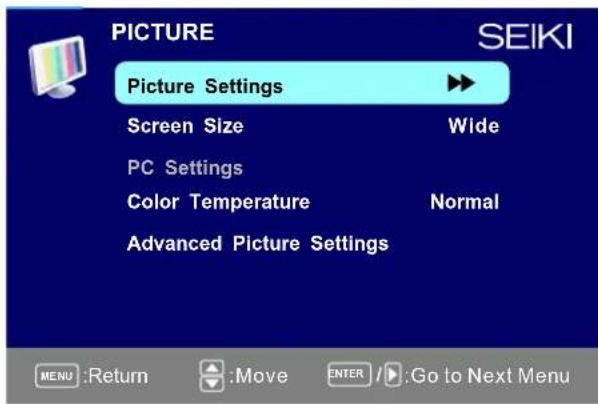
Picture Settings
- Press ENTER when the Picture Settings item is highlighted. Then you will go to the sub-menu as following.
- Press / to select the desired menu item. Press ENTER to proceed if necessary.
- Press / to the desired level.
- When you have changed the settings, you can exit from the menu by pressing MENU.
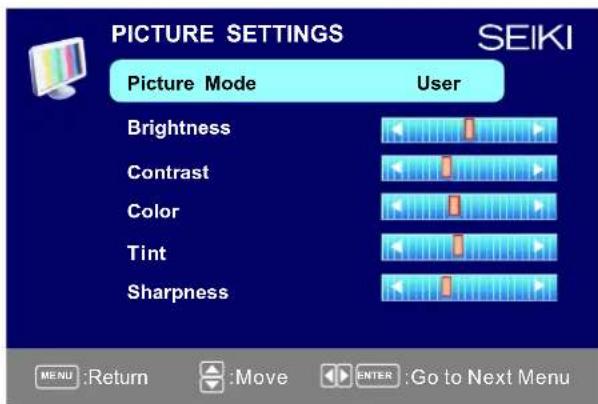
Picture Mode
Press / button to select Picture Mode, then press button to adjust. Only in the User mode, the detail options as following can be adjusted. Available picture mode: Energy Saving, Dynamic, Standard, Movie, User.
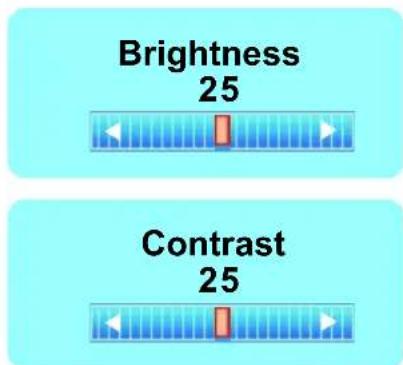
Brightness
Press / button to select Brightness, then press / button to adjust.
Contrast
Press / button to select Contrast, then press / button to adjust.
Color
Press / button to select Color, then press / button to adjust.
Sharpness
Press / button to select Sharpness, then press / button to adjust.
Tint
Press / button to select Tint, then press button to adjust.

Color 27

Sharpness 27

Tint 27
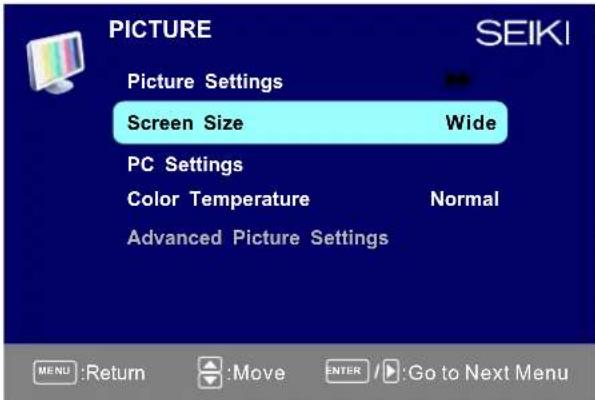
Screen Settings
Screen Size
Press / button to select Screen Size, then press / button to adjust. Available Screen Size: Standard, Wide, Wide Zoom, Zoom.
Color Temperature
Press ENTER when the Color Temperature item is highlighted. Then press button to adjust. Available color temperature: Normal, Warm, Cool.
Color Temperature Warm
Advanced Picture Settings
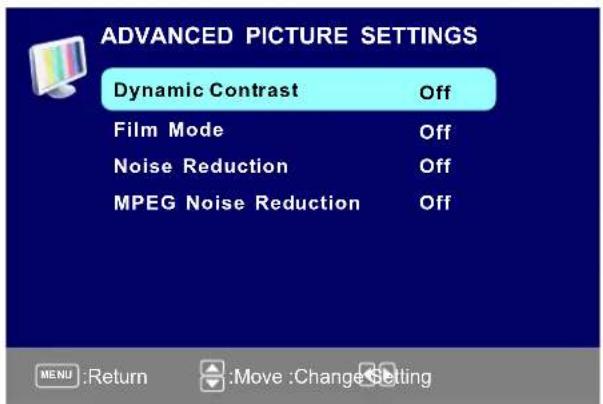
Dynamic Contrast
Press / button to select the button to adjust. It can adjust the contrast corresponding to the input signal in order to improve the picture quality displayed. Available Mode: On/Off.
Film Mode
Press / button to select the item Film Mode, then press button to adjust. It handles 3:2 pull down and 2:2 pull down. Available Film Mode: On/Off.
Noise Reduction
Press / button to select the item Noise Reduction, then press button to adjust. Available Noise Reduction: Off, Low, Medium, High.
MPEG Noise Reduction
Press / button to select the item MPEG Noise Reduction, then press button to adjust. It can improve the quality of the pictures by reducing the block noise. Available MPEG Noise Reduction: Off, Low, Medium, High.
Dynamic Contrast Off
Film Mode Off
Noise Reduction Off
MPEG Noise Reduction Off
SOUND MENU
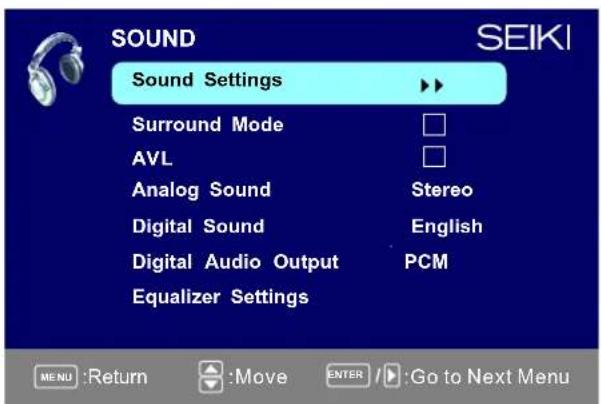
Sound Settings
- Press ENTER when the Sound Settings item is high lighted. Then you will go to the sub-menu as following.
- Press / to select the desired menu item. Press ENTER to proceed if necessary.
- Press to the desired level.
- When you have changed the settings, you can exit from the menu by pressing MENU.

Sound Mode
Press / button to select the item Sound Mode, then press button to adjust. Only in the User mode, the detail options as following can be adjusted. Available Sound Mode: User, Dynamic, Standard, Soft.
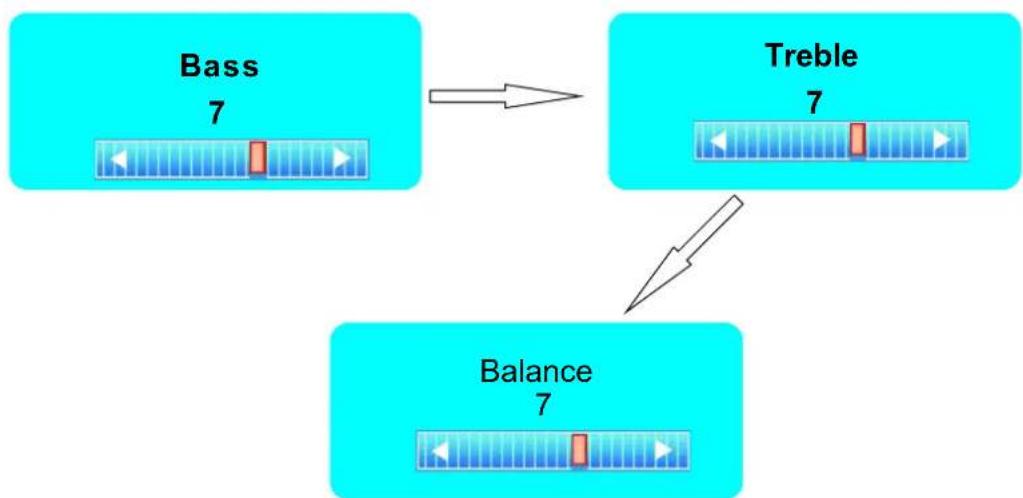
Bass
Press / button to select the item Bass, then press / button to adjust.
Treble
Press / button to select the item Treble, then press / button to adjust.
Balance
Press / button to select the item Balance, then press button to adjust.
Surround Mode
Press / button to select the item Surround Mode, then press OK button to adjust. It can set the picture to fit the screen automatically. When the Auto Wide is selected, the symbol will show as following:
Surround Mode

AVL
Press / button to select the item AVL, then press button to select ON or OFF. Auto Volume Level can set the volume automatically adjust corresponding to the input audio.
Analog Sound
Press / button to select the item Preferred Analog Sound, then press / button to select the prefer audio when switching to an analog channel. Available Analog Sound: Stereo, Mono,SAP.
Digital Sound
Press / button to select the item Preferred Digital Sound, then press button to select the prefer audio when switching to a digital channel. Available Digital Sound: English, French, Spanish.
Digital Audio Output
Press / button to select the item Digital Audio Output, then press / button to select the desired digital audio output. Available digital audio output: PCM,Raw, Off.
Equalizer Settings
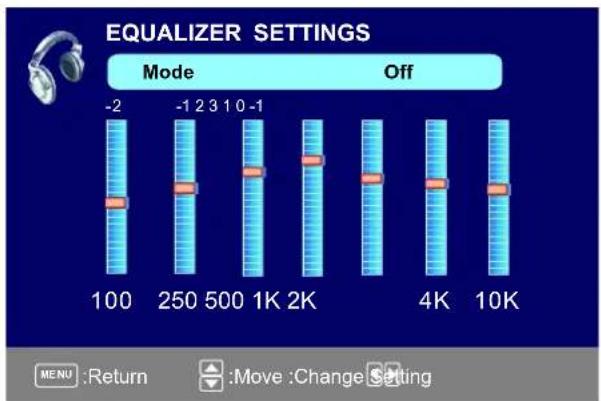
Equalizer Mode
Press / button to select the item Equalizer Mode, then press / button to select the desired mode. Available Equalizer Mode: Off, Rock, Pop, Jazz, User.
CHANNEL MENU
Note: This menu is only shown when the input source is TV.
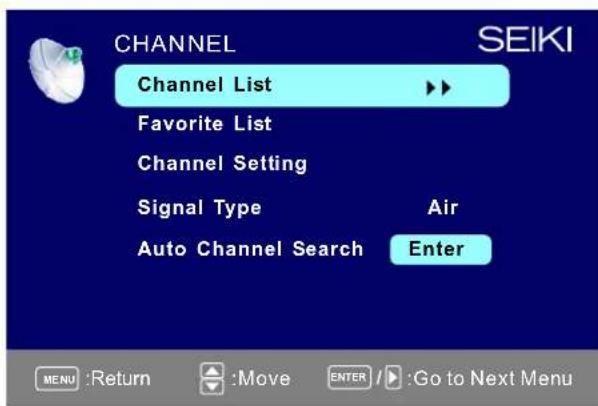
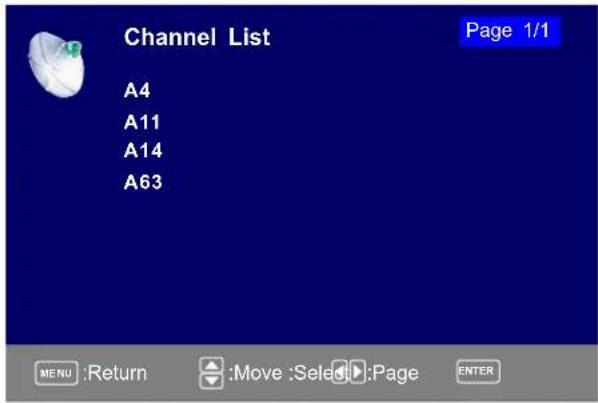
Channel List
Press / button to select Channel List, then press OK button to scan the Channel List. If you select the option "In Channel List" On, the channel label will display in the list.
Favorite List
Press / button to select Favorite List, then press OK button to scan the Favorite Channel List.

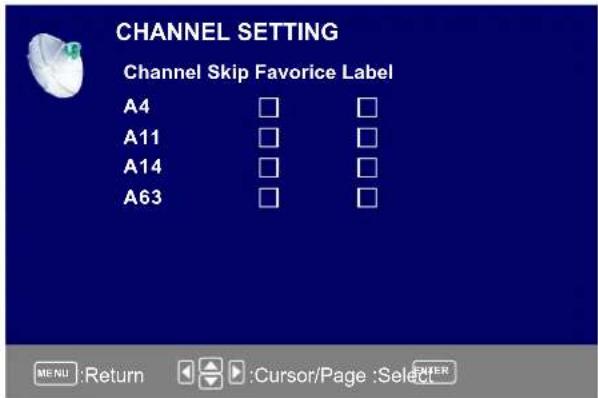
Channel Setting
Press / button to select Manual Channel Setting, then press OK button to set the value in the sub menu.
Signal Type
Press / button to select Signal Type, then press / button to select the type you want to set. There are two selections: Air and Cable.
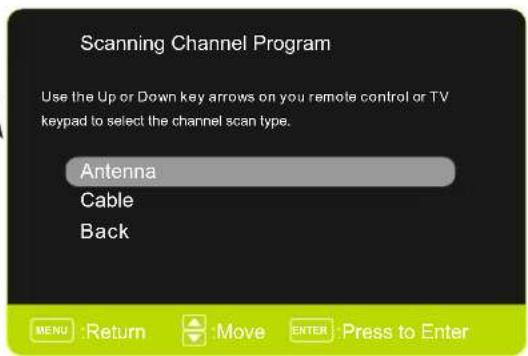
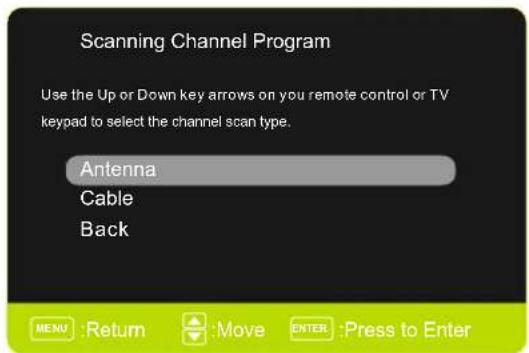
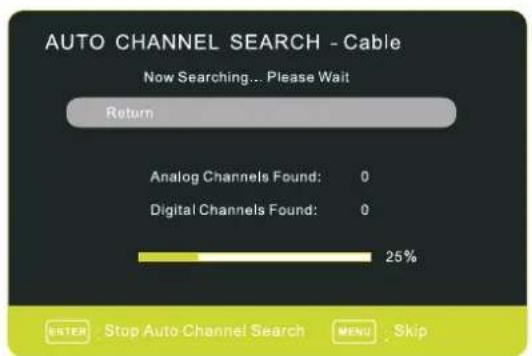
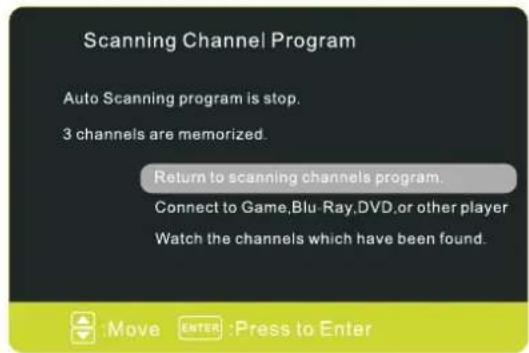
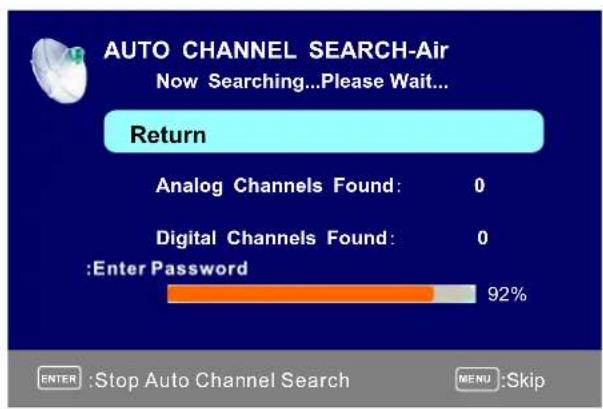
Auto Channel Search
Press / button to select Auto Channel Search, then press OK button to search channel. A Channel Search Menu will appear as below.
PARENTAL CONTROL
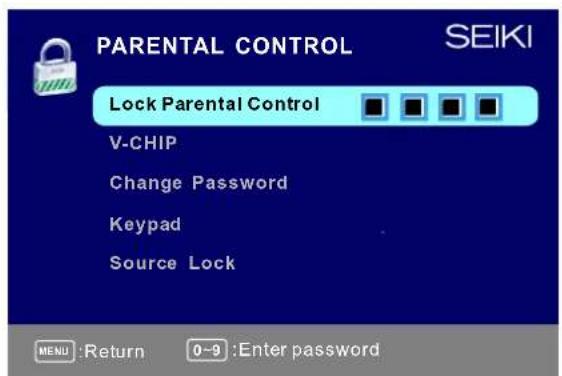

Input password to enter, default password is "0000".
V-CHIP
Press / button to select V-CHIP, then press OK button to adjust. A sub menu will appear as below.
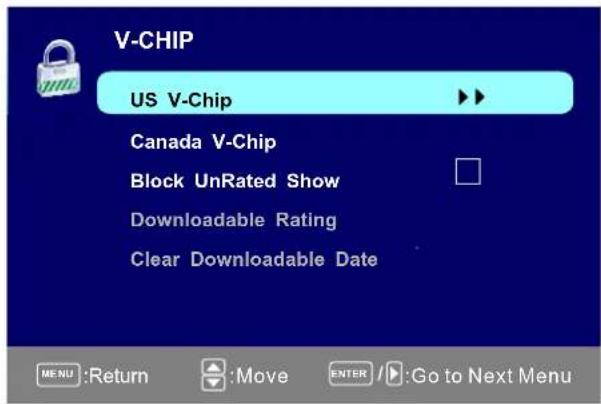
US V-CHIP
Press / button to select US V-CHIP, then press OK button to adjust. A sub menu will appear as below.
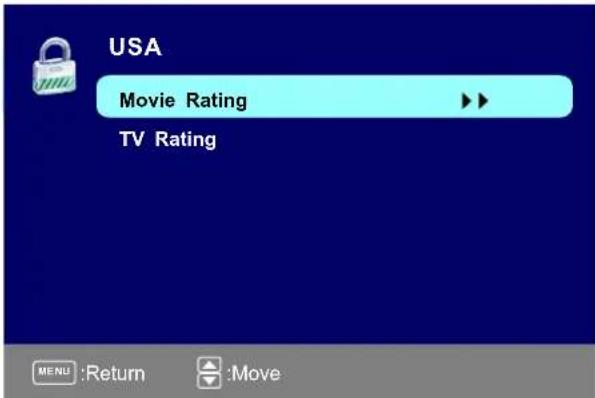
Movie Rating
Press / button to select Movie Rating, then press OK button to adjust. A sub menu will appear as below.
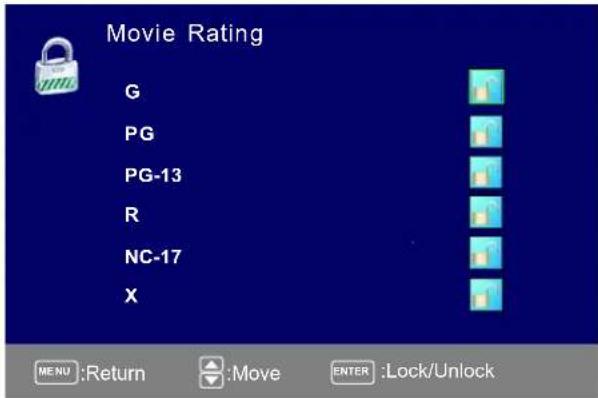
Press / button to select Rating, then press OK button to lock.
TV Rating
Press / button to select TV Rating, then press OK button to adjust. A sub menu will appear as below.
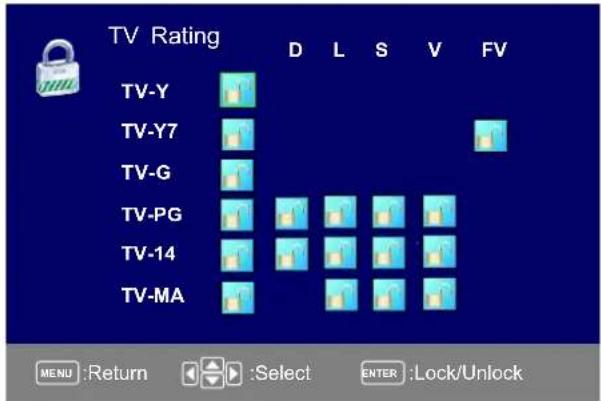
Press / / button to select Rating, then press OK button to lock.
CANADA V-CHIP
Press / button to select US V-CHIP, then press OK button to adjust. A sub menu will appear as below.
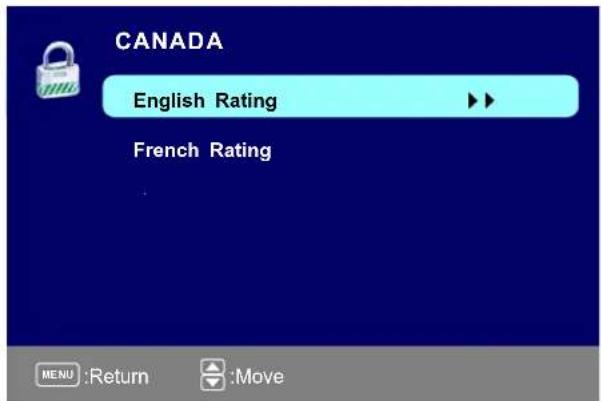
The operation of CANADA V-CHIP is the same as the operation of US V-CHIP.
Information
Motion Picture Association of America (MPAA) Rating System
| Grade | Meaning | |
| G | General Audiences | Content not offensive to most viewers |
| PG | Parental Guidance Suggested | Content is such that parents may not want their children to view the program |
| PG-13 | Parental Guidance Cautioned | Program is inappropriate for preteens, with a greater degree of offensive material suggested than a PG rated program |
| R | Restricted viewing | Not for children under 17, Strong element of sex and/or violence |
| NC-17 | No Children Under age 17 | Not for children under 17 under any circumstances. Strong sexual content |
| X | Hard Core Films | Same as NC-17 rating |
| No Rating | No Rating | MPAA Not Rated |
TV Parental Guideline Rating System
| Grade | Meaning | |
| TV-Y | Young Children | Content not offensive to most viewers |
| TV-Y7 | Children 7 and over | Considered suitable for children over 7, may contain Fantasy Violence Scenes |
| TV-G | Parental Audience | Considered suitable for all audiences; children may watch unattended |
| TV-PG | Parental Guidance | Suggested Unsuitable for younger children, may contain; Suggestive Dialogue, Bad Language, Sex, and Violence Scenes |
| TV-14 | Parents Strongly Cautioned | Unsuitable for children under 14, may contain: Strong Dialogue, Bad Language, Sex, and Violence Scenes |
| TV-MA | Mature Audience Only | Adults only, may contain Strong Dialogue, Bad Language, Sex, and Violent Scenes |
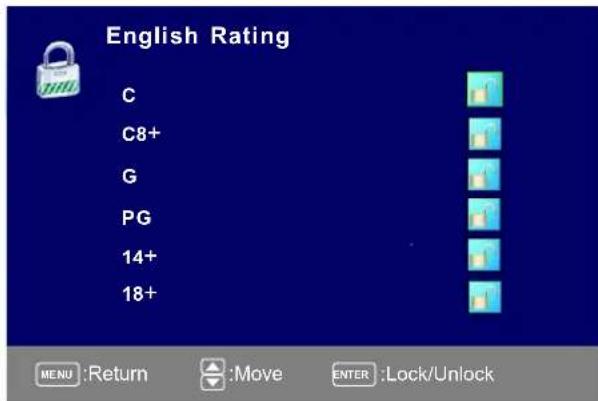
Canadian Rating: Canadian English is used throughout all English-speaking Canada (C, C8+, G, PG, 14+, 18+).
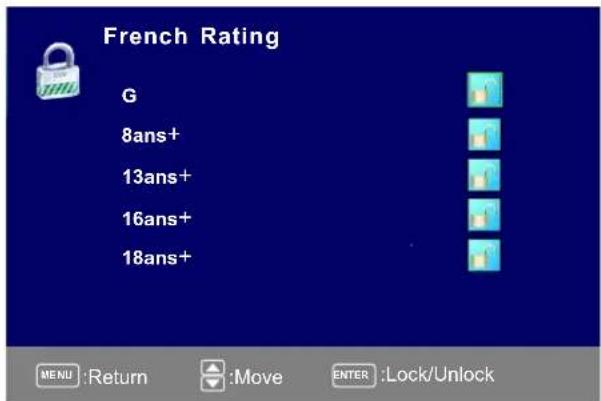
Canadian French is used in Quebec (G, 8 ans+, 13 ans+, 16 ans+, 18 ans+)
Note: The V-Chip will automatically block certain categories that are "more restrictive". If you block TV-Y category, then TV-Y7 will be automatically blocked. Similarly, if you block TV-G category, then all the categories in the "young adult" will be blocked (TV-G, TV-PG, TV-14, and TV-MA).
Block UnRated Show
Press / button to select Block UnRated Show, then press OK button to set the rating locked.
Downloadable Rating
Press / button to select Downloadable Rating, then press OK button to set the rating.
If the DTV program doesn't have this rating information, this option will be in gray.
Clear Downloadable Date
Press / button to select Clear Downloadable Data, then press OK button to set the rating. Note: The above two operation only valid when playing the downloadable data stream.
The operations are the same as US V-CHIP.
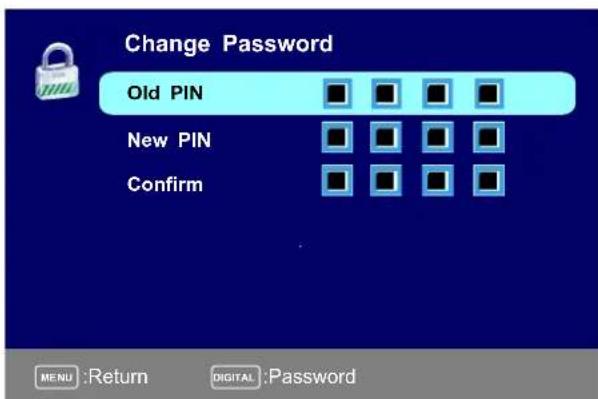
CHANGE PASSWORD
Press / button to select Change Password, then press OK button to adjust the value.
A Sub Menu Will appear as below. If the password is changed, all of the passwords in the menu will be changed at the same time.
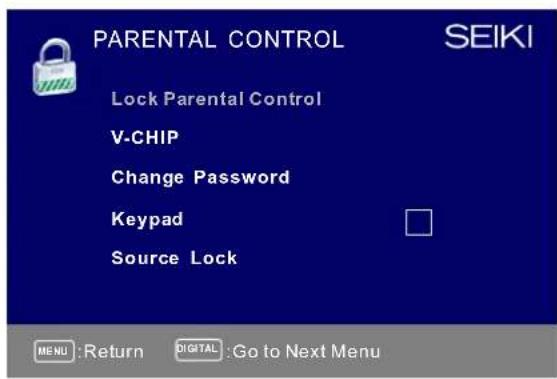
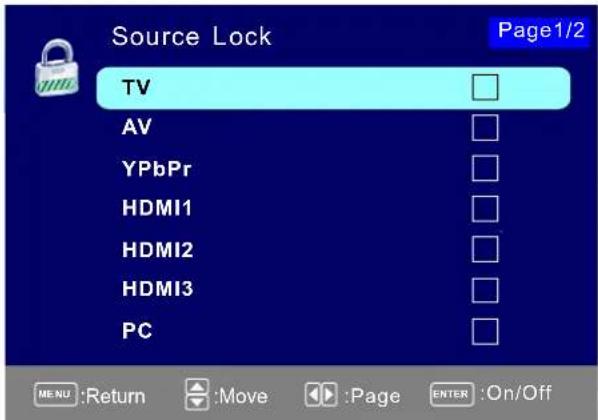
Source Lock
Press / button to select Source Lock, then press OK button to enter the sub menu.
Press / button to select Source, then press OK button to set the Source Lock.
You can't enter the locked source if you set the Source lock.
Setup Menu

Closed Caption
Press / button to select the item Closed Caption, then press / button to adjust.
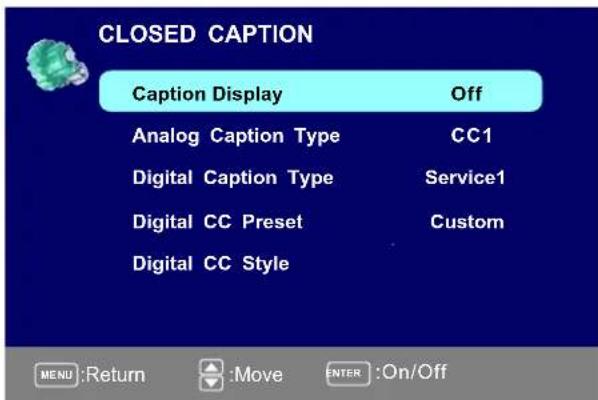
Caption Display
Press / button to select Caption Display, then press / button to select ON or OFF.
Analog Caption Type
Press / button to select Analog Caption Type, then press / button to select the type.
Available type: CC1, CC2, CC3, CC4, TEXT1, TEXT2, TEXT3, TEXT4.
Digital Caption Type
Press / button to select Digital Caption Type, then press / button to select the type.
Available type: Service1~6.
Digital CC Preset
Press / button to select Digital CC Preset, then press / button to select Default or Custom.
Digital CC Style
This menu is only shown when the Digital CC Preset is selected Custom.
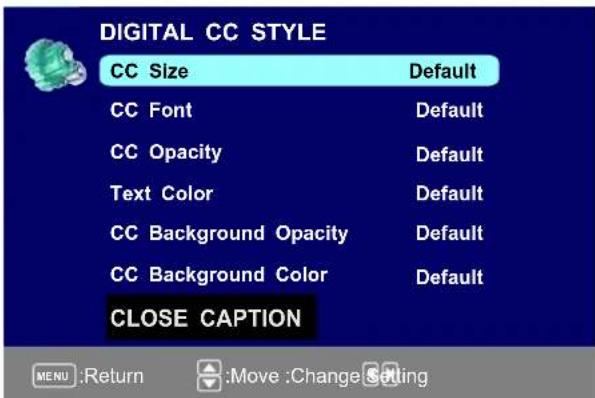
CC Size
Press / button to select CC Size, then press button to set. Available Size: Default, Small, Standard d, Large.
CC Font
Press / button to select, then press button to select the Font. Available type: Default, Style0~7.
CC Opacity
Press / button to select CC Opacity, then press / button to select the Opacity.
Available Opacity: Default, Solid, Flashing, Translucent, Transparent.
Text Color
Press / button to select Text Color, then press / button to select the color.
Available Color: Default, Black, White, Red, Green, Blue, Yellow, Magenta, Cyan.
CC Background Opacity
Press / button to select CC Background Opacity, then press / button to select the Opacity.
Available Opacity: Default, Solid, Flashing, Translucent, Transparent.
CC Background Color
Press / button to select CC Background Color, then press / button to select the Color.
Available Color: Default, Black, White, Red, Green, Blue, Yellow, Magenta, Cyan.
Menu Language
Press / button to select the item Menu Language, then press / button to adjust.
Available Language: English, French, Spanish.
Clock
Press / button to select the Clock, then press OK to edit.
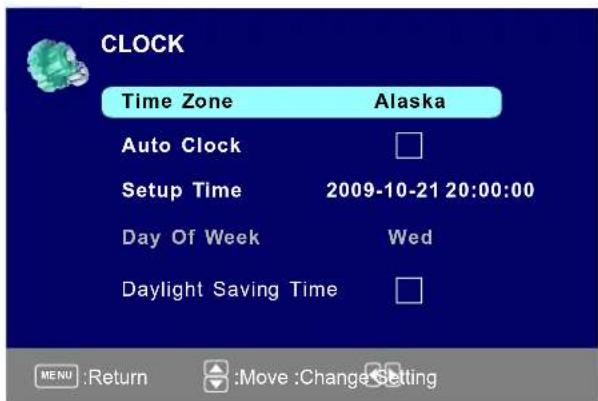
Time Zone
Press / button to select Timer Zone, then press / button to set. Available Size: Central, Mountain, Pacific, Alaska, Hawaii, Samoa, Newfoundland, Atlantic, Eastern.
Auto Clock
Press / button to select Auto Clock, then press ENTER button to set it Enable/Disable. If you set it Enable, it will adjust the time corresponding the DTV time automatically.
Setup Time
Press / button to select Setup Time, then press / button to adjust the time and use the ENTER button to go to the next option.
Day Of Week
This option displays the Day Of Week corresponding to the setup time.
Daylight Saving Time
Press / button to select Daylight Saving Time Tintpress button to set. Size: 10s 20s,30s 40s 50s 60s
OTHERS MENU
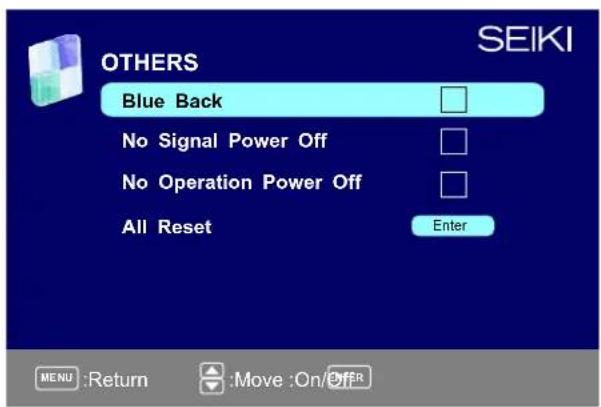
Blue Back
Press / button to select Blue Background, then press OK button to select when there is no signal, whether set the background in blue or not.
No Signal Power Off
Press / button to select No Signal Power Off, then press OK button to select it On or Off. When set it On and there is no signal input by 10 minutes, it will turns off the panel and the LED light turns amber.
No Operation Power Off
Press / button to select No Operation Power Off, then press OK button to select it On or Off. When set it On and there is no operation input by 3 hours, it will turns off the panel and the LED light turns red.
All Reset
Press / button to select All Reset, then press OK button to execute reset. When you select All Reset item, a dialogue box will appear as following:
Attention! If [ All Reset ] was executed TV system is reset.
AV/YPbPr/HDMI1/HDMI2/HDMI3
1.PICTURE menu and description are the same as that for TV source.
2.SOUND menu and description are the same as that for TV. But the settings for Analog Sound and Digital Sound are inv in these sources.
3.PARENTAL menu and description are the same as that for TV V source.
4. Setup menu and description are the same as that for TV source. But the setting for Closed Caption is invalid in source HDMI.
5.OTHER menu and description are the same as that for TV source.
6.CHANNEL menu and description are invalid in these sources.
PICTURE MENU

Picture Settings
- Press ENTER when the Picture Settings item is highlighted. Then you will go to the sub-menu as following.
- Press / to select the desired menu item. Press ENTER to proceed if necessary.
- Press / to adjust the item to the desired level.
- When you have changed the settings, you can exit from the menu by pressing MENU.
Picture Mode
Press / button to select Picture Mode, then press button to adjust. Available picture mode: Dynamic, Standard, Movie, User.
Brightness
Press / button to select Brightness, then press / button to adjust.

Contrast
Press / button to select Contrast, then press / button to adjust.

Color
Press / button to select Color, then press button to adjust.

Sharpness
Press / button to select Sharpness, then press button to adjust.

Screen Size
- Press ENTER when the Screen Size item is highlighted. Then you will go to the sub-menu as following.
- Press / to select the desired menu item. Press ENTER to proceed if necessary.
- Press / to adjust the item to the desired level.
- When you have changed the size, you can exit from the menu by pressing MENU.
Screen Size
Press / button to select Screen Size, then press button to adjust. Available Screen Size: Standard, Dot By Dot, Wide.
PC Setting
- Press ENTER when the PC Settings item is highlighted. Then you will go the sub-menu as following.
- Press / to select the desired menu item. Press ENTER to proceed if necessary.
- Press / to adjust the item to the desired level.
- When you have changed the settings, you can exit from the menu by pressing MENU.
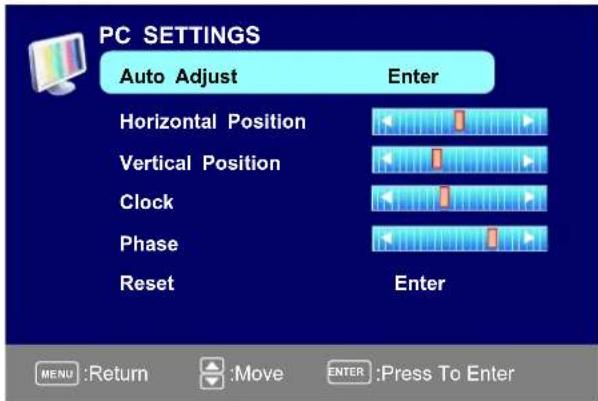
Auto Adjust
Press / button to select Auto Adjust, then press OK button to start auto adjusting.
Horizontal Position
Press / button to select Horizontal Position, then press button to adjust.
Vertical Position
Press / button to select Vertical Position, then press / button toadjust.
Clock
Press / button to select Clock, then press / button to adjust.
Phase
Press / button to select Phase, then press / button to adjust.
Reset
Press / button to select Reset, then press OK button to reset the options above.


1.SOUND menu and description are the same as that for TV. but the settings for Analog Sound and Digital Sound are invalid in PC source.
2.PARENTAL menu and descriptions are the same as that for TV source.
3. Setup menu and description are the same as that for TV source. But the setting for Closed Caption is invalid in PC source.
4.OTHER menu and description are the same as that for TV source.
5.CHANNEL menu and description are invalid in PC source.
Note: The operation and description of the hot key is programmable on your remote control.
9. Troubleshooting
Please check if you can solve problems by troubleshooting yourself.
| Troubleshooting | Control |
| No signal | Please check that all cables are correctly plugged in. |
| No color shades | Adjust the contrast, the color and the brightness. |
| Stain on the screen | May be the result from a lighting signal from car, motor, neon light and other electrical devices or appliances. |
| Double or multiple display image | May be the result of an electrical wave disturb from other TV, Computer and Game machine or Radio. |
| Snow on the screen | The cables of the antenna are not correctly plugged in. |
| The remote control does not work | Please check the batteries order and alignment. Check that the IR of the remote control is not hidden by something. |
| "Zip" made noise on TV cover | Even if the display image is correct, the noise may come from an unsteady fixation of the panel. |
| No sound | Make sure that you have not press the MUTE button of the panel or of the remote control. |
10. SPECIFICATIONS
This manual is only for your reference, any change to the design and specification will not be advised.
| Screen Size | 32inch | |
| Display Type | TFT LCD | |
| Resolution(Pixel) | 1920 X 1080 | |
| Aspect Ratio | 16:9 | |
| Power Supply | AC100-240V,50/60Hz | |
| Power Consumption | 110W | |
| TV System | ATSC/NTSC | |
| Video Input Format | PAL/NTSC | |
| Audio Output Power | L/R 2X8W | |
| SUPPORT | ANTENNA | YES |
| AV-IN | YES | |
| YPbPr - IN | YES | |
| HDMI - IN | YES | |
| VGA(PC) - IN | YES | |
| VGA(PC) AUDIO - IN | YES | |
| SCART - IN | -- | |
| SCART - OUT | -- | |
| AUDIO - OUT | YES | |
| S-VIDEO - IN | -- | |
| COAXIAL - OUT | YES | |
| COMMON INTERFACE | -- | |
| USB | Service Port Only | |
| IPOD | -- | |
| DVD | Disc Physical Format | -- |
| DVD Video Output Format | -- | |
| Dimensions | W/Stand(LxWxH-mm) | 782*238*558 mm |
| W/O Stand(LxWxH-mm) | 782*85m503 | |
| Wall-mount | 400*20 VESA(mm) | |
| Wall-mount Screw size | M5*12 | |
| Weight | Net (Kgs) | 9.48 |
| Gross (Kgs) | 12.65 | |
www.seikiworld.com
À écran plat
Téléviseur LCD
SC322TI
Qualification ENERGY STAR
If[All Reset]was executed
TV system is reset.
AV/YPbPr/HDMI1/HDMI2/HDMI3
Vertical Position 25

Horloge
Back View and Control Connections
If[All Reset]was executed TV system is reset.
AV/YPbPr/HDMI1/HDMI2/HDMI3

Vertical Position 25
Reloj


- Flat Panel LCD Television
- ENERGY STAR® Qualification.
- Important Safety Instructions
- Note:
- PREFACE
- SAFETY PRECAUTIONS
- IN THE CARTON
- FRONT/BACK CONNECTIONS OF L D C V
- Back View and Control Connections
- ATV INSTALL TION DRAWINGS
- Power Cord Connection
- Antenna Connection
- AV Connection
- YPbPr(Component) Connection
- VGA(PC) Connection
- COAX Connection
- HDMI Connection
- Service Port Function
- REMOTE CONTROL.
- Remote control instructions in TV mode
- POWER
- P MODE
- S.MODE
- SLEEP
- NUMBERBUTTONS
- MUTE
- SOURCE
- CH+/CH
- MTS
- MENU
- DISPLAY
- RETURN
- CH.LIST
- EXIT
- A,B,C,D
- V-CHIP
- FAV.CH
- FAV+/FAV-
- AUTO
- ADD/ERASE
- HDMI
- VGA
- COMP
- Remote control setup
- To prevent battery leakage which may result in bodily injury or damage to the remote:
- 8.Menu Operation
- SETUP WIZARD
- Select Language
- Select Time Zone
- Power On Mode
- Select Input Source
- BASIC OPERATION
- PICTURE MENU
- Picture Settings
- Picture Mode
- Brightness
- Contrast
- Color
- Sharpness
- Tint
- Screen Settings
- Screen Size
- Color Temperature
- Dynamic Contrast
- Film Mode
- Noise Reduction
- MPEG Noise Reduction
- SOUND MENU
- Sound Settings
- Sound Mode
- Bass
- Treble
- Balance
- Surround Mode
- AVL
- Analog Sound
- Digital Sound
- Digital Audio Output
- Equalizer Settings
- Equalizer Mode
- CHANNEL MENU
- Channel List
- Favorite List
- Channel Setting
- Signal Type
- Auto Channel Search
- PARENTAL CONTROL
- US V-CHIP
- Movie Rating
- TV Rating
- CANADA V-CHIP
- Information
- Block UnRated Show
- Downloadable Rating
- Clear Downloadable Date
- CHANGE PASSWORD
- Source Lock
- Closed Caption
- Caption Display
- Analog Caption Type
- Digital Caption Type
- Digital CC Preset
- Digital CC Style
- CC Size
- CC Font
- CC Opacity
- Text Color
- CC Background Opacity
- CC Background Color
- Menu Language
- Clock
- Time Zone
- Auto Clock
- Setup Time
- Day Of Week
- Daylight Saving Time
- OTHERS MENU
- Blue Back
- No Signal Power Off
- No Operation Power Off
- All Reset
- AV/YPbPr/HDMI1/HDMI2/HDMI3
- PC Setting
- Auto Adjust
- Horizontal Position
- Vertical Position
- Phase
- Reset
- Troubleshooting
- SPECIFICATIONS
- À écran plat
- Téléviseur LCD
- Qualification ENERGY STAR
- If[All Reset]was executed
- TV system is reset.
- Horloge
- If[All Reset]was executed TV system is reset.
- Reloj
Brand : Seiki
Model : SC322TI
Category : Television