
Teasi One 3X - Browser A-Rival - Free user manual and instructions
Find the device manual for free Teasi One 3X A-Rival in PDF.

| Product type | Recreational GPS navigator for cycling |
| Brand | A-Rival |
| Model | Teasi One 3X |
| Dimensions (approx.) | 100 x 60 x 20 mm |
| Weight (approx.) | 100 g |
| Power supply | Rechargeable lithium-ion battery via mini USB, battery life 8-12 hours |
| Main functions | GPS navigation, route planning with altimetry, data display (speed, distance, calories), route recording, Bluetooth sensor compatibility (heart rate, cadence), easy/advanced mode |
| Screen | Color touch screen |
| Connectivity | Bluetooth Low Energy 4.0, mini USB, micro SD card reader |
| Mapping | Built-in OpenStreetMap, free updates via Teasi tool |
| Mounting | Handlebar mount included |
| Care and cleaning | Clean with a soft, dry cloth; avoid water and harsh products |
| Safety | Do not operate while driving; install according to local regulations; secure mounting |
| Spare parts and repairability | Contact support service (First Service Center, Hanover); 36-month warranty; no consumer spare parts |
| General information | Support: support.teasi.de; website: www.teasi.eu; CE compliance; 36-month warranty |
Frequently Asked Questions - Teasi One 3X A-Rival
User questions about Teasi One 3X A-Rival
0 question about this device. Answer the ones you know or ask your own.
Ask a new question about this device
Download the instructions for your Browser in PDF format for free! Find your manual Teasi One 3X - A-Rival and take your electronic device back in hand. On this page are published all the documents necessary for the use of your device. Teasi One 3X by A-Rival.
USER MANUAL Teasi One 3X A-Rival
Thank you for choosing a product from TEASI. A very good choice!
We hope you'll enjoy using your new Recreational Navigation System. Just in case that you are facing any problems with your device, visit http://support.teasi.de
On our website – www.teasi.eu – you’ll find detailed manuals, updates and technical information.
Do you need additional accessory like charger, mount or a bag? Ask your TEASI-dealer or simply visit our online shop at www.teasi.eu, for your order and more information.
The use and operation of navigation systems
Attention! Don't operate with the device while driving. Even the smallest and shortest distractions from road or traffic for you and other road users - even at slow speeds – may have devastating consequences.
Type in the destination before starting your journey and start the navigation system before you start driving.
If you have to change the route or the settings while driving, you should better stop for it.
After switching on the device it could take a few moments to find the required minimum number of navigation satellites. Depending on the environment, it may go faster or longer. Under the open sky, it is the fastest. In inner cities with narrow streets and tall buildings, this process may take longer, because the "view to the sky" is very narrow and that cause reflections of the satellite signals. In the forest it may also take longer because of the crowns of leaves. In tunnels, buildings, etc. the system does not work! As soon as you are positioned under the open sky the connections to the satellites will be established as quickly as possible. The map data is up to date in time of production of your navigation system. Nevertheless, it may happen that you may have long-known streets, paths, house numbers, roundabouts, etc. are not included. This is not a fault, but due to the fact that streets are changing. Your device is using Open Street Map (OSM). This is in our opinion the most useful map for cyclists. OSM is a non-profit web-based collaborative project to create a free map of the world. We like this idea and we support it.
Updates and Enhancements
You can download the detailed manual from our website:
www.teasi.eu
For software and map updates, please download our TEASI Tool for free, also from www.teasi.eu.
Bluetooth
TEASI one ^3 X uses Bluetooth ^® Low-Energy (BLE) Technology V.4 for the exchange of data. Supported hardware includes, for example, external sensors for heart rate or cadence. The sensor data can be recorded or displayed – incl. notification about exceeding or falling below personal threshold values.
Appearance
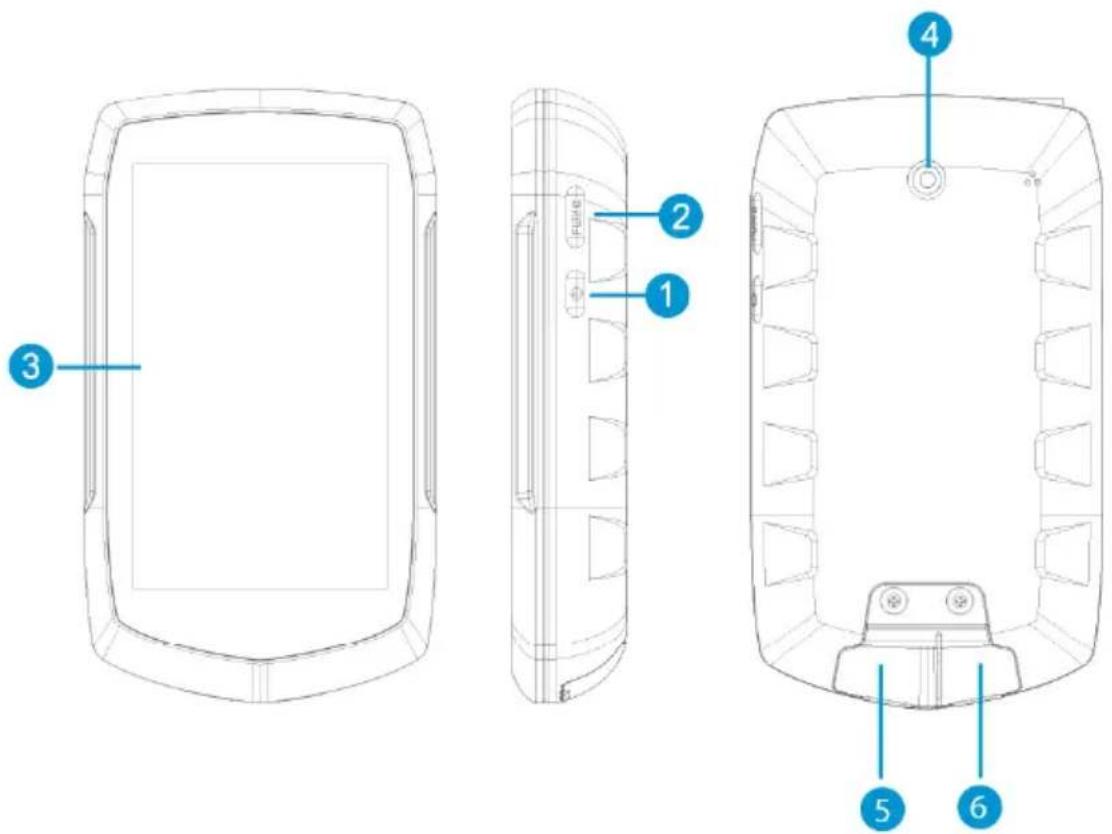
| 1. Power button | 2. Back-/Settings button |
| 3. Touch-Display | 4. Bracket fixing |
| 5. Micro-SD card slot (under cover).For memory-expansion.No Micro SD-card supplied. | 6. Mini USB port (under cover) |
1 Discovering the program
1.1 Main menu

After initialization the main menu appears. You can select: Computer, Destination Map, Fitness, Plan, Memory and Settings
Note: depending on your model, the display may vary.
1.2 Map
In map mode you can see where you are, follow navigation instructions, save your current position as a favorite, record your trip, or search for addresses and venues nearby.
1.3 Computer
Computer menu is responsible for showing the data and information about your trip.
The content of the information box can be changed by tapping on it.
Note: Some Fields might require a navigation or a record of a trip in progress to display real values.
1.4 Memory
Memory is responsible to show you your recorded and imported trips, and favorites.
You can call up all your saved data and statistics via this submenu.
Memory can be conveniently managed on a PC or MAC via the TEASI-Tool.
1.5 Fitness
You can create your own trainings based on Distance, Speed, Time, or Calories.
1.6 Destination
In the Destination menu you can select where to navigate, based on the type of your target location.
1.7 TEASI Plan (feat. Altitude graph)
TEASI Tour is our groundbreaking feature to untie your hand by letting trips to be created on-the-go!
Tap to add new points to your track, remove points if needed, save your track for further use when finished, and navigate to it with the go button.
1.8 Settings
The Settings menu is for adjusting and fine-tuning your device.
You can:
- select the display mode of maps
- enable and configure POI display
- manage your accounts
- change language
- adjust sound settings
- get information about the product
- set backlight strength and timer
- set date ,time, and time zone
- select between Easy mode and Full mode(chapter 3)
- clean up unnecessary maps to gain free space
- calibrate your Display
- setting up Bluetooth sensors
- display the GPS status
2 The First Startup sequence
When the device is first switched on, or after a factory reset it is necessary to set up some required information.
2.1 Language & EULA
Select the desired language, then read and agree the End-User License Agreement (EULA).
2.2 Profile
Set up a profile or multiple profiles in order to customize the device to your needs. Tap on every detail to set it.
2.3 Date & Time
It is possible to set the date and time by GPS, or manually. If "GPS" mode is selected, only the format and time zone can be set.
If manual settings are chosen, you can also change the date and the time.
3 Easy mode – Full mode
The easy mode appears in a compact layout with the essential features of the Teasi software, which makes the device simpler and more effective to operate.
The full mode, in which all the functions are activated, can be re-enabled through settings – system menu.
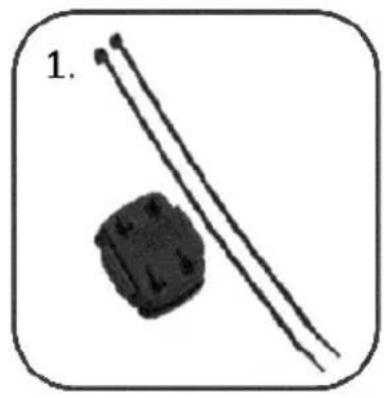
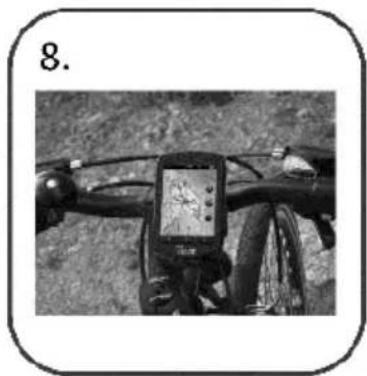
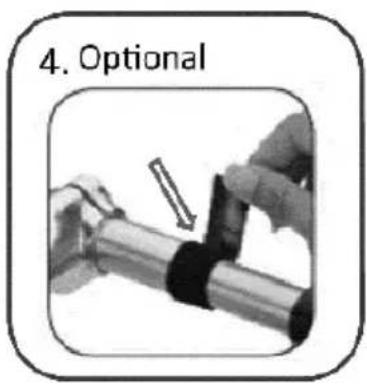
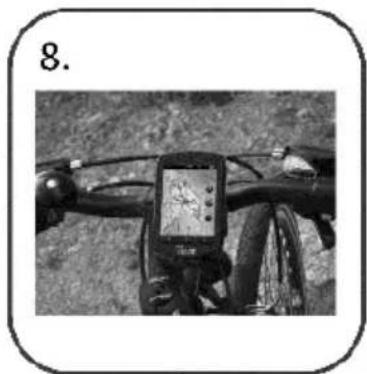
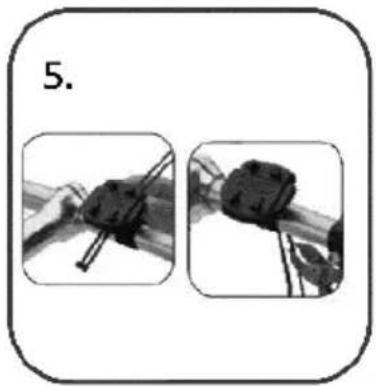
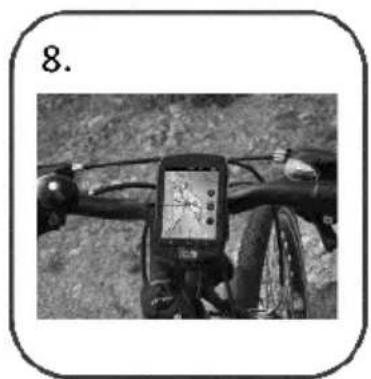
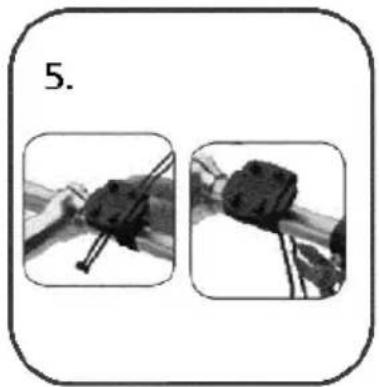
4 Mounting the holder on your bicycle
natural_image
Simple line drawing of a battery and its circuit board (no text or symbols)
natural_image
Close-up of a black plastic component with a screwdriver and two parallel strips, labeled '2.' (no text or symbols on the main subject)


natural_image
Two black-and-white images showing a mechanical component being held, with no visible text or symbols.
natural_image
Diagram showing two views of a mechanical component with an inset close-up (no text or symbols)
natural_image
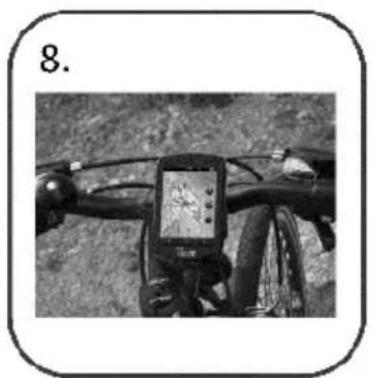
Black-and-white photo of a bicycle with a mounted GPS device on its head, showing no visible text or symbols.Check with local laws about area of installation restrictions. Do not mount close to any shifters or other objects which could inhibit operation and safety of your bicycle.
Userinformation/Contact
If your device has a defect or you have problems with it, please contact our Service & Support Centre.
If you need to send your device to us, please attend to the following points:
- Whenever possible, use the original packaging.
- Add a detailed error description
- Add your full name and address and a copy of your purchase receipt.
- Stamp and send the package to us (sufficient postage).
Address of our Service Center:
First Service Center, Kleine Düwelstr. 21, DE-30171 Hannover
You can get help at: http://support.teasi.de
Declaration of Conformity
Hereby Baros GmbH, declares, that the device TEASI one ^3 X, is in compliance with the essential requirements and other relevant regulations of Directive 1999/5/EC.
The Declaration of Conformity can be found at: www.a-rival.de
Guarantee
Please keep the proof of purchase for this device for the entire duration of the guarantee period, as it must be produced in the event of any claim.
You (as the end user) receive a 36 month guarantee from the date of sale.
The article has been manufactured using the most modern production methods and subjected to strict quality controls.
Please contact only the manufacturer (not the dealer where you purchased it) in the event of any defects during the guarantee period.
http://support.teasi.de
The guarantee does not cover damage caused by improper use or external influence (water, falling, sunlight, breakage or impact).
TEASI
natural_image
Simple line drawing of a battery and its circuit board (no text or symbols)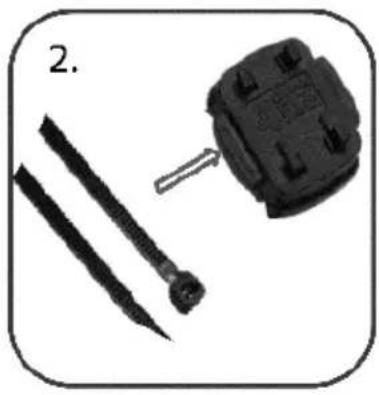
natural_image
Close-up of a black plastic component with a screwdriver and two parallel strips, labeled '2.' (no text or symbols on the main subject)


natural_image
Two black-and-white images showing a mechanical component being held, with no visible text or symbols.
natural_image
Diagram showing two views of a mechanical component with an inset close-up (no text or symbols)

natural_image
Close-up of a bicycle's front wheel with a mounted sensor device (no visible text or symbols)natural_image
Simple line drawing of a battery and its circuit board (no text or symbols)
natural_image
Close-up of a black plastic component with a screwdriver and two parallel strips, labeled '2.' (no text or symbols on the main subject)

natural_image
Two black-and-white images showing a mechanical component being held, with no visible text or symbols.
natural_image
Diagram showing two views of a mechanical component with an inset close-up (no text or symbols)

natural_image
Close-up of a bicycle's front wheel with a mounted sensor device (no visible text or symbols)natural_image
Simple line drawing of a battery and its circuit board (no text or symbols)
natural_image
Close-up of a black plastic component with a screwdriver and two parallel strips, labeled '2.' (no text or symbols on the main subject)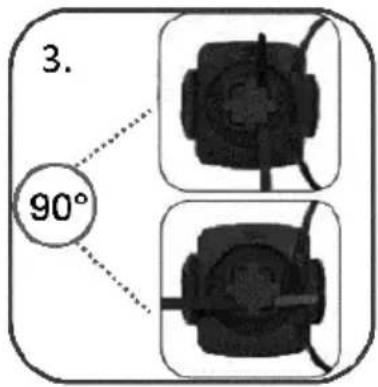


natural_image
Two black-and-white images showing a mechanical component being held, with no visible text or symbols.
natural_image
Diagram showing two views of a mechanical component with an inset close-up (no text or symbols)
natural_image
Close-up of a bicycle's front wheel with a mounted sensor device (no visible text or symbols)natural_image
Simple line drawing of a battery and its circuit board (no text or symbols)
natural_image
Close-up of a black plastic component with a screwdriver and two parallel strips, labeled '2.' (no text or symbols on the main subject)


natural_image
Two black-and-white images showing a mechanical component being held, with no visible text or symbols.
natural_image
Diagram showing two views of a mechanical component with an inset close-up (no text or symbols)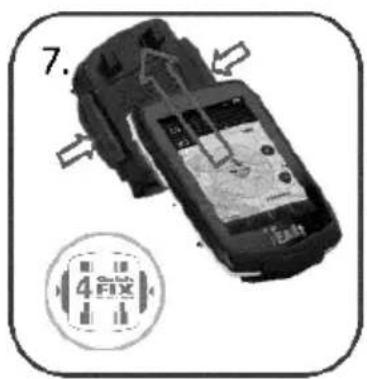

natural_image
Close-up of a bicycle's front wheel with a mounted sensor device (no visible text or symbols)natural_image
Simple line drawing of a battery and its circuit board (no text or symbols)
natural_image
Close-up of a black plastic component with a screwdriver and a separate screwdriver, labeled '2.' (no text or symbols on the main subject)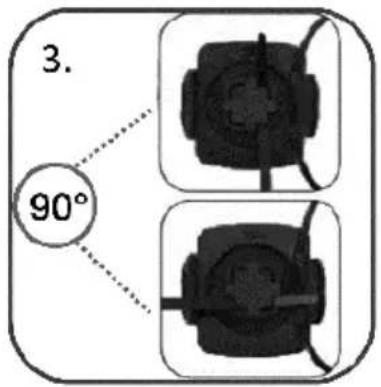

natural_image
Two-step diagram showing a hand holding a small object with a string, before and after being held by a tool (no text or symbols)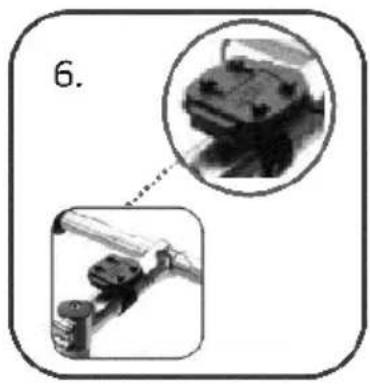
natural_image
Diagram showing two views of a mechanical component with an inset close-up (no text or symbols)
natural_image
Black-and-white photo of a bicycle's front bike with a mounted GPS meter (no visible text or symbols)natural_image
Simple line drawing of two elongated objects, one resembling a battery or sensor and the other a cube, with no text or symbols.
natural_image
Close-up of a mechanical component with a screw and a button, labeled '2.' (no text or symbols on the main subject)


natural_image
Two black-and-white images showing a tool being held, with no visible text or symbols.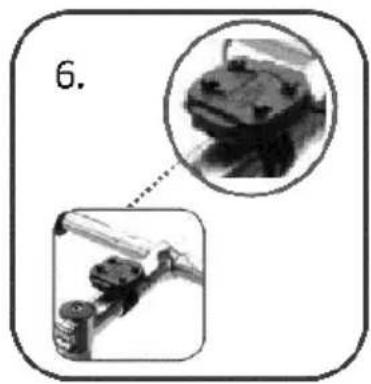
natural_image
Two black-and-white images showing mechanical components: one with a magnified inset, the other with a close-up view (no text or symbols)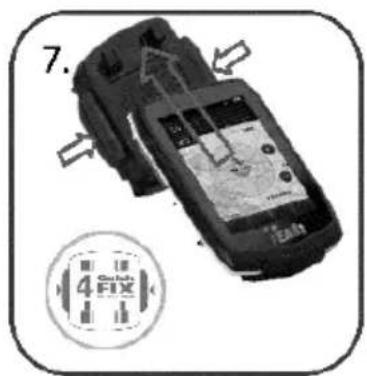
natural_image
Close-up of a bicycle's front-mounted navigation device with visible sensor and track (no text or symbols)natural_image
Simple line drawing of two mechanical components, one with a cylindrical body and the other with a straight rod (no text or symbols)
natural_image
Illustration of a mechanical component with a screwdriver and a black housing (no text or symbols)

natural_image
Two black-and-white images showing a mechanical component being held, with no visible text or symbols.
natural_image
Two-panel image showing a close-up of mechanical components with a magnified inset (no text or symbols)

natural_image
Close-up of a bicycle's front-mounted navigation device with visible sensor and track (no text or symbols)


- The use and operation of navigation systems
- Updates and Enhancements
- Bluetooth
- Appearance
- Discovering the program
- Main menu
- Map
- Computer
- Memory
- Fitness
- Destination
- TEASI Plan (feat. Altitude graph)
- Settings
- You can:
- The First Startup sequence
- Language & EULA
- Profile
- Date & Time
- Easy mode – Full mode
- Mounting the holder on your bicycle
- Userinformation/Contact
- Address of our Service Center:
- Declaration of Conformity
- Guarantee
- http://support.teasi.de
- TEASI
Brand : A-Rival
Model : Teasi One 3X
Category : Browser