DWM99W - Washing machine DANBY - Free user manual and instructions
Find the device manual for free DWM99W DANBY in PDF.

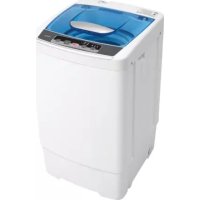
| Product Type | Top-loading Washing Machine |
| Brand | Danby |
| Model | DWM99W |
| Washing Capacity | 4 kg |
| Dimensions (D × W × H) | 545 mm × 550 mm × 890 mm |
| Net Weight | 36 kg |
| Power Supply | 120 V ~ 60 Hz, 2.5 A |
| Required Water Pressure | 0.02 MPa to 0.8 MPa |
| Wash Programs | Normal, Economy, Delicate, Spin Only |
| Available Temperatures | Hot (135-145°F), Warm, Cold (50-75°F) |
| Water Levels | Low 1, Low 2, Medium, High |
| Safety | Automatic shut-off if lid open, drum brake, motor overload protection |
| Drum Material | Stainless Steel |
| Included Accessories | 2 supply hoses, anti-noise pad, plug for mobile installation |
| Warranty | 1 year parts |
Frequently Asked Questions - DWM99W DANBY
User questions about DWM99W DANBY
0 question about this device. Answer the ones you know or ask your own.
Ask a new question about this device
Download the instructions for your Washing machine in PDF format for free! Find your manual DWM99W - DANBY and take your electronic device back in hand. On this page are published all the documents necessary for the use of your device. DWM99W by DANBY.
USER MANUAL DWM99W DANBY
Read and follow all safety rules and operating instructions before first use of this product.
PRECAUTION:
Top Load Washing Machine Instructional Manual
Danby
Safety Instructions 2
Installation Instructions 3
Electrical Requirements 4
Water Supply Requirements 5
Installing the Washer . 6
Installer Checklist 11
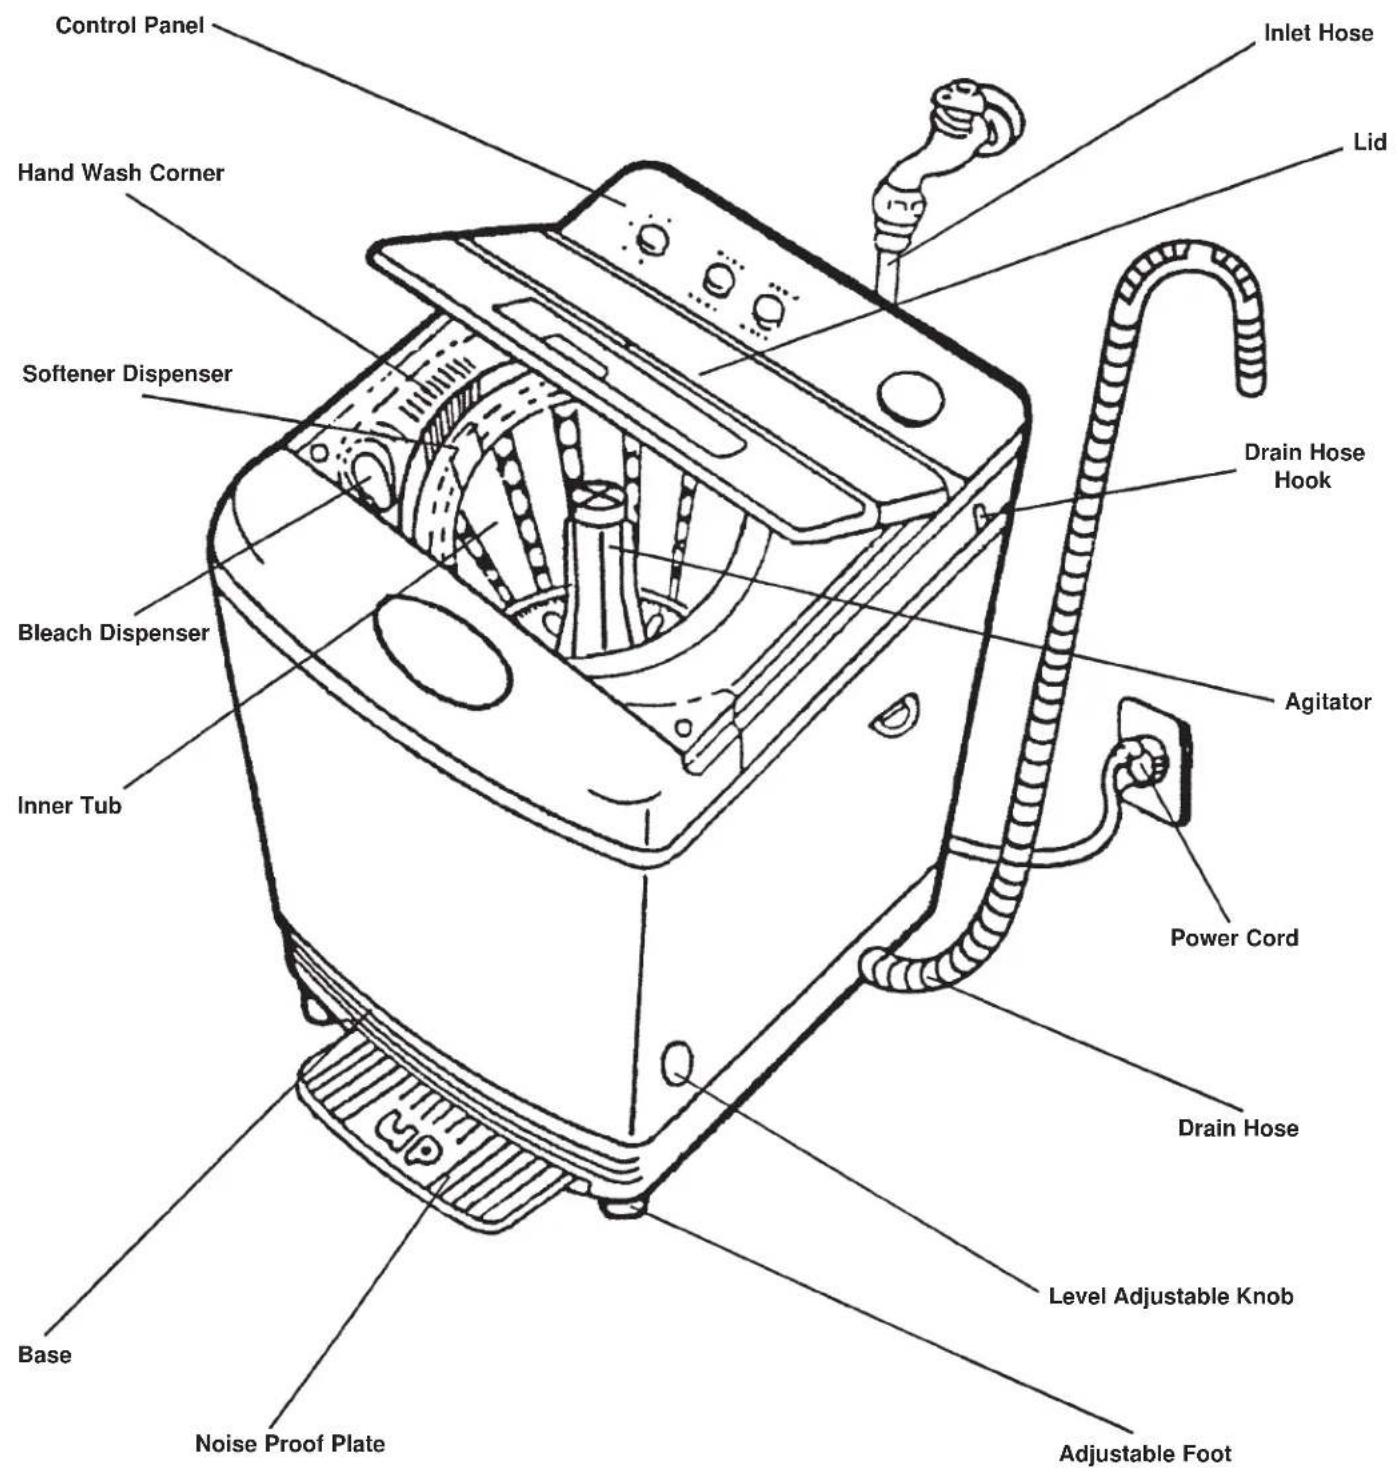
Parts Identification 12
Control Panel 13
Before Washing 13
How to Use Your Washer 14
General Washing Information 15
Special Care Washing Instructions 16
User Maintenance Instruction 16
Trouble Shooting 17
Wiring Diagram 17
Warranty 18
INTRODUCTION
Thank you for buying a Danby appliance. Before operating this unit please read and save these instructions.
Model Number:
Serial Number:
Date of Purchase:
Place of Purchase:
Dealer's Name and Address:
This information will be required if your unit requires servicing and/or for general inquiries. To contact a Customer Service Representative, call Danby TOLL FREE. 1-800-26-2a-yb
CAREFULLY READ AND SAVE THESE INSTRUCTIONS
These instructions for use are intended for the user. They describe the appliance and correct installation and operating procedures for safe use.
NOTE:
This appliance was carefully packed and thoroughly inspected before leaving our factory. Responsibility for its safe delivery was assumed by the carrier upon acceptance of the shipment. Claims for loss or damage sustained during transit must be made directly to the carrier.
SAFETY INSTRUCTIONS
SAVE THESE INSTRUCTIONS
- Please read this instruction manual carefully before operating.
- Refer to the Grounding Instructions (under electrical requirements) in this manual for the proper grounding of the washer.
- Do not wash articles that have been previously cleaned in, washed in, soaked in or spotted with gasoline, dry-cleaning solvents, other flammable or explosive substances as they give off vapors that could ignite or explode.
- Do not allow children to play on or in the washer. Close supervision of children is necessary when the washer is used near children.
- Do not reach into the washer if the inner tub or agitator is revolving.
- Do not install or store the washer where it will be exposed to water and/or weather.
- Do not tamper with the controls.
- Do not repair or replace any part of the washer, or attempt any servicing unless specifically recommended in the user maintenance instructions trouble shooting guide that you understand and have the skills to carry out.
- Do not add gasoline, dry-cleaning solvents, or other flammable or explosive substances to the wash water. These substances give off vapors that could ignite or explode.
- Under certain conditions, hydrogen gas may be produced in a hot water system that has not been used for two weeks or more. HYDROGEN GAS IS EXPLOSIVE. If the hot water system has not been used for such a period, before using this washer, turn on all hot water faucets and let the water flow from each for several minutes. This will release any accumulated hydrogen gas. THIS GAS IS FLAMMABLE, DO NOT SMOKE OR USE AN OPEN FLAME DURING THIS TIME.
-
Replace worn power cords and/or loose plugs.
-
To reduce the risk of an electric shock or fire, DO NOT use an extension cord or an adapter to connect the washer to the electrical power source.
- Use your washer only for its intended purpose, washing clothes.
- ALWAYS disconnect the washer from electrical supply before attempting any service. Disconnect the power cord by grasping the plug, not the cord.
- Install the washer according to the INSTALLATION INSTRUCTIONS. All connections for water, drain, electrical power and grounding must comply with local codes and be made by licensed personnel when required. Do not do it yourself unless you know how!
- To reduce the risk of fire, clothes which have traces of any flammable substances such as vegetable oil, cooking oil, machine oil, flammable chemicals, thinner etc. or anything containing wax or chemicals such as in mops and cleaning cloths, must not be put into the washer. These flammable substance may cause the fabric to catch on fire.
- Do not use fabric softeners or products to eliminate static unless recommended by the manufacturer of the fabric softener or product.
- Keep your washer in good condition. Bumping or dropping the washer can damage safety features. If this occurs, have your washer checked by a qualified serviceman.
- Be sure water connections have a shut-off valve and fill hose connections are tight. CLOSE the shut-off valves at the end of each wash day.
- The LID MUST BE CLOSED any time the washer is to spin. DO NOT by-pass the safety switch by permitting the washer to spin with the lid open. A brake will stop the inner tub within seconds if the lid is opened during spinning. If the inner tub does not stop when the lid is opened, remove the washer from use and call a serviceman.
SAFETY INSTRUCTIONS CONTINUED
- Always follow the fabric care instructions supplied by the garment manufacturer.
- Never operate the washer with any guards and/or panels removed.
- DO NOT operate the washer with broken or missing parts.
- DO NOT by-pass any safety devices.
- Failure to install, maintain, and/or operate this machine according to these instructions may result in conditions which can produce bodily injury and/or property damage.
NOTE:
The WARNING AND IMPORTANT SAFETY INSTRUCTIONS appearing in this manual are not meant to cover all possible conditions and situations that may occur. It must be understood that common sense, caution and carefulness are factors which CANNOT be built into the washer. These factors MUST BE supplied by the person(s) installing, maintaining, or operating the washer.
Always contact your dealer, distributor, service agent or the manufacturer about any problems or conditions you do not understand.
INSTALLATION INSTRUCTIONS
BEFORE YOU START
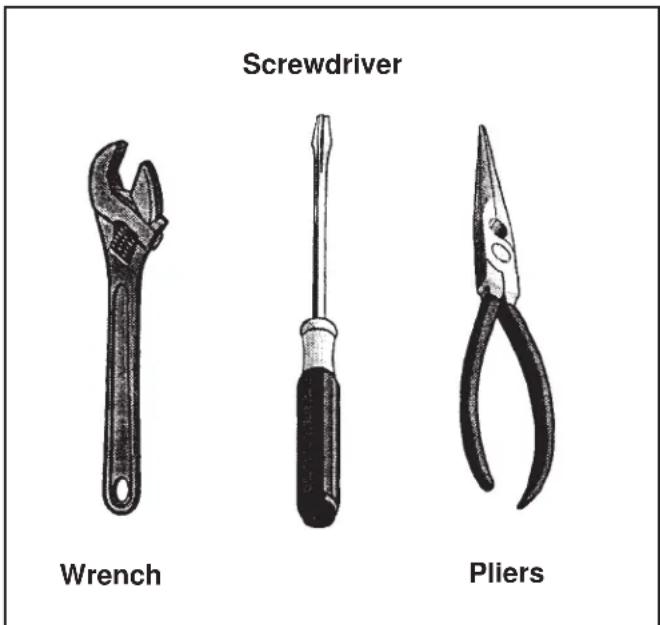
Tools
For most installations, the basic tools that you will need are:
Electrical
The washer needs a 120V / 60Hz polarized three slot effectively grounded receptacle. For more detailed information refer to the Section on Electrical Requirements
Water
The washer needs standard 3/4 inch water supply faucets with a pressure between 0.02MPa and .08 MPa. For more detailed information refer to the Water Supply Requirements
Specifications
- Rated Voltage 120V~
- Rated Frequency 60Hz
- Rated Current 2.5A
- Max Washing capacity and Spin dry capacity 4.0kg
- Enter water pressure 0.02MPa 0.8MPa
6.Net weight 36kg - Size(D X W X H) 545mm x 550mm x 890mm
ELECTRICAL REQUIREMENTS
(120V~/ 60HZ WITH THE 3 PRONG GROUNDING PLUG)

WARNING
Toreduce the risk of electrical shock or personal injury, all wiring and grounding MUST conform with the latest edition of the National Electrical Code, ANSI/NFPA 70, and such local regulations as might apply. IT'S THE CONSUMERS RESPONSIBILITY TO HAVE THE WIRING FUSES AND CIRCUIT BREAKERS CHECKED BY A QUALIFIED ELECTRICIAN TO MAKE SURE YOUR HOME HAS ADEQUATE ELECTRICAL POWER TO OPERATE THE WASHER.
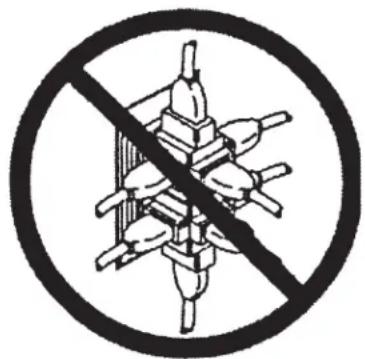
DO NOT OVERLOAD THE WASHER
DO NOT USE AN ADAPTER
DO NOT USE AN EXTENSION CORD
Note:
Have a qualified electrician check the polarity of the wall receptacle. If a voltage reading is measured other than illustrated, a qualified electrician should correct the problem.
GROUNDING INSTRUCTIONS
The washer must be grounded in the event of a malfunction or breakdown, grounding will reduce the risk of electrical shock by providing a path of least resistance for electrical shock. The washer is equipped with a cord having an equipment grounding conductor and a 3 prong grounding plug. The plug must be plugged into an appropriate outlet that is installed and grounded in accordance with all local codes and ordinances.
Do not modify the plug provided with the washer, if it will not fit the outlet, have a proper outlet installed by a qualified electrician.
If a positive ground cannot be established through the power cord and if local code permits its use, connect an external ground wire (18 gauge minimum, available at your local hardware store). Connect one end of the wire under any screw (located at rear of washer) and other end to a known effective electrical ground.
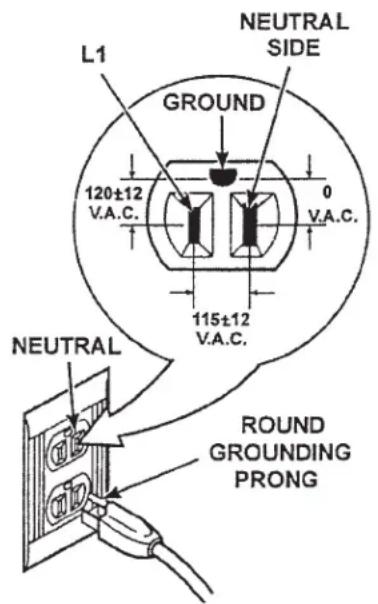
STANDARD 120 VOLT, 60 HERTZ, 3-WIRE EFFECTIVELY GROUNDED CIRCUIT

WARNING
Under certain conditions, hydrogen gas may be produced in a hot water system that has not been used for two weeks or more. HYDROGEN GAS IS
EXPLOSIVE. If the hot water system has not been used for such a period and before using the washer, turn on all hot water faucets and let the water flow from each for several minutes. This will release any accumulated hydrogen gas.
THIS GAS IS FLAMMABLE, DO NOT SMOKE OR USE AN OPEN FLAME DURING THIS TIME.
Water supply faucets must fit standard 3/4 inch (19.05mm) female garden hose couplings.
DO NOT USE SLIP-ON OR CLAMP-ON CONNECTIONS.
NOTE:
Water supply faucets should be readily accessible to permit turning them off when the washer is not being used.
WATER TEMPERATURE
Cold
Recommended cold water temperature is 50 75^, 10 23.8^
Hot
Recommended hot water temperature is 135 145^,57 62.7^
Warm
Mixture of hot and cold water. (Warm water temperature is dependent upon the water temperature and the pressure of both the hot and cold water supply lines.)
IMPORTANT: Owner should turn off water supply whenever there will be an extended period of non-use.
Water pressure
Do not operate the washer when the water pressure is lower than 0.02MPa or higher than .8 MPa. to avoid damage of the inlet system.
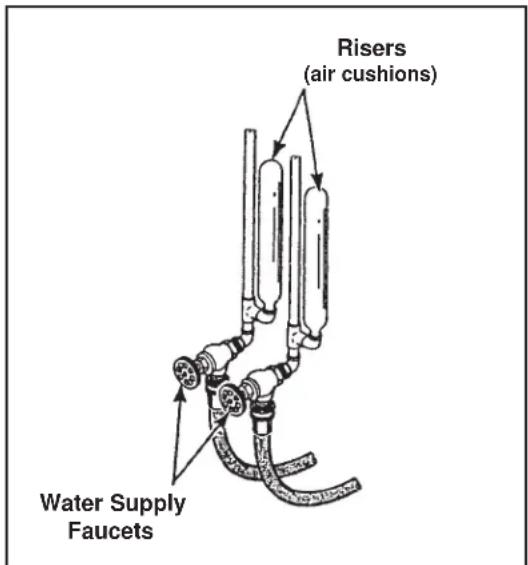
Risers
Risers (or air cushions) may have to be installed if the pipes knock or pound when flow of water stops. The risers are more efficient when installed as close as possible to the water supply faucets, see illustration below.
INSTALLING THE WASHER
STEP1
Remove the shipping brace and insert the noise proof plate on the washing machine.
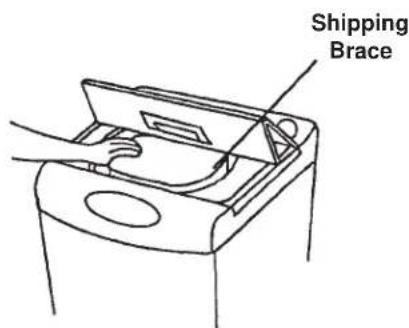
The shipping brace should be saved and must be used (to prevent damage to washer components) whenever the washer is moved or transported to a new location.
CAUTION:
- Do not put you hands into rotating tub
- Do not sprinkle water over the control panel
- Do not leave wet clothes on the control panel
- The safety switch will stop the spinning operation automatically if the laundry load is unevenly distributed (balanced) in the tub. Open the lid and redistribute the laundry evenly, then close the lid to restart.
After use, turn off the water supply lines
Take the noise proof plate out of the package.

The opening of the noise proof plate is at the bottom of the machine.
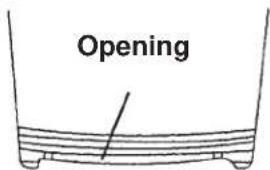
Insert the noise proof plate into the washing machine base.
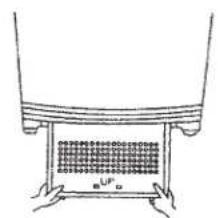
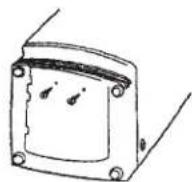
Lay down the machine and secure the noise proof plate by fastening the two screws
STEP 2
Single Hose Installation (portable applications)
Your washing machine is equipped with easy to install accessories allowing the washing machine to be connected to a single source water supply line;
Accessories Included:
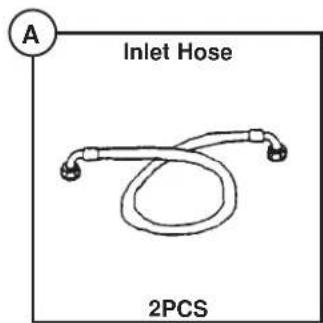
2 only Inlet Hose Fig. A
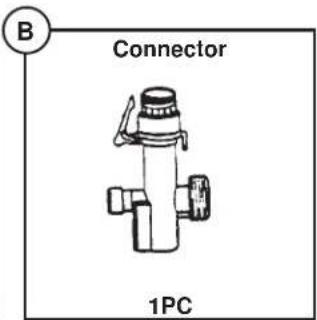
1 only Water Inlet Hose "Quick Connect". Fig. B
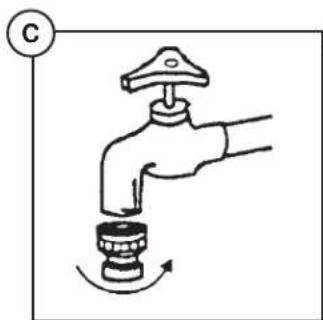
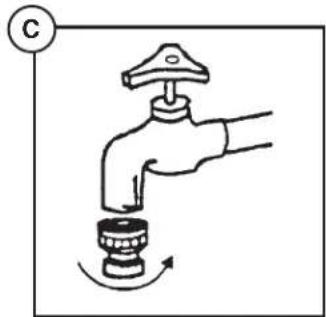
1 only Fucet Adapter. Fig.C
1 only Water Inlet Valve Cap/Plug. Fig. D
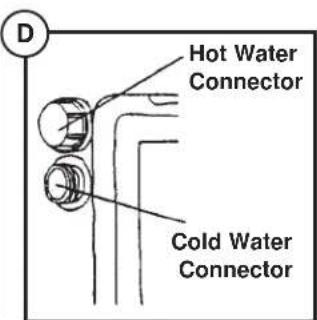
Important Notice: For portable installations (using a single inlet hose only) it will be necessary to "cap/plug" one side of the hot/cold water valve not being used. Fig. D
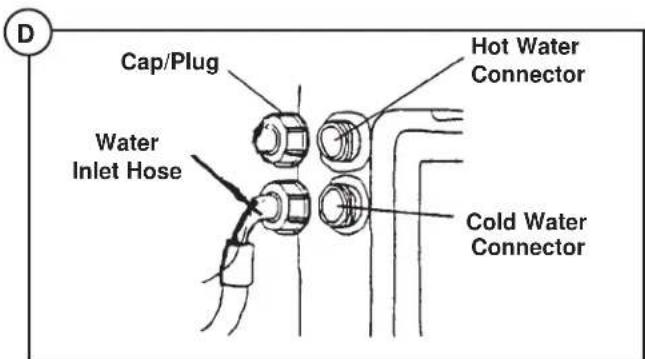
Failure to install the "cap/plug" on the open side of the water valve will result in leakage from the valve during any/all water fill cycles.
Special Note: Depending on which side of the (Hot/Cold) valve the cap/plug is installed, certain "WASH/TEMP" fill programs will not be operational. i.e.
- If you cap/plug the HOT WATER (upper) valve, it will not be possible to select the "COLD/COLD" WASH/TEMP water fill program. You can only select either the WARM/COLD or HOT/COLD WASH/TEMP water fill programs. (under the COLD/COLD setting no water will enter the wash tub)
- If you cap/plug the COLD WATER (lower) valve, it will not be possible to select the "HOT/COLD" WASH TEMP water fill program. You can only select either the WARM/COLD or COLD/COLD WASH/TEMP water fill program. (under the HOT/COLD setting no water will enter the wash tub)
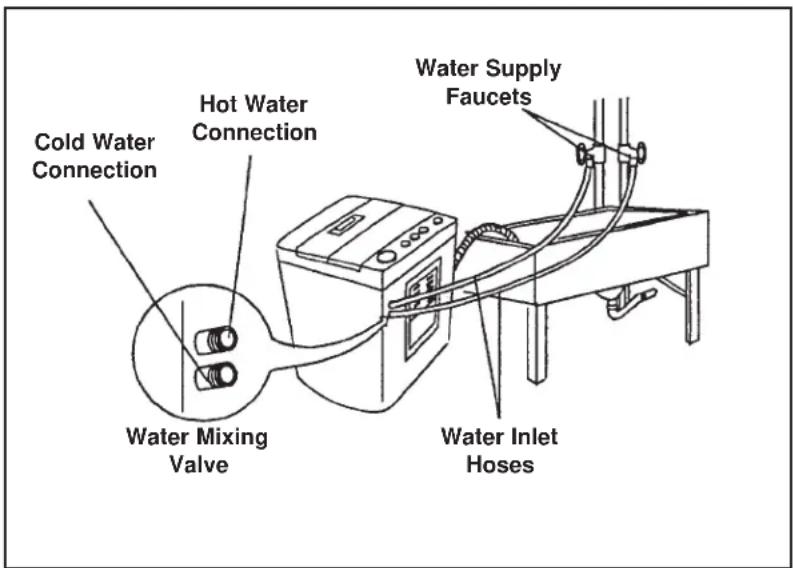
Connecting the Water Inlet Hose:
- Screw the faucet adapter onto the faucet. Fig. C (check for leaks, use Teflon tape to eliminate if necessary)
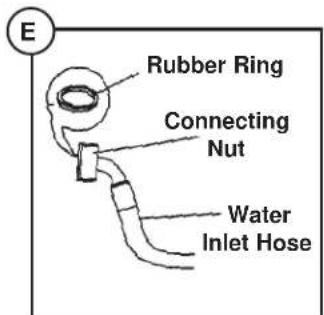
Install rubber washer into each end of the fill hose. Fig. E
- Connect fill hose (with 90^ elbow) to either the HOT/COLD water inlet valve located at the back of the washing machine, tighten moderately. (remember to install the "cap/plug" on the inlet valve not being used)
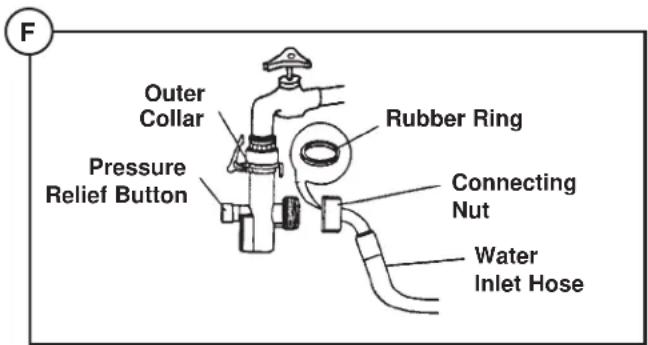
- Connect the opposite end of the hose directly to the body of the quick connect. Fig. F
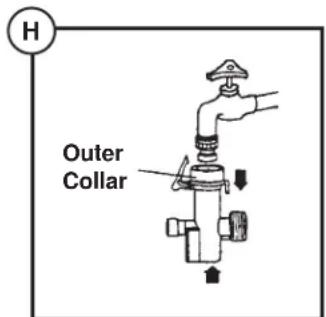
- Attach the quick connect directly to the faucet adapter, by pulling the outer collar (ring) downward while pushing the quick connect upward onto the faucet. Release the outer collar (ring) and the quick connect will lock into place. Fig. H
- Slowly open the water supply line and check for any sign of leaks at all water connection points.
- If leaks occur, immediately close the water supply and effect the necessary repairs and/or replacement of any/all defective connections. If you are unable to effect suitable repairs yourself, call our toll free CUSTOMER HELP LINE at "1 800 26 DANBY and ask for assistance.
NOTE: Once the water supply line to the machine is open, the inlet hose is pressurized. (even when the water supply is closed immediately thereafter)
NOTE: Failure to relieve (release) hose pressure before attempting to disconnect the hose from the faucet can result in back pressure over-spray.
WARNING: Incoming water temperature can be very hot and back pressure over-spray can cause severe burns and/or scalding.
NOTE: To relieve (release) hose pressure, close the water faucet. Press and "Hold" the "red" (pressure relief) button located on the front (body) of the quick connect until the flow of water stops.
Fig. F When the flow of water has stopped, the hose pressure is released and it is now safe to disconnect the hose from the faucet adapter.
Permanent Hose Installation (dual hose)
If your washing machine is to be permanently installed both fill hoses are required. The following accessories are not required for permanent installation applications;
- Water Inlet Hose Quick Connect.
- F截图 Adapter.
- Water Inlet Valve Cap/Plug.
We recommend that you store these items in a safe place for future use, in the event there is ever a need to change your installation method.
Connecting the Water Inlet Hoses:
- Install a rubber washer into each end of both fill hoses.
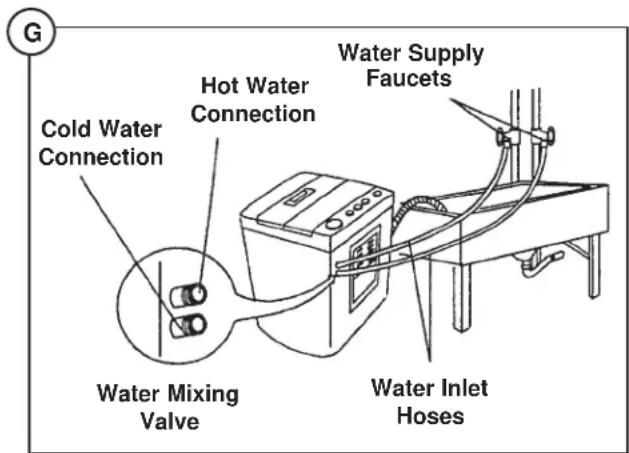
- Connect the both fill hoses (with the 90^ elbow) respectively to both the HOT & COLD water valves located at the back of the washing machine and tighten moderately. Fig. G
- Connect the opposite end of the fill hoses to their respective HOT & COLD water supply lines. Fig. I IMPORTANT: Make sure the HOT water line is connected to the HOT (upper) water valve and the COLD water line is connected to the COLD (lower) water valve. Fig. I

- Slowly open both water supply lines and check for any sign of leaks at all connection points.
- If leaks occur, immediately close the water supply lines and effect the necessary repairs and/or replacement of any/all defective connections.
- If you are unable to effect suitable repairs yourself, call our toll free CUSTOMER HELP LINE at "1 800 26 DANBY and ask for assistance.
STEP3
Connect Drain Hose to Drain Receptacle
Portable Installation: Hang the drain pipe over the edge of the wash tub and/or kitchen sink. Make sure the hose cannot be accidentally displaced when the drain water is being discharged.
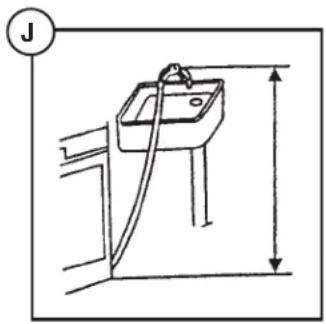
Permanent Installation: Insert the end of the drain hose directly into the drain stem pipe and /or hang over the edge of the wash tub.
NOTE: The highest point of the drain hose must be positioned between 26^ 46^ above floor level, otherwise the pumping out (efficiency) of the water may be affected. Fig.J
STEP4
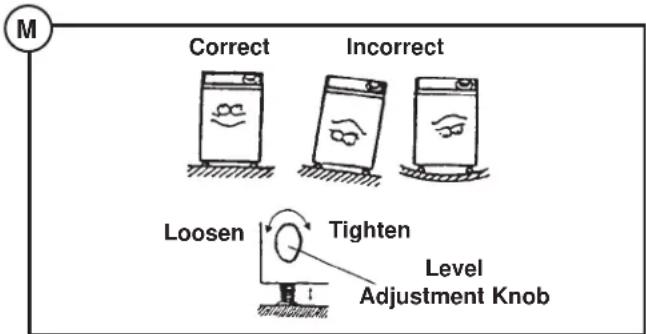
Levelling the Washing Machine.
Toprevent vibration and unnecessary movement during wash and spin operation, the washer must be installed on a firm and level surface. This is accomplished by using the level adjustment knob located on the lower right side of the cabinet. To change the height of the adjustment leg, unscrew the level adjustment knob, set the machine level and re-tighten when the machine is stable. Fig. M
The inclination angle of the washer shall not be more than two (2^) degrees. Place the washer at least 5cm (2^ ) away from the wall.
Portable Installations: For portable applications, the washing machine comes equipped with four (4) "north/south" casters that can easily be installed to assist in the movement of the machine too and from the sink. Lay the unit on its back. Install the casters into the bottom of the base as depicted. Fig. N
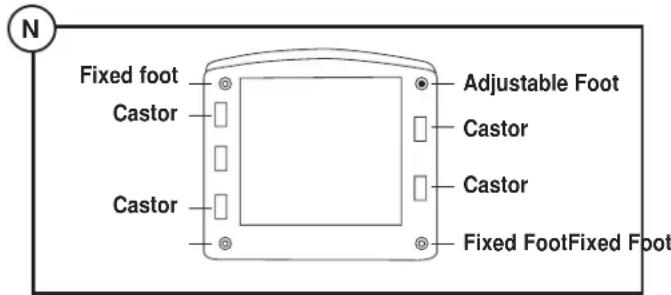
Return the machine to the upright position. When the machine is positioned for operation, set the height of the adjustment leg slightly higher than the front caster to prevent movement of the machine during wash and spin operation.
NOTE: Not all movement will be totally eliminated, this is normal.
STEP5
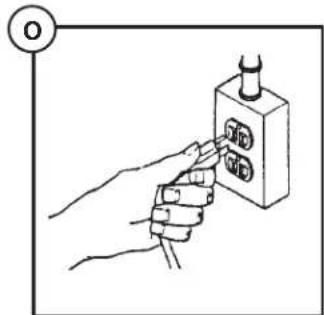
Plug In the Washing Machine.
Refer to section on Electrical Requirements before connecting the washer. Fig. O
STEP6
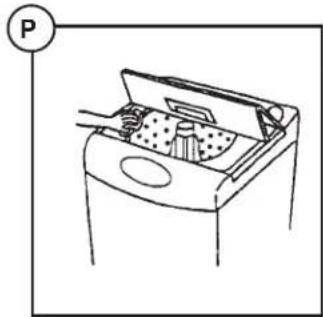
Wipe Out the Inside of the Washer Prior to Being Used.
Review Use and Care Guide. Fig. P
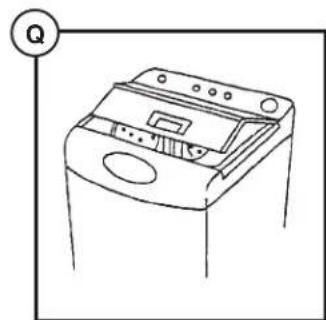
STEP7
Check the Safety Switch.
The washer should stop spinning when the lid is opened. Fig. Q
INSTALLER CHECKLIST
FAST TRACK FOR INSTALLING THE WASHER
(refer to manual for more detailed information)
Remove the shipping brace
Connect the water inlet hoses
Connect the hose to drain receptacle
Install on a firm and level surface
Plug in the washer
Wipe out the inside of washer, review use and care guide
Check safety switch
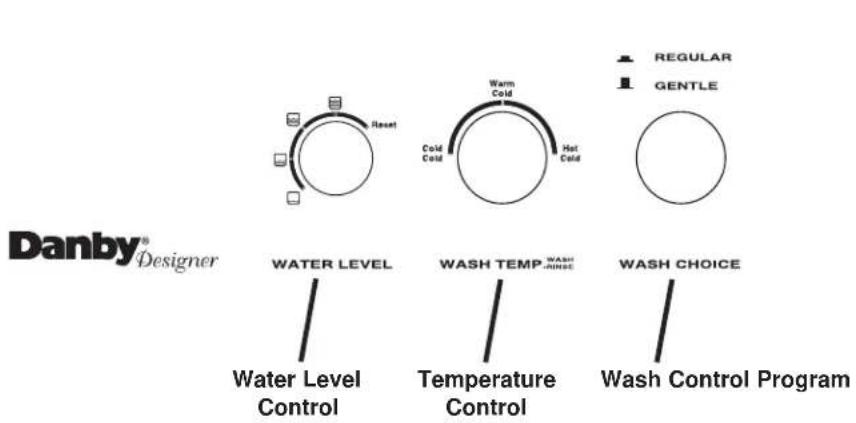
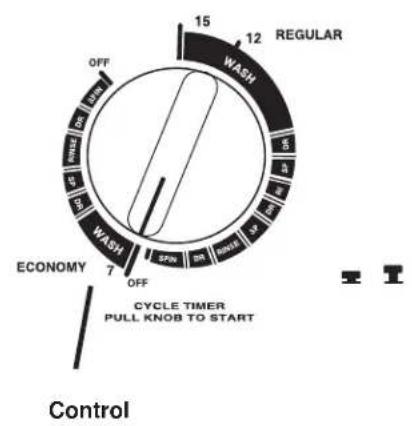
CONTROL PANEL
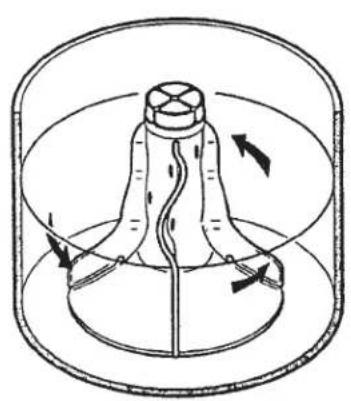
BEFORE WASHING
PREPARE WASH LOAD
Load articles by the weight not more than 4kg . Mix large and small articles in a load to get the best washing results.
Drop articles loosely into the inner tub. Do not pack them in or wrap them around the agitator.
Articles should move freely through the wash water for best cleaning results. Articles should rollover sink and then reappear.
When washing very large articles, do not fill inner tub as full as other loads.
The water level in your washer should fit the size of your wash load. Small loads will use lower water levels. There must be enough water in the inner tub to allow articles to move and turn over freely.
Overloading the inner tub can result in poor washing and rinsing. Overloading may also cause wrinkling and tearing of articles.
Water Level
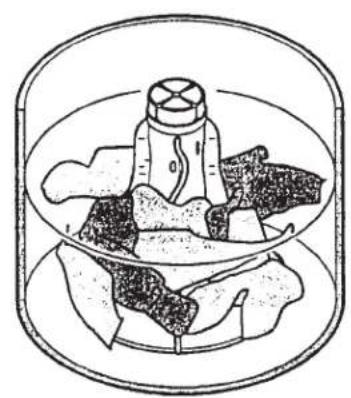
Right
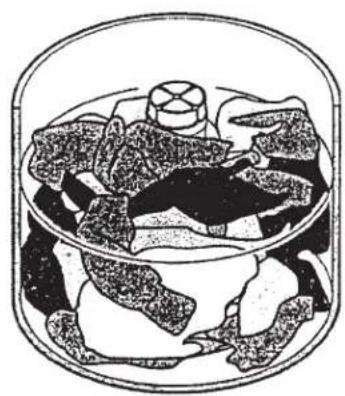
Wrong
WASH TEMPERATURE
Hot Water
Hot water will give the best results of cleaning and sanitizing. But it is not suitable for all articles. It is best for sturdy whites and colourfast articles, heavily soiled articles and diapers.
Warm Water
By using warm water, there is less chance of colour loss in articles. Use with light and moderate soils, non-colourfast or dark colours, permanent press, silks, woolens, nylons and acrylic.
Cold Water
Cold water is less effective in cleaning than hot or warm water, but it does minimize wrinkling and colour fading. Use it for washing extra sensitive clothes and for the rinsing of all fabrics.
Energy
You can save energy when washing by following a few guidelines:
- Heating water accounts for the greatest expense when washing. Save on heating water by using cold rinses.
- Wash full loads, but do not overload.
- Select a shorter wash time for lightly soiled articles.
HOW TO USE YOUR WASHER
A.) Determine proper cycle
- Press down the program knob and turn it to the desired function.
- Pull up the program knob to start the wash program.
WARNING:
The program knob can only be turned clockwise when it is pressed down.
B.) To Wash clothes
IMPORTANT:
Before using your new washer, make sure the washer cord is plugged into a properly grounded and polarized outlet which has the appropriate voltage (refer to the serial plate). Make sure the washer hoses are connected to the hot and cold water faucets, and that the faucets are turned on. Be sure the drain hose is not kinked and is inserted into a drain. See the INSTALLATION INSTRUCTIONS for details of proper washer installation.
Before using the washer for the first time, wipe out the inside of the washtub with a sudsy cloth.
- Load laundry and add detergent (refer to section "GENERAL WASHING INFORMATION" for proper detergent usage.
- Water level, Select water level according to laundry quantity. Refill function allows you to add water during operation (turn the water level knob to RESET and hold for 2-3 seconds. Then turn to the level desired).
3. Wash Choice,
regular mode, press down the WASH CHOICE button. Gentle mode, release the button.
4. Close the lid
The washer will not spin with the lid open.
5. Set WASH/RINSE temperatures
NOTE: If your washer is (permanently installed connected to both a HOT/COLD water supply, the washer will provide a cold rinse in all temperature settings. If your washer is installed under a portable application, connected to a single water supply, the wash and rinse temperatures will be the same. Also refer to the "special note" under portable (single hose) installation.
C.) Timer
Although the washer cycles are automatic, the timer may be reset to lengthen, shorten or repeat a portion of the cycle.
Toset or reset the timer, push timer knob in to stop the washer. Hold timer knob firmly while turning clockwise to the setting desired. Pull timer knob out to start the washer.
HOW TO USE YOUR WASHER CONTINUED
Cycles

ECONOMY CYCLE
Water Refill
Wash 7 min.
Drain 2.3 min.
Spin 2.7 min.
Water Refill
Rinse 2 min.
Last Rinse 2 min.
Drain 2.8 min.
Spin 4.2 min.

REGULAR CYCLE
Water Refill
Wash 12-15 min.
Drain 2.3 min.
Spin 2.7 min.
Water Refill
Rinse 2 min.
Drain 2.3 min.
Spin 2.7 min.
Water Refill
Rinse 2 min.
Last Rinse 2 min.
Drain 2.8 min.
Spin 4.2 min.
Recommended Detergent Amount
| Water Level | Detergent Amount | |
| Lightly Soiled | Heavily Soiled | |
| Low 1 10 | - 16g 20 - 32g | |
| Low 2 12 | - 19g 24 - 38g | |
| Mid 14 - 22g 27 - 43g | ||
| High 18 - 24g 35 - 47g | ||
GENERAL WASHING INFORMATION
Bleach
Pour the bleach into the bleach dispenser.
Wash the inner tub with clean water after using bleach
Hand Wash Corner
Use this hand wash corner to wash heavily soiled spots.
Preparations Before Wash
Remove clothes that cannot be machine washed. Separate greased items from non-greased items, separate dark from light colours
Empty pockets and remove all things attached to the laundry, especially small metal objects.
Maximum Capacity
The maximum washing capacity and spin capacity is 4kg
If the agitator cannot rotate, reduce 1 or 2 laundry articles.
Spin Only Program
Close the lid
Turn the program knob to the starting point of the last spin function and pull out the knob to begin.
A variety of knits are being used for many types of clothing and household furnishings. Many knits are machine washable, some are hand washable and some must be dry-cleaned. When buying, make sure the garment has a care label with care instructions. These directions must be followed otherwise they may shrink or relax when exposed to water.
Rayon Knits
Rayon stretches and shrinks easily. Treat as a delicate fabric and wash gently.
Cotton Knits
Unless the label indicates that it is preshrunk, cotton knits will probably shrink to some degree. Over drying contributes to shrinkage of cotton knits. Wash water should be hot or warm suitable for colour and soil. The rinse water should be cold.
Synthetic Knits
Knits made from synthetic fibers or blends containing a high percentage of synthetics will generally keep their shape. When buying, make sure the trimmings (including belts) are machine washable, seams are not frayed, and zippers and trimmings are well fastened.
Wool Sweaters
Loosely knit or delicately constructed sweaters will need delicate care hand wash. Rinse thoroughly. Block to shape and dry flat.
For sweaters labeled "machine washable" follow manufacturers directions. Dry flat. Excess agitation and excess tumbling are the main cause of wool shrinkage.
Wool Knits
Dry-clean wool knits unless labeled "machine washable" follow manufacturers directions.
USER MAINTENANCE INSTRUCTION
Cold Weather
If the washer is delivered on a cold day (below freezing), or is stored in an unheated room or area during the cold months, do not attempt to operate it until the washer has had a chance to warm up.
Care of Your Washer
- Use only a damp or sudsy cloth for cleaning the control panel. Some spray prewash products may harm the finish on the control panel.
- Wipe the washer cabinet as needed. If detergent, bleach or other washing products are spilled on the cabinet, wipe immediately. Some products will cause permanent damage if spilled on the cabinet.
- Do not use scouring pads or abrasive cleaners.
- Do not lay sharp or rough objects on or against the washer. The finish could be damaged.
-
Do not expose the washer to direct sunlight or rain.
-
Keep the washer away from fire or heat source.
- The washtub will need no particular care though it may need rinsing or wiping after an unusual load has been washed. This also may be necessary if too little detergent has been used.
- Leave the lid and open to allow the inside of the washer to dry out after use. This helps prevent musty odors from developing.
- W hen unplugging the power cord, do not pull the wire cord, grasp the "plug" firmly and pull.
Motor Overload Protector
The internal overload protector in the motor will stop the motor automatically in the event of an overload. The overload protector will reset itself in two or three minutes and the motor will reset automatically. If the overload protector stops the motor again, remove the washer from use and call the serviceman to correct the problem.
TROUBLE SHOOTING
| Problem | Location to be checked |
| The washer will not drain | • Is the drain hose kinked or hung too high? • Is the drain hose frozen or clogged? |
| Spin malfunction | • Is the laundry unevenly balanced in the tub? • Is the lid closed? • Is the washer on a level surface? |
| Washer will not fill up | • Is the water faucet open? • Is the water pressure too low? • Is the filter in the inlet valve clogged? • Is there any water? |
| Spin malfunction | • Is the power cord firmly plugged in? • Have you blown a fuse or tripped the breaker switch? • Did the water reach the program level? |
Notice
-
Do not operate the washer when the water pressure is lower than 0.02MPa or higher than 0.8MPa to avoid damage of the inlet system
-
Do not use the washtub as a water container and always to drain water completely
- Close the tap after use
- Unplug the power cord
WIRING DIAGRAM
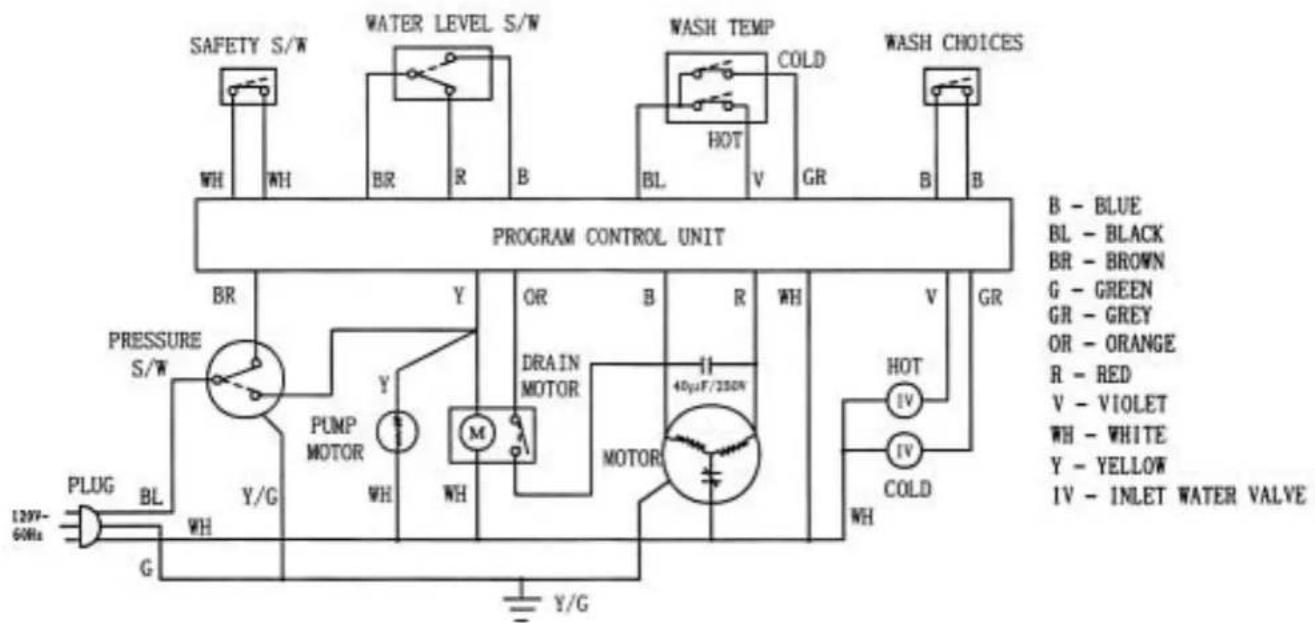
Danby
LIMITED PRODUCT WARRANTY
This quality product is warranted to be free from manufacturer's defects in material and workmanship, provided that the unit is used under the normal operating conditions intended by the manufacturer.
This warranty is available only to the person to whom the unit was originally sold by Danby or by an authorized distributor of Danby, and is non-transferable.
TERMS OF WARRANTY
First Year
During the first year (1), any mechanical or electrical parts of this product found to be defective, will be repaired or replaced, at warrantor's option, at no charge to the ORIGINAL purchaser.
To obtain Service
Danby reserves the right to limit boundaries of "In Home Service" due to the proximity of an Authorized Service Depot. Any appliance requiring service outside the limited boundaries of "In Home Service", it will be the customer's responsibility to transport the appliance to the closest Authorized Service Depot at their own expense. Contact your dealer from whom your unit was purchased, or contact your nearest authorized Danby service depot, where service must be performed by a qualified service technician. If service is performed on the units by anyone other than an authorized service depot, or the unit is used for commercial application, all obligations of Danby under this warranty shall be at an end.
EXCLUSIONS
Save as herein provided, Danby Products Limited (Canada) or Danby Products Inc. (U.S.A.), there are no other warranties, conditions, representations or guarantees, express or implied, made or intended by Danby Products Limited or its authorized distributors and all other warranties, conditions, representations or guarantees, including any warranties, conditions, representations or guarantees under any Sale of Goods Act or like legislation or statue is hereby expressly excluded. Save as herein provided, Danby Products Limited (Canada) or Danby Products Inc. (U.S.A), shall not be responsible for any damages to persons or property, including the unit itself, howsoever caused or any consequential damages arising from the malfunction of the unit and by the purchase of the unit, the purchaser does hereby agree to indemnify and save harmless Danby Products Limited from any claim for damages to persons or property caused by the unit.
GENERAL PROVISIONS
No warranty or insurance herein contained or set out shall apply when damage or repair is caused by any of the following:
1) Power Failure.
2) Damage in transit or when moving the appliance.
3) Improper power supply such as low voltage, defective house wiring or inadequate fuses.
4) Accident, alteration, abuse or misuse of the appliance such as inadequate air circulation in the room or abnormal operating conditions, (extremely high or low room temperature).
5) Use for commercial or industrial purposes.
6) Fire, water damage, theft, war, riot, hostility, acts of God such as hurricanes, floods etc.
7) Service calls resulting in customer education.
Proof of purchase date will be required for warranty claims; so, please retain bills of sale. In the event warranty service is required, present this document to our AUTHORIZED SERVICE DEPOT.
Warranty Service
With-In Canada With-In United State
In Home In Home
TABLE DES MATIÈRES
Installation de tuyau simple (applications portatives)
For service, contact your nearest service depot or call:
1-800-26-Dandy
(1-800-263-2629)
to recommend a depot in your area.
Pour obtaining the service, consultez
Top Load Washing Machine
The model number can be found on the serial plate located on the back panel of the unit.
All repair parts available for purchase or special order when you visit your nearest service depot. To request service and/or the location of the service depot nearest you, call the TOLL FREE NUMBER.
When requesting service or ordering parts, always provide the following information:
Product Type
- Model Number
- Part Description