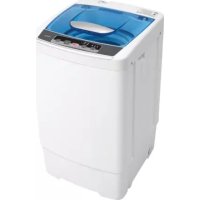
DWM028WDB3 - Washing machine DANBY - Free user manual and instructions
Find the device manual for free DWM028WDB3 DANBY in PDF.

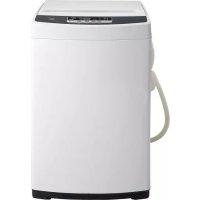
| Product Type | Washing Machine |
| Brand | Danby |
| Model | DWM028WDB3 |
| Dimensions (W x H x D) | 41 cm x 74 cm x 42 cm |
| Maximum wash capacity | 2.8 kg |
| Loading type | Top-loading |
| Agitator type | Pulsator |
| Number of programs | 7 programs |
| Available programs | Wash & Rinse & Spin, Wash & Rinse, Rinse & Spin, Wash, Rinse, Spin, Delicate |
| Water levels | Low (15 L), Medium (20 L), High (26 L) |
| Program duration | 5 to 30 minutes depending on program |
| Lint filter | Yes, clean after each cycle |
| Water supply | Cold water only |
| Electrical connection | 3-prong grounded plug |
| Adjustable feet | Yes (1 adjustable front foot, 3 fixed feet, 2 rear rollers) |
| Functional parts warranty | 12 months |
| Plastic parts warranty | 30 days |
| In-home service | Yes within 100 km of an authorized service center |
| Country of manufacture | Not specified (check rating plate) |
Frequently Asked Questions - DWM028WDB3 DANBY
User questions about DWM028WDB3 DANBY
0 question about this device. Answer the ones you know or ask your own.
Ask a new question about this device
Download the instructions for your Washing machine in PDF format for free! Find your manual DWM028WDB3 - DANBY and take your electronic device back in hand. On this page are published all the documents necessary for the use of your device. DWM028WDB3 by DANBY.
USER MANUAL DWM028WDB3 DANBY
Welcome to the Danby family. We are proud of our quality products and we believe in dependable service. We suggest that you read this owner's manual before plugging in your new appliance as it contains important operation information, safety information, troubleshooting and maintenance tips to ensure the reliability and longevity of your appliance.
Visit www.Danby.com to access self service tools, FAQs and much more. For additional assistance call 1-800-263-2629.
Note the information below; you will need this information to obtain service under warranty. You must provide the original purchase receipt to validate your warranty and receive service.
Model Number:
Serial Number:
Date of Purchase:
Need Help?
Before you call for service, here are a few things you can do to help us serve you better.
Read this owner's manual:
It contains instructions to help you use and maintain your appliance properly.
If you receive a damaged appliance:
Immediately contact the retailer or builder that sold you the appliance.
Save time and money:
Check the troubleshooting section at the end of this manual before calling. This section will help you solve common problems that may occur.

1-800-26-Danby
(1-800-263-2629)

Important Safety Information READ AND FOLLOW ALL SAFETY INSTRUCTIONS
SAFETY INSTRUCTIONS
WARNING: To reduce the risk of fire, electric shock or injury to persons when using this appliance, follow basic safety precautions, including the following:
- Do not wash articles that have been previously cleaned in, washed in, soaked in or spotted with gasoline, dry-cleaning solvents or other flammable or explosive substances as they give off vapours that could ignite or explode.
- Do not add gasoline, dry-cleaning solvents or other flammable or explosive substances to the wash water. These substances as they give off vapours that could ignite or explode.
- Under certain conditions, hydrogen gas may be produced in a hot water system that has not been used for 2 weeks or more. HYDROGEN GAS IS EXPLOSIVE. If the hot water system has not been used for such a period, turn on all hot water faucets and let the water flow for several minutes before using the washing machine. This will release any accumulated hydrogen gas. Do not smoke or use an open flame during this process.
- Do not allow children to play on or in the appliance. Close supervision of children is necessary when the appliance is in use.
- Before the appliance is removed from service or discarded, remove the door or lid.
- Do not reach into the appliance if the tub or agitator is moving.
- Do not install or store this appliance where it will be exposed to the weather.
- Do not tamper with the controls.
- Do not repair or replace any part of the appliance or attempt any servicing unless specifically recommended in the user maintenance instructions or in published user repair instructions that you understand and have the skills to carry out.
GROUNDING INSTRUCTIONS
This appliance must be grounded. Grounding reduces the risk of electrical shock by providing an escape wire for the electrical current.
This appliance has a cord that has a grounding wire with a 3-prong plug. The power cord must be plugged into an outlet that is properly grounded. If the outlet is a 2-prong wall outlet, it must be replaced with a properly grounded 3-prong wall outlet. The serial rating plate indicates the voltage and frequency the appliance is designed for.
WARNING - Improper use of the grounding plug can result in a risk of electric shock. Consult a qualified electrician or service agent if the grounding instructions are not completely understood, or if doubt exists as to whether the appliance is properly grounded.
Do not connect your appliance to extension cords or together with another appliance in the same wall outlet. Do not splice the power cord. Do not under any circumstances cut or remove the third ground prong from the power cord. Do not use extension cords or ungrounded (two prongs) adapters.
If the power supply cord is damaged, it must be replaced by the manufacturer, its service agent or similar qualifi ed person in order to avoid hazard.
CAUTION: Do not connect this appliance to a hot water supply. This appliance is for cold water connection only.
This appliance is not intended for use by persons (including children) whose physical, sensory or mental capabilities may be different or reduced, or who lack experience or knowledge, unless such persons receive supervision or training to operate the appliance by a person responsible for their safety.
INSTALLATION INSTRUCTIONS
LOCATION
- Do not use hot water. This appliance is for cold water connection only.
- Two people should be used when moving the appliance.
- Remove interior and exterior packaging prior to installation. Wipe the outside of the appliance with a soft, dry cloth and the inside with a lukewarm wet cloth. Do not spray the appliance with water.
- Place the appliance on a level floor that is strong enough to support it when it is fully loaded, in a room that has convenient access to a water supply and drain, has low moisture and humidity and does not freeze in winter.
- Do not place the appliance on carpeted flooring as this can block the lower ventilation openings.
- Keep the appliance away from heat sources and out of direct sunlight. Excessive heat or sunlight can deform or discolour the appliance.
- This appliance is intended for household use only. It is not designed for outside installation, including anywhere that is not temperature controlled (garages, porches, vehicles, etc.).
- This appliance is 41~cm (16.2 inches) wide by 74~cm (29.1 inches) high by 42~cm (16.5 inches) deep. Make sure that you leave the minimum amount of space between the appliance and all surrounding walls and vents. Do not cover any of the ventilation openings with any material as the appliance needs adequate space to breathe.
- Allow 12.7cm (5 inches) of space between the back, sides and top of the appliance and all adjacent walls.
- This appliance is intended for free-standing installation only and is not intended to be built into a cabinet or counter. Building in this appliance can cause it to malfunction.
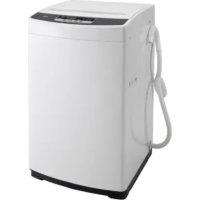
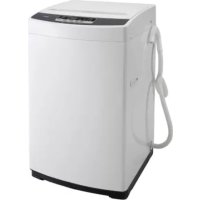
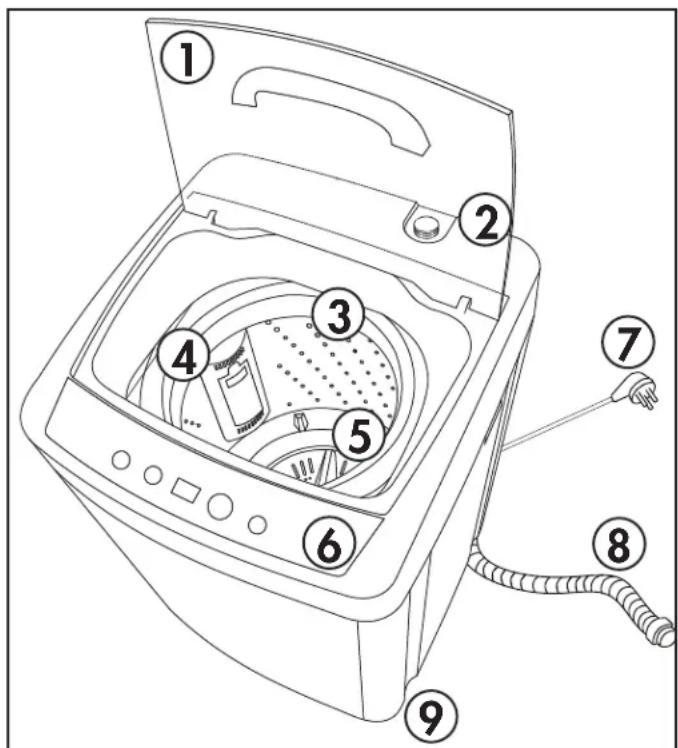
FEATURES
- Lid
- Water Inlet
- Inner Tub
- Lint Filter
- Pulsator
- Control Panel
- Power Cord
- Drain Hose
- Adjustable Foot
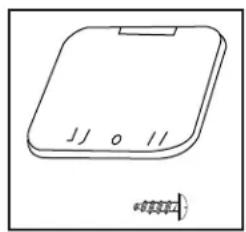
ACCESSIONS
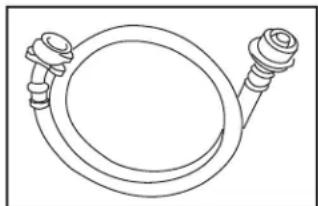
Water Inlet Hose Assembly
Base Plate
INSTALLATION INSTRUCTIONS
BASE PLATE INSTALLATION
Place the appliance on its back on a soft blanket or towel to avoid damaging flooring or scratching the washer cabinet. Attach the base plate to the bottom of the appliance using the screws provided.
Ensure that the base foam and fixing frame have been removed from the bottom of the appliance before attaching the base plate.
LEVELLING INSTRUCTIONS
It is important that the appliance is level to help avoid unbalanced loads and excessive noise.
- Turn the levelling foot counter-clockwise until the top of the foot it touching the bottom of the cabinet.
- Slowly turn the levelling foot clockwise until the appliance is level.
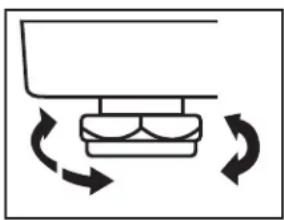
Note: This appliance includes one adjustable foot on the front, three solid feet and two rollers on the back.
WATER INLET HOSE INSTALLATION
One end of the inlet hose assembly is bent at a 90^ angle. Attach this end to the water inlet on the top of the appliance.
Remove the aerator from the faucet that will be used as a water supply. Attach the other end of the inlet hose assembly to the faucet.
Turn on the water supply and check both connections for leaks. If any leaks are found, turn off the water, remove the hose and use tefl on tape to ensure a tight seal at the connection. Be careful when removing the hose as it will be filled with water.
Important: Do not connect the water inlet hose to a hot water supply. This appliance is for cold water connection only.

DRAIN HOSE INSTALLATION
The drain hose will arrive pre-attached to the appliance. It will default to exiting the right side of the appliance. It can be changed to a left hand side exit by removing the base plate from the bottom of the appliance and re-routing the drain hose. Make sure to replace the base plate after moving the hose.
When running the drain hose to a drain, ensure that there are no bends in the hose as this can cause a blockage and impede the drain function.
The drain hose can be directed upward toward a sink or bucket but ensure that the hose does not rise more than 100cm (39.4 in) from the ground as this can impact the drain function.
OPERATING INSTRUCTIONS
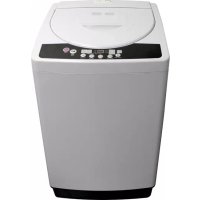
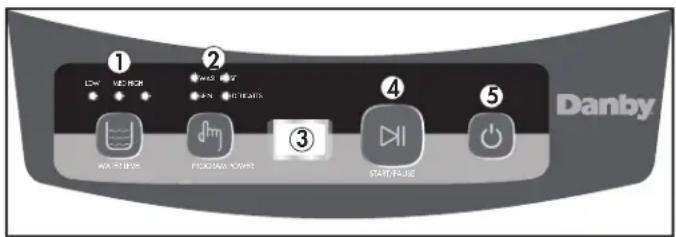
CONTROL PANEL
1. Water level button and indicator lights
- Press this button to choose the desired water level. The indicator light will illuminate to show LOW, MED or HIGH.
2. Program button and indicator lights
- Press this button to choose the desired program. The indicator lights will illuminate to display what part of the cycle is currently active.
3. Time display screen
- Displays the remaining time is a program.
- Displays fault codes when there is an error in operation.
4. Start/Pause button
- Press this button to start a chosen program.
- Press this button during operation to pause a program.
- Press this button to restart a program that has been paused.
5. On/Off button
- Press this button to turn the appliance on or off.
FUNCTION INSTRUCTION
Prior to starting the washing machine, check that:
- The drain hose is in the correct position.
- There are no leaks in the inlet hose when the faucet is turned on.
- The power cord is properly plugged into a three prong grounded outlet.
- That all coins and loose items have been removed from clothing.
- Place clothing into the washing machine and add the desired amount of detergent.
DETERGENT
The amount of detergent required will vary based on the amount of laundry being added to the appliance.
Consult the below table for information on laundry weights and detergent amounts.
| Weight of laundry | Water Level | Water Volume | Detergent Amount |
| 2-2.8 kgs (4.4-6.2 lbs) | High 26 | 6.1 liters (~0.92 cu.ft.) | 31.8 grams (0.07 lbs) |
| 1-2 kgs (2.2-4.4 lbs) | Med 20 | 0.1 liters (~0.71 cu.ft.) | 27.2 grams (0.06 lbs) |
| <1 kg (<2.2 lbs) | Low 15 | liters (~0.53 cu. ft.) | 18.2 grams (0.04 lbs) |
AUTOMATIC POWER OFF FUNCTION
If the washing machine is turned on and no program is selected within 10 minutes, the appliance will automatically power off to conserve energy.
Once a wash program is complete, a buzzer will sound six times to alert that the program is finished and the appliance will automatically power off to conserve energy.
OPERATING INSTRUCTIONS
CARE & MAINTENANCE
PROGRAM SELECTION
Press the water level button to choose the size of wash load that will be completed.
Press the program button repeatedly to choose the desired program. The programs will cycle in the following order:
- Wash & Rinse & Spin
- Wash & Rinse
- Rinse & Spin
- Wash
- Rinse
- Spin
- Delicates
Consult the below table for information on program times.
- Normal wash time is approximately 10 minutes.
Normal rinse time is approximately 15 minutes.
Normal spin time is approximately 5 minutes.
Note: Program times can vary based on the amount of clothing in the washing machine and the water pressure going into the inlet hose.
| Program Total Time | |
| Wash & Rinse & Spin 30 minutes | |
| Wash & Rinse 25 minutes | |
| Rinse & Spin 20 minutes | |
| Wash 10 minutes | |
| Rinse 15 minutes | |
| Spin 5 minutes | |
| Delicates 17 minutes | |
- Close the lid and press the Start/Pause button to begin the desired program.
- A program can be paused once it is in operation by pressing the Start/Pause button.
- When a program is finished, an alarm will sound.
- To reduce the risk of electric shock and water leaking, disconnect the water inlet hose and the power cord when the appliance is not in use.
CLEANING
Before performing any cleaning or maintenance, ensure that the water inlet hose has been disconnected and that the power cord has been unplugged.
Clean the outside of the appliance with a warm, damp cloth. Avoid using detergents or chemicals as this can damage or discolor the cabinet.
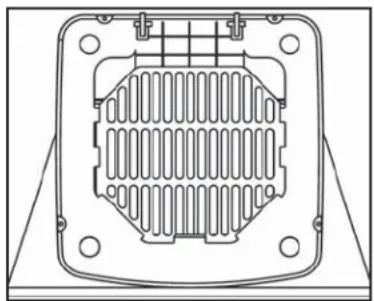
LINT FILTER
The lint fi ler should be cleaned after each program.
- Remove the lint filter from the inner tub of the appliance.
- Open the lint filter and remove any lint that has accumulated.
- The lint fi liter can be rinsed under cold water to remove any lint build up. Do not use detergents or chemicals on the lint fi liter.
- Ensure that the lint filter is replaced in the appliance before beginning a new program.
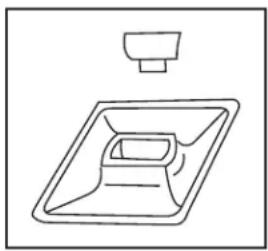
WATER INLET
The water inlet may require periodic cleaning to remove debris or hard water build up.
- Ensure the water inlet hose has been disconnected from the appliance.
- Remove the fi liter screen from the inlet valve and remove any debris or hard water build up. The fi liter screen can be rinsed under cold water to remove any build up.
- Ensure that the filter screen is replaced in the water inlet valve before reattached the water inlet hose.
VINEGAR RINSE
A rinse of vinegar and water can be run through the washing machine to remove any stains on the inner tub or any lingering odors.
Place 1/2 cup of vinegar in the washine machine and choose the highest water level. Allow the appliance to run a full Wash & Rinse & Spin program with no laundry to remove stains and odors.
TROUBLESHOOTING
Danby Consumer Care: 1-800-263-2629
Hours of operation:
Monday to Thursday 8:30 am - 6:00 pm Eastern Standard Time
Friday 8:30 am - 4:00 pm Eastern Standard Time
Information in this manual is subject to change without notice.
| PROBLEM POSSIBLE CAUSE | |
| Washer does not operate • Not plugged in. | • The circuit breaker tripped or a blown fuse. • The lid is not closed. • The water source is not turned on. |
| No water or insufficient water supply • The water source is not turned on. • The water inlet hose is bent. • The fiiter screen in the water inlet is clogged. | |
| The washing machine does not drain • The drain hose is bent. • There is a problem with the drain pump. | |
| Washing machine vibrates or is too noisy • The washer is not level. • The washing machine is touching another object. • The laundry load is not balanced. | |
| Washing machine does not spin • The lid is not closed. • The washer is not level. | |
ERROR CODES
E1 - No water flow
- Check that the water source is turned on.
- Check the water pressure.
- Check that the water inlet fiiter screen is clean.
E2 - Lid is open
- Check that the lid is completely closed.
E3 - Load is unbalanced
- Ensure that the laundry load is balanced.
E4 - Drain alarm
- Ensure that the drain hose is no more than 100cm (39.4 in) above the ground.
- Ensure that the drain hose is not clogged or bent.
F1 - System error
- Disconnect both the water inlet hose and the power cord and call a service repair technician.
E3 - SPIN CYCLE ADJUSTMENT
If the laundry load is uneven during the spin cycle, a safety feature will activate that will stop the spin program and revert back to a rinse. The tub will fi II with water in an attempt to balance the load. Once the tub is balance, the spin cycle will resume.
This function will activate twice. If the load remains unbalanced, the appliance will stop functioning, an alarm will sound and the error code E3 will display on the control panel.
LIMITED "IN HOME" WARRANTY
This quality product is warranted to be free from manufacturer's defects in material and workmanship, provided that the unit is used under the normal operating conditions intended by the manufacturer.
This warranty is available only to the person to whom the unit was originally sold by Danby Products Limited (Canada) or Danby Products Inc. (U.S.A.) (hereafter "Danby") or by an authorized distributor of Danby, and is non-transferable.
TERMS OF WARRANTY
Plastic parts are warranted for thirty (30) days from the date of purchase, with no extensions provided.
First 12 months During the first twelve (12) months, any functional parts of this product found to be defective, will be repaired or replaced, at warrantor's option, at no charge to the original purchaser.
To obtain service Contact the dealer where the unit was purchased, or contact the nearest authorized Danby service depot, where service must be performed by a qualified service technician. If service is performed on the unit by anyone other than an authorized service depot, all obligations of Danby under this warranty shall be void.
Boundaries of Danby reserves the right to limit the boundaries of "In Home Service" to the proximity of an authorized service depot. Any appliance requiring service outside the limited boundaries of "In Home Service", will be the consumer's responsibility to transport at their own expense to the original point of purchase or a service depot for repair. If the appliance is installed in a location that is 100 kilometers (62 miles) or more from the nearest service center, it must be delivered to the nearest authorized Danby Service Depot by the purchaser.
Transportation charges to and from the service location are not protected by this warranty and are the responsibility of the purchaser.
Nothing within this warranty shall imply that Danby will be responsible or liable for any spoilage or damage to food or other contents of this appliance, whether due to any defect of the appliance, or its use, whether proper or improper.
EXCLUSIONS
Save as herein provided, by Danby, there are no other warranties, conditions, representations or guarantees, express or implied, made or intended by Danby or its authorized distributors and all other warranties, conditions, representations or guarantees, including any warranties, conditions, representations or guarantees under any Sale of Goods Act or like legislation or statute is hereby expressly excluded. Save as herein provided, Danby shall not be responsible for any damages to persons or property, including the unit itself, howsoever caused or any consequential damages arising from the malfunction of the unit and by the purchase of the unit, the purchaser does hereby agree to indemnify and hold harmless Danby from any claim for damages to persons or property caused by the unit.
GENERAL PROVISIONS
No warranty or insurance herein contained or set out shall apply when damage or repair is caused by any of the following:
1) Power failure.
2) Damage in transit or when moving the appliance.
3) Improper power supply such as low voltage, defective house wiring or inadequate fuses.
4) Accident, alteration, abuse or misuse of the appliance such as inadequate air circulation in the room or abnormal operating conditions (ie. extremely high or low room temperature).
5) Use for commercial or industrial purposes (i.e. If the appliance is not installed in a domestic residence).
6) Fire, water damage, theft, war, riot, hostility, acts of God such as hurricanes, floods etc.
7 Service calls resulting in customer education.
8) Improper Installation (ie. Building-in of a free standing appliance or using an appliance outdoors that is not approved for outdoor application, including but not limited to: garages, patios, porches or anywhere that is not properly insulated or climate controlled).
Proof of purchase date will be required for warranty claims; retain bills of sale. In the event that warranty service is required, present the proof of purchase to our authorized service depot.
Warranty Service In Home
Danby Products Limited
PO Box 1778, Guelph, Ontario, Canada N1H 6Z9
Telephone: [519] 837-0920 FAX: [519] 837-0449
1-800-263-2629 04/17
Danby Products Inc.
PO Box 669, Findlay, Ohio, U.S.A. 45840
Telephone: (419) 425-8627 FAX: (419) 425-8629
Bienvenue
Danby Products Limited
PO Box 1778, Guelph, Ontario, Canada N1H 6Z9
Telephone: (519) 837-0920 Telecopieur: (519) 837-0449
1-800-263-2629
04/17
Danby Products Inc.
PO Box 669, Findlay, Ohio, U.S.A. 45840
Telephone: [419] 425-8627 Telecopieur: [419] 425-8629
Bienvenido
Danby Products Limited
PO Box 1778, Guelph, Ontario, Canada N1H 6Z9
Telephone: [519] 837-0920 FAX: [519] 837-0449
1-800-263-2629
04/17
Danby Products Inc.
PO Box 669, Findlay, Ohio, U.S.A. 45840
Telephone: (419) 425-8627 FAX: (419) 425-8629
NOTES / REMARQUES / NOTAS :
NOTES / REMARQUES / NOTAS :