USER MANUAL Fusion 12000+ SUNTEC
natural_image
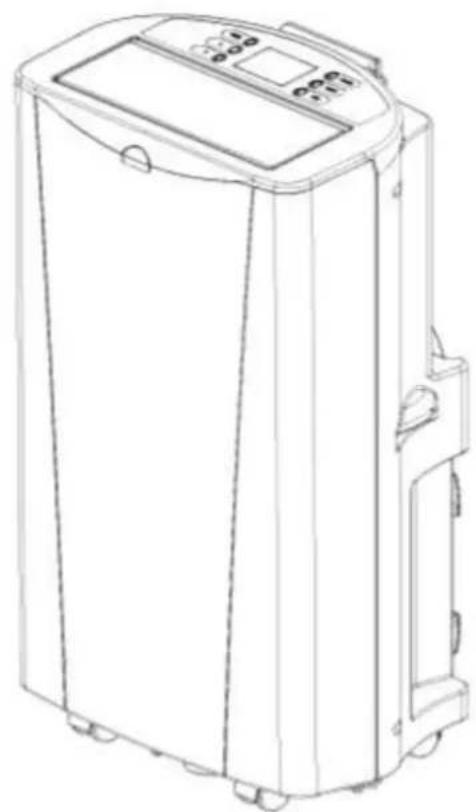
Line drawing of a portable air purifier device with control panel and buttons (no text or symbols)
Aufbau
Abb. 1
Abb. 2
flowchart
graph LR
    A["Assembly Setup"] --> B["Reassembly"]
    B --> C["Internal Structure"]
    C --> D["Coating"]
    D --> E["Product Final"]
    style A fill:#f9f,stroke:#333
    style E fill:#bbf,stroke:#333
Abb.3 Abb.4
Abb.5
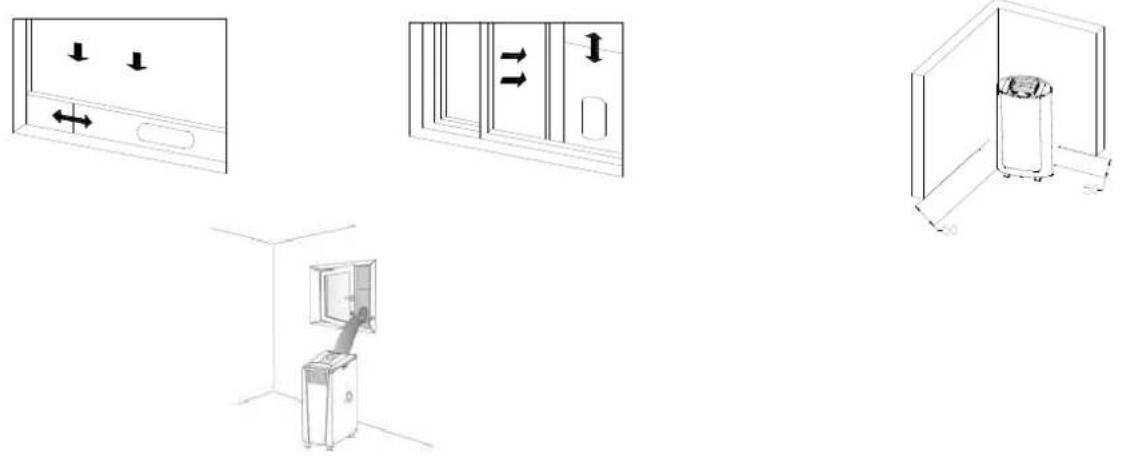
Abb.6
Abb.7
natural_image
Line drawing of a trash bin near a door with a handle, no text or symbols present
natural_image
Line drawing of a cylindrical air conditioner unit connected to a wall-mounted control panel (no text or symbols)
Abb.8
SEHR WICHTIG!
natural_image
Diagram showing a device's internal structure before and after assembly, with no visible text or symbols.
natural_image
Simple line drawing of a cabinet with an open door, placed in a corner room (no text or symbols)
natural_image
Two technical diagrams showing a cylindrical component inserted into a wall, with no visible text or symbols.
natural_image
Diagram showing a mechanical assembly transforming into a container with a striped pattern (no text or symbols)
Lagerung
© 2016 KLIMATRONIC® FUSION+
SUNTEC WELLNESS GMBH / HOLZSTRASSE 2 / 40 221 DÜSSELDORF / DEUTSCHLAND
KLIMATRONIC®
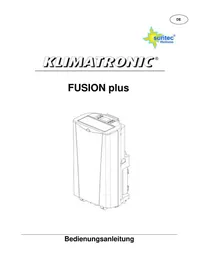
FUSION plus
natural_image
Line drawing of a portable air purifier device with control panel and buttons (no text or symbols)
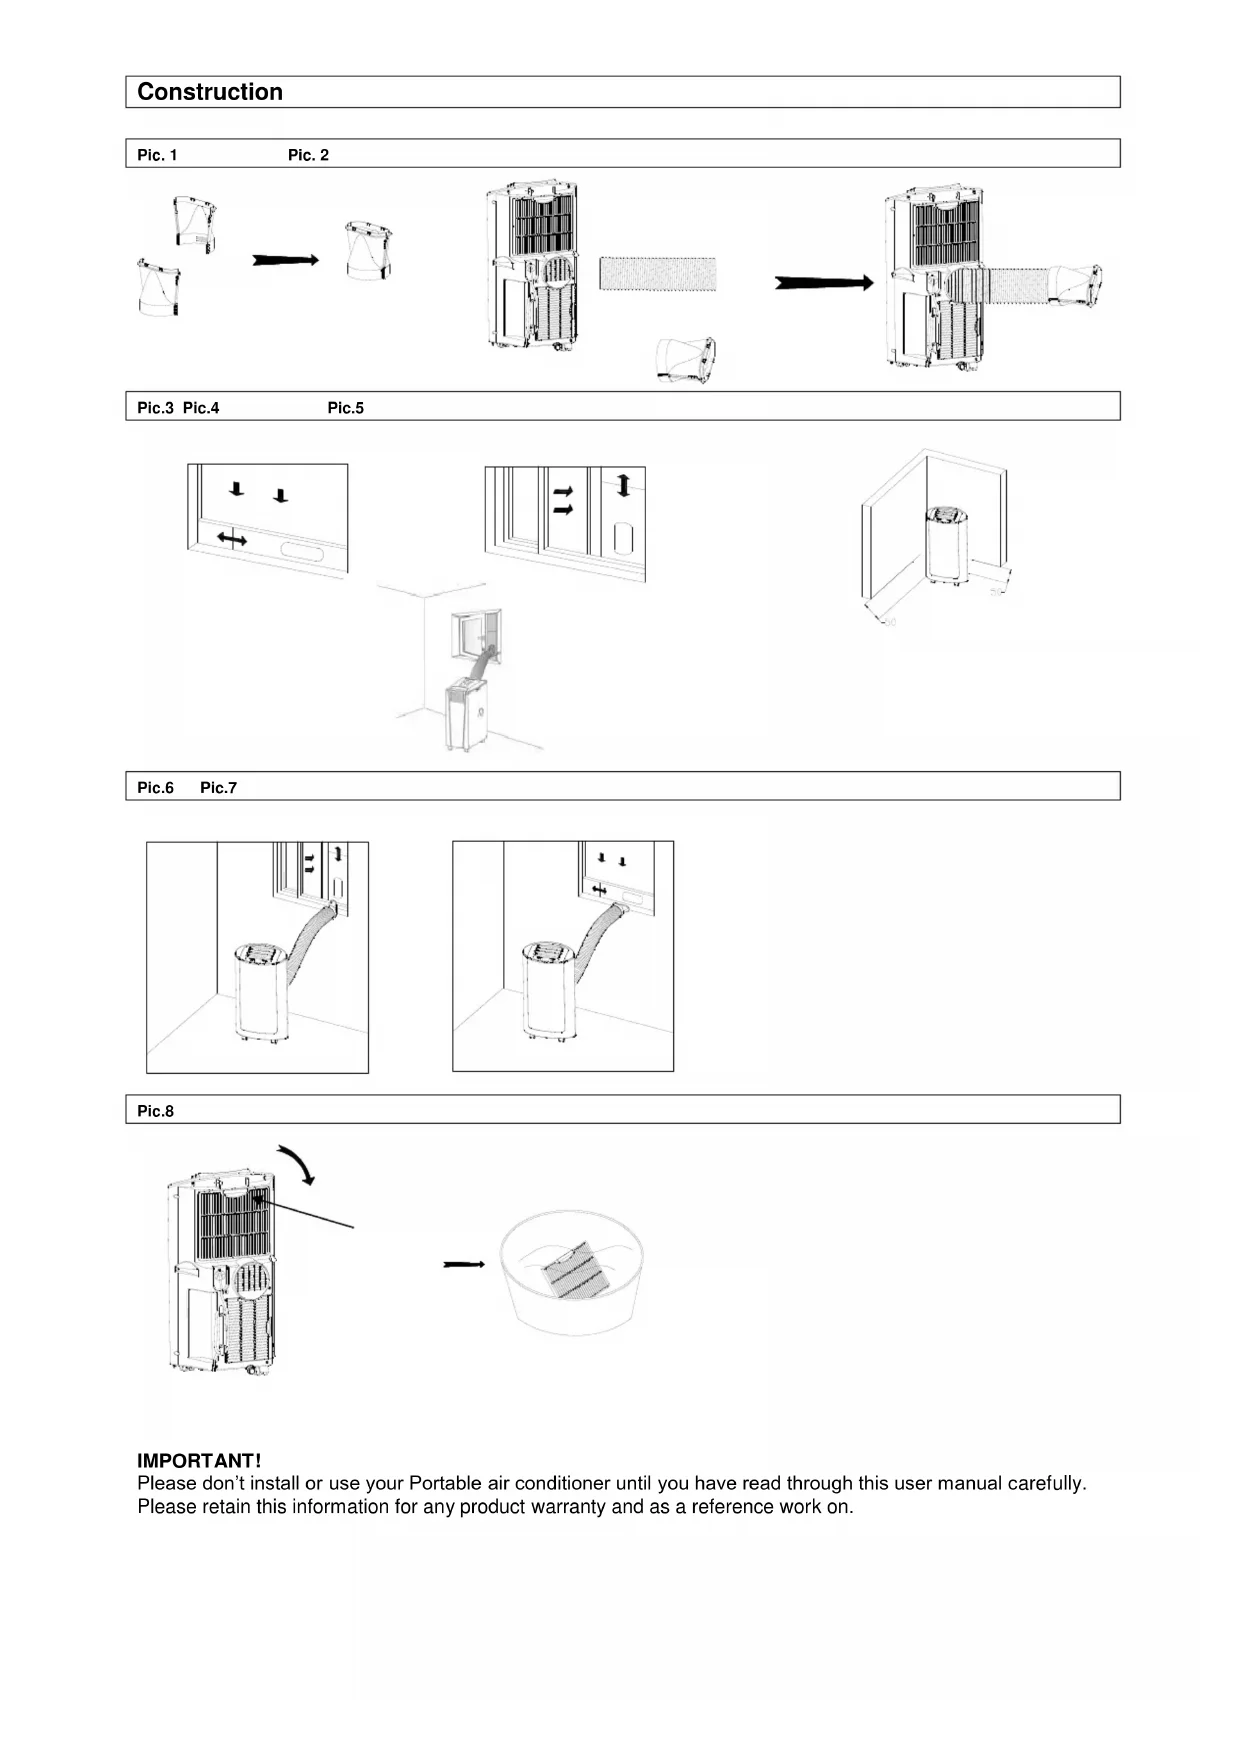
Construction
Pic. 1
Pic. 2
flowchart
graph LR
    A["Assembly Setup"] --> B["Reassembly"]
    B --> C["Internal Structure"]
    C --> D["Material Handling"]
    D --> E["Product Output"]
Pic.3 Pic.4
Pic.5
Pic.6 Pic.7
natural_image
Line drawing of a trash bin with a curved pipe extending from a window (no text or symbols)
natural_image
Simple line drawing of a cylindrical container with a curved handle, next to a wall-mounted control panel (no text or symbols)
Pic.8
IMPORTANT!
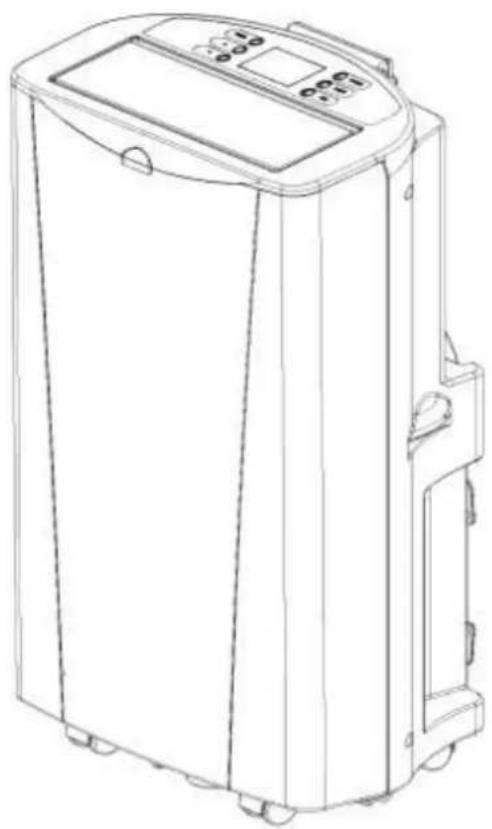
Please don't install or use your Portable air conditioner until you have read through this user manual carefully. Please retain this information for any product warranty and as a reference work on.
Introduction
Congratulations on purchasing your SUNTEC WELLNESS KLIMATRONIC® FUSION PLUS unit.
Your air-conditioner has been developed and manufactured in accordance with standards of state of the art technology.
Please read the operating instructions carefully before connecting your FUSION PLUS unit to the power supply in order to prevent damage from improper use. Pay special attention to the safety instructions. If you pass this FUSION PLUS unit on to a third party, you must also include these operating instructions. Please keep these operating instructions in a safe place for any questions which may arise in future.
Thank you for showing confidence in our product. We hope you enjoy a pleasant room climate with your local Suntec air-conditioner.
Important Safeguards
This appliance can be used by children aged from 8 years and above and persons with reduced physical, sensory and mental capabilities or lack of experience and knowledge if they have been given supervision or instruction concerning use of the appliance in a safe way and understand the hazards involved. Cleaning and user maintenance shall not be made by children without supervision.
• The appliance is for indoor use only.
- Read all instructions, Rated Power Supply: Please connect the unit with Gounded Power Sources: 220-240VAC, 50HZ
- Disconnect the power plug before dismantling, assembling or before cleaning
- Avoid touching mobile parts of the appliance
- Never insert fingers, pencils or any other objects though the guard whenever the power plug is connectet, especially while running
- Do not use the appliance for any other purpose than its intended use
- When the power cord is damaged, it must be replaced by the manufacturer or its service agent or a similar qualified person in order to avoid hazard
- Do not use your appliance with an extension cord unless it has been checked and tested by a qualified electrician or electrical supplier
- The local air conditioner unit must always be stored and transported upright, otherwise you may cause irreparable damage to the compressor: in case of doubt we suggest to wait for at least 24 hours before you start air-conditioning unit
- Avoid restart the local air conditioner unit unless 3 minutes have passed since being turned off, or the compressor may get damaged
- Never use the mains plug as a switch to start and turn off the local air conditioner unit. Use the provided ON/OFF switch located on the control panel
• Always place the portable local air conditioner on a dry stable place
- The appliance must be positioned so that the plug is accessible. And it shall be installed in accordance with national wiring regulations.
- Do not cover or restrict the airflow from the outlet or inlet grills.
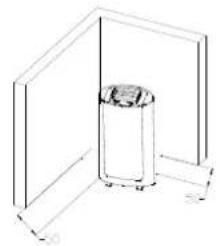
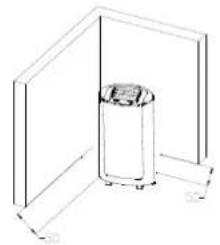
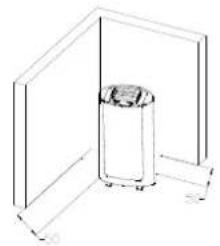
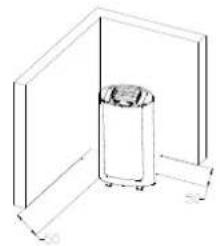
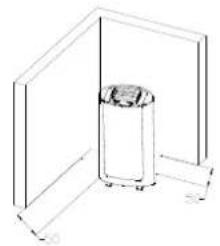
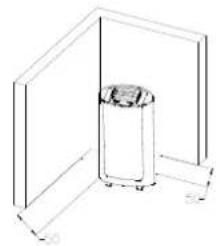
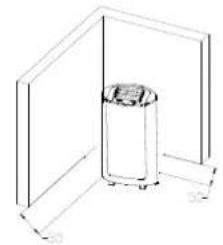
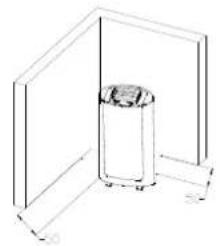
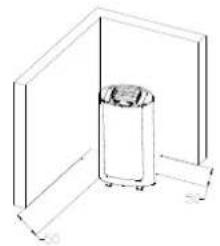
- The minimum distance from furniture and wall should be 50 cm
Energy Saving Tips
- Keep the filters clean. Under normal conditions, the filter should be cleaned approximately every 30 days. Since the filters remove airborne particles, more frequent cleaning may be necessary, depending on the indoor air quality.
- Set the fan speed switch to high cool and the thermostat to the coolest position for the initial start-up, then set the fan switch to Low cool and lower the thermostat to a comfortable setting.
- To achieve a better ambient temperature, we recommend you to use the cooling mode only when the ambient temperature is above 35^ C. Therefore, it may be necessary, to start the device early in the morning on warm days with a cool room temperature below 35^ C. The heating function is not recommended when the ambient temperature is below 7^ C.
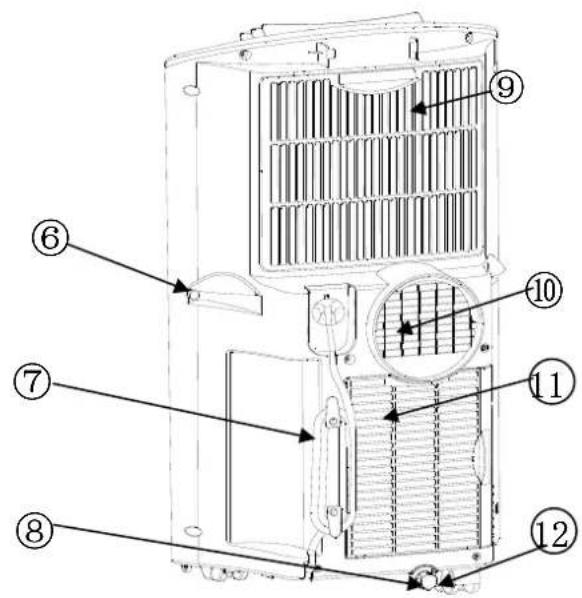
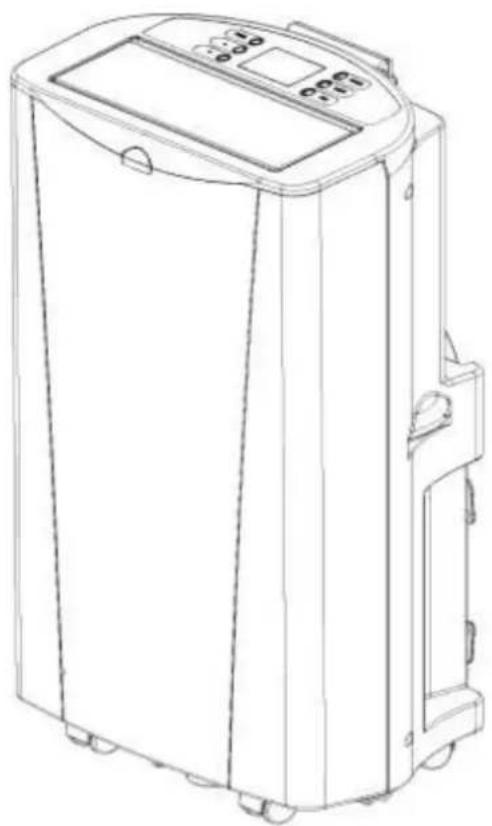
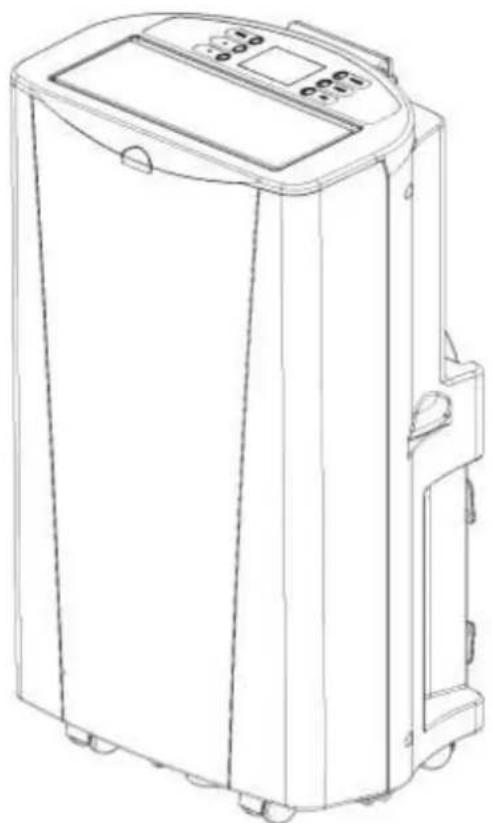
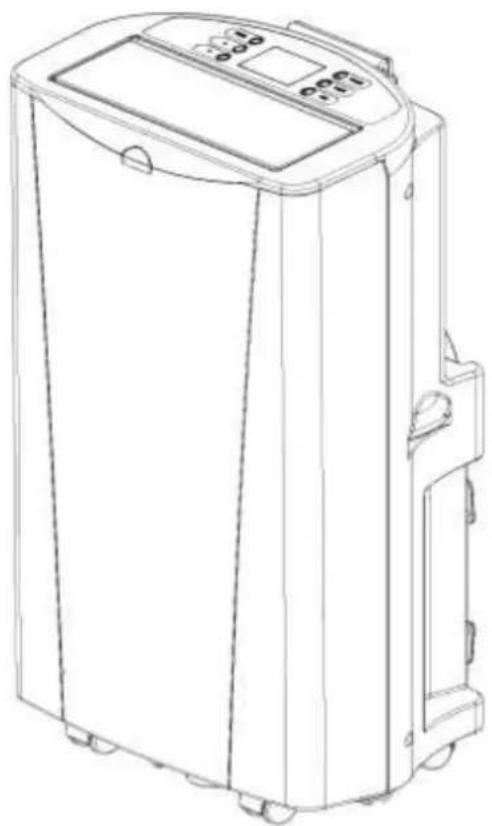
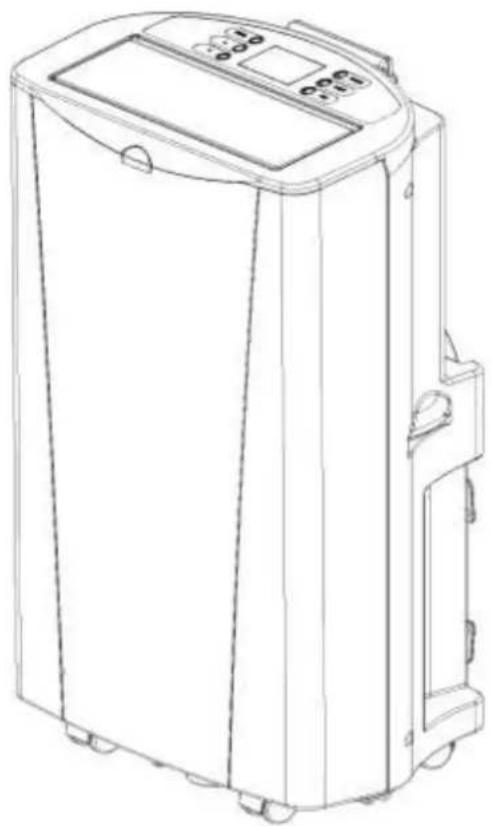
Part list
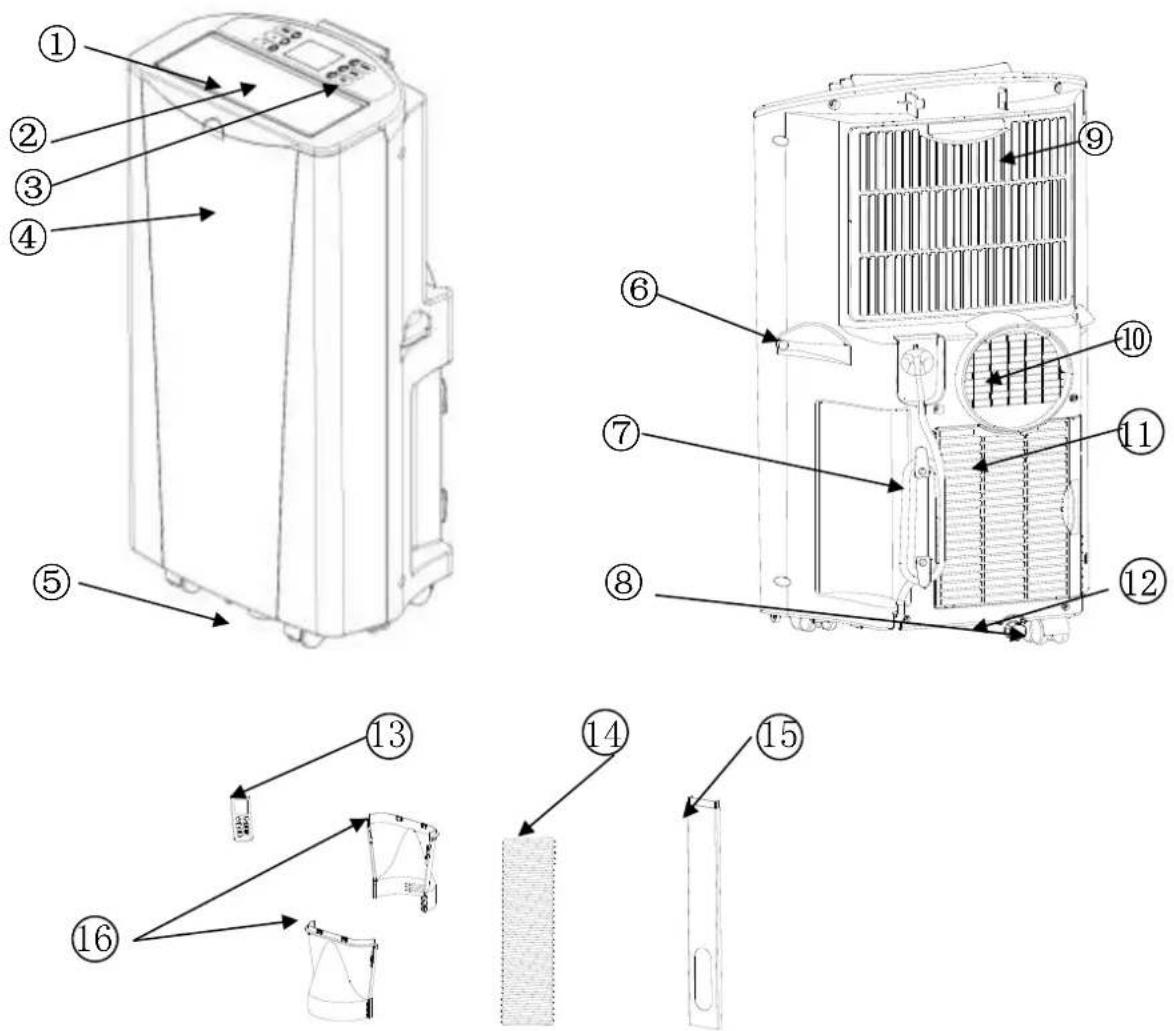
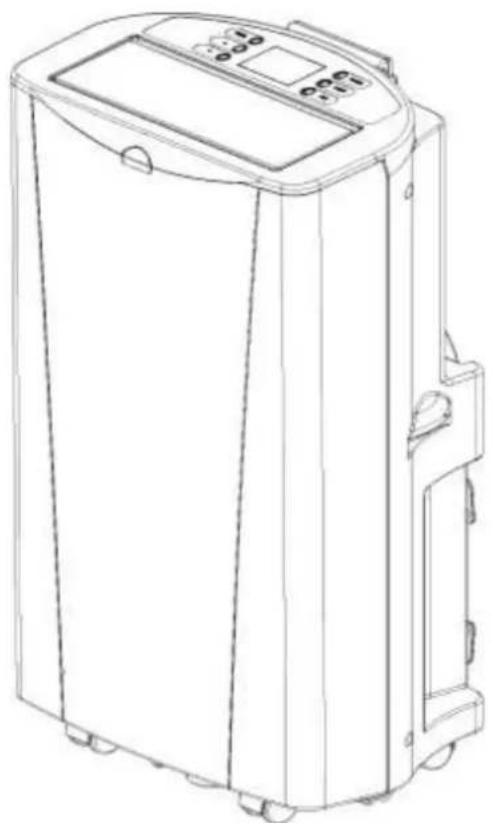
- Tope cover
- Air outlet grille
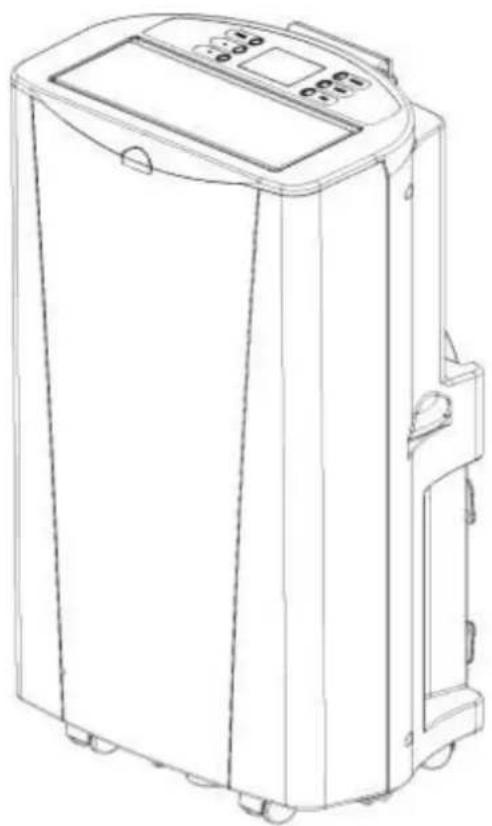
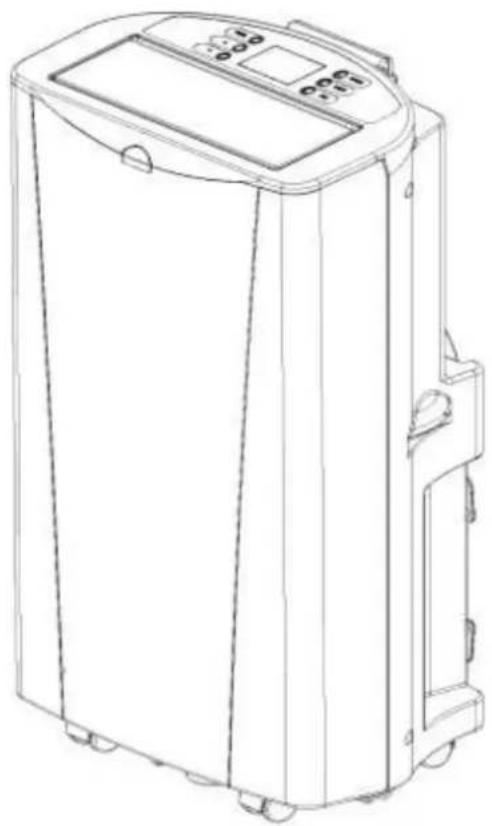
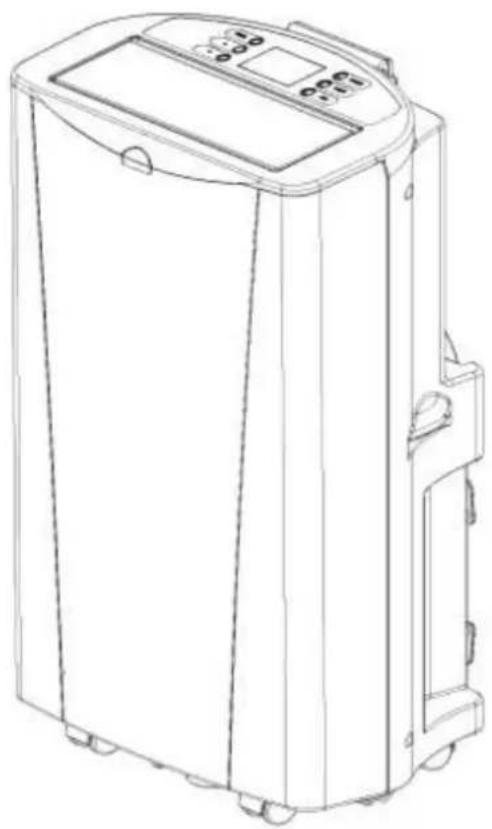
- Control panel
- Front cover
- Caster
- Handle
- Power cord
-
Drain port
-
Up filter frame
- Protective net
- Down filter frame
- Water plug
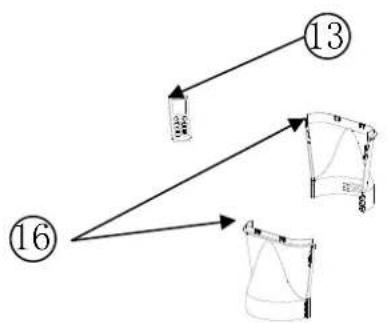
- Remote control
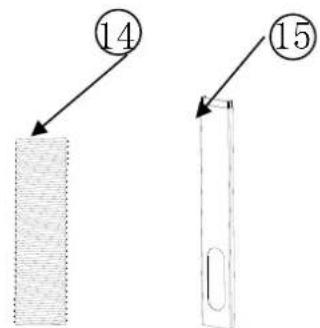
- Exhaust hose
- Window kits
- Hose adaptor
Installation
Warning: Before using this unit, please keep it upright at least 2 hours.
The unit can be moved easily among the rooms, but please note the following:
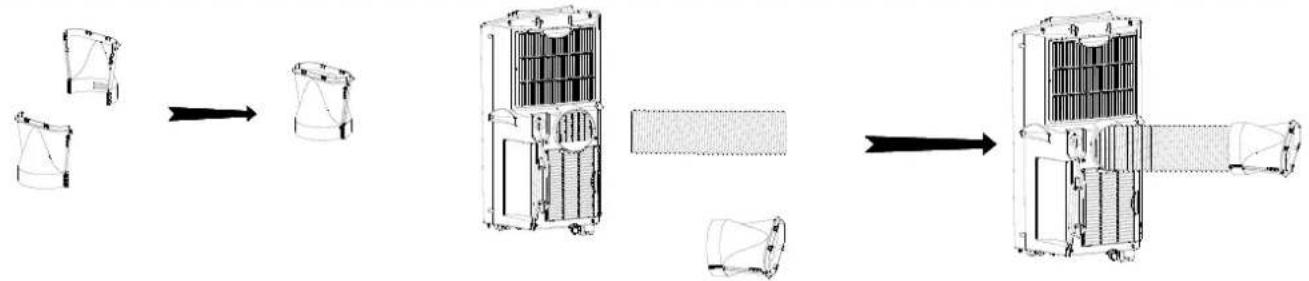
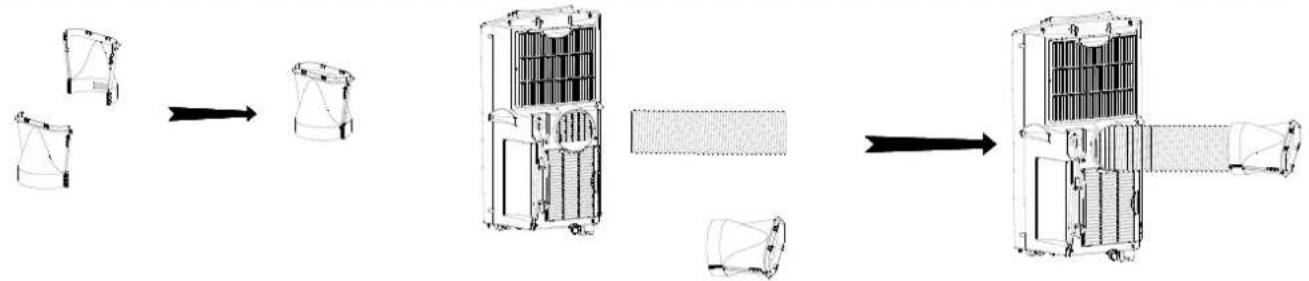
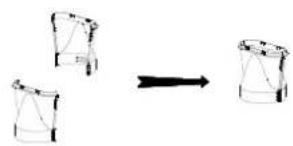
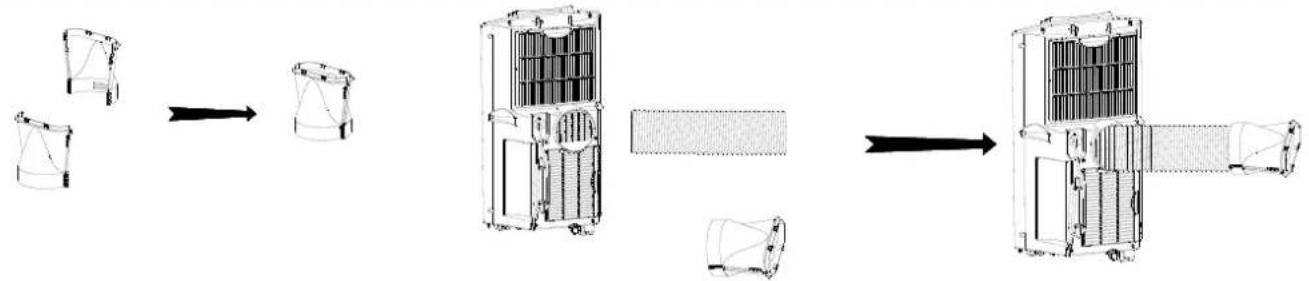
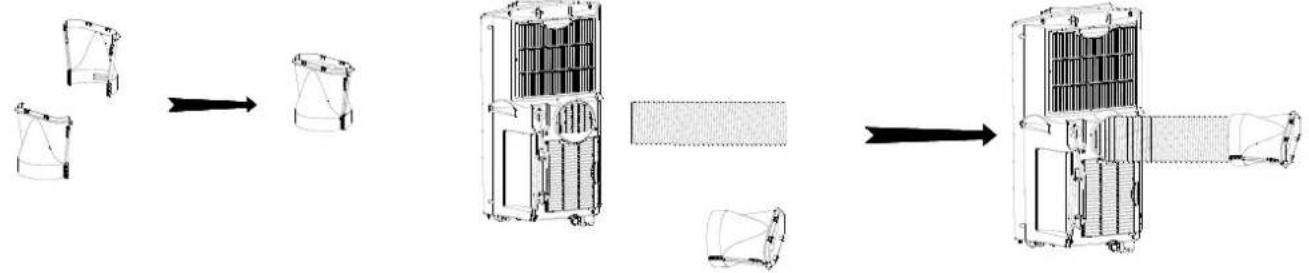
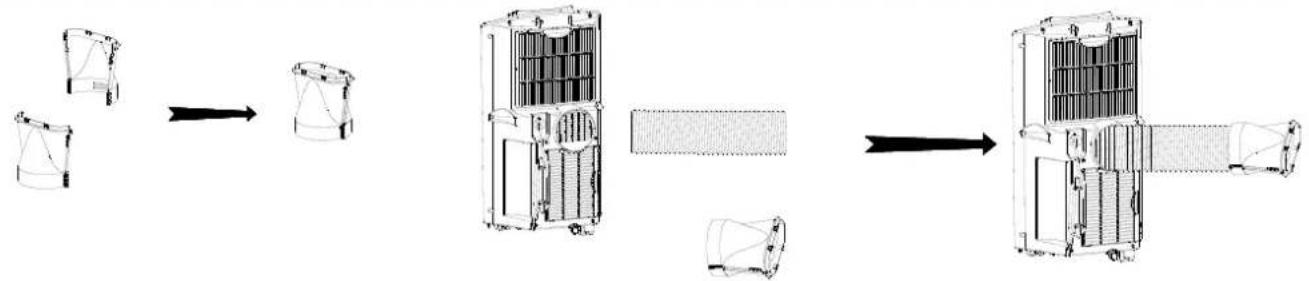
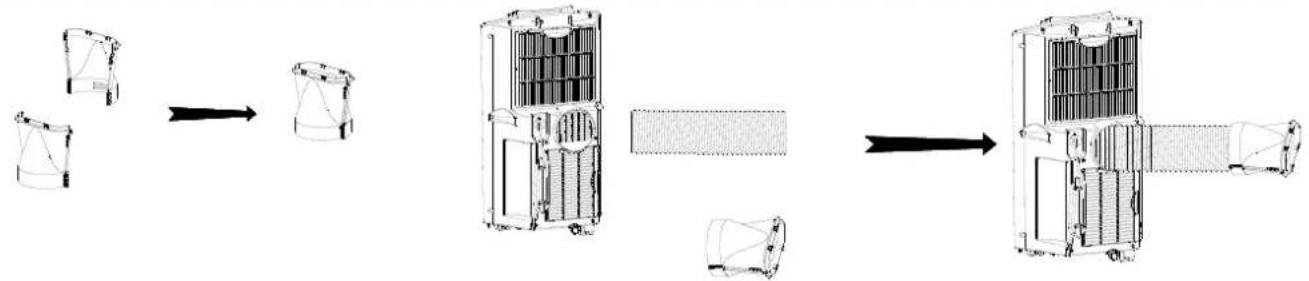
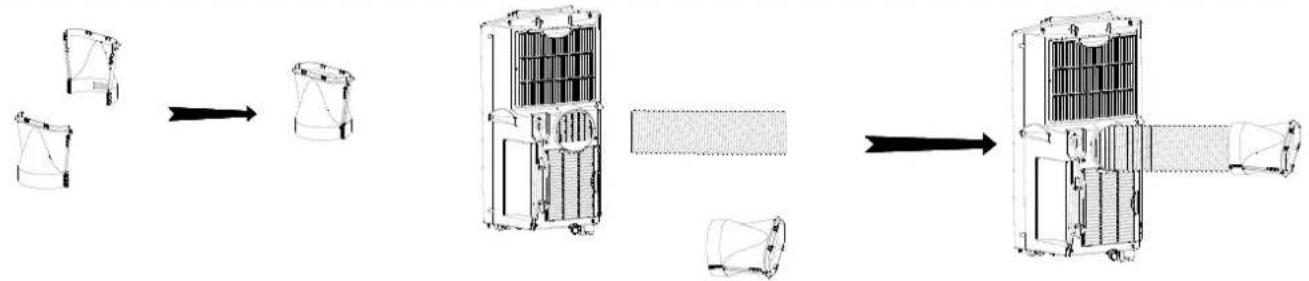
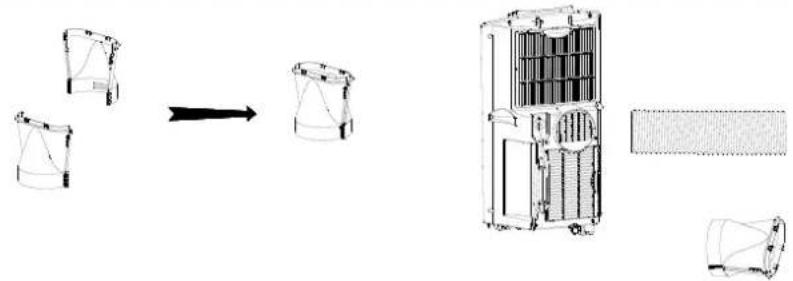
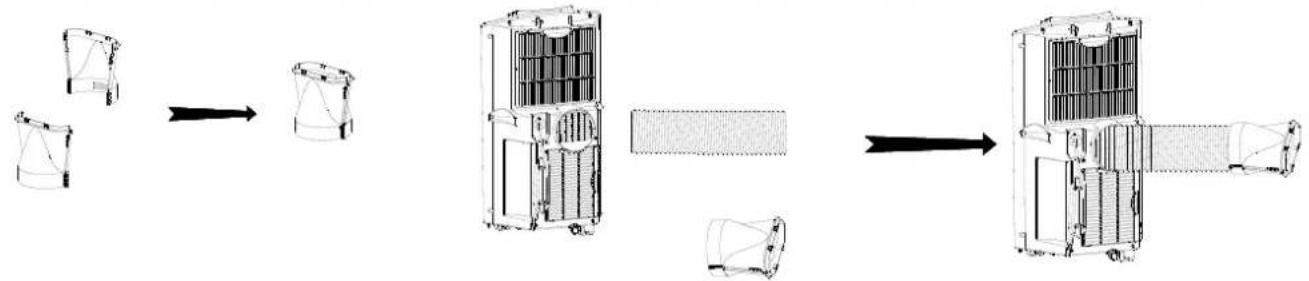
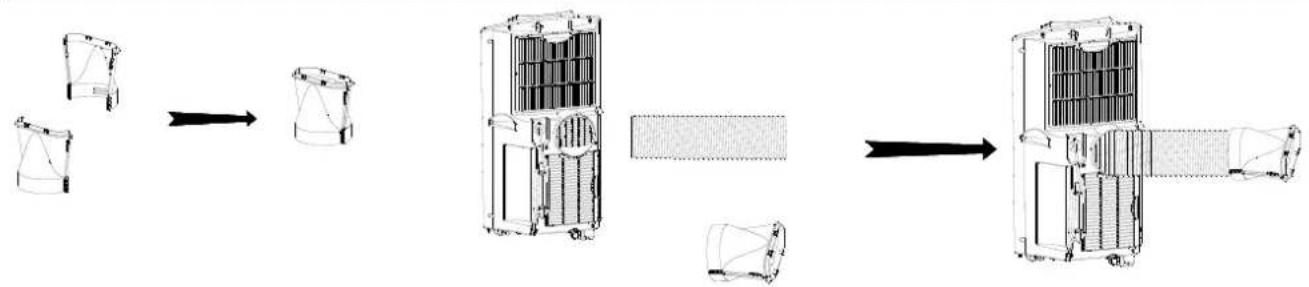
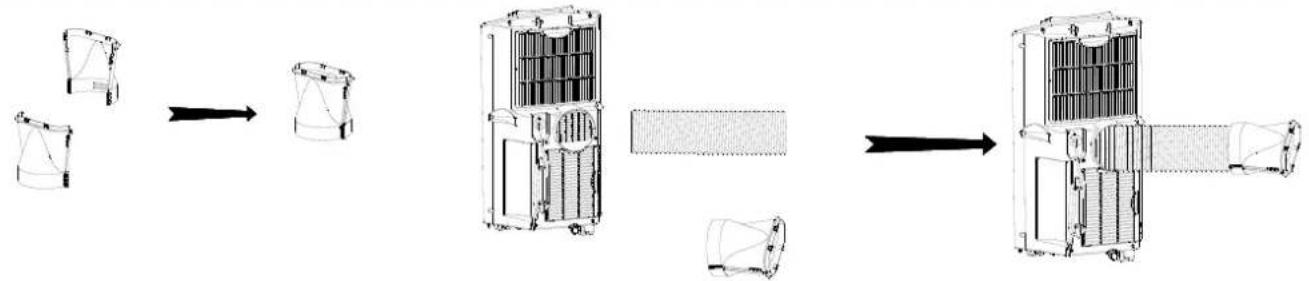
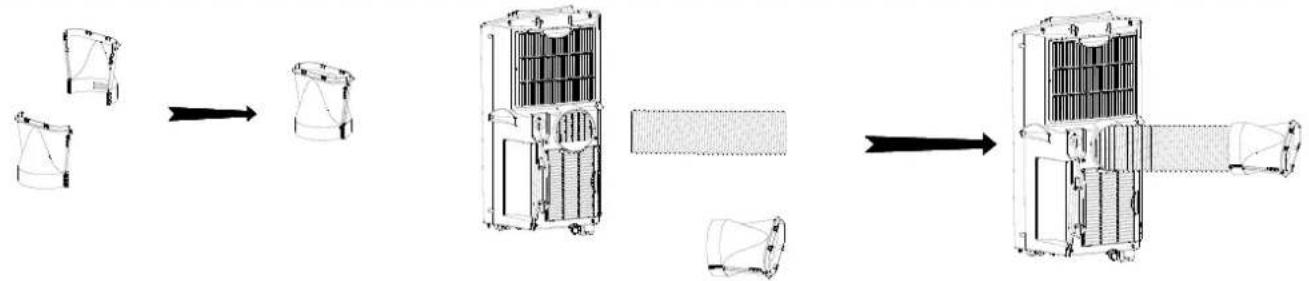
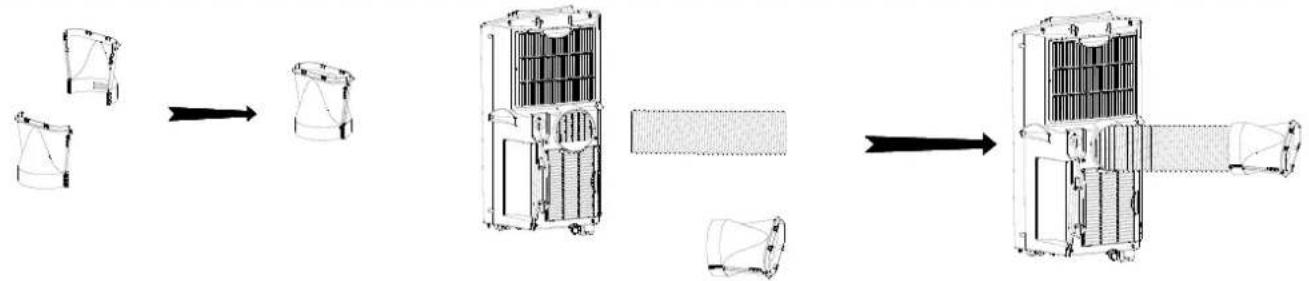
Assemble hose adaptor, Picture 1
1) Please take out the 2 parts and press it firmly together.
2) Each hand hold one part, you can connect them easily.
Remark: Don't push too hard to prevent damage.
natural_image
Simple line drawing of three cylindrical containers with arrows indicating transformation (no text or symbols)
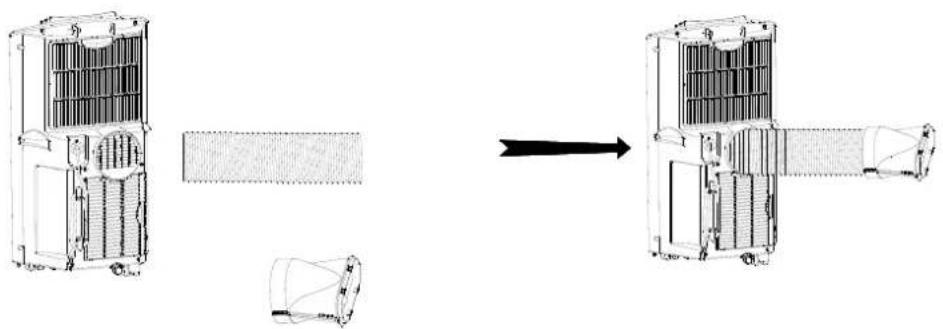
Assembly of the exhaust hose, Picture 2
1) Screw the exhaust hose counterclockwise to the rear of the unit.
2) Attach the exhaust hose taper at the end of the exhaust hose.
natural_image
Diagram showing a mechanical assembly transformation from a fan-like device to a cylindrical component, with no visible text or symbols.
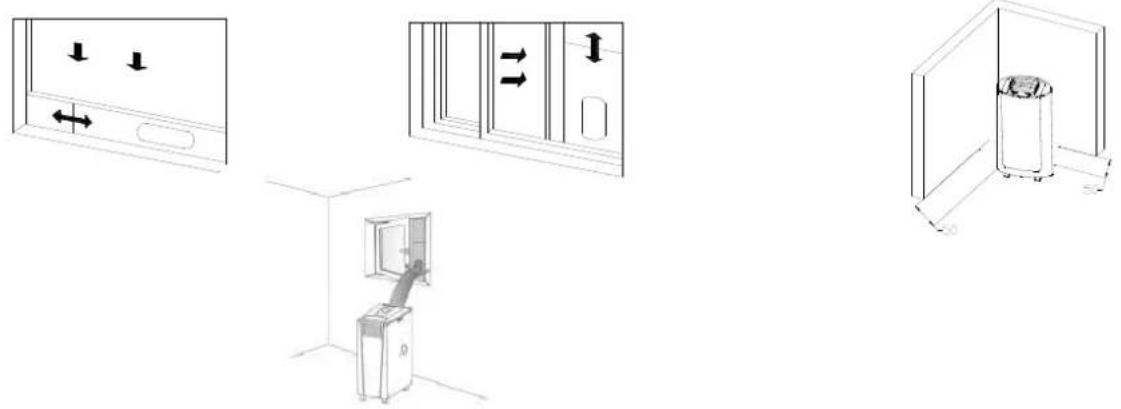
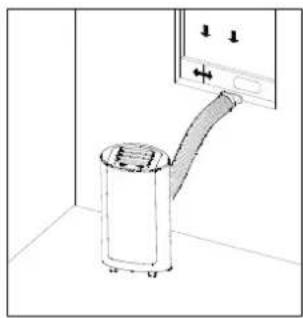
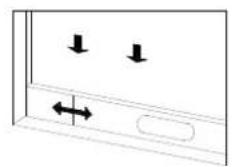
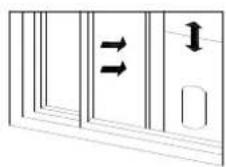
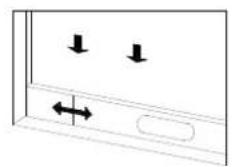
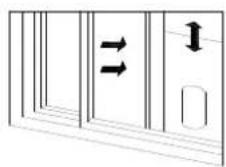
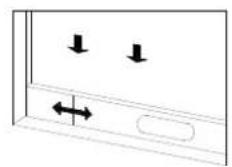
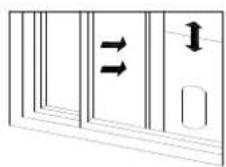
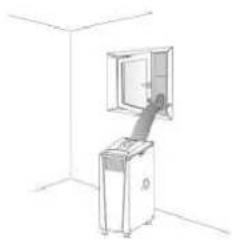
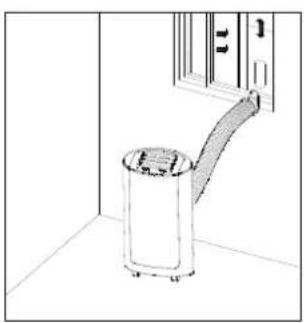
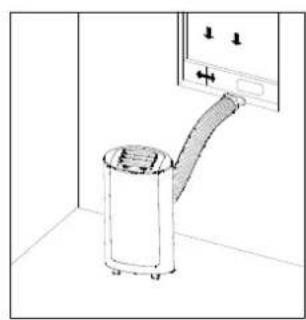
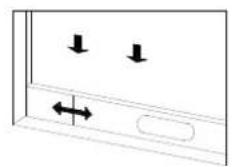
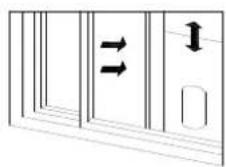
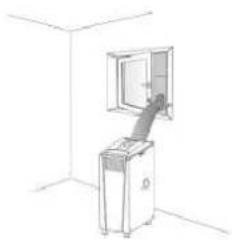
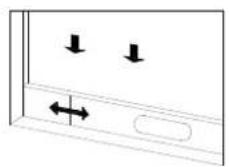
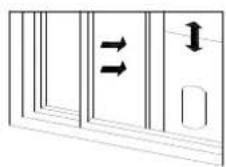
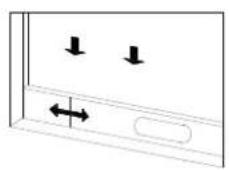
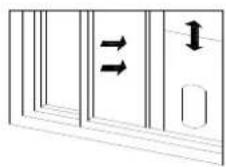
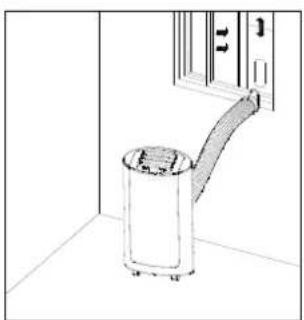
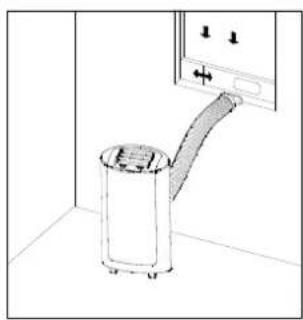
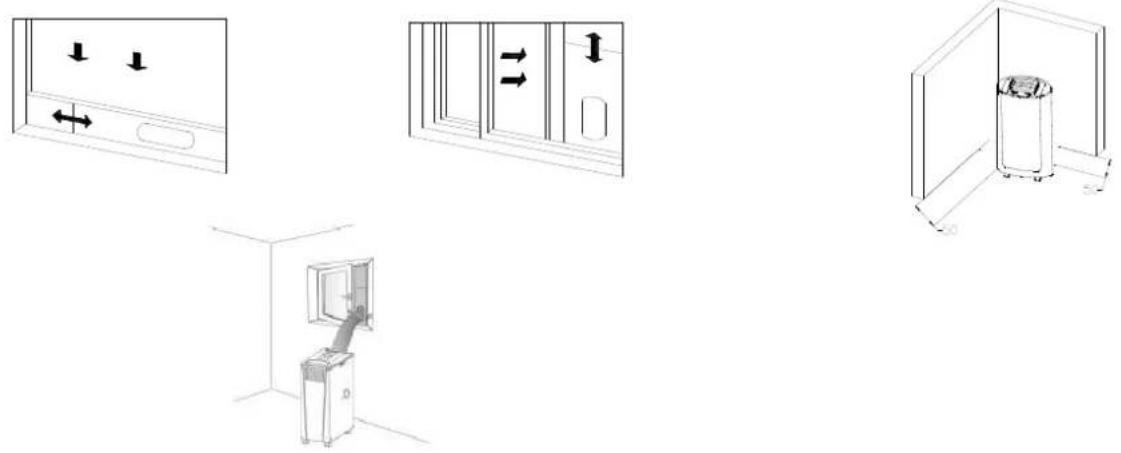
Installation of the window kits, Picture 3 and 4
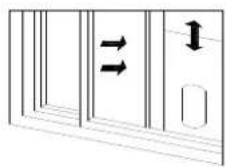
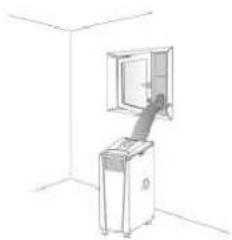
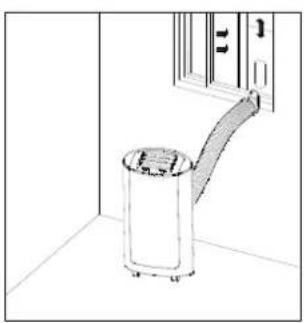
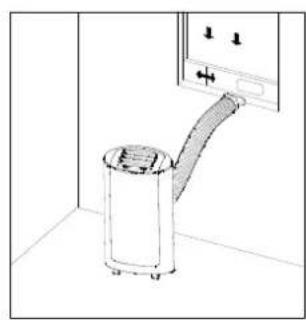
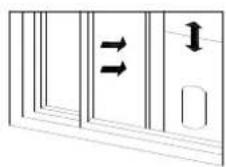
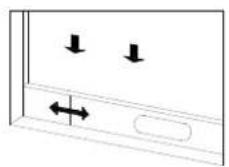
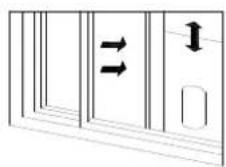
1.3. Partially open the window and then fix the window kits to the window.
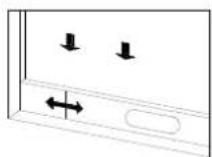
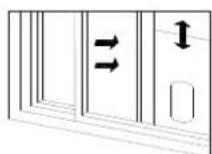
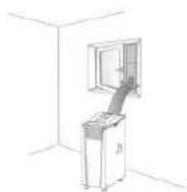
To use the local air conditioner efficiently, we recommend the use of the Air-hung windows block climate-Sails. This is for all types of windows and doors universal sail, which prevents the penetration of air from the outside when the air hose is led to the outside. As with a mosquito net, it is fixed with Velcro and operated by a zipper (see "Accessories").
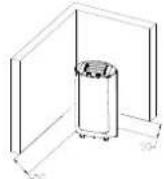
Positioning the local air conditioner
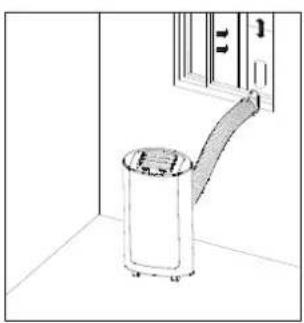
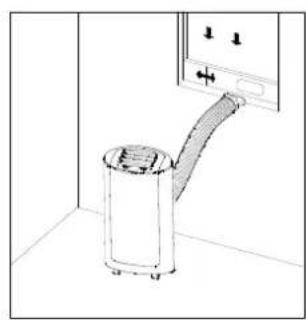
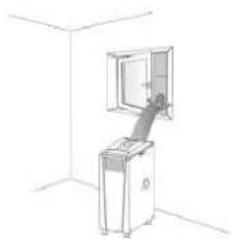
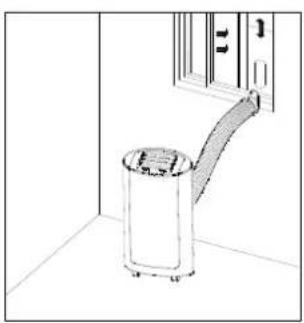
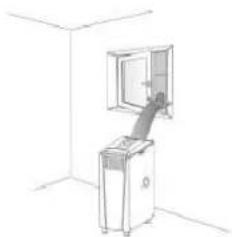
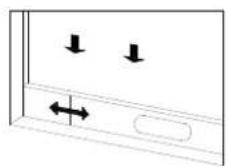
1.4 Please make sure the unit is upright. The unit should be put on the flat floor and 50 cm to around objects because that can affect the performance of the unit strongly.
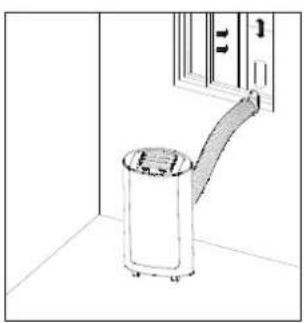
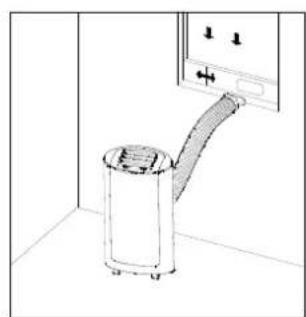
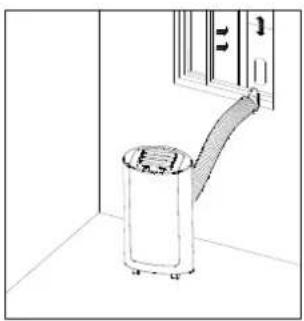
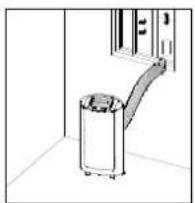
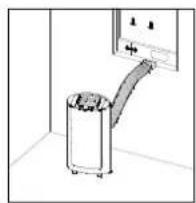
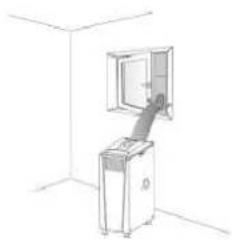
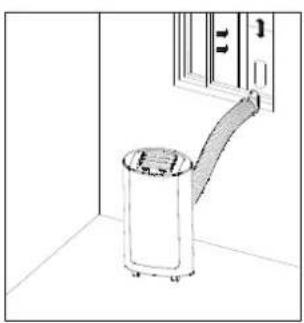
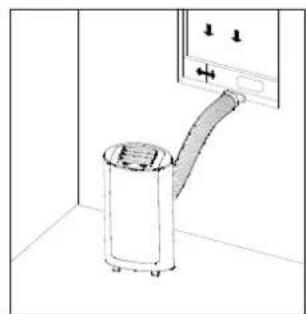
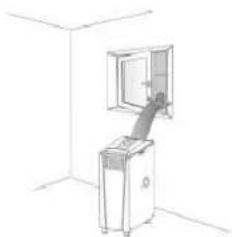
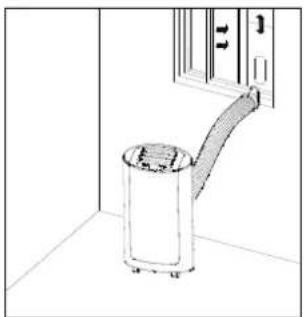
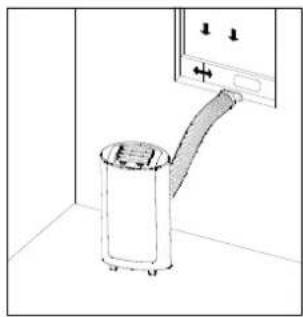
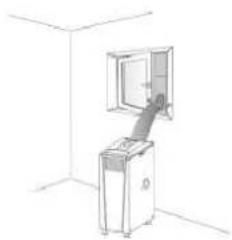
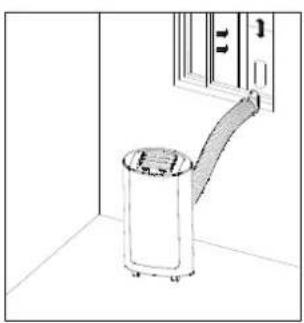
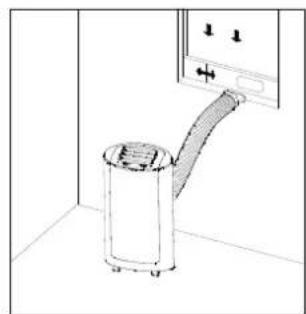
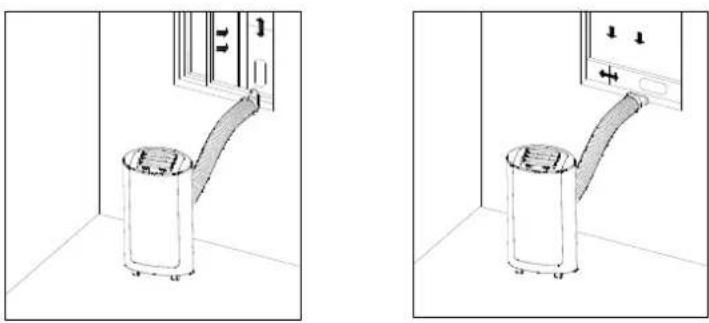
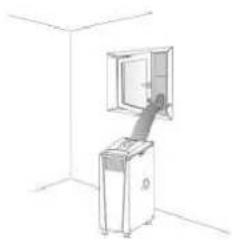
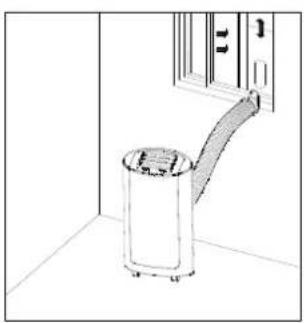
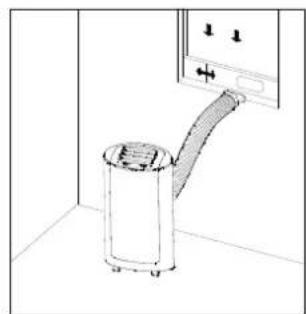
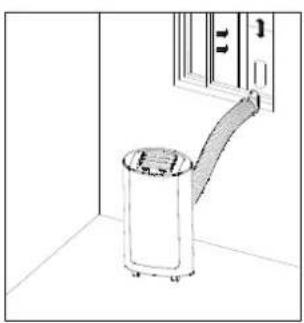
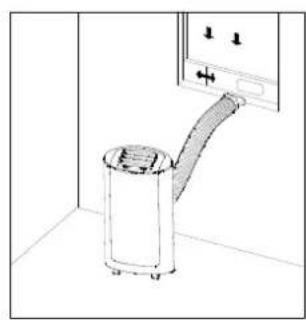
Attach the exhaust hose to the window kit
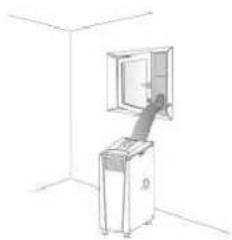
Fix the other end of the heat-exhausted hose to the air-outlet window kit
natural_image
Simple line drawing of a trash bin and adjacent door (no text or symbols)
natural_image
Simple line drawing of a cylindrical device with a curved arm, next to a wall-mounted control panel (no text or symbols)
Control and setting
This portable local air conditioner of cooling only model has three functions: cooling, dehumidifying and fan. If the machine you purchased is cool and heat model, it has four functions cooling, heating, dehumidifying and fan Fan has three speeds: high speed, middle speed and low speed,
Setting temperature is 16--30°C, 24 hours timer, water-throwing function, sensor and water-level protective function.
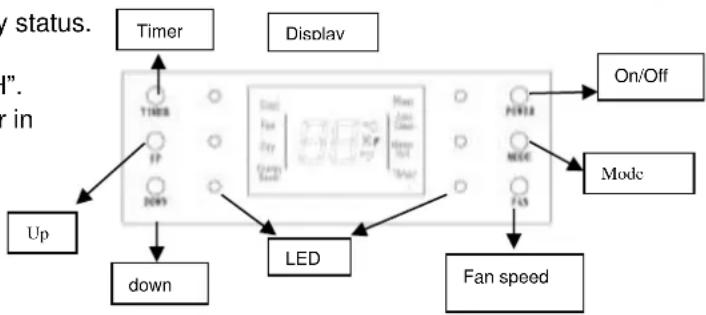
Control panel
1.1 When plug in, follow the start music, unit is in standby status. Display shows the temperature (5 \~ 35°C).
If ambient temperature is above 35^ C, screen will show "H".
If it is below 5 °C, it will indicate "L" and the unit will enter in standby status.
flowchart
graph TD
    Timer --> Display
    Display --> On/Off
    Display --> Mode
    Up --> down
    up --> LED
    LED --> Fan speed
    style Timer fill:#f9f,stroke:#333
    style Display fill:#ccf,stroke:#333
    style On/Off fill:#cfc,stroke:#333
    style Mode fill:#fcc,stroke:#333
    style Down fill:#ffc,stroke:#333
    style LED fill:#cfc,stroke:#333
    style Fan speed fill:#fcc,stroke:#333
1.2 ON/OFF POWER button: When press this button, model will enter cooling mode
(Setting temperature 22^ C high speed fan. Press again, unit will shut off and play shut-off music.
1.3 Mode button MODE:
Press this key to choose Cooling, Heating (only for cool & heat model) Fan, or Dehumidifying Mode.
Press the "Mode" button until the "Auto" icon (see Figure 4) is lit.
Press "Temp +" or "Temp -" to set the desired room temperature. (16 °C - 31 °C)
1.4 Fan button FAN:
a) Under cooling mode:
LOW FAN (F1) →MIDDLE FAN (F2) →HIGH FAN (F3) →LOW FAN (F1) →..., goes like this.
b) Under fan model: same as cooling mode
c) Under dehumidifying mode, fan is working in low speed
d) If switch between cooling and fan, fan speed won't change.
1.5 Timer button TIMER:
Press it, TIMER icon will flash, "0" areas indicates 24:00; you can set your time through UP and DOWN buttons. The HOUR number will change from 1,2,3...24; the Minute number will change from 10,
20,30...50. Auto-shut-off timer is only available when the unit on; auto-run timer is only available when the unit is off. After timer setting accomplishes effectively, TIMER icon will keep on flashing until setting time is due. If set again, history record will be cleared.
1.6 Up and Down button: can set temperature and timer.
Under cooling or heating mode, the sting temperature ranges from 16\~30°C. If press Up and Down button simultaneously, the unit will shift between °C to °F.
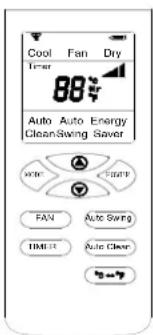
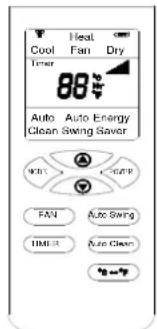
Remote Control
-
Power: Press this key to turn on/off the button.
-
Mode: Press this key to choose cooling, heating, dehumidifying, fan
3.Up: Press this key to turn up temperature or adjust time.
-
Down: Press this key to turn down temperature or adjust time.
-
Fan: Press this key to set low/middle/high fan speed.
-
Auto Swing: Press this key to control swing function.
-
°C↔°F: Press this key to choose Centigrade or Fahrenheit.
-
Timer: Press this key to set time. Within 5 hours, time interval is half hour; from 5 hours to 24 hours, time interval is 1 hour. Once set number will flash 5 times as confirmation.
-
Auto Clean: Press this button only when the machine is on, then turn off the machine, the compressor will stop working, the motor will keep working for some time to dry the evaporator.
Multi protective function
3.1 Water-full protection:
When the water level in the bottom water plate is surpassing warning level, the unit will alert automatically and "FL" will flashes on LCD. Please discharge water in the machine according to Chapter "Water Drainage"
3.2 Anti-freezing protecting control(only for cool & heat model):
Under anti-freezing function, the "heat" will flash
3.3 Anti-heating protecting
Under heating mode, the compressor and motor will stop work until the temperature of the machine automatically recover to ordinary heating status.
3.4 Compressor delay-protection
Except for the first power-on, the compressor can start at once. In other cases, the compressor runs under 3 minutes delay protection.
Water drainage
1.1 When water tank is full and unit stop working, please shut off the unit and unplug
Please don't move the model sharply, or the water will spilt out from water received plate.
1.2 Use a water container to take water under the water plug.
1.3 Screw off the water plug and unplug the water blocker, water will come out to the water container.
2. Continue drainage:
2.1 Screw off the water plug and unplug the water blocker.
2.2 Use water pipe to connect the water outlet. Lead the pipe to the outside or washroom.
Remark: 1. This method can be done only if there is no water in the water received plate.
2.3 This model have self evaporative function, under cooling mode, please don't use continue drainage to get better cooling effect.
Cleaning
Please shut off the unit and unplug the plug before cleaning or maintenance Clean the surface
Clean the housing with a duster or a soft wet cloth. Do not use chemical solvent (such as benzene, alcohol, gasoline). The surface may be damaged or even the whole case may be deformed.
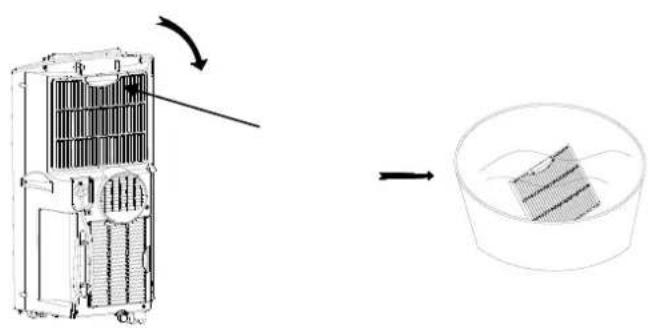
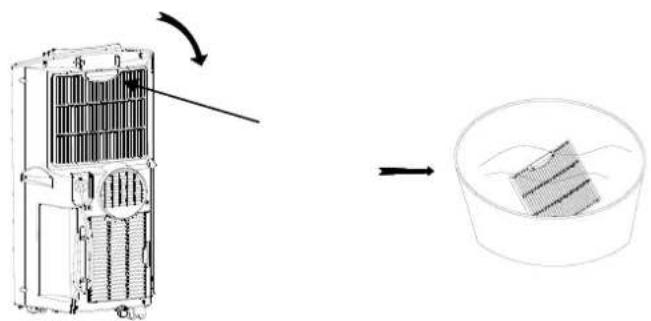
1. Air filter cleaning
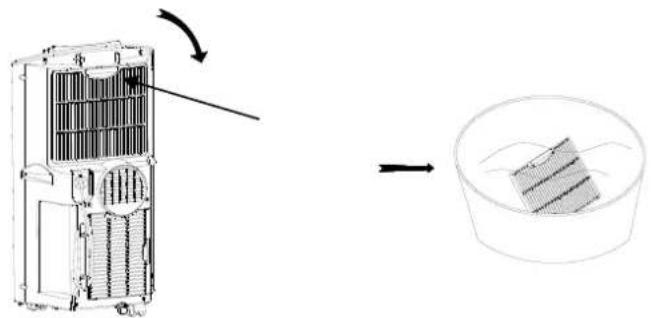
1.1 Clean the air filters every 2 weeks. If the air filter is blocked with dust, the efficiency will reduce.
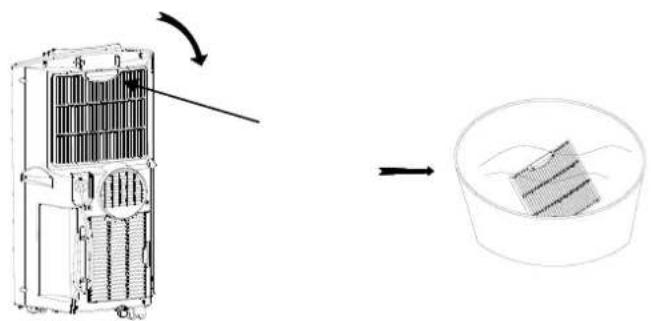
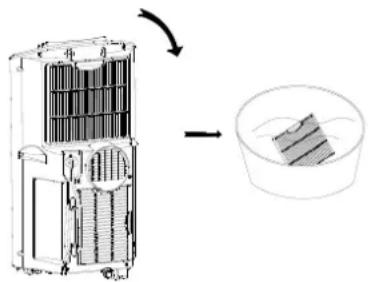
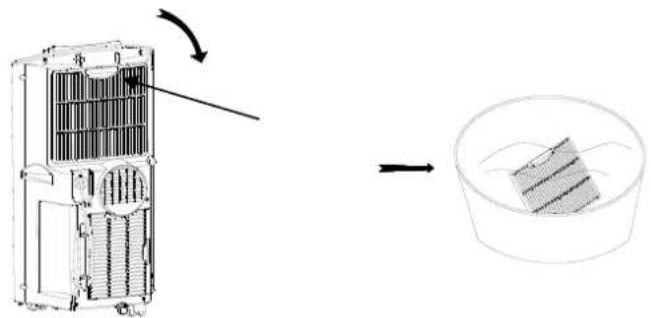
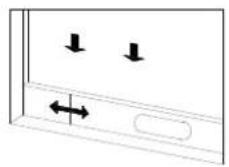
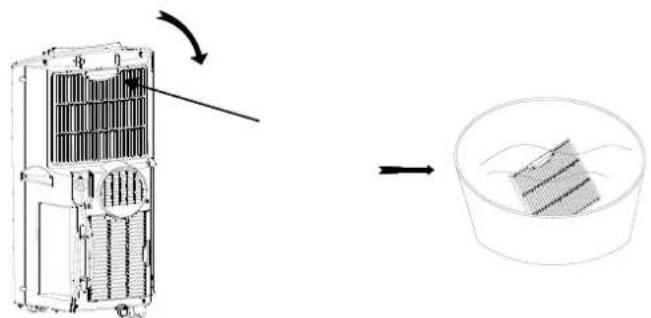
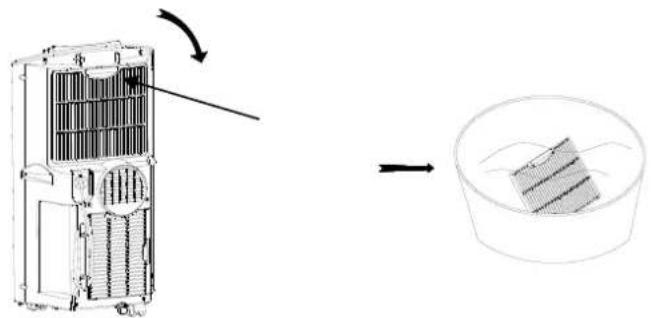
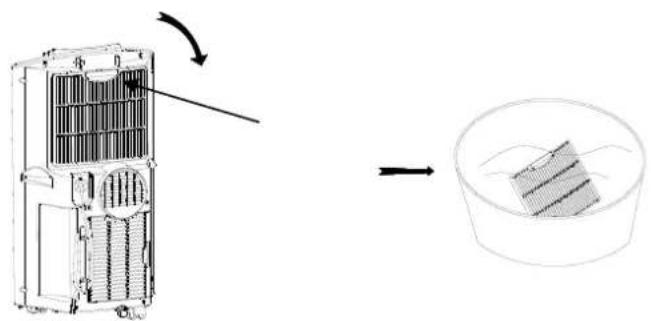
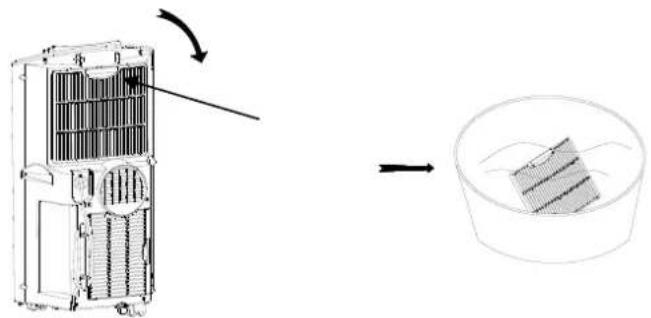
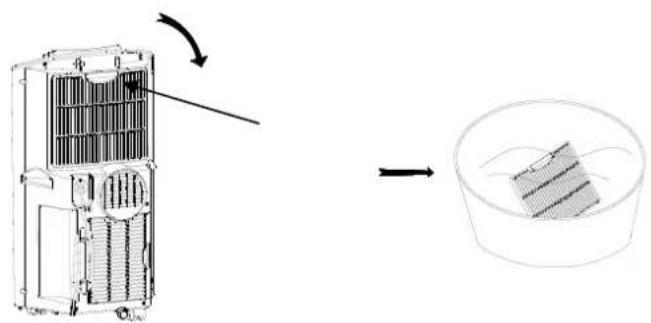
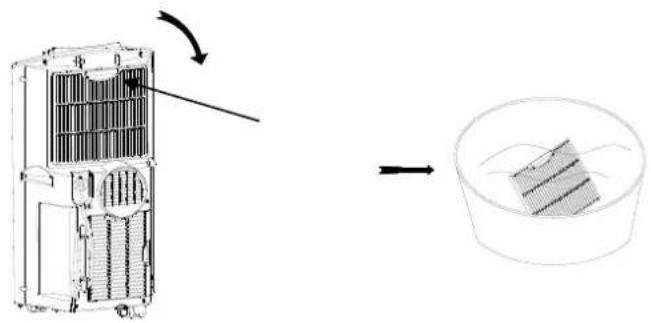
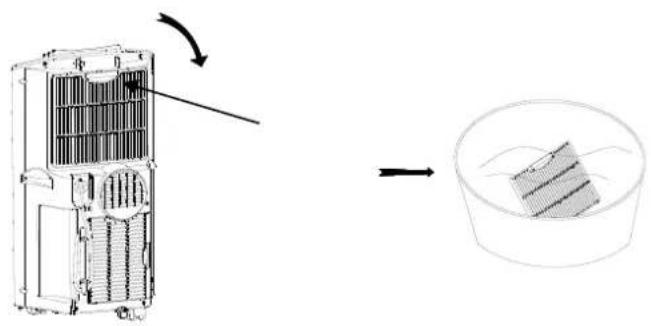
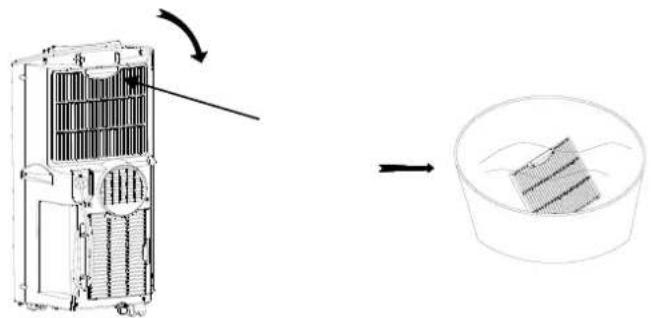
1) Pull out up and down filter as below pictures
2) Wash the air filters by immersing it gently into warm (about 40^ C) water with a neutral detergent, rinse it and dry it thoroughly in a shaded place.
3) Install air filters carefully after cleaning the filters.
Storage
- Pull out the plug in drainage hole and empty the water-received plate, or drain out the water by leaning the unit, then shift the unit mode to Fan mode, and press the button for 5 seconds till it to low fan speed. Keep this mode for half day till the conduit is dried. Doing like this can keep the inner unit dried and not go moldy.
- Turn off the unit and pull out the plug.
- Coil the wire and bind it together, then put it into the accessories room.
- Separate the air-exhausted pipe and safely keep it.
- Put the unit into a plastic bag, then keep it in a dried place.
- Take out the batteries of remote control and safely keep them.
Trouble Shooting
Don't repair or disassemble the unit by yourself, unsuitable repair may make the quality-protected card in vain, and even cause damage to the user or his/her possession.
| Trouble | Reason | Solution |
| The unit doesn’t work | No power supply | Power-on and turn on the unit. |
| Water-full indicator illuminate | Drain out the inner stored water |
| Timer function is active | Cancel Timer function |
| Room temperature too low or too high? | Suggesting ambient temperature between 7-40°C |
| The unit does not seem to perform. | In direct sunlight | Draw the curtains |
| Windows or doors open, many people or a heat source in the room | Close windows and turn on another local air conditioner |
| Filter is very dirty | Clean or change the air filter |
| Air inlet or air outlet is blocked | Clear out the stemming |
| Room temperature is lower than setting temperature | Change the setting temperature |
| The unit noise is high | The unit is not put on flat place | Put the unit on flat and hard place( reduce noise) |
| Compressor doesn’t work | Heat-exceeded protection is active | Re-start the unit 3 minutes later till the temperature low down. |
| Remote control doesn’t work | The distance is too far. | Let the remote control near the unit and make sure it aims at the air-outlet grille |
| Control panel hasn’t received the signal from remote control. |
| The batteries are dead | Change the batteries |
| CH01 on LCD | Evaporator function is not in the normal range | instruct a technician or bring the unit back to the market, please keep the bill ready |
| CH02 on LCD | Room temperature is abnormal | instruct a technician or bring the unit back to the market, please keep the bill ready |
| FL on LCD | Water is full inside the machine | Drain out water from drain port at bottom rear of the unit. |
Spare parts and Accessories supply (Fast convenient supply)
You can obtain spare parts and accessories for your FUSION PLUS unit from your local dealer. And at our website www.suntec-wellness.de
you will find further information on individual accessory products as well as information on obtaining our spare parts quickly and conveniently. You will also find other information (e.g. FAQ, lists of spare parts, document download, etc) about your FUSION PLUS unit.
| NameEAN | Description | Drawing |
| Air-Block Klima-Sail4250058312099 | Sail which can be used for all types of windows and doors. As for an external fly screen, it is fixed with Velcro and operated via a zip. The window or door can be closed at any time. | 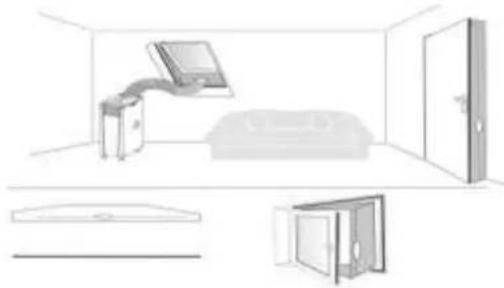 |
| Air-Extension-Kit4250058312105 | A World First with which you can air-condition almost every corner of your house, and it doesn't matter where the local air conditioner is located. You can extend the extract air hose by 5 meters via a special propeller. For PROGRESS this also applies for the air supply and extraction. | 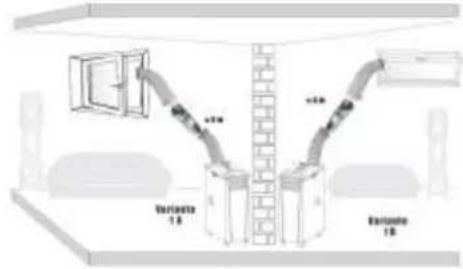 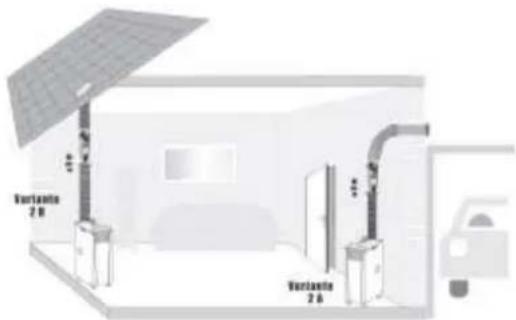 |
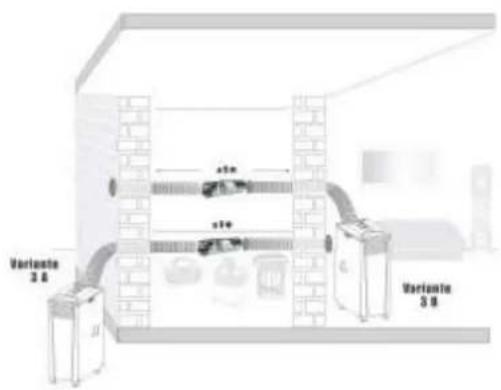
| FUSION Wall-Kit4250058312471 | Clean closing of a wall or wall boring from inside and outside with connection element for the air hose. |  |
| Window-Kit4250058312013 | Sliding seal of window and connection adapter for air hose, especially for sliding windows. | |
In the case of complaints
- Would you like to complain about the device, you can do it within 24 months from the date of purchase (receipt).
- A free replacement or repair will be excluded from the prior improper product manipulation.
- Defects on parts and consumables, as well as cleaning, maintenance or replacement of said parts are therefore chargeable.
- If you want to make a claim, please bring the whole unit in its original packaging and with proof of purchase to your dealer. For a timely and convenient service register, visit our website also www.suntec-wellness.de and learn more.
- No proof of purchase will generally not free repair or replacement.
• In the event that the complaint case is analogous to our terms of service, all defects of the device or its accessories due to material or manufacturing faults by repair or, at our option, by replacement of the device.
- The damage of accessories does not automatically lead to a free replacement of the entire unit. In these cases, please contact your dealer. Glass breakage, or breakage of plastic parts is always a charge.
- The dealer or repair after the warranty service can carry out repairs with costs.
The unit complies with the essential health and safety requirements of the European Union. The EC declaration of conformity is the basis for the CE marking of this unit.
With the publication of this manual, all previous are not valid. SUNTEC, SUNTEC Wellness, KLIAMTRONIC and the Sun logo are registered trademarks. © 2016/01 SUNTEC WELLNESS GMBH
ERP Regulation
This high-quality single-channel portable air conditioning unit is in accordance with the rules and regulations of the European Union, in particular the new ERP Regulation 626/2011 to a "local air conditioner."
Refrigerant
(CE) N 842/2006: This local air conditioner contains the refrigerant R410A. The amount of refrigerant is less than 1kg, and is in a closed cooling circuit. The coolant does have zero ozone depletion potential, but is a so-called greenhouse gases under the Kyoto Protocol (with a GWP of 2087,5) and may thus contribute to global warming,
if it is released to the atmosphere. Therefore only trained technicians with refrigerant certificate make a filling or emptying. Your local Suntec air conditioner does not have to use if used properly and undamaged coolant circuit can be refilled with refrigerant
Note concerning protection of environment
This product must not be disposed of via normal household waste after its service life, but must be taken to a collection station for the recycling of electrical and electronic devices. The symbol on the product, the operating instructions or the packaging indicates such disposal procedures. The materials are recyclable in accordance with their respective symbols. By means of re-use, material recycling or any other form of recycling old appliances you are making an important contribution to the protection of our environment. Please ask your local council where your nearest disposal station is located.
© 2016 KLIMATRONIC® FUSION+
SUNTEC WELLNESS GMBH / HOLZSTRASSE 2 / 40 221 DÜSSELDORF / GERMANY
KLIMATRONIC®
FUSION plus
natural_image
Line drawing of a portable air purifier device with control panel and buttons (no text or symbols)
Mise en place
Fig. 1
Fig. 2
flowchart
graph LR
    A["Assembly Setup"] --> B["Product Assembly"]
    B --> C["Material Collection"]
    C --> D["Final Product"]
Fig.3
Fig.4
Fig.5
natural_image
Simple line drawing of a cylindrical object inside a rectangular frame with dimension lines (no text or symbols)
natural_image
Simple line drawing of a cabinet with an open door, no text or symbols present
Fig.7
Fig.6
natural_image
Line drawing of a trash bin near a door with a handle, no text or symbols present
natural_image
Simple line drawing of a trash bin with a hanging handle, next to a control panel (no text or symbols)
Fig.8
TRÈS IMPORTANT !
flowchart
graph TD
    A["13"] --> B[" "]
    C["16"] --> D[" "]
    B --> E[" "]
    D --> E
natural_image
Diagram showing a device's internal structure before and after assembly, with no visible text or symbols.
natural_image
Simple line drawing of a cabinet with an open door, no text or symbols present
natural_image
Two technical diagrams showing a cylindrical component inserted into a wall, with no visible text or symbols.
3.3 Protection antisurchauffe :
© 2016 KLIMATRONIC® FUSION+
SUNTEC WELLNESS GMBH / HOLZSTRASSE 2 / 40 221 DUSSELDORF / ALLEMAGNE
KLIMATRONIC®
FUSION plus
natural_image
Line drawing of a portable air purifier device with control panel and buttons (no text or symbols)
Opbouw
Afb. 1
Afb. 2
flowchart
graph LR
    A["Raw Material"] --> B["Add"]
    B --> C["Process Unit"]
    C --> D["Final Assembly with Drying"]
    D --> E["Final Product"]
Afb.3
Afb.4
Afb.5
natural_image
Simple line drawing of a cylindrical object inside a rectangular frame, with dimension lines indicating width and height (no text or symbols)
natural_image
Line drawing of a simple room interior with a cabinet and open door (no text or symbols)
Afb.7
Afb.6
natural_image
Simple line drawing of a cylindrical container with a curved handle, placed near a window (no text or symbols)
natural_image
Simple line drawing of a trash bin with a handle, next to a wall-mounted control panel (no text or symbols)
Afb.8
natural_image
Diagram showing a device interior with internal structure and a resulting container (no text or symbols)
ZEER BELANGRIJK!
natural_image
Diagram showing a device transformation from a rectangular frame to a cylindrical container, with no visible text or symbols.
natural_image
Simple line drawing of a cabinet with an open door, no text or symbols present
natural_image
Two technical diagrams showing a cylindrical component inserted into a wall, with no visible text or symbols.
natural_image
Diagram showing a device's internal structure transforming into a container with a striped pattern (no text or symbols)
Opslag
© 2016 KLIMATRONIC® FUSION+
SUNTEC WELLNESS GMBH / HOLZSTRASSE 2 / 40 221 DÜSSELDORF / DUITSLAND
KLIMATRONIC®
FUSION plus
natural_image
Line drawing of a portable air purifier device with control panel and door (no text or symbols)
Esterno
Fig. 1
Fig. 2
flowchart
graph LR
    A["Assembly Setup"] --> B["Product Assembly"]
    B --> C["Material Collection"]
    C --> D["Final Product"]
Fig. 3
Fig.4
Fig.5
natural_image
Simple line drawing of a cylindrical object inside a rectangular frame with dimension lines (no text or symbols)
natural_image
Simple line drawing of a cabinet with an open door, no text or symbols present
Fig.7
Fig.6
natural_image
Line drawing of a trash bin near a door with a handle, no text or symbols present
natural_image
Simple line drawing of a trash bin with a hanging handle, next to a control panel (no text or symbols)
Fig.8
IMPORTANTE!
natural_image
Diagram showing a mechanical assembly transformation from a fan-like device to a cylindrical device, with no visible text or symbols.
natural_image
Simple line drawing of a cabinet with an open door, no text or symbols present
natural_image
Two technical diagrams showing a cylindrical component inserted into a wall, with no visible text or symbols.
natural_image
Diagram showing a device with internal components being processed into a container (no text or symbols present)
Stoccaggio
© 2016 KLIMATRONIC® FUSION+
SUNTEC WELLNESS GMBH / HOLZSTRASSE 2 / 40 221 DÜSSELDORF / GERMANIA
KLIMATRONIC®
FUSION plus
natural_image
Line drawing of a portable air purifier device with control panel and buttons (no text or symbols)
Sastavljanje
SI. 1
Sl. 2
flowchart
graph LR
    A["Assembly Setup"] --> B["Reassembly"]
    B --> C["Internal Structure"]
    C --> D["Material Handling"]
    D --> E["Product Output"]
SI.3 SI.4
SI.5
natural_image
Simple line drawing of a cylindrical object inside a rectangular frame with dimension lines (no text or symbols)
natural_image
Simple line drawing of a cabinet with an open door, no text or symbols present
SI.6
SI.7
natural_image
Line drawing of a trash bin near a door with a handle, no text or symbols present
natural_image
Simple line drawing of a trash bin with a handle, next to a wall-mounted switch (no text or symbols)
SI.8
VAŽNO!
Nemojte instalirati ili upotrebljavati mobilni klima-uredaj prije nego što pozorno pročitate ove upute za uporabu. Spremite ove upute za slučaj da Vam zatreba jamstvo ili naknadne informacije
Uvod
Čestitamo na kupovini SUNTEC WELLNESS KLIMATRONIC ® FUSION PLUS uređaja! Vaš klima-uređaj razvijen je i proizveden prema najvišim standardima najmodernije tehnike.
Molimo Vas da pažljivo pročitate upute za uporabu prije nego što priključite FUSION PLUS uređaj na struju da biste izbjegli štete koje mogu nastati nestručnim rukovanjem. Osobitu pozornost obratite na napomene o sigurnosti. Ako ovaj FUSION PLUS uređaj proslijedite trećim osobama, morate im predati i ove upute za uporabu. Dobro spremite upute za uporabu za slučaj ako biste kasnije imali još neka pitanja.
Zahvaljujemo Vam na povjerenju i želimo Vam ugodnu klimu u prostorijama uz Vaš Suntec klima-uredaj.
Napomene u vezi sa sigurnim rukovanjem prije uporabe
natural_image
Diagram showing a device's internal structure before and after assembly, with no visible text or symbols.
Postavljanje kompleta pribora za prozorsku instalaciju, slika 3 i 4
Spremanje
- Izvucite kabel i ispraznite spremnik za vodu ili ispraznite vodu tako da lagano nagnete uređaj. Nakon toga uključite uređaj. Pritisnite tipku Fan (ventilator) i držite je 5 sekundi dok se uređaj ne prebaci na niski broj okretaja ventilatora. Zadržite taj način rada pola dana dok se ne osuši cijev. Tako će se unutarnja jedinica osušiti i neće doći do pojave plijesni.
- Isključite uređaj i izvucite kabel iz struje.
- Namotajte kabel i učvrstite ga na mjestu za njegovo fiksiranje.
- Stavite uređaj u plastičnu vrećicu i spremite ga na suhome mjestu.
- Izvadite baterije iz daljinskog upravljača i spremite ih na sigurno.
Kvarovi
Ne popravljajte i ne rastavljajte uređaj sami. Zbog nestručnih popravaka uređaj može postati neupotrebljiv, možete izgubiti jamstvo ili čak može doći do trajnih šteta za korisnika ili na samome klima-uređaju!
| Kvar | Uzrok | Rješenje |
| Uređaj ne funkcionira | Nije spojen kabel | Stavite utikač u utičnicu i uključite uređaj |
| Water-full – prikaz titra na zaslonu | Ispustite nakupljenu vodu |
| Timer funkcija je aktivna | Prekinite timer funkciju |
| Temperatura prostorije je previsoka ili preniska | Temperatura prostorije je ispod 7°C ili iznad 40°C. |
| Čini se da uređaj ne radi | Neizravna izloženost sunčevu svjetlu | Navucite zavjese |
| Prozori i vrata su otvoreni, u prostoriji se nalazi mnogo ljudi ili neki izvor topline | Zatvorite sve prozore i uključite drugi klima-uredaj |
| Filter je jako prljav | Očistite ili zamijenite filter za zrak |
| Blokiran je dovod ili odvod zraka | Očistite začepljeno mjesto |
| Temperatura prostorije niža je od namještene temperature | Promijenite postavke za temperaturu |
| Uređaj stvara previše buke | Uređaj ne stoji na ravnoj površini | Postavite uređaj na tvrdu, ravnu podlogu (smanjuje buku) |
| Kompresor ne funkcionira | Aktivirana je zaštita od pregrijavanja | Nakon 3 minute ponovo uključite uređaj dok se temperatura ne smanji |
| Daljinski upravljač ne funkcionira | Udaljenost je prevelika | Držite daljinski upravljač blizu uređaja i provjerite je li usmjeren prema rešetki za ispuštanje zraka |
| Kontrolna ploča nije primila signal daljinskog upravljača |
| Baterije su prazne | Promijenite baterije |
| CH01 | Funkcija isparavanja nije u predviđenom rasponu | Zatražite pomoć tehničara ili odnesite uređaj u trgovinu gdje ste ga kupili. U tom slučaju pripremite i račun. |
| CH02 | Temperatura prostorije ne odgovara predviđenom rasponu temperature za rad uređaja | Zatražite pomoć tehničara ili odnesite uređaj u trgovinu gdje ste ga kupili. U tom slučaju pripremite i račun. |
| FL | Spremnik za vodu je pun | Ispustite vodu iz uređaja kako je opisano u dijelu „Odvod vode“. |
© 2016 KLIMATRONIC® FUSION+
SUNTEC WELLNESS GMBH / HOLZSTRASSE 2 / 40 221 DÜSSELDORF / DEUTSCHLAND
KLIMATRONIC®
FUSION plus
natural_image
Line drawing of a portable air purifier device with control panel and buttons (no text or symbols)
Uputstvo za upotrebu
Sastavljanje
SI. 1
Sl. 2
flowchart
graph LR
    A["Assembly Setup"] --> B["Reassembly"]
    B --> C["Internal Structure"]
    C --> D["Coatings & Material Handling"]
    D --> E["Product Output"]
SI.3 SI.4
SI.5
natural_image
Simple line drawing of a cylindrical object inside a rectangular frame, with dimension lines labeled (no text or symbols)
natural_image
Simple line drawing of a cabinet with an open door, placed in a corner room (no text or symbols)
SI.6
SI.7
natural_image
Line drawing of a trash bin near a door with a handle, no text or symbols present
natural_image
Simple line drawing of a trash bin with a handle, next to a wall-mounted switch (no text or symbols)
SI.8
VAŽNO!
Nemojte instalirati ili koristiti mobilni klima-uređaj prije no što pažljivo pročitate ovo uputstvo za upotrebu. Spremite ove uputstvo za slučaj da Vam zatreba garancija ili naknadne informacije
Uvod
Čestitamo na kupovini SUNTEC WELLNESS KLIMATRONIC ® FUSION PLUS uređaja! Vaš klima-uređaj razvijen je i proizveden prema najvišim standardima najmodernije tehnike.
Molimo Vas da pažljivo pročitate uputstvo za upotrebu prije nego što priključite FUSION PLUS uređaj na struju da biste izbjegli oštećenja koje mogu nastati nestručnim rukovanjem. Posebnu pažnju obratite na informacije o sigurnosti. Ako ovaj FUSION PLUS uređaj date trećim osobama, morate im dati i ovo uputstvo za upotrebu. Dobro spremite uputstvo za upotrebu ako biste kasnije imali još neka pitanja.
Zahvaljujemo Vam na povjerenju i želimo Vam ugodnu klimu u prostorijama uz Vaš Suntec klima-uređaj.
natural_image
Diagram showing a device's internal structure before and after assembly, with no visible text or symbols.
Postavljanje kompleta pribora za prozorsku instalaciju, slika 3 i 4
natural_image
Simple line drawing of a cabinet with an open door, placed in a corner room (no text or symbols)
Da biste mogli učinkovito upotrebljavati klima-uredaj, preporučujemo Vam da kod prozora koji se otvaraju „na kip“ koristite Air-Block Klima-Sail. To je univerzalni produžetak u obliku jedra koji se može koristiti na svim vrstama vrata i prozora, a sprečava ulazak zraka izvana kad jednom spojite cijev za odvod otpadnog zraka. Kao i zaštitna mreža protiv insekata, jedro se pričvršćuje samoljepivom trakom, a ima i patentni zatvarač (vidi dio „Pribor“).
Postavljanje klima-uredaja
natural_image
Diagram of a mechanical device with internal components and a separate inset showing a striped component (no text or symbols)
Spremanje
- Izvucite kabel i ispraznite spremnik za vodu ili ispraznite vodu tako da lagano magnete uređaj. Nakon toga uključite uređaj. Pritisnite dugme Fan (ventilator) i držite je 5 sekundi dok se uređaj ne prebaci na niski broj okretaja ventilatora. Zadržite taj način rada pola dana dok se ne osuši cijev. Tako će se unutrašnja jedinica osušiti i neće doći do pojave plijesni.
- Isključite uređaj i izvucite kabel iz struje.
- Namotajte kabel i učvrstite ga na mjestu za njegovo fiksiranje.
- Stavite uređaj u plastičnu kesicu i spremite ga na suhome mjestu.
- Izvadite baterije iz daljinskog upravljača i spremite ih na sigurno.
Kvarovi
Ne popravljajte i ne rastavljajte uređaj sami. Zbog nestručnih popravaka uređaj može postati neupotrebljiv, možete izgubiti pravo na garanciju ili čak može doći do trajnih šteta za korisnika ili na samome klima-uređaju!
| Kvar | Uzrok | Rješenje |
| Uređaj ne funkcionira | Nije spojen kabel | Stavite utikač u utičnicu i uključite uređaj |
| Water-full – prikaz titra na ekranu | Ispustite nakupljenu vodu |
| Timer funkcija je aktivna | Prekinite timer funkciju |
| Temperatura prostorije je previsoka ili preniska | Temperatura prostorije je ispod 7°C ili iznad 40°C. |
| Čini se da uređaj ne radi | Idirektna izloženost sunčevu svjetlu | Navucite zavjese |
| Prozori i vrata su otvoreni, u prostoriji se nalazi mnogo ljudi ili neki izvor topline | Zatvorite sve prozore i uključite drugi klima-uređaj |
| Filter je jako prljav | Očistite ili zamijenite filter za zrak |
| Blokiran je dovod ili odvod zraka | Očistite začepljeno mjesto |
| Temperatura prostorije niža je od podešene temperature | Promijenite postavke za temperaturu |
| Uređaj stvara previše buke | Uređaj ne stoji na ravnoj površini | Postavite uređaj na tvrdu, ravnu podlogu (smanjuje buku) |
| Kompresor ne funkcionira | Aktivirana je zaštita od pregrijavanja | Nakon 3 minute ponovo uključite uređaj dok se temperatura ne smanji |
| Daljinski upravljač ne funkcionira | Udaljenost je prevelika | Držite daljinski upravljač blizu uređaja i provjerite je li usmjeren prema rešetki za ispuštanje zraka |
| Kontrolna ploča nije primila signal daljinskog upravljača |
| Baterije su prazne | Promijenite baterije |
| CH01 | Funkcija isparavanja nije u predviđenom rasponu | Zatražite pomoć tehničara ili odnesite uređaj u prodavnicu gdje ste ga kupili. U tom slučaju pripremite i račun. |
| CH02 | Temperatura prostorije ne odgovara predviđenom rasponu temperature za rad uređaja | Zatražite pomoć tehničara ili odnesite uređaj u prodavnicu gdje ste ga kupili. U tom slučaju pripremite i račun. |
| FL | Spremnik za vodu je pun | Ispustite vodu iz uređaja kako je opisano u dijelu „Odvod vode“. |
© 2016 KLIMATRONIC® FUSION+
SUNTEC WELLNESS GMBH / HOLZSTRASSE 2 / 40 221 DÜSSELDORF / DEUTSCHLAND
KLIMATRONIC®
FUSION plus
natural_image
Line drawing of a portable air purifier device with control panel and buttons (no text or symbols)
Postavitev
Slika 1
Slika 2
flowchart
graph LR
    A["Assembly Setup"] --> B["Product Assembly"]
    B --> C["Final Product Structure"]
    C --> D["Final Product"]
natural_image
Simple line drawing of a cylindrical object inside a rectangular frame, with dimension lines indicating width and height (no text or symbols)
natural_image
Simple line drawing of a cabinet with an open door, no text or symbols present
Slika 6 Slika 7
natural_image
Line drawing of a trash bin near a door with a handle, no text or symbols present
natural_image
Simple line drawing of a trash bin with a handle, next to a wall-mounted switch (no text or symbols)
Slika 8
ZELO POMEMBNO!
natural_image
Diagram showing a device's internal structure before and after assembly, with no visible text or symbols.
Montaža nastavka za okno, sliki 3 in 4
natural_image
Simple line drawing of a cabinet with an open door, placed in a room with no text or symbols.
natural_image
Diagram showing a container being folded into a plastic cup, with an arrow indicating the process (no text or symbols present)
SKLADIŠČENJE
© 2016 KLIMATRONIC® FUSION+
SUNTEC WELLNESS GMBH / HOLZSTRASSE 2 / 40 221 DÜSSELDORF / DEUTSCHLAND
KLIMATRONIC®
FUSION plus
natural_image
Line drawing of a portable air purifier device with control panel and buttons (no text or symbols)
Montáž
Obr. 1
Obr. 2
flowchart
graph LR
    A["Assembly Setup"] --> B["Product Assembly"]
    B --> C["Material Collection"]
    C --> D["Final Product"]
Obr. 3 Obr. 4
Obr. 5
natural_image
Simple line drawing of a cylindrical object inside a rectangular frame with dimension lines (no text or symbols)
natural_image
Line drawing of a cabinet with an open door, no text or symbols present
Obr. 6
Obr. 7
natural_image
Line drawing of a trash bin near a door with a handle, no text or symbols present

natural_image
Simple line drawing of a trash bin with a handle, next to an electrical outlet (no text or symbols)
Obr. 8
VEL'MI DÔLEŽITÉ!
natural_image
Diagram showing a device transformation from internal air ducts to a final assembly, with no visible text or symbols.
natural_image
Simple line drawing of a cabinet with an open door, no text or symbols present
natural_image
Two technical line drawings of a mechanical component with no visible text or symbols
Popis funkcie zariadenia
Funkcia ochrany zariadenia
© 2016 KLIMATRONIC® FUSION+
SUNTEC WELLNESS GMBH / HOLZSTRASSE 2 / 40 221 DÜSSELDORF / DEUTSCHLAND
KLIMATRONIC®
FUSION plus
natural_image
Line drawing of a portable air purifier device with control panel and wheels (no text or symbols)
Montáž
Obr. 1
Obr. 2
flowchart
graph LR
    A["Raw Material Inspection"] --> B["Add Product"]
    B --> C["Add Internal Components"]
    C --> D["Add Packaging"]
    D --> E["Final Assembly with Internal Components"]
Obr. 3 Obr. 4
Obr. 5
natural_image
Simple diagram showing two downward arrows and a double-headed arrow inside a rectangular frame (no text or symbols)
natural_image
Pure technical line drawing of a mechanical component inside a rectangular frame (no text or symbols)
natural_image
Line drawing of a simple room interior with a cabinet and open door (no text or symbols)
Obr. 6
Obr. 7
natural_image
Simple line drawing of a trash can next to a door with a handle (no text or symbols)
natural_image
Simple line drawing of a trash bin with a handle, next to a wall-mounted switch (no text or symbols)
Obr. 8
VELMI DŮLEŽITÉ!
natural_image
Diagram showing a device transformation from a grid-patterned structure to a mechanical assembly (no text or symbols)
natural_image
Simple line drawing of a cabinet with an open door, no text or symbols present
natural_image
Two technical diagrams showing a cylindrical component inserted into a wall, with no visible text or symbols.
Uložení
© 2016 KLIMATRONIC® FUSION+
SUNTEC WELLNESS GMBH / HOLZSTRASSE 2 / 40 221 DÜSSELDORF / DEUTSCHLAND
KLIMATRONIC®
FUSION plus
natural_image
Line drawing of a portable air purifier device with control panel and buttons (no text or symbols)
Elementy zestawu
Rys. 1
Rys. 2
flowchart
graph LR
    A["Assembly Module"] --> B["Product"]
    B --> C["Packaging Unit"]
    C --> D["Final Packaging & Assembly"]
    D --> E["Final Product"]
Rys.3 Rys.4
Rys.5
Rys.6 Rys.7
Rys.8
UWAGA!
natural_image
Technical line drawing of a mechanical or electronic device with internal components and a separate schematic view (no text or symbols)
natural_image
Line drawing of a mechanical device with a cabinet and door, positioned in a room with no visible text or symbols.
natural_image
Diagram showing a device's internal structure transforming into a container with a striped pattern (no text or symbols)
Przechowywanie
© 2016 KLIMATRONIC® FUSION+
SUNTEC WELLNESS GMBH / HOLZSTRASSE 2 / 40 221 DÜSSELDORF / DEUTSCHLAND
KLIMATRONIC®
FUSION plus
natural_image
Line drawing of a portable air purifier device with control panel and buttons (no text or symbols)
Constructia
Figura 1
Figura 2
flowchart
graph LR
    A["Assembly Setup"] --> B["Reassembly"]
    B --> C["Internal Structure"]
    C --> D["Material Handling"]
    D --> E["Product Output"]
Figura 3 Figura 4
Figura 5
natural_image
Simple line drawing of a cylindrical object inside a rectangular frame with dimension lines (no text or symbols)
natural_image
Simple line drawing of a cabinet with an open door, placed in a corner room (no text or symbols)
Figura 7
Figura 6
natural_image
Line drawing of a trash bin near a door with a handle, no text or symbols present
natural_image
Simple line drawing of a trash bin with a hanging handle, next to a control panel (no text or symbols)
Figura 8
FOARTE IMPORTANT!
natural_image
Diagram showing a device's internal structure before and after assembly, with no visible text or symbols.
natural_image
Two technical diagrams showing a cylindrical component inserted into a wall, with no visible text or symbols.
3.2 Functia anti-înghet (Anti-Freeze):
© 2016 KLIMATRONIC® FUSION+
SUNTEC WELLNESS GMBH / HOLZSTRASSE 2 / 40 221 DÜSSELDORF / DEUTSCHLAND
KLIMATRONIC®
FUSION plus
natural_image
Line drawing of a portable air purifier device with control panel and buttons (no text or symbols)
Összeszerelés
Ábra 1
Ábra 2
flowchart
graph LR
    A["Assembly Setup"] --> B["Reassembly"]
    B --> C["Internal Structure"]
    C --> D["Coatings & Material Handling"]
    D --> E["Product Output"]
Ábra 3 Ábra 4
Ábra 5
natural_image
Simple line drawing of a cylindrical object inside a rectangular frame with dimension lines (no text or symbols)
natural_image
Simple line drawing of a cabinet with an open door, placed in a corner room (no text or symbols)
Ábra 6
Ábra 7
natural_image
Line drawing of a trash bin near a door with a handle, no text or symbols present
natural_image
Simple line drawing of a trash bin with a handle, next to a wall-mounted switch (no text or symbols)
Ábra 8
NAGYON FONTOS!
natural_image
Diagram showing a device's internal structure before and after assembly, with no visible text or symbols.
natural_image
Two technical diagrams showing a cylindrical component inserted into a wall, with no visible text or symbols.
Üzemmódok leírása
Védőfunkciók
natural_image
Diagram showing a container being processed with a cylindrical container, no text or symbols present
Tárolás
© 2016 KLIMATRONIC® FUSION+
SUNTEC WELLNESS GMBH / HOLZSTRASSE 2 / 40 221 DÜSSELDORF / NÉMETORSZÁG