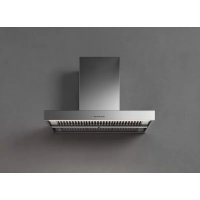
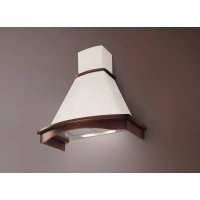
Rubik E.ion - Basket FALMEC - Free user manual and instructions
Find the device manual for free Rubik E.ion FALMEC in PDF.
Download the instructions for your Basket in PDF format for free! Find your manual Rubik E.ion - FALMEC and take your electronic device back in hand. On this page are published all the documents necessary for the use of your device. Rubik E.ion by FALMEC.
USER MANUAL Rubik E.ion FALMEC
This instruction booklet must be kept together with the appliance for future reference. If the appliance is sold or consigned to other parties, check that the booklet is supplied with it, to ensure that the new user has the correct information on the operation of the range hood and is aware of the warnings. These warnings have been provided for the your safety and the safety of others. As a result, please read them carefully before installing and operating the appliance. This appliance is not intended for use by young children or infirm persons unless they have been adequately supervised by a responsible person to ensure that they can use the appliance safely. Young children should be supervised to ensure they do not play with the appliance. The appliance must be installed by qualified personnel, in accordance with the standards in force. If the supply cord is damaged, it must be re-placed by the manufacturer, its service agent or similarly qualified persons in order to avoid a hazard. Any modifications that may be required to the electrical system for the installation of the range hood must only be made by qualified electricians. It is dangerous to modify or attempt to modify the characteristics of this system. In the event of malfunctions or if repairs are required to the appliance, do not attempt to solve the problems directly. Repairs performed by unqualified persons may cause damage. For all repair and other work on the appliance, contact an authorised service/spare parts centre. Always check that all the electrical parts (lights, exhaust device), are off when the appliance is not being used. Read the entire instruction booklet before performing any operations on the range hood. The range hood must only be used for the exhaust of cooking fumes in home kitchens. The manufacturer disclaims all liability for any other use of the appliance. The maximum weight of any object placed above the hood, or hung to it (if possible) must not exceed 1,5 kilos. After installing the stainless steel hood, clean it in order to remove any residue of the protective glue, and stains of grease or oil. The manufacturer recommends its cleaning cloth available for purchase. The manufacturer accepts no liability in case of dam- age caused by the use of different detergent types. SAFETY WARNINGS The electrical system features an earth connection in compliance with international safety standards; furthermore, it is compliant with the European standard for electromagnetic com- patibility. Do not connect the appliance to flues (from boilers, fireplaces, etc.). Make sure the mains volt- age corresponds to the values on the rating plate located inside the range hood. The minimum safety distance between the cooktop and the range hood must be at least 65 cm. Never cook on “open” flames under the range hood. Check deep-fryers during use: superheated oil may be flammable. - Ensure there is adequate ventilation of the room when the rangehood is used at the same time as appliances burning gas or other fuels. - Do not flambe under the rangehood - The exhaust air must not be discharged into a flue which is used for exhausting fumes from appliances burning gas or other fuels. - Ensure that all regulations concerning the discharge of exhaust air have been fulfilled before you use the appliance.13 Before performing any cleaning or maintenance operations, disconnect the appliance by un- plugging it or using the main switch. The manufacturer disclaims all liability for any damage that may be directly or indirectly caused to people, things and animals due to the failure to follow all the instructions provided in this booklet and above all the warnings relating to the installation, operation and maintenance of the appliance. TECHNICAL SPECIFICATIONS
The technical data pertaining to the electric appliance The technical specifications of the ap- pliance are shown on the rating plates located inside the range hood. INSTALLATION
The distance between the hob and the lowest part of the range hood is normally at least 65 cm (see figure C1). This distance is measured in the lowest part of the range hood not operating at safety voltage. Based on this detail provided by European Standards, the distance may be reduced in some models as specified in the general catalogue. Should the instructions of the gas cooker specify a greater distance, take this into consideration. The filtering E-ION range hoods are with air recirculation system do not require an exhaust air connection. For the combined and regenerable Carbon.Zeo filter maintenance see section H. Assembly instructions: see section “O” of the booklet. ELECTRICAL CONNECTIONS
ATTENTION! Disconnect the appliance from the mains before performing any kind of opera- tion inside the hood range. Ensure that the wires inside the range hood are not disconnected or cut; if this is the case, contact your nearest After-Sales Service. Electrical connections must be performed by qualified personnel. Connection must be performed in compliance with the standards in force. Verify that the electrical system can support the load of the appliance (see technical data plate in section B). The E-ION range hoods are usually supplied without plug and with power cable with transparent sheath where the main insulation of the earth cable is yellow/green. The appliance must be connected downstream a disconnection device conforming to the III over-voltage category and national installation rules. The yellow/green earth cable must be interrupted by the switch. Before connecting the appliance to the mains, verify that: - the power voltage corresponds to that indicated in the data plate. - the earth socket is correct and functional. - the power supply system has an efficient earth connection according to the standards in force. - the omnipolar socket or switch can be accessed easily with the appliance installed. The manufacturer declines any liability in the event safety standards are not complied with.
OPERATION14 T: Timer key: pressing this key when the extractor fan is switched on will activate the shut- down function after 15 minutes. Turn off the extractor fan and the light. The active function is signalled with the red LED light flashing. The timer function, if activated, will be deactivated when pressing the timer key again. The function is also deactivated when pressing the 0/1 key if the extractor fan has switched off. The key will light up permanently to signal, when the extractor fan is switched off, to clean the aluminium filters after 30 hours of operation. Applying prolonged pressure will reset the signal. DEC: Deceive the automatic function is activated it will be deactivated. If the extractor fan is in operation, it will reduce the speed and if the ioniser is activated it will reduce the power of the ioniser. 0/1: If the automatic function is activated, it will be deactivated. If the extractor fan is switched off, it will be activated to the first speed. If the extractor fan is in operation, it will be switched off. With the extractor fan and the light switched off, applying prolonged pressure it will enable the activation/deactivation of the ioniser. The ioniser has been activated if the Auto key lights up during the prolonged pressure. INC: If the automatic function is active it deactivates it. If the extractor fan is in operation, pressing the key will increase the speed up to intensive and, if the ioniser is activate, it will increase ionising power. The intensive has a 14 minute duration, after which time the extractor fan will return to the 3rd speed. The intensive function is signalled by the flashing INC LED. Note: 3 speeds are active in the SPRING model hood featuring 2 motors and the maximum speed is not timed. Auto: With extractor fan switched off the automatic mode will be activated/deactivated; if activated the auto LED will be lit. In this mode, if the air quality is good, (completely green leaf) the extractor fan and the ioniser are switched off. If the quality of the air has deteriorated, the leaf is partially or completely yellow, the extractor fan is activated at the first speed and the DEC LED lights up until the leaf turns completely green. L: The brief pressure activates/deactivates the light. With the extractor fan and light switched off, applying prolonged pressure enables the memorisation of the RF remote control. The key flashes for a few seconds or until the remote control key is recognised. When the extractor fan is enabled in normal functioning mode the ioniser (with increasing power according to the level of air pollution) is also activated.
FILTERS REMOVING AND REPLACING’S INSTRUCTIONS
To remove the metal filters, remove the lower panel fastened with one of the magnets of the range hood. This way, the filters can be removed by using the appropriate handle.
2. COMBINED AND REGENERABLE FILTERS (qualified personnel only)
The CARBON-ZEO filters can be regenerated according to the procedures described in paragraph H regarding maintenance. These filters are placed in the upper side of the range hood. Follow the instructions below to remove them (see fig. F2): - Disconnect the appliance from the mains. - Loosen the 2 screws (V1) (4 screws for SPRING double motor range hood). - Carefully remove the combined filter-holder (SF) (2 filter-holders for the SPRING double motor range hood) - Remove the filter (F) from the combined filter-holder (SF). To order new charcoal filters, contact your distributor/dealer. ONLY FOR ITALY: Download the filter order module from the website: www.falmec.com.15 LIGHTING
The E-ION range hood is equipped with high efficiency, low consumption LED lighting with ex- tremely long duration under normal use conditions. LED spotlight replacement must be carried out only by qualified technicians and using only original material.
MAINTENANCE AND CLEANING
A constant maintenance ensures a proper operation and efficiency over time. Special atten- tion must be paid to the metal grease-trapping filters, in order to prevent dangerous grease to accumulate on the range hood, with consequent risk of fire.
1. METAL GREASE-TRAPPING FILTERS
These trap the grease particles suspended in the air; therefore, we recommend washing them frequently (every 2/3 weeks) with hot water and detergent, preventing them from bending. Before installing them back, wait until they are fully dried. To disassemble and assemble them, see instructions at section F1. Operations must be performed frequently and constantly, in order to prevent oils, greases and dust to enter inside the ionising sys- tem.
2. CARBON.ZEO COMBINED FILTERS
CARBON.ZEO filters do not require special maintenance. In normal use conditions, we recommend regenerating them every 18 months and replacing them after 3 years. Be- fore starting any operation, disconnect the range hood from the mains. To remove it see paragraph F2. To regenerate the CARBON.ZEO filter (every 18 months); remove the fabric mesh-holder lower frame (TPM) from the combined filter (see fig. H2) and put it in a normal domestic oven at a temperature of 200°C for approximately 2 hours. Once the filter has been cooled, re-install the fabric mesh-holder lower frame (TPM) on the hood, following the inverse order of the procedure described in section F2. Reconnect the range hood to the mains.
3. EXTERNAL CLEANING
We recommend cleaning the external surfaces of the range hoods at least every 15 days, to prevent that oily or greasy substance can damage the range hood surfaces. The hood must be carefully cleaned using a humid cloth with neutral liquid detergent or denatured alcohol, in order to not damage the surfaces and active components of the range hood. Do not use products containing abrasive substances, rough cloths or cloths commonly marketed for cleaning steel. Failure to comply with these indications will deteriorate ir- reversibly the steel surfaces. These indications must be stored together with the instructions booklet of the range hood. The manufacturer declines any liability for failure to comply with these instructions.
4. CLEANING THE IONISED PIPES (qualified personnel only)
This extremely delicate operation must be performed by qualified personnel, as the ionised pipes are powered at high voltage. In normal use conditions, we recommend performing the operation every 18 months. Before starting any operation, disconnect the range hood from the mains. Remove the CARBON-ZEO filters as described in paragraph F2. The ion- ised pipes can now be accessed and removed and cleaned as described in the following section (see fig. H4). - Release spring M of the earthed metal sheath outside the pipe; - Loosen the ionised pipes (TI) of the ionising chamber and remove the metal mesh; - Carefully clean the pipe using a cloth with ethylic alcohol. Wash the external metal16 sheath using water and soap and rinse it carefully.- Ensure that the sheath is FULLY DRY (put it in the oven at 50°C for 10 min) and then place it back in the pipes.- Re-activate the pipes in the ionising chamber and re-hook spring M.- Re-install the CARBON-ZEO filters by following the inverse operation described in sec-tion F2.- Reconnect the range hood to the mains. After approximately 4 years of normal use, the efficiency of the ionising pipes can gradually reduce. Therefore, we recommend replacing them after 5 years.
5. CLEANING THE INSIDE OF THE APPLIANCE
The electrical parts or parts of the motor assembly inside the range hood must not be cleaned using liquids or solvents. Do not use abrasive products. All the above operations must be performed after having dis-connected the appliance from the mains power supply. WARRANTY
The new equipment is covered by warranty. The warranty conditions are provided by the distributor. The manufacturer is not liable for any inaccuracies in this booklet resulting from printing or transcription errors. The manufacturer reserves the right to modify its products as it consid-ers necessary or in the interests of the user, without compromising their essential safety and operating characteristics. ASSEMBLY INSTRUCTIONS
(Fig. A) 1) Verify that the ceiling is arranged for installing the hood range power supply, according to the standards in force. Disconnect the power supply of the electrical system that powers the range hood.2) Insert:- the 4 steel cords (C1) in the 4 holes (F1) of the ceiling support (SC);- The power cable of the range hood system (CAI) inside the hole (F2) of the ceiling support (SC). 3) Connect the power supply terminal (MA) to the power cable (CAI) complying with the phase provisions, neutral and earth (see sect. D). (Fig. B) 1) Fasten the support (SC) to the ceiling using 4 fischer of Ø 8 mm and relative screws V1.2) Insert the steel cords (C1) inside the holes of the support cover plate (C). (Fig. C) 1) Detect the height (Y) of the range hood from the ceiling, considering the height X=60/65 cm and that (Z) varies depending on the model of the range hood. (Fig. D) 1) After having determined the height (Y), cut the lower part of the steel cords (C1) in excess.2) Loosen the cable-lock (BC) by rotating the knurled cylinder anti-clockwise; 3) insert the steel cords (C1) inside; 4) lock them rotating the knurled cylinder clockwise, after having controlled that the range hood is at the required height “Y”. Use a spirit level to verify the range hood planarity in the two directions.17 5-6) Insert the range hood power cable (CA) in the hole of the support cover plate (C) and connect it to the terminal (MA) complying with the provisions of sect D. (Fig. E)
1) Place the terminal inside the support (SC);
2) lift the support cover plate (C);
3) tighten the support cover plate (C) to the support (SC) using 2 screws (V4).
4) Power the range hood electrically.
1) Cut off the voltage from the electrical system that powers the hood. Make sure there is a
set-up for the electrical power supply (Solution A or B) for the hood on the wall it is being installed on, according to regulations in force.
2) Position the hood bracket (SP) at distance Y, considering that the distance between the
hood and cooking surface must be approximately 60-65 cm.
3) Attach the hood bracket (SP) using 2 Ø 8 mm dowels and relative V1 screws. Warning, if the
power supply cable for the hood system (CAI) is positioned behind the hood bracket (SP) (Solution A), pass it through the hole (F) on the bracket. (Fig. B) 1A) Solution A -> - Momentarily place the hood near the hood bracket (SP) and connect the power supply clamp (MA) to the power supply cable of the hood (CA), observing the phase, neutral and earth requirements (see sec. D), cutting off any excess cable. - Place the clamp and the power supply cable between the back of the hood and the hood bracket (SP) so that they are hidden. 1B) Solution B (more common) -> the electrical outlet (PE) is placed near the hood. In this case it is necessary to install a plug with a phase, neutral and earth on the hood power supply cable (CA), observing the regulations in force. (Fig. C)
1) Insert the heads of the V4 screws assembled on the hood into the holes on the hood bra-
2) Move the hood so that the heads of the screws fit into the slots on the hood bracket.
3-4) Permanently fasten the bracket (SP) to the hood using the 4 V5 screws provided. (only for Solution B) Connect the hood to the electrical power mains. - Electrically power the hood.18