Rocket 125 3D - Drone XciteRC - Free user manual and instructions
Find the device manual for free Rocket 125 3D XciteRC in PDF.
| Product Type | RTF electric quadcopter (ready to fly) |
| Brand | XciteRC |
| Model | Rocket 125 3D |
| Category | Drone |
| Remote control frequency | 2.4 GHz |
| Drone power supply | Rechargeable LiPo battery |
| Remote control power supply | 3 AA batteries (alkaline or rechargeable) |
| Charger included | USB charger |
| Charging time | Approximately 40 minutes |
| Flight time | Approximately 6 to 8 minutes |
| Remote control range | Up to 50 meters |
| Flight functions | 360° flips, Headless mode, Speed mode (EASY/PRO) |
| Gyroscope | Built-in, requires calibration before first flight |
| Camera / Photo | Optional, with included microSD card and USB reader |
| Lighting | Switching, LEDs on arms |
| Protection guards | Included, removable |
| Spare blades | Included in delivery |
| Assembly | Pre-assembled (RTF) |
| Recommended use | Sufficiently large indoor space or windless outdoor |
| Minimum age | 14 years (adult supervision for under 14) |
| Spare parts | Available on XciteRC website |
Frequently Asked Questions - Rocket 125 3D XciteRC
User questions about Rocket 125 3D XciteRC
0 question about this device. Answer the ones you know or ask your own.
Ask a new question about this device
Download the instructions for your Drone in PDF format for free! Find your manual Rocket 125 3D - XciteRC and take your electronic device back in hand. On this page are published all the documents necessary for the use of your device. Rocket 125 3D by XciteRC.
USER MANUAL Rocket 125 3D XciteRC
Rocket125 Quadrocopter3D
natural_image
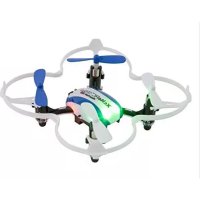
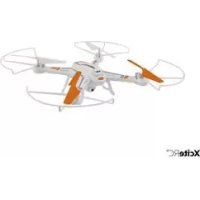
White quadcopter drone with orange propellers and green control lights (no text or symbols visible)15006100 XciteRC Rocket 125 3D Quadrocopter 2.4 GHz
15006000 XciteRC Rocket 125 3D Quadrocopter 2.4 GHz mit Kamera
DE
Inhaltsverzeichnis
natural_image
Black handheld gaming controller with multiple grip handles (no visible text or symbols)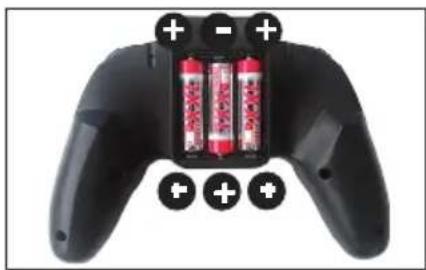
natural_image
Black game controller with three red batteries and battery icons on top (no text or symbols)natural_image
Close-up of a small drone with four propellers and a hand adjusting its body, showing no visible text or symbols.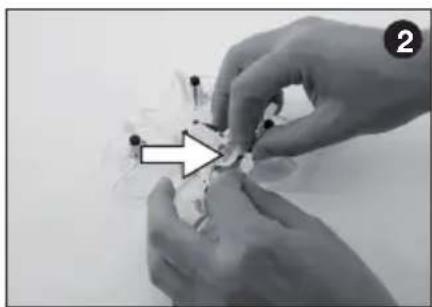
natural_image
Close-up of hands assembling small mechanical components (no visible text or symbols)natural_image
Front view of a white quadcopter drone with multiple propellers and a central cockpit (no visible text or symbols)natural_image
Close-up of a handheld gaming controller with two scroll buttons and a central display (no visible text or symbols)natural_image
Close-up of a handheld electronic device with dual circular ports and a central display (no visible text or symbols)natural_image
Close-up of a game controller with directional arrows indicating movement or control (no text or symbols visible)Headless-Mode
natural_image
Close-up of a black handheld game controller with a purple head and scroll, showing no text or symbols on the device itself.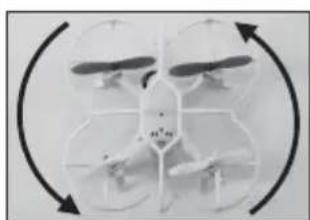
natural_image
Diagram of a four-bladed drone with circular arrows indicating rotation or cycle (no text or symbols)DE
natural_image
Close-up of a robotic control panel with a finger adjusting it (no visible text or symbols)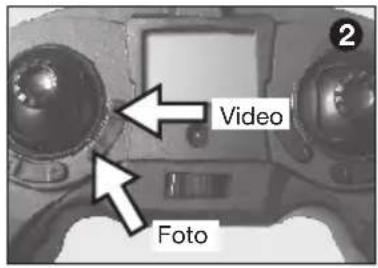
text_image
Video Foto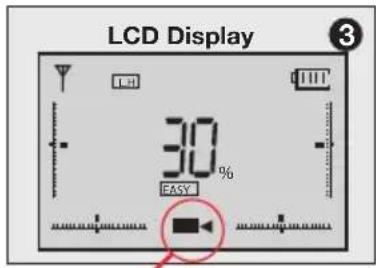
text_image
LCD Display 30% EASYnatural_image
Close-up of a black iOS game controller with a black handle and control buttons, no visible text or symbols.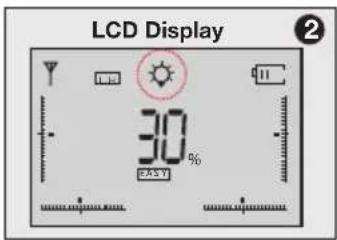
text_image
LCD Display 30% EASYLanden:
- Cd = Cadmium
- Pb = Blei
• Hg = Quecksilber - Li = Lithium
DE
EN
Summary
Intended Usage 15
Scope of delivery....15
Explanation of Symbols 15
Warnings and safety notes....15
Handling precautions for batteries or rechargeable batteries....17
The remote control system 18
Transmitter 18
Battery charging....18
Installation of the rotor guards....19
Getting started 19
RC functions 20
Mode setting 20
Trim 21
Speed and 360 degree flips....21
Headless mode 21
Applying the camera (optional)....22
Illumination 22
Landing: 22
Maintenance....22
Troubleshooting....23
Repairs, Spare Parts....23
Environmental Protection Notes....24
Notes on battery law 24
Imprint
This manual is a publication of
All rights including translation. Reproductions of any kind, such as photocopying, microfilming or storage in electronic data processing equipment, without the written permission of the publisher. Reproduction in whole or part, is prohibited.
This manual corresponds to the technical status of the product at time of printing, changes in technology and equipment reserved. Text and illustrations of this manual, no claims can be derived.
NO LIABILITY FOR PRINTING ERROR! SUBJECT TO CHANGE!
The latest version of this manual can be found on the Internet at www.XciteRC.com
© Copyright 2015 by XciteRC-Modellbau GmbH & Co. KG
Thank you for purchasing the Quadrocopter Rocket 125 3D from XciteRC. This manual contains important instructions for operating your new model. Therefore, please read all instructions in this manual thoroughly before using the model, so that you can operate your model safely.
All company and product names mentioned are trademarks of their respective owners. All rights reserved.
Intended Usage
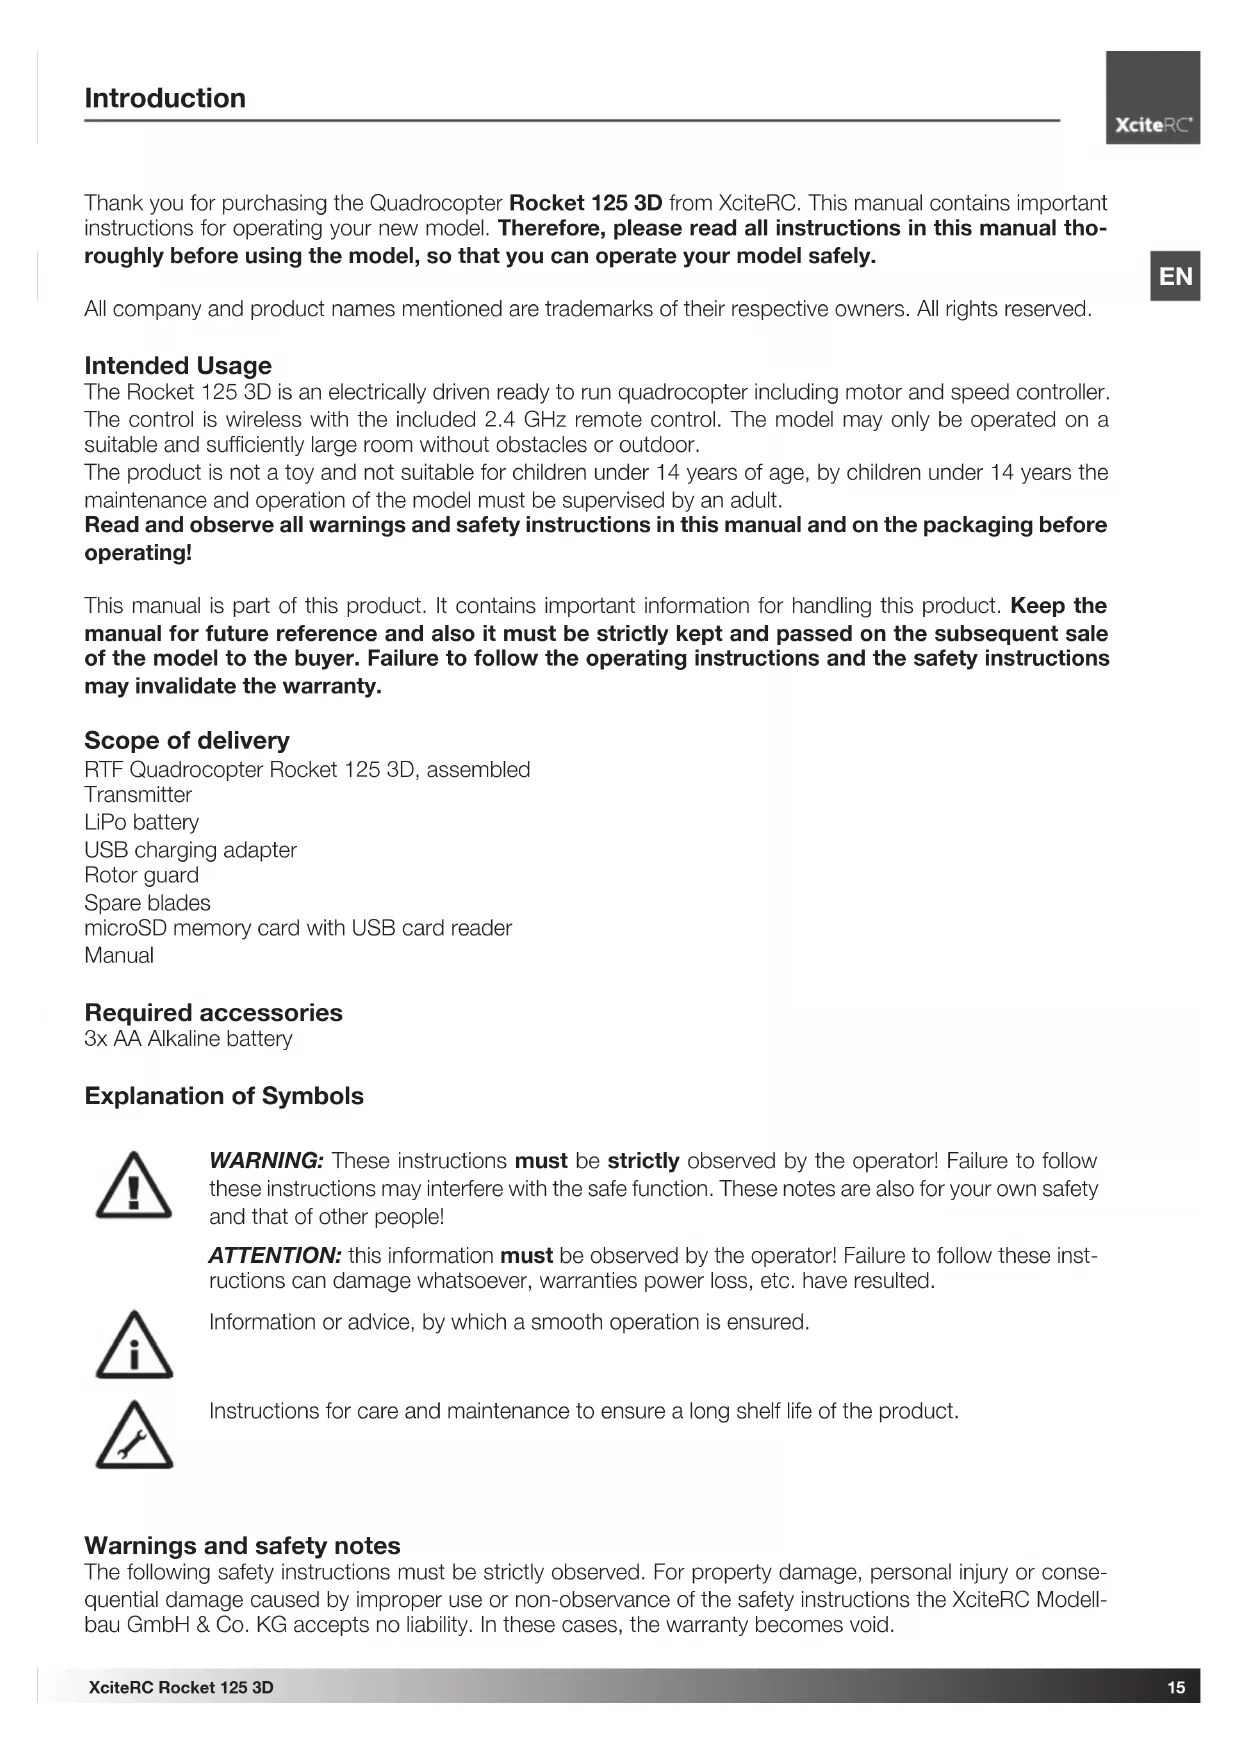
The Rocket 125 3D is an electrically driven ready to run quadrocopter including motor and speed controller. The control is wireless with the included 2.4 GHz remote control. The model may only be operated on a suitable and sufficiently large room without obstacles or outdoor.
The product is not a toy and not suitable for children under 14 years of age, by children under 14 years the maintenance and operation of the model must be supervised by an adult.
Read and observe all warnings and safety instructions in this manual and on the packaging before operating!
This manual is part of this product. It contains important information for handling this product. Keep the manual for future reference and also it must be strictly kept and passed on the subsequent sale of the model to the buyer. Failure to follow the operating instructions and the safety instructions may invalidate the warranty.
Scope of delivery
RTF Quadrocopter Rocket 125 3D, assembled
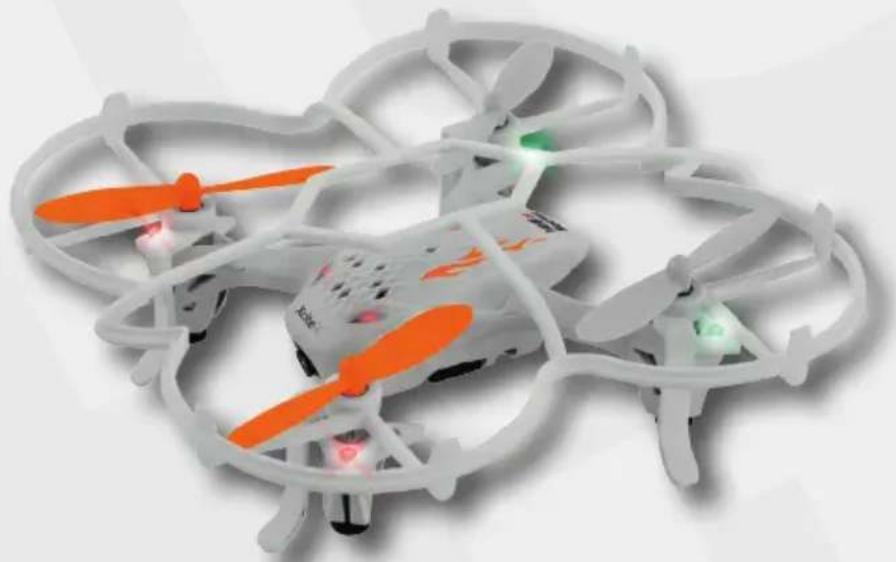
Transmitter
LiPo battery
USB charging adapter
Rotor guard
Spare blades
microSD memory card with USB card reader
Manual
Required accessories
3x AA Alkaline battery
Explanation of Symbols
WARNING: These instructions must be strictly observed by the operator! Failure to follow these instructions may interfere with the safe function. These notes are also for your own safety and that of other people!
ATTENTION: this information must be observed by the operator! Failure to follow these instructions can damage whatsoever, warranties power loss, etc. have resulted.
Information or advice, by which a smooth operation is ensured.
Instructions for care and maintenance to ensure a long shelf life of the product.
Warnings and safety notes
The following safety instructions must be strictly observed. For property damage, personal injury or consequential damage caused by improper use or non-observance of the safety instructions the XciteRC Modellbau GmbH & Co. KG accepts no liability. In these cases, the warranty becomes void.
EN
Move your model always with the maximum caution and responsibility, otherwise it may cause damage to other property or even physical injury. A third party liability insurance is mandatory. If you already have a liability insurance policy, check before start-up the model, whether radio-controlled models are covered by a corresponding amount.

- The product contains small parts that can cause injury if swallowed, and must therefore be kept away from children under 3 years.
- The product is not a toy and not suitable for children under 14 years.
- The operation of radio-controlled models requires practice. In the beginning operate your new model therefore with extra caution and familiarize yourself with the response to your commands.
- ⚠️ WARNING: The safe operation requires concentration and quick reaction. Do not operate your model if you are tired or under the influence of drugs or alcohol – risk of accident and injury!
- ⚠️ WARNING: The control of this model is done via radio signals, which can be influenced by the environment. This may cause a suddenly loss of control of your model. The model may only be operated on a suitable and sufficiently large room without obstacles. An outdoor use is not recommended.
- Operate your model therefore only with sufficient light within line of sight, away from cars, traffic and people – risk of accident and injury!
- ATTENTION: due to the small size and weight, the model should not be exposed to drafts or a strong winds. Avoid flights near open windows or air-outlets of an air-conditioning system - crash hazard!
- Do not operate your model during a thunder storm or near radio towers or power lines.
- Radio remote controlled models may not be operated at any public space by implication (streets, roads, squares or lakes). Before operation please ask where the operation is allowed. This also applies to private property, here the consent of the owner is required.
- ⚠️ WARNING: Keep your fingers or loose clothing or hair away from the rotating parts or the propeller / rotor unit - risk of injury!
- Always switch on the model first, then the transmitter. ⚠️ WARNING: during the operation of the transmitter must remain switched on!
- Never operate your model with low transmitter batteries, because this reduces the range of your model dramatically.
- If the drive battery is empty, the model first slow down until it no longer reacts properly to your commands. Stop the operation and change the drive battery or charge it again.
- Pay attention to the instructions and warnings for this and any other equipment used by you (chargers, rechargeable battery packs, etc.).
- ⚠️ WARNING: Keep packaging material, small parts, chemicals and electrical components away from children – risk of accident and injury!
- The model and the transmitter may be neither get humid nor wet, especially the electronic components (receiver, speed controller, servo) and, if used, lithium batteries, are not waterproof! The model may not
be used in the rain (or heavy fog), do not drive in wet grass or through puddles or snow. ⚠️WARNING: Fire or explosion due to moisture in lithium batteries!
- Plastic parts (eg. fuselage or main blades) is less flexible and can break more easily at cold temperatures (below 10 °C).
- The modification of the model is not permitted for safety and CE approval regulations, which applies in particular to the transmitter, receiver and speed controller. Maintenance or repairs using original replacement parts are excluded.
• After use, first turn off the model and then the transmitter.
- ⚠️WARNING: remove the drive battery from the model and transmitter after use. Store the model never with built-in battery. Fire hazard!
- Store batteries separately on a non-combustible surface.
- The drive components (motor and speed controller) or the car battery may become hot during operation.

WARNING: Risk of burns! Let these components cool down completely after the operation (and before each battery change)!
Operation of the model is performed solely at the risk of the operator. Only a careful and deliberate operation protects against physical injury and damage to property.
Handling precautions for batteries or rechargeable batteries:
- Keep batteries away from children! Never let batteries unattended, as they can be swallowed by children or pets!
- Use only the recommended or equivalent type of batteries / rechargeable batteries.
WARNING: Do not expose batteries / rechargeable batteries to heat or throw into fire – fire or vision hazard!
WARNING: Insert batteries / rechargeable batteries with the correct polarity, no short-circuiting - or explosion hazard!
- If possible, always replace all batteries at the same time, never use new and used batteries and batteries with different charge levels simultaneously.
WARNING: Do not use defective or damaged batteries or rechargeable batteries – fire hazard! of chemical burns on contact with skin, use protective gloves!
- WARNING: Do not attempt to recharge non-rechargeable batteries in a charger – fire or explosion hazard!
- Remove the rechargeable batteries from the device before charging.
WARNING: Charging may take place only with a suitable charger for the type of battery on a fire-surface and under constant adult supervision – fire hazard!
- Immediately remove used batteries from the devices.
NOTE: NiMH batteries must be checked at least every 3 months and, if necessary, recharged, other because of the typic self-discharge they may get deep discharged and damaged! Therefore, better o-called RTU batteries with a very low self-discharge.
NOTE: note the specified storage voltage for lithium batteries. Is a completely full or empty lithium dry time stored for a longer time, it can be damaged.
The XciteRC Modellbau GmbH & Co. KG cannot monitor the proper use of the battery or batteries you use, therefore, the warranty is excluded due to incorrect charging or discharging.
EN
EN
The remote control system
Here you get an overview of the remote control system of your XciteRC Rocket 125 3D and its various features and settings. Before the first flight, you should absolutely have read and understood all these functions and settings.
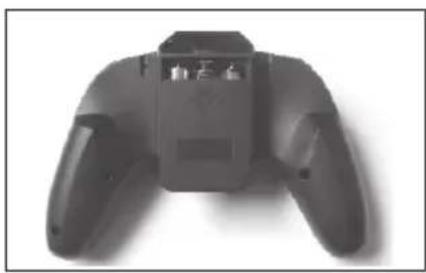
- Do make sure that the transmitter is turned off - POWER-LED off.
- Now open the battery compartment cover on the backside of the transmitter. Slide the cover down and insert three size AA Alkaline batteries.
- ⚠️ WARNING: pay attention to the correct polarity - fire or explosion hazard!
natural_image
Top-down view of a black handheld gaming controller with multiple handles and a central display (no visible text or symbols)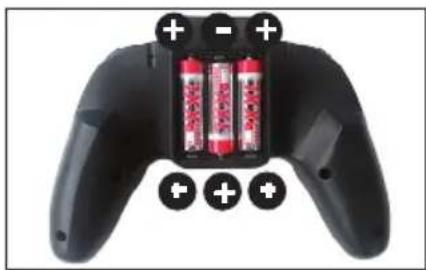
natural_image
Black game controller with three red batteries and battery icons on top (no text or symbols)- Close the battery compartment cover, then turn on transmitter.
- The POWER LED must lit. Attention: if the POWER LED flashes and a beep sound appears or does not light at all, the model may not started – crash hazard! Change transmitter batteries immediately.
- ⚠️WARNING: check the POWER LED also during operation. If the POWER LED starts to blink and the sound appears, stop operation, switch the model off and replace the transmitter batteries – crash hazard!
- ⚠️ ATTENTION: The maximum range of the remote control system is about 50 meters, do not fly farther away under any circumstances - crash hazard!
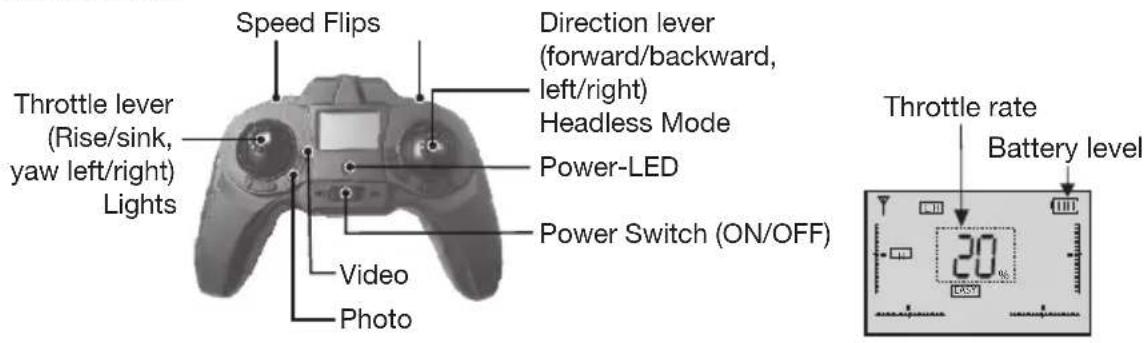
Transmitter
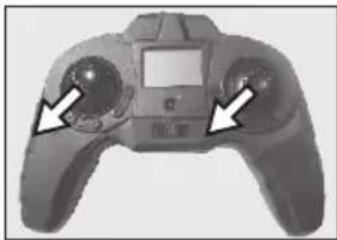
text_image
Speed Flips Direction lever (forward/backward, left/right) Headless Mode Power-LED Power Switch (ON/OFF) Throttle lever (Rise/sink, yaw left/right) Lights Video Photo Throttle rate Battery level 20%Battery charging
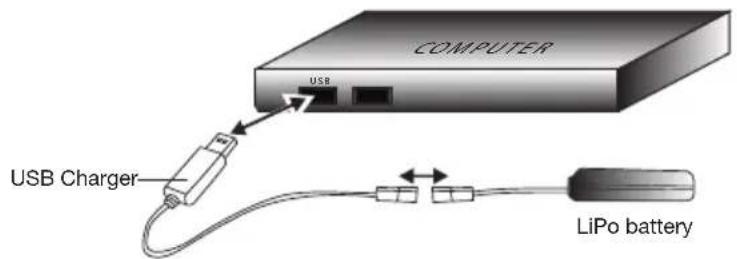
WARNING: Be sure to read all safety instructions regarding the use of rechargeable batteries. Charging may take place only with the supplied charger on a fireproof surface and under constant adult supervision - fire or explosion hazard!
text_image
COMPUTER USB USB Charger LiPo battery- Connect the USB cable to a PC or appropriate power supply with max. 1 A output. The red LED lights up.
- Connect the Quadrocopter battery with the charger.
- WARNING: The Quadrocopter battery is polarized. Check the side channels. Do not use force - fire or explosion hazard!
- The red LED goes out to indicate charging. Charging time is about 40 minutes. If the battery is fully charged, the red LED lights up again.
- Unplug the battery and the USB cable.
The flight time of the Quadrocopter is about 6-8 minutes.
Getting started
Before you begin please check:
- ⚠️ WARNING: Only start with a sufficiently full transmitter batteries (rechargeable batteries) and fully charged drive battery – crash hazard!
- Check all parts for damage and dirt. Replace any damaged parts and clean the model, because dirt increases the weight and therefore can degrade the flying qualities.
natural_image
Close-up of a small drone with visible propellers and control buttons, being handled by a hand (no text or symbols)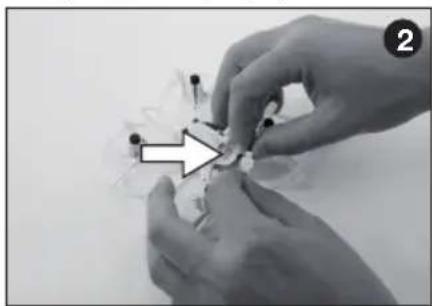
natural_image
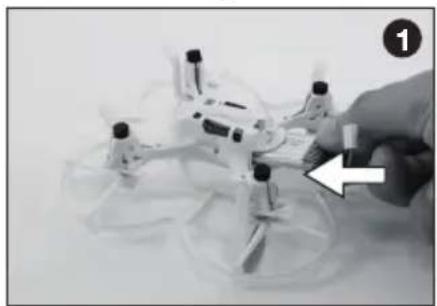
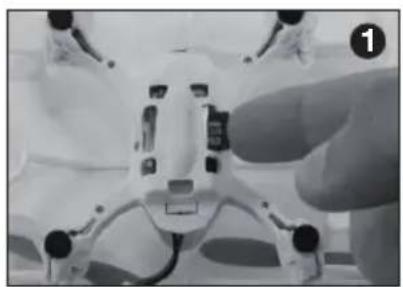
Close-up of hands assembling small components with a black arrow pointing to a component (no text or symbols visible)- Place into the battery compartment on the rear (1) and connect it to the quadrocopter (2).
- ⚠️ WARNING: The battery connector is polarized. Check the side channels. Do not use force - fire or explosion hazard!
natural_image
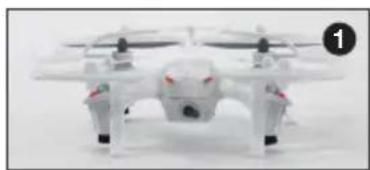
White quadcopter drone with visible propellers and antenna (no text or symbols)- LED flashing fast: automatic detection
- LED flashing slowly: ready to bind
-
LED on: Binding completed
-
Place the Quadrocopter on a flat surface in the starting position and switch it on (1). The LEDs first flashes quickly, then after a few seconds slow. Now switch the transmitter on. Move the left throttle lever all the way up and then back in the lowest position (2). This safety circuit prevents the rotor may start after turning ON the Quadrocopter
- The model is ready to fly as soon as a short beep is heard. The POWER LED of the transmitter and the Quadrocopters LED lights up solid.
- Note: when the model is not used for about 30 seconds, it automatically switches back to the bind mode, the LEDs starts to flash. To fly, the throttle must once again moved all the way up and then back in the lowest position
- i GYRO CALIBRATION: before the first flight the gyro must be calibrated. Move both control levers downwards to the left and hold until all LEDs flash briefly. This is also necessary if the model flies badly e.g. after a crash
EN
EN
natural_image
Close-up of a handheld gaming controller with two control knobs and a display screen (no visible text or symbols)- MODE SELECTION: to select the control mode 1 or 2 (see chart RC functions), switch the transmitter off and press the right trim lever. Now switch on the transmitter again (5).
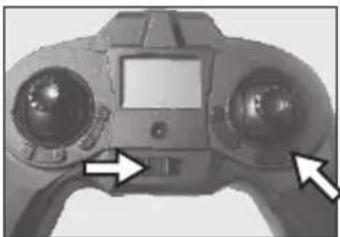
natural_image
Close-up of a handheld electronic device with dual circular ports and a central display (no visible text or symbols)- If the flight battery runs low, the LEDs on the motor mounts starts flashing. From now on the model is controllable for one more minute only. Find a suitable landing spot and land. Charge the flight battery again.
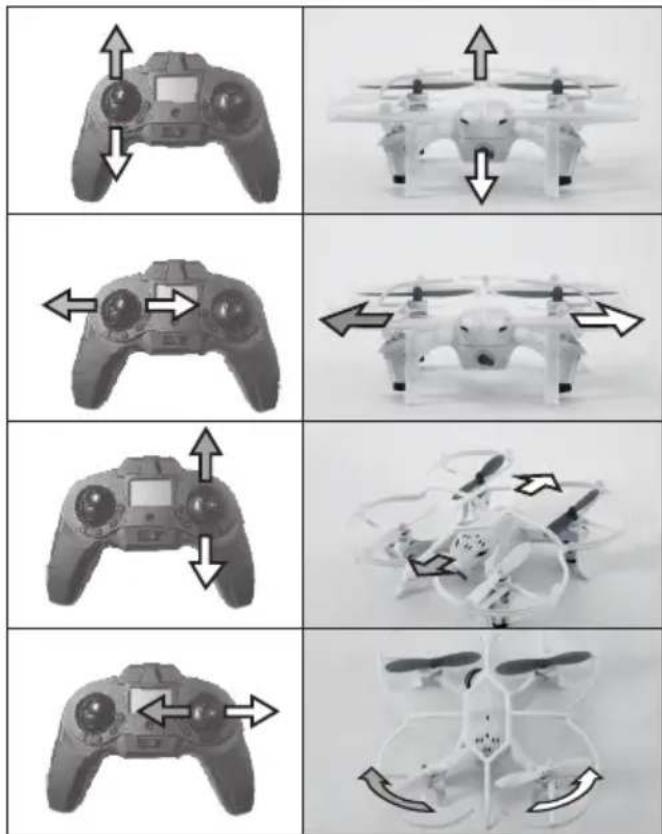
RC functions
Mode 1 (factory setting)
Mode 2
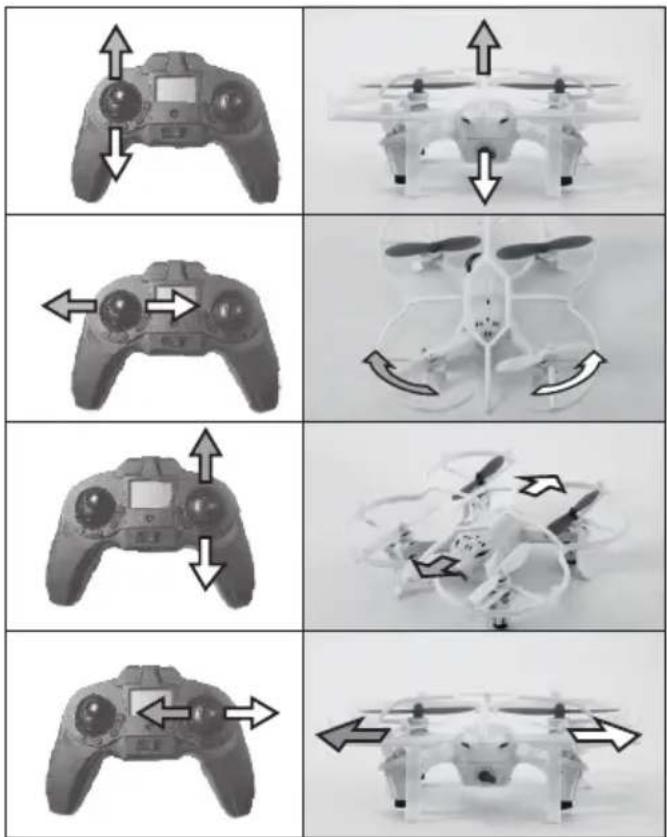
text_image
Diagram showing six different stages of a drone's control system, with arrows indicating movement and rotation directions.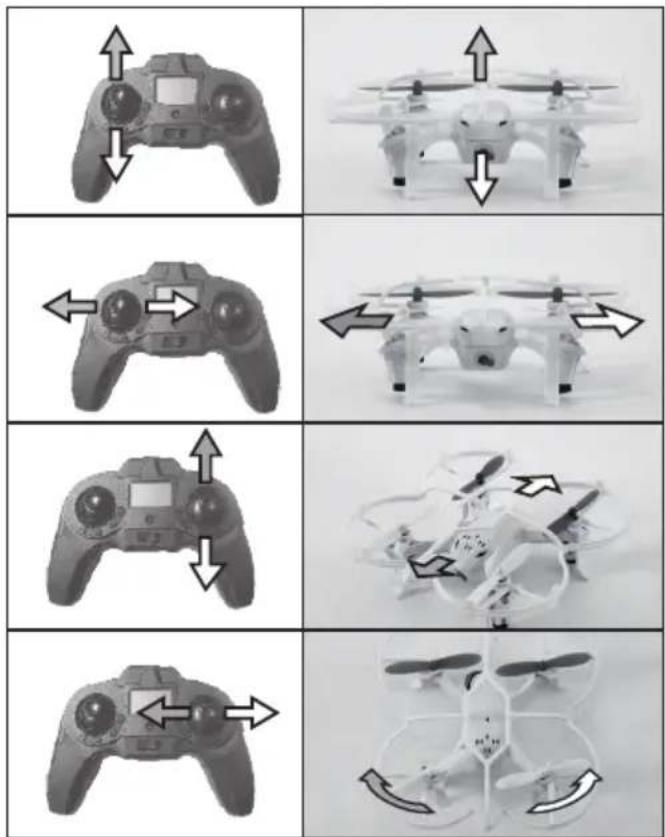
text_image
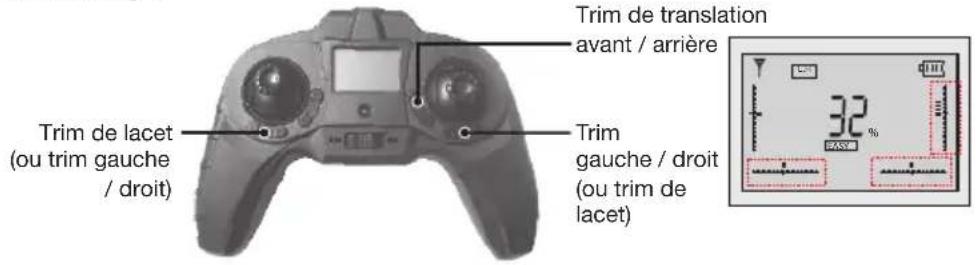
Diagram showing four different stages of a drone with directional arrows indicating movement or rotation.Trim
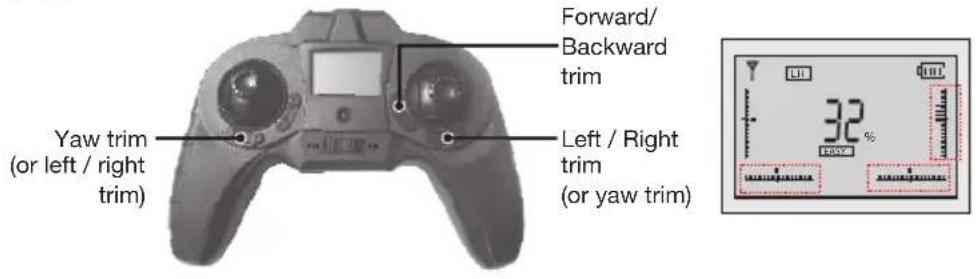
text_image
Forward/ Backward trim Yaw trim (or left / right trim) Left / Right trim (or yaw trim) 32%Speed and 360 degree flips
Speed: press the speed button on the left side of the transmitter (1) during the flight and the Quadrocopter becomes faster. The PRO-Mode is for experienced pilots or outdoor. The display switches from EASY to PRO (2). Press the speed button again to return to slower speed.
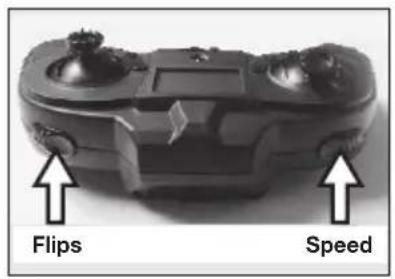
text_image
Flips Speed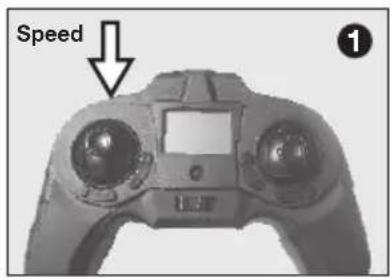
text_image
Speed ①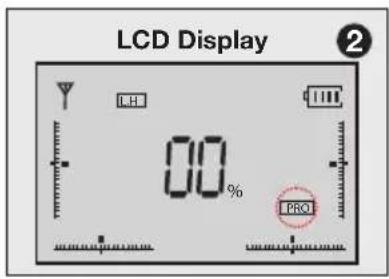
text_image
LCD Display 00% PRO360 degree flips and rolls
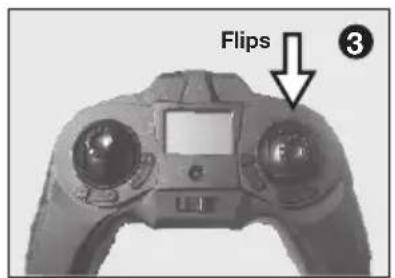
Once you are familiar with the aforementioned maneuvers, you can venture to flips and rolls. Fly at least 1.5 m high, and activate the PRO mode (see above). Then press the FLIPS button (3). A sound and 3D in the screen (4) indicates that the mode is active. Now move the right control lever to the desired direction (5) and the model rolls once around its own axis. Hold the lever down in the end stop to fly multiple flips.
NOTE: for better 3D performance, we recommend that you remove the rotor guards.
text_image
Flips ③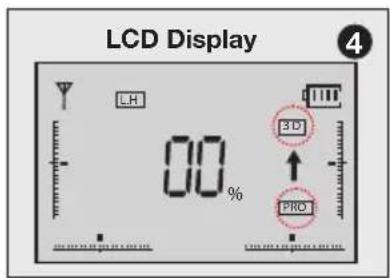
text_image
LCD Display 4 LH 00% 3D PRO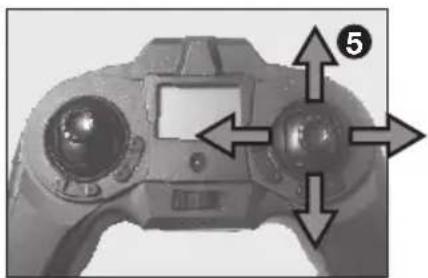
natural_image
Close-up of a digital camera with adjustment knobs and a screen (no visible text or symbols)Headless mode
The Headless mode is ideal for beginners to fly the model safely. In headless mode, the Quadrocopter always fly from the pilot's view. No matter how the model is in the air, the front is always away from the pilot, left and right does not swap when the model is flying towards the pilot.
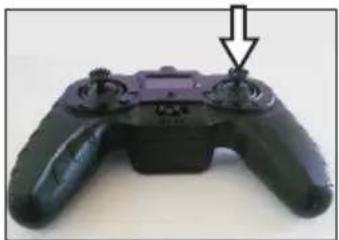
The Headless mode is activated by pressing the control lever, a beep indicates the function. As long as this beep appears, the Headless mode is active. Press the control lever again to deactivate the headless mode.
EN
Press
natural_image
Close-up of a black handheld game controller with a scroll wheel and a small hand cursor, showing no visible text or symbols.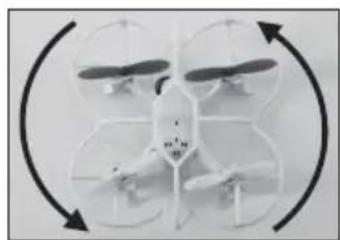
natural_image
Diagram of a four-engine aerial drone with four propellers and four wheels, shown in circular motion arrows (no text or symbols)Applying the camera (optional)
Make sure that the SD card is inserted in the camera. Otherwise the the camera is deactivated. Each tome pressing the PHOTO button makes a photo frame, accompanied by a short beep. Press the VIDEO button, the video recording starts, also the camera icon appears in the display, accompanied by a Di-Di sound and the camera symbol in the display. Press the VIDEO button again to stop the recording.
natural_image
Close-up of a hand adjusting a small white drone component (no visible text or symbols)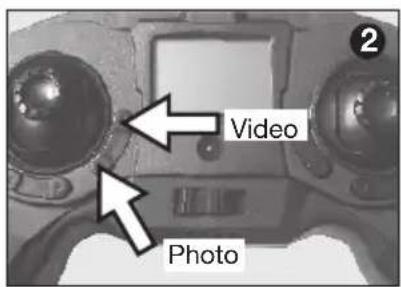
text_image
2 Video Photo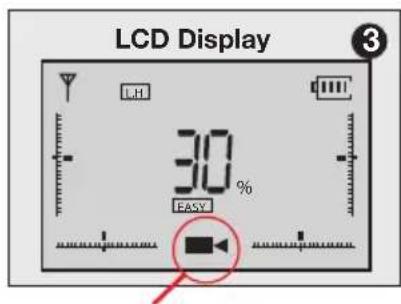
text_image
LCD Display 30% EASYON: Video recording
OFF: Video recording stopped
Illumination
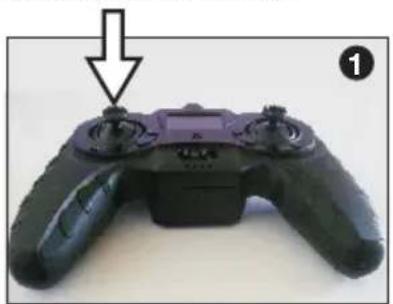
Press the control lever to switch the lighting of the Rocket 125 3D on or off. Is the lighting on, a bulb appears in the transmitter screen.
natural_image
Close-up of a black and purple handheld gaming controller with a purple head and control buttons, labeled with number 1 (no text or symbols on the device itself)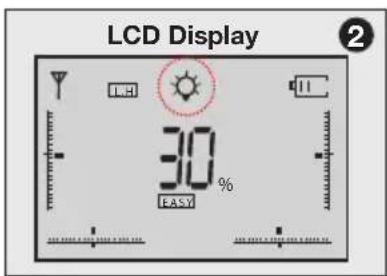
text_image
LCD Display 30% EASYLanding:
- Carefully push the left throttle lever rearward. Try to land „smooth“ without damaging the Quadrocopter.
- NOTE: if the flight battery runs empty, the Quadrocopter does not respond accurately to your commands, the flight is unstable. In this case land immediately.
- Switch of the Quadrocopter and then the transmitter.

WARNING: the motor of the XciteRC Rocket 125 3D may get very hot during operation. Allow to cool down minimum 20 minutes before the next start to avoid damage. Fire hazard!
Maintenance
To have fun with your model over a long period, occasional service work is required to get your model in good condition and to minimize wear.
- Remove dirt or dust depending with compressed air or a soft brush after each use. For stubborn dirt, a harder brush or a toothbrush can be used.
- To clean the body/fuselage no chemical cleaners such as thinners may used, as this damage the plastic of the body/fuselage. Normally a piece of soft cloth is ok, stubborn dirt can be removed with washing-up liquid.
- Check the tightness of all screws and tighten if necessary.
- Also check all connections, cables and power battery / rechargeable battery for damage.

WARNING: Damaged batteries or rechargeable batteries must not be used again and must be sed of immediately – fire hazard! Please note the disposal notes at the end of this manual.
- Check the model for worn, broken or jammed parts and gears and repair if necessary.

WARNING: remove the batteries / rechargeable batteries of the transmitter and model when not in fire hazard!
Troubleshooting
| Problem Possible | Cause Corrective Action | |
| Rotor don't move ON | N/OFF switch is OFFWeak Quadrocopter batteryTransmitter - model not bound | Switch ON QuadrocopterRe-charge batteryRebind: first switch on the model, then the transmitter |
| Rotor stops suddenly, Quadrocoper crashes | Weak Quadrocopter batteryWeak transmitter battery | Re-charge batteryChange transmitter batteries |
| The Quadrocopter does not react to the remote control.Loss of control. | Gyro initialisation failureQuadcopter not bound to the transmitterGyro calibration failure after a crash | Place the model on a flat surface when switching onRe-bind: switch on the quadcopter first, then the transmitterRe-calibrate the gyro, see section: Getting Started, gyro calibration |
| The Quadrocopter flies uncontrollably | Gyro calibration failure after a crash Re-calibrate the gyro, see section Getting Started, gyro calibration | |
Repairs, Spare Parts
Normal wear and defective parts that result from an accident, are excluded from the guarantee. These include in particular:
For car models: bald tires, worn parts and drive gears, or bent / broken suspension, chassis or bodywork
For ship models: damaged or broken propellers, torn superstructure
For airplanes: damage due to improper transportation or crash
I If you find a part that is defective in material or workmanship right after opening the package, return - before you used it – to your dealer or directly to us and we will send you a replacement.
For the Rocket 125 3D some parts are available as spares. If a part is defective or worn, you can identify it with the help of the online spare parts list.
In case of problems or questions, please contact your dealer or:
XciteRC Modellbau GmbH & Co. KG - Service, Autenbachstrasse 12, D-73035 Göppingen, Phone +49 7161 40 799 50
Email: service@xciterc.de
Spare parts for the XciteRC Rocket 125 3D you may order in your local hobby shop or online at http://www.
XciteRC.com/
EN
Environmental Protection Notes
The symbol of the crossed out dust bin on the product or packaging indicates that this product must be disposed of separately from normal household waste. In order to avoid harmful effects on the environment and human health in the disposal of electrical and electronic equipment and the re-use or recycling are possible. You have the opportunity to submit electrical and electronic equipment free of charge at an appropriate collecting point in your area. Please check with your city or town across the available depot. You also have the option to return old electrical and electronic equipment which has been purchased from us. We will then perform a proper recycling or reuse.
Possibly contained batteries must be removed from the product and disposed of at the appropriate collecting point.
Notes on battery law:
According to the German Battery Act (BattG) the one who sells batteries (and accumulators etc.) or devices containing batteries, we are obliged to draw your attention to the following:
Batteries and rechargeable batteries should not be disposed of with household waste but you are legally obliged to return used batteries. Batteries can contain contaminants that could harm the environment or your health if improperly stored or disposed of. Batteries also contain important raw materials such as iron, zinc, manganese or nickel and can be recycled.
You can send us back the batteries after use either sufficient postage:
returned free of charge or in close proximity (eg in trade or municipal collection). The levy is limited to points of sale to end-users for the disposal of such waste batteries and customary amounts, which the distributor as new batteries in his range or has done.
Batteries containing pollutants are marked with a sign, a crossed-out rubbish bin, and the chemical symbol of the pollutant-heavy metal.
This crossed-out bin means that you must not dispose of batteries with household waste.
Among these characters, see also the following symbols have the following meanings:

Cd

Hg

Pb

Li-Po
- Cd = cadmium
- Pb = plumbium
- Hg = mercury
- Li = lithium
EN
FR
Sommaire
natural_image
Top-down view of a black handheld gaming controller with multiple handles and a central display (no visible text or symbols)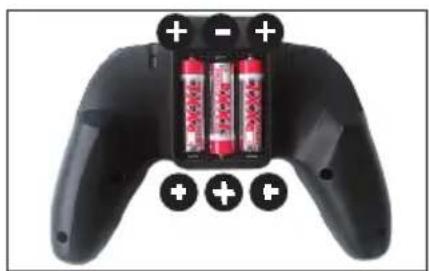
natural_image
Black game controller with two red batteries and three black battery icons on top (no text or symbols visible)natural_image
Close-up of a hand holding a small drone with visible propellers and control buttons (no text or symbols)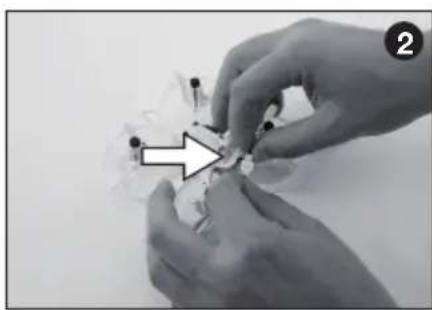
natural_image
Close-up of hands assembling small components with a black arrow pointing to a component (no text or symbols visible)natural_image
Front view of a white quadcopter drone with red highlights (no text or symbols visible)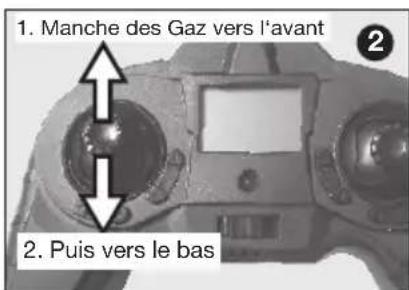
natural_image
Close-up of a handheld gaming controller with two control knobs and a display screen (no visible text or symbols)natural_image
Close-up of a handheld electronic device with dual control knobs and a central touchscreen (no visible text or symbols)text_image
Diagram showing six different stages of a drone's control system, with arrows indicating movement and directional changes.Mode 2
text_image
Diagram showing six different stages of a drone with directional arrows indicating movement or rotation.Trimmage
natural_image
Close-up of a digital camera with two lenses and control buttons, no visible text or symbolsMode Headless
natural_image
Close-up of a black handheld game controller with a scroll and control buttons (no visible text or symbols)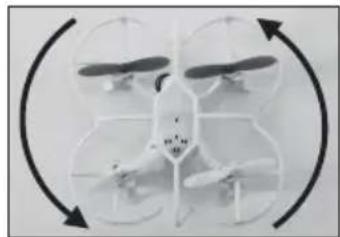
natural_image
Diagram of a four-bladed drone with four wings and four propellers, surrounded by circular arrows indicating rotation (no text or symbols)natural_image
Close-up of a robotic device with a finger adjusting its top component (no visible text or symbols)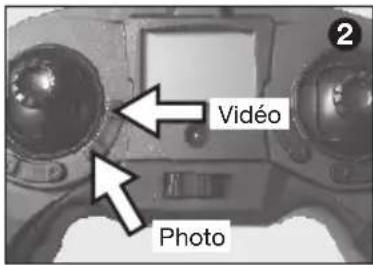
natural_image
Close-up of a black handheld game controller with a purple head and control buttons, labeled with number 1 (no text or symbols on the device itself)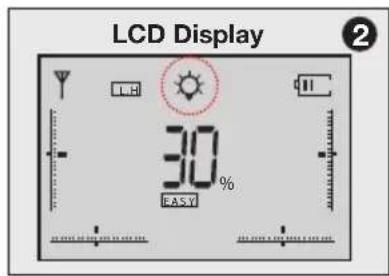
text_image
LCD Display 30% FASYAtterrissage:
EN The XciteRC Modellbau GmbH & Co. KG declare that this product complies with the essential requirements and other relevant regulations of the directives R&TTE 1999/5/EC and RoHS 2011/65/EC.
The detailed Declaration of Conformity can be found at www.XciteRC.com at the respective product link Declaration of Conformity or via E-mail: info@xciterc.de.