Rocket 400 GPS - Drone XciteRC - Free user manual and instructions
Find the device manual for free Rocket 400 GPS XciteRC in PDF.
| Product Type | RTF quadcopter (ready to fly) with remote control |
| Brand | XciteRC |
| Model | Rocket 400 GPS |
| Dimensions | Approx. 400 mm diagonal (estimated) |
| Weight | Approx. 450 g (estimated) |
| Motor Power Supply | LiPo 3S 11.1 V battery (included) |
| Flight Battery Capacity | Not specified; flight time approx. 15 min |
| Charging Time | Approx. 5 hours with the included charger |
| Transmitter Power Supply | 4 AA batteries (not included) |
| Radio Control Frequency | 2.4 GHz |
| Maximum Range | 600 m |
| Integrated Sensors | GPS, magnetometer, inertial measurement unit |
| Flight Modes | Normal, Position Hold, Altitude Hold, Flight Direction Lock, Coming Home |
| Failsafe Function | Automatic Coming Home in case of signal loss |
| Calibration Required | Magnetometer before first flight; manual calibration possible |
| Propellers | 4 propellers, clockwise and counterclockwise rotation |
| Landing Skids | Removable, screw mounting |
| Accessory Mount | Mounting plate with vibration dampeners for camera or other |
| Auxiliary Ports | S1, S2 outputs (proportional), G+12V, USB port (reserved) |
| Status LEDs | Rear LED (red, green, yellow) for GPS, calibration; LEDs under arms for battery alarm |
| Maintenance | Clean with soft cloth, no chemicals; check screws and parts |
| Spare Parts | Available from dealer or at www.XciteRC.com |
| Minimum Recommended Age | 14 years (under adult supervision) |
| Warranty | Does not cover damage due to improper use |
Frequently Asked Questions - Rocket 400 GPS XciteRC
User questions about Rocket 400 GPS XciteRC
0 question about this device. Answer the ones you know or ask your own.
Ask a new question about this device
Download the instructions for your Drone in PDF format for free! Find your manual Rocket 400 GPS - XciteRC and take your electronic device back in hand. On this page are published all the documents necessary for the use of your device. Rocket 400 GPS by XciteRC.
USER MANUAL Rocket 400 GPS XciteRC
natural_image
White and blue quadcopter drone with propellers and propellers (no visible text or symbols)15001300 XciteRC Rocket 400 GPS Quadrocopter 2.4 GHz
DE
Inhaltsverzeichnis
natural_image
Close-up of a white mechanical component with black triangular markers and a red curved highlight (no text or symbols)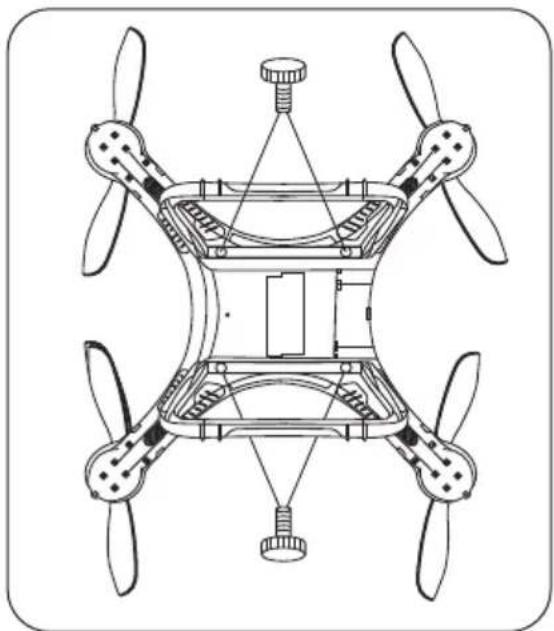
natural_image
Technical line drawing of a four-blade drone with propellers and control panel (no text or symbols)natural_image
Line drawing of a propeller blade assembly (no text or symbols)
natural_image
Technical line drawing of a four-blade drone with propellers and control panels (no text or symbols)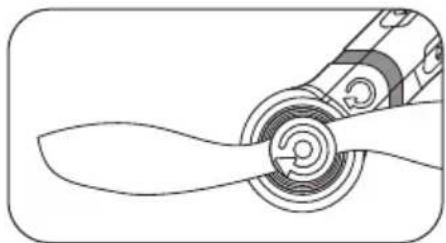
natural_image
Line drawing of a propeller blade and rotor assembly (no text or symbols)natural_image
Close-up of hands assembling a black mechanical component (no visible text or symbols)natural_image
Close-up of a mechanical assembly with white and black components (no visible text or symbols)natural_image
Close-up of a robotic arm gripping a white tool, with no visible text or symbolsnatural_image
Exterior view of a modern office building (no signage)natural_image
Close-up of a robotic camera module with a digital display and camera, no visible text or symbols on the device itself.natural_image
Close-up of a transparent camera with a black lens and adjustment lever (no visible text or symbols)natural_image
Line drawing of a power supply unit connected to a box with coiled cable, no text or symbols presenttext_image
ALR1 ALR2 2 PUMS OR *****B
natural_image
Front view of a device control panel with two circular buttons and a central indicator (no text or symbols visible)D
text_image
SWB1 ALR1 ALR2 SWA1 Power50Wartung
- Cd = Cadmium
- Pb = Blei
- Hg = Quecksilber
- Li = Lithium
EN
Summary
Intended Usage 17
Scope of delivery 17
Required accessories 17
Explanation of Symbols 17
Warnings and safety notes....17
Handling precautions for batteries or rechargeable batteries 19
Assembly of the landing skid 20
Assembly of the propeller 20
Bottom connectors....20
Camera mount 21
The remote control system 21
Transmitter 22
Battery charging 22
LED's and their meaning....23
Transmitter modes....24
Calibration....24
Flight modes....24
Getting started 25
Landing: 26
Transmitter calibration 26
Maintenance....27
Troubleshooting....27
Repairs, Spare Parts....28
Environmental Protection Notes 29
Notes on battery law 29
Declaration of conformity 46
Imprint
This manual is a publication of
All rights including translation. Reproductions of any kind, such as photocopying, microfilming or storage in electronic data processing equipment, without the written permission of the publisher. Reproduction in whole or part, is prohibited.
This manual corresponds to the technical status of the product at time of printing, changes in technology and equipment reserved. Text and illustrations of this manual, no claims can be derived.
NO LIABILITY FOR PRINTING ERROR! SUBJECT TO CHANGE!
The latest version of this manual can be found on the Internet at www.XciteRC.com
© Copyright 2014 by XciteRC-Modellbau GmbH & Co. KG
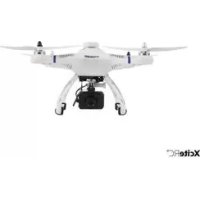
Thank you for purchasing the Quadrocopter Rocket 400 GPS from XciteRC. This manual contains important instructions for operating your new model. Therefore, please read all instructions in this manual thoroughly before using the model, so that you can operate your model safely.
All company and product names mentioned are trademarks of their respective owners. All rights reserved.
Intended Usage
The Rocket 400 GPS is an electrically driven ready to run quadrocopter including motor and speed controller. The control is wireless with the included 2.4 GHz remote control.
The product is not a toy and not suitable for children under 14 years of age, by children under 14 years the maintenance and operation of the model must be supervised by an adult.
Read and observe all warnings and safety instructions in this manual and on the packaging before operating!
This manual is part of this product. It contains important information for handling this product. Keep the manual for future reference and also it must be strictly kept and passed on the subsequent sale of the model to the buyer. Failure to follow the operating instructions and the safety instructions may invalidate the warranty.
Scope of delivery
RTF Quadrocopter Rocket 400 GPS, partly assembled
Transmitter
LiPo battery
Mains charger
Blades
Landing gear
Manual with spare parts list
Required accessories
4 AA batteries or rechargeable batteries for the transmitter
Explanation of Symbols

WARNING: These instructions must be strictly observed by the operator! Failure to follow these instructions may interfere with the safe function. These notes are also for your own safety and that of other people!
ATTENTION: this information must be observed by the operator! Failure to follow these instructions can damage whatsoever, warranties power loss, etc. have resulted.

Information or advice, by which a smooth operation is ensured.
Instructions for care and maintenance to ensure a long shelf life of the product.
Warnings and safety notes
The following safety instructions must be strictly observed. For property damage, personal injury or consequential damage caused by improper use or non-observance of the safety instructions the XciteRC Modellbau GmbH & Co. KG accepts no liability. In these cases, the warranty becomes void.
Move your model always with the maximum caution and responsibility, otherwise it may cause damage to
EN
EN
other property or even physical injury. A third party liability insurance is obligatory. If you already have a liability insurance policy, check before start-up the model, whether radio-controlled models are covered by a corresponding amount.

- The product contains small parts that can cause injury if swallowed, and must therefore be kept away from children under 3 years.
- The product is not a toy and not suitable for children under 14 years.
- The operation of radio-controlled models requires practice. In the beginning operate your new model therefore with extra caution and familiarize yourself with the response to your commands.
- ⚠️ WARNING: The safe operation requires concentration and quick reaction. Do not operate your model if you are tired or under the influence of drugs or alcohol – risk of accident and injury!
- ⚠️ WARNING: The control of this model is done via radio signals, which can be influenced by the environment. This may cause a suddenly loss of control of your model. The model may only be operated on a suitable and sufficiently large room without obstacles. An outdoor use is not recommended.
- Operate your model therefore only with sufficient light within line of sight, away from cars, traffic and people – risk of accident and injury!
- Do not operate your model during a thunder storm or near radio towers or power lines.
- Radio remote controlled models may not be operated at any public space by implication (streets, roads, squares or lakes). Before operation please ask where the operation is allowed. This also applies to private property, here the consent of the owner is required.
- ⚠️ WARNING: Keep your fingers or loose clothing or hair away from the rotating parts or the propeller / rotor unit - risk of injury!
- Always switch on the transmitter first, then the model. NOTE: during the operation of the transmitter must remain switched on!
- Never operate your model with low transmitter batteries, because this reduces the range of your model dramatically.
- If the drive battery is empty, the model first slow down until it no longer reacts properly to your commands. Stop the operation and change the drive battery or charge it again.
- Pay attention to the instructions and warnings for this and any other equipment used by you (chargers, rechargeable battery packs, etc.).
- ⚠️ WARNING: Keep packaging material, small parts, chemicals and electrical components away from children – risk of accident and injury!
- The model and the transmitter may be neither get humid nor wet, especially the electronic components (receiver, speed controller, servo) and, if used, lithium batteries, are not waterproof! The model may not
be used in the rain (or heavy fog), do not drive in wet grass or through puddles or snow. WARNING: Fire or explosion due to moisture in lithium batteries!
- Plastic parts (eg. fuselage or main blades) is less flexible and can break more easily at cold temperatures (below 10 °C).
- The modification of the model is not permitted for safety and CE approval regulations, which applies in particular to the transmitter, receiver and speed controller. Maintenance or repairs using original replacement parts are excluded.
• After use, first turn off the model and then the transmitter.
- ⚠️WARNING: remove the drive battery from the model and transmitter after use. Store the model never with built-in battery. Fire hazard!
- Store batteries separately on a non-combustible surface.
- The drive components (motor and speed controller) or the car battery may become hot during operation.
WARNING: Risk of burns! Let these components cool down completely after the operation (and also before each battery change)!
Operation of the model is performed solely at the risk of the operator. Only a careful and deliberate operation protects against physical injury and damage to property.
Handling precautions for batteries or rechargeable batteries:
- Keep batteries away from children! Never let batteries unattended, as they can be swallowed by children or pets!
-
Use only the recommended or equivalent type of batteries / rechargeable batteries.
-
⚠️ WARNING: Do not expose batteries / rechargeable batteries to heat or throw into fire – fire or explosion hazard!
- ⚠️ WARNING: Insert batteries / rechargeable batteries with the correct polarity, no short-circuiting – fire or explosion hazard!
- If possible, always replace all batteries at the same time, never use new and used batteries and batteries with different charge levels simultaneously.
- ⚠️ WARNING: Do not use defective or damaged batteries or rechargeable batteries – fire hazard! Risk of chemical burns on contact with skin, use protective gloves!
- WARNING: Do not attempt to recharge non-rechargeable batteries in a charger – fire or explosion hazard!
- Remove the rechargeable batteries from the device before charging.
- ⚠️WARNING: Charging may take place only with a suitable charger for the type of battery on a fire-proof surface and under constant adult supervision – fire hazard!
- Immediately remove used batteries from the devices.
NOTE: NiMH batteries must be checked at least every 3 months and, if necessary, recharged, otherwise because of the typic self-discharge they may get deep discharged and damaged! Therefore, better use so-called RTU batteries with a very low self-discharge. - Ⓗ NOTE: note the specified storage voltage for lithium batteries. Is a completely full or empty lithium battery time stored for a longer time, it can be damaged.
The XciteRC Modellbau GmbH & Co. KG cannot monitor the proper use of the battery or batteries you use, therefore, the warranty is excluded due to incorrect charging or discharging.
EN
EN
Assembly of the landing skid
- Place the landing skid on the designated positions and lock with the accompanying screws.

WARNING: Mind the antenna, it has to be placed inotch (see red markings) of the Quadrocopter shell and ending skid – do not pinch - danger of falling!
- Fix the antenna with double-sided adhesive tape in the landing skid (see figure).

natural_image
Close-up of a white mechanical component with black triangular markers and a red curved highlight (no text or symbols)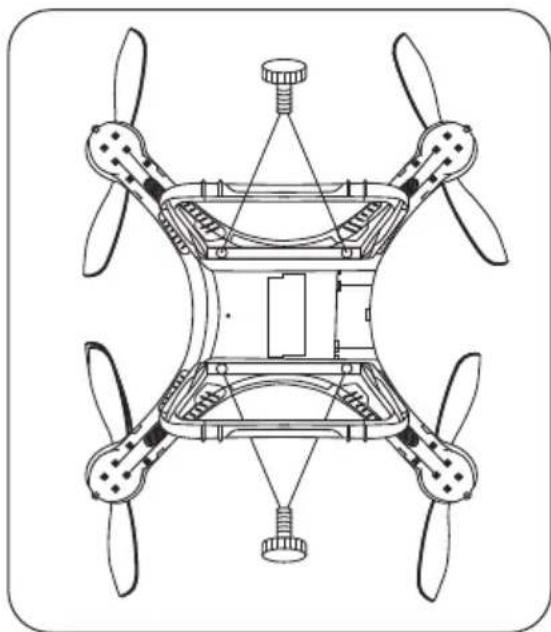
natural_image
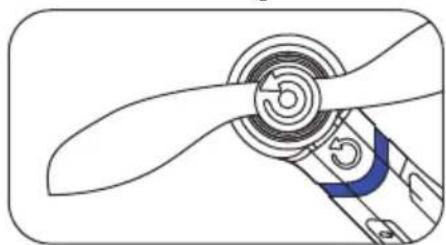
Technical line drawing of a multi-blade drone with four propellers and a central hub (no text or symbols)Assembly of the propeller
-
The arrow of the propeller has to point upwards. Mind that the running direction on the Quadrocopter pipes, and the running direction of the propeller have to be identical (see figure)
-
Fasten the propeller with the appropriate nut, silver for clockwise motors, black for counter-clockwise motors.

WARNING: Tighten the nut firmly – danger of falling!
natural_image
Line drawing of a propeller with a blue accent (no text or symbols)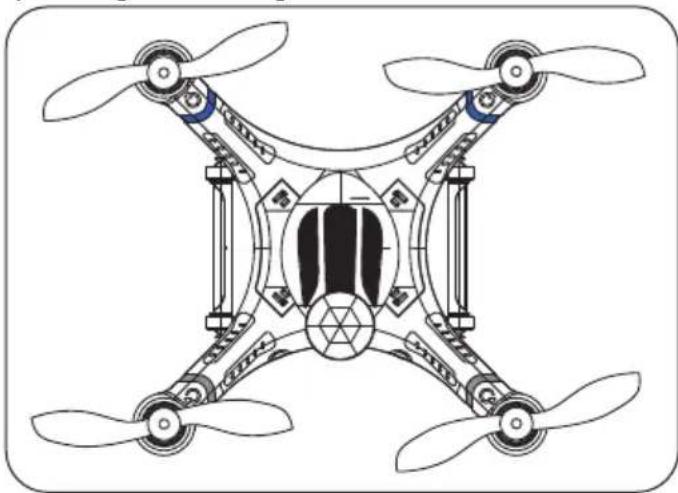
natural_image
Technical line drawing of a four-blade drone with propellers and control panels (no text or symbols)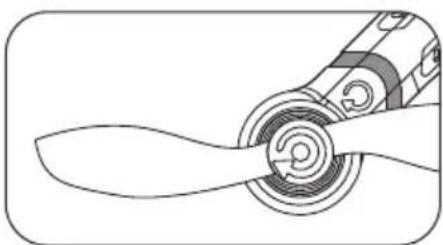
natural_image
Line drawing of a propeller blade with spiral blades (no text or symbols)Bottom connectors
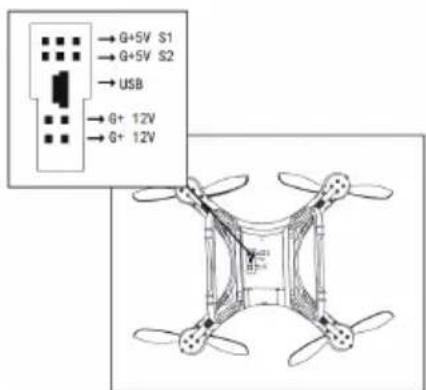
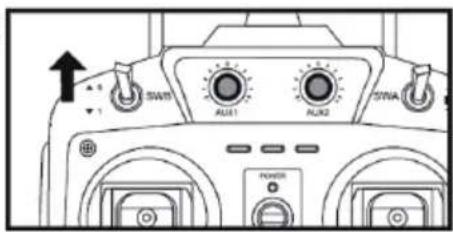
- The terminals S1 and S2 are proportional outputs, which are controlled via the rotary knob AUX1 and AUX2 on the transmitter. Here you may connect the camera # 15001119 an control the tilt.
- At the terminals G+ 12V suitable accessories (eg. gimbals) can be powered.
- The USB port is reserved for future special features.
text_image
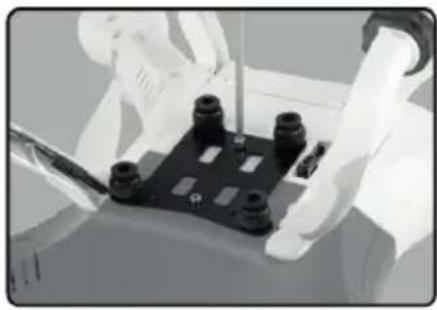
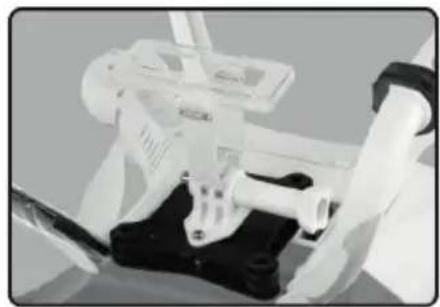
G+5V S1 G+5V S2 USB G+ 12V G+ 12VCamera mount
natural_image
Close-up of hands assembling a black mechanical component with a screwdriver (no visible text or symbols)Fit the mount using the supplied screws.
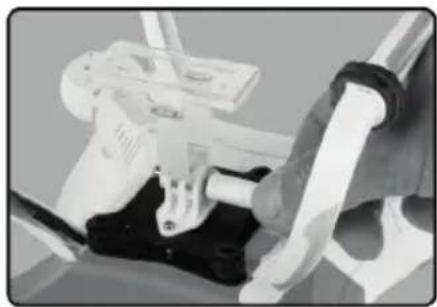
natural_image
Close-up of a mechanical device with white and black components, possibly a robotic arm or robotic device (no visible text or symbols)Install the rubber isolated camera mount.
natural_image
Close-up of a mechanical assembly with clamps and a tool (no visible text or symbols)Remove the thumbscrews to release the camera frame.
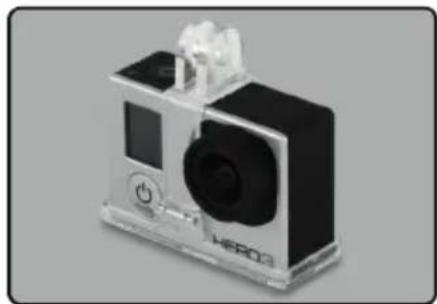
natural_image
Exterior view of a black and white H803 camera device with a digital display (no visible text or symbols)Snap the frame closed around the camera.

natural_image
Close-up of a robotic camera module with a G2O3 sensor and control panel (no visible text or symbols)Re-fit the frame to the rubber isolated mount.
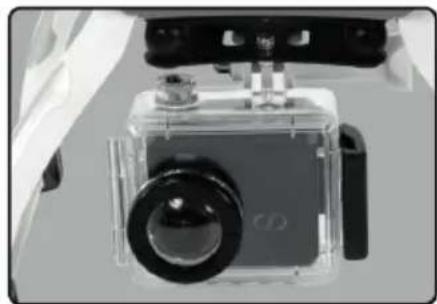
natural_image
Close-up of a transparent digital camera with a black lens and black handle (no visible text or symbols)Alternatively, mount an action camera in its own hardcase.
The remote control system
Here you get an overview of the remote control system of your XciteRC Rocket 400 GPS and its various features and settings. Before the first flight, you should absolutely have read and understood all these functions and settings.
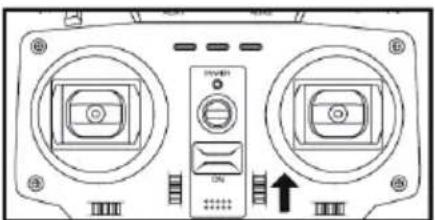
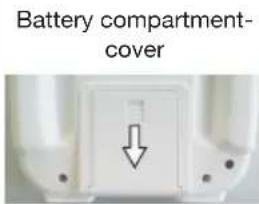
- Do make sure that the transmitter is turned off - POWER-LED off.
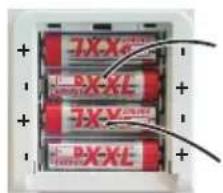
- Now open the battery compartment cover on the backside of the transmitter, therefore slide the cover down (1). Insert four AA batteries into the battery compartment of the transmitter (2). Pay attention to the correct polarity!
text_image
Battery compartment- cover①
text_image
TX-XL TX-Y TX-XL②
4x 1.5 V AA batteries
- Close the battery compartment cover, then turn on transmitter – push ON / OFF switch.
- The red POWER LED must lit. ⚠️ Attention: if the POWER LED flashes or does not light at all, the model may not started – crash hazard! Change transmitter batteries immediately.
- ⚠️WARNING: check the POWER LED also during operation. If the POWER LED starts to blink, stop operation, switch the model off and replace the transmitter batteries – crash hazard!
- ATTENTION: The maximum range of the remote control system is about 600 meters. This model is equipped with an Coming Home function and comes automatically back to the starting point after exceeding the maximum range. This works only if a sufficient GPS signal was present at the start - read the section LEDs and their meaning.
Transmitter
EN
text_image
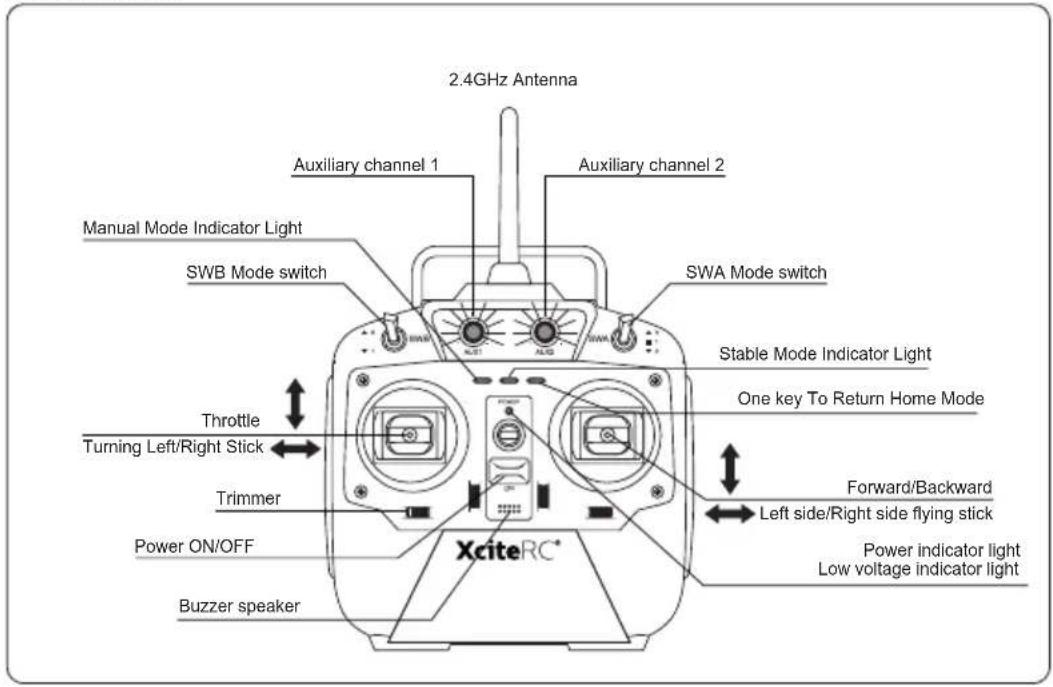
2.4GHz Antenna Auxiliary channel 1 Auxiliary channel 2 Manual Mode Indicator Light SWB Mode switch SWA Mode switch Stable Mode Indicator Light One key To Return Home Mode Throttle Turning Left/Right Stick Trimmer Power ON/OFF Forward/Backward Left side/Right side flying stick Power indicator light Low voltage indicator light Buzzer speaker XciteRC®Battery charging
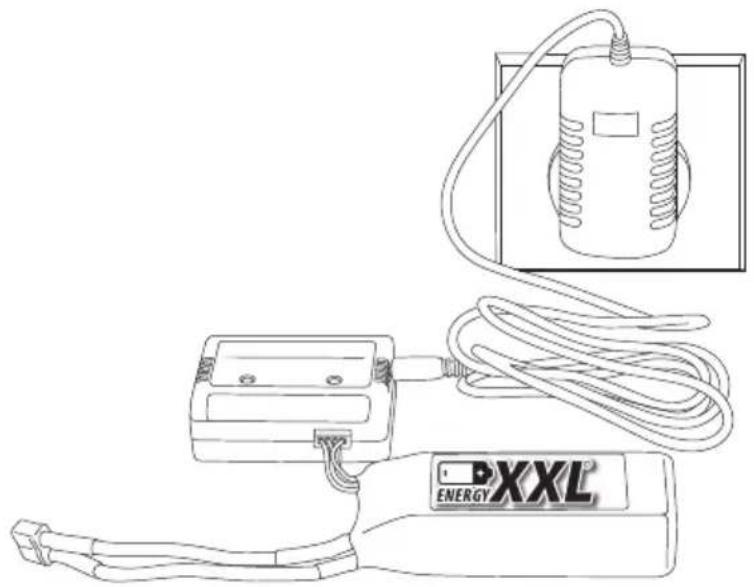
WARNING: Be sure to read all safety instructions regarding the use of rechargeable batteries. Charging may take place only with the supplied charger on a fireproof surface and under constant adult supervision - fire or explosion hazard!
- Connect the power supply with the charger. The green LED lights up.
- Connect the batteries balancer wire with the charger.
- ⚠️ WARNING: The balancer connector is polarized. Check the side channels. Do not use force - fire or explosion hazard!
- The red LED lights to indicate charging. Charging time is about 5 hours. If the battery is fully charged, the red LED goes out.
- Unplug the battery from the charger and also the power supply from the jack. The flight time of the Quadrocopter is about 15 minutes.
natural_image
Line drawing of an electronic device connected to a box with coiled cable, labeled 'PXXL' (no text or symbols on the device itself)LED's and their meaning
In the tailpiece there are placed two LED's to control the GPS-status (green), Magnetometer (yellow) and the calibration display (red). More of them are below the Quadrocopter pipes to display the flight attitude and the battery condition.
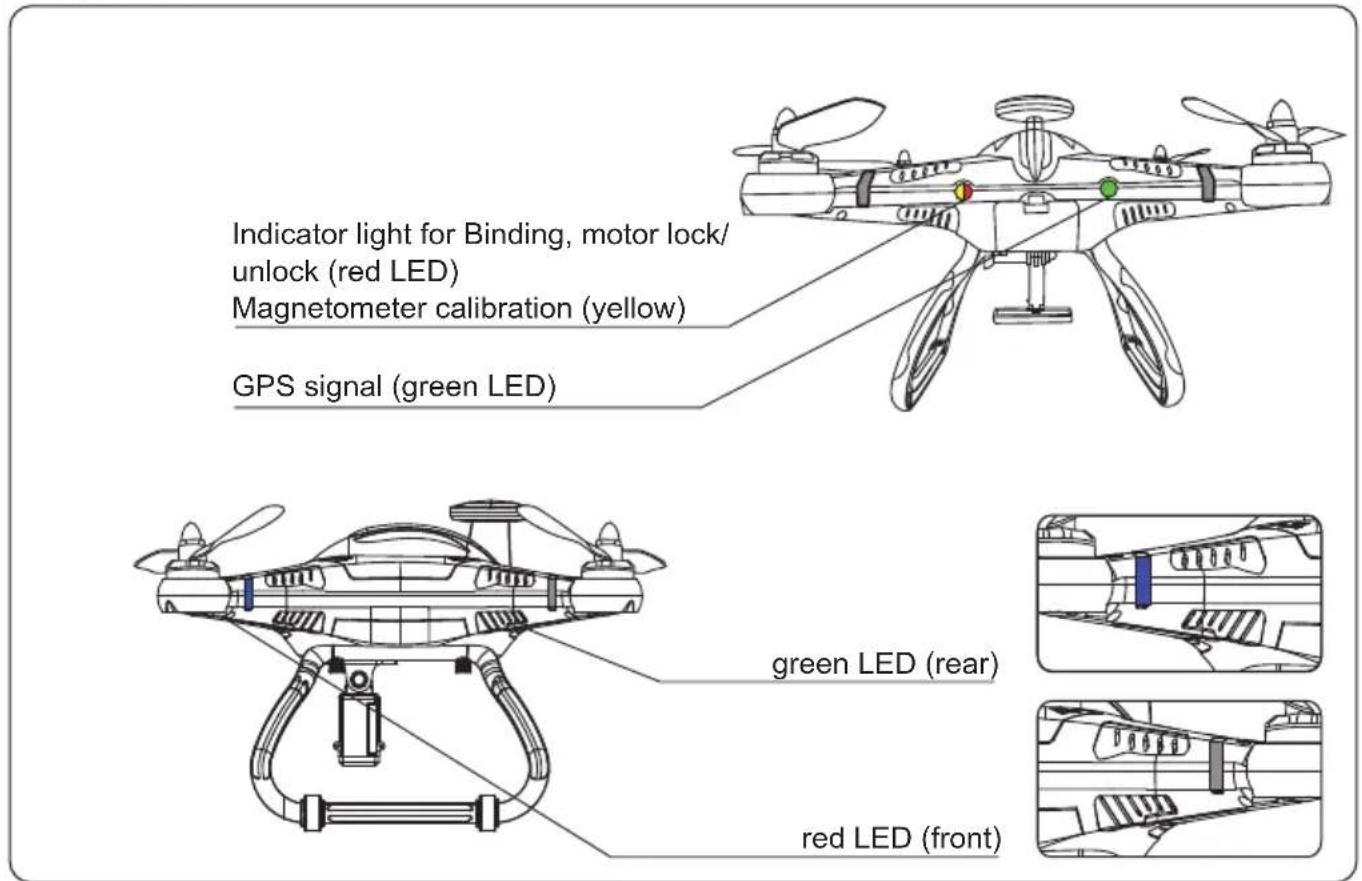
text_image
Indicator light for Binding, motor lock/ unlock (red LED) Magnetometer calibration (yellow) GPS signal (green LED) green LED (rear) red LED (front)Tail-LED's:
| red green yellow Function | |||
| blinks slowly Calibration is performed/motors locked | |||
| on Calibration is performed/motors unlocked | |||
| blinks GPS-search or less than 6 satellites receivable | |||
| on GPS: more than 6 satellites/GPS ok | |||
| blinks blinks Calibration needed | |||
WARNING: If the green LED blinks, all GPS-supported modes (Position-Hold, Altitude-Hold and Coming-Home) mustn't be used for the model receives no sufficient GPS-signal and is unable to determine its position – danger of falling! Also without function is the Failsafe Coming-Home!
Quadrocopter pipes-LED's:
| red = front green = tail | ||
| on on Normal operation | ||
| blinks | blinks | Battery warning |
Battery warning: If the LED's do blink and simultaneously an acoustic warning signal is to be heard the model is to land instantly – danger of falling!
Regard: If the battery voltage drops to 10.2 – 10.4 V, the LED's will slowly start to blink. From this moment on
EN
you have approximately 1 to 2 minutes left to fly back the model or land safely. With the battery lifetime short the blinking frequency becomes higher, meaning the LED's will blink faster—instantly land!
If the battery is empty, the motors cannot be unlocked, the model can't start. Exchange battery or recharge.
Transmitter modes
Regard: To start, the switches have to be adjusted to position „normal“
 SWR Mode ON/OFF SWR Mode ON/OFF | Mode Switch SWB (left) | Switch SWA (right) | Transmitter-LED | |
| Normal 0 0 red | ||||
| Position Hold 0 1 blue | ||||
| Flight Direction Locked | 1 1 | |||
| Altitude Hold 1 2 | ||||
| Coming Home 0 2 green |

WARNING: If the green LED blinks, all GPS-supported modes (Position-Hold, Altitude-Hold and Coming-Home) mustn't be used for the model receives no sufficient GPS-signal and is unable to determine its position – danger of falling! Also without function is the Failsafe Coming-Home!

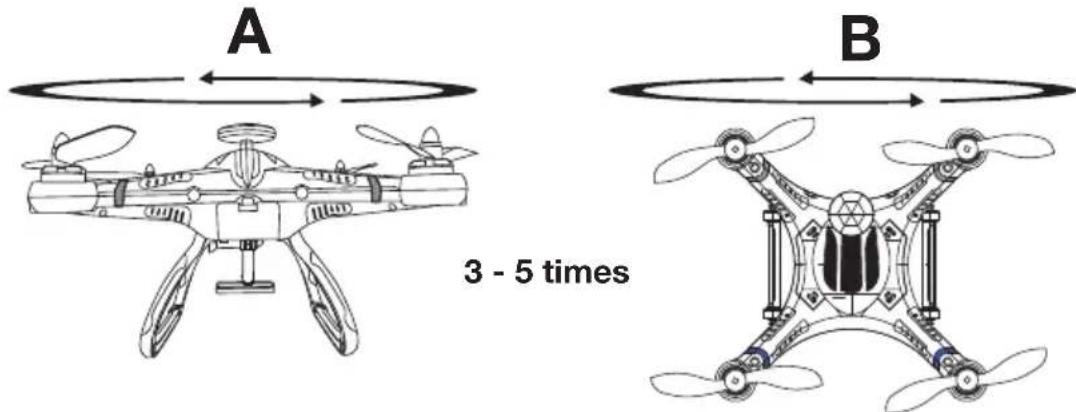
IMPORTANT: before the first flight of the integrated magnetometer needs to be calibrated. Proceed as follows:
- Place the Quadrocopter on a level surface and turn it on. The rear LED's flash alternately fast. NOTE: avoid objects with large metal surfaces, eg. halls with metal cladding, so that nothing interferes the correct calibration.
- Turn both switches SWA and SWB of the transmitter in position 0 and switch on the transmitter.
- Place the Quadrocopter on a flat surface and move the switch SWA from position 0 to 2 and back again, until the left LED will begin to flash yellow. The Quadrocopter is in calibration mode.
- Now rotate the Quadrocopter on the flat area about 3-5 times in a circle (A) and observe the left, yellow LED. Once it flashes slowly, rotate the model in the vertical with the face down and turn it again 3-5 times (B). Observe again the left LED, when it flashes red, turn the Quadrocopter again on a level surface and turn it off. The magnetometer is now calibrated ready.
NOTE: if the left LED's flashing the next you switch alternately (red and yellow), the calibration has I and must be repeated.
text_image
A B 3 - 5 timesFlight modes
Normal: Normal flight without GPS or altimeter control. If the mode is active the transmitter's red LED is on.
Position Hold: Fly to the favoured spot in a stable position and make sure the switches are adjusted cor-
rectly, then move the throttle lever to center position. The model remains in its position and automatically performs correcting maneuvers. Regard: Depending on wind speed the model may need more or less room for corrections. Only use this function if enough space is available – don't fly too close to obstacles like trees or exterior walls – danger of collision!
Regard: You can overcome this position by hand through strong throttle inputs.
If the mode is active, the blue LED of the transmitter is on, furthermore an acoustic beep signal is to be heard.
Coming Home: Adjust the model's nose towards the starting point and the switches into correct position to activate the mode. If the model flies higher than 15 meters it will directly fly to the starting point at the current height. If it flies lower, it will ascend to a 15m height first for reasons of security, then fly back. Arrived over the starting position (resp. the position in which the motors were unlocked) the model will pause at this height a few seconds and slowly begins to descend.
Regard: Bring the model to a stable hovering and the nose in the direction of the starting position, before you activate the mode. Once landed the motors will be automatically locked (see paragraph Operation). To start again, set switch SWA to 0 and unlock motors.
WARNING: If the battery warning is active (Quadrocopter pipes LED's blink), try to land as quickly as possible and don't try to bring back the model via the Coming-Home function – danger of falling! If the mode is active, the green LED of the transmitter is on, furthermore an acoustic beep signal is to be heard.
Flight Direction Lock: This mode saves the current „forward direction“. This means whatever direction the model’s nose is pointing to, after the activation the edge which showed forward during flight is front. For activation make sure the switches are in correct position.
Regard: This mode is in need of getting used to for beginners, therefore more suited for experienced model pilots. The Coming Home mode also works with activated Flight Direction Lock.
Altitude Hold: Let the model fly to the favoured height in a stable position and adjust the switches to the correct position. Then move the throttle lever to center position. This height is now automatically kept. The rest of the control functions remain as usual. Regard: Depending on wind speed the model may need more or less room for corrections. Only use this function if enough height is available – so don't activate too close to the ground – danger of falling!
Regard: You can overcome this position by hand through strong throttle inputs.
If the mode is active, the green LED of the transmitter is on, furthermore an acoustic beep signal is to be heard.
Failsafe Coming Home: If no transmitter signal can be received (z.B. model out of reach, obstacles or empty transmitter battery), the Failsafe Coming Home is automatically activated. The model returns to the starting position (resp. the position in which the motors were unlocked).
If you want to cancel the Failsafe Coming Home (for example the model is within sight again and therefore controllable), bring the switches each to position:
SWA on position 0: to 1 and back again.
SWA on 1 or 2: to 0 and then 1 and again 0

WARNING: if the GPS supported modes (position hold, altitude hold and Coming Home resp. Failsafe
Coming Home) dis not react during the flight, the model does not receive a sufficient GPS signal and can not determine its position. Go in this case immediately switch to manual mode to recover the flight control
- danger of falling!
Getting started
Before you begin please check:

WARNING: Only start with a sufficiently full transmitter batteries (rechargeable batteries) and fully tied drive battery – crash hazard!
EN
- Check all parts for damage and dirt. Replace any damaged parts and clean the model, because dirt increases the weight and therefore can degrade the flying qualities.
- Put battery into battery compartment and plug in. Place the Quadrocopter on an even surface and don't move it anymore until the start. The red and green tail-LED of the model will blink alternately fast.
- As soon as the two LED's slowly blink, you can close the battery compartment.
- Now turn on the transmitter. Regard: Switch SWA and SWB in position 0, throttle lever to the lowest position = no throttle. The binding is finished as soon as the transmitter's beep-sound stops. Note: Perform steps 1-3 also if you need to re-bind the Quadrocopter to the transmitter, for example, after a transmitter change.
- GPS: Wait approximately 2 minutes, until the green LED on the model is permanently on.
WARNING: If the green LED blinks during start, all GPS-supported modes (Position-Hold, Altitude-Hold and Coming-Home) mustn't be used for the model receives no sufficient GPS-signal and is unable to determine its position – danger of falling! Also without function is the Failsafe Coming-Home!
- Unlock motors: Move the throttle lever to the lowest right position and wait until the red LED of the model stops blinking. You can now start your model.
- Lock motors: Move the throttle lever to the lowest left position and wait until the red LED blinks. If you now open the throttle the motors won't start. For reasons of security always use this mode if you are not flying.
- Calibration: In rare cases it can happen that the Quadrocopter flies unstable barely holding its position, then it has to be re-calibrated. The procedure is as follows:
a. Lock motors: Move the throttle lever to the lowest left position and wait until the red LED on the model blinks.
b. Now move the throttle lever to the lowest right position and wait until the red LED won't blink anymore, then start. Hold the model in the air for approximately 20 seconds and land again. Lock the motors (throttle lever lower left), the calibration is completed.
Motor unlock
Motor lock
Landing:
- Carefully push the left throttle lever rearward. Try to land „smooth“ without damaging the Quadrocopter.
- Switch of the Quadrocopter and then the transmitter.

WARNING: the motor of the XciteRC Rocket 400 GPS may get very hot during operation. Allow to cool down minimum 20 minutes before the next start to avoid damage. Fire hazard!
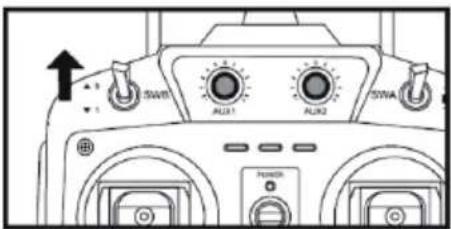
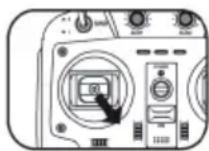
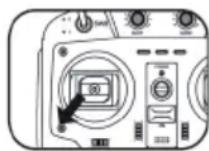
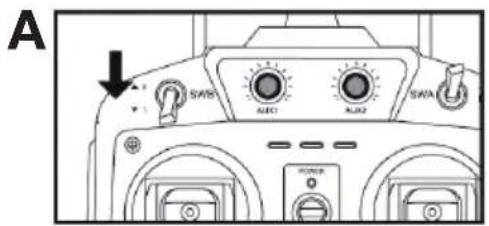
Transmitter calibration
The transmitter of the Rocket 400 GPS is calibrated at the factory. However, should a recalibration be required (eg. if the Quadrocopter rolls to one side more sensitive than to the other), this can be done anytime.
- To do this, bring both switches SWA and SWB, as well as the AUX1 and AUX2 dial to the 0 position, the trim lever must also be brought into neutral position. To do this, move the trim levers in the middle until you hear a long beep. This indicates that the neutral position is reached.
- Set the switch SWB in position 1 (A) and the throttle stick to the middle position. Now press the horizontal trim lever on the right side up and turn on the transmitter (B). All three Mode LED's lights up. Move both sticks in circular motions to the full scale (C). Make about two complete circles, then move both sticks back to neutral position. After that move both AUX knobs twice from minimum to full scale, and finally back to position 0.
- To complete the calibration switch SWB back in position 0 (D). The transmitter confirms the successful calibration with a beep.
text_image
A SANS AUTO AUTO SANS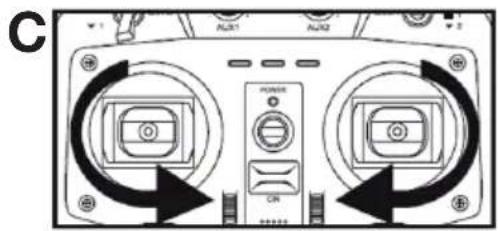
text_image
C AUR1 AUR2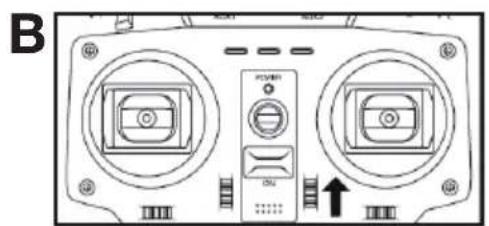
natural_image
Front view of a computer monitor with two front panels and a central control unit (no visible text or symbols)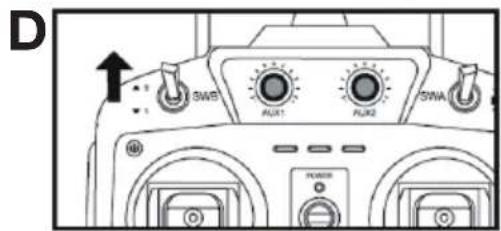
text_image
D SWB PUA1 PUA2 SWAMaintenance
To have fun with your model over a long period, occasional service work is required to get your model in good condition and to minimize wear.
- Remove dirt or dust depending with compressed air or a soft brush after each use. For stubborn dirt, a harder brush or a toothbrush can be used.
- To clean the body/fuselage no chemical cleaners such as thinners may used, as this damage the plastic of the body/fuselage. Normally a piece of soft cloth is ok, stubborn dirt can be removed with washing-up liquid.
- Check the tightness of all screws and tighten if necessary.
- Also check all connections, cables and power battery / rechargeable battery for damage.
- WARNING: Damaged batteries or rechargeable batteries must not be used again and must be disposed of immediately – fire hazard! Please note the disposal notes at the end of this manual.
- Check the model for worn, broken or jammed parts and gears and repair if necessary.
- WARNING: remove the batteries / rechargeable batteries of the transmitter and model when not in use – fire hazard!
Troubleshooting
| Problem Solution | |
| Model flies circles in Hold mode | GPS signal poor, look for another place and try again |
| GPS signal poor, fly. 3-5 minutes in normal mode and check the green GPS-LED. If it is still on check Position Hold once more | |
| Motors won’t start Switch SWA | not in position 0 |
| Battery voltage low, recharge or exchange battery | |
| Model doesn’t take off Check the assembly of the propellers – rotational direction | |
| Modell lands in Coming Home mode far away from the starting position | GPS signal poor, look for another place and try again |
| Model has no stable hover flight | Re-calibrate model (see paragraph Operation, point 7) |
EN
Repairs, Spare Parts
Normal wear and defective parts that result from an accident, are excluded from the guarantee. These include in particular:
For car models: bald tires, worn parts and drive gears, or bent / broken suspension, chassis or bodywork For ship models: damaged or broken propellers, torn superstructure
For airplanes: damage due to improper transportation or crash
I If you find a part that is defective in material or workmanship right after opening the package, return - before you used it – to your dealer or directly to us and we will send you a replacement.
For the Rocket 400 GPS some parts are available as spares. If a part is defective or worn, you can identify it with the help of the exploded view.
In case of problems or questions, please contact your dealer or:
XciteRC Modellbau GmbH & Co. KG - Service, Autenbachstrasse 12, D-73035 Göppingen, Phone +49 7161 40 799 50
Email: service@xciterc.de
Spare parts for the XciteRC Rocket 400 GPS you may order in your local hobby shop or online at http://www.XciteRC.com/
Environmental Protection Notes
The symbol of the crossed out dust bin on the product or packaging indicates that this product must be disposed of separately from normal household waste. In order to avoid harmful effects on the environment and human health in the disposal of electrical and electronic equipment and the re-use or recycling are possible. You have the opportunity to submit electrical and electronic equipment free of charge at an appropriate collecting point in your area. Please check with your city or town across the available depot. You also have the option to return old electrical and electronic equipment which has been purchased from us. We will then perform a proper recycling or reuse.
Possibly contained batteries must be removed from the product and disposed of at the appropriate collecting point.
Notes on battery law:
According to the German Battery Act (BattG) the one who sells batteries (and accumulators etc.) or devices containing batteries, we are obliged to draw your attention to the following:
Batteries and rechargeable batteries should not be disposed of with household waste but you are legally obliged to return used batteries. Batteries can contain contaminants that could harm the environment or your health if improperly stored or disposed of. Batteries also contain important raw materials such as iron, zinc, manganese or nickel and can be recycled.
You can send us back the batteries after use either sufficient postage:
returned free of charge or in close proximity (eg in trade or municipal collection). The levy is limited to points of sale to end-users for the disposal of such waste batteries and customary amounts, which the distributor as new batteries in his range or has done.
Batteries containing pollutants are marked with a sign, a crossed-out rubbish bin, and the chemical symbol of the pollutant-heavy metal.
This crossed-out bin means that you must not dispose of batteries with household waste.
Among these characters, see also the following symbols have the following meanings:

Cd

Hg

Pb

Li-Po
- Cd = cadmium
- Pb = plumbium
- Hg = mercury
- Li = lithium
FR
Sommaire
natural_image
Close-up of a white mechanical component with black triangular markers and a red curved highlight (no text or symbols)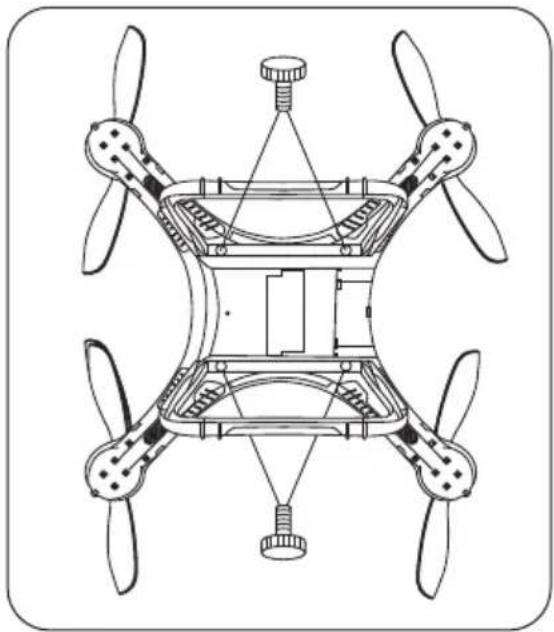
natural_image
Technical line drawing of a four-blade drone with propellers and structural components (no text or symbols)Montage des hélices
natural_image
Line drawing of a propeller blade assembly with no text or symbols
natural_image
Technical line drawing of a four-blade drone with propellers and control panels (no text or symbols)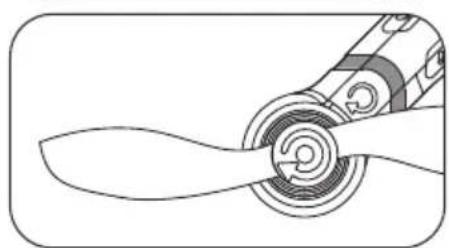
natural_image
Line drawing of a propeller blade with spiral blades (no text or symbols)natural_image
Close-up of robotic arms assembling a black mechanical component (no visible text or symbols)natural_image
Close-up of a robotic arm with articulated joints and a black base (no visible text or symbols)natural_image
Close-up of a robotic arm gripping a black plastic object, with no visible text or symbolsnatural_image
3D rendering of a black and white head-mounted camera with a circular lens, no visible text or symbolsnatural_image
Close-up of a robotic camera module with a digital display and camera, no visible text or symbolsnatural_image
Close-up of a transparent digital camera module with lens and adjustment knobs (no visible text or symbols)natural_image
Line drawing of a handheld electronic device connected to a box with coiled cable, labeled 'ENERGY XXL' (no text or symbols on the device itself)natural_image
Front view of a device control panel with two circular buttons and a central indicator (no text or symbols visible)D
text_image
SWA1 AUX1 AUX2 SYNAEntretien
natural_image
Green electronic circuit board with wires and terminal blocks (no visible text or symbols)Akkuanschluss-Platine Power Supply System Connexion d'accu
natural_image
Three identical gray propeller blades arranged horizontally (no text or symbols)Propeller-Set Rocket 400 GPS (4) Propeller-Set Rocket 400 GPS (4) Hélices Rocket 400 GPS (4)
15001113
natural_image
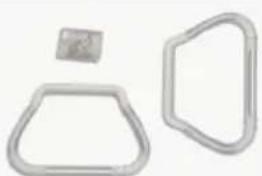
Three metallic mechanical components: a rounded rectangular frame, a small square component, and a rounded rectangular frame (no text or symbols visible)Landegestell Rocket 400 GPS Landing Skid Rocket 400 GPS Train d'atterissage Rocket 400 GPS
15001301
natural_image
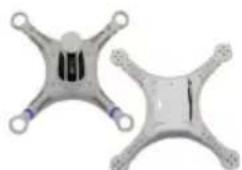
Two identical gray mechanical components with four arms and central slots, no visible text or symbols.Verkleidung Rocket 400 GPS Vers. 2 Body Shell Cover Set version 2 Cellule Rocket 400 GPS version 2
15001115
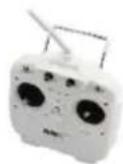
Sender 2.4 GHz Rocket 400 GPS
Transmitter 2.4 GHz
Emetteur Rocket 400 GPS
15001116
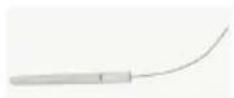
Ersatzantenne Sender 2.4 GHz Antenna Transmitter 2.4 GHz Antenne émetteur 2.4 GHz
15001117
natural_image
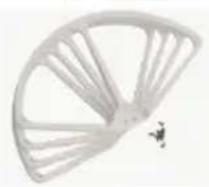
White fan-shaped object with radial lines, possibly a decorative fan or blade, with a small black symbol at the bottom right (no text or symbols present)Propellerschutzringe (4) Propeller Fender Bracket (4) Protection des hélices (4)
15001118
natural_image
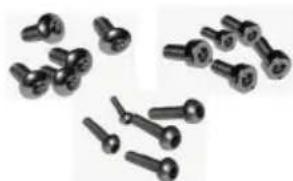
Collection of metallic screw or nut components (no text or symbols visible)Schraubenset Rocket 400 GPS Screw Set Rocket 400 GPS Lot de visserie Rocket 400 GPS
56600021
natural_image
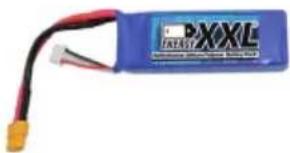
Blue XXL battery with red and black wires, no visible text or symbols on bodyLipo-Akku 11.1 V 2700 mAh 40C LiPo Battery 2700 mAh 11.1 V 40C LiPo accu 2700 mAh 11.1 V 40C
CE
EN The XciteRC Modellbau GmbH & Co. KG declare that this product complies with the essential requirements and other relevant regulations of the appropriate CE directives.
The Declaration of Conformity can be found at www.XciteRC.com at the respective product link data sheet.