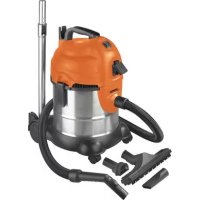
Force 1420S wetdry - Vacuum Cleaner Eurom - Free user manual and instructions
Find the device manual for free Force 1420S wetdry Eurom in PDF.


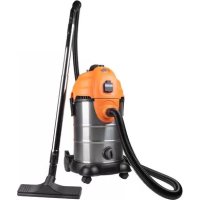
| Product type | Wet/dry vacuum cleaner |
| Brand | Eurom |
| Model | Force 1420S wetdry |
| Power | 1400 W |
| Supply voltage | 230 V ~ 50 Hz |
| Vacuum | 180 mbar |
| Airflow rate | 30 l/s |
| Tank capacity | 20 liters (stainless steel) |
| Filter type | Washable HEPA |
| Filter cleaning system | Yes, cleaning button |
| Integrated power outlet | Yes, max 1800 W |
| Power cord length | 7 m |
| Flexible hose length | 2.6 m (Ø 32 mm) |
| Suction tube | Telescopic, up to 116.6 cm |
| Included accessories | Combined nozzle, brush attachment, flat crevice tool, adapter |
| Liquid suction function | Yes (with float, without HEPA filter) |
| Weight | 6 kg |
| Dimensions (L x W x H) | 42 x 36 x 56 cm |
| Warranty | See manual (1 year standard) |
| Intended use | Indoor only |
| Repairability | Contact a qualified electrician |
Frequently Asked Questions - Force 1420S wetdry Eurom
User questions about Force 1420S wetdry Eurom
0 question about this device. Answer the ones you know or ask your own.
Ask a new question about this device
Download the instructions for your Vacuum Cleaner in PDF format for free! Find your manual Force 1420S wetdry - Eurom and take your electronic device back in hand. On this page are published all the documents necessary for the use of your device. Force 1420S wetdry by Eurom.
USER MANUAL Force 1420S wetdry Eurom
natural_image
Exterior view of a vacuum cleaner with attached circuit board and cleaning tools (no text or symbols visible)Force 1420S wet/dry
Art.nr. 161328
Dank
natural_image
Line drawing of a vacuum cleaner with attached sensors and cleaning tools (no text or symbols)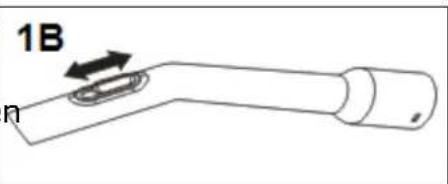
natural_image
Close-up of a hand pressing down on a black plastic component with a curved arrow indicating rotation (no text or symbols)Stopcontact
flowchart
graph TD
    A["Device 1: Initial component"] --> B["Assembly Unit 1"]
    B --> C["Assembly Unit 2"]
    C --> D["Assembly Unit 3"]
Opruimen
natural_image
Close-up of a vacuum cleaner's side panel and handle assembly (no visible text or symbols)natural_image
Diagram showing a hand holding a textured object and a device with a handle, both without any text or symbols.Ketel ledigen
natural_image
Line drawing of a two-step industrial vacuum cleaner system with left and right side views (no text or symbols)Filter reinigen
natural_image
Symbol of a trash bin with crossed lines indicating no waste or discharge, and a solid black rectangle below (no text or labels)Thank you very much for choosing for a EUROM device. You have made a good choice! We hope you will be satisfied about its functioning.
To get maximum profit from your product, it is important to read this manual attentive and totally before use, and to understand what is written. Read especially the safety instructions: they are there to protect you and your environment.
Keep the manual in a safe place for future reference. Store also the package: that is the best protection for your product in times of no-use. And if you at any time pass the appliance on, pass on the manual and package too.
We wish you a lot of fun with the Force vacuum cleaner!
Eurom
Kokosstraat 20
8281 JC Genemuiden (NL)
info@eurom.nl
www.eurom.nl
This manual has been complied with the utmost care. Nevertheless, we reserve the right to optimize this manual at any time and to adjust it technically. The image used may differ.
Technical specifications
| Tension | 230V / 50Hz |
| Power | 1400 Watt |
| Vacuum | 180 mbar |
| Air flow | 30 l/s |
| Capacity barrel | 20 liter (SS) |
| Filter | HEPA |
| Filter cleaning system | + |
| Socket | Max. 1800 W |
| Cable - length | 7 m |
| Flexible hose - length | 2,6 m. with curved pipe - 32 mm |
| Suction tube | telescope - till 116,6 cm |
| Accessory | combi floorbrushdust brushcrevice tool |
| Weight | 6 kg |
| Dimensions | 42 x 36 x 56 cm |
Important safeguards
- Before use, check if the voltage complies with the specifications marked on the voltage label attached at the vacuum cleaner.
- Before use, please check the vacuum cleaner, the power cable and plug for damage. Do not use a damaged machine!
- Do not use extension cords with inadequate current carrying capacity.
- Do not use outdoors!
- Keep the machine away from strong sunlight, ovens, stoves and high temperatures. That can distort the plastic.
- Don't use the appliance in flammable ambience, such as near by combustible gastanks, gastubes or spray cans. Danger of explosion and fire!
-
Do not use vacuum cleaner EUROM Force to pick up:
-
Burning, smoking or hot objects, such as coal and hot ash, glowing cigarettes and match, etc.
- to large objects
- sharp objects like nails, parts of glass etc.
• volatile liquid, combustible gas, acids, explosive garbage, etc.
• dangerous materials like asbestos etc. - flammable or combustible liquids such as gasoline. Don't use the cleaner in areas where they may be present.
-
Material which easily attach on the filter as calcareousness powder, gesso and graphite powder. That will block the ventilation and damage the motor.
-
Make sure that never water enters the barrel cap; water in the motor can cause damage or personal injury. For the same reason do not overturn the machine when you draw liquids.
- Do not put any object into openings. Do not use with any opening blocked; keep free of dust, lint, hair and anything that may reduce the airflow.
- Use extra care when cleaning on stairs.
- Do not wrest, tramp or haul the hose. Do not use the hose if it is broken.
-
Do not pull or carry the vacuum cleaner by its cord. Never close the door on the cord, or pull the cord around sharp edges or corners. Do not run the vacuum cleaner over the cord and don't walk over it. Keep the cord away from heated surfaces.
-
Turn off the equipment before unplugging.
-
Always switch off and unplug the vacuum cleaner when you stop the work, leave the room and before emptying the barrel or maintaining/cleaning the equipment.
-
Do not unplug by pulling the cord. To unplug, grasp the plug, not the cord.
-
Do not touch plug and/or cable with wet hands and don't use the vacuumcleaner without wearing shoes.
-
Ensure you turn the unit off at very minimum every 15 minutes (for 1 minute) to let the motor cool down – failure to do so may cause motor failure!
-
Do not use this unit for more than 4 hours (including rest breaks) on any given day.
-
This appliance is not intended for use by persons (including children) with reduced physical, sensory or mental capabilities, or lack of experience and knowledge, unless they have been given supervision or instruction concerning use of the appliance by a person responsible for their safety.
-
Children should be supervised to ensure that they do not play with the appliance.
-
Use only as described in this manual. Use only manufacturers' recommended attachments.
-
Store your cleaner indoors in a cool, dry area.
-
If the vacuum cleaner, the power cord or the plug becomes damaged or dysfunctions, do not use the vacuum cleaner anymore, but take it to an authorized service agent to be repaired. Never repair it by yourself, that lets expire the guarantee and the responsibility of supplier.
Parts name
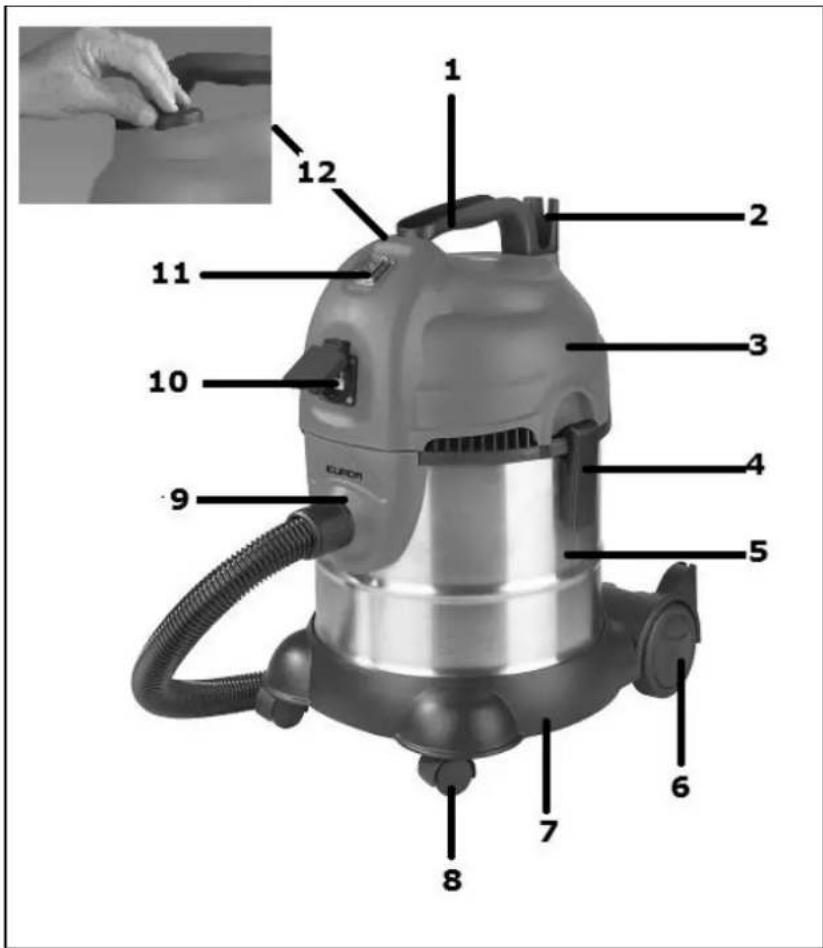
- handle
- cable suspension, cable and plug
- cap (with motor)
- lock (2x)
- barrel
- big wheel (2x)
- pedestal
- little castor (2x)
- connection hose
- socket
- ON / OFF - switch
- filter cleaning button
Standard accessories
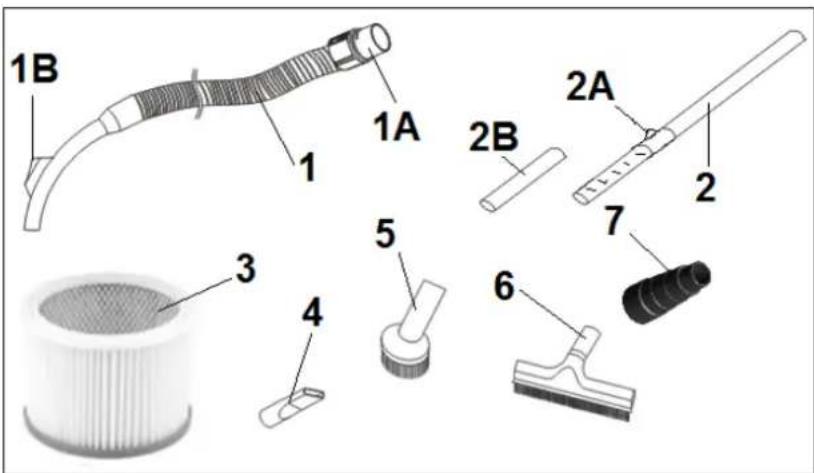
- Hose
1A. Hose connection
1B. Sliding block airflow - Telescope tube
2A. Sliding block telescope
2B. Extension telescope tube - HEPA filter
- Crevice nozzle
- Dust brush
- Combi floorbrush
- Adapter tools
Operation
- Put the hose connection in the machine; if necessary, turn it a bit till the narrow
part is in total in the machine. Then turn it as far as possible clockwise.
• After this, connect the accessories you wish with a twisting force, see picture.
- You can adjust the telescope tube by pushing the sliding block 2A down and tracking/pushing the lowest tube to the length you wish.
- Insert the plug into the socket.
- Press the switch on/off to I to turn on.
- You can adjust the airflow by pushing the sliding block 1B up and down.
- If necessary, due to the surface and task, the hair or rubber strips can be removed from the suction mouth. In order to do so, slide the discs on suction mouth outwards, take the strip holder from the suction mouth, slide the excess strip out and replace the holder.
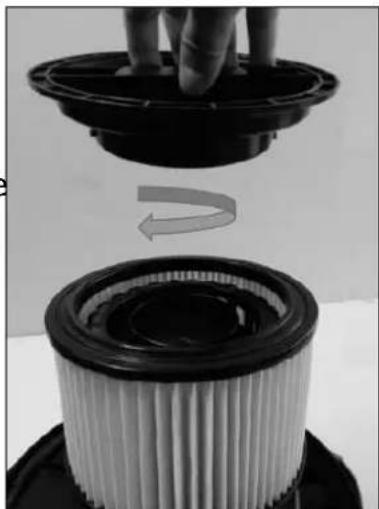
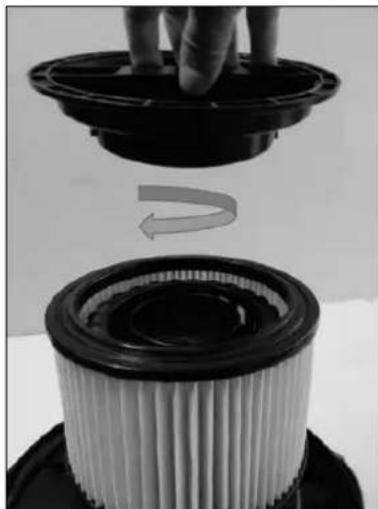
- For the vacuuming of liquid the motor (which is situated in the cap) is provided with a floater that is hanging under the motor, in the barrel. For the vacuuming of dry dirt and dust the motor is provided with a filter that the floater surrounds and in that way prevents that dust enters the mechanic system. Do you want to vacuum liquid, remove than the filter by opening the locking blocks, to lift and turn the cap, to turn the lid from the filter (see image), and to slide the filter from from the floaters frame. Now you can remove the filter. Bring the cap back in its position and close the blocks. Place the supplied black filter around the float
natural_image
Line drawing of a vacuum cleaner with attached sensors and cleaning tools (no text or symbols)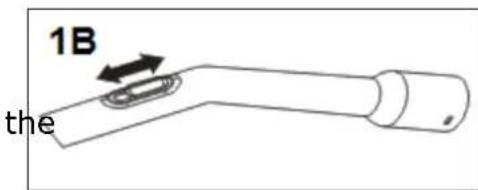
natural_image
Close-up of a hand pressing down on a black plastic component with a curved arrow indicating rotation (no text or symbols)Be careful!
- Never vacuum dust without the filter around the floater!
- Never vacuum liquid with the filter around the floater!
Socket
In order to use the socket, you must lift the lid and insert the plug into the socket. Then use the ON/OFF switch to select the appropriate setting:
I = device works, power from socket
O = device off, power to socket (max. 1800W)
II = Power to socket, connected device will work. After 5-8 seconds the vacuum clean will start. If the connected device is switched off, the vacuum cleaner will also stop after 5-8 seconds.
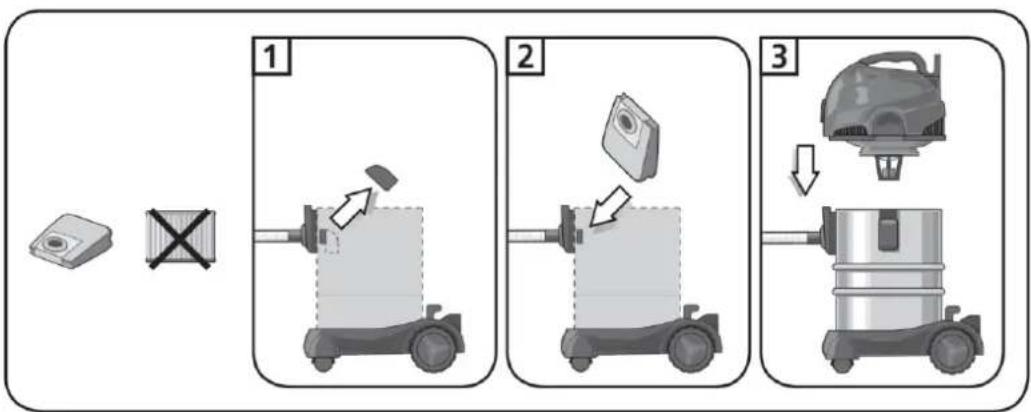
Extra paper filter
An extra paper filter (dust bag) is supplied with the device. You are advised to replace the HEPA filter with this filter if you intend to clean very fine particles, e.g. in the event of drilling or sanding work. This will prevent you from having to clean the HEPA filter during
flowchart
graph TD
    A["Device 1"] --> B["Reinjection"]
    B --> C["Discharge"]
    C --> D["Cleaning"]
    D --> E["Assembly"]
    E --> F["Final Assembly with Air Conditioner"]
this type of work.
Install the paper dust bag as follows:
- Remove the HEPA filter (see: Cleaning the filter)
- Remove the 'knee' on the air inlet within the drum
- Slide the opening in the paper dust bag over the air intake opening
- Secure the cover (without HEPA filter, secure with clamps)
To clean up
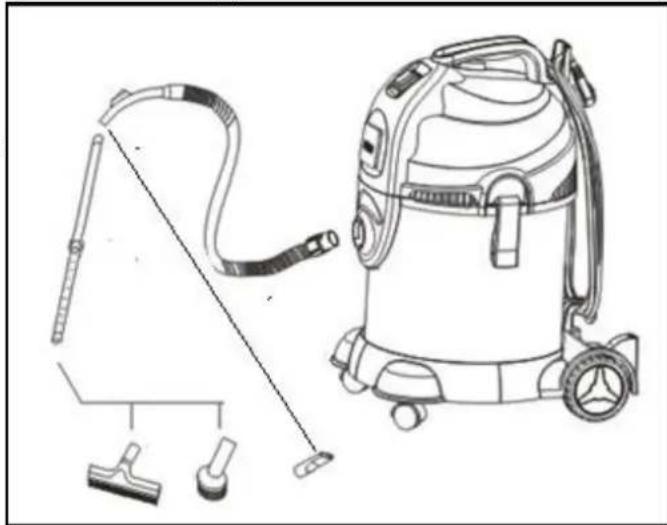
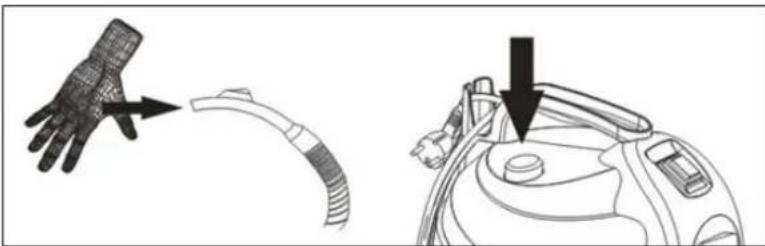
Switch the device off and remove the plug from the socket. Wind the electrical cable around the cable hanger; the upper section provides a groove into which you can wedge the plug. Place the accessories at the appropriate locations behind the device, see image.

natural_image
Close-up of a vacuum cleaner's side panel and brush, showing internal components and cleaning mechanism (no text or symbols visible)Cleaning and maintenance
Before cleaning or maintenance: always switch off the equipment and unplug it.
Filter cleaning system
When you feel that the suction is getting weaker, please remove the tube and jam the hose by hand (while the equipment is working). Then press the filter cleaning button 10-15 times: this will clean the filter and recover the suction force.
natural_image
Diagram showing a hand holding a mesh object and a device with a handle, both without any text or symbols.Emptying barrel
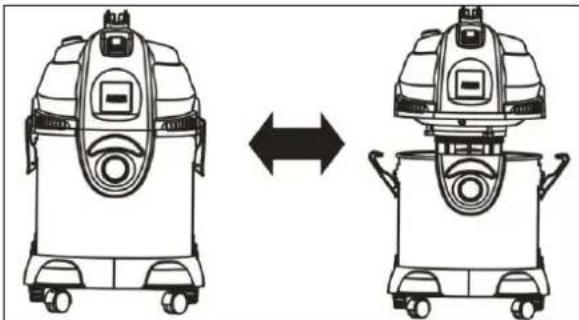
Open both the locking blocks (4) en take the up housing from the vacuum cleaner.
Remove the dust out of the barrel and clean the barrel if necessary. At the end, place back the up housing and close the locking blocks.
natural_image
Line drawing of a two-step industrial vacuum cleaner device with left and right side views (no text or symbols)Cleaning the filter
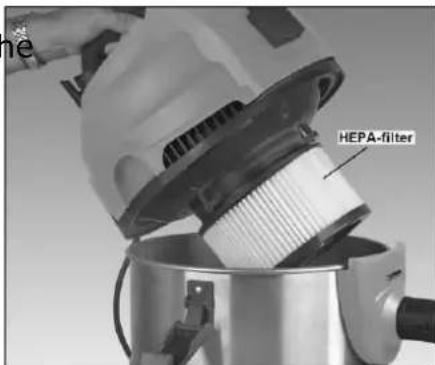
Clean the filter regularly. Open both clips and remove the lid of the vacuum cleaner. Turn the lid from filter, slide the HEPA filter off the frame and carefully wash with lukewarm water. Do not use any aggressive or abrasive cleaning agents!
Let the filter dry thoroughly before replacing. Never use the device without a filter!
Maintenance
- Keep the body of the device, the filter and accessories clean and regularly check to ensure no excess air is being sucked in.
- Check the cable and plug regularly for damage. Do not use the device if it has a damaged cable and/or plug but take it to an authorised engineer to be replaced!
- Regularly check to ensure no objects are stuck in the suction mouth, hose or pipe. Remove them if necessary.
- Use the device carefully; ensure it does not fall, bump into other objects or become otherwise damaged.
- Store the device in a dry environment.
- Never use the device for too long in one go; give it regular opportunities to cool down. This will extend its life expectancy.
- If the device falters, vibrates, makes peculiar noises or emits a burning smell, stop using it immediately and ask your supplier or service provider to check/repair it.
Removal
natural_image
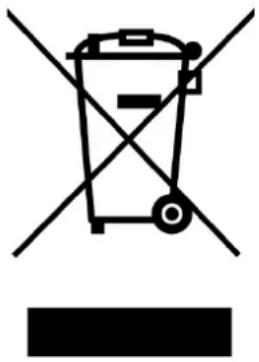
Symbol of a trash bin crossed with no visible text or labelsIn the EU this symbol indicates that this product may not be disposed of as ordinary household waste. Old equipment contains valuable materials, suitable for recycling. These materials should be made suitable for reuse in order to prevent any adverse effects to health and the environment caused by unregulated waste collection. Therefore, please make sure that you bring old equipment to a designated collection point. Alternatively, contact the original supplier, who can make sure that as many of the components as possible can be recycled.
CE - statement
Eurom-Kokosstraat 20-8281 JC-Genemuiden-NL hereby declares that the Eurom Force vacuum cleaner type 1420S wet/dry complies with the LVD guideline 2014/35/EU and the EMC guideline 2014/30/EU and meets the following standards:
LVD 2014/35/EU
EN 60335-1:2012+AC:2014+A11:2014+A13:2017
EN 60335-2-2:2010+A11:12+A1:13
EN 62233:2008
EMC 2014/30/EU
EN 55014-1:2017
EN 55014-2:2015
EN 61000-3-2:2014
EN 61000-3-3:2013
RoHS 2011/65/EU&(EU)2015/863
Genemuiden, 14-07-2020
W.J. Bakker, alg. dir.
Dank
natural_image
Line drawing of a vacuum cleaner with attached sensors and cleaning tools (no text or symbols)
natural_image
Diagram of a mechanical component with a labeled arrow and part number 1B (no text or symbols beyond label)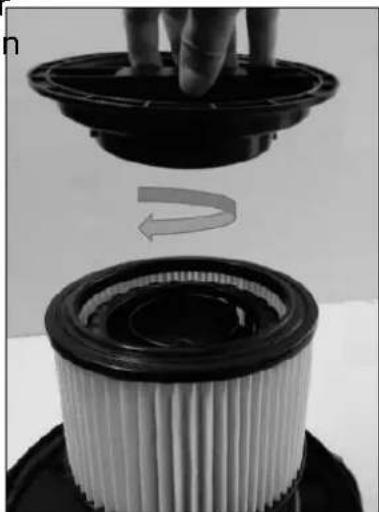
natural_image
Close-up of a hand pressing down on a black plastic component with a curved arrow indicating rotation (no text or symbols)Achtung!
natural_image
Close-up of a vacuum cleaner's side panel with handle and control panel (no visible text or symbols)natural_image
Diagram showing two identical illustrations of a vacuum cleaner before and after assembly, with no text or symbols present.Filter reinigen
natural_image
Diagram showing a hand holding a textured object and a device with a black arrow pointing to a component (no text or symbols present)natural_image
Symbol of a trash bin crossed with no text or numbers, representing waste sorting or disposal (no text present)natural_image
Line drawing of a vacuum cleaner with attached sensors and cleaning tools (no text or symbols)natural_image
Line drawing of a mechanical component with an arrow indicating direction (no text or symbols)natural_image
Close-up of a hand pressing down on a black plastic component with a curved arrow indicating rotation (no text or symbols)Attention!
natural_image
Close-up of a vacuum cleaner's side panel and brush, showing internal components and cleaning mechanism (no text or symbols visible)natural_image
Diagram showing a hand holding a textured object and a device with a black arrow pointing to a component (no text or symbols present)Vidage de la cuve
natural_image
Line drawing of two identical vacuum cleaner units with wheels and control panels, shown in side and top views (no text or symbols)Nettoyage du filtre
natural_image
Symbol of a trash bin with no text or numbers present

- Force 1420S wet/dry
- Dank
- Stopcontact
- Opruimen
- Ketel ledigen
- Filter reinigen
- Important safeguards
- Parts name
- Standard accessories
- Operation
- Be careful!
- Socket
- Extra paper filter
- To clean up
- Cleaning and maintenance
- Filter cleaning system
- Emptying barrel
- Cleaning the filter
- Maintenance
- Removal
- CE - statement
- LVD 2014/35/EU
- EMC 2014/30/EU
- RoHS 2011/65/EU&(EU)2015/863
- Achtung!
- Attention!
- Vidage de la cuve
- Nettoyage du filtre
Brand : Eurom
Model : Force 1420S wetdry
Category : Vacuum Cleaner