
H200 - Humidifier SOLAC - Free user manual and instructions
Find the device manual for free H200 SOLAC in PDF.

| Brand | Solac |
| Model | H200 |
| Product Type | Ultrasonic humidifier |
| Power Supply | Mains (220-240 V) |
| Main Functions | Ultrasonic, steam jet regulation, automatic shut-off when water runs out, safety when removing tank |
| Tank Capacity | Approximately 2 L (estimation) |
| Autonomy | Varies depending on steam setting |
| Adjustable steam flow | Yes, via rotary knob |
| Automatic shut-off | Yes, when the tank is empty or removed |
| Maintenance and Cleaning | Weekly cleaning of the transducer with vinegar; cleaning the tank with diluted bleach |
| Safety | Circuit breaker in case of water shortage, do not use with damaged cord, do not touch the transducer |
| Spare parts and repairability | Repairs by authorized technical service; do not open the device |
| General information | Use in vertical position, 0.5-1 m above the ground, do not expose to sunlight or heat |
| Dimensions (estimated) | Height: 30 cm, Width: 20 cm, Depth: 20 cm |
| Weight (estimated) | 1.5 kg |
Frequently Asked Questions - H200 SOLAC
User questions about H200 SOLAC
0 question about this device. Answer the ones you know or ask your own.
Ask a new question about this device
Download the instructions for your Humidifier in PDF format for free! Find your manual H200 - SOLAC and take your electronic device back in hand. On this page are published all the documents necessary for the use of your device. H200 by SOLAC.
USER MANUAL H200 SOLAC
natural_image
White ceramic water purifier with a clear lid and control panel, no visible text or symbols on the device body.5- 8 • ESPAÑOL
9-11 • ENGLISH
12-15 • FRANÇAIS
16-19 • DEUTSCH
20-23 • PORTUGUÊS
24-27 • ITALIANO
28-31 • NEDERLANDS
32-35 • ČESKY
36-39 • POLSKA
40-43 • SLOVENSK Ý
44-48 • MAGYAR
49-52 • Българск
53-56 • HRVATSKA
Fig.1
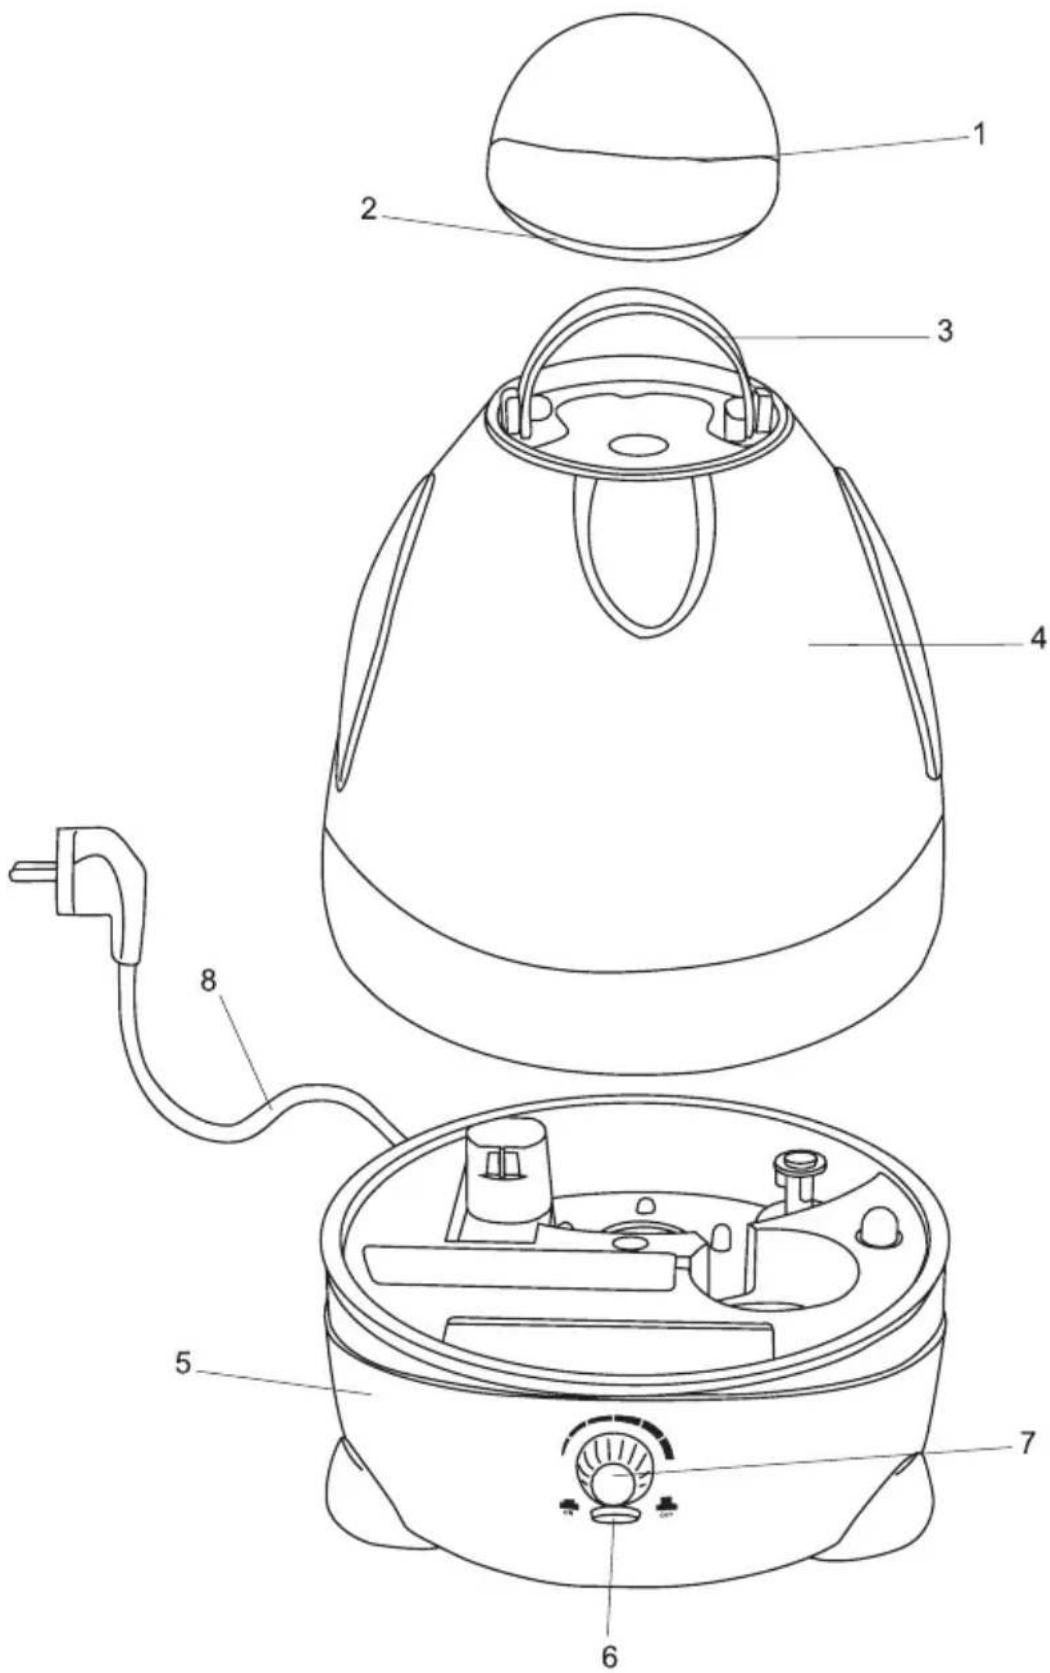
Fig.2
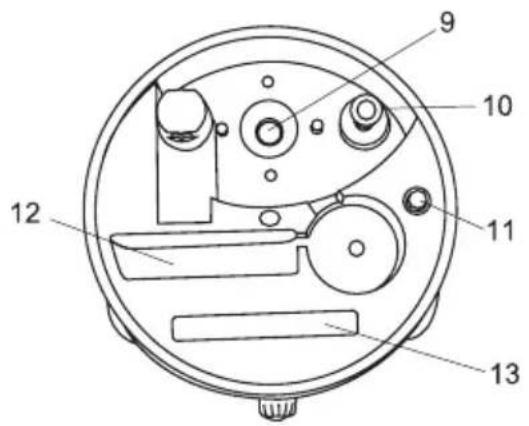
Fig.3
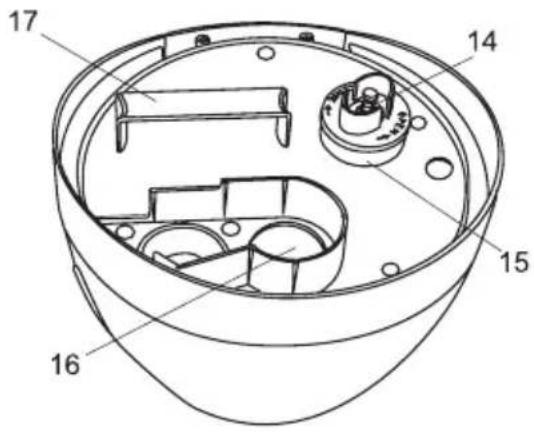
Fig.4
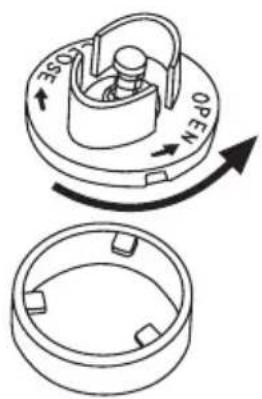
Fig.5
natural_image
Technical line drawing of a mechanical assembly with a flanged base and a circular component with internal components (no text or symbols)Fig.6

natural_image
Diagram of a mechanical component with a rotating arrow indicating rotation (no text or symbols)• ESPAÑOL
ADVERTENCIAS
- Please read the instructions carefully before first use, and keep them for future consultation.
- Keep the apparatus and packaging out of the reach of children.
- Before use, ensure that the voltage in your home is the same as that on the specifications plate.
- Always use in the vertical position.
- Do not cover while in use.
- Place on a flat, firm shelf about 0.5 m or 1 m from the floor. Never use on the floor. Never tip.
- Use only for the purposes indicated. The manufacturer is not liable for damage caused by unsuitable or incorrect use of the humidifier.
- If the apparatus does not work, unplug it: do not tamper with it. If repairs are necessary, please contact the Technical Assistance Service.
- Do not use if the connection cable is damaged or the apparatus is faulty. Some operations, such as replacement of the power cable, must be done by an authorised service centre: the right tools are required.
- If not to be used, unplug.
- The unit must be unplugged for assembly, cleaning, removal or filling with water.
- Always fill the tank with clean water. Do not add detergent, freshener or essence. NEVER PLACE THE WATER IN THE VAPORISATION CHAMBER.
- When in use, do not remove the vapour output cover from the vaporisation tank, or from the water tank.
- Do not expose to direct sunlight or place near heat sources.
- Do not place the vapour outlet near furnishings, walls or television sets.
- Ensure that the water tank cover is completely closed.
- Ensure that the apparatus is unplugged before removing the water tank.
- Do not touch the ultrasound transmitter with the hands or with tools.
- Do not use the humidifier when barefoot.
- When unplugging, do not pull on the power cable or the apparatus.
- Do not leave exposed to atmospheric elements.
- Do not touch with wet hands when in operation.
- Do not fill with hot water.
MAIN COMPONENTS
Fig. 1
- Vapour output nozzle
- Rotary head
- Top carry handle
-
Water tank
-
Central body
- On/off button
- Flow regulator control
- Power cable
Fig. 2
- Transducer
- Water level float
- Pilot light on
- Vaporisation chamber
- Cleaning brush
Fig. 3
- Water opening valve
- Water cap
- Vapour outlet channel
- Bottom tank handle
OPERATION AND USE
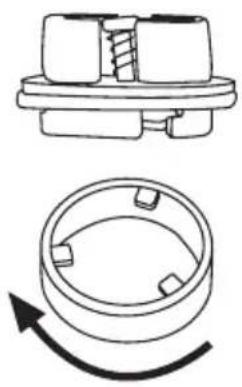
- Separate the water tank and central body, turn over and remove the cap from the bottom, turning it anticlockwise Fig. 4. Fill with cold water; do not fill completely.
- Replace the plug, aligning the notches on the tank with the grooves on the cap, and turn it clockwise. Fig. 5
- Turn the tank over, holding it by the top handle, and place it on the central body, making sure it fits perfectly. Before replacing the penguin head, turn the top handle forward. Fig. 6
- Plug in and turn on Fig. 1 (6); the light signal inside the humidifier body comes on. In a few seconds, vapour will start to come from the opening.
- Use the flow regulator control to adjust the intensity of the vapour output. Fig 1 (7)
- The humidifier has a safety system that switches the transducer (9) off before it runs out of water, thanks to the water level float (10)
- It has another safety system that switches the transducer (9) off when extracting the water tank (4).
MAINTENANCE AND CLEANING
Before any cleaning operation, switch the apparatus off and unplug it.
- There may be some lime deposits in the transducer, particular in areas with hard water. Overcome this drawback by cleaning the transducer with water and vinegar on a soft cloth at least once a week, as follows:
a) Dampen a cloth with vinegar and wipe the transducer gently, until the lime deposits disappear completely.
b) Rub down with a dry cloth and remove remains of humidity.
c) Do not rub the transducer with solid objects.
d) Do not clean with chemical products.
- Clean the inside of the water tank at least once a week, as follows:
a) Fill the tank with clean water adding a few drops of bleach or a similar disinfectant. Close the tank completely with its cap and shake forcibly.
b) Rinse thoroughly.
Note: Water accumulated over long periods may create bacteria and mildew (fungus).
-
Clean all the humidifier parts and then dry them well before storing the apparatus in its box.
-
With each change of water the use is recommended of the brush included, to remove dust and any lime remains on the transducer.
-
Do not place the transducer directly under the tap.
Water must not get into the apparatus; should that happen, take it to an authorised assistance centre before using it again.
TROUBLESHOOTING
Do not try to open the apparatus: there is a risk of electrocution.
If it does not work:
- Ensure it is properly plugged in.
- Check that the switch is in the ON position.
If the operating light signal is on but, instead or vapour, the apparatus emits air:
- Check that there is water in the tank.
- Check for possible lime deposits on the water level float or the transducer.
- Check that the flow regulator is open.
Strange odour:
- Clean the tank with water and vinegar and rinse with clean water.
- Leave the tank open for some time without the cap, in a cool place.
OBSERVATIONS
- Ultrasound humidifiers produce smaller water particles which may more easily reach the lower respiratory tracts. This type of humidifier is therefore suitable for the treatment of symptoms of the common cold and laryngitis. There use is not however recommended for persons with bronchial asthma and allergies.
- Domestic humidifiers are ideal for obtaining a comfortable humidity environment between 40% and 60% , the range in which the risk of respiratory infection is minimised.
•FRANÇAISE
REMARQUES


Brand : SOLAC
Model : H200
Category : Humidifier