
MKL 5460 X - Cooker BLOMBERG - Free user manual and instructions
Find the device manual for free MKL 5460 X BLOMBERG in PDF.
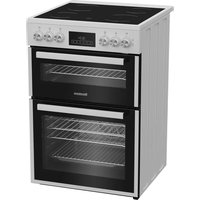
| Product type | Ceramic hob |
| Brand | Blomberg |
| Model | MKL 5460 X |
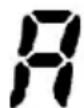
| Dimensions (mm) | Width: 880, Depth: 280 |
| Minimum cutout (mm) | C: 60, D: 30-40, E: 120 |
| Electrical supply | 230 V / 50 Hz (standard estimate) |
| Cooking power | 9 power levels (1 to 9) |
| Number of cooking zones | 4 radiant zones |
| Automatic heating function | Yes, activation by PLUS key after level 9 |
| Timer | Independent (0-99 min) and per cooking zone |
| Child lock | Lock key (LOCK) |
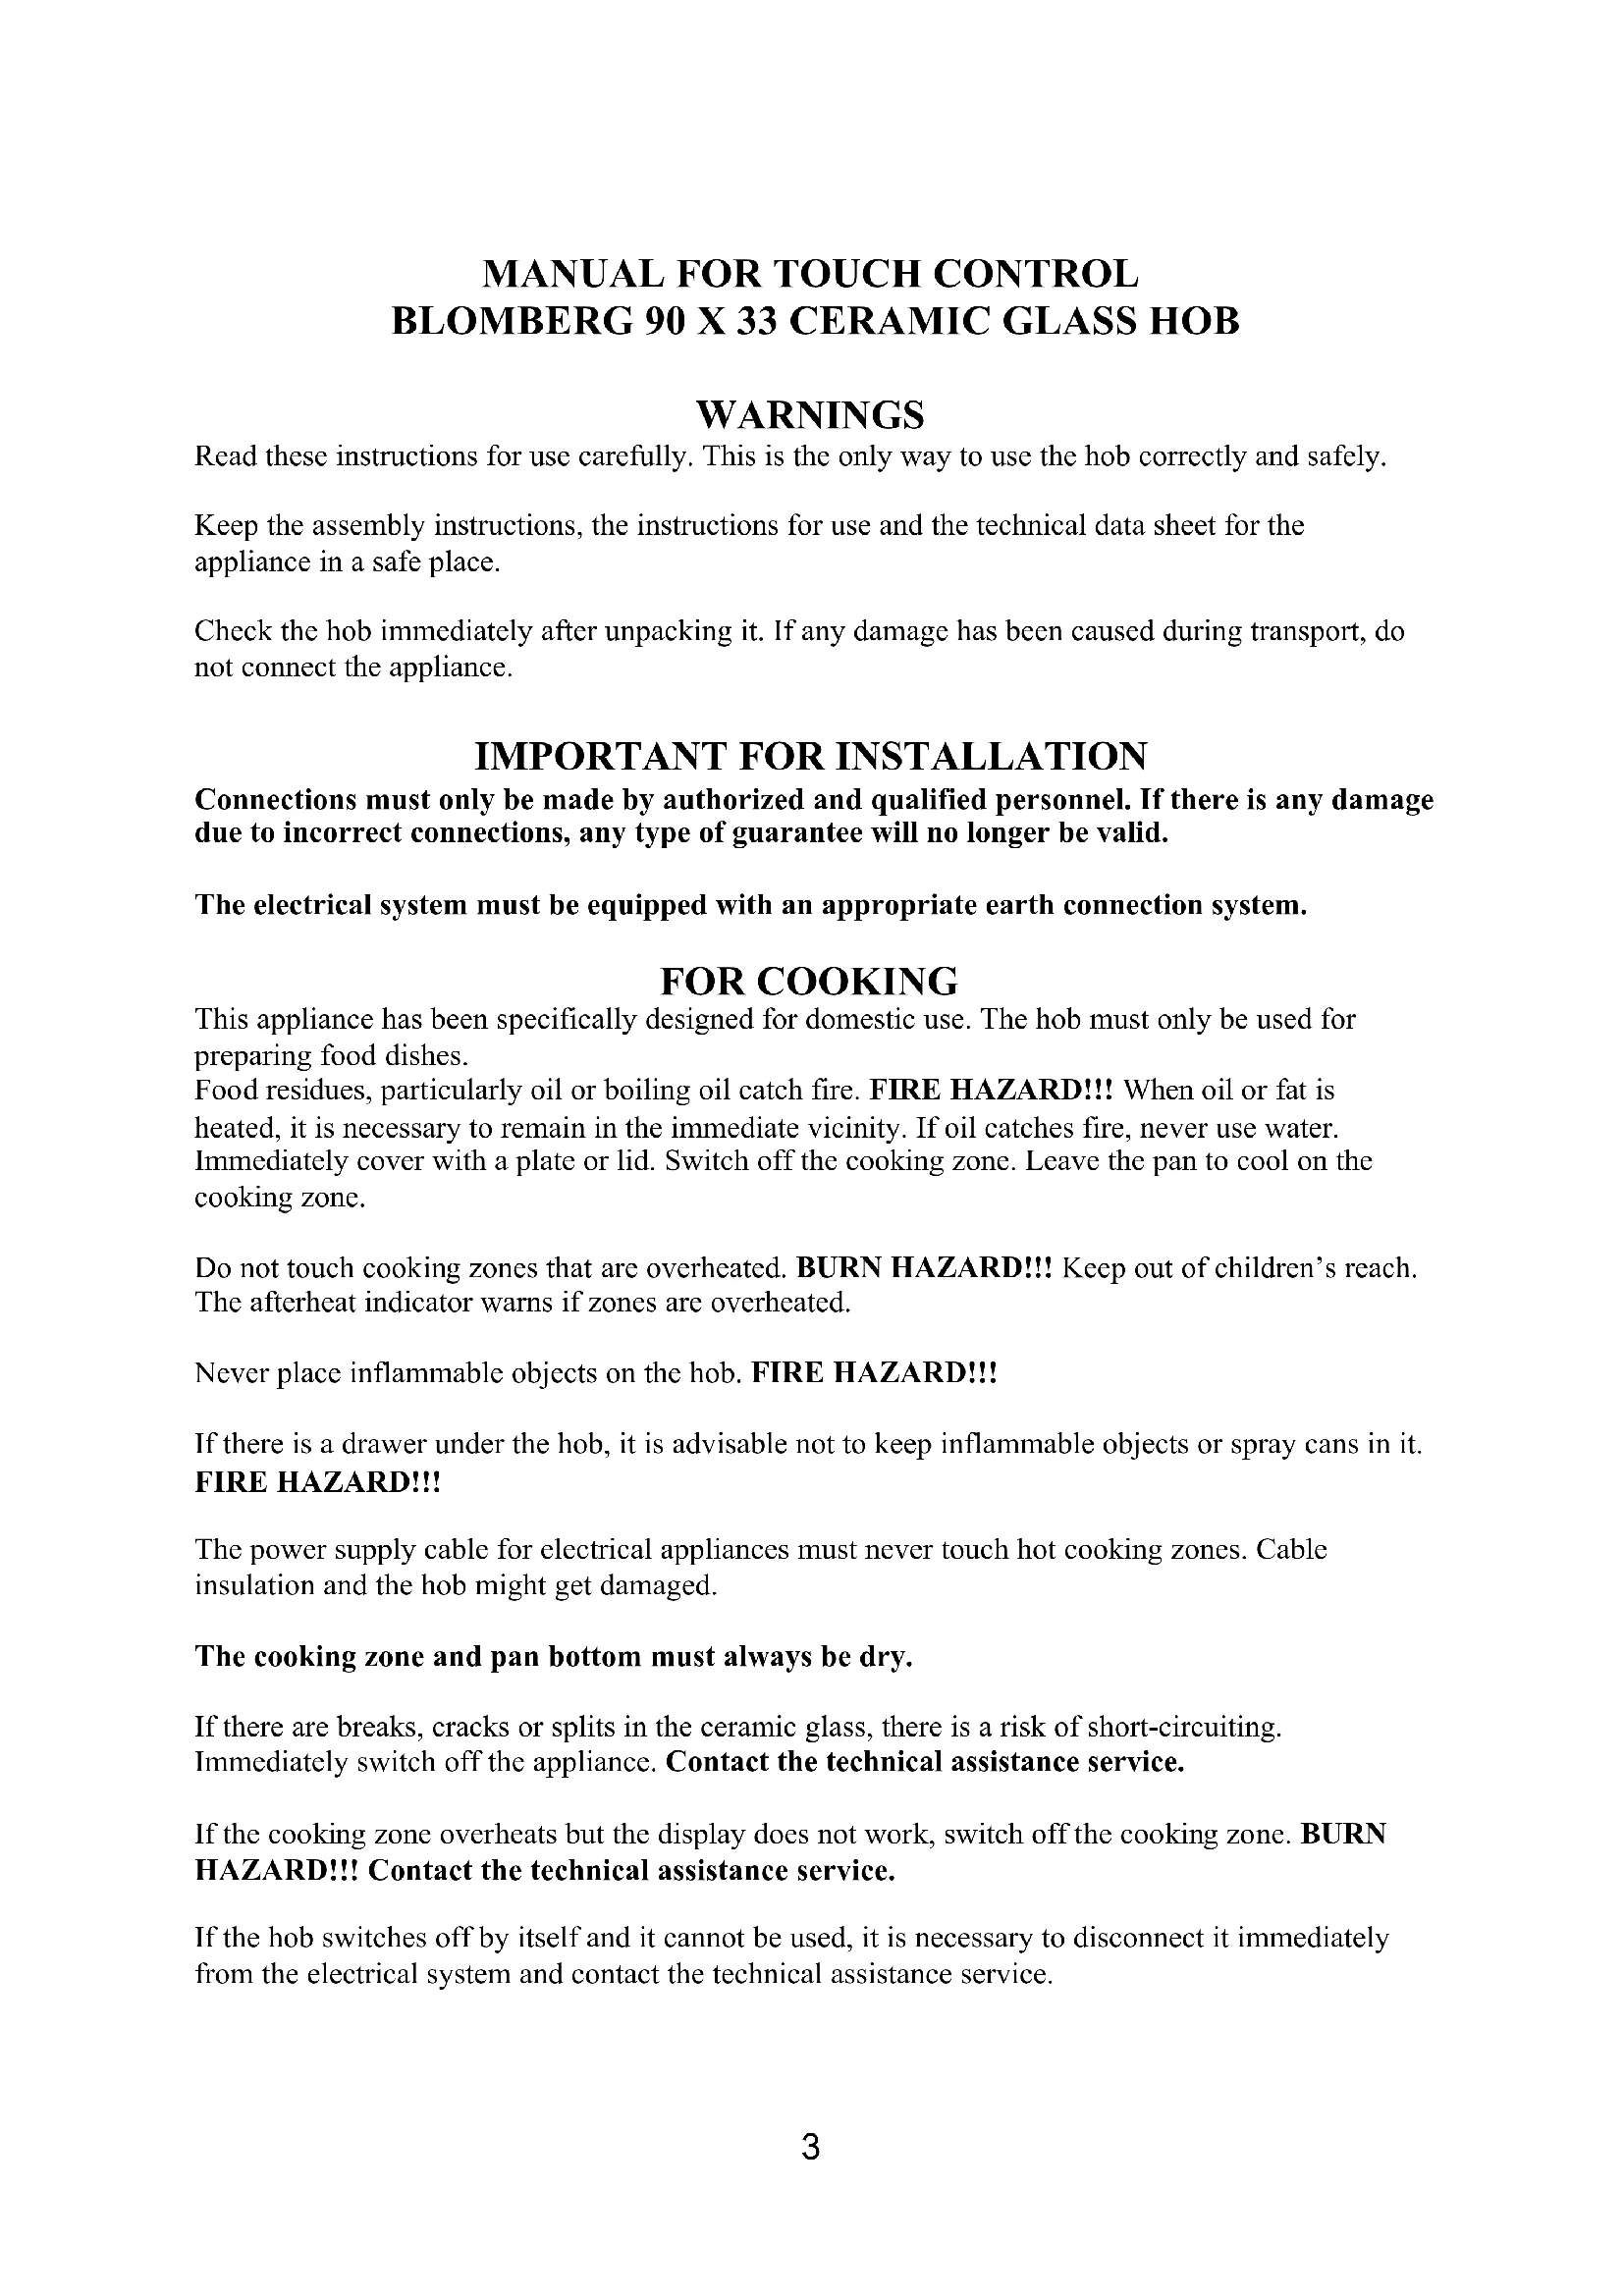
| Residual heat indicator | Display "H" for hot zones |
| Automatic safety shut-off | According to power level (up to 6 h) |
| Multi-circuit zones | Yes, double/triple circuit selectable |
| Controls | Touch controls, power, selection, plus/minus, timer, lock |
| Display | Digital displays per zone, indicator lights |
| Care and cleaning | Hot water with alkaline product, avoid abrasives |
| Safety | Fire hazard: do not leave oil unattended; emergency stop if controls are blocked |
| Repairability | Repairs by qualified personnel only; error codes (Er12, Er16, etc.) |
| Weight | Not specified (estimated 10-15 kg) |
Frequently Asked Questions - MKL 5460 X BLOMBERG
User questions about MKL 5460 X BLOMBERG
0 question about this device. Answer the ones you know or ask your own.
Ask a new question about this device
Download the instructions for your Cooker in PDF format for free! Find your manual MKL 5460 X - BLOMBERG and take your electronic device back in hand. On this page are published all the documents necessary for the use of your device. MKL 5460 X by BLOMBERG.
USER MANUAL MKL 5460 X BLOMBERG
Ceramic built-in hobs
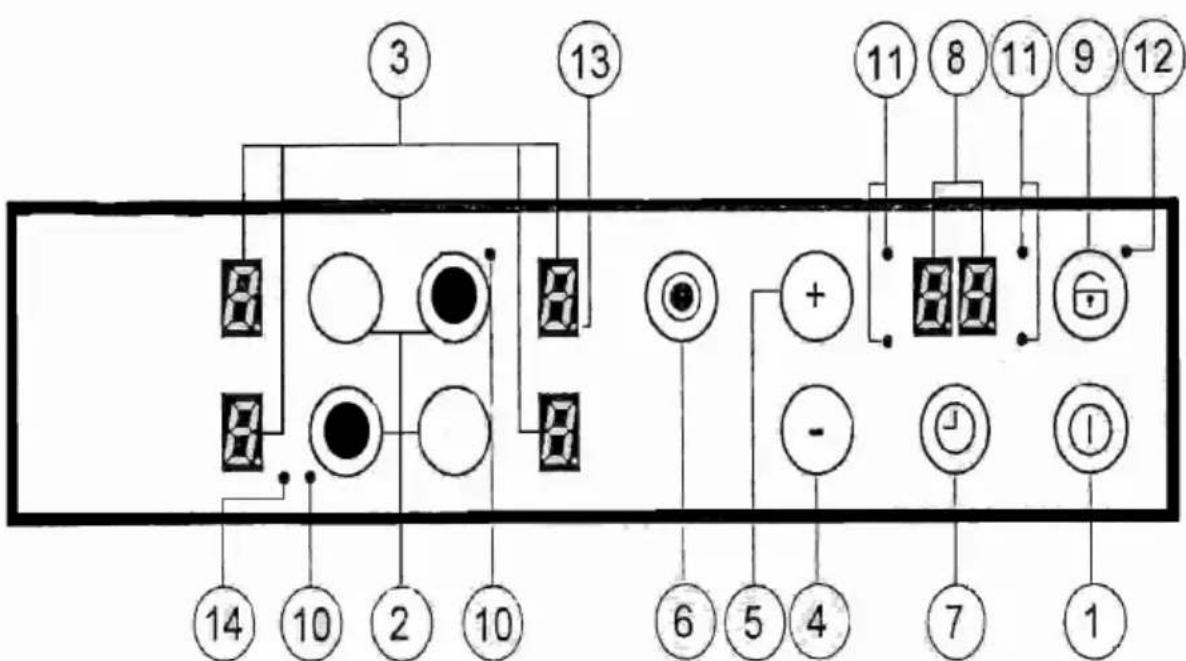
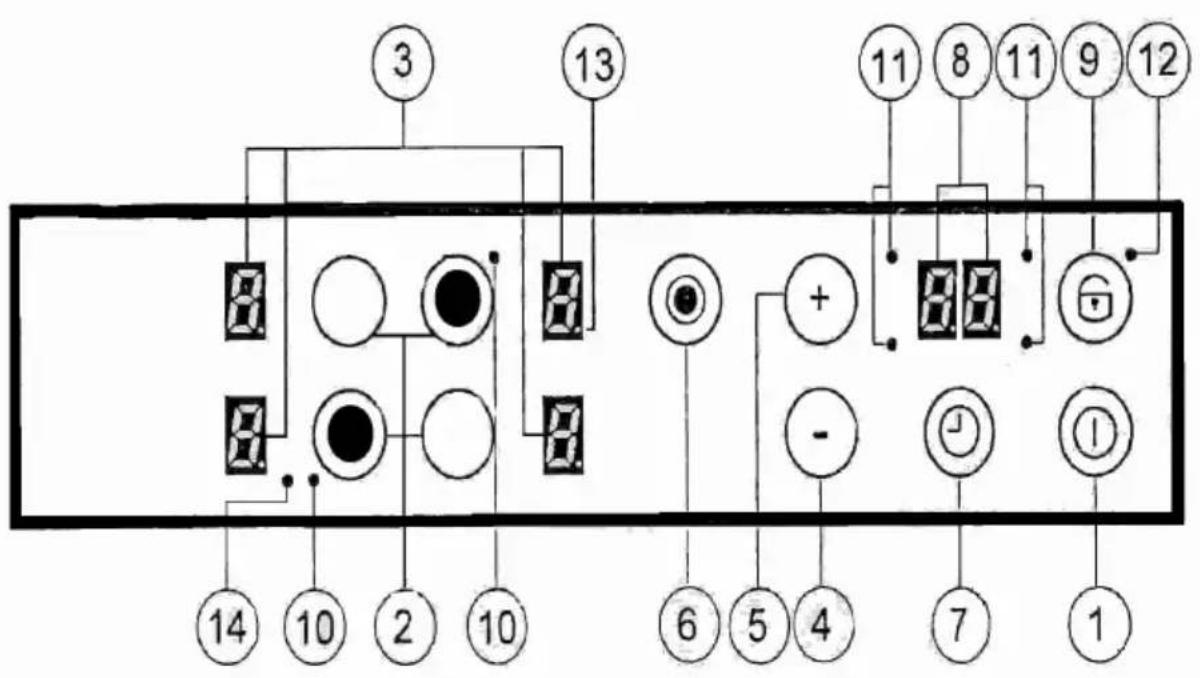
- Start button (OFF/ON control)
- Cooking zone selection buttons (ON/OFF)
- Cooking zone display
- MINUS button
- PLUS button
- Extended zone (ON/OFF) button
- Timer zone button
- Timer Display
- Lock button
- Indicator light for extended zone
- Indicator light for selecting timer for cooking zones
- Key-Lock (ON/OFF) Indicator light function
- Lit decimal display for power setting: unlit display for cooking zone setting: blocked cooking zone
- Indicator light for triple circuit extended zone
MANUAL FOR TOUCH CONTROL BLOMBERG 90 X 33 CERAMIC GLASS HOB
WARNING
Read these instructions for use carefully. This is the only way to use the hob correctly and safely.
Keep the assembly instructions, the instructions for use and the technical data sheet for the appliance in a safe place.
Check the hob immediately after unpacking it. If any damage has been caused during transport, do not connect the appliance.
IMPORTANT FOR INSTALLATION
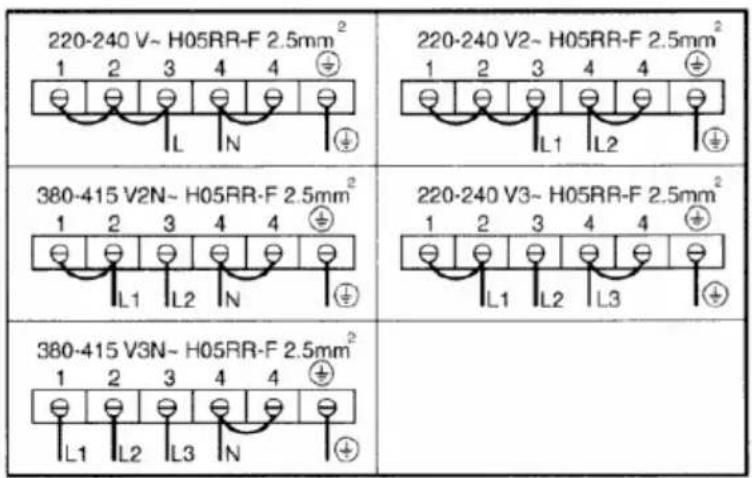
Connections must only be made by authorized and qualified personnel. If there is any damage due to incorrect connections, any type of guarantee will no longer be valid.
The electrical system must be equipped with an appropriate earth connection system.
FOR COOKING
This appliance has been specifically designed for domestic use. The hob must only be used for preparing food dishes.
Food residues, particularly oil or boiling oil catch fire. FIRE HAZARD!!! When oil or fat is heated, it is necessary to remain in the immediate vicinity. If oil catches fire, never use water. Immediately cover with a plate or lid. Switch off the cooking zone. Leave the pan to cool on the cooking zone.
Do not touch cooking zones that are overheated. BURN HAZARD!!! Keep out of children's reach. The afterheat indicator warns if zones are overheated.
Never place inflammable objects on the hob. FIRE HAZARD!!!
If there is a drawer under the hob, it is advisable not to keep inflammable objects or spray cans in it. FIRE HAZARD!!!
The power supply cable for electrical appliances must never touch hot cooking zones. Cable insulation and the hob might get damaged.
The cooking zone and pan bottom must always be dry.
If there are breaks, cracks or splits in the ceramic glass, there is a risk of short-circuiting. Immediately switch off the appliance. Contact the technical assistance service.
If the cooking zone overheats but the display does not work, switch off the cooking zone. BURN HAZARD!!! Contact the technical assistance service.
If the hob switches off by itself and it cannot be used, it is necessary to disconnect it immediately from the electrical system and contact the technical assistance service.
Any repair operations carried out incorrectly are a high risk. Risk of electric shocks!!! Repairs must only be carried out by qualified and specialized technical personnel.
Rough surfaces on pans and frying pans scratch ceramic glass. Check pans.
Avoid cooking with empty pans, especially if it is an enamelled or aluminium pan. Pan bottoms and ceramic glass could be damaged.
For special pans, follow the manufacturer's instructions.
Never place hot pans or frying pans on the control panel, on the display area or the frame. This might cause damage!!!
Salt, sugar and sand scratch ceramic glass. Do not use the hob as a work surface or for placing anything.
Hard or pointed objects accidentally falling on the hob may cause damage. Do not place these objects on the hob.
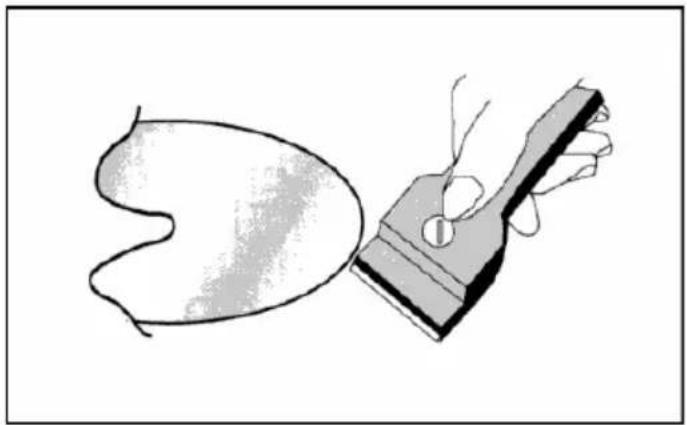
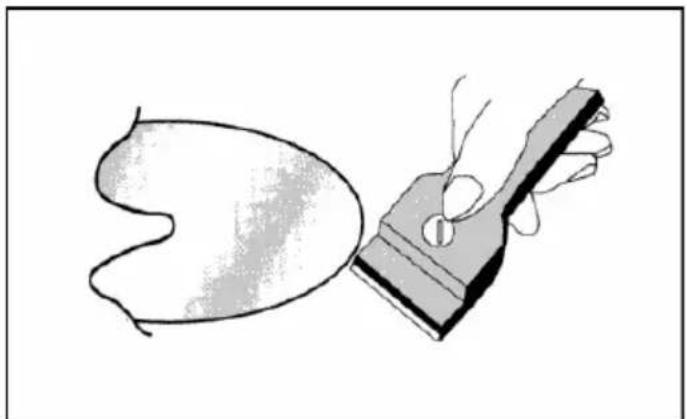
Sugar and other food with high sugar content will damage the hob. Any spilt food must be removed immediately with a scraper for glass. Warning!!! The scraper for glass has a sharp blade. (OPTIONAL)
If placed on hot cooking zones, aluminium foil and plastic containers will melt. The protective film used in the kitchen is not suitable for this hob.
The following damage will not affect the correct functioning or the stability of the ceramic glass.
The formation of gelatinous residues due to melted sugar or food with a high sugar content.
- Scratches due to salt, sugar or sand grains or rough pan bottoms.
Metal colour from pan use or after using unsuitable detergents.
- Opaque decoration after using unsuitable detergents.
Only use warm water with an alkaline product. Do not use corrosive or abrasive products, as they might cause the formation of opaque areas.
On/off for Touch control
After ignition, the touch control requires about 1 second before it is ready to operate. After resetting, all displays and indicator lights flash for about 1 second. After this, all displays and indicator lights switch off and the touch control is in the stand-by position.
The touch control can be switched on by pressing the power button. The display for the cooking zones shows "0". If a cooking zone is "burning hot", the display shows "H", instead of "0". The decimal point, at the bottom right of all cooking zone displays, flashes at intervals of a second to indicate that at that moment no cooking zone has been selected.
After being switched on, the touch control stays active for 20 seconds. If a cooking zone or the timer is not selected, the touch control returns to stand-by.
The touch control switches on only when the power button is activated. Pressing the power button at the same time as other buttons will have no effect and the touch control will stay on stand-by.
The touch control can be switched off at any time by pressing the power button. This applies even if the control has been blocked with a child safety lock. The power button should always be the first to be switched off.
Automatic switching off
Once it is switched on, the touch control automatically switches off after 20 seconds of inactivity. After selecting a cooking zone without setting the power level, the time for automatic switching off is 10 seconds. After this, the cooking zone is deselected, and 10 seconds later, the touch control switches off.
Switching a cooking zone on/off
When the touch control is on, the cooking zone can be selected by pressing the select button (the PLUS touch control for the related cooking zone): A lit decimal point on the display of a cooking zone indicates selection. If the zone is "burning hot", an "H" will appear on the display of the corresponding hotplate. Pressing the (+) button again, it is possible to select a power level and the cooking zone starts to heat up. After selecting, it is necessary to release the (+) button for 0.3 seconds before being able to select the power using the same button.
After selecting the cooking zone, the power level can be selected pressing down the PLUS button, starting at level 1 it is increased by one unit every 0.4 seconds. When it reaches level 9, it is not possible to select higher levels.
If the cooking zone is selected using the (-) button, the starting level is "9" (maximum level). If the button is pressed down, the active level decreases by one unit every 0.4 seconds. When level 0 is reached, it is not possible to decrease further. The setting can only be changed by activating the (-) button or (+) button again.
Switching off a cooking zone
Select the zone to be switched off using the (+) selection button. The selection is shown by the decimal point on the display of the related zone. By pressing the (+) button and (-) button at the same time, the power level is set at 0. Alternatively, the (-) button can be used to reduce the power level to 0.
All cooking zones are at the "0" power level, the decimal points on the display flash. If a cooking zone is "burning hot", an "H" will appear, instead of an "0"
Switching off all cooking zones
All cooking zones can be switched off immediately, at any moment, by pressing the power button. When on stand-by, an "H" appears for all cooking zones that are "burning hot". All the other displays will switch off.
The power level
The power of the cooking zone can be set to 9 levels, indicated by the symbols "1" to "9", using an indicator light display with seven sections.
The automatic heating function (by selecting)
When the automatic heating function has been activated, the power of the cooking zone reaches 100% for an established heating time, which depends on the selected power level. At the end of this heating time, the touch control returns to the pre-selected power level.
Starting the automatic heating process:
- The touch control is on and a cooking zone is selected.
- When power level 9 has been reached, automatic heating is activated by pressing the PLUS button again.
- The required power level is selected by pressing the PLUS and MINUS buttons; the chosen level appears on the display.
- Three seconds after pressing these buttons (power level selection) and 16 seconds after the activation of the automatic heating function, the symbol "A" (which indicates a power increase) appears on the display instead of the selected power level.
-
If a lower level is selected using the MINUS button, after the "A" has appeared on the display, the automatic heating function will be interrupted.
-
Using the PLUS button, it is possible to select a higher power level, in this case the automatic heating time will be adapted to the selected setting.
- When the heating time has ended, the previously selected power level will appear on the display.
The afterheat indicator
This warns the user that the ceramic glass is at a dangerous temperature if there should be contact with the entire area above the cooking zone. The temperature is established by following a mathematical model and if there is any afterheat, "H" appears on the corresponding display with seven sections.
Heating and cooling are calculated according to:
The selected power level (from "0" to "9")
The relay activation time.
After switching off the cooking zone, "H" appears on the corresponding display until the cooking zone temperature drops below the critical level.
The automatic switch off function (Operating time limit)
According to the power level, each cooking zone is switched off after a pre-established maximum time, if no operations are carried out.
Each operation on the cooking zone (using the PLUS and MINUS buttons or the double circuit of the zone, if present) restores the maximum operating time for the cooking zone to its initial value.
- When the control is activated, the ON/OFF button has priority over all other buttons, therefore the control can be switched off at any moment even if for multiple or continuous activation of buttons.
- On stand-by mode, continuous activation of buttons will have no effect, however, before the electronic control can be switched on again, it needs to recognise that no button has been activated.
The lock button for this device (block)
Using the "lock" button, complete control can be blocked (device), to prevent accidental actions. If you do not de-activate the lock button before switching off the control, it will still be activated when the control is switched on again.
It is not possible to activate other buttons before dc-activating the lock button. The only button that can be activated is the start button.
Safety stop
If one or more cooking zones accidentally stay on without control, after a certain time the control card is automatically switched off (see table).
| Power level | Operating time limit in hours |
| 1-2 6 | |
| 3-4 5 | |
| 5 4 | |
| 6-9 1.5 |
Multiple circuit stop
Using the TouchLite control, it is possible, depending on model type, to control hotplates with a double or triple circuit.
When a radiant multiple hotplate is activated, all circuits start at the same time. If you wish to switch on the innermost circuit only, the outer circuits can be switched off using the appropriate button.
If the multiple-circuit button is activated, the outermost circuits of the activated cooking zone can be deactivated at any moment. An activated outer circuit has a special supplementary indicator light. Activating the multiple-circuit button again, activates the outer circuits again and the relevant indicator lights light up.
Triple circuit operation:
If the element to be controlled is a triple-circuit radiant hotplate, the following applies:
- Pressing the multiple-circuit button for the first time switches off the outermost circuit and the indicator light at the top of the display.
- Pressing the multiple-circuit button a second time switches off the median circuit and the indicator light at the bottom of the display.
- Pressing this button a third time, switches on the median circuit again. Further pressing adds the third circuit and its related indicator light.
The Acoustic signal (buzzer)
The following activity is indicated by a buzzer during use:
- A short sound for normal button pressing.
The Timer function
The timer function is the following:
- The Timer is autonomous for 1.99min : there is a sound signal when this time is up. This function is only available when the hob is not in use.
The Autonomous Timer
- If the touch control is off, the autonomous timer can be used by pressing the timer button. The display indicates "00". By pressing the start button, the touch control returns to the stand-by mode and the timer is switched off.
The values can be altered (0-99 min.) increasing by one minute using any PLUS button from 0 to 99 and the MINUS button from 99 to 0. - Continuously pressing the PLUS or MINUS buttons will greatly increase the variation speed until a maximum value, without sound signals.
-
If the PLUS (or MINUS) button is released, the increase (decrease) speed will start again from the initial value.
-
The timer can be set by pressing down the PLUS or MINUS buttons or by pressing down further (with sound signal).
After the timer has been set, countdown begins. When time is up, a sound signal is given off and the display flashes.
The sound signal will stop:
-
Automatically after 2 minutes.
-
By pressing any button.
The display stops flashing and switches off.
Switching off / altering the timer
- The timer can be altered or switched off at any moment by pressing the PLUS and MINUS buttons (with sound signal). The timer switches off and clears the time to "0" by pressing the MINUS button or by pressing the PLUS and MINUS buttons at the same time, which directly clears the timer to "0" before switching off.
- If the touch control is switched on (using the power button), the autonomous timer switches off.
Setting the timer for the cooking zones
It is possible to set a separate timer for each cooking zone by switching on the touch control.
- By selecting the cooking zone using the zone selection button, setting the power level and then pressing the timer button, it is possible to set a countdown to switch off the cooking zone.
The number of indicator lights positioned around the timer display corresponds to the number of cooking zones to indicate which zones have been activated by the timer. - When the timer is selected, its display flashes, and the indicator lights around the display lights up. If a cooking zone is selected, the timer indicator lights switches off and the display no longer flashes.
- When altering the selection of a cooking zone, the timer display indicates the timer value corresponding to the newly selected cooking zone. The timers set for each cooking zone remain activated.
-
Other timer functions are the same as for the autonomous timer. The PLUS button must be pressed to increase the value of the corresponding cooking zone.
-
Time up is indicated by an acoustic signal and by "00" on the display, the cooking zone indicator light for the timer flashes. The cooking zone is switched off, and "H" appears if the zone is "burning hot", otherwise a "dash" appears on the cooking zone display.
The sound signal and flashing on the display are interrupted:
- Automatically after 2 minutes.
- By pressing one of the buttons.
The timer display switches off.
The basic functions are the same as the ones described for the autonomous timer.
Pan recognition function (with dedicated electronics only)
The touch control does not contain pan recognition sensors.
Table:
| Display | Possible causes | Counterme |
| Er12 Short-circuit in the 5V or earthed control relay | Replace the control | |
| Er16 Short-circuit or disconnected pan sensor or power supply | Remove the causes (customer service) | |
| Er22 Short-circuit or disconnection in the pressure button area | Replace the control | |
| Er25 Control incorrectly connected Connect to correct mains voltage | ||
| Er26 Short-circuit in the relay tension control | Replace the control | |
| Continuous sound Water on the glass above the control card | Clean | |
| “H” flashes Hot pan on the control card; faulty radiant hotplate seal | Wait until the control card returns to the normal temperature | |
| Faulty component Replace the control | ||
| Er33 Water on the glass above the control card | Clean | |
WARNING
Before any operation:
Disconnect the hob from the electrical mains.
Make sure that the hob is cold.
Do not try to repair the hob on your own, contact a qualified service centre.
A:880-2mm
B:280-2mm
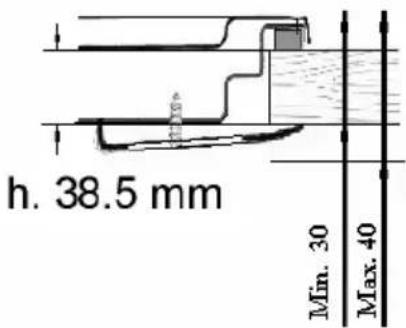
C:60mmMIN
D: 30 mm MIN 40 mm MAX
E:120mmMIN

N.B. THE MATERIAL AND GLUES USED FOR THE KITCHEN UNIT MUST RESIST A TEMPERATURE OF min. 100^ .
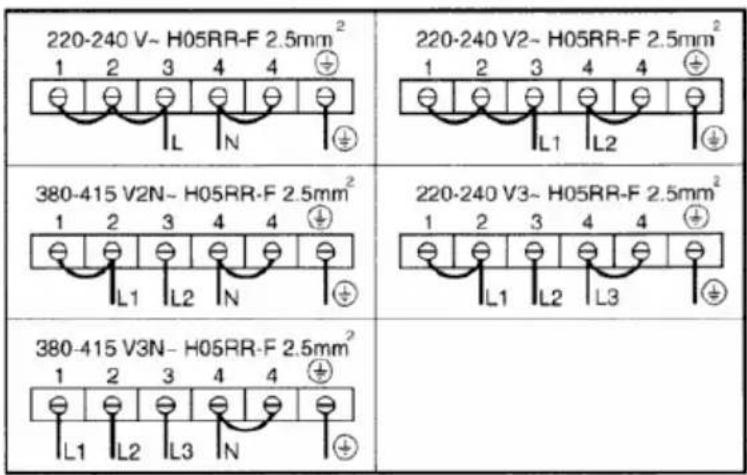
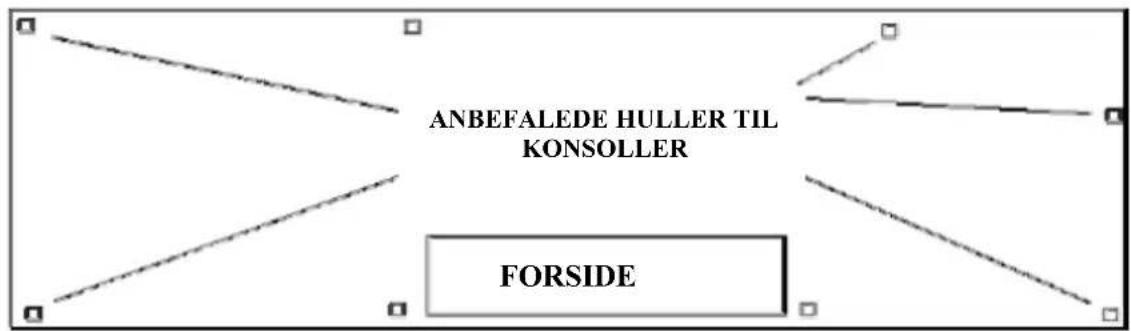
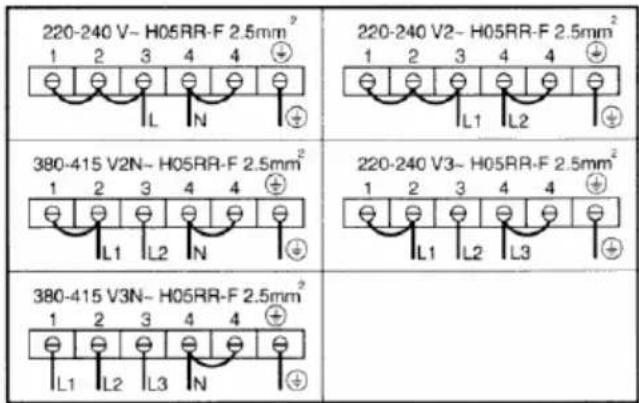
CONNECTIONS TO ELECTRICAL SYSTEM
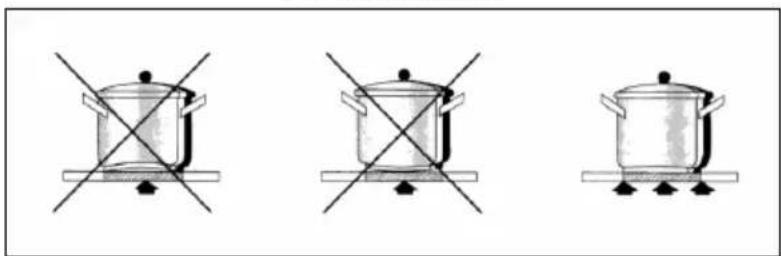
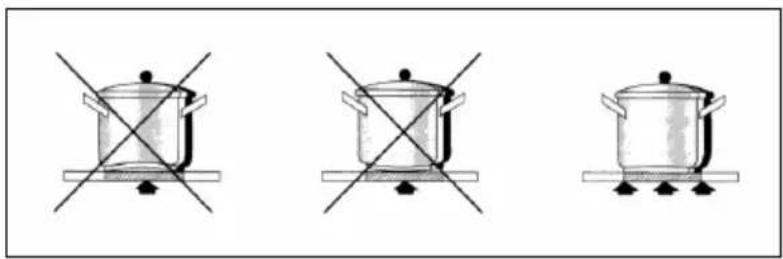
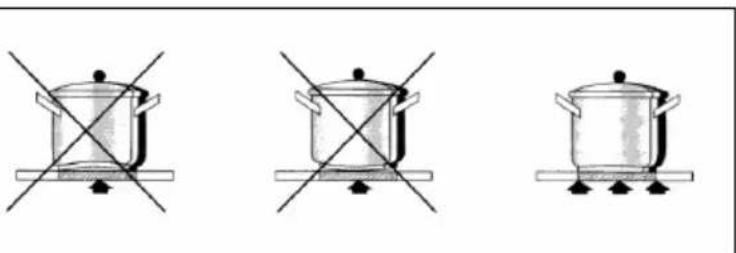
CORRECT PAN POSITIONING
OPTIONAL
A:880-2mm
B:280-2mm
C:60mmMIN
D: 30 mm MIN 40 mm MAX
E:120mmMIN

Opm.: ALLE MATERIALEN EN LIJMEN DIE VOOR DEZE KOOKPLAAT WORDEN GEBRUIKT, DIENEN BESTAND TE ZIJN TEGEN EEN TEMPERATUUR VAN min. 100^ .
AANSLUITING OP DE ELEKTRICITEIT
GOED GEPLAATSTE PAN
OPTIONAL
MANUEL D'UTILISATION
A:880-2mm
B:280-2mm
C:60mmMIN
D:30mmMIN 40mm MAX
E: 120 mm MIN
N.B. MATERIALERNE OG LIMEN, DER ER BRUGT TIL KÖKKENENHEDEN, SKAL KUNNE MODSTÄ EN TEMPERATURE PÅ MINDST 100^ .
TILSLUTNINGER TIL ELEKTRISK SYSTEM
KORREKT PANDE-/GRYDE PLACERING
TILBEHØR


PT
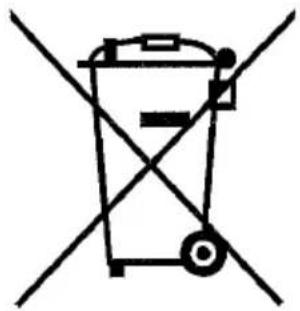
This appliance is marked according to the European Directive 2002/96/EC on Waste Electrical and Electronic Equipment (WEEE). This guideline is the frame of a Europeanwide validity of return and recycling on Waste Electrical and Electronic Equipment
IT


- Ceramic built-in hobs
- MANUAL FOR TOUCH CONTROL BLOMBERG 90 X 33 CERAMIC GLASS HOB
- WARNING
- IMPORTANT FOR INSTALLATION
- FOR COOKING
- On/off for Touch control
- Automatic switching off
- Switching a cooking zone on/off
- Switching off a cooking zone
- Switching off all cooking zones
- The power level
- The automatic heating function (by selecting)
- The afterheat indicator
- The automatic switch off function (Operating time limit)
- The lock button for this device (block)
- Safety stop
- Multiple circuit stop
- Triple circuit operation:
- The Acoustic signal (buzzer)
- The Timer function
- The Autonomous Timer
- Setting the timer for the cooking zones
- Pan recognition function (with dedicated electronics only)
- CONNECTIONS TO ELECTRICAL SYSTEM
- CORRECT PAN POSITIONING
- OPTIONAL
- AANSLUITING OP DE ELEKTRICITEIT
- GOED GEPLAATSTE PAN
- MANUEL D'UTILISATION
- TILSLUTNINGER TIL ELEKTRISK SYSTEM
- KORREKT PANDE-/GRYDE PLACERING
- TILBEHØR
- PT
- IT
Brand : BLOMBERG
Model : MKL 5460 X
Category : Cooker