CD1.2 - DJ Equipment Citronic - Free user manual and instructions
Find the device manual for free CD1.2 Citronic in PDF.

| Product type | Professional dual CD player for DJs |
| Brand | Citronic |
| Model | CD1.2 |
| Player dimensions | 482 x 88.8 x 254 mm (front face to connectors) |
| Controller dimensions | 482 x 88.8 x 70 mm (front face to feet) |
| Player weight | 5 kg |
| Controller weight | 2 kg |
| Total weight | 8.2 kg |
| Total dimensions (packaging) | 530 x 445 x 205 mm |
| Power supply | 230 V~ / 50 Hz |
| Power consumption | 35 W |
| Output level | 2 V RMS |
| Frequency response | 20 Hz - 20 kHz (± 2 dB) |
| Signal-to-noise ratio | 84 dB (HF-A) |
| Total harmonic distortion | 0.01% |
| Channel separation | 82 dB |
| Pitch adjustment range | ± 8% and ± 16% |
| Pitch accuracy | 0.1% |
| Pitch Bend | ± 16% |
| Display | LCD 10 characters |
| Main functions | Single/continuous play, frame search, +10 skip, manual BPM, Cue, Play/Pause, Stop, Time (elapsed/remaining) |
| Care and cleaning | Wipe with a slightly damp cloth (water); clean CDs with a soft, dry cloth |
| Safety | Double insulation; do not expose to moisture; disconnect before repair; maintenance by qualified technician |
| Spare parts and repairability | Original parts mandatory; repair by qualified technician |
| General information | 19" rack mounting possible; max tilt 15° |
Frequently Asked Questions - CD1.2 Citronic
User questions about CD1.2 Citronic
0 question about this device. Answer the ones you know or ask your own.
Ask a new question about this device
Download the instructions for your DJ Equipment in PDF format for free! Find your manual CD1.2 - Citronic and take your electronic device back in hand. On this page are published all the documents necessary for the use of your device. CD1.2 by Citronic.
USER MANUAL CD1.2 Citronic
To prevent fire or shock hazard, do not expose this appliance to rain or moisture.
To reduce the risk of electric shock, do not remove the cover (or back). There are no serviceable parts inside.
Always refer servicing to qualified service personnel.
Cautionary Notes:
- Handle the power supply cord carefully. Do not damage or deform the power supply cord. If it is damaged or deformed, it may cause electric shock or malfunction when used. When removing from wall outlet, be sure to remove by holding the plug attachment and not by pulling the cord.
• In order to prevent electric shock, do not open the top cover. If a problem occurs, contact your dealer. - Do not place metal objects or spill liquid inside the cd player. Electric shock or malfunction may result.
- Any use of the controls, or any adjustment, or the performance of any procedure other than those specified herein may result in hazardous radiation exposure.
- The compact disc player should not be opened or repaired by anyone except properly qualified service personnel.
- Double insulated - when servicing, use only identical replacement parts.
Important Information:
- The lightning flash with arrowhead symbol, within an equilateral triangle, is intended to alert the user to the presence of un-insulated "dangerous voltage" within the product's enclosure that may be of sufficient magnitude to constitute a risk of electric shock to persons.
- The exclamation point within an equilateral triangle is intended to alert the user to the presence of important operating and maintenance (servicing) instructions in the literature accompanying the appliance.
- This CD player uses a semiconductor-based laser. To allow you to enjoy music in a stable manner, it is recommended to operate the appliance between 41°f-95°f (5°C-35°C).
• This unit may cause interference to radio and television reception.
Caution
To prevent electric shock do not use this (polarized) plug with an extension cord, receptacle or other outlet unless the blades can be fully inserted to prevent blade exposure.
Safety Instructions
All the safety and operating instructions should be read before the appliance is operated.
- Retain Instructions - The safety and operating instructions should be retained for future reference.
- Heed Warnings - All warnings on the appliance and in the operating instructions should be adhered to.
- Follow Instructions - All operating and use instructions should be followed.
-
Water and Moisture - The appliance should not be used near water - for example, near a bathtub, washbowl, kitchen sink, laundry tub, in a wet basement, or near a swimming pool, and the like.
-
Carts and Stands - The appliance should be used only with a cart or stand that is recommended by the manufacturer. An appliance and cart combination should be moved with

care. Quick stops, excessive force, and uneven surfaces may cause the appliance and cart combination to overturn.
-
Wall or Ceiling Mounting - The appliance should be mounted to a wall or ceiling only as recommended by the manufacturer.
-
Ventilation - The appliance should be situated so that its location or position does not interfere with its proper ventilation. For example, the appliance should not be situated on a bed, sofa, rug, or similar surface that may block the ventilation openings; or, placed in a built-in installation, such as a bookcase or cabinet that may impede the flow of air through the ventilation openings.
-
Heat - The appliance should be situated away from heat sources such as radiators, heat registers, stoves, or other appliances (including amplifiers) that produce heat.
-
Power Sources - The appliance should be connected to a power supply only of the type described in the operating instructions or as marked on the appliance.
-
Grounding or Polarization - Precautions should be taken so that the grounding or polarization means of an appliance is not defeated.
-
Power - Cord Protection - Power - supply cords should be routed so that they are not likely to be walked on or pinched by items placed upon or against them, paying particular attention to the cord in correspondence of plugs, convenience receptacles, and the point where they exit from the appliance.
-
Cleaning - The appliance should be cleaned only as recommended by the manufacturer. Clean by wiping with a cloth slightly damp with water. Avoid getting water inside the appliance.
-
Disconnect power cord before servicing.
-
Replace critical components only with factory parts or recommended equivalents.
-
For AC line powered units - Before returning repaired unit to user, use an ohm - meter to measure from both AC plug blades to all exposed metallic parts. The resistance should be more than 100,000 ohms.
-
Non - use Periods - The power cord of the appliance should be unplugged from the outlet when left unused for a long period of time.
-
Object and Liquid Entry - Care should be taken so that objects do not fall and liquids are not spilled into the enclosure through openings.
-
Damage Requiring Service - The appliance should be serviced by qualified service personnel when;
- The power supply cord or the plug has been damaged; or
- Objects have fallen, or liquid has been spilled into the appliance; or
• The appliance has been exposed to rain; or
- The appliance does not appear to operate Normally or exhibits a marked change in performance; or
- The appliance has been dropped, or the enclosure damaged.
-
Servicing - The user should not attempt any service to the appliance beyond that described in the operating instructions. All other servicing should be referred to qualified service personnel.
-
Ventilation - The appliance should be situated so that the location or position does not interfere with its proper ventilation. For example, the appliance should not be situated on a bed, sofa, rug, or similar surface that may block the ventilation openings; or, placed in a built-in installation, such as a bookcase or cabinet that may impede the flow of air through the ventilation openings.
-
Cleaning - The appliance should be cleaned only as recommended by the manufacturer.
Nonuse Periods - The power cord of the appliance should be unplugged from the outlet when left unused for a long period of time.
Main Features
• Large LCD screen with wide angle view
- Pitch bend buttons
- Manual BPM button
- Pitch range: ± 16%
- Pitch display
- Selectable elapsed, remain, total remain time display
- Single / continuous play modes
- Frame search
- Fast search mode
• +10 Track skip button
Features & Functions Main Unit
text_image
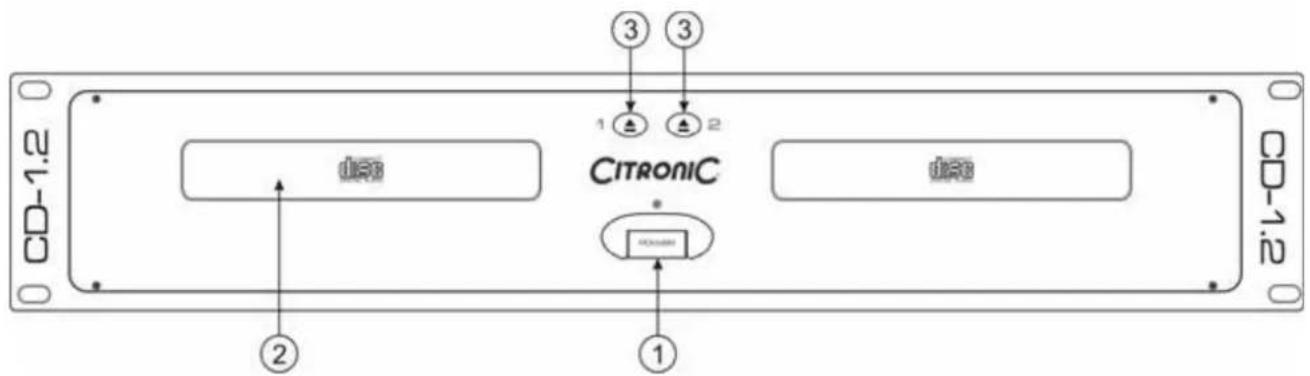
CD-1.2 ② ① ③ ③ ① ① ① ① ① ① ① ① ① ① ① ① ① ① ① ① ① ① ① ① ① ① ① ① ① ① ① ① ① ① ① ① ① ①- Power Switch
When the power switch is pressed, the power turns on.
- Disc Holder
Place the discs in the holder. Press the OPEN/CLOSE (3) button to open and close the disc holder.
- Open/Close ▲
Press it to open and close the disc holder. The control unit also includes OPEN/CLOSE button. The disc holder cannot be opened during playback, so stop playback before pressing the button.
text_image
CAUTION MAX OF ELECTRIC SWITCH DO NOT OPEN MINTENZA CHICKEN HAZARD/GO NOT OPEN ANSUROQUE DE CHOC ELECTRIQUE NE PAS OUTRUN LINE OUT CITRONIC CD-1.2 LINE OUT ⑤ ④ ⑥- AC Connection
This connection accepts a standard UK IEC connection power lead.
- Line Out L & R
The audio signals from each player are output from these jacks. Connect these to a Line or CD input of your mixer.
- Remote Control Connector
This 8-pin terminal connects to the remote control unit with the supplied cord.
Features & Functions Control Unit

text_image
CD-1.2 1 2 3 4 5 6 7 8 9 10 11 12 13 14 15 16 17 0 703:20:89 0 703:20:88 +020 +020 +020 +020 +020 +020 +020 +020 +020 +020 +020 +020 +020 +020 +020 +020 +020 +020 +020 +020 +021 +021 +021 +021 +021 +021 +021 +021 +021 +021 +021 +021 +021 +021 +021 +021 +021 +021 +021 +021 +022 +022 +022 +022 +022 +022 +022 +022 +022 +022 +022 +022 +022 +022 +022 +022 +023 +023 +023 +023 +023 +023 +023 +023 +023 +023 +023 +023 +023 +023 +023 +023 +023 +023 +023 +023 +024-
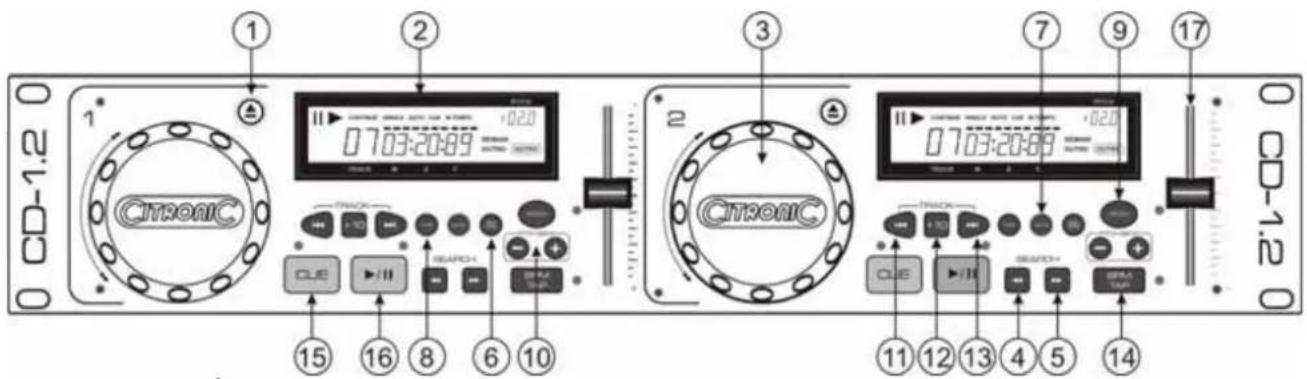
Open/Close ▲ Press it to open and close the disc holder. The main unit also includes OPEN/CLOSE buttons. The disc holder cannot be opened during playback, so stop playback before pressing the button.
-
LCD Display
-
Jog Wheel The jog wheel is multi functional. When in pause mode turning the jog wheel will search the CD frame by frame in 1 second increments. When in play mode the jog wheel can be used to pitch bend.
-
Backward Search Button Pressing this button will fast search back through the CD in 15 second increments.
-
Forward Search Button Pressing this button will fast search forward through the CD in 15 second increments.
-
SGL/Cont (Single/Continuous) Press this button to select single play mode where the CD will stop at the end of the track or continuous play where the CD will continuously play through each track in the CD. The selection is indicated on the LCD display.
-
Stop Button This button will stop the CD.
-
Time Button This button switches the time display between remaining time, elapsed playing time, and total remaining time. The Outro function is also activated using this button where the last 30 seconds only of the selected track will play.
-
Pitch On/Off Button Pressing this button switches the pitch on and off.
-
Pitch Bend Buttons Pressing these buttons will increase '+' or decrease '-' the pitch of the CD playing when the button is released the pitch returns to normal as determined by the pitch slider (16).
-
Skip Button Use this button to go back to the beginning of the current track or select a previous track for playing.
-
+10 Button Use this button to skip 10 tracks forward.
-
Skip HButton Use this button to go back to the beginning of the current track or select a previous track for playing.
-
BPM Button This button allows you to manually set the tracks BPM. To set the tracks BPM tap this button a few times to the tracks beat, the unit will translate your taps to BPM which is then displayed in the LCD (2).
-
Cue Button Pressing the CUE button during play provides a return to the position at which play was started. If PAUSE is used before CUE or a CUE POINT was set, that will become the cue point. Alternately pressing the Play button and the CUE button allows the CD to be played from the same position any number of times. The CUE Button will light up from the time the CUE button is pressed until the CD has reset to the position at which play was started. Steady lighting of this button indicates the ready condition. The CUE button can be held down to play a CD. When you release the CUE button it instantly returns to the CUE POINT.
-
Play/Pause Button Use this button to start playback. Press once to start playback, once again to set the pause mode, and once more to resume playback.
-
Pitch Slider Use the slider to adjust the CD pitch. Slide up to decrease the pitch, down to increase the pitch.
Installation Notes
The control unit and player have rack-fixing holes on the front panel to enable them to be easily fitted into a suitable case.
Mounting
The player will work normally when the main unit is mounted with the front panel at within 15 degrees of the vertical plane. If the unit is tilted excessively, discs may not be loaded or unloaded properly.
text_image
Figure 1 Max 15 degrees Main Unit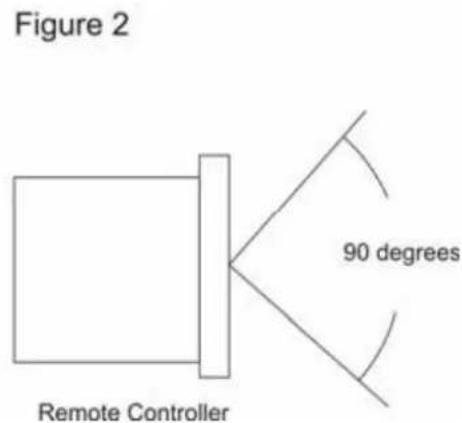
text_image
Figure 2 Remote Controller 90 degreesThe control panel's LCD's are designed to be clearly visible within the angles shown in Figure 2. Mount the control unit so that the visual angle is within this range.
Connections
- Turn off the POWER switch.
- Connect the RCA phone jack (phono) cable to the input on your mixer.
- Connect the control cords to the REMOTE connector on the main unit.
CAUTION:
- Be sure to use the supplied control cords. Using another type of cable may result in damage. Be sure the power is off when connecting the control cords. Otherwise the units may not work properly.
Opening and Closing the Disc Holder
Turn the unit power on. Press the OPEN/CLOSE button to open the disc holder. OPEN/CLOSE buttons are provided on both the main unit and control unit.
The disc holder cannot be opened during playback to prevent playback from being interrupted if the OPEN/CLOSE button is pressed accidentally. Stop the playback first, then press the OPEN/CLOSE button.
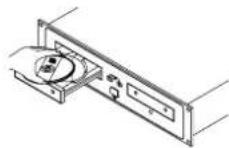
Figure 3
Loading discs
Hold the disc by the edges and place it in the disc holder, then press the OPEN/CLOSE button again to close the disc holder. The unit will show the total track number and the total playing time for about 2 seconds then enter the cue condition, the cue point will be set to the music starting point of the first track automatically.
CAUTION:
- Do not place any foreign objects in the disc holder, and do not place more than one disc in the disc holder at a time.
- Do not push the disc holder in manually when the power is off, as this may result in malfunction and damages the player.
Before You Power Off
When you have finished using the CD player, before switching off the power, be sure that the disc holder had been closed with the OPEN/CLOSE button.
CAUTION:
Do not forcibly close the disc holder when the power is off.
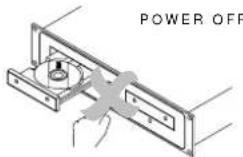
Do not switch off the power when the disc holder is open.
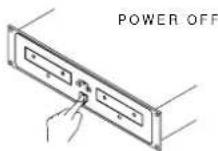
Switch off the power after the disc holder has been closed with the OPEN/CLOSE button.
Care of Compact Discs
Handling
- Do not allow fingerprints, oil or dust to get on the surface of the disc.
- If the disc is dirty, wipe it off with a soft dry cloth.
• Do not use petrol, thinner, water, record spray, electrostatic-proof chemicals, or silicone-treated cloths to clean discs. - Always handle discs carefully to prevent damaging the surface; in particular when removing a disc from its case or returning it.
- Do not bend the disc.
- Do not apply heat.
- Do not enlarge the hole in the center of the disc.
- Do not write on the label (printed side) with a hard-tipped implement such as a pencil or ball point pen.
- Condensation will form if a disc is brought into a warm area from a colder one, such as outdoors in winter. Do not attempt to dry the disc with a hair dryer, etc..
Storage
• After playing a disc, always unload it from the player.
• Always store the disc in the jewel case to protect from dirt or damage.
- Do not place discs in the following areas:
- Areas exposed to directs sunlight for a considerable time.
- Areas subject to accumulation of dust or high humidity. Areas are affected by heat from indoor heaters, etc..
Technical Specifications
Performance
Output Level : 2Vrms
Channel Balance : ±1dB
Frequency Response : ±2dB 20Hz to 20KHz
De-Emphasis : ±2dB 20Hz to 20KHz
Channel Separation : 82dB
THD-Noise : 0.01%
Pitch Slider : ±8, & ±16%
Pitch Bend : ±16%
Pitch Accuracy : 0.1%
Weights & Dimensions
Player : 482 x 88.8 x 254mm (front panel to end of Connectors)
Controller : 482 x 88.8 x 70mm (front panel to end of feet)
Player : 5 Kgs (Net)
Controller : 2 Kgs (Net)
Packed (Gross) : 8.2Kg
Packed Size : 530 x 445 x 205mm
Packed Cube : 0.048 M
Power Requirements
Power Supply : 230V AC, \~50Hz
Power Consumption : 35W
CD-1.2
DUAL CD-PLAYER
text_image
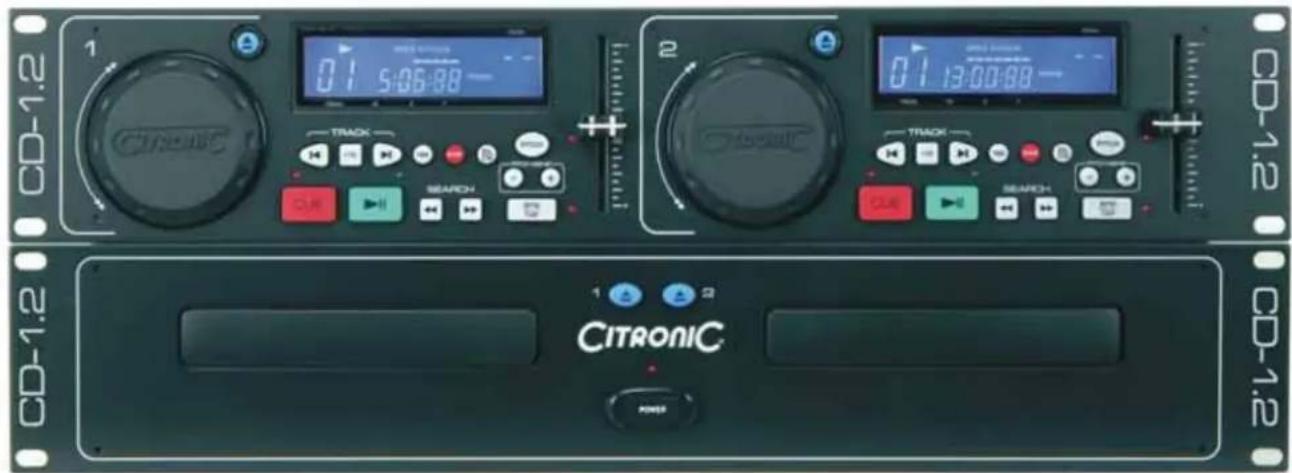
CD-1.2 1 CITRONIC 0:1 5:06:88 - Track SEARCH 2 CITRONIC 0:1 13:00:88 - TRACK SEARCH 1 2 POWER CD-1.2 CD-1.2 CD-1.2170.634 CD-1.2 DUAL CD-PLAYER
OWNERS MANUAL
Features & Functions Main Unit
text_image
CD-1.2 ② ① ③ ③ 1 2 CITRONIC ① ② CD-1.2- Aan/Uit Schakelaar
Features & Functions Control Unit
text_image
CD-1.2 1 2 3 7 9 17 0 0703:20:89 +020 0703:20:89 +020 0703:20:89 C15 16 8 6 10 C14 11 12 13 4 5 14 C13 15 C12 16 C11 17 C10 18 C9 19 C8 20 C7 21 C6 22 C5 23 C4 24 C3 25 C2 26 C1 27 C0 28 C9 29 C8 30 C7 31 C6 32 C5 33 C4 34 C3 35 C2 36 C1 37 C0 38 C9 39 C8 40 C7 41 C6 42 C5 43 C4 44 C3 45 C2 46 C1 47 C01. Open/Close ▲
text_image
CD-1.2 1 2 3 4 5 6 7 8 9 10 11 12 13 14 15 16 17 0703:20:89 +02.0 Chronic Chronic Chronic Chronic Chronic Chronic Chronic Chronic Chronic Chronic Chronic Chronic Chronic Chronic Chronic Chronic Chronic Chronic Chronic Chronic Chronic Chronic Chronic Chronic Chronic Chronic Chronic Chronic Chronic Chronic Chronic Chronic Chronic Chronic1. Open/Close ▲
natural_image
Simple line drawing of a rectangular object with a 90-degree angle label, no text or symbols present.Tænder og slukker afspilleren (on/off).
2. CD-skuffer
3. Åbne/Lukke
6. Remote Control Connector
6. SGL/Cont (Single/Continuous)
text_image
Figure 1 Max 15 degrees Main Unit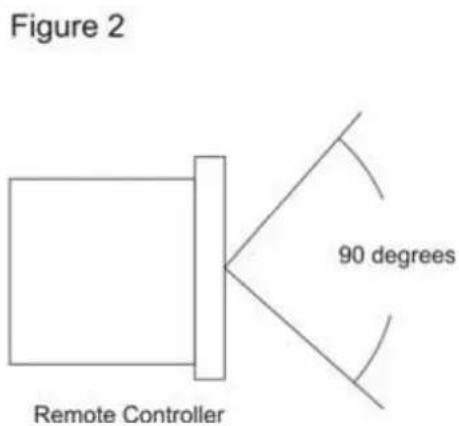
text_image
Figure 2 Remote Controller 90 degreesPitch regulering : ±8, & ±16%
Pitch Bend : ±16%
Pitch tolerance : 0.1%