WX782 - Weather Station Cresta - Free user manual and instructions
Find the device manual for free WX782 Cresta in PDF.
| Product type | Indoor/outdoor weather station |
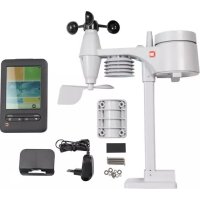
| Main unit power supply | 4 AA alkaline batteries 1.5 V or AC/DC adapter 6 V 300 mA (not included) |
| External sensor power supply | 2 AAA alkaline batteries 1.5 V |
| Number of external sensors | Up to 3 (1 included) |
| RF transmission frequency | 433 MHz |
| Maximum range (open field) | 75 m |
| Sensor transmission cycle | 60 to 75 seconds |
| Indoor temperature range | -10 °C to +60 °C (recommended: 0 °C to +50 °C) |
| Outdoor temperature range | -20 °C to +60 °C (recommended: -10 °C to +50 °C) |
| Temperature accuracy | 0.1 °C |
| Clock | Radio-controlled DCF-77, manual setting possible |
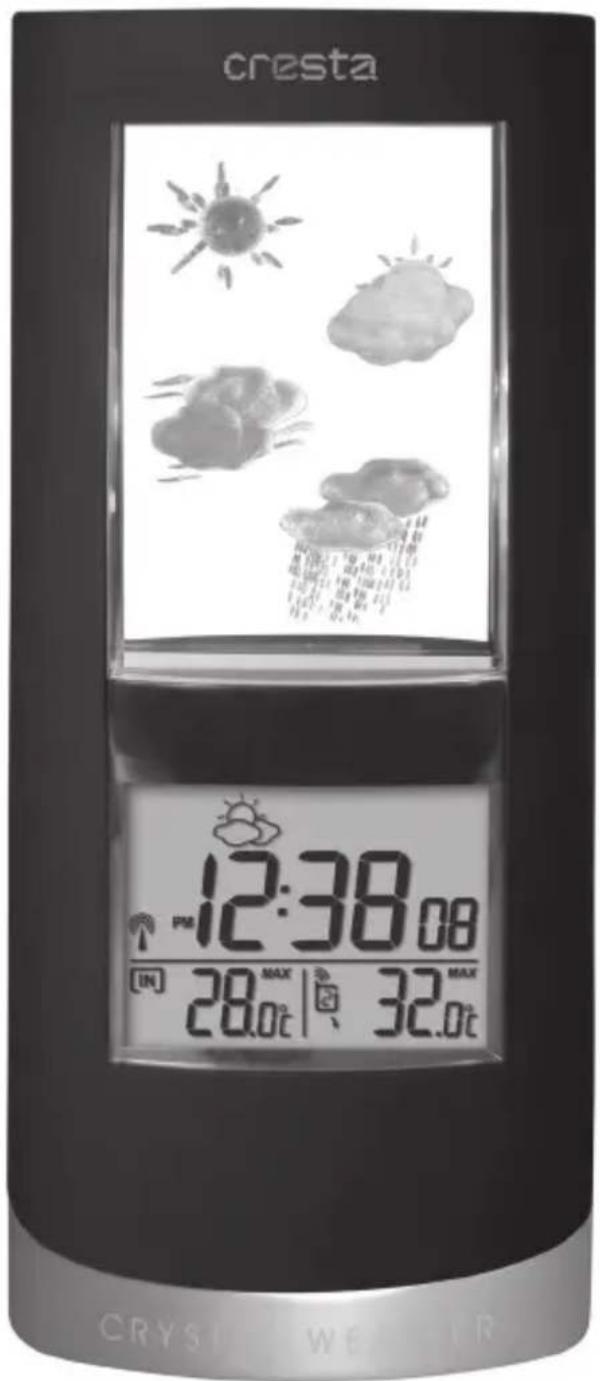
| Weather forecast | 3D icon display (sunny, partly cloudy, cloudy, rainy) with color change |
| Alarm | Daily with snooze function via IR detector |
| Backlight | Activated by IR motion sensor (< 8 cm), adjustable duration from 5 to 60 minutes |
| Display | LCD with icons, indoor/outdoor temperature, time/date, alarm, battery status |
| Auto-scroll function | Alternating display of indoor and outdoor temperatures (4 seconds) |
| Temperature memory | Records indoor/outdoor max/min temperatures, resettable |
| Available languages (abbreviated) | English, German, French, Spanish, Italian |
| Maintenance | Wipe with a soft, dry cloth; do not use abrasive products |
| Safety | Replace batteries as soon as the low battery icon appears; do not expose to water |
Frequently Asked Questions - WX782 Cresta
User questions about WX782 Cresta
0 question about this device. Answer the ones you know or ask your own.
Ask a new question about this device
Download the instructions for your Weather Station in PDF format for free! Find your manual WX782 - Cresta and take your electronic device back in hand. On this page are published all the documents necessary for the use of your device. WX782 by Cresta.
USER MANUAL WX782 Cresta
J. Indication Auto Scroll
Porte de transmission RF : maximum 75 metres
CRYSTAL WEATHER STATION WITH 433MHZ THERMO SENSOR
MODEL:WX782
INSTRUCTION
Congratulations on your purchase of this new Crystal Weather Station with 3D projection icons. This unique product is designed for everyday use for the home or office and is a definite asset of great use. To fully benefit from all the features and understand the correct operation of this product, please read this instruction manual thoroughly.
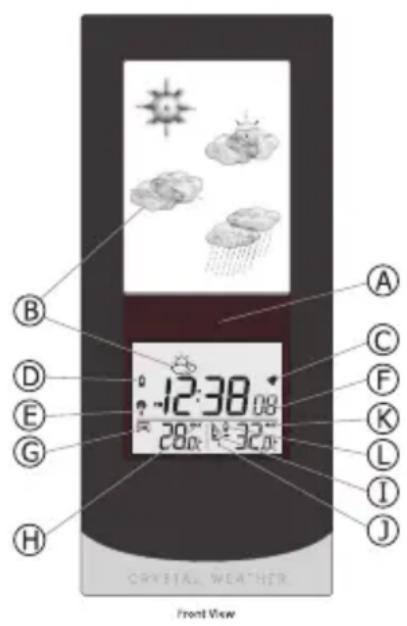
FUNCTIONS OF THE WEATHER STATION
This weather station measures the ambient temperature and atmospheric pressure for weather forecasting. Moreover, equipped with a 433MHz radio frequency (RF) interface, it can receive data from up to three remote sensors for outdoor temperature measurement within a distance of 75 meters (250 feet) in open space. The data is continuously updated and displayed on LCD display.


FEATURES: MAIN UNIT
A. IR motion sensor
It is a motion sensing device to activate the backlight or snooze function, provided that an object (e.g. human hand) gets within an 8cm distance in front of the sensor.
B. Weather forecast
The unit lights up the 3D weather icon in the crystal and displays weather icon simultaneously in the LCD to forecast the weather.
C. Alarm on icon
It is shown when the daily alarm is enabled.
D. Low battery indicator
It is to indicate the battery in the main unit is low and all displayed information in LCD is no longer reliable. The user needs to change the batteries at once
E. Radio reception signal
It is to indicate the status of DCF radio controlled time reception
F. Clock window
Display current time, calendar or alarm time
G. Indoor indicator
Indicates the indoor temperature is displayed
H. Indoor maximum/minimum indicator
Indicates the maximum/minimum indoor temperature is displayed
I. Outdoor remote sensor indicator
Indicates the current outdoor remote sensor signal received. It can display up to 3 different remote sensors which is placed in 3 different places and within 75 meter distance from the main unit.
J. Auto scroll indicator
The animated rolling arrow icon is shown to indicate the auto scroll of 3 different remote channels.
K. Outdoor maximum/minimum indicator
Indicates the maximum/minimum outdoor temperature is displayed.
L. Remote sensor battery low indicator
Appears when the batteries of the remote sensor are running dry and the temperature measured by this sensor is no longer reliable. The user must change the batteries at once.
DESCRIPTION OF BUTTONS
- [LIGHT - SNOOZE] is contactless key sensing by an IR motion sensor IR motion sensor is placed between the crystal and LCD display to detect a motion up to 8cm distance. When triggered, activate backlight for 16 seconds (24 seconds if with adaptor) or stop alarm temporarily for 5 minutes when alarm sounds;
2. [CLOCK]
-
Press once to toggle for clock, calendar & alarm display mode.
-
Press and hold 2 seconds to enter the setting of the display mode - Clock/Calendar/Alarm
3. [▲]
-
Press once to increase the setting in CLOCK,CALENDAR or ALARM setting mode or deactivate the radio controlled function in RCC radio mode
-
Press and hold 2 seconds to manually activate the radio controlled function
4. [▼]
-
Press once to decrease the setting in CLOCK,CALENDAR or ALARM setting mode
-
Press once to arm or disarm the daily alarm under alarm display mode uitlezing.
5. [CHANNEL]
-
Select among channel 1, 2, 3 or to enter auto scroll mode.
-
Press and hold 2 seconds to activate or deactivate the sensor searching mode
6. [MEMORY]
-
Toggle for max or min temperature memory reading for both IN & OUT thermometers
-
Press and hold 2s to clear individual memory when the Max or Min temperatures are displayed
7. [UNIT]
-
Toggle for setting temperature display unit ^ C or ^ F
-
Press & hold 2s to set the crystal weather icon illumination cycle
8. [RESET]
- Press once to trigger system reset and restore all setting to factory default
| Power Supply | |||
| Slide switch position | Battery Only | Battery & Adapter | Adapter only |
| Auto | Wave hand in front of the IR sensor to activate backlight for 16 seconds | Wave hand in front of the IR sensor to activate backlight for 24 seconds | |
| OFF | Disable the backlight function | ||
| Wave hand in front of the IR sensor to activate backlight for 16 seconds | Backlight always on | ||
GETTING STARTED
This Weather Station was designed for easy set up. For best operation, the following steps are required to be done in the proper sequence.
- INSERT BATTERIES FOR MAIN UNIT BEFORE DOING SO FOR THE SENSOR UNITS.
- RECEIVING UNIT CANNOT BE PROGRAMMED MANUALLY UNTIL THE WIRELESS REMOTE SENSOR UNIT REGISTRATION PROCEDURE HAS BEEN COMPLETED.
- POSITION THE REMOTE UNIT AND MAIN UNIT WITHIN EFFECTIVE TRANSMISSION RANGE, WHICH, IN USUAL CIRCUMSTANCES, IS 250 FEET.
Although the remote unit is weather resistant, it should be placed away from direct sunlight, rain or snow.
BATTERY INSTALLATION FOR MAIN UNIT
- Turn the metal nut anti-clockwise on the bottom of the unit to open and release the battery compartment;
- Insert 4 AA size 1.5V alkaline battery as indicate by the polarity;
- Push the battery compartment back, turn the metal nut clockwise to lock; Note: Replace the batteries when the low battery indicator appears on the top-right corner of the LCD.
WIRELESS REMOTE SENSOR REGISTRATION PROCEDURE
- Insert x4 AA batteries first to the main unit, the temperature display shows - - . - While the wave icon will keep blinking for 2 minutes indicate unit is in sensor searching mode.
- In a second step, insert the x2 AAA batteries for the sensor unit. The LED on the front panel will start flashing at a rate of one time per around 2 seconds indicates channel-1 is in use.
- While the LED is flashing, press once the [CH] key will change the sensor channel setting to 2. Keep toggle on [CH] key can change channel setting up to 5. The LED is blinking at a frequency to indicate the channel setting. i.e. continuous blinks 2 times indicate channel-2 is selected.
Note: If user does not press any key for 10 seconds, it will exit the channel setting mode and transmit the RF signal. The main unit will register the temperature reading.
(If the transmitter has the LCD display, the C/F key will toggle the
temperature unit on the LCD.) As the channel 4 & 5 are reserved for other models, please never set the remote sensor to channel 4 & 5.
REMOTE CHANNEL AUTO-SCROLLING
This device is equipped with an auto-Scroll function. While the auto-Scroll function is set, the unit will automatically cycle to display the temperature of each remote sensor for 4 seconds.
- To retrieve manually the specific sensor temperature reading, press CHANNEL key until desired channel number is displayed.
- To enable autoScroll function, use CHANNEL button to select channel 1, 2, ... until auto scroll icon appears.
DCF-77 RADIO CONTROLLED CLOCK
The radio-controlled time is calculated by the Cesium Atomic clock of Braunschweig (official clock of Germany). Then the time is coded and transmitted from Mainflingen - near Frankfurt - via a signal on DCF -77 (77.5 kHz). The transmitting range of the signal is 1500km , which means that most of Western and Central Europe is covered by this signal. Within this range the received time is completely accurate. Once sensor signal(s) are received, the wave icon will flash to indicate that the receiving unit starts to receive the DCF radio controlled time signal.
Radio Controlled wave icon can indicate 4 levels of signal status:


Once the time signal is received, the wave icon will stay on the LCD, and time and calendar will automatically be updated.
Note: During 10 minutes of time signal reception, all manual settings will be suspended. If setting is desired, the user can press [▲] key once to abort the reception.
SET THE CLOCK,CALENDAR & LANGUAGE
- Press & hold [CLOCK] button for 2 seconds to enter clock setting mode. Flashing 24 hours will appear.
- Press [▲] or [▼] button to switch between 12Hr/24Hr time format, and then press [CLOCK] button to confirm.
- The hour digits will flash. Use the [▲] button to increase by one hour or [▼] button to decrease by one hour to your desired hours. Holding down either button will change the increment unit rapidly. Press [CLOCK] button to confirm.
- The minute digits will flash. Use the [▲] button or [▼] button to set your desired minutes. Holding down either button will change the increment unit rapidly. Press [CLOCK] button to confirm.
Note: Every change of minute digit will automatically reset the seconds to zero.
- The year digit will flash and 'Y' icon appears. Press [▲] or [▼] button to set your desired year. Press [CLOCK] button to confirm.
Note: Year range is from 2000 to 2099.
- 'D' and 'M' icons will flash. Press [▲] or [▼] to select D M (Date Month) or M D (Month Date) format. Press [CLOCK] button to confirm.
GB
- 'Month' digits will flash. Press [▲] or [▼] button to set your desired month. Press [CLOCK] button to confirm. Do the same to set Date.
Note: The weekday will be automatically calculated and displayed for the date set above.
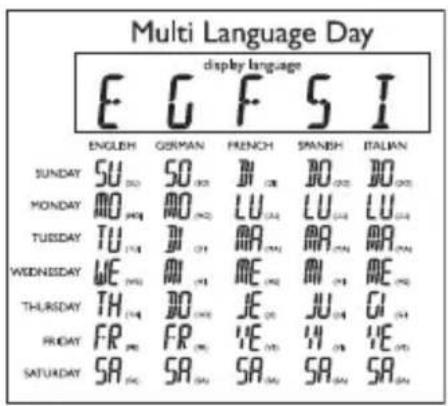
- 'E' digit will flash. Press [▲] or [▼] button to switch 5 languages display of weekday (English/German/French/Spanish/Italian. See table 1). Press [CLOCK] button to confirm.
- 'ON' digit will flash. Press [▲] or [▼] button to set the RCC on or off. Press [CLOCK] button to confirm.
Note: The RCC is default set to on.
Table 1
Note: If there is no key pressed in setting mode for 10 seconds, it will automatically save the set value and exit to normal display.
To set daily alarm
- In clock time display mode, press [CLOCK] button third to switch to display alarm time.
- Press and hold [CLOCK] button for 2 seconds to enter alarm setting mode.
- The hour digits will flash, use [▲] button to increase by one hour or [▼] button to decrease by one hour to your desired hours. Holding down the button will change the increment unit rapidly. Press [CLOCK] button to confirm.
- The minute digits will flash. Use [▲] button to increase by one minute on [▼] button to decrease by one minute to your desired minutes. Holding down the button will change the increment unit rapidly. Press [CLOCK] button to confirm and finish the setting.
CRYSTAL WEATHER ICON ILLUMINATION CYCLE
- Press and hold [UNIT] for 2 seconds, the digits of the illumination cycle for the crystal weather icon start to flash.
- Press [▲] or [▼] button to select the duration: 5 minutes, 10 minutes, 20 minutes, 30 minutes and 60 minutes.
- 'ON' digit will flash. Press [▲] or [▼] button to set the crystal weather icon illumination cycle on or off. Press [UNIT] button to confirm and finish the setting. Longer illumination cycle will save more battery power and have a longer battery lifetime.
Specifications
Main Unit
Displayed IN temperature range: -10°C to +60.0°C (14°F to 140.0°F)
Proposed operating range: 0^ to +50.0^ (32.0°F to 122.0°F)
Temperature resolution : 0.1^ (0.2^)
Remote Temperature measurement
Displayed OUT temperature range: -20.0°C to +60.0°C (-4.0°F to 140.0°F)
Temperature resolution : 0.1^ (0.2^)
Batteries : Use 4 pieces UM- 3 AA size 1.5V alkaline
battery
Remote Unit
Displayed range : -20.0°C to +60.0°C (-4.0°F to 140.0°F)
Proposed operating range : -10.0°C to +50.0°C (14.0°F to 122.0°F)
Temperature resolution : 0.1^ (0.2^)
RF Transmission Frequency : 433 MHz
RF Transmission Range : Maximum 75 meters
Temperature sensing cycle : 60 - 75 seconds
Batteries : Use 2 pieces UM-4 AAA size 1.5V alkaline
battery