VX 250 - Iron Turmix - Free user manual and instructions
Find the device manual for free VX 250 Turmix in PDF.
| Product Type | Steam generator iron |
| Brand | Turmix |
| Model | VX 250 |
| Power supply | 230 V ~ |
| Plug type | Grounded plug |
| Water tank | Removable, capacity not specified (fill with cold tap water) |
| Anti-scale cassette | EMC system (Electronic Mineral Control), monthly replacement in average use |
| Thermostat adjustment | 3 positions: • (synthetics), •• (silk/wool), ••• (cotton/linen) |
| Steam control | Variable mode, Eco mode, Maxi/Turbo steam mode |
| Vertical steaming | Yes, for hanging garments and curtains |
| Iron rest plate | Removable, with gray silicone strips |
| Auto-stop function | Automatic shut-off after 20 minutes of inactivity or if trigger not pressed |
| Light indicators | Lights: power on (green), steam generator (yellow), cassette change (flashing), auto-stop (red) |
| Sound signal | Emitted when the device is ready to produce steam |
| Allowed water type | Tap water, distilled water for irons, or mixture |
| Soleplate care | Clean after each use with a damp cloth; do not use abrasive products |
| Warranty | 2 years (product), 10 years against limescale (EMC system) |
| Accessories | Spare anti-scale cassette (art. no. 60453) |
| Storage | Horizontal, temperature >5°C, out of reach of children |
Frequently Asked Questions - VX 250 Turmix
User questions about VX 250 Turmix
0 question about this device. Answer the ones you know or ask your own.
Ask a new question about this device
Download the instructions for your Iron in PDF format for free! Find your manual VX 250 - Turmix and take your electronic device back in hand. On this page are published all the documents necessary for the use of your device. VX 250 by Turmix.
USER MANUAL VX 250 Turmix
FR Chers clients, chers clients.
3.13 Plaque repose-fer

22 23

1
Thank you very much for having decided to buy a TURMIX product. Since 1933, we have been working with only one objective: that you should have fun working with your appliance. Our philosophy is based on four words: Durable, uncomplicated, fascinating, reliable. This means that we place a lot of value on quality, ergonomics, simplicity and service repairs, to be able to offer you the best products and services. We wish you great pleasure with your TURMIX product.

Table of Contents
| 1 Making the Appliance Operational the First Time | 1.1 Description of Parts 46 | |
| 1.2 Brief Instructions 48 | ||
| 2. Important safety notes 492 Safety | ||
| 3 Commissioning | 3.1 Making the Appliance Operational the First Time 50 | |
| 3.2 Installing 50 | ||
| 3.3 Inserting an anti-scale cartridge 50 | ||
| 3.4 Filling/refilling the water tank | ||
| 50 | ||
| 3.5 Types of water | 51 | |
| 3.6 Setting the thermostat 51 | ||
| 3.7 Connecting | 52 | |
| 3.8 Switching on and heating-up | ||
| phase | 52 | |
| 3.9 Variable steam control knob 53 | ||
| 3.10 Generating steam/Steam | ||
| trIGGER | 53 | |
| 3.11 Noises | 54 | |
| 3.12 Vertical ironing | 54 | |
| 3.13 Detachable ironing rest | 54 | |
| 3.14 Auto-Stop function | 55 | |
| 3.15 After Ironing | 55 | |
| 3.16 Maintenance and Care 55 | ||
| 3.17 EMC Electronic Mineral | ||
| Control/Anti-scale cartridge 56 | ||
| 4.1 Disposal | 564 | |
| 5.1 Faults | 575 | |
| 6 Annexe | 6.1 Fault Analysis | 59 |
| 6.2 Warranty 60 | ||
| 6.3 Accessories | 61 | |

46
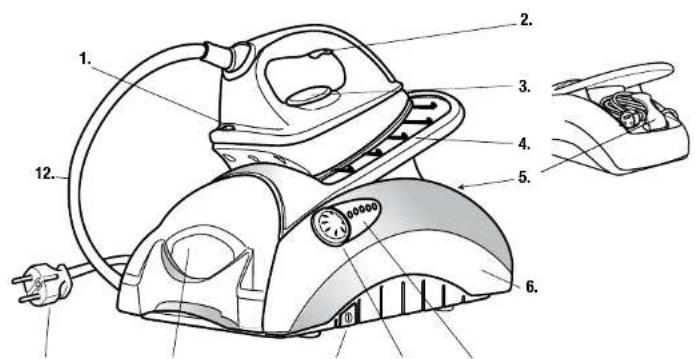
Control panel VX 250

1.1 Description of Parts
Overview of the Operation and 1 Iron temperature indicator lamp
Appliance Parts 2 Steam trigger
3 Thermostat regulator for regulating the iron temperature
4 Detachable ironing rest
5 Cord clip
6 Steam generator housing
7 Control panel
8 Variable steam control knob
9. On/Off switch
10 Removable water tank
11 Mains cable/plug
12 Steam hose between Iron and
generator
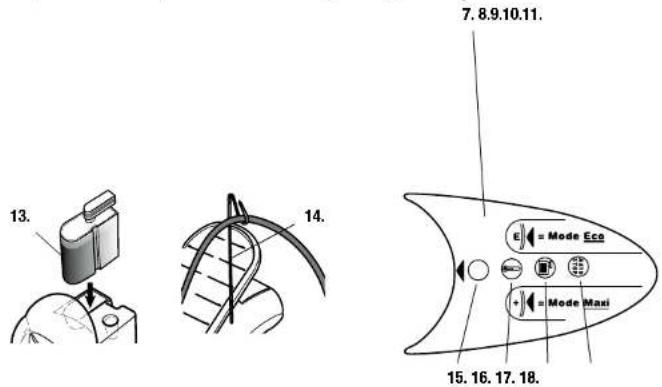
13 Anti-scale cartridge
14 Hose cable
Operating panel 15 Power on light
16 Steam generator Indicator lamp
17 Indicator lamp for replacing the
anti-scale cartridge
18 Indicator lamp for the Auto-Stop
Function

48
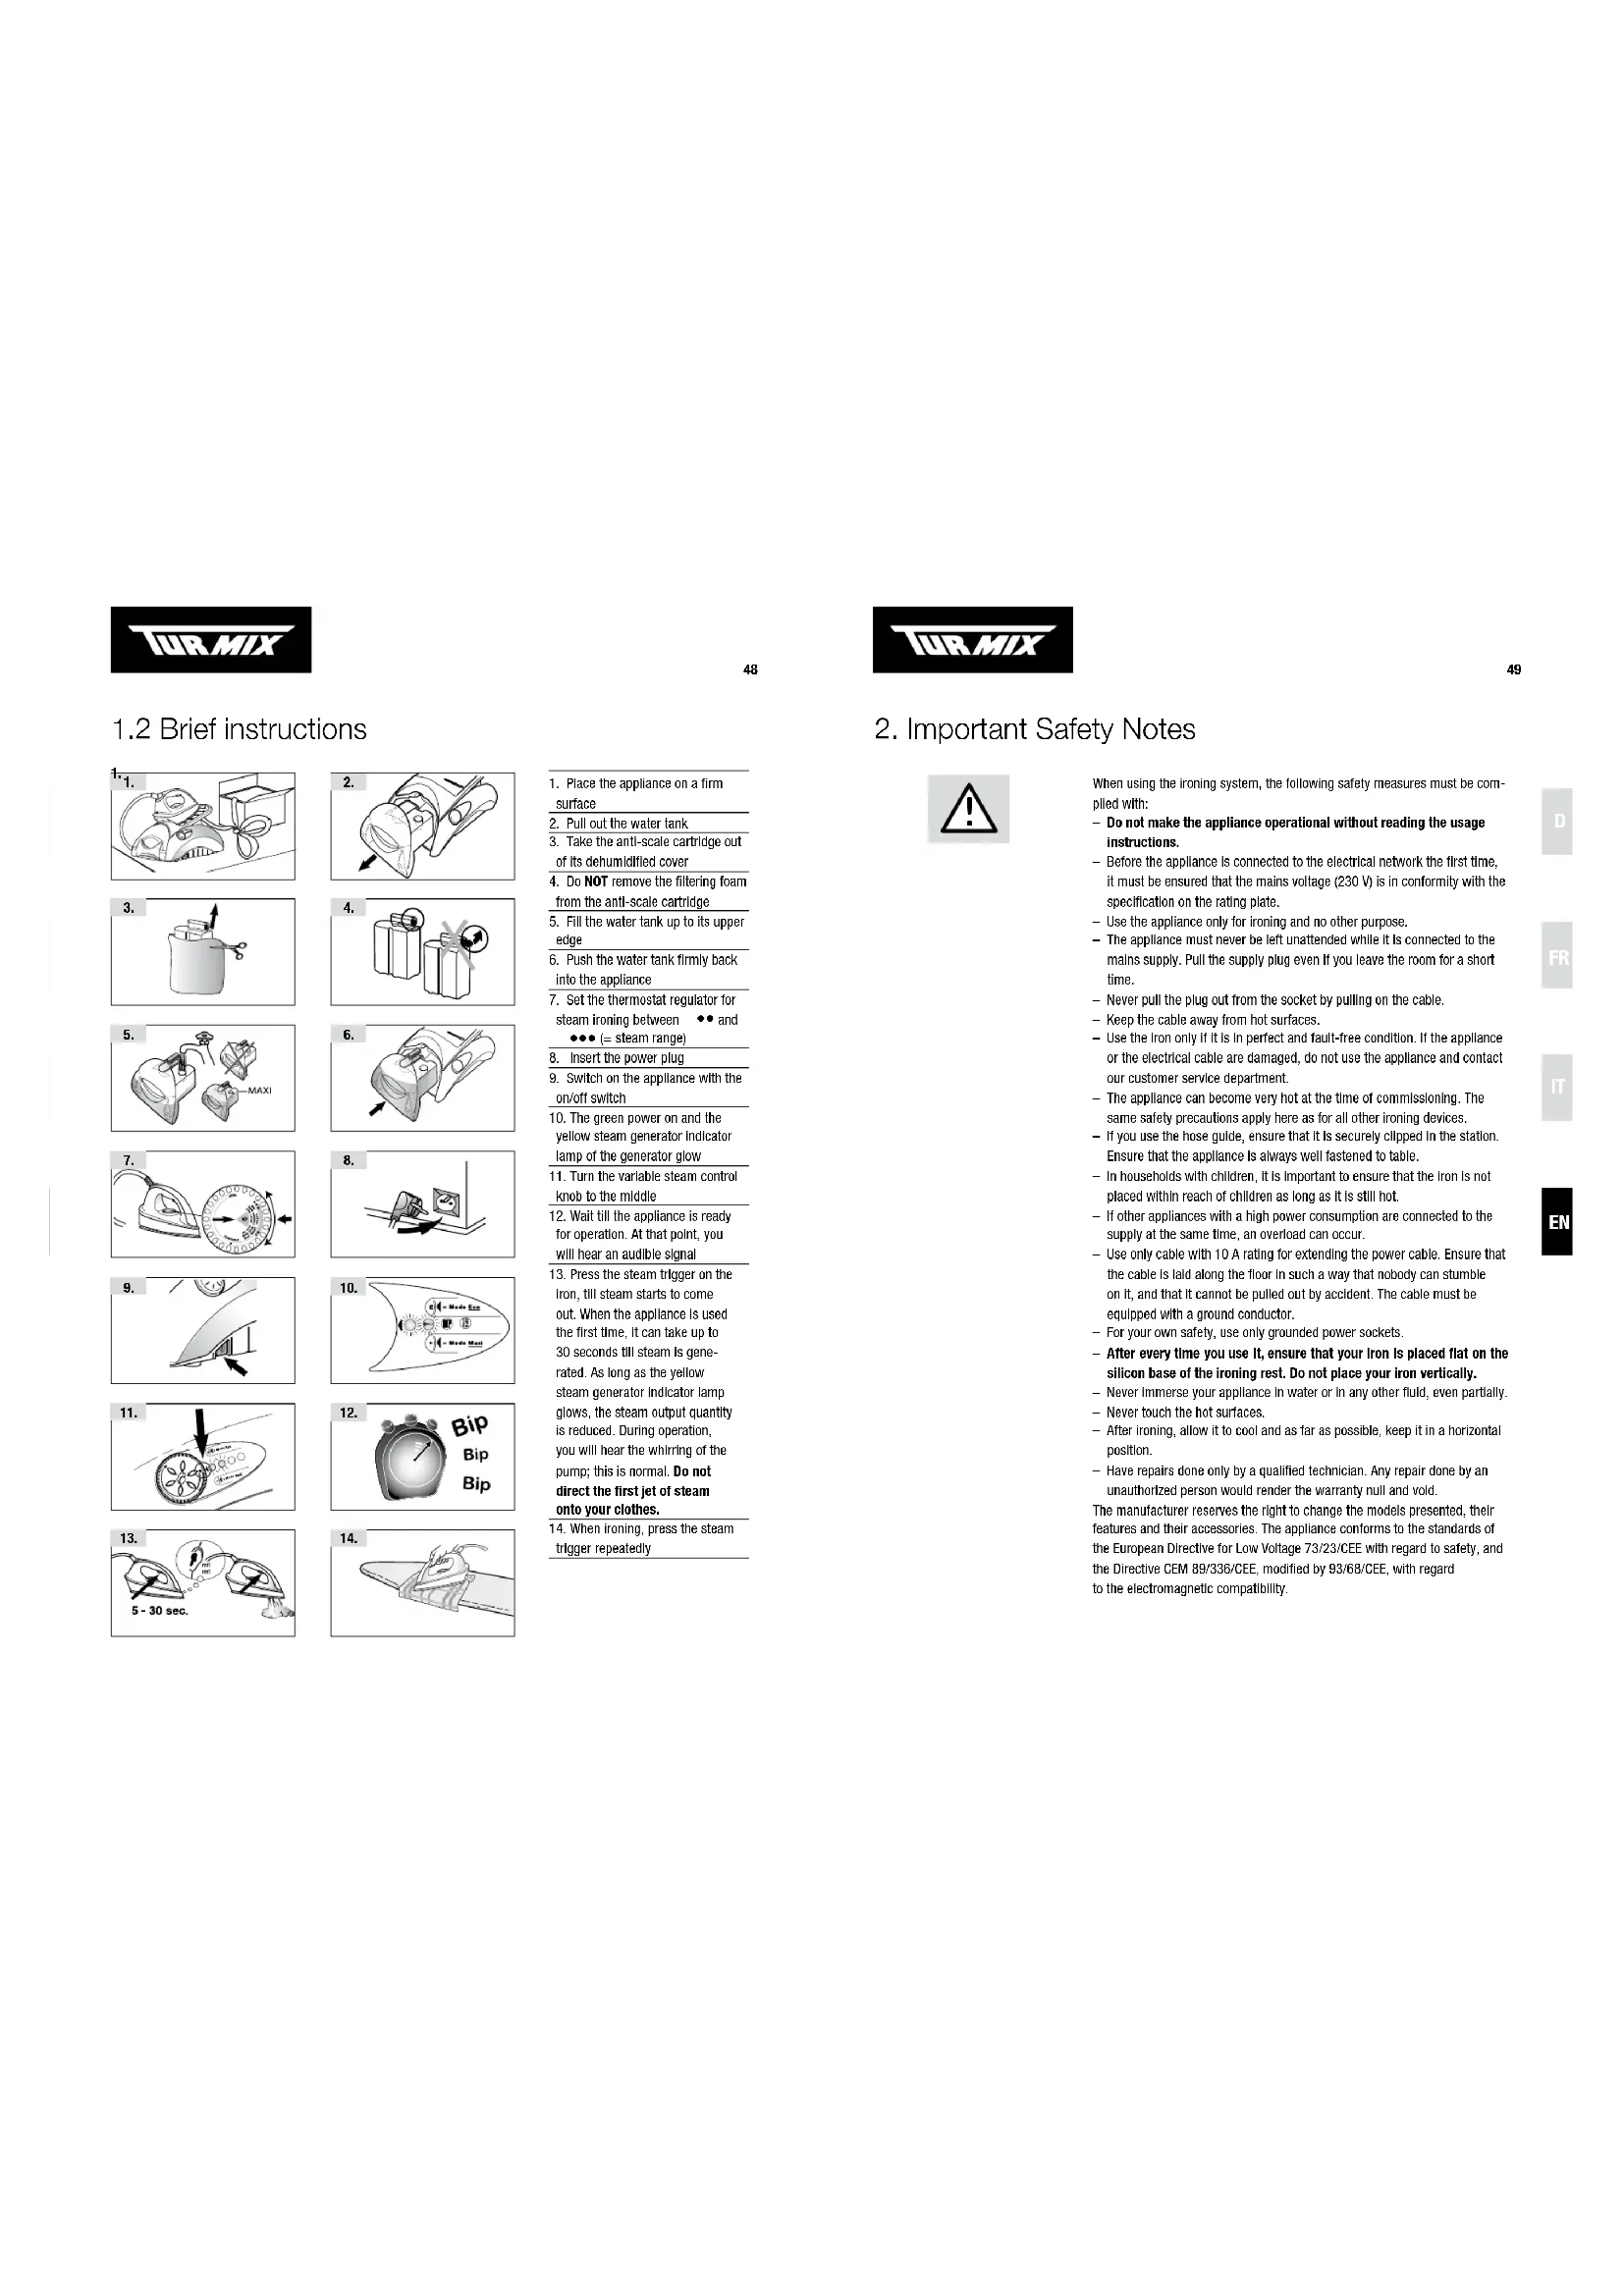
1.2 Brief instructions


- Place the appliance on a firm surface
2.Pull out the water tank - Take the anti-scale cartridge out of its dehumidified cover
- Do NOT remove the filtering foam from the anti-scale cartridge
- Fill the water tank up to its upper edge
- Push the water tank firmly back into the appliance
- Set the thermostat regulator for steam Ironing between . . . and
{steam range}
- Insert the power plug
- Switch on the appliance with the on/off switch
- The green power on and the yellow steam generator indicator lamp of the generator glow
- Tum the variable steam control knob to the middle
- Wait till the appliance is ready for operation. At that point, you will hear an audible signal
- Press the steam trigger on the iron, till steam starts to come out. When the appliance is used the first time, it can take up to 30 seconds till steam is generated. As long as the yellow steam generator indicator lamp glows, the steam output quantity is reduced. During operation, you will hear the whirring of the pump; this is normal. Do not direct the first jet of steam onto your clothes.
- When ironing, press the steam trigger repeatedly

49
2. Important Safety Notes

When using the ironing system, the following safety measures must be complied with:
- Do not make the appliance operational without reading the usage instructions.
Before the appliance is connected to the electrical network the first time, it must be ensured that the mains voltage (230V) is in conformity with the specification on the rating plate.
- Use the appliance only for Ironing and no other purpose.
- The appliance must never be left unattended while it is connected to the mains supply. Pull the supply plug even if you leave the room for a short time.
- Never pull the plug out from the socket by pulling on the cable.
- Keep the cable away from hot surfaces.
- Use the iron only if it is in perfect and fault-free condition. If the appliance or the electrical cable are damaged, do not use the appliance and contact our customer service department.
- The appliance can become very hot at the time of commissioning. The same safety precautions apply here as for all other irning devices.
- If you use the hose guide, ensure that it is securely clipped in the station. Ensure that the appliance is always well fastened to table.
- In households with children, it is important to ensure that the iron is not placed within reach of children as long as it is still hot.
- If other appliances with a high power consumption are connected to the supply at the same time, an overload can occur.
- Use only cable with 10 A rating for extending the power cable. Ensure that the cable is laid along the floor in such a way that nobody can stumble on it, and that it cannot be pulled out by accident. The cable must be equipped with a ground conductor.
For your own safety, use only grounded power sockets.
- After every time you use it, ensure that your iron is placed flat on the silicon base of the ironing rest. Do not place your iron vertically.
- Never immerse your appliance in water or in any other fluid, even partially.
- Never touch the hot surfaces.
After Ironing, allow it to cool and aa far as possible, keep it in a horizontal position.
- Have repairs done only by a qualified technician. Any repair done by an unauthorized person would render the warranty null and void.
The manufacturer reserves the right to change the models presented, their features and their accessories. The appliance conforms to the standards of the European Directive for Low Voltage 73/23/CEE with regard to safety, and the Directive CEM 89/336/CEE, modified by 93/68/CEE, with regard to the electromagnetic compatibility.

50
3. Commissioning
3.1 Making the Appliance Operational the First Time
3.2.Installation

1

2
Before you make the appliance operational the first time, please read the operating manual completely.
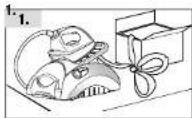
Place the appliance for ironing on a firm and stable surface 1, 2, so that adequate air circulation below the appliance is possible.
Ironing board pads with a wooden surface should be protected with an oil cloth 2 or similar material to protect it from moisture.
3.3 Inserting anti-scale cartridges

3

4
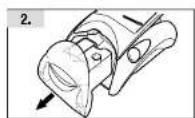
Pull out the water tank 3.
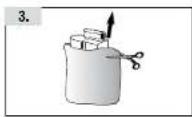
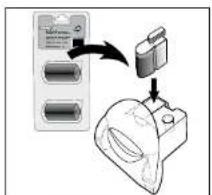
Remove the anti-scale cartridge from its anti-moisture protective covering 4 and insert it in the opening of the water tank provided 5. The anti-scale cartridge must be inserted well in the water tank, so that steam can be generated. Do not remove the filtering foam 6.

5

6

Caution! Do not remove the filtering foam and insert the anti-scale cartridge completely!
3.4 Filling/refilling the water tank

7

8
Fill the water tank with tap water up to its upper edge 7. Push the water tank firmly back into the appliance (locks in place) 8.

Caution! Never fill hot water! Do not add any other agents (ironing aids, perfume, etc.)
The water tank can be removed and refilled while ironing.
When the tank has been removed, do NOT press the steam trigger.

51
3.5 Types of water
You can use: tap water, distilled water for irons, or a mixture of the two. Do not use: Rain water, condensed water from the washing machine dryers, defrosted water form the refrigerator or water from any evaporator appliance, water from decalcifying plants and other decalcifying devices that work with regenerating salts (incompatibility with the EMC system; also see page 56). Durability of the anti-scale cartridge: The anti-scale cartridge must be changed approximately monthly with an average ironing time of about 2-3 hours per week. Depending on the quantity of lime present in the tap water and for an ironing time of 2 to 3 hours per week, it may be more economical to use commercial distilled water. In this case, the anti-scale cartridge lasts 1 to 2 years (depending on the ironing time and steam quantity).
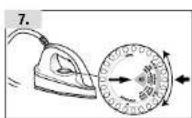
3.6 Setting the thermostat
9
Adjust the thermostat of the Iron according to the fabric. For steam ironing, a setting between and on the scale must be selected 9.

Caution! For using steam, always set the thermostat between and
We recommend sorting the clothes in the order indicated by the manufacturer on the iron's thermostat dial and starting with the lowest temperature.
| THERMOSTAT TYPE OF CLOTH STEAM | ||
| • | Synthetic fibres: Acetates - Polyacrylcs - Polyamides | Dry |
| •• | Natural animal fibres: Silk - Wool Light steam | |
| ••• | Natural plant fibres: Cotton - Linon Heavy steam | |


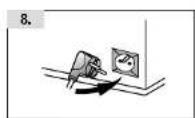
3.7 Connecting

10
Connect the mains cable to a grounded mains socket 10.

Caution! Electrical energy can be fatal! In an emergency, immediately pull the plug from the socket. Never allow live parts to come in contact with water!
3.8 Switching On and Heating Up Phase
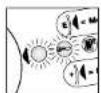
11 12
Press the on/off switch 11.
The green power on lamp and the yellow steam generator Indicator lamp of the generator will glow 12.

1314
Tum the variable steam control knob to the middle 13.
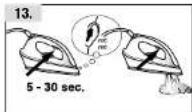
Wait till the appliance is ready for operation (when it is ready, an audio signal is sounded) 14.
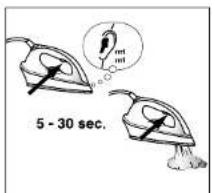
15
Lift the Iron and hold it in the air and press the steam trigger till steam starts to come out. When the appliance is used for the first time, this takes up to 30 seconds 15.
As long as the yellow steam generator indicator lamp glows 12 (about 2 min.), the steam output quantity remains at a reduced level. When the indicator lamp goes off, it automatically increases.

During ironing, the yellow steam generation indicator lamp and the red heating-up lamp of the iron go on and off regularly. This indicates that the generator and iron are getting heated. This is a normal feature.
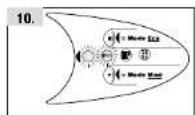
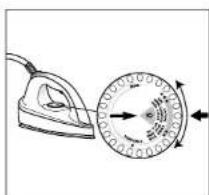
3.9 Variable steam control knob

16

17

18
The flow control knob can be used to adjust the quantity of steam continuously depending on the material (also see the table on page 9).
Continuous variable steam output 16:
Adjust the flow control knob to suit the type of material being ironed, to the desired position. The table on page 9 shows typical applications. The more you rotate the knob clockwise ^+ ", the greater does the quantity of steam output become.
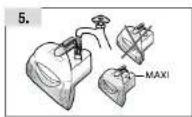
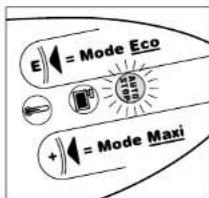
"E" = Eco-Mode 17 (only model VX 250):
This setting is recommended for quick ironing jobs that need less steam (for example, when you want to straighten out a slightly creased blouse early in the morning).
"Maxi"-Modus / Turbo steam ≈ 18 (only model VX 250):
In this position, lots of steam comes out of the base of the iron for a few seconds (= "Turbo-stam"); thereafter, the steam output quantity is reduced back to the normal level.
Wait for a few seconds before you repeat this turbo-effect, since otherwise, water can come out of the base (the steam has to get heated up again first).
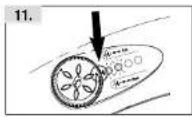
3.10 Generating steam/Steam trigger Press the steam trigger to get steam 19.
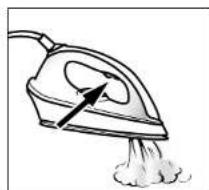
19
Here are a few valuable tips for using the appliance:
10 Gowing to the high steam output, press the steam trigger only briefly only once. Brief and repeated pressing of the steam trigger is enough to continuously get an adequate quantity of steam (pressing it for too long can result in water being ejected).
2 When use is Intensive, steam can come out even after releasing the steam trigger. Therefore, the residual steam can condense on the ironing rest and water residue is left behind. This is normal. Sponge it off if necessary. There is no risk of the metal being damaged.
- Turn the flow control knob to the middle 17:
the appliance is used for the first time.
If the water tank is empty,
every time the anti-scale cartridge is replaced.

Caution! If there is no more water in the tank do not press the steam trigger any more!


3.11 Noises

20
In order to ensure a uniform steam output, your steam generator is fitted with a pump. This becomes noticeable as soon as you press the steam trigger of the iron 20.
Under certain conditions, it is louder, for example
- when the appliance is used for the first time
the water tank is empty
every time the anti-scale cartridge is replaced.
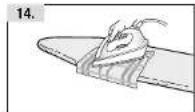
3.12 Vertical ironing
21
Your Iron can also be held vertically to steam clothing on hangers or curtains in situ etc. In this manner, you can also iron or freshen festons, trousers etc. The results vary according to the type of fabric:
For vertical ironing, move the iron from the top to the bottom and briefly press the steam trigger several times.
Tip: Hand the feston or trousers on a hanger for more convenient ironing.
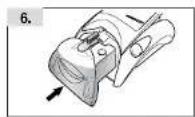
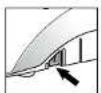
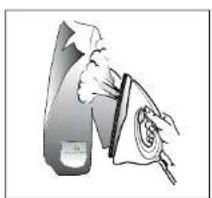
3.13 Detachable ironing rest

22 23
1
The ironing rest can be removed. It can thus be used as an ironing rest on the ironing table, for example, for pressing shirts.
Simply pull the ironing rest upwards and backwards to release it from the steam generator 22. Caution: The ironing rest is wet during and after use! Place the Ironing rest on the Ironing table and put the Iron on the grey silicon stripe of the ironing rest. Ensure firm seating of the ironing rest!
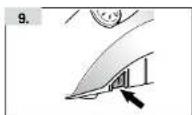
Put the ironing rest back on the steam generator:
Push the Ironing rest carefully on the runners completely back into the housing 23. Ensure firm seating of the ironing rest, so that the iron cannot fall down.

Caution! Wear gloves when removing or replacing the ironing rest when the appliance is hot!
3.14 Auto-Stop function
24
The Auto-Stop function switches off the electrical supply to the appliance automatically if
- for a period of about 20 minutes the Iron has not been moved or
- the steam trigger has not been pressed for a long time.
The red "AUTO-STOP"-indicator lamp glows as soon as the function is active 24.
Upon pressing the steam trigger, this indicator lamp goes off and the appliance starts to heat up again. As soon as the appliance is ready for operation, an audio signal is sounded.
3.15 After Ironing

25

26
After the ironing, switch off the station with the on/off switch 25. The green power on and the yellow steam generator light go off. Pull the mains supply plug and let the station cool completely.
Store the cord under the cord clip 26.
Tidy up the station without emptying the tank.

Caution! Store the appliance flat, since otherwise, water can run out! Do not store the appliance at temperatures below 5^ and keep it out of reach of children!
3.16 Maintenance and Care
27
Detergent residues, or the aporets of the fabrics and materials can stick to the iron soleplate, so that it will not slide smoothly over the materials any more.
Thestore, after ironing, runs off the iron with a non-fibrous cloth. Treat stubborn stains and deposits with an iron cleaning pencil. Do not use alkali-containing products (for example oven cleaners) like scouring powders, strong cleaners, or stool wool.

56
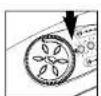
3.17 EMC Electronic Mineral Control
The electronic EMC system checks the condition of the anti-scale cartridge. It continuously measures the mineral element components of the filtered water. If the cartridge is used up, the EMC system interrupts the steam ejection and this avoids any calcification.
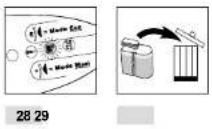
As soon as the cartridge starts to lose its efficacy, the indicator lamp starts flashing. The cartridge must now be replaced as soon as possible 28.
If the anti-scale cartridge is not replaced, the EMC system interrupts the exit of steam to protect the station from calcification damage.
A warning signal is sounded upon pressing the steam trigger. For emergencies, the station can be run for a short time with distilled water.
After replacing the anti-scale cartridge (also see Page 50), the appliance must be switched off and on again. Dispense of the old anti-scale cartridge with the household trash 29.
As soon as the appliance is ready for operation, an audio signal is sounded. Press the steam trigger till steam is ejected. The water circuit of the station is now filled once more and Ironing can be continued.
You can order replacement anti-scale cartridges from your dealer under item number 60453 (double pack with 2 anti-scale cartridges) 30.


After inserting the anti-scale cartridge, the pump can sound louder than usual. This is normal, since there is still air in the water circuit!
4. Disposal
5.1 Disposal
Out-of-commission appliances should be deposited with a sales outlet for free, technically correct disposal. Dispos of appliances with dangerous faults immediately and ensure that they cannot be used any more. Do not dispose of the appliance with the household trash (protection of the environment!)

57
5. Faults
| FAULT'S POSSIBLE CAUSES | SUGGESTED SOLUTIONS | |
| -Indicator lamps do not glow -The appliance does not become hot | -Plug is not firmly inserted in the power socket -Apppliance not connected to the mains supply or on/off switch not pressed -Other causes* | -Check the plug connection and the power supply -Insert the plug and press the on/off switch |
| -The iron does not become hot | -Thermostat is set to 'mini' -Other causes* | -Set the thermostat to the desired temperature |
| -No steam is generated -Appliance not ready | -No water in the tank -Water tank not inserted correctly -No anti-scale cartridge in the water tank -The indicator lamp flashes -Other causes* | -As soon as the appliance is ready for operation again, an audio signal sounds -When making the appliance operational, press the steam trigger till steam comes out the first time -The anti-scale cartridge is new. The water is first absorbed by the granulate before it is then carried on further to the steam generator -Fill up the water tank -Push the water tank firmly into the station -Insert the anti-scale cartridge in the water tank -Replace anti-scale cartridge |
| -Steam and water comes out of the base | -Iron is not hot enough -Intensive generation of steam -Condensate water in the connecting pipe -Other causes* | -Set the thermostat between ** and *** and wait till the yellow steam generator indicator lamp goes off -Press the steam trigger several times |
| -The appliance makes an unusual, loud noise | -Condensate water in the connecting pipe -No water in the tank -Water tank not fastened correctly -Other causes* | -Press the steam trigger several times -Fill up the water tank -Push the water tank firmly into the station |
| -Indicator lamp glows "Hot" -Auto-Stop after 20 minutes of non-use | -Pressure the steam trigger. The indicator lamp goes off and the appliance starts to heat up again. Wait till the warning signal sounds | |
| -Indicator lamp glows "Anti-scale" scale cartridge used up -Replace anti-scale | scale cartridge. Switch the appli- ance off and on again. Wait till an audio signal sounds and then press the steam trigger, till steam starts to come out | |
喜 Please contact your dealer or our customer service department


Our TURMIX electrical household appliances earn a warranty of 2 years from the date of purchase. We undertake to replace, restore to cost, any parts of the appliances that get damaged as a consequence of material or manufacturing defects during the warranty period. Return shipments should be packed in the original packing or something equivalent. In case of improper handling or in case repairs are attempted by third parties, the warranty is rendered null and void. Damage from hydro-chemical Intuitions (e.g., owing to calcitrification) as well as parts that are subjected to normal wear, do not fall under the warranty. Moreover, damage or malfunction faults that are a consequence of order from suffering plants are excised from the warranty.
Please preserve your receipt carefully, it serves as the warranty certificate as well.
Moreover, all appliances that are equipped with an BMP Electronic Mineral Control carry a ten-year warranty against sealing damage.
SERVICE CENTER
Grindelsstrasse 3-5, 8303 Bassersdorf, Switzerland
Tel. +41 (0)43 266 16 26, Fax +41 (0)43 266 16 27
info@sckt.ch www.turnix.ch
SERVICE CENTER
These anti-scale cartridges were developed and filed for TURMA steam generators. In combination with the EMC system, they effectively avoid the need for large scale operation. Your steam generator will be grateful to you.