
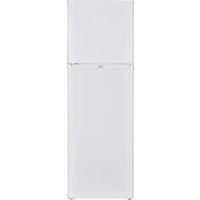
BFZ34 - Refrigerator PROLINE - Free user manual and instructions
Find the device manual for free BFZ34 PROLINE in PDF.
| Product Type | Freezer |
| Brand | Proline |
| Model | BFZ34 |
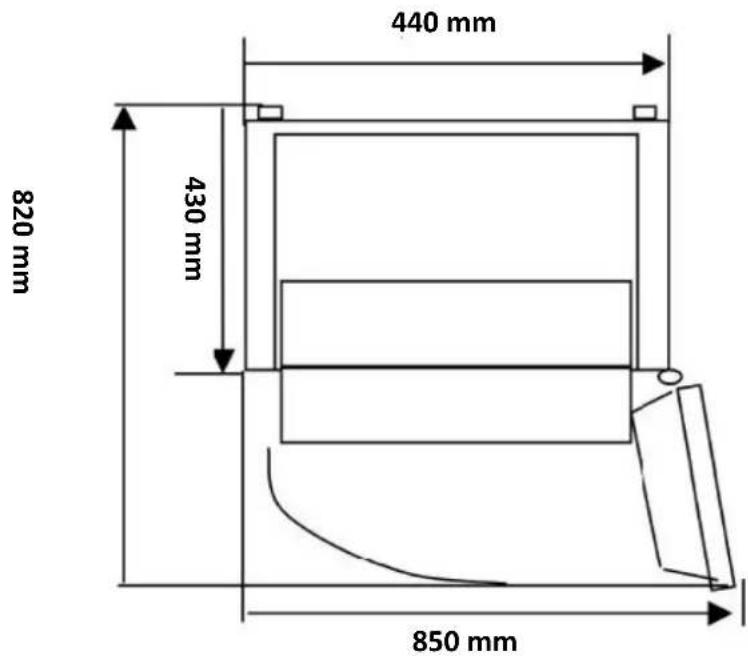
| Dimensions (W x D x H) | 440 x 490 x 510 mm |
| Net Weight | 16 kg |
| Power Supply | 220-240 V ~ 50 Hz |
| Energy Consumption | 146 kWh/year |
| Energy Class | A+ |
| Freezer Capacity | 34 L |
| Freezing Capacity | 2.0 kg/24h |
| Autonomy in Case of Power Failure | 15 hours |
| Refrigerant | R600a (21 g) |
| Climate Class | N (16°C to 32°C) |
| Star Rating | 4 stars |
| Noise Level | 42 dB |
| Defrosting | Manual |
| Reversible Door | Yes |
| Ice Cube Making | Yes (tray not supplied) |
| Adjustable Feet | Yes |
| Safety | Earthing mandatory, child lock (lock disengaged) |
| Recommended Cleaning | Soft cloth, warm water and mild detergent |
| Ambient Operating Temperature | 16°C to 32°C |
| Repairability | Spare parts available via after-sales service |
Frequently Asked Questions - BFZ34 PROLINE
User questions about BFZ34 PROLINE
0 question about this device. Answer the ones you know or ask your own.
Ask a new question about this device
Download the instructions for your Refrigerator in PDF format for free! Find your manual BFZ34 - PROLINE and take your electronic device back in hand. On this page are published all the documents necessary for the use of your device. BFZ34 by PROLINE.
USER MANUAL BFZ34 PROLINE
Emballages possibles:
Darty Plc © UK: EC1N 6TE 11 / 11 / 2013
Table of Contents
WARNING 2
IMPORTANT SAFETY INSTRUCTIONS 4
NAMES OF PARTS 5
BEFORE INSTALLING THE FREEZER 5
INSTALLATION 6
AMBIENT TEMPERATURE 6
BEFORE PLACING FOOD IN THE FREEZER. 6
POWER FAILURE 7
TEMPERATURE CONTROL. 7
MOVING YOUR APPLIANCE 7
FREEZING AND STORING FOOD 7
MAKING ICE CUBES 9
DEFROSTING 9
DOOR CONVERSION 10
TIPS FOR SAVING ENERGY 10
OPERATINGNOISES 11
CLEANING AND MAINTENANCE 11
TROUBLESHOOTING 11
SPECIFICATIONS 11
WARNING
This appliance is intended for domestic household use only and should not be used for any other purpose or in any other application, such as for non-domestic use or in a commercial environment.
If the supply cord is damaged, it must be replaced by the manufacturer, its service agent or similarly qualified persons in order to avoid a hazard.
This appliance can be used by children aged from 8 years and above and persons with reduced physical, sensory or mental capabilities or lack of experience and knowledge if they have been given supervision or instruction concerning use of the appliance in a safe way and understand the hazards involved. Children shall not play with the appliance. Cleaning and user maintenance shall not be made by children without supervision.
For the details concerning the method of cleaning, please see section "Cleaning and maintenance" on page11.
The appliance shall not be exposed to rain.
WARNING: Keep ventilation openings, in the appliance enclosure or in the built-in structure, clear of obstruction.
WARNING: Do not use mechanical devices or other means to accelerate the defrosting process, other than those
recommended by the manufacturer.
WARNING: Do not damage the refrigerant circuit.
WARNING: Do not use electrical appliances inside the food storage compartments of the appliance, unless they are of the type recommended by the manufacturer.
Do not store explosive substances such as aerosol cans with a flammable propellant in this appliance.
WARNING: For making ice (ice cubes), use potable water only.
CAUTION: The cooling system is under high pressure. Do not touch it. Contact qualified maintenance services before disposal.
INSTALLATION: DO NOT INSTALL THIS APPLIANCE IN AREAS THAT ARE TOO HUMID OR TOO COLD, SUCH AS THE OUTBUILDINGS, GARAGES OR WINE CELLARS.
Never freeze defrosted food except if they have been cooked before, in order to eliminate harmful bacteria. Never refreeze seafood that has been defrosted.
For disposal of the appliance:
To prevent possible harm to the environment or human health from uncontrolled waste disposal, recycle it responsibly to promote the sustainable reuse of material resources. And the disposal should only be done through public collection points.
For installation, servicing:
Appliance should be placed on a horizontal floor and keep the ventilation freely. Don't try to replace or repair any components by yourself, ask the service agency for help if necessary.
For handling:
Always handle the appliance to avoid any damage.
IMPORTANT SAFETY INSTRUCTIONS
- If you are discarding an old freezer with a lock / catch fitted to the door, ensure that it is left in a disabled condition to prevent the entrapment of young children when playing.
- Unplug the appliance from the mains socket when not in operation and before cleaning. Remove food before cleaning the appliance.
- Do not insert oversized food as this could cause incorrect operation.
- Extreme caution must be used when moving the appliance.
- Do not give children ice-cream and water ices direct from the freezer as the low temperature may cause 'freeze burns' on the lips.
- Do not use pointed or sharp-edged tools to remove frost or layers or ice. Use a plastic scraper.
- Do not stand or support yourself on the base or doors, etc.
Dispose of your old appliance
Refrigerators contain refrigerant and gases in the insulation.
Refrigerant and blowing gases must be disposed of professionally. Ensure that tubing of the refrigerant circuit is not damaged prior to proper disposal.
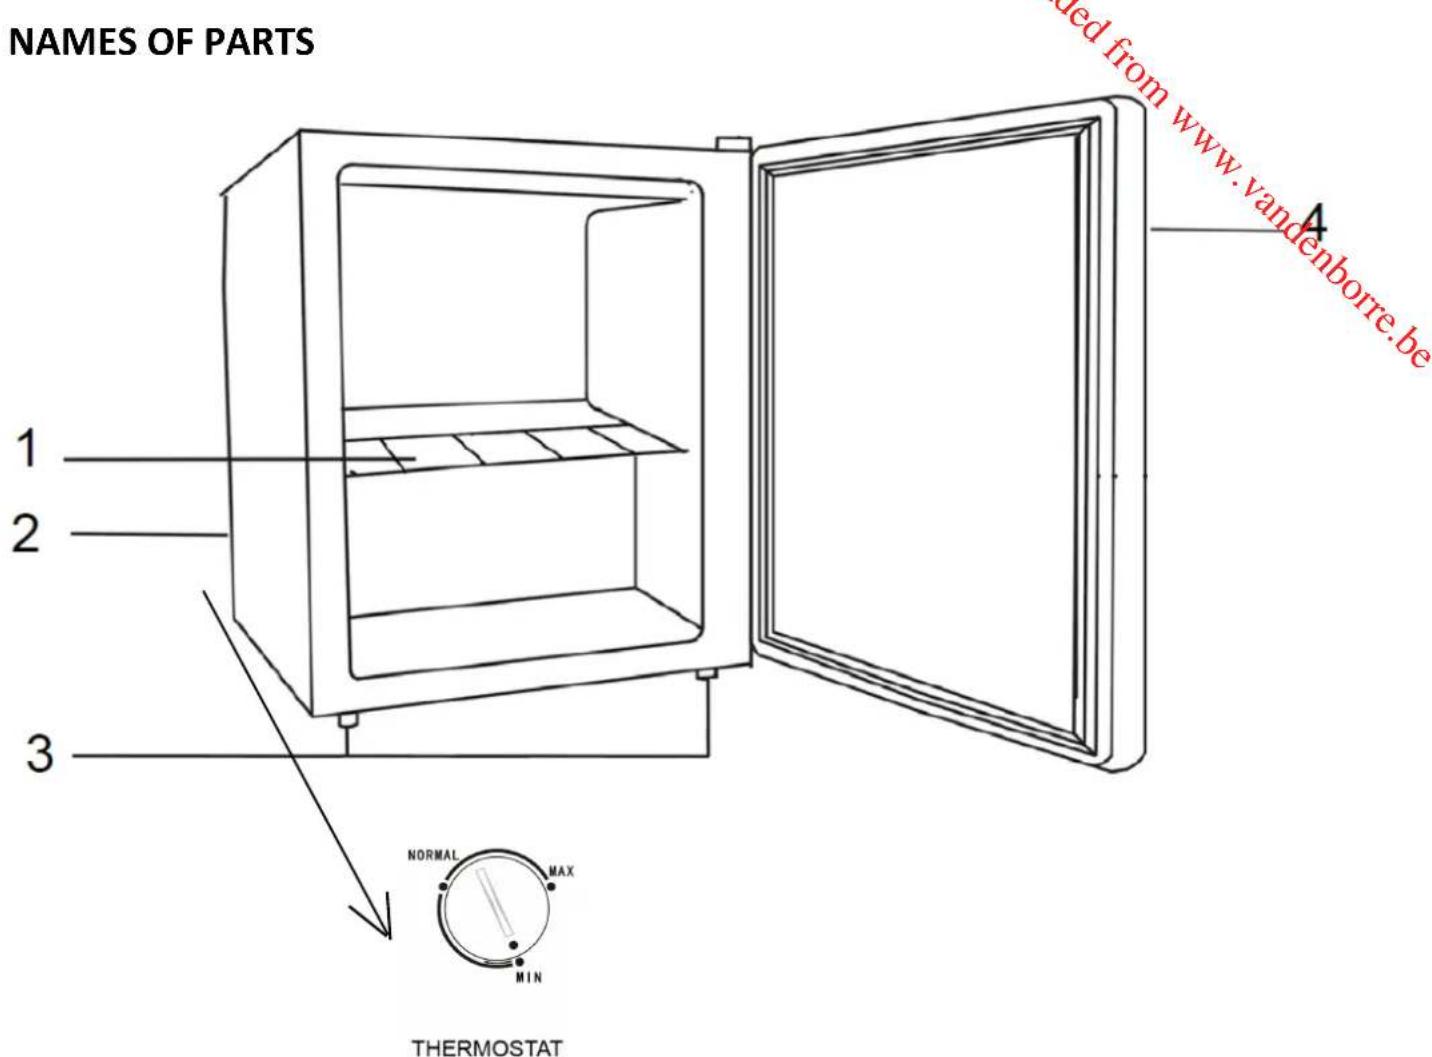
- Shelf
- Temperature control knob (back of the freezer)
- Levelling feet
- Freezer door
BEFORE INSTALLING THE FREEZER
Before connecting your freezer to the power supply, check that the voltage stated on the rating label of your appliance corresponds to the voltage in your home.
Ensure that the plug remains accessible after installation.
The appliance must be grounded. The manufacturer is not responsible for damages that may occur as a result of usage without grounding.
INSTALLATION
Install the appliance in a dry, well ventilated room. The installation location should neither be exposed to direct sunlight nor near a heat source, e.g. a cooker, radiator, etc.
To ensure adequate ventilation for the appliance, allow a minimum of 10cm of airspace on each side of the cabinet.
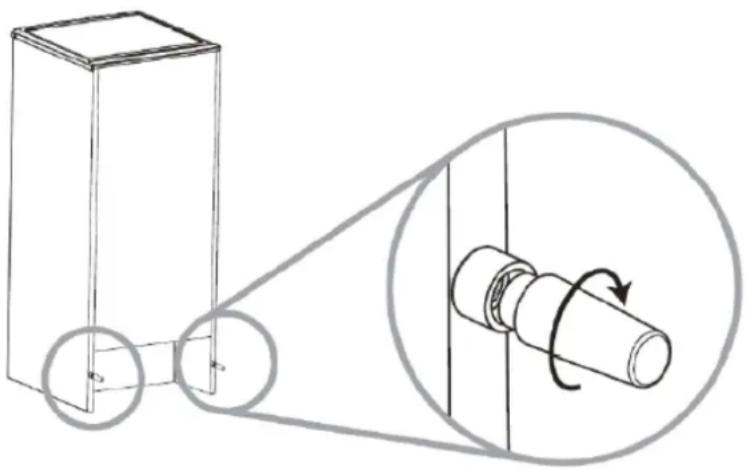
For uneven surfaces, front feet can be aligned.
Additional spacers for better performance
There are 2 additional spacers supplied. It is recommended to install these 2 spacers to your freezer as per the diagram below.
Note: The fitting of these spaces is not essential but will ensure that there is sufficient space for air circulation and better cooling performance.
AMBIENT TEMPERATURE
This appliance is designed to operate in ambient temperature between 16^ and 32^ . If these temperatures are exceeded, i.e. colder or warmer, the appliance will not operate correctly. If the ambient temperatures are exceeded for long periods, the temperature in the freezer will rise above -18^ and food spoilage may occur.
- Remove all packaging.
- Allow the appliance to run empty for 2 - 3 hours so the compartment can cool to the appropriate temperature.
- Clean the inside of the appliance with warm water and a little liquid detergent to remove manufacturing and transportation dust.
POWER FAILURE
If there is a power failure, do not open the door. Frozen food should not be affected if the power failure lasts for less than 15 hours.
Do not refreeze frozen foods that have thawed completely. The food may be dangerous to eat
TEMPERATURE CONTROL
The freezer is controlled with a temperature control knob located at the back of the appliance. Adjust the control knob as desired to suit your individual preference.
MIN is off setting
NORMAL is warmest setting
MAX is coldest setting
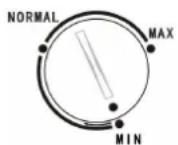
THERMOSTAT
In the off position (MIN) the appliance does not operate (the cooling system is switched off), but power supply is not interrupted.
The running time and temperature are affected by where the freezer is located, how often the door is opened and the temperature of the room the freezer is located in.
When you use the appliance for the first time or after defrosting, adjust the control knob to the coldest setting for at least 2 hours before introducing food to be stored, and then readjust to the middle setting.
MOVING YOUR APPLIANCE
If the appliance is turned off for any reason, wait for 10 minutes before turning it back on. This will allow the refrigeration system pressures to equalise before restarting.
- Turn off the appliance and unplug it from the mains socket. Remove all food.
- Relocate and install. If the appliance has been left on its side for any length of time, leave it standing upright for at least 10 minutes before turning on.
Your appliance uses isobutane (R600a) as a refrigerant. Although R600a is an environmentally friendly and natural gas, it is explosive. Therefore you should be careful during shipment and installation to prevent your appliance's cooler elements from being damaged. In the event of a leak caused by damage to the cooler elements, move your freezer from open flame or heat sources and ventilate the room where the appliance is located for a few minutes.
FREEZING AND STORING FOOD
- To store deep-frozen food.
- To make ice cubes.
To freeze food.
Note: Ensure that the freezer door has been closed properly.
Purchasing frozen food
- Packaging must not be damaged.
- Use by the 'use by /best before/best by/ date.
- If possible, transport deep-frozen food in an insulated bag and place quickly in the freezer.
Storing frozen food
Store at -18°C or colder. Avoid opening the freezer door unnecessarily.
Freezing fresh food
Freeze fresh and undamaged food only.
To retain the best possible nutritional value, flavour and colour, vegetables should be blanched before freezing.
Aubergines, peppers, zucchini and asparagus do not require blanching.
Note: Keep food to be frozen away from food which is already frozen.
- The following foods are suitable for freezing:
Cakes and pastries, fish and seafood, meat, game, poultry, vegetables, fruit, herbs, eggs without shells, dairy products such as cheese and butter, ready meals and leftovers such as soups, stews, cooked meat and fish, potato dishes, soufflés and desserts.
The following foods are not suitable for freezing:
Types of vegetables, which are usually consumed raw, such as lettuce or radishes, eggs in shells, grapes, whole apples, pears and peaches, hard-boiled eggs, yoghurt, soured milk, sour cream, and mayonnaise.
Packing frozen food
To prevent food from losing its flavour or drying out, place food in airtight packaging.
- Place food in packaging.
- Remove air.
- Seal the wrapping.
- Label packaging with contents and dates of freezing.
Suitable packaging:
Plastic film, tubular film made of polyethylene, aluminium foil.
These products are available from specialist outlets.
Recommended storage times of frozen food in the freezer
These times vary depending on the type of food. The food that you freeze can be preserved from 1 to 12 months (minimum at -18^ ).
| Food | Storage time |
| Bacon, casseroles, milk | 1 month |
| Bread, ice cream, sausages, pies, prepared shellfish, oily fish | 2 months |
| Non-oily fish, shellfish, pizza, scones and muffins | 3 months |
| Ham, cakes, biscuits, beef and lamb chops, poultry pieces | 4 months |
| Butter, vegetables (blanched), eggs whole and yolks, cooked crayfish, minced meat (raw), pork (raw) | 6 months |
| Fruit (dry or in syrup), egg whites, beef (raw), whole chicken, lamb (raw), fruit cakes | 12 months |
Never forget:
- When you freeze fresh foods with a 'use by /best before/best by/ date, you must freeze them before this date expires.
- Check that the food was not already frozen. Indeed, frozen food that has thawed completely must not be refrozen.
Once defrosted, food should be consumed quickly.
MAKING ICE CUBES
Fill the ice cube tray (not supplied) with 34 full of drinking water and place in the freezer. If the ice cube tray is stuck to the compartment, loosen with a blunt tool only. To loosen the ice cubes, twist the ice cube tray slightly or hold briefly under flowing water.
DEFROSTING
The freezer does not defrost automatically, otherwise the frozen food would start thawing. A layer of frost in the compartment impairs refrigeration of the frozen food and increases power consumption. Remove the layer of hoarfrost regularly.

Do not scrape off hoarfrost or ice with a knife or pointed object. Doing this may damage the
refrigerant tubes.
- Remove the frozen food and place temporarily in a cool location.
- Set the temperature control knob to the off position (MIN) and disconnect the mains plug from the mains socket.
- To accelerate the defrosting process, place a pan of hot water on a stand in the freezer.
- Wipe up condensation with a cloth or sponge.
- Wipe dry the compartment.
- Plug in the appliance and adjust the temperature control knob as desired.
- Put the frozen food back in the freezer.
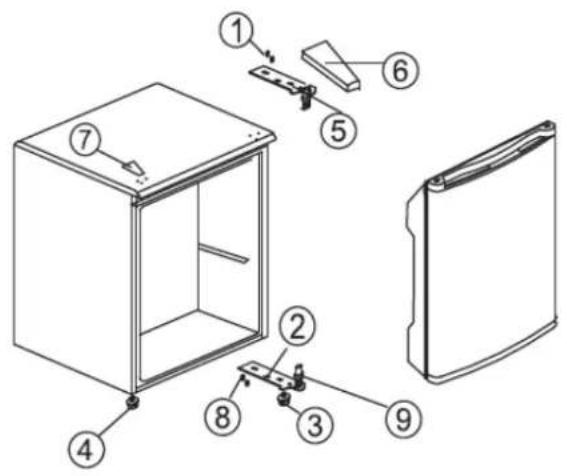
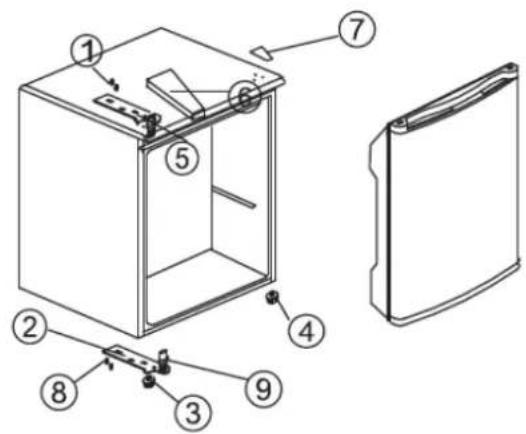
DOOR CONVERSION
If you need to hinge your door on the opposite side it is recommended that you call your local authorised service agent to make this conversion or ask a technician.
Before you reverse the door, you should ensure the appliance is unplugged and empty. It is recommended to use a crosshead screwdriver and a spanner (both not supplied).
-
Remove the upper hinge cover (6).
-
Remove the screws (1) that hold the upper hinge (5) (right side) to the frame. Remove the upper hinge.
-
Lift the door off the appliance and place it on a padded surface to prevent it from being scratched.
-
Remove the screws (8) that hold the lower hinge (2) and remove the lower hinge.
-
Remove the left front foot (4) and transfer it to the right side.
-
Before fitting the lower hinge (2), remove the hinge pin (9) and then reverse the direction of the lower hinge (2).
-
Fit the lower hinge on the left side of the lower frame with screws (8).
-
Insert the hinge pin (9) to the lower hinge (2).
-
Fit the door onto the lower hinge.
-
While holding the door in the closed position, secure the upper hinge (5) in the top frame of left side with screws (1).
-
Make sure the door is properly aligned on the appliance before tightening the screws.
-
Fit the upper hinge cover (6) on the upper hinge.
TIPS FOR SAVING ENERGY
For the most energy efficient use of your appliance:
- Ensure your freezer has adequate ventilation as recommended in the installation instructions.
- Allow warm food and drinks to cool down before placing in the appliance.
- Keep door openings to a minimum.
- Open the appliance as briefly as possible.
- Regularly defrost the freezer compartment to remove the layer of frost.
- Ensure that the freezer door is always closed properly.
OPERATING NOISES
Normal noises
- Motors are running.
- Refrigerant is flowing through the tubing.
CLEANING AND MAINTENANCE

Do not use abrasive cleaning agents or solvents.
- Set the temperature control knob to the off position (MIN) and disconnect the mains plug from the mains socket.
- Take out the food and store in a cool location.
- Clean the appliance with a soft cloth, warm water and detergent.
- Wipe the door seal with clear water only and then wipe dry thoroughly.
- After cleaning reconnect and adjust the temperature control knob as desired.
- Put the food back into the appliance.
TROUBLESHOOTING
If there is a problem with your appliance, please check the following points before contacting customer service.
| Problem | Possible causes | Possible solution |
| Appliance does not operate. | No electricity at power outlet. | Check that the plug is correctly connected and power switched on. |
| Noises | Cabinet not stable or level. Freezer is defrosting. | See installation section. |
| Appliance not cool | Temperature setting not correct. Frequent door openings. Large amount of food recently added. | See temperature control section. Minimise door openings to allow temperatures to stabilise. |
SPECIFICATIONS
| Brand | Proline |
| Appliance type | Freezer Type I |
| Star rating | *** |
| Climate class + Ambient range | N (+16°C ~ +32°C) |
| Electric shock protection class | I |
| Rated voltage and frequency | 220-240V~ 50Hz |
| Input power | 80W |
| Energy consumption | 0.400 kWh/24h |
| Refrigerant/Amount | R600a / 21g |
| Rated current | 0.50A |
| Freezer storage volume | 34L |
| Total gross volume | 35L |
| Freezing capacity | 2 kg/24h |
| Net weight | 16kg |
| Insulation blowing gas | Cyclopentane |
| Product dimension (W x D x H mm) | 440x490x510 |
| Energy class (1) | A+ |
| Power consumption (2) | 146 kWh/annum |
| Noise | 42dB |
| Power failure safe storage time | 15 hours |
| (1) Energy class: A+++......D (A+++=economical D=less economical) | |
| (2) The real power consumption depends on using conditions and appliance location. | |
We apologise for any inconvenience caused by minor inconsistencies in these instructions, which may occur as a result of product improvement and development.
Darty Plc © UK: EC1N 6TE 25 / 11 / 2013
Inhoudsopgave
WAARSCHUWINGEN 2
BELANGRIJKE VEILIGHEIDSVOORZORGEN
BENAMING VAN DE ONDERDELEN 5
VOORDAT U DE DIEPVRIEZER INSTALLEERT 5
INSTALLATIE. 5
OMGEVINGSTEMPERATUUR 6
VOORDAT U LEVENSMIDDELEN IN DE KOELKAST OF DIEPVRIES ZET. 6
STROOMONDERBREKING 6
TEMPERATUURREGELING 7
UW APPARAAT VERPLAATSEN 7
LEVENSMIDDELEN IN DE DIEPVRIEZER INVRIEZEN EN BEWAREN. 7
IJSBLOKJESMAKEN 9
ONTDOOIER 9
DE DEUOPENINGOMKEREN 10
TIPS OM ENERGIE TE BESPAREN 10
GELUIDEN VAN UW APPARAAT 11
REINIGEN EN ONDERHOUD 11
PROBLEM OPLOSSEN 11
UW APPARAAT VERPLAATSEN
Darty Plc © UK: EC1N 6TE 11 / 11 / 2013
Índice
ADVERTENCIAS 2
Darty Plc © UK: EC1N 6TE 11 / 11 / 2013
Obsah
UPOZORNÉNÍ
DULEZITE BEZPECNOSTNI POKNY 4
POPIS SOUCASTI 5
PRED MONTAZIMRAZNICY 5
MONTAZ. 6
OKOLNI TEPLOTA 6
NEZ VLOZITE JIDLO DO CHLADNICKY NEBO MRAZNICKY. 6
VYPADEK NAPAJENI 6
OVLADANI TEPOTY 7
PREVOZ PRISTROJE. 7
MRAZENI A USOCHOVA POTRAVIN V MRAZNIČCE. 7
VYROBA LEDU 9
ROZMRAZOVANI 9
OBRACENI DVERI 9
TIPY PRO USPORU ENERGIE 10
PROVOZNI HLUK. 10
CISTENIA UDRZBA 11
RESENI PROBLEMU 11
TECHNICKE UDAJE 11
UPOZORNÉNÍ
Darty Plc © UK: EC1N 6TE 11 / 11 / 2013
Obsah
VAROVANIA 2
DOLEZITE BEZPECNOSTNE POKNY 4
POPIS SUCASTI 5
PRED MONTAZOU MRAZNICKY 5
INSTALACIA. 6
OKOLITA TEPLOTA. 6
PRED VLOZENIM JEDLA DO PRIESTORU CHLADNICKY ALEBO MRAZNICKY. 6
VYPADOK ELEKTRICKEJ ENERGIE 7
OVLADANIE TEPLOTY 7
PRESUN ZARIADENIA 7
ZMRAZOVANIE A SKLADOVANIE POTRAVIN V PRIESTORE MRAZNICKY 8
VYROBA LADOVCH KOCIEK. 9
ROZMRAZOVANIE 9
ZMENA SMERU OTVARANIA DVIEROK 10
TIPY NA SETRENIE ENERGIE 11
PREVÁDZKOVY HLUK 11
CISTENIE A STAROSTLIVOST 11
RIESENIE PROBLEMOV 11
TECHNICKE UDAJE 12
VAROVANIA
DÔLEŽITÉ BEZPECNOSTNÉ POKNY
Darty Plc © UK: EC1N 6TE 11 / 11 / 2013

- Table of Contents
- WARNING
- For disposal of the appliance:
- For installation, servicing:
- For handling:
- IMPORTANT SAFETY INSTRUCTIONS
- Dispose of your old appliance
- BEFORE INSTALLING THE FREEZER
- INSTALLATION
- Additional spacers for better performance
- AMBIENT TEMPERATURE
- POWER FAILURE
- TEMPERATURE CONTROL
- MOVING YOUR APPLIANCE
- FREEZING AND STORING FOOD
- Purchasing frozen food
- Storing frozen food
- Freezing fresh food
- Packing frozen food
- Recommended storage times of frozen food in the freezer
- Never forget:
- MAKING ICE CUBES
- DEFROSTING
- DOOR CONVERSION
- TIPS FOR SAVING ENERGY
- OPERATING NOISES
- Normal noises
- CLEANING AND MAINTENANCE
- TROUBLESHOOTING
- SPECIFICATIONS
- Inhoudsopgave
- UW APPARAAT VERPLAATSEN
- Índice
- Obsah
- UPOZORNÉNÍ
- VAROVANIA
- DÔLEŽITÉ BEZPECNOSTNÉ POKNY
Brand : PROLINE
Model : BFZ34
Category : Refrigerator