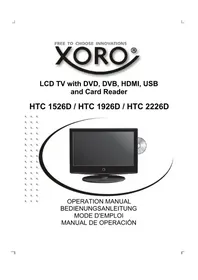
HTC 1526D - TV XORO - Free user manual and instructions
Find the device manual for free HTC 1526D XORO in PDF.



User questions about HTC 1526D XORO
0 question about this device. Answer the ones you know or ask your own.
Ask a new question about this device
Download the instructions for your TV in PDF format for free! Find your manual HTC 1526D - XORO and take your electronic device back in hand. On this page are published all the documents necessary for the use of your device. HTC 1526D by XORO.
USER MANUAL HTC 1526D XORO
FREE TO CHOOSE INNOVATIONS

LCD TV with DVD, DVB, HDMI, USB and Card Reader
U.S. Patens Nos. 4,631,603; 4,577,216; 4,819,098; 4,907,093; 5,315,448 and 6,516,132 "This product incorporates copyright protection technology that is protected by U.S. patents and other intellectual property rights. Use of this copyright protection technology must be authorized by Macrovision, and is intended for home and other limited viewing uses only unless otherwise authorized by Macrovision. Reverse engineering or disassembly is prohibited."
Dolby
Manufactured under license from Dolby Laboratories. "Dolby" and the double-D symbol are trademarks of Dolby Laboratories. Confidential Unpublished works. 1992-1997 Dolby Laboratories, Inc. All rights reserved.
HINWEISE
Deutsch
Please select country first, Then select Start to update info.
Country Selection
UK
Start
Cancel

DTV Manual Tuning

UHF CH 52
Please select channel then
Press OK to search
NO SIGNAL
Bad Normal Good
Kanaleinstellungen
Deutsch
ATV Manuelle Suche
Zeitzone (Time Zone)
Compatibility of Discs, USB and Card Reader 9
Recycling 10
In the box 11
Features. 11
Mounting the Stand 12
Quick Start Guide 13
Connectors
Rear connection panel 14
Right Side 14
Front Side 15
The Remote Control
Insert Battery. 16
Operation range 16
Buttons 17
Connection
Power. 19
Antenna 19
SCART 19
HDMI. 19
YUV 20
S-Video 20
VGA 21
Service Port 21
First Time Installation 22
Sources 23
DVB-T Mode
Getting into DVB-T mode 24
Important buttons and there functions 24
Videotext 25
EPG 26
Analog TV Tuner
Getting into analog TV mode 28
Important buttons and there functions 28
Videotext 29
Contents
English
LCD Settings
General 30
Channel Setting 31
Picture Setting 35
Sound Setting 38
Time Setting 39
Options 41
Lock Setting. 42
Troubleshooting 43
Troubleshooting DVB-T 44
DVD Player / USB / Card Reader
Getting into DVD mode 46
Getting into USB or Card Reader 46
Important buttons and there functions. 47
Data memories with Music-, JPEG or Video files. 51
System Setup. 53
Troubleshooting DVD / USB / Card Reader 57
Specifications 59
Safety Information


The lightning flash with an arrowhead symbol within an equilateral triangle is intended to alert the user of the presence of uninsulated "dangerous voltage" within the product's enclosure that may be of sufficient magnitude to constitute a risk of electric shock to persons.

The exclamation point within an equilateral triangle is intended to alert the user of the presence of important operating and maintenance (servicing) instructions in the literature accompanying the appliance.
THIS DEVICE COMPLIES WITH PART 15 OF THE FCC RULES. OPERATION IS SUBJECT TO THE FOLLOWING TWO CONDITIONS: (1) THIS DEVICE MAY NOT CAUSE HARMFUL INTERFERENCE, AND (2) THIS DEVICE MUST ACCEPT ANY INTERFERENCE RECEIVED. INCLUDING INTERFERENCE THAT MAY CAUSE UNDESIRED OPERATION.
User Manual
- All the safety and operating instructions should be read before the product is operated.
- Retain Instructions - The safety and operating instructions should be retained for future reference
- All warnings on the product and in the operating instructions should be adhered to.
- All operating and use instructions should be followed.
Laser
This Digital Video Disc Player employs a Laser System of the class 1.
- Make sure the device is shut down prior to opening player lid.
- Do not open the appliance. Do not attempt to dismantle the appliance.
- In order to avoid any danger: Have service work only carried out by the manufacturer or an authorized service workshop.
- Visible laser radiation when open and interlocks defeated.
- Use of controls or adjustments or performance of procedures other than those specified herein may result in hazardous radiation exposure.
Operation
- Receiving analogue or digital TV broadcast
- Playing of Video DVD, Video CD or Audio-CD. USB and card reader are part of the internal DVD-Player.
- Connecting external devices by HDMI, video components (YUV), SCART, S-VIDEO or VGA
- No other operation are allowed.
Safety Information
Power Supply
- Never touch the plug with wet hands.
- If you want to pull the plug out of the plug socket, always pull directly on the plug. Never pull on the cable as it could tear.
- Make sure that the power cable is not bent, caught or run over and that it does not come into contact with heat sources.
- Make sure that the power cable is not wound around the device while in operation.
- Never place the machine on the power cable while it is being operated.
- Only use extension cables that are designed for the power consumption level of the machine.
- Keep the appliance away from rain and any moisture.
- Only operate the machine if the electrical voltage stated on the type plate beneath the machine agrees with the voltage on your plug socket. The wrong voltage can destroy the machine.
- Do not stand vases etc. on the appliance.
- Water could seep into the appliance.
- Do not open the appliance.
- Pull out the mains plug if the appliance is not to be used over a longer period of time.
- Take care that nobody can trip over the power supply cable.
Antenna
The device can be connected to an antenna.
- Unplug the power cord cable from the mains outlet before connecting or disconnecting the DVB-T to/from the antenna, otherwise both might be damaged.
- If an outside antenna or cable system is connected to the product, be sure the antenna or cable system is grounded so as to provide some protection against voltage surges and built-up static charges.
- Pull out the antenna connection if the appliance is not to be used over a longer period of time.
Safety Information
Operation and Position
- During playback, the disc rotates very fast. Do not open or do not move the player during playback. Otherwise the disc can be damaged.
- Do not connect accessories on the player which are not defined by the manufacture.
- Do not place this product on an unstable cart, stand, tripod, bracket, or table. The product may fall, causing serious injury to a child or adult, and serious damage to the product. Use only with a cart, stand, tripod, bracket, or table recommended by the manufacturer, or sold with the product.
- Any mounting of the product should follow the manufacturer's instructions, and should use a mounting accessory recommended by the manufacturer.
- A product and cart combination should be moved with care. Quick stops, excessive force, and uneven surfaces may cause the product and cart combination to overturn.
- The internal player or a connected DVD-Player is able to show a still image on the TV screen or monitor over an unlimited period of time. This can cause damage to the screen. It is therefore advisable to activate the screen saver. Or switch the player off, if the device is not in use.
- Do not uses the device permanent in the 4:3 mode. This can cause damage to the screen.
- Do not increase the volume when the device is just playing very quiet sections. This cold damage the speaker if very loud passages starts all of a sudden after the quiet section.
- Place only CDs or DVDs into the tray.
- Switch the device off by the Off/On switch if it is not going to used for a longer period of time.
- Disconnect the main plug during thunderstorms.
- Slots and openings in the cabinet are provided for ventilation and to ensure reliable operation of the product and to protect it from overheating, and these openings must not be blocked or covered.
- The openings should never be blocked by placing the product on a bed, sofa, rug, or other similar surface.
- This product should not be placed in a built-in installation such as a bookcase or rack unless proper ventilation is provided or the manufacturer's instructions have been adhered to.
- Protect the device against weather influences, moistures and high temperature.
- Never spill liquid of any kind on the product.
- Do not expose the device and the remote control to direct sunlight.
- If an outside antenna or cable system is connected to the product, be sure the antenna or cable system is grounded so as to provide some protection against voltage surges and built-up static charges.
- Due to the legal requirements of CE-conformity, the customer is asked to only connect USB-Sticks to the USB port.
Safety Information
Defect
- Servicing - Do not attempt to service this product yourself as opening or removing covers may expose you to dangerous voltage or other hazards. Refer all servicing to qualified service personnel.
- Damage Requiring Service - Unplug this product from the wall outlet and refer servicing to qualified service personnel under the following conditions:
a. When the power-supply cord or plug is damaged.
b. If liquid has been spilled, or objects have fallen into the product.
c. If the product has been exposed to rain or water.
d. If the product does not operate normally by following the operating instructions. Adjust only those controls that are covered by the operating instructions as an improper adjustment of other controls may result in damage and will often require extensive work by a qualified technician to restore the product to its normal operation.
e. If the product has been dropped or damaged in any way, and
- When the product exhibits a distinct change in performance this indicates a need for service.
- When replacement parts are required, be sure the service technician has used replacement parts specified by the manufacturer or have the same characteristics as the original part. Unauthorized substitutions may result in fire, electric shock, or other hazards.
- Please read in the section Troubleshooting our service address and phone number.
- Nicotine can be destroyed the electronically components and can pollute the LCD TFT panel.
Dolby
Manufactured under license from Dolby Laboratories. "Dolby" and the double-D symbol are trademarks of Dolby Laboratories. Confidential Unpublished works. 1992-1997 Dolby Laboratories, Inc. All rights reserved.
Notes
Disc Compatibility
- Depending on the conditions of the recording equipment or the CD-R/RW (or DVD -R, DVD +R, DVD -RW, DVD +RW) disc itself, some CD-R/RW (or DVD -R, DVD +R, DVD -RW, DVD +RW) discs cannot be played on the unit.
- Do not attach any seal or label to either side (the labelled side or the recorded side) of a disc.
- Do not use irregularly shaped CDs (e.g., Heart shaped or octagonal) since they may result in malfunctions.
- Some playback operations of DVDs and Video CDs may be intentionally programmed by software manufacturers. This unit plays DVDS and Video CDs according to disc content designed by the software manufacturer, therefore some playback features may not be available or other functions may be added.
Compatibility of the integrated USB port
- Due to legal requirements of CE-conformity, the customer is asked to only connect USB-Sticks to the USB port.
- The USB port can be supported up to 2 GB flash memory size. In order to the many different USB-Sticks and the build-in electronics components a support of all USB-Sticks can not guaranteed.
- Please format the USB-Sticks only with FAT 32 file system. NTSC file system is not supported and can not recognize by the USB port.
Compatibility of the integrated Card Reader
- Please uses only SD, MMC or MS card media.
- The card reader can be supported up to 2 GB memory size. In order to the many different card medias and the build-in electronics components a support of all SD, MMC or MS cards can not guaranteed.
- Do not use SDHC card medias.
- Do not use MS Pro or MS Duo card medias.
- Please format the cards only with FAT 32 file system. NTSC file system is not supported and can not recognize by the card reader.
Macrovision
U.S. Patens Nos. 4,631,603; 4,577,216; 4,819,098; 4,907,093; 5,315,448 and 6,516,132
"This product incorporates copyright protection technology that is protected by U.S. patents and other intellectual property rights. Use of this copyright protection technology must be authorized by Macrovision, and is intended for home and other limited viewing uses only unless otherwise authorized by Macrovision. Reverse engineering or disassembly is prohibited."
Notes
Recycling Information
Recycling of electronic devices
This product is designed and manufactured with high quality materials and components which can be recycled and reused.
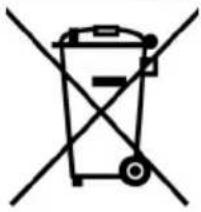
This symbol means that electrical and electronic equipment, at their end-of-life, should be disposed of separately from your household waste.
Please, dispose of this equipment at your local community waste collection/ recycling centre. In the European Union there are separate collection systems for used electrical and electronic product. Please, help us to conserve the environment we live in!

Recycling of paper and carton
The material recycling symbol on the carton and user manual denotes that they are recyclable. Dispose them not with the normal household waste.

Recycling of plastic parts
The material recycling symbol on the plastic parts denotes that they are recyclable. Dispose them not with the normal household waste.

Green Dot
Following accessories should be in the box:
- HTC 1526D / HTC1926D / HTC 2226D LCD-TV
Remote Control with Battery - Manual
- Main adapter
- Wire for the main adapter
Warranty card
If any of the accessories are missing, then contact your dealer as soon as possible. Keep all the original packaging in case you need to return the set to the dealer.
Features
High quality display
- Many Connections: VGA, RF, Y Pb Pr with progressive scan, S-VIDEO, SCART and HDMI
HDMI Supports up to 1080p input resolutions
- Stereo audio input
- Integrated analog TV Tuner with videotext
- Integrated digital terrestrial TV Tuner (DVB-T) with EPG and videotext
Automatic or manual channel search
- Auto-shutdown to save power when no signal input
DVD-Player inside with Slot-in technology
- Integrated USB port and Card Reader for SD, MMC and MS cards (US and Card Reader are part of the DVD-Player)
Mounting the Stand
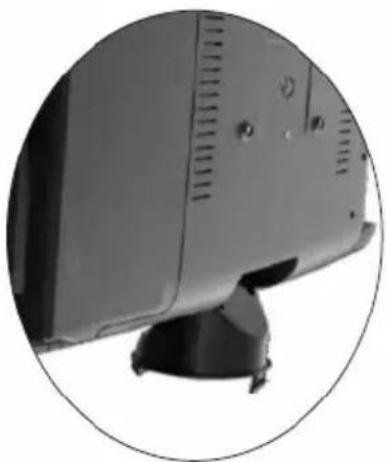
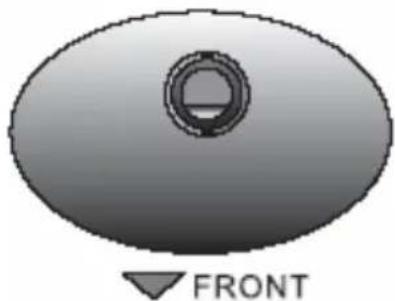
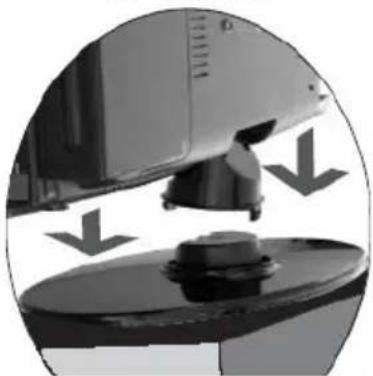
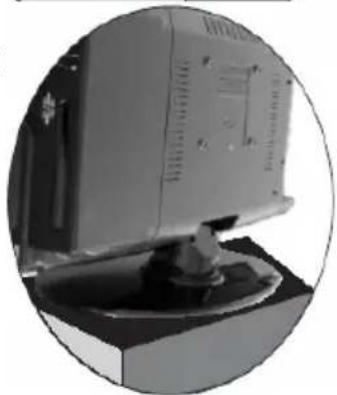
The TV set will be delivered without mounted stand. The stand can be mounted easily in four steps
- Please unpack the TV set carefully out off the box. The stand bracket is pre-assembled. On the bottom side of the bracket you can find two plug-and-socket connectors. This connectors must not damaged.
English
- Place the stand on a stable ground and arrange the stand in order to the picture.
- Arrange the TV set above the stand and connect the stand bracket carefully with the stand. Please refer the picture.
- Press carefully the TV set down until the plug-and-socket connectors locked into the stand. Control the mounting and fitting of the stand and lift the stand carefully. The stand does not drop off from the TV set.
Quickstart Guide
-
Connect the stand in order to the instruction on the previous page.
-
Connect the aerial or input source to the appropriate input socket at the rear of the set.
-
Connect the small round plug on the power adaptor cable to the power input socket at the rear of the set.
-
Connect the main cable between the power adapter and the main supply. The LED will show a red light.
-
Switch the power on by pressing the POWER button on the front panel or the remote control. The LED will show a green light.
-
Use the SOURCE button on the front panel or the remote control and a popup window with the sources appears on the screen. You can select following sources:TV, PC-RGB, YUV, S-Video, SCART, DTC or DVD. You can use the front panel control to adjust the volume or select a channel, as shown below, or you may use the remote control and confirm by OK button.
A. Analog TV tuner (for example: cable system)
After switched on and press the SOURCE button and choose "TV" by pressing the navigation button UP/DOWN and confirm by the OK button. Now the HTC xx26D is in TV Mode. By the first using of the TV set, the systems starts automatically the menu for searching the TV channels (please refer page 22).
B.DVD-Player:
Switch on the unit and press the SOURCE button and choose "DVD" by pressing the navigation button UP/DOWN and confirm by the OK button. Now the HTC xx26D is in DVD Mode.
C.DVB-T mode:
Switch on the unit and press the SOURCE button and choose "DTV" by pressing the navigation button UP/DOWN and confirm by the OK button. Now the HTC xx26D is in DVB-T mode. By the first using of the TV set, the systems starts automatically the menu for searching the TV channels (please refer page 22).
- To switch the set off a short time, press the POWER button, the set will go into stand-by and the LED will show red. If you are not going to use the set for some time, switch the power off completely by unplugging the mains cable.
Connectors
Rear Connection Panel

English
| Name | Function | Descr |
| DC In | Connect to Power Adapter | |
| HDMI | HDMI input | |
| Service Port | USB port for installing new upgrades | |
| VGA | VGA signal of computer input | |
| SCART | Euro AV (Audio/Video) input | |
| S-Video | S-video input | |
| Y Pb Pr | Video components signal input | |
| AUDIO | Audio signal input for YPbPr, VGA and S-Video | |
| PHONE | Headphone | |
| RF | Connect to cable or air |
ption
Note:
The service port is only for installation of new firmware required. This is not a USB port for playback music, pictures or video.
Buttons on the right side
On the right bottom side are the following buttons:
| Button | Function |
| Open / | Close the loader |
| Stop | |
| >Play / | Pause |
| DVD DVD | Slot-in loader |
| USB | USB Port |
| Card Reader for SD, MMC and MS cards | |
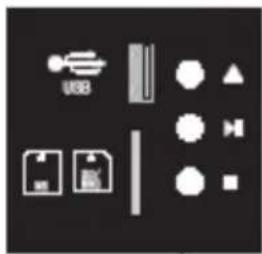
Control Elements
Buttons on the right side
On the right upper side are the following buttons:
| Button | Function |
| Power | Power On/Off (StandBy) |
| Menu LCD | Setup Settings |
| V+ / V+ Change Volumen | |
| P+ / P- Change TV channel | |
| SOURCE | Choose Source |

Note:
Select source by pressing the SOURCE button from TV, SCART, AV, S-Video, PC, HDMI DVB-T and DVD.
Front Side
LED
The LED shows the status of the device. RED indicates the Stand-By mode and GREEN indicates that the device is LCD Panel ON.
IR
Infrared receiver
Speaker
Right and left speaker
LCD Panel
LCD TFT Panel
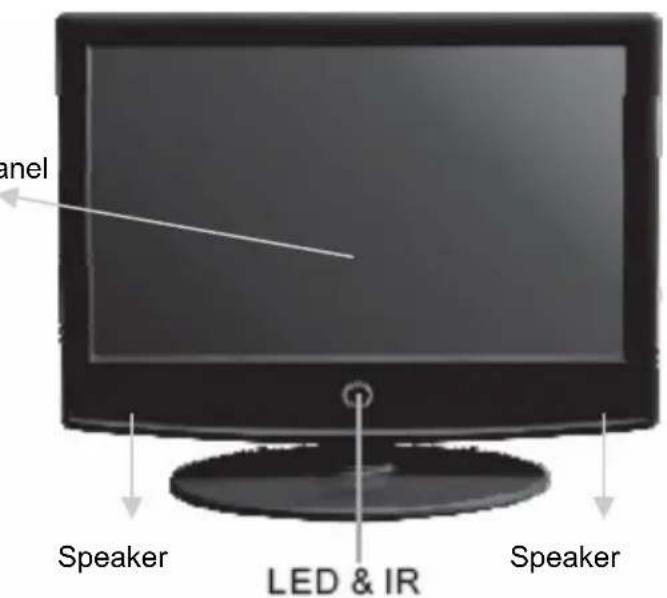
Remote Control
Insert battery into the remote control
Insert the batteries in the remote control:
- Open the cover.
- Insert the batteries. Make sure to match - and +.
- Close the cover
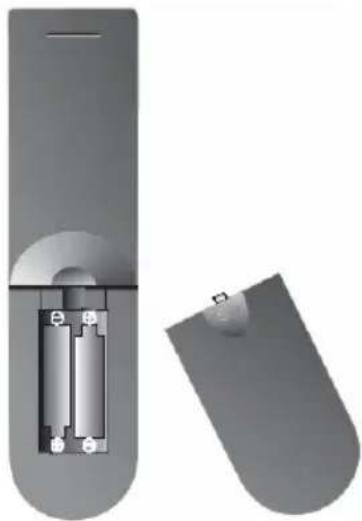
Notes on batteries:
Improper use may cause battery leakage and corrosion.
Please follow the instructions below:
- Do not insert the batteries in the wrong direction
- Do not use different types of batteries together
- If you do not use the remote control for a long time, remove the batteries
- If the remote control operates not correctly, replace the batteries
If battery leakage occurs, wipe the battery liquid from the battery compartment, then insert new batteries
Make sure that the used batteries are disposed properly according to you local regulations.
Operation range
Point the remote control at the IR:
- Within about 5m with angle about 30 grade in both direction.
Notes:
- Do not expose the IR of the device to a strong light source or direct sunlight.
- Direct the remote control at the infrared receiver (IR) of the player
- Do not drop the remote control.
- Do not spill water or put anything wet on it.
- Do not disassemble the remote control.
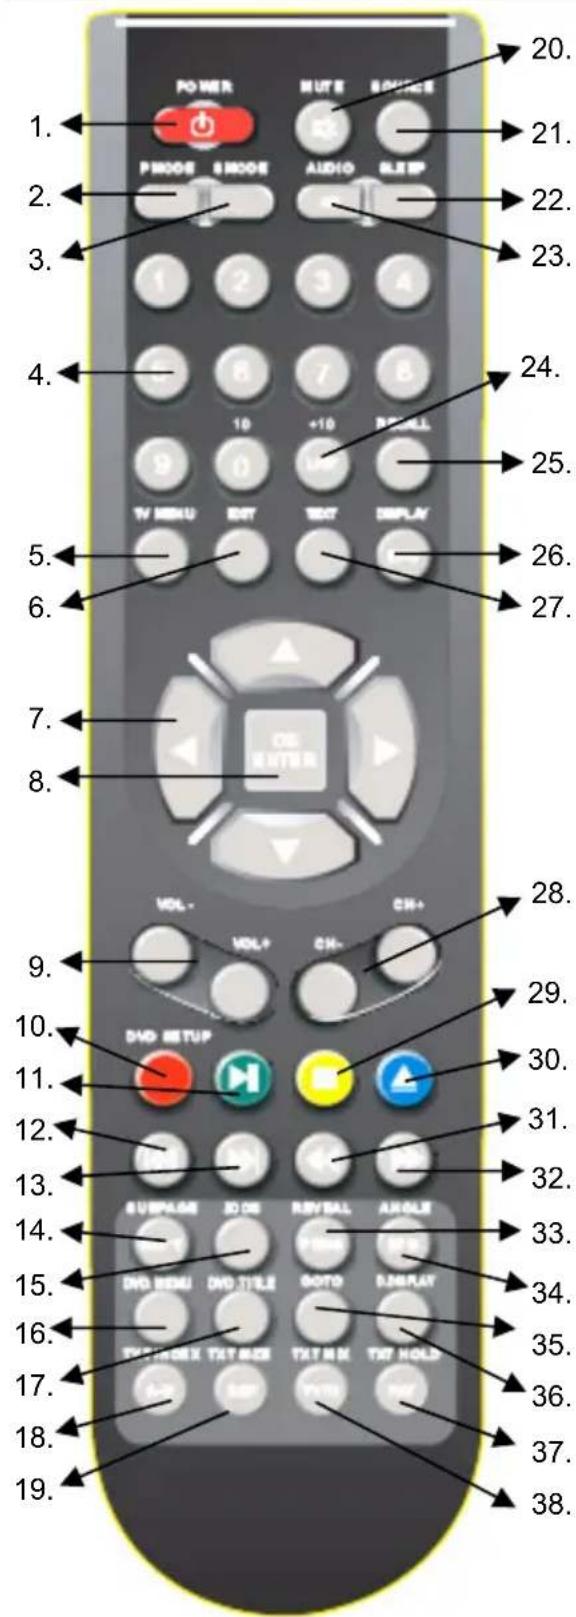
Remote Control
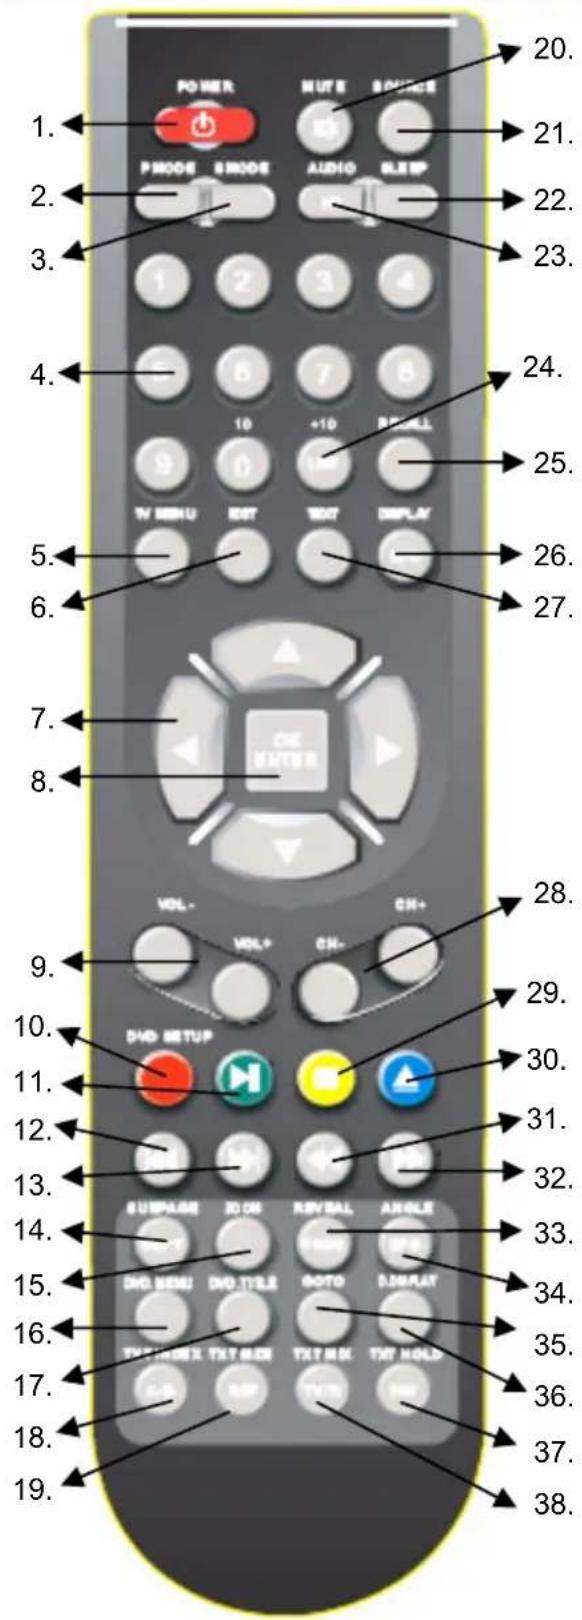
Buttons of the remote control:
ATV: Analogue TV Tuner
DVB-T: Digital TV Tuner
DVD: DVD Player
- POWER button
- Picture mode (PMODE)
- Sound mode (SMODE)
- Numeric buttons (0-9)
- TV settings (TV MENU)
6.Exit button (EXIT) - Navigation cross
- ENTER button
- Volume (Vol- / Vol+)
- ATV + DVB-T: Red Teletext button; DVD: DVD Settings (DVD SETUP)
- ATV + DVB-T: Green videotext button; DVD: Play/Pause button
- DVD: Previous Track/chapter
- DVD: Next track/chapter
- ATV + DVB-T: Videotext sub page button; DVD: Subtitle button (SUBT)
- ATV + DVB-T: Aspect Ratio LCD
4:3 / 16:9 / Zoom 1 / Zoom 2 (SIZE);
DVD: Zoom button
16.DVD:VideoDVDMenu - DVD: Video DVD Title menu
- ATV + DVB-T: Videotext Index button; DVD: A-B segment playback (A-B)
- ATV + DVB-T: Videotext zoom (TEXT SIZE); DVD: Repeat function (REP)
- MUTE button
- SOURCE button
- Sleeptimer button
- ATV: Audio system; DVB-T: Audio language; DVD: Audio language
More button description on the next page.
Remote Control
English
Buttons of the remote control:
ATV: Analogue TV Tuner
DVB-T: Digital TV Tuner
DVD: DVD Player
- ATV + DVB-T: TV channel list (LIST); DVD: Quick navigation in file browser (+10)
- Last TV channel (RECALL)
- ATV: Source information (Display); DVB-T: Information
- ATV + DVB-T: Videotext (TEXT)
- ATV + DVB-T: Channel (CH-/CH+)
- ATV + DVB-T: Yellow Videotext button; DVD: Stop button
- ATV + DVB-T: Blue Videotext button; DVD: Open/Close
31.DVD:FastBackward (< < )
32.DVD:FastForward () - ATV + DVB-T: Videotext Reveal function: DVD: Program playback (PROG)
- DVB-T: EPG button; DVD: Angle button
35.DVD:GOTO button - DVD: DVD Information button (D.DISPLAY)
- ATV: Videotext Mix displaying; DVB-T: Switch to TV and Radio channels
- ATV: Videotext Hold function; DVB-T: Favourite channel view (FAV)
Connection
Power connection
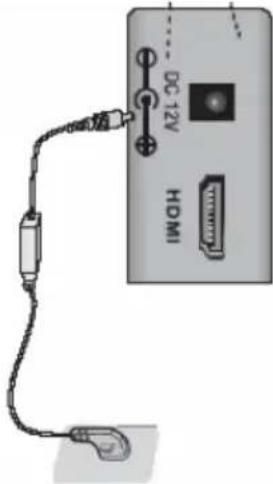
Connect the AC/DC power adapter with the DC IN input of the HTC TV set. After that, please connect the power cable with the wall mounted power outlet.
On the front side you can see a red LED light. The HTC TV set is now in Stand-By mode. By pressing the POWER button on the remote control or on the top side of the device the red LED changes to a green light.
Antenna
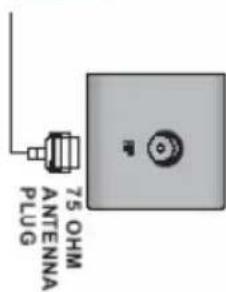
The HTC TV set has an analogue and a digital TV Tuner inside. For receiving analogue TV signals please connect the antenna cable with the RF connector on the HTC TV set and with the VHF/UHF roof antenna or with a CATV antenna plug.
For receiving digital terrestrial TV signals please connect the HTC TV set with the RF plug and also with the roof antenna. If no roof antenna is available, please use indoor aerial.
For activating the analogue TV Tuner, please switch with the SOURCE button and choose in the popup window "TV" or "DTV" for digital terrestrial TV.
Note:
For getting the best DVB-T reception please uses the roof antenna. If not possible, than you can connect the HTC TV set with an active indoor aerial.
SCART Input
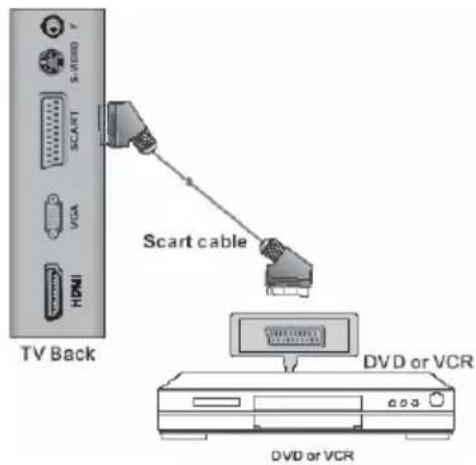
Audio- and Video signals from a VCR or a setup box can be transmitted by SCART. Please connect a SCART cable with the SCART input on the HTC TV set and with the SCART output on the VCR or setup box.
Press the SOURCE button and choose "SCART" in the popup window and the SCART interface is activated.
HDMI
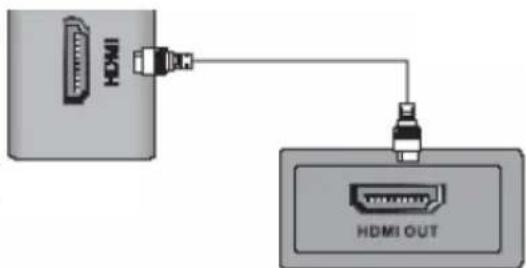
If you want connect a multimedia device with HDMI like a game console "PS3" or a setup box with the HTC TV set, you can establish a HDMI connection. Please connect the HDMI cable on the HDMI interface on the HTC TV set and the HDMI output of the multimedia device.
Please press the SOURCE button and choose "HDMI" in the popup window and the HDMI input is active.
Connection
English
Component Y Pb Pr Video- and Stereo Audio input
If you uses more than one multimedia terminals and the SCART, HDMI and S-Video connection are used, than you connect the next device by the audio/video component input (Y Pb Pr). Please connect the wire of an 3-pin component cable with the YPbPr input of the HTC TV set and the multimedia device. Please pay attention to the coloured coding of the cable, inputs jacks (LCD set) and the video output jacks (source):
- "Y" with the green wire or RCA plug
- "Pb" with the blue wire or RCA plug
- "Pr" with the red wire or RCA plug
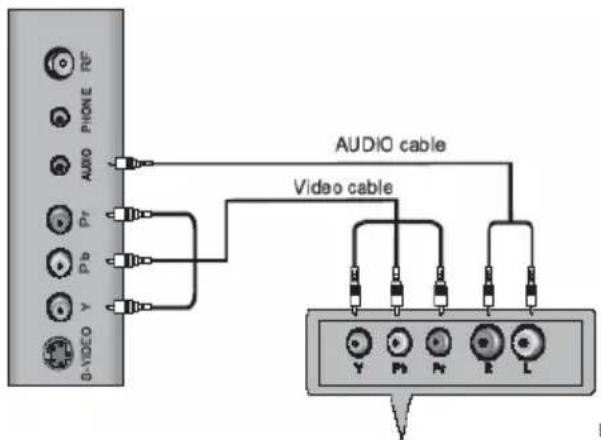
With this kind of connection only video signals are transmitted. For listening sound on the TV you should establish also a sound connection. Please connect the white and red wire of the 2-pin component cable with the AUDIO OUT (source) and the stereo jack with the "AUDIO" plug of the HTC TV set.
Please press the SOURCE button and choose ^ YUV^ in the popup window. The YUV input is active.
Note:
The Audio-adapter cable (RCA to stereo jack) is not part of the accessories.
If you uses more than one multimedia terminals and the SCART, HDMI and AV connection
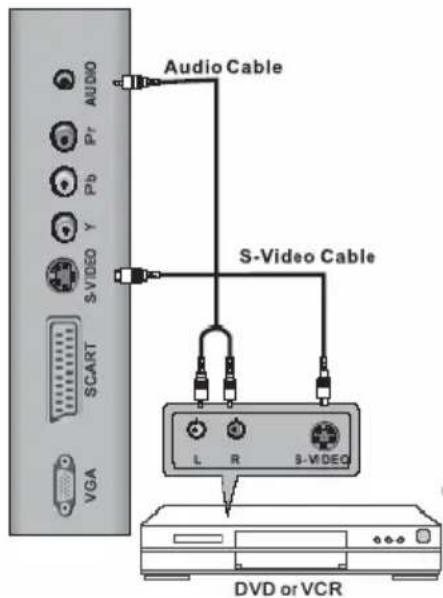
are used, than you connect the next device by the S-Video. Please connect the S-Video cable with the S-VIDEO input of the HTC TV set and with the S-Video output of the multimedia device. With this kind of connection only video signals are transmitted. For listening sound on the TV you should establish also a sound connection.
Please connect the white and red wire of the 2-pin component cable with the AUDIO OUT (source) and the stereo jack with the "AUDIO" plug of the HTC TV set.
Please press the SOURCE button and choose „S-Video" in the popup window. The S-Video input is active.
Note:
The Audio-adapter cable (RCA to stereo jack) is not part of the accessories.
Connection
VGA
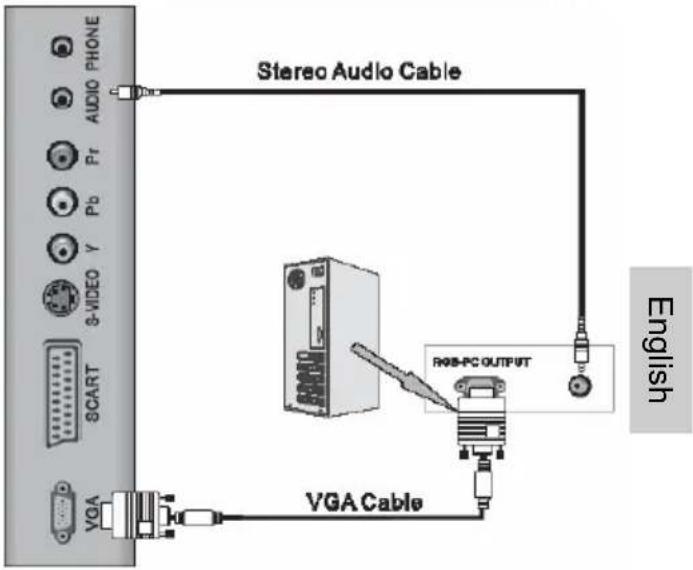
You can use the HTC TV set as a PC monitor by using the VGA interface. Please connect a VGA cable with the VGA input of the HTC TV set and with the PC.
With this kind of connection only video signals are transmitted. For listening sound on the TV you should establish also a sound connection. Please connect the white and red wire of the 2-pin component cable with the AUDIO OUT (source) and the stereo jack with the "AUDIO" plug of the HTC TV set.
Please press the SOURCE button and choose "VGA" in the popup window. The VGA input is active.
Notes:
- Before you connect the HTC TV set with the PC, please change the graphic resolution of the PC to: 640 x 480, 800 x 600 or 1024 x 768.
- Please establish the connection and switch to "PC-VGA" input.
-
For displaying the best results, please uses the native resolution of the TV LCD panel:
-
HTC 1526d 1366 x 768 Pixel
- HTC 1926d 1440 x 900 Pixel
- HTC 2226d -> 1366 x 768 Pixel
Service Port
The service port is only for installing new firmware version (upgrade) for the TV part.
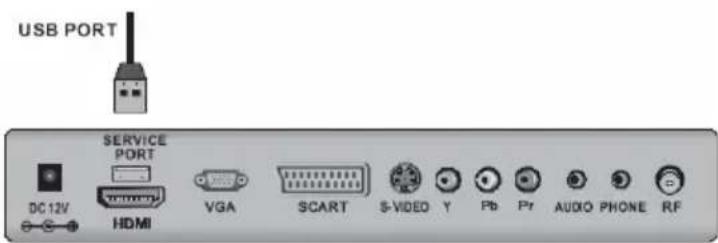
Note:
This USB port can not be used to connect USB-Sticks for playback of audio or video content. Please connect the USB-Stick with the USB port on the right side.
First Time Installation
When you start the HTC TV set the first time and choose TV or DTV, than appears the installation guide on the screen. With this guide you can search analogue and digital TV channels. The search routine includes the frequencies of the analogue and digital broadcaster.
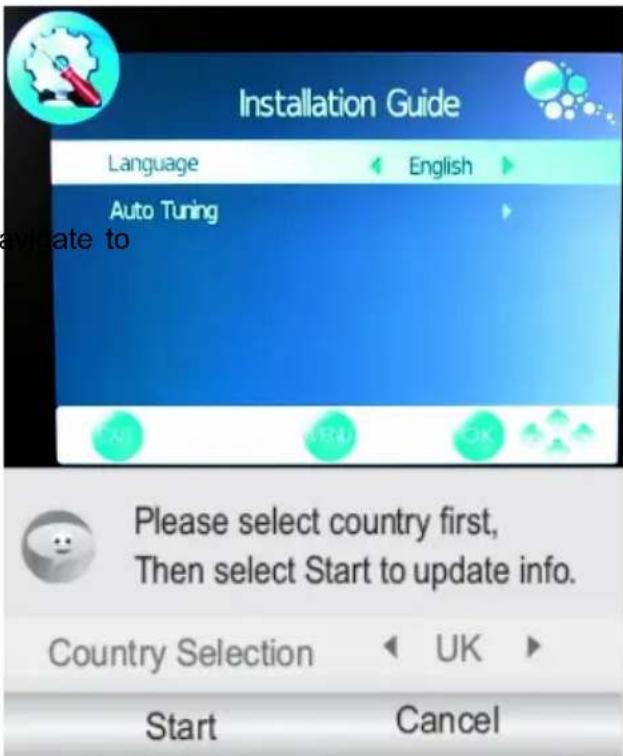
- Please select the OSD language. You can choose the pre-installed languages by pressing the or buttons. If you find your languages, please confirm the language by pressing the OK button.
- Press the button and n the option "Auto Tuning". The search starts when you press the button.
- A new popup window appears on the screen. There you can see the option country selection. Please choose the suitable country by pressing the or buttons.
- If you had chosen the country, please press the button, so that the "Start" field will be marked with blue and is active. Press the OK button and the search starts immediately.
- A new window opens on the screen, where the status of the searching is documented. The values of the found TV broadcast stations of analog
- After finishing of the searching, all found TV broadcast station will be saved into the channel list. You can look at the TV channel list by pressing the LIST button.
Note:
The complete searching needs a couple of minutes.
Sources
The single sources and inputs of the HTC TV set can be choose by pressing the SOURCE button. A popup window appears on the screen. The sources are:
DTV DVB-T TV Tuner
TV Analogue TV Tuner
SCART SCART Video/Audio Input
YPbPr Video component input
DVD Internal DVD Player
PC-RGB VGA port
HDMI HDMI Video/Audio input
S-Video S-Video input

Input Source
DTV
TV
SCART
YPbPr
DVD
PC-RGB
HDMI
S-VIDEO
EXIT
OK

There you can choose the source by pressing the / button. Confirm the selected source with the OK button.
DVB-T
If you want to use the terrestrial digital TV (DVB-T), than you need to change the source into DTV. Press the SOURCE button and navigate to DTV with the / button. Confirm the selection DTV by pressing the OK button.
Important buttons and there functions
Channel List
Press the LIST button on the remote control and you gets the provided and receives TV broadcast stations. By using the / buttons you can select the TV station, which you like. To disappear thee channel list, press the OK button.
Change TV channel
To change to TV channel you can press the P- or P+ button.
Select TV Channel
You have also quick access to the different TV channels by using the numeric buttons.
Last TV channel
Press the RECALL button to go back to the last TV channel.
Change the Volume
By pressing the V- or V+ buttons you can adjust the volume of the speaker.
TV/Radio
Press TV/RADIO button to switch between TV and Radio station.
Note:
Digital Radio will be not transmitted in every country.
EPG
Press EPG button to show the EPG information. For detailed information about the EPG please refer the section about EPG.
Favourite list
If you had defined some TV or Radio into a favourite list, than you have a quick access to the favourite list by pressing the FAV button.
Important buttons and there functions
Subtitle
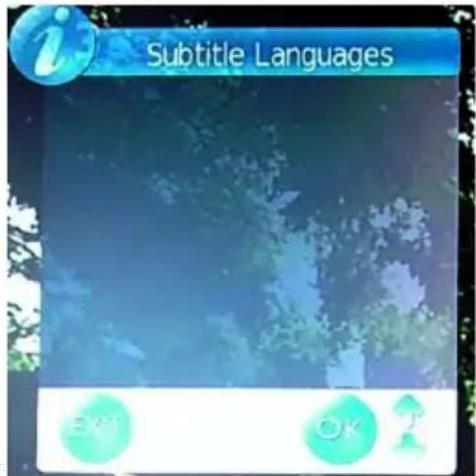
Press SUB-T button to turn on or off the subtitle on the screen. This function can be activated, if the service is provide by the TV channel and program. In case that subtitles are supported, than they will be listed into the popup window. You can choose the subtitle and start them with the OK button.
Note:
Subtitles are not supported in every country.
English
Tele-/ Videotext
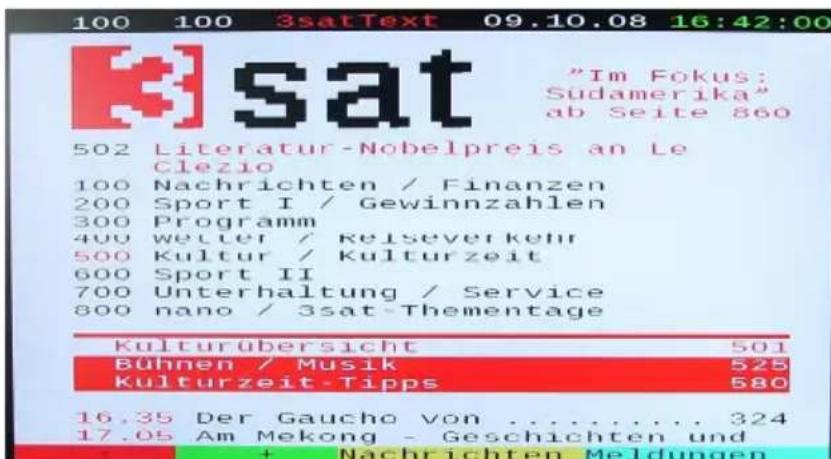
Press TEXT button to view the videotext information of the current TV program.
- With the numeric buttons you can select special videotext pages.
- On the bottom side of the videotext window you can find four colored fields (Red, Yellow, Green, Blue). The colored fields correspond with the colored buttons on the remote control. Press one of the colored button, the HTC TV set goes directly to this videotext page.
- With the RED button you can choose to the previous videotext page.
- With the GREEN button you can choose the next videotext page.
- With the YELLOW button you can choose the pre-defined videotext page.
- With the BLUE button you can choose the pre-defined videotext page.
- The TEXT button closes the opened videotext window.
- Press the MIX button and the videotext window gets a transparent background, so that you watch also the live picture.
- The INDEX button makes a quick access to the first videotext page (for example page 100).
- With the SIZE button you can zoom in the videotext window on full screen size. Then you can see the first half videotext page. Press again the SIZE button and you can the second part of the videotext page. By pressing the third time the SIZE button the videotext window changes to normal size and view.
Important buttons and there functions
Language or another Audio
Press AUDIO button to change the audio language or the audio track output. After pressing the AUDIO button a popup window appears on the screen, where you can select the preferred audio language or sound mode by using the / buttons. Confirm the selection by pressing the OK button.
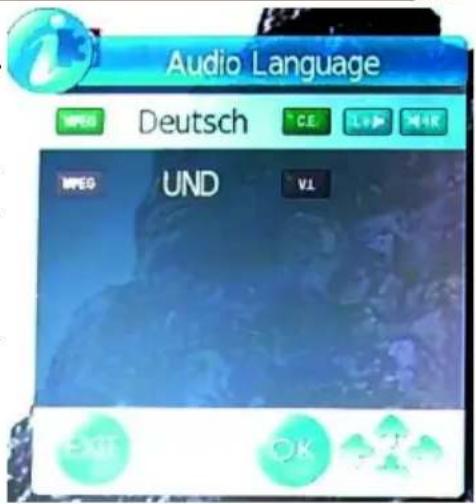
English
Note:
Some broadcaster supports different languages or sound modes.
Quick-Information
Press the OK button during the live picture and a popup window appears on the screen. The information in the window are TV program title, current date, current time, duration of the actual TV program, resolution of the transmission (for example 576i) and if videotext is available.

On the right side you can find an arrow sign. By pressing the button you gets information about the next TV program.
Information
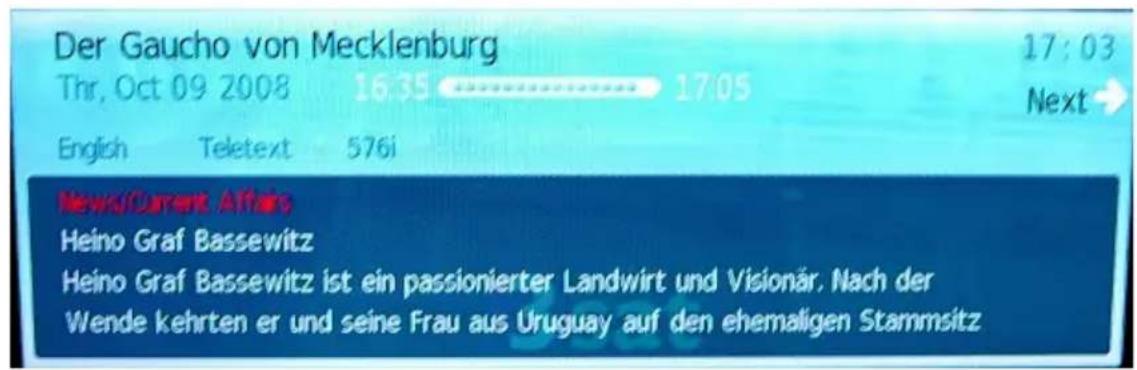
Press the INFO button during the live picture and detailed information are appears on the screen.
Important buttons and there functions
Beside the TV program title, time, date, duration time of the current program title, resolution of the broadcast and if videotext is available, you can see the detailed EPG information of the current TV program. With the / buttons you can browse all EPG information, if more than one page is available. By pressing the button you gets information about the next TV program and there EPG information.
EPG
The electronic program guide (EPG) can be activated by pressing the EPG button as well and the EPG window appears on the screen.
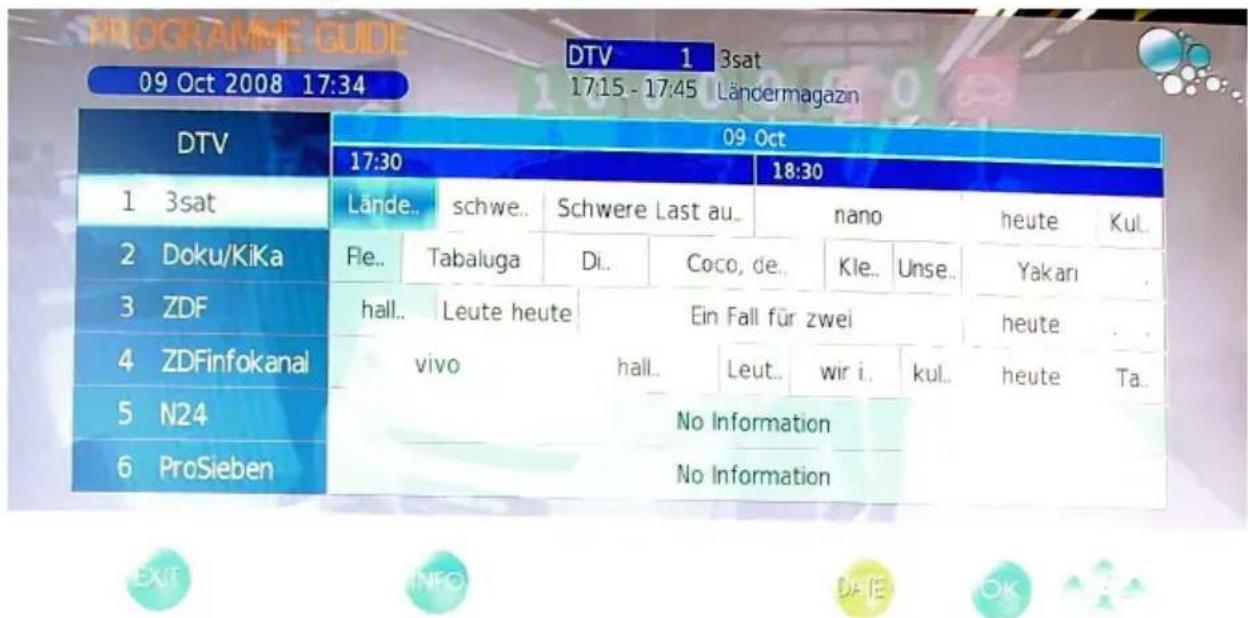
The EPG window is organized in three sections:
Top Current TV channel number (e.g. DTV 1) and TV broadcast station name
Date, duration time of the current TV program and the TV program title
Middle EPG overview by list
Bottom Buttons for navigation
The active and current TV station and TV program is accentuate in blue. Inside of the TV station you can navigate with the or buttons to the previous or next TV program. With the / buttons you can change to the TV broadcast station. Following button help you for easier navigation:
EXIT Exit of the EPG window
INFO Access to detailed EPG information by each TV program
YELLOW Switches from daily mode to weekly mode
DVB-T
EPG
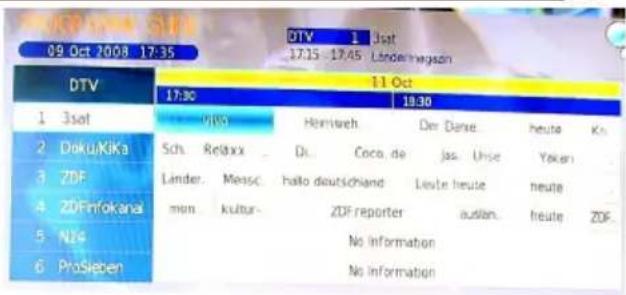
By the weekly mode the date bar changes from the bright blue into yellow. Now you can browse to the next date by using the or buttons.
Press again the YELLOW button and the displaying changes from the weekly mode into the daily mode.
Note:
The HTC TV set supports 7-days EPG preview.
Analoger TV Tuner
If you want to use the analogue TV Tuner (Cat TV), than you need to change the source into TV. Press the SOURCE button and navigate to TV with the / button. Confirm the selection TV by pressing the OK button.
Channel List
Press the LIST button on the remote control and you gets the provided and receives TV broadcast stations. By using the / buttons you can select the TV station, which you like. To disappear thee channel list, press the OK button.
Change TV channel
To change to TV channel you can press the P- or P^+ button.
Select TV Channel
You have also quick access to the different TV channels by using the numeric buttons.
Last TV channel
Press the RECALL button to go back to the last TV channel.
Change the Volume
By pressing the V- or V+ buttons you can adjust the volume of the speaker.
TV Analog
Tele-/ Videotext
Press TEXT button to view the videotext information of the current TV program.
- With the numeric buttons you can select special videotext pages.
- On the bottom side of the videotext window you can find four colored fields (Red, Yellow, Green, Blue). The colored fields correspond with the colored buttons on the remote control. Press one of the colored button, the HTC TV set goes directly to this videotext page.
- With the RED button you can choose to the previous videotext page.
- With the GREEN button you can choose the next videotext page.
- With the YELLOW button you can choose the pre-defined videotext page.
- With the BLUE button you can choose the pre-defined videotext page.
- The TEXT button closes the opened videotext window.
- Press the MIX button and the videotext window gets a transparent background, so that you watch also the live picture.
- The INDEX button makes a quick access to the first videotext page (for example page 100).
- With the SIZE button you can zoom in the videotext window on full screen size. Than you can see the first half videotext page. Press again the SIZE button and you can the second part of the videotext page. By pressing the third time the SIZE button the videotext window changes to normal size and view.
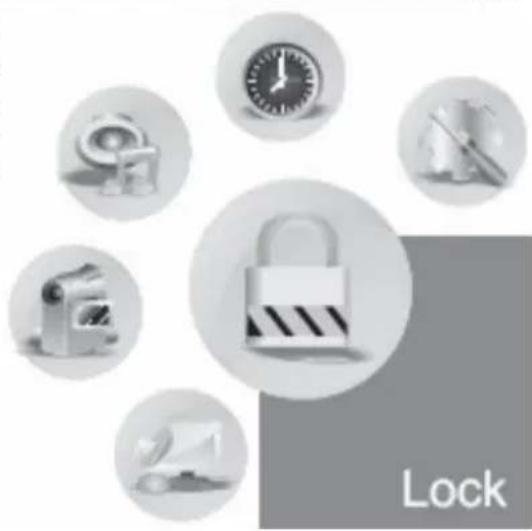
LCD Settings
Press the TV MENU button and you gets access to the different LCD settings. The beside picture shows the different categories "Time", "Channel", "Lock", "Options", "Sound" and "Picture" which characterizes with symbols. The following description shows a list of each categories.

Time
Clock, On Time, Off Time, Sleep timer, Time zone and Auto Stand-By

Sound
Sound mode, Treble, Bass, Balance, Auto Volume, Surround Mode

Picture
Picture Mode, Contrast, Brightness, Colour, Sharpness, Hue, Colour Temperature, Aspect Ratio, Noise Reduction and Screen (only by VGA mode)

Channel
Auto Search, DTV manual search, TV manual search, Programme Edit

Lock
Lock Channel, Password, Block Channel, Parental Control

Options
Language, Audio language, Subtitle language, Country, Default
After starting the LCD settings you can change the category by using the or buttons. You can enter in each category by pressing the button and this category is active.
Each option or setting can be change by or buttons.
To exit the active category please press repeatedly the button.
To leave the TV settings, press the EXIT or TV MENU button.
LCD Settings
Channel setting
The channel settings include the options for Auto Search (Auto Tuning), DTV manual Search, ATV manual Search and Programme Edit.
Auto search (Auto Tuning)
With this setting you can search the TV broadcast station for analogue and digital TV programs.
- Press the button and navigate to the option „Auto Tuning". The search starts when you press the button.
- A new popup window appears on the screen. There you can see the option country selection. Please choose the suitable country by pressing the or buttons.
- If you had chosen the country, please press the button, so that the "Start" field will be marked with blue and is active. Press the OK button and the search starts immediately.
- A new window opens on the screen, where the status of the searching is documented. The values of the found TV broadcast stations of analogue, digital and Radio are listed.
- After finishing of the searching, all found TV broadcast station will be saved into the channel list. You can look at the TV channel list by pressing the LIST button.
Note:
The complete searching needs a couple of minutes.
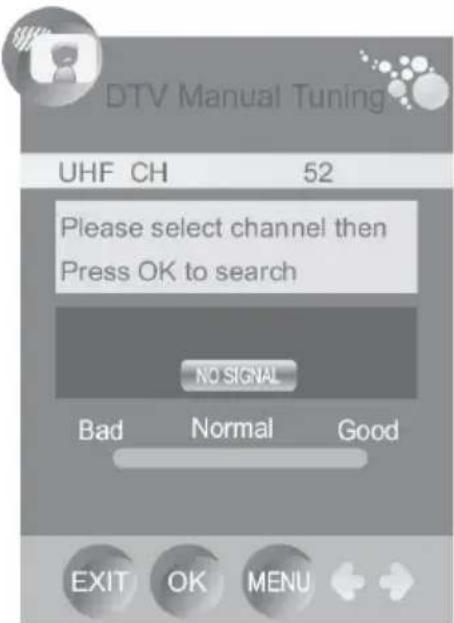
DTV Manual Search (DTV Manual Tuning)
Press the button and navigate to the option "DTV manual Tuning". The search starts when you press the button.
- You can change the channel by using or buttons. So you can define, on which channel shall be runs the search.
- Starts the searching by the OK button.
To leave the DTV manual tuning, press the EXIT or TV MENU button.
LCD Settings
Channel setting
ATV Manual Search (ATV Manual Tuning)
Press the button and navigate to the option "ATV manual Tuning". The search starts when you press the button. The options are:
Storage To
- System (B/G for West Europe, I for UK, D/K for Eastern Europe and France, L or LL for part of France)
- Current TV channel
Search
- Fine Tuning
- Skip
Frequency
- With the / buttons you can browse to each setting.
- With the or buttons you can choose the position in the channel list, where the found TV channel is stored.
- Go to "Audio" and choose the Audio system by using the or buttons.
- Go to "Search" and start them by the button.
ATV Manual Tuning
Storage TO 1
System
Current CH
Search
Fine-Tune
Skip No
Frequency 600.00
EXIT SAVE

Fine Tuning
By using the or buttons you can start the fine tuning of each TV channel, if the signal is too weak or distorted.
Skip
By using the or buttons you can activate the Skip function.
- Yes - The channel is skipped by changing the TV channel with the P- or P+ button.
- No - The Skip function is deactivated.
Other buttons for navigation
With the RED button you can save the changes, if you for example has changes the Audio system.
To leave the ATV manual tuning, press the EXIT or TV MENU button.
LCD Settings
Channel setting
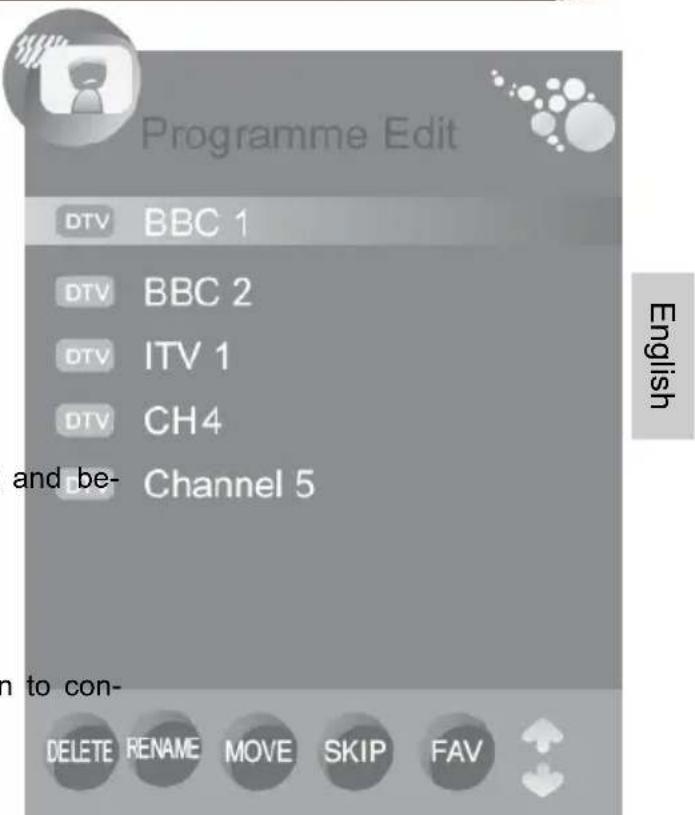
The option "Programme Edit" includes settings for Moving and sorting, Skip and define Favourites.
Move a TV channel
This option is responsible for sorting the TV channel, so that you can define your personal view of the TV channel list.
- With the / buttons you can choose the TV channel, which shall be edit.
- Press the YELLOW button side the chosen TV channel you can see now an arrow symbol.
- Move the TV channel with the / buttons on the position which you like.
- Press the TV MENU button firm and save the moving.
- To leave the setting press the EXIT button.
Define TV Channels into Favourites
Here you can define your preferred TV channels into a favourite list. You can activate the list by pressing the FAV button.
- With the / buttons you can choose the TV channel, which shall be edit.
- Press the FAV button and beside the chosen TV channel you can see now heart symbol.
- To leave the setting press the EXIT button.
Note:
If you want to delete a favourite TV channel from the favourite list, than browse the TV channel which is marked by a heart symbol and press the FAV button. The heart symbol is deleted and this TV channel can not seen anymore in the favourite list.
LCD Settings
Channel setting
Skip a TV Channel
With this option you can define single TV channel which can not dial anymore by using the numeric buttons.
- With the / buttons you can choose the TV channel, which shall be skipped.
- Press the BLUE button and beside the chosen TV channel you can see now blue symbol.
- To leave the setting press the EXIT button.
Rename a TV Channel (only by analogue TV channel possible)
With this option you can rename single analogue TV channel and define a new label.
- With the / buttons you can choose the TV channel, which shall be skipped.
- Press the GREEN button and beside the chosen TV channel you can see now green symbol.
- With the / buttons you can browse the letters on each place.
- With the or buttons you can go to the next position.
- Save the new label of the TV channel by pressing the TV MENU button.
- To leave the setting press the EXIT button.
Delete a TV Channel
With this option you can delete single TV channel from the TV list.
- With the / buttons you can choose the TV channel, which shall be skipped.
- Press the RED button and beside the chosen TV channel you can see now red symbol.
- Confirm the deleting by pressing again the RED button.
- To leave the setting press the EXIT button.
Note:
The selected TV channel is now deleted from the TV channel list.
LCD Settings
Picture setting
The picture settings include option for "Picture Mode", "Contrast", "Brightness", "Colour", "Sharpness", "Hue", "Colour Temperature", "Aspect Ratio", "Noise Reduction" and "Screen".
Picture Mode
With the or buttons you can choose the picture mode. The live picture changes to the preset settings. The presets are:
Dynamic
Standard
Mild
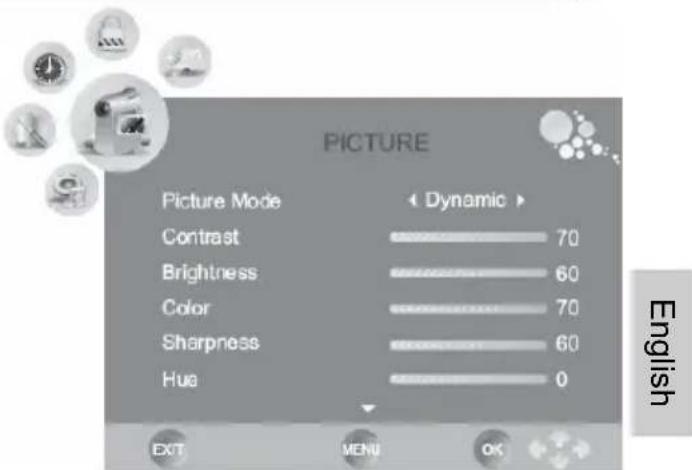
You can define you own settings if you uses the USER options.
Brightness
With the or buttons you can select the level of brightness. This option is only than active, when you uses the USER option by the picture mode.
Contrast
With the or buttons you can select the level of contrast. This option is only than active, when you uses the USER option by the picture mode.
Colour
With the or buttons you can select the level of contrast. This option is only than active, when you use the USER option by the picture mode.
Sharpness
With the or buttons you can select the level of sharpness. This option is only than active, when you uses the USER option by the picture mode.
Hue
With the or buttons you can select the level of hue. This option is only than active, when you use the USER option by the picture mode.
LCD Settings
Picture setting
Colour Temperature
With the or buttons you can select the level of colour temperature. The three preset options are:
Cool
Warm
Medium
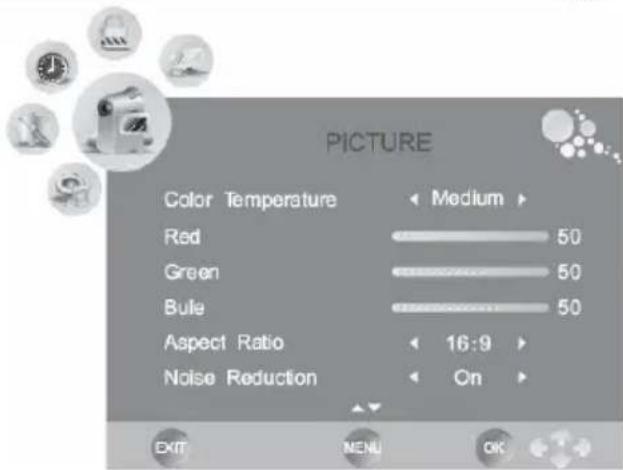
You can define you own settings if you use the USER options. Than you can get access to the three colours "Red", "Green" and "Blue". Select the level of each colour by using the or buttons.
Aspect Ratio
With the or buttons you can select the aspect ratio and changes the view on the screen. The options are:
16:9 - The picture is every time in full screen mode, independent from the supported aspect ratio.
4:3 - The picture view is 4:3 and shows on the left and right side a black bar, independent from the supported aspect ratio.
- Auto - The view is defined by the supported aspect ratio and the adjustment is automatically. By 16:9 is the picture in full screen and by 4:3 show the screen the black bars on the right and left side.
- Zoom 1 - This option can be used for an 4:3 aspect ratio. The picture is zoomed into full screen by keeping the aspect ratio. Parts of the picture will be cut-off (specially on the top or bottom side) and can not seen anymore.
- Zoom 2 - This option can be used for an 16:9 widescreen or cinemascope picture. The picture is zoomed into full screen by keeping the aspect ratio. Parts of the picture will be cut-off (specially on the right and left side) and can not seen anymore.
By every source except the internal DVD-Player you can change the aspect ratio by pressing the ZOOM button on the remote control.
Note:
Do not uses the 4:3 aspect ratio every time, because you can damage the TFT LCD screen.
Noise Reduction
With the or buttons you can activate or deactivate the noise reduction. The option ON starts the noise reduction and OFF deactivate them.
LCD Settings
Picture setting
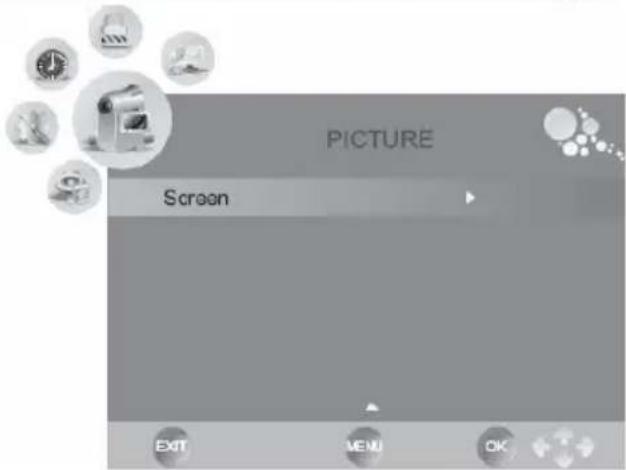
When you uses the VGA input, than you have several additional options for the adjustment of the picture. These options are behind the setting SCREEN.
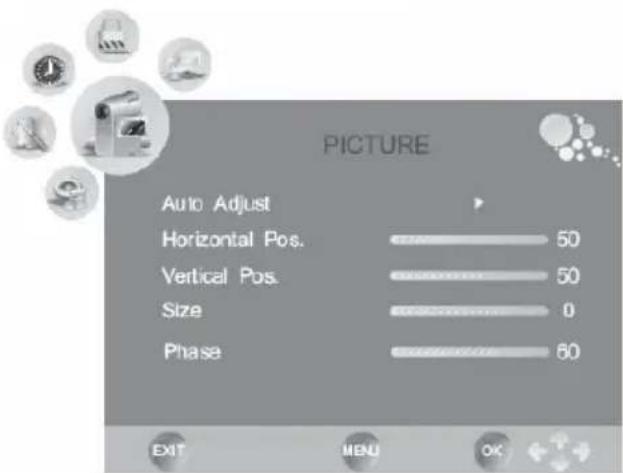
Press the button to get access to the SCREEN options. The sub-options are:
- Auto Adjust
Horizontal Position
Vertical Position
Size
Phase
Auto Adjust
You can uses the Auto adjust option to synchronizes the picture from the PC VGA port in an optimal way. Press the button to synchronizes the screen display.
Horizontal and Vertical Position
With these option you can adjust the VGA picture manually on the screen. Press the or buttons and the picture shifts to high and width.
Size
Press the or buttons to change the size of the VGA picture on the screen, until a stable image is obtained.
Phase
Use or buttons to adjust the phase of the ADC sampling clock relative to the H-sync signal, until a stable image is obtained.
Save the new settings by pressing the TV MENU button.
To leave the setting press the EXIT button.
LCD Settings
Sound setting
The sound settings include options for "Sound Mode", "Treble", "Bass", "Balance", "Auto Volume" and "Surround".
Sound Mode
With the or buttons you can select the sound mode. The preset options are:
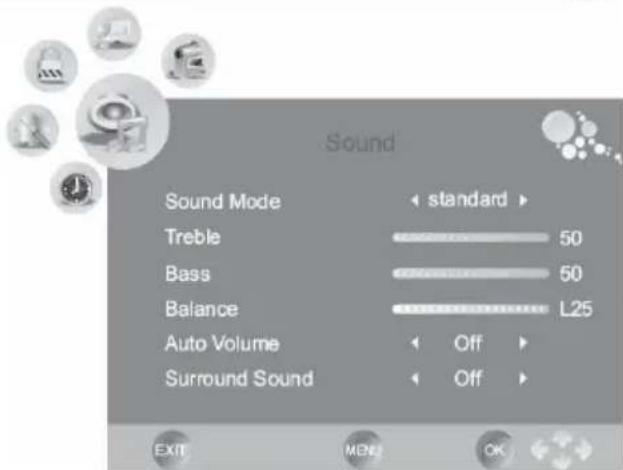
Music
Movie
Sport
Standard
You can define you own settings if you uses the USER options. Than you have access to the settings of treble and bass.
Treble and Bass
With the or buttons you can select the level treble and bass. These option are only than active, when the USER option by sound mode is set.
Balance
With the or buttons you can select the balance.
Auto Volume
With this option you can activate an automatic damping of the volume, if very loud sound passage are happened. This mode is like a Night Mode. With the or buttons you can activate or deactivate the damping.
ON - The damping is active
- OFF - deactivate the damping
Surround Sound
This option activates the surround effects by the sound output. With the or buttons you can activate or deactivate the surround sound.
ON - The Surround Sound is active
- OFF - deactivate the Surround Sound
LCD Settings
Time setting
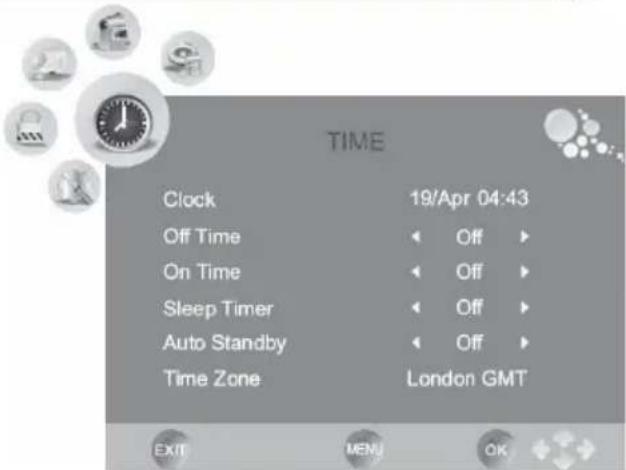
The Time settings include the options for "Clock", "Off Time", "On Time", "Sleep Timer", "Auto Stand-By" and "Time Zone".
Clock
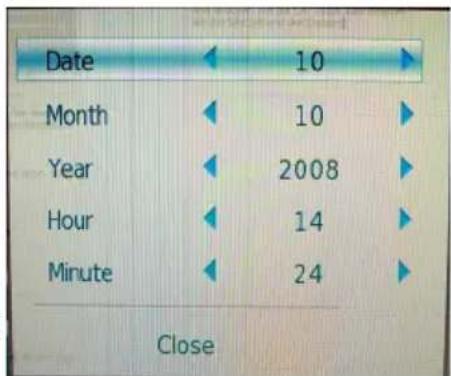
Choose the clock setting with the button and start to change the clock by pressing the OK button. An additional popup window appears on the screen.
With the / buttons you can choose every sub-option. With the or buttons you can change the options. The sub-options are:
4s||6u3
- Date
Month
Year - Hour
- Minute
If you had change some settings, please navigate to the button to "Close" and press the OK button for the saving the changes.
Off Time of the HTC TV set
With this option you can program the TV set for automatically switch off. Start the option by pressing the button and a new popup window appears on the screen. There you can define each setting to program the off time. The settings are:
Repeat
Here you can define the cycle of the off time:
A. Once
B. Every Day
C. Monday-Friday
D. Monday-Saturday
E. Saturday-Sunday
F. Sunday
G. Off
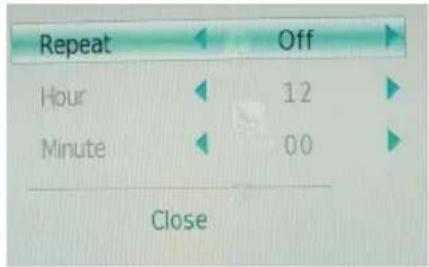
- Hour
Define the clock in hour (e.g. 18 o'clock)
- Minute
Define the clock in minutes (e.g. 15 minutes)
LCD Settings
Time setting
On Time of the HTC TV set
With this option you can program the TV set for automatically switch on. Start the option by pressing the button and a new popup window appears on the screen. There you can define each setting to program the on time. The settings are:
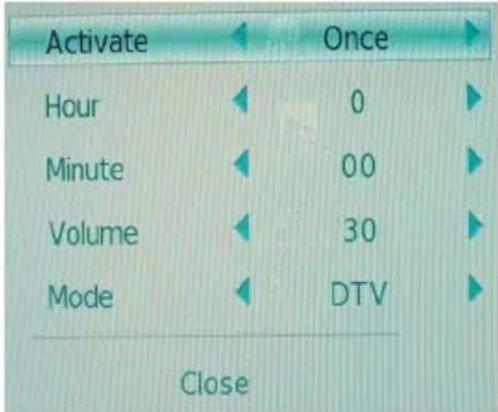
Activate
Here you can define the cycle of the on time:
A. Once
B. Every Day
C. Monday-Friday
D. Monday-Saturday
E. Saturday-Sunday
F. Sunday
G. Off
- Hour
Define the clock in hour (e.g. 18 o'clock)
- Minute
Define the clock in minutes (e.g. 15 minutes)
Volume
Here you can define the volume level by switch on the HTC TV set
Mode
Here you can define the Mode, in which the HTC TV set starts by On Time. You can choose DTV, ATV and Radio
For example, you define the settings to Monday-Friday, 8:05 o'clock, Volume 40 and DTV. Than the HTC TV set starts between Monday and Friday at 8:05 o'clock with the last active DTV channel by a volume of 40.
Sleep Timer
With the option you can program the Sleep Timer to switch off the HTC TV set. The preset steps are defined in minutes.
Note:
You can also start the Sleep Timer by pressing the SLEEP button on the remote control. By repeatedly pressing the SLEEP button you can change the preset minutes.
Auto Stand-By
With this option you can program the HTC TV set for automatically switch off, when after several minutes no active signal provided by the source (HDMI, DVD, VGA, ect.)
LCD Settings
Time setting
Time Zone
With this option you can set the Time Zone. If you had chosen by the first time installation the country, than the Time Zone is defined already.
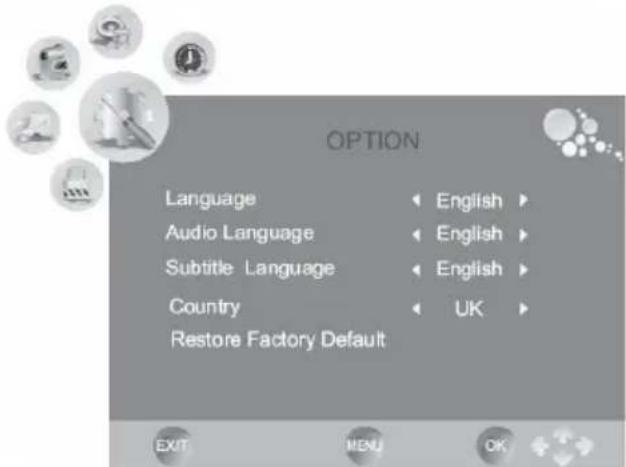
Options
The Option Settings include the "Language", "Audio language", Subtitle language", "Country" and the "Factory Default".
You can change each setting by using the or buttons.
Language
Here you can select the language for the OSD.
English
Audio language
This option is important in DVB-T mode and you can select the audio language. Some broadcast TV stations supports multi-lingual TV programs.
Subtitle language
This option is important in DVB-T mode and you can select the subtitle language. Some broadcast TV stations supports subtitles in TV programs.
Country
Here you can define the country. The country setting has influence by other options, like Time Zone or the searching of ATV and DTV channels.
With this option you can load and reset the factory default settings. All personally settings are deleted.
LCD Settings
Lock setting
The LOCK settings include the option for "Lock Channel", "Set Password", "Block Program" and the "Parental Guidance".
Before you can change the settings, you have to insert the preset password if you enter into the menu. The password is "0 0 0 0"
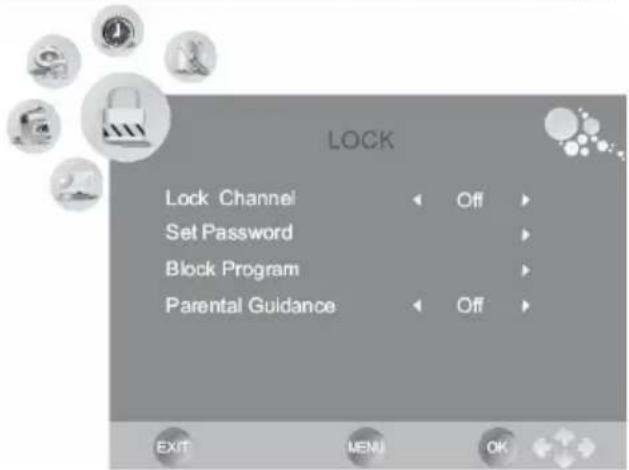
Lock Channel
With this option you can lock a channel.
Set Password
With this option you can change the preset password. Please insert the new password and confirm the new password again.
Block Program
With this option you can block single TV channels. After starting the option the channel list appears on the screen. With the / buttons you can choose TV channel which you want to block. To block a channel please press the GREEN button on the remote control. On the chosen TV channel appears a lock symbol. Save the settings by pressing the TV MENU button.
The block TV channel can not choose anymore.
Parental Guidance
With this option you can define the level of the parental control. The parental control can be only than active when the TV broadcaster supports this function.

Troubleshooting
Check the following guide for the possible cause of a problem before contacting service. Technical Support of Xoro/MAS:
| Problem Solution | |
| TV won't switch on | ·Check the mains cable is connected properly to both the mains supply and the mains adapter ·Check the cable from the mains adapter is connected properly to the set. ·The electronic circuit may have reset. Pull the plug out, wait for 60 seconds, then plug back again. |
| No picture | ·Check the aerial or other input is connected properly. ·Check that the correct input is selected, using the SOURCE button. ·Check the brightness and contrast settings in the Picture Setting. |
| No sound | ·Check that the VOLUME isn't turned down, or the MUTE button pressed. ·Check that the audio cables are connected to the correct inputs. |
| Picture is wrong colour | ·Check that the correct input is selected, using the SOUECE button. |
| The picture is unstable when used with a PC | ·Check the Picture Setting and adjust the view by Auto Adjust match the video output settings of the PC. |
| There are a few coloured spots on the screen | ·High resolution LCD screens often have a small number of faulty pixels. ·This is normal and within the bounds of our quality control checks. |
| Picture with wrong scaling | ·The LCD has the wrong aspect ratio. Please press the Size button to switch the aspect ratio from 16:9 to 4:3. |
Troubleshooting
| Symptom | Correction |
| No DVB-T reception | •Switch the player into the DVB-T mode. •No DVB-T reception in your region. •Realign the antenna. Please pay attention to the direction of the antenna tower. •Please use an active indoor aerial or a roof antenna. •Retry the Auto Scan. |
| Picture freezes | •Realign the antenna. Please pay attention to the direction of the antenna tower. •Please use an active indoor aerial or a roof antenna. |
| Strong mosaics or artefacts | •Realign the antenna. Please pay attention to the direction of the antenna tower. |
| No searching possible | •Realign the antenna. Please pay attention to the direction of the antenna tower. •Control the Country selection |
| No Audio or no second audio language | •Press the AUDIO button. Many TV broadcaster supports just only one language. |
| No subtitles | •Press the SUB-T button. Many TV boradcaster does not support subtitles. |
Picture Quality
Die picture quality by DVB-T depends on the different areas and the different conditions. Some parameters are important for the picture quality, the bit rates, the resolution and the reception of the transmitted DVB-T signals.
Bit rate
The bit rates is fixed by the TV broadcaster and can be different between each TV program. Also the different TV broadcaster define the bit rate different to each others. If you see by watching DVB-T strong mosaics structures, artefacts or an un sharp picture, than you can try to increase the Signal strength and Signal quality by searching a better position of the indoor aerial. Maybe you can try also to change a passive indoor aerial to an active indoor aerial. But, if you can realizes optimal condition by receiving the DVB-T signals and you have anymore the artefacts or mosaics structures, than is the transmitted bit rates to low.
In Germany the values are very different by the bit rates:
ZDF 2700 until 4500 kbps
ARD 2000 until 4500 kbps
HR 1800 until 3500 kbps
Private TV Stations 1800 until 2700 kbps
If the bit rate is higher, than the picture quality is mostly better and the picture is more than less by artefacts or mosaic structures.
Resolution
The second influence by the picture quality is the transmitted resolution. If the resolution is higher than you can see a more sharper picture. For example:
ARD/ZDF 720x576 or 704x576 (that's PAL Full D1 resolution)
Other 544x576or 528x576
Receiving Condition
If you see by the information Signal strength and Signal quality some low values, you can try to find another antenna position to increase the reception quality. Visible indicators for a worst reception of the DVB-T signals is for example the a freeze picture or the message "No Signal".
The reception quality depends for example on the kind of the antenna. Three different kind of antenna are available, the passive and active indoor aerial and the roof antenna. Realign your indoor aerial in this way, that you get the best reception as possible. Helpfully it to know in which direction are the public antenna power and than you can adjust the antenna to this direction.
If a passive indoor aerial can not receive the DVB-T signal strong enough, please try an active indoor aerial. The best reception results are by the roof antenna possible.
DVD-Player / USB / Card Reader
Press the SOURCE button on the remote control and choose DVD for using the internal DVD Player.
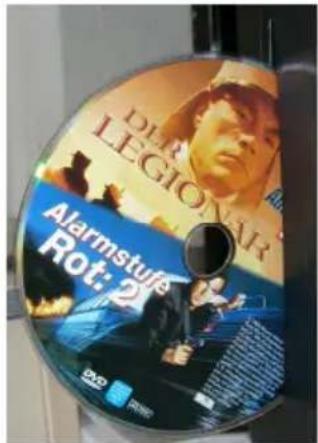
The DVD Slot-In loader opens and produces now some noise. The Slot-In loader is on the left side of the HTC xx26D. Place the disc with the printed side to the rear into the loader and push very slightly to the right side. You can see the silver side. The loader moves in the disc automatically and reads the disc information.
Notes:
- If the disc is inserts with the wrong side, than the loader tries to read the disc. This procedure needs more time than in a normal way. The loader can not read the disc content and displays the message "No disc" and moves out the disc.
- To be able to eject a CD or DVD it is necessary to enable the DVD mode. Otherwise the pressing of the OPEN/CLOSE button (▲) will be without function. Switch on the unit and press the SOURCE button and choose "DVD" in the source menu. Now the HTC xx26d is in DVD mode.
USB Port and Card Reader
Please connect the USB Stick or the Card media in order to the description by the USB Port and Card Reader on the right side of the device. Normally, the printed side of the memory shall be show to the rear side. Start the USB Port or Card Reader by pressing the DVD-SETUP and go to the System Setting and choose by the option SOURCE the USB or CARD.
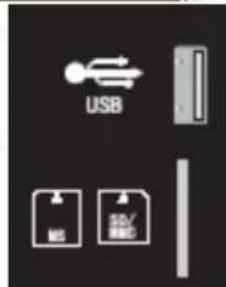
Note:
Due to the legal requirements of CE-conformity, the customer is asked to only connect USB-Sticks to the USB port.
Function
An On Screen Display (OSD) indicator will be displayed at the upper part TV screen when certain functions are executed, or when pressing the OSD button on the remote control.
The OSD indicator is a user friendly interface designed to display the status of playback type. When a different disc is loaded (DVD, CD, Music ready); the OSD indicator bar will be different.
The OSD bar will appear automatically if it is activated by pressing the D.DISPLAY button, Press the D.DISPLAY again and a new status bar will appear. Press D.DISPLAY a third time and the OSD bar will disappear. When OSD indicator bar appears, press other button, the
OSD indicator bar will disappear automatically.

DVD-Player / USB / Card Reader
Function
By pressing the D.DISPLAY button again the following picture is shown by Video -DVD:

- Active sound track
- Format of sound track DD 5.1 CH (channel)
- Subtitle (not included in this example) (OFF)
- More aspects (in this example there are no aspects activate at moment)
By MPEG-4 video files the information is a bit different than with a video DVD. Important information for a ISO Data disk with MPEG-4 files are:

- Disc Format (here CDROM)
- Number of tracks and which one is just played
- With or without sound
- Running time
Open/Close
To open and close the disc tray. Press OPEN/CLOSE button on the front panel or the remote.

Notes:
Player will not skip forward or backward during "WARNING" section of a DVD disc.
- Single chapter DVD or single track CD cannot skip
Play/Pause
Press PLAY button to play the disc. Press PLAY/PAUSE button again to pause (still picture). Press PLAY/PAUSE button to playback the content.

Stop
Press STOP button to stop in two modes:

- Press STOP button once. Stop memorizes the interrupt position and the OSD shows PRESTOP. Resume play by pressing PLAY button.
- Press STOP button twice completely stop disc. The OSD shows "STOP" and the PLAY button will resume disc.
DVD-Player / USB / Card Reader
Function

Press this button skip advance DVD chapter or CD track.

Press this button skip backward DVD chapter or CD track.
Fast Backward/Fast Forward

Press this button to fast backward through the disc. Repeatedly press the button.

Press this button to fast forward through the disc. Repeatedly press the button will increase the search speed.
Notes:
The changes in speed by fast backward or fast forward are from Normal x2 x4 x8 20 Normal
- The player is muted in fast forward or fast backward this mode.
- Player will not fast forward or fast backward during WARNING section of a DVD disc
DVD Menu
While playing a DVD, press the DVD.MENU button return to the DVD disc menu.

Numeric Buttons
Numerical key pad (Random Program access)
- To direct access a DVD chapter or a CD track, input the desired DVD chapter or CD track number using the numerical key pad.
- Input data for the DVD disc start menu or the player's setup menu.


Title
While playing a DVD, press the DVD.TITLE button return to the DVD disc title menu.

Audio Track
While playback a DVD disc, press AUDIO button repeatedly to select the desired audio sound track. A DVD disc may contains up to 8 selectable audio sound tracks.
Function
Repeat section A-B
To repeat playback a specific section of a disc.
- Press the A-B button at the starting point of the desired section, "REPEAT A-" display on screen.
- Press the A-B button again, at the end of the desired section, "REPEAT A-B" display on screen. The desired section A to B until the function is cancelled.
- To cancel the function, Press the A-B button again return to normal play.
Note:
Some DVD discs do not allow A-B function
Repeat Mode
Press PEPEAT button repeatedly to select the repeat mode. In DVD mode In CD mode
REP. CHAPTER Repeat chapter REP. 1 Repeat track
REP. TITLE Repeat title REP. ALL Repeat disc
REP. OFF Repeat off REP. OFF Repeat off

Note:
Some DVD discs do not allow repeat function.
Angle
While playback a DVD disc, press ANGLE button repeatedly to select the desired camera angle. A DVD disc may contain up to 9 selectable camera angles.
Subtitle
While play a DVD disc, press SUB-T button repeatedly to select the desired subtitle, A DVD disc may contains up to 32 selectable subtitles.
Note:
DVD disc start menu may contains set up of angle, Subtitle and Audio soundtrack selection. You may do the selection in the disc start menu.
Zoom
Press the ZOOM button repeatedly TV Screen display:
ZOOM x2 -> ZOOM x3 -> ZOOM x4 -> ZOOM x1/2 -> ZOOM x1/3 -> ZOOM x1/4 -> ZOOM OFF

When playback the JPEG. Press the ZOOM button display the zoom x1/2, x1/3, x1/4, press direction button to rotate picture. While display the zoom x2, x3, x4, press direction button to move picture position.
Function
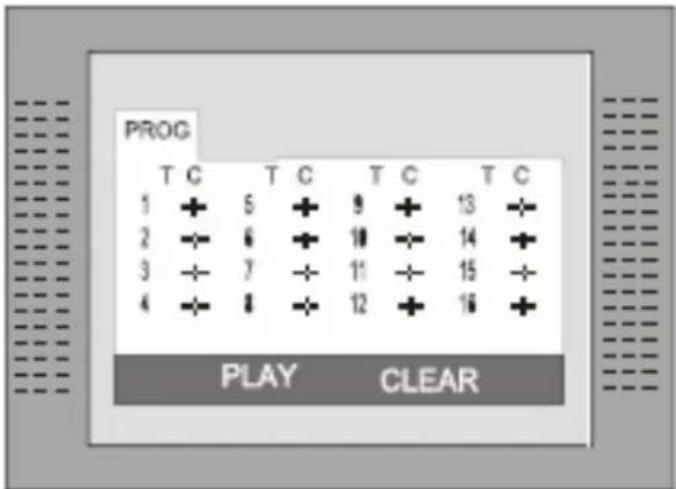
Program
Press PROG button to quit the program menu.

In DVD mode
When the program menu appears input the Title and Chapter Number
PLAY: Press PLAY button to start program play.
CLEAR: Navigate to the CLEAR button if you want to cancel the wrong information you input. Press ENTER again to cancel all the tracks.
In CD mode
When the program menu appears, input the Track number, press ENTER, when the programming is completed.
Data memory with Music, JPEG or Video files
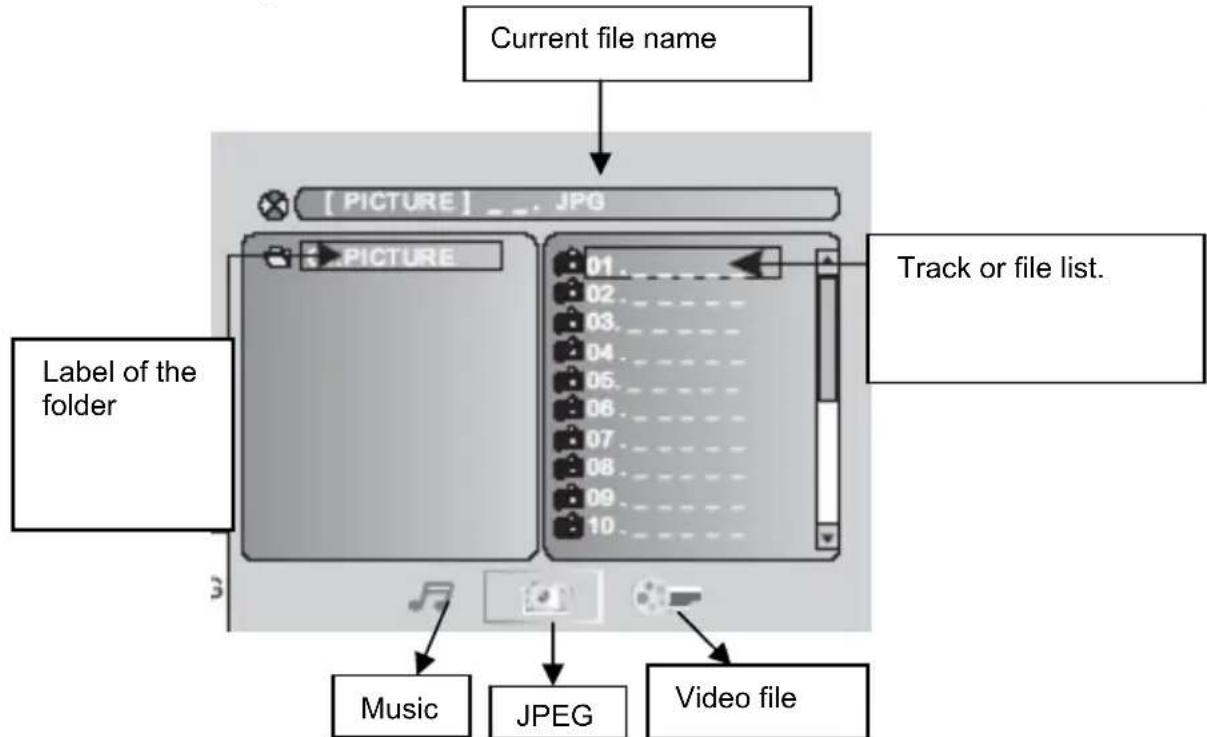
Insert the a disc or connect a USB-Stick or connect a card memory (SD, MMC or MS card) and the player will auto search the directories saved Video/Music/JPEG files. After searching, it will auto go to the first directory saved Music files (to the disc containing both Music and JPEG files. To the disc containing single type of files, it will go to the first directory) and play the first song in the directory (File name is highlighted). The screen displays as the picture below:
If the internal DVD-player does not read the USB-Stick or read the Card media, please press the DVD-SETUP button and choose in the system setting the option SOURCE. There you can activate the USB port or Card Reader.
Notes:
- With the arrow key to the right you can change between the catalogue window, the Chops and Track window and to the file format. File formats are of the order: music (mark (note)), pictures (camera) and video (arrow).

- The DVD player starts with the playback of Music files.
- If the internal DVD-player does not read the USB-Stick or read the Card media, please press the DVD-SETUP button and choose in the system setting the option SOURCE. There you can activate the USB port or Card Reader.
- Due to legal requirements of CE-conformity, the customer is asked to only connect USB-Sticks to the USB port.
Data memory with Music, JPEG or Video files
- Use the Arrow buttons to enter the Directory Region and highlight the desired directory, then the first track under it starts playback. You also can use the arrow buttons to enter the File Region and select the file you want to play.
Notes:
- With pressing the Left and Right arrow buttons, you can activate Directory Region, File Region and File Switch Region separately.
The highlight in Directory Region and File Region is shown as the picture on left page; While highlighted, a transparent rectangle appears - In File Switch Region, you can press the Left and Right arrow buttons to switch
the highlight, then press Enter; the " " " and " "Button is illustrated in the left side picture. For example, if a disc with Music and JPEG files but without any Video files is loaded, the color of the letter " " and " " will be white and " " black. If a Music file playing, " " turns red.
- When playing a JPEG picture on discs containing Music and JPEG files, press the Return button to return to JPEG list.
- You can press the Numeric buttons to select the file you want to play. For example, if you desire the 15^th track in current list, press the 10 + Button once, then press "5", the 15^th starts playback.
- A folder or the root of a disc, USB-Stick or Card Media may not more than 400 files inside. Otherwise all files below them will be ignored.
Notes:
- When playing a disc with Music files, no video can be displayed at the same time.
-
You can press the "PREVIEW" buttons to get helpful message.
-
When playing JPEG picture, press the Program button to choose the picture transition mode. There are 17 transition modes available. Press Program repeatedly to activate the function and choose the desired switch mode. Following transition modes are available :Spread from Left Up to Down, Spread from Down to Left, spread from Left to Right, Spread from Right to Left, Spread from Left Up to Right Down, spread from Right UP to Left Down, Spread Left Down to Right Up, Spread From Right Down to Left Up, Spread from Center to Up /Down, Fold from Up /Down to Center, old from Left/Right to Center, Horizontal Shutter, Vertical Shutter, Fold from the Corners to the Center, and Play, Off.
-
Do not insert more than 400 files in a folder or root directory of a disc or other kind of memories. Otherwise, the player can not recognize the files above 400.
DVD Player Setup
Press the DVD-SETUP button to enter the player's setup menu. Setup menu is a facility for the owner to adjust the detail setting of the player. For the detail of Setup menu see "SET UP MENU" of this instruction manual. Various features of the player can be adjusted in the SETUP menu.
- Press DVD SETUP button SETUP menu appears.
- Press the UP/DOWN button to highlight the desired menu.
In STOP mode, press DVD SETUP button Highlight SYSTEM SETUP. Press UP/DOWN button to select the subtitle. Press ENTER button, the screen displays submenu.
- Press UP/DOWN button to highlight the desired time
Press ENTER confirm your selected item.
System Setup:
TV System
There are NTSC / PAL / AUTO three modes, and choose one mode according your TV mode.
If the TV mode is not suitable as the DVD player screen will blink and become colorless.
The default setting: PAL
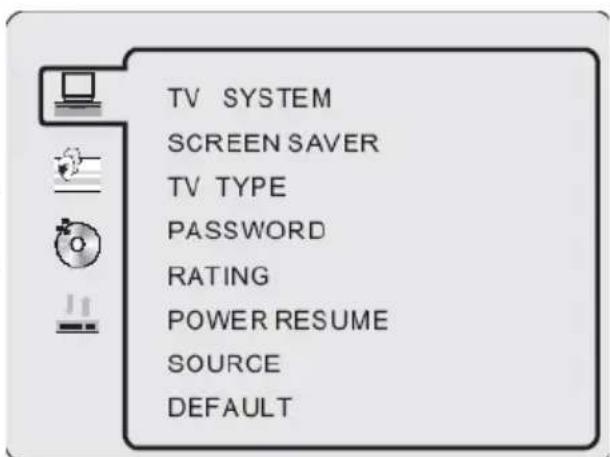
SCREENSAVER
This setting activates or deactivates the screen saver. If the screen saver is ON, than appears the screen saver automatically when the playback stops for a longer time or when no disc is inside.
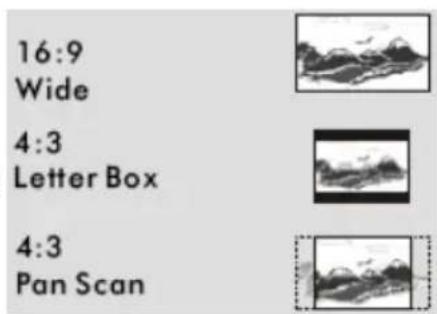
TV Type
- 4:3 Pan Scan: It is suit to the common size TV. When playing, the picture will be cut. so that the TV screen is filled with the picture.
- 4:3 Letter box: when the player connect to the commonly size TV, please select the type. The top and bottom of TV screen will display black frame.
- 16:9 Wide Screen: When the player connects to the wide screen TV.
The default setting: 4 : 3 Pan Scan.
System setup
Password
Move the cursor the PASSWORD item and press ENTER button to confirm and then input the secret code "0 0 0 0" (if it is the first use). After confirmation, you are required to input new secret code and then press ENTER button to confirm.
Warning:
Please remember the new secret code, otherwise you will not be able to change the parental control. Please contact the agent or our company if you forget the secret code.
RATING
There are total eight levels of this control. Eight levels as follow:
- KID-SAFE
- G
- PG
- PG13
- PG-R
- R
- NC-17
- ADULT
The first level discs are open to people of average and eight level only suitable for the adult. If you want to change the Parental control setting, enter the user's age control item and then enter four digital secret code. The default secret code is 8357(if you are using this player for the first time, just input this code). If the input code has been confirmed, the level setting up menu will appear. Move the cursor to choose the expected level and press ENTER button to confirm and store it.
Source
With this option you can activate the DVD loader, USB port or Card Reader. Choose one of the source and confirm by pressing the ENTER button. If you use the AUTO setting, the player starts every time the source which has insert a media.
Resume
This option starts the resume function.
Default
This is the factory default setting up. When choose "RESTORE", the previous setting up, by the user will be cancelled and the player will come to the factory setting up state.
DVD Player Setup
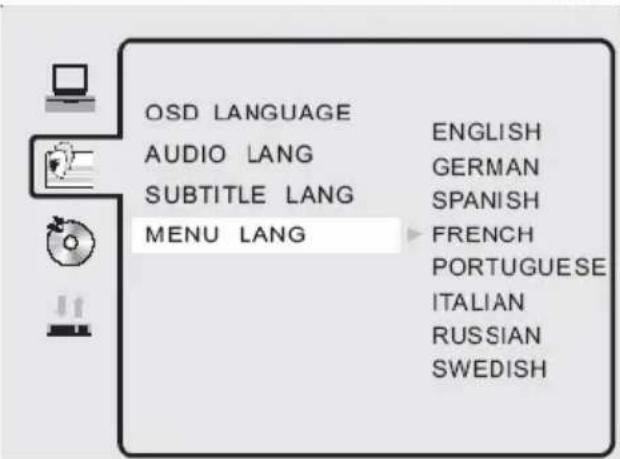
Language Setup
In STOP mode, press DVD SETUP button and Highlight LANGUAGE.
- Press UP/DOWN button
- Press ENTER button, the screen displays submenu.
- Press UP/DOWN button to highlight the desired item in the LANGUAGE menu.
- Press ENTER to confirm your selected item.
- Press SETUP button SETUP to quit.
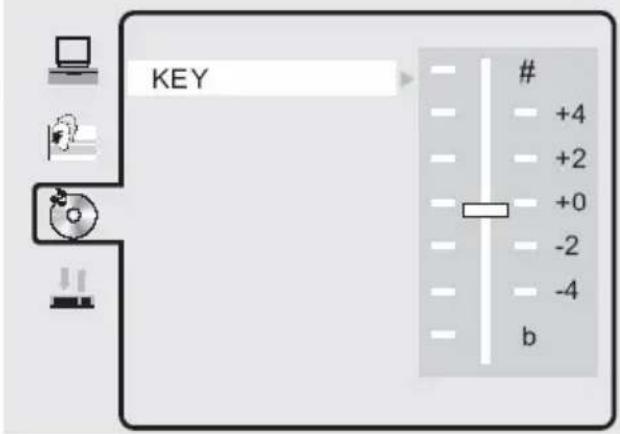
Audio setup
The setting "KEY" adjust the bass audio output.
Positive values for decreasing the bass. Negative values for increasing the bass.
DVD Player Setup
Digital setup
In STOP mode, press DVD SETUP button and Highlight DIGITAL SETUP.
- Press UP/DOWN button
- Press ENTER button, the screen displays submenu.
- Press UP/DOWN button to highlight the desired item in the LANGUAGE menu.
- Press ENTER to confirm your selected item.
- Press SETUP button SETUP to quit.
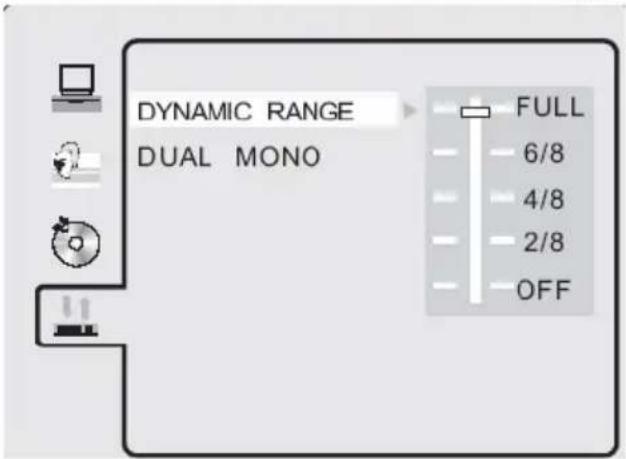
Dynamic Range
Here you can change the audio compression. If you choose the setting "FULL" than the audio gets the biggest limitation. A kind of "NIGHT MODE". By using the setting "OFF", the audio gets no compression.
Dual Mono
The options here are Stereo, Mono L, Mono R and Miy Mono. If you have Dolby digital output your amplifier/decoder, you may select stereo, left, right and mixed sound accordingly.
Troubleshooting DVD
Our custom service will help you. Did you already read the Troubleshooting pages?
Technical custom service of Xoro/MAS:
Phone: +49 40 77 11 09 17
Internet: www.xoro.de/support.htm
| Symptom Check and Action | |
| Does not play | No disc, load a disc.Disc has been loaded upside down. Place the disc with the label side up.Disc's region code does not match to the player.Disc's rating level is higher than the player's rating level setting.Disc is not correct type for the player.Disc is damaged or power on for one or two hours.Moisture may be condensed inside the player. Remove the disc and leave the unit power on for one or two hours. |
| No Picture | Check the system connection is proper and secure.Check if the connection cables are damagedCLEAN the disc. |
| Picture Noise / distorted | The disc is dirty or damaged. Clean the disc or try another disc. |
| Picture not full screen | Select the screen format from the player's SETUP MENU.See "SETUP MENU" of this manual.Select the screen format from DVD disc menu. |
| Problem message dis-play on screen | Following message will display when there is a problem with the loaded disc" 1. "WRONG REGIONAL DISC": Disc's region code is not match to the player. 2. "WRONG PASSWORD": The player refuse to play a disc with rating level higher than the player's rating level setting. 3. "WRONG DISC": The player is equipped with automatic disc quality detection software. When the player detects a problem disc or a damaged disc, the player may keep playing the disc at lower quality or stop playing, depending on the damage level of the disc. |
Troubleshooting DVD
| Symptom Check and Action | |
| Cannot SKIP or SEARCH | Some discs are programmed that do not allow users to SKIP or SEARCH a some sections, especially at the beginning WARNING section Single Chapter disc cannot apply SKIP function. |
| Remote control des not function | Remove the obstacles between the remote control and the player. Point the remote control towards the remote sensor on the player. Check if the batteries of the remote control have been loaded with correct polarities. Replace the batteries of the remote control. |
| No playback from USB | Activates the USB port (System Setup → Source → USB) Connect the USB-Stick Connect the USB Stick in order to the description. Label side to the rear. Content are not conform |
| No playback from Card Media | Activates the Card Reader (System Setup → Source → Card) Connect the Card Media Use only SD, MMC or MS cards Connect the Card Media in order to the description. Label side to the rear. Content are not conform |
Specifications
| HTC 1526D HTC 1926D | HTC 2226D | ||
| Screen Size 39.6 cm (15) | 6 Inch) 48 cm (19 Inch) | 55 cm (21.6 Inch) | |
| Resolution 1366 x 768 | 1440 x 900 | 1366 x 768 | |
| Aspect Ratio 16:9 | 16:10 | 16:9 | |
| Brightness 250 cd/m | 2 | 300 2 | cd/m 400 2 |
| Contrast 500:1 | 1000:1 | 1000:1 | |
| Reaction Time | 5 ms | 3,5 ms | 5 ms |
| Viewing Angle | 90° | 160° | 160° |
| TV System | PAL BG / DK / I oder SECAM BG / DK / L / L' | ||
| Stereo | NICAM / A2 | ||
| Connectors | |||
| HDMI | Standard TMDS max. 1080p | ||
| Y Pb Pr | Y: 1 V p-p // Pb and Pr: 0,7 V p-p | ||
| S-Video | Y: 1,0 V p-p +/- 3 dB / C: 0,3 V p-p +/- 3 dB | ||
| SCART | RGB: 1,0 V p-p 75 Ohm | ||
| PC VGA | 640 x 480 b. 60 Hz / 800 x 600 b. 60 Hz / 1024 x 768 b. 60 Hz | ||
| Antenna | RF Antennenanschluss, 75 Ohm | ||
| Speaker | 2 x 3 Watt | 2 x 3 Watt | 2 x 3 Watt |
| AC / DC Adapter 110—240 V 50/60 Hz | 12 V max. 4 A | 12 V max. 5 A | 12 V max. 6 A |
| Consumption | 48 Watt | 60 Watt | 70 Watt |
| Dim. (LxTxH) [mm] | 402 x 153 x 329 | 465 x 153 x 405 | 538 x 153 x 425 |
| Weight | 3,8 kg | 5,5 kg | 7,0 kg |
| Pixel Error | |||
| Bright Dot | ≤ 3 | ≤ 2 | ≤ 2 |
| Dark Dot | ≤ 5 | ≤ 5 | ≤ 5 |
| Bright + Dark Dots | ≤ 5 | ≤ 5 | ≤ 5 |
| Linie defects | No | No | No |
| Mura | No | No | No |

」
L
厂
Tpe6obAHn 6e3onacHOn 3KcnnyaTaun
3neKtpnuecka 6e3oNaChocTb 5
Φn3nuecka 6e3oNaChocTb. 7
O6aHnHΦopMaun
CoBMeCTHMOCTbO6OpUdoBaHn. 9
YTNIN3aIg OTXOIOB. 10
KomnJIeKtaun 11
OchOBhIe Oco6eHHoCTn. 11
Iodctabka 12
BbICTpbI cTapT 13
KhONKn ynpaBneHnna pa3bEmbl Ha Kopnyce ycTpoNCTBa
TbIOBaI naHEnb. 14
IpaBaa 6okobaa naneb 14
Bepxnaheb 15
ΦoHTaJIbHa NaHeJIb 15
NylbT dncTaHcnoHHoro ynpaBneHn
Iodrotobka Iy K pa6ote 16
IpaBnla nCnoB3OBaHna Iy 16
PacnoJIOxHeNkHONKHaIy 17
PoiKJIIOHHeBHEuHNxycTPOIcTB
IepBoe BkIoueHne MOHO6Joka 22
NcToUHnKu CnHaHa 23
HactpoKa npneMHnKa uΦpOBOrHa3eMHOro BeaHn
BaxKHeIe KhoNkI pDy n nx 24
3neKtpoHna nporpaMa nepea EPG. 27
KauecTBo n306paXeHn 28
Hactpoika npneMnka aHaIorOBoro BeaHna
Hactpoika TeJeBn3opa
Mehno hacrpoKn TepeBn3opa 31
Hactpoika kaHaIOB 32
HactpoIka n3obpaxeHn 36
HactpoKa TeJeBeeUaHnA 39
HactpoKa BpeMeHn 40
DOnoJIHnTeJIbHbIe HacTpoKn 42
HactpoKa 6JIOKIpOBok 43
HencnpabHOCTn TeIeBn3opa n cnocobixx yctpaHeHH 44
Bocnpon3BeDeHne c dncKOB, USB nopTa n KapT naMaTn
3arpy3ka/n3BneueHne DVD ncka 46
USB npT n cnot dny kapT naMrtn 46
HOpMaOnnHa cTpKa peKIma DVD 46
OchOBhIe npabnla ynpaBHeHnB BocpOn3BeDeHnEM 47
Bocnpo3BeDHeNc paiIOB MP3, MPEG-4 n JPEG 51
COДЕРЖAHNE
Hactpoika DVD nponrpbBaTeJia
CnCTeMHbIe HacTpoiKu 53
HactpoKa Ra3bIKOBbIX npaMeTpOB 55
HacrpoKa 3Byka 55
Hacrpoika ufofoBoro aynoOBbIXoDa 56
HeicnpabHocn DVD npOnrpbBaTeJn cnOc6blnx yCTpaHeHna 57
Texnueckne xapaKtepcntuKu 59
3JeKtpnuecka 6e30naCHOctb


Cnmbolom MoHnn Co cTpeKoBHytpn paBHocToPOHHero TpeyrolbHnka 0603Haayetc HAnuue Bo BHyTpEHnx CXemax ycTpoiCTBa OnaCHO DnA 3DopOBBy YeNoBEKa yPoBnHa npJKeHn.

CIMBOJOM BOCKNIUaTeJIbHOrO 3HaKa BHyTpRu paBHOCTOpOHHeRo TpeYrOBnka O6o3HaauKToCra BaXhBie N O6raTeJIbHbIe IIN Co6JIIODeHn HNCTpyKcUN IO NCNoJIb3OBAHnIO N O6cLyXNBaHnO yCTpoCTBa.
3TO yCTPOIcTBO COOTBETCTByet Tpe6oBAHnM Uactn 15 PpaBn PhedapbHO Komnccnn no Cb3n (FCC, CLA). FyHKUIOHPOBaHne 3TOO yCTPOINCTBA ONpeDJIeTcR cJeDyUOIMN DBymra YCNOBAMN: (1) OHO He DoJNKHO Co3DaBaTb 3NeKTPOMaHHTHbIE NOMEXI DnRA Dpynx np6opOB n (2) 3TO yCTPOINCTBO CnOCo6HO pa60TaTB pRn BO3dEInCTBn Ha Hero 3NEKTPOMaHHTbIX NOMEx CO CTOPOHbI Dpynx yCTPOINCTB.
Pyko0o3meo noIb3oBameJia
- BCE nHCTpykun no 6e3onacHocTn npabote doJxHbI 6bItb npOHTaHbI Do hauana pa6oTBc yCTpOInCTBOM.
- CoxpaHnTe HnctpyKuIN - HnctpyKuIN no 6e3oNaChOCTn npa60Te cneDyET coxpaHrTb DnI NCNoJIb3OBaHHB KaueCTBe CnpaBOUHOH NfOpMaun.
- CnEpyET TBepIO npIepeKINBaTbCBy BExePdynpeXKeHn, npIKneeHHbIX Ha KOpnyce yCTpoiCTBa n 3aNNcaHHbIX B PykoBOcTBe noJIb3OBaTeJIa.
- CnEduTe BCem INHCTpyKcIaM No pa6Ote N IcNoJIb3OBaHIno yCTpoNCTBa.
Janaep
LiofoBoI npoIrpBbATEIb BnDeO IINCKOB COePKeNT BCTpoEHHyIO Na3epHyO CnCTEmy Klacca 1.
- y6eIntecb, yTO npBOp BbIKHouen nepeD TeM, kAK OTKpbBaTb KpbIShy npOnrPbBaTeJIa.
- He BCKpbBaIte yCTpoINCTBO. He nbTaIteCb pa3bpaTb yCTPOINCTBO.
- Bo n36exaHne kaKoJ-Ni6o onachocTn: No npo6JIeMaM obcIyXuBaHna yCTpOcTba o6paauTeCb K npoN3BOdntEnH nn ABTopn3OBaHHOMy cepBCHOMy ceHTpy.
- BuaHmra na3epnra paanaqna npncyTCTByeT, kOrda Kopnyc OTKpbIT.
- IpnmeHHeHpepylnpoBok, HacptoeK JIN BbINONHeHne Oepaun, OTNNUHBIX OT Tex, KOtOpble ONncaHb BYpKOBOcTBe, MoKeT npNBecTN K ONaCHOMy paNaUNOHOMY BO3dEInCTBIO.
Oco6eHHocMu MOHO6Joka
- Ppne m aHaIorOBoro nIu cHpoBOro Ha3eMHoro TeJeBeuaHnA.
- Bocnpoun3BedeHne BnJeO DVD nckOB, BnJeO CD nni ayno-CD.
- BcTpoeHHbIe USB nopT nCnot dJa YTeHnKaP TnaMaTn.
- Подсоевинец Вьшнх устpoист no nHTeppeicam HDMI, SCART, S-VIDEO, VGA И КОМноERTHOMу поту (YUV).
- Hnkaoe npyroe nCnoJb3ObaHne MOHO6Joka He dOnyckaTcra.
3neKtpnuecka 6e30naChocTb
3JIeKmpocha6KeHue
- Hnkorda He TporaTe BnIky BnaJkbIM pykAmN.
- EcnBbXOTnTe BbIaunTb BNJKy n3 po3eKn, BcERda TAHnte HENOCpeDCTBeHHO 3a BNJKy. HNKoRda He TAHnte 3a Ka6eJb, OH MOKeT NOpBaTbcra.
- 6eNTecb, yTo KaebIb NITaHn He n3OrHyT, He 3aUeMJeH IIN Ha npIaBneH, a TaKke B TOM, yTO OH He KOHTaKtpyeC nCTOuHNkAmN, pON3BOJaUIMn TENNo.
- y6eIntecb, yTO Ka6JIb nHTaHn He o6MOTAH BOKpyr yCTpOiCTBa BO BpeMa erop a60tbl.
- Hnkorda He pa3MeaIte ycTpoiCTBO cBepxy ka6eI IITaHn BO BpeM erop a60tbl.
- IcnoIb3yTe TOnIbKO Ka6eIbHbIe ydIIHHTeJI, COOTBeTCTByIOUne ypoBHIO notpe6IaEmoM MoIuHOCTn yCTpOJCTBa.
- Depxnte yctpoictBO noaJIbIe OT DOxJn IpyrNxBIOB BnaI.
- YcTpoIcTBO MOKeT pa6oTaTb TOnbKO, ecN 3JIeKtpuYeCKoe HAnpJxHeHne, O6O3HaueHHoe Ha TnIOB0I pIaCTnHke CHN3y yCTpoIcTBA, COOTBeTcTByeT HApPjxHeHNO B po3ETke 3JIeKtpocEtN. HeCOOTBeTcByUoUee HAnpJxHeHne MoKe TpNBecTNI K HeNCnPaBHOCTn yCTpoIcTBA.
9.He cTaBbTe Ba3bI IN TOMy noo6HbIe Beun CBepxu yCTpoNCTBa. - BOna moKeT npocOHTbcBHyTp b yCToPoiCTBa.
- He BckpbIbAaTe yCTpoNcTBO.
- BbTaunTe cTeBoi uTencelb, ecn yCTpoIcTBo He nCNoJb3yeTcB TeueHne DOnrO nepnoDa BpeMeHN.
- N03a6oTbTecb ,yTo6bl HNKTO He CnOtbIkaJcra O Ka6eJIb NITaHna.
AhmeHHa
YcTpoCTBO MOKET 6bITb NOkNIOyeHO KaHTHe.
- OToCoeDInHnIte Ka6eIb NITaHnIg OT po3ETKu 3JIeKTPoNtAHnI nepeI IOdCoeDInHeHnEM IINOTcoEduHEHnEM TIOHEPA cIpPOBOrO Ha3EmHO BcUaHnI (DVB-T) K/OT aHTehHbI, INaYe cyIecTByeT ONaCHOCb IOBpeJdeHnI dIra obOnx yCTpOInCTB.
- Ecnn BHeHnra aHTeHna nIIN cNCTema Ka6eJe IODcoEiHHeHa K yCTpOiCTBy, y6eINTecb, YTO aHTeHna nIIN Ka6eNbHa CNTema 3a3eMJIeHbl, YTO bYdET oBeCneuHBaTb HeKOTOpyIO 3aIHTy OT cKaUka HAnpJxKeHn I BHyTpEHHero cTaTnueckoro 3apJa.
- OToeHNHe aHTeHHy, ecn yctpoIcTBO He nCNoJIb3yETcB TeYeHne dOnrO
TPEBOAHNA BE3OPIACHOH 3KcPJIYATAUIN
Φn3nuecka 6e3oNaCHOCTb
Pa6oma u mecmononoxeHue
1.Bo BpeM BOcnpOn3BeDeHnA DnCK BpaUaTcra OueHb 6bICTpo.He OTKpbBaIte HnepeBnraTe MOHO6nok BO BpeM BOcnpOn3BeDeHnA.B npOTNBOM Cnyae, nck6ydtIOBpExdH.
2. He noDcoeHnYte akceccyapbl, KOtOpblE He peKOMeHNIOBaHbI npOn3BOIDTeJIem, KMOHO6IOKV.
3. He pacnojarate MOHOBnK Ha HeycTouHBOM CTOJe NIn HeycTouHBoN NOCTaBKe. HeyctOnyBaY yCTAHOBKa MOHObNOka MoXe TcTaTb npUHOB erO naDeHnA, NOBLeYb 3a coBoi cepE3HbIe IOBpeXdeHnK kak IIOe, Tak n H3dJIy. IcNoJb3yIte ToIbKO Te MeCTa dN yCTAHOBKn MOHObNOka N Te CneuaNbHbIe npncoc6JeHnA, KOtOpbl EekomeHDOBaHbI pON3BOHTeJEM NIN PPODAOTC BmEcTe C VCTPOINCTBOM.
4. Pn IIO6oYcTaHOBKe MOHO6JIOKa y6eIHTecb, YTO yCTaHOBka COOTBeTCTByET Tpe6OBAHnAM, peKOMeHNIOBaHHbIM npON3BOUNTeJIeM, n NcNoJIb3yIte TOIbKO peKOMeHNyEMbIe pON3BOUNTeJIeM akCECVapbl.
5. Ipn nCnOJb3OBaHn nepeBnKHO NOCTaBKn OCTOPoXHo nepeBnraTe ee C yCTaHOBJEHOM Ha Hee MOHO6NOKom, YTO6bl N36ExKaTb COCKaJIb3bIBaHnMa HO6Noka Ha non.BHe3aHnA octAHOBka, Ype3MePHOe PpIMHeHne CNbI N HEPOBHn NOBepxHOCTb POJa MOKeT NOCJvKHTb PpUHHo NaJeHn PpN6opa.
6. BCTpoEHbI ININ BHeHnD DVD npOnrPbIBaTeJIb MOyT BOCpON3BOJNTb CTaTNueCKoe 3o6paXeHne Ha 3KpaHe TeJIeBn3Opa B TeUeHne IInTEJIbHOrO IepNoDa BpeMeHN. 3TO MoKeT cTAb IIpnHIOH NOBpeXdEHH 3KpaHa. B 3tOM cIyuae IpeJaaraETcA kTNIBPOBaTB 3KpaHHyIO 3aCTaBky ININ BBIKNIOHTb MOHO6nOK, ecNI yCTpoiCTBO He NCNOB3yETcR.
7. He nCnoB3yTe MOHO6NOK npoJOnKnteJIbHoe BpeMg B peXnme 4:3. 3To MoKeT cTaTb npuHHoN NOBpeKdEHNr 3KpaHa.
8. He yBelenuBaIte yPoBeHb 3Byka, KOrda npOnrPbIBaETCra HerpOMKn OTPbIBOK. EcIn 3a 3TINM OTPbIKOM NocJeDyET HeOxNJaHHoe NOBblSeHne rPOMKoCTn, 3TO MOKeT IOBpeNTb rPOMKOROBOpTeJIM MOHO6JOKa.
9. BCTABJnTe TOnbKO CD nn DVD nCKn B NOdoH dJa DnCKOB.
10. BbIKnIOuAaTe MoHO6Iok, IcNoJIb3yra KhoNky Off/On (BKnIOUHTb/BbIKNIOUHTb), ecHn OH He NcNOJb3yeTcR B TeHeHne DOJrOro NepnoDa BpeMeHN.
11. OTKIQUaIte MOHO6NOK OT 3NeKTPoCeTn npu rpo3e.
12. OTBepTnI N IeJI N KOpnyce oBecneuBaIOT BeHTnIaIIO n rapAHTnpYIOT HAdexHyio pa6Oy yCTpOJCTBA, 3aIuaIOT erO OT nepepeBa, NO3TOMy OHn He DoJXHbI 6bITb 6JOKIOBAHbl INN 3aKbITbl.
13. He yctaHaBnBaIe MoHO6nok Ha KPOBaTb, cody, npei npyrne MmRkne noBepxHocTN, NockoNbky, B pe3yIbTaTe, BeHTINrAIOHHbIe OTBepCTnB MOHO6nOke MOrY T OKa3aTbcra 3aKpblbIM.
14. MoHO6nok He npedHa3Haueyd nB BCTpaUNBaHnB Me6eIb nn CTeHy; He pa3MeaJTe MOHO6nok B 3akpbItoe npoctpaHCTBO, TaKoe, Ka KkaΦ nn 3akpbITar TeJeBN3NoHHaR cTOnKa, ecnn Tam He oecneuBaETcRa HndEkaaBar BeHTnlaqna nn 3TO He yKa3aHO BV NHCTPVkUnn PON3BODNTeJIa.
15. 06ecneyte 3aunTy MOHO6JIOka OT BJIINHn IORoHbIX ycNoBn, BnaHn N BBICOKO Tempeatypbl.
16. HnKoIa He npOuBaIe IIO6Oro PoDa XnIKoCTHa MoHO6JOK.
17. 3aunuatae MOHO6nok n npbT dncTaHcNOHHoro ynpabNeHnO rnonaHaHn rnpMbx COJHeuHbIX Jyuei.
Φn3nuecka 6e30nacHOCTb
- EcnBHeHna aHTeHa nn CnCTema KaBeNei NOcOeINHeHa K MOHO6NOKy, y6eNTecb, yTO aHTeHa nn KaBeIbHa cNCTema 3a3emJIeHbl, yTO 6ydt oBeCneuBaTb HeKOTOpU 3aunTy OT cKaUka HapJxKeHHn n CTaTnueCKOrO 3apJa.
- B COOTBETCTBUN C Tpe6oBaHnA M No 6e3oNaCHOCTN NOIb3OBATeJAM peKOMeHNyETcR NOdklIOuATb K USB nopTy TOnbko USB-ΦnAaKn.
HeucnpaBnocmu
- 06cnykBaHHe: He nbItaTeCb obcIyKBaTb ycToPcIOCTBO camOCToTeJbHO: OTkpBtBt HIN cDBrTaB Kopnyc, TAK KAK 3TO MOKeT CTAb npuHoi nopaxeHna 3JeKTpueckm TOKOM INI npuBeCTN K DpyrIM ONaChbIM NocpeiDCTBnM. O6paaaiTeCb 3a NOMoUbIO NO 06cIyKBaHIO n3dEJIg K KBaIIΦnCupOBaHHOMy nepcoHaNy aBTOpN3OBaHHoro cepBnCHOrO ueHTpa.
2.Поврждени,Тpe6уше BMeшаTeьCTBa cepBnCHоCnyx6bl:В cnyuae BO3HnKHOBEHnIIO60I n3 IpeueuCJIeHHbIX HnXe CNTyaUm Heo6xoJIMO OTKIIQUHTb MOHO6lOK OT 3NeKTPocETn IO6paTntbCBAABTOPu3OBaHHbI cepBnCHbI ueHTp:
a. NOBpeKdEn uHyp nHTaHn nn uTencBbHa BnIka.
b. XnIkoCTb nnn noctopOHnH npedMeT nonaBHyTp b Kopnyca MOHO6noka.
c. MoHO6JIOK nonaI NOI DOXkB nII NIOBveprCBAO3DeNCTBnIO cbipocTn.
d. MoHObIok YHKUHOHpyET HeCTabNbHO IJIN erO pa6oTa He COOTBeTCTByET ONncaHIO B INcTpKuIN. PerynpyTe ToJIbKO Te HAcTpoiKn, KOtOpBie OINCAHbIB PykoBoDCTBe NOnb3OBaTeN; HenpabInbHaer perynnpobKa HeONncAHbIX HAcTpoeK MOKeT npBecTI K HeNCnPabHOCTH MOHObLOka N BO3HNKHeT Heo6XODIMocTb npoJOnkTeNbHoi pa6oTbI KBaINΦuCupOBaHHOrO CneuaNtcta, YTO6bl NCpapBtB BaWy owN6ky.
e. MoHO6nok ypaI nn erO Kopnyc 6bln noBpeKdeH KaKIM-JIb6o dpyrIM cnoc6obm.
- IpoBnIe MOHO6NOKOM npaMeTpbl XapaKTepnCTNK CyueCTBeHNO OTNIuHaOTcOT 3aBHeHHbIX. JIOoe cyueCTBeHHoe OTKIOHeHne B pa6ote MOHO6NOKa CBnTeJIbCTByeT, YTO n3dJIe HJXdaETCBAcePBnCHOM 6cnjKBaHN.
- Ipn Heo6xOIMOCn 3aMeHb KaKnx-JIb6o DeTaneM MOHO6Noka B cepBnCHOM cHTpe notpe6yIe OT CneuJnCTa CepBnCHORO UENTpa NOITBepXJdEHn TOrO, YTO nCNoJIb3yEmbIe Nm HOBbie DeTaNN COOTBeTCTBYIOT Tpe6OBaHnM pON3BOJntEJIr MOHO6Noka Hr OToJInuAOTc CBOUMn NapaMeTpAmN OT 3aMeHReMbIX DeTaneN. NcNoJIb3OBAHHe Hepa3peWehHBIX DeTaneN MoKeT CTaTB npUHHoN IOXapa, nopaxHnR JNeKTpUeCKM TOKOM n/Inn DpyrNX OnaCHOCTeN.
- HNOKTN MOKET NOBpeDHTb 3JIeKTPoHHbIe KOMNoHEnTbI N 3aRpy3HnTb LCD TFT naHeNb MOHO6IOka.
Dolby
ПОНЗВЕДЕНО NO ЛИЦЕНЗМ KOMпанн Dolby Laboratories. АббpeваТурь "Dolby" n DD"ЯBNIOTcTOPROБыIM МарКамн Dolby Laboratorios n He MoryT nCNoIb3OBAtbcS 6e3 ee corlacna. 1992-1997 Dolby Laboratories, Inc. BCE npaba 3aunuENbl.
CobmecTUMOCTb 60pUdoBaHn
Coemecmumocmb c duckamu
- B 3aBnCmOCTn OT COCToHn O6OpUdoBaHn, Ha KOTOpOM 6bJIi 3aIncAbl DnCKn, n camix dNcKOB CD-R/RW (uJn DVD -R, DVD +R, DVD -RW, DVD +RW), HeKOTOpBie dNcKn CD-R/RW (uJn DVD -R, DVD +R, DVD -RW, DVD +RW) MoYr He BOCpON3BODnTbcra Ha 3Tom YCTPOINCTBe.
- He npnkpennrte kakne-Jinbo apJbIKN nn HaKneKN K o6eHM cToPOHAM nCKa (MapKnpoBaHHa CTOPOHa Nn CTOPOHa C 3anncbjo).
3.He nCnoJb3yIe CD nucn HnnpaBnIbHOH OOpMbI (Ha npMep, B OOpMe cepua IIN BOcMbIVOnJIbHbI).IO3Ke OHN MOrVT CTaTb PnUHON HeNCnPabHOpa6Obl. - HeKOTOpBie onepaunn Bocnpoun3BeDeHnra DVD n Video CD nckOB moryt 6bIb yMbIJIeHHO 3anporpaMMnpoBaHb npoun3BOIDTeHem nporpaMMHO oecneueHn. PponrpBbATEnb MoKet BOCpoun3BOIDnTb TOnbKO TO cOepxHMoe DVD n Video CD nCKOB, KOTOpoe 6blno 3aIncAHO Ha HNX pa3pa60TuHKAMn nporpaMMHO oecneueHn, NO3tOMy HeKOTOpBie ONuIN MOrY 6blb HeIOCTynHb Ha HeKOTopBX dNcKaX, a HeKOTOpBie DNCKMORYTCoepKaT DOONHHTeHBHe OIcUNBocnpoun3BeDeHn.
Coemecmumocmb ecmpoeHHo2o npma USB
- B COOTBETCTBn C Tpe6oBaHnA M No 6e3OnaCHocT N OJIb3OBAteJIaM peKOMeHnyetcnoKIOKNIOHTB K USB NOPTV TOIbKO USB-ΦnəuKn.
- NopT USB MOKET NOIDepXINBaTb 0JIaH-NaMraTb EMKOCTbO Do 2 M6. NockoJbKy cyueCTByeT ORpOMHOE KOJIneCtBO pa3HOO6pa3HbIX USB-ФIaIeK C pa3HOO6pa3HbIMN 3JIeKTPOHHbIMN KOMNoHeHTaMn, NOIDepXka IIO6oB USB-ФIaIeK He MoKet 6blTb rapaHTnpOBaHa.
- IoxaanyiCTa, npoopmatnpyTe USB-Фнэшky c nCnoIb3OBAHnEM faIIOBOI CnCTeMbI FAT 32. FaIIOBaa CnCTema NTFS He noDpeKxNbaetc n He 6ydt ONo3HaHa USB NOPTOM.
Coemecmumocmb ccmpoeHHo2 cnoa dny umeHua Kapn nammu
- IoxaIyIcTa, nCnoJb3yIte TOnbko KapTbI nAmrTn SD, MMC nJIn MS.
- Cnot dnyuTeHnKapT nAMrTH MoKeT NOdEepXNBaTb 013w-nAmrTB EMKOCTbHO Do 2 M6. Nocoklbky cyueCTByeT orpOMHoe KOJInuEcTBO pa3Hoo6pa3HbIX KapT nAMrTH o pa3Hoo6pa3HbIMN 3JNEkTPOHHbIMN KOMNoHEHTAMN, NOdEepXka Bcex KapT nAMrTH SD, MMC uIN MS He MoKeT 6bITb rapaHTnPOBaHa.
- He nCnoJIb3vIte KapTb I naMrtu SDHC.
- He nCnoJIb3yIe KapTb IaMaTy MS Pro nn MS Dyo.
- IoxaIyIcTa, npoΦopMaTpyIe KapTbI NaMrtn C nCNoJIb3OBaHHeM paJIOBOI cnCTembl FAT 32. PaJIOBaa cNCTema NTFS He noDepKINBaETcRn He 6yTe TOnO3HaHa cNOTOM dIyUteHn KaPT NaMrtn.
06 aemopckom npae:
HeaBtopn3oBaHoe KOnnpOBaHne, BeuHne, Np6nHoe Bocnpon3BeDeHne n Cdaay DnCKOB B apEny 3anpeuehbl. B daHbI npOdyKT BkInoueHa TexHOJOrna 3auNTbI ABTOPCKOR npaba, 3aunueHHa naTeHTbIMn fOpMylamn Ha cnocob, codepkaumncs B onpeDeneHHbIX natehtax CUSA, n dpyrmm cpeCTBaMn 3auNTbl npab Ha HntJIeKtyaIbHyO co6CTBeHHocTB, npHaadJeKaUy0 Kopnpaunn Macrovision. DaHbI npOdyKT npEHa3NaueH ToIbKO dJa DomaAHeRo n dpyrO rOpaHueHHoro npocmOTpa, ecnn Hnoe He pa3peSeHo KOpnpaunn Macrovision. ModnPhiKaunn npa3bOpka yctpoiCTBa 3anpeuehbl.
OBUJAHNFOPMAUN
yTnHn3aun oTXoDOB
Ymuni3aunna 3neKmpoHnOo 6obpydoaunu
3TO 6OBpyOBAHHe CnpoEeTnpoBaHO n 3r0ToBJIeHO n3 MaTePnaIOB n KOMNoHETOB BbICOKOTo KaueCTBa, KOToPbIe MOryT 6bITb yTIN3OBAHbl n 3aTEM CHOBA NcNOJb3OBAHbl.
Yka3aHHbI CNMB0J 6o3Haayet, YTO 3JIeKTpUyeCKoe N 3JIeKTpOHHO 6OpyIDobAHne IocJe IcHepnAHn CBOero pecypca cJeDyET pa3MeCTNTb OTdJIbHO OT 6bITOBORO Mycopa.
Ioxanynta, pa3MeaIte 3TO o6OpydoBaHne B cNeuaJIbHbIX, npedHa3NaeHHbIX dIg 3TOrO MeCTax IJg BBIO3a Mycopa/ueHTpax
yTNIN3aun, paCnoJIOKeHHbIX B paNoHe BaUero npoxnBaHna. B EbponeeCKOM CoIO3e ectb OTdJIbHa cNCTema IJRA BbIBO3a NcNOJb3OBaHHoro 3JIeKTPuYeCKoro n 3JIeKTPoHHoro 6OpuyoBAnHa. POnKaIyIcTa, NOMOrIte HAM COxpaHHTb OkpyXaIOU cyEpy, B KOTOPoM Mbl XNBem!

Pycckn
Ymuniuzua 6ymau u KapmoHa
CnB0yTnJIn3aunMaTePnanaHaDeTanJnxN3KapToHa NPykoBoCTBO NOb3OBaTeJIyKa3bIBaOT Ha TO, YTO 3TOT MaTePnAn IOBTOpHO nCnObl3yETc. Pa3MeaIte TaKne DeTaII N OTDenbHO OT O6bUHOro 6bITOBORo Mycopa.

Ymuniuzua demaneu u3 nlaemuka
Cnmbon ytnnn3aun MaTePnaHa Ha Detanx n3 nlaCTnka yka3bIbaeT H aTO, YTO OHH NOBtOHO nCNOJb3yOTcR. Pa3MeuaTe TaKne DeTAn OTdEHLHO OT 06bUHOro 6bITOBORo Mycopa.

Haioe Ha ymunu3auuio
CBeTOBOH INHdNKaTOp INK-ceHcOp
PpomkoBOpnteIb
ПильТ ДИСТАНЦИОНноРABЛЕня
Iodzomovka IyK pa6ome
Ppaeunaucnojb3o8aHuaIy
1 OTKpoIte KpbIuKy OTeKa 3JIeMEnTOB NITAHN.
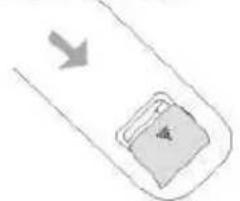
2 yctahOBNTe 3JIemEnTbI NHTAHN,co6JIOdaa noJapHOCTb.
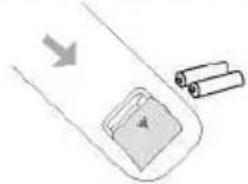
3 3akpoTe KpbuKy OTCeka 3JIeMeHToB NITAHIN.
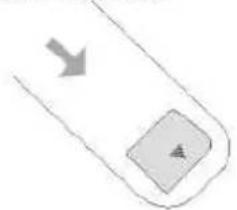
HanpaBte Iy Ha IK-cehCop MOHO6noka (pacnoIoxKeH Ha pOHTaIbHoN NaHeiN) HaxMITE KHOIky, COOTBETCTByUOyU Heo6xOIMoKOMaHNe,
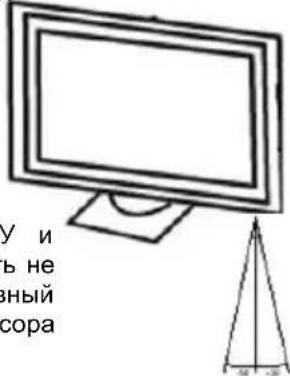

nny
PpumeaHua no uCnoJb30aHuO 6amapeek:
Heco6IIODeHne nepeuCnEHHbIX HNXe yka3aHm MOKeT npNBecTN K yTeUKe 3JIeKTPoNtA n KoppO3n6BaTapeek:
- Пи установке батаразек соблдаитЕ нлярhoeТь.
- YctaHaBnBaEmbIe 6aTapeKn DOJXHbI 6bITb ODHoro N TORO Xe TUNa.
Bo Bpemr dnteJbHbIX nepepbIOB B nCnoJb3OBAHN Iy BbiHMaTe N3 Hero 6aTaapeKn. - PpH He npabnBHO pa6oTe pDy 3aMeHrTe 6aTaapeKn.
B cnlyae yteuKN 3JeKtpoNtA npotpnte 6atapeHbI OTceK n yctaHOBnTe HOBBie 6atapeKn. - Пи утллзациь сатapeек co6юдай Te yctahOBJIeHHbIe npabuJa.
PpumeyaHua:
- Hanpaenme Iny Ha UK-ceHcop, pacnoJoxeHHbu Ha pOHaMaIbHOu naHeNu MOHObla.
HeponymeIy. - Obepeaume Pny om nonadahua Kuokocmu.
He pa36upaume Iy.
PacnoJoxKeHue KhoNOK Ha N
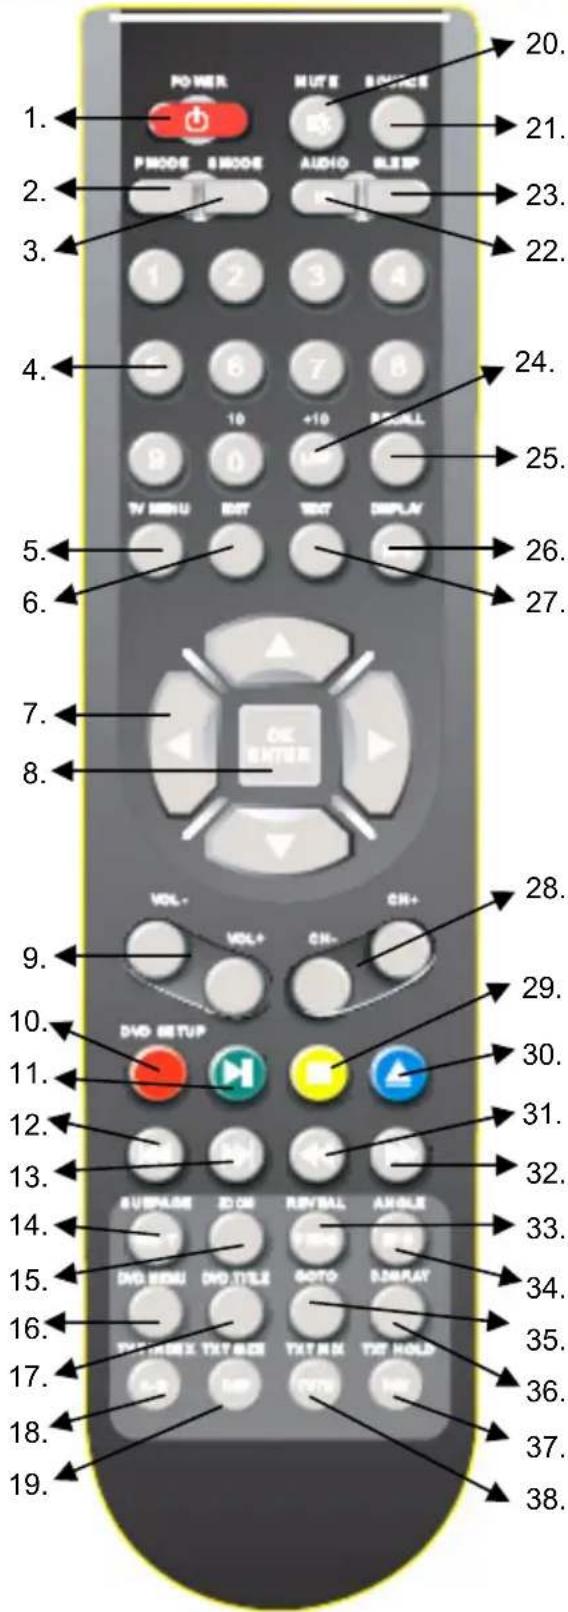
ATV:AHAnorOBbI TB TIOHeP DVB-T:UuPpOBoT TB TIOHeP DVD:DVD npOnrpBbATEb
-
POWER: BkIIOueHHe NITaHn IIN IpeXoD B pexIM 3Heproc6epeXeHn Standby.
-
PMODE: Bb6op pexma n3o6paxeHnA.
-
SMODE: BB6op pexnma 3ByaHna.
-
0-9: BbI6op KaHnA Na BSeHaHnA 0-9.
-
TV MENU: HabtpoikKa TeJeBn3opa.
-
EXIT: BbIXOД n3 MeHIO HAcTpoEK.
-
▲/▼/▲/OK: Khoπκ ηραβνηηκύκρομ.
-
ENTER: NOITBePxJdHHe BbIbpaHHbIX 3HaueHnB 3KpaHHbIX MeHIO HAcTpoEk.
-
VOL-/VOL+: yBEniueHne/ymEnbIeHne o6uE nn pOMKoCTn.
-
ATV: Kapachna Khonka pejxima TeNeteKCT;
DVB-T: Kapachna Khonka pejxima TeNeteKCT;
DVD: DVD SETUP: HactpojuKa DVD npourpbyBaTeJIa. -
ATV: 3eneHaj KhoNka pexnma TeJeTeKCT; DVB-T: eeneHaj KhoNka pexnma TeJeTeKCT; DVD: PLAY/PAUSE: Bocnpoun3BeDeHne/nay3
12.DVD: nepexoK npdebyuuei rnaBe/Tpeky.
13.DVD: nepexoK cneyuoue rnaBe/tpeky.
- ATV: SUB.Page: nepexoД K noДстраицepexma TeNETeKCT;DVB-T:SUB.Page: nepexoД K noДстраицepexma TeNETeKCT;
DVD: SUB-T: BblOp r3bka cy6TnTPOB.
- ATV: SIZE: yctaHObKa fOpMaTa 3KpaHa 4:3/16:9.
DVB-T:SIZE:vCTaHOBkaΦoDMATAKpHa 4:3/16:9.
DVD: ZOOM: MacsTa6pOBaHne 306paKeHnA.
16.DVD: MENU:3KpaHHoe MeHIO INCKA.
-
DVD: TITLE: ornaBneHne φnIbMa (MeHIO pa3dJeOB).
-
ATV: INHdEeKCHa KhoNka pexkma TeTeKCT;
DVB-T: INdekchna KhoNka peKIma TeTeKCT;
DVD: A-B: Bb6op n IOBtOPOe Bocnpo3BeDeHne cpaMaHTa 3aINcN OT TOckn A do TOchk B.
-
ATV: TEXT.SIZE: macuTa6npoBaHne peKIma TeIeTeKCT;
DVB-T: TEXT.SIZE: macuTa6npoBaHne peKIma TeIeTeKCT;
DVD: REP: NOBTOphoe BOCnpou3BeJeHne. -
MUTE: OTKJIIOUcHHe 3Byka.
-
SOURCE: BbI6op nCTOuHnka CnHana.
-
ATV: Bb6op peXIma ayDnOcoPBOxoJHnI;
DVB-T AUDIO: Bb6op 3bka 3BykoBOro
CONPOBOXdHn;
DVD: AUDIO: Bb6op 3bka 3BykoBoro conpoBoxKeHn.
-
SLEEP: TaMep abTomatueckoro OTKJIIOUeHnA.
-
ATV: LIST: Cnncok KaHaJIOB;
DVB-T:LIST:CnncOKKaHAnOB
PacnoonKeHue KhoNOK Ha N
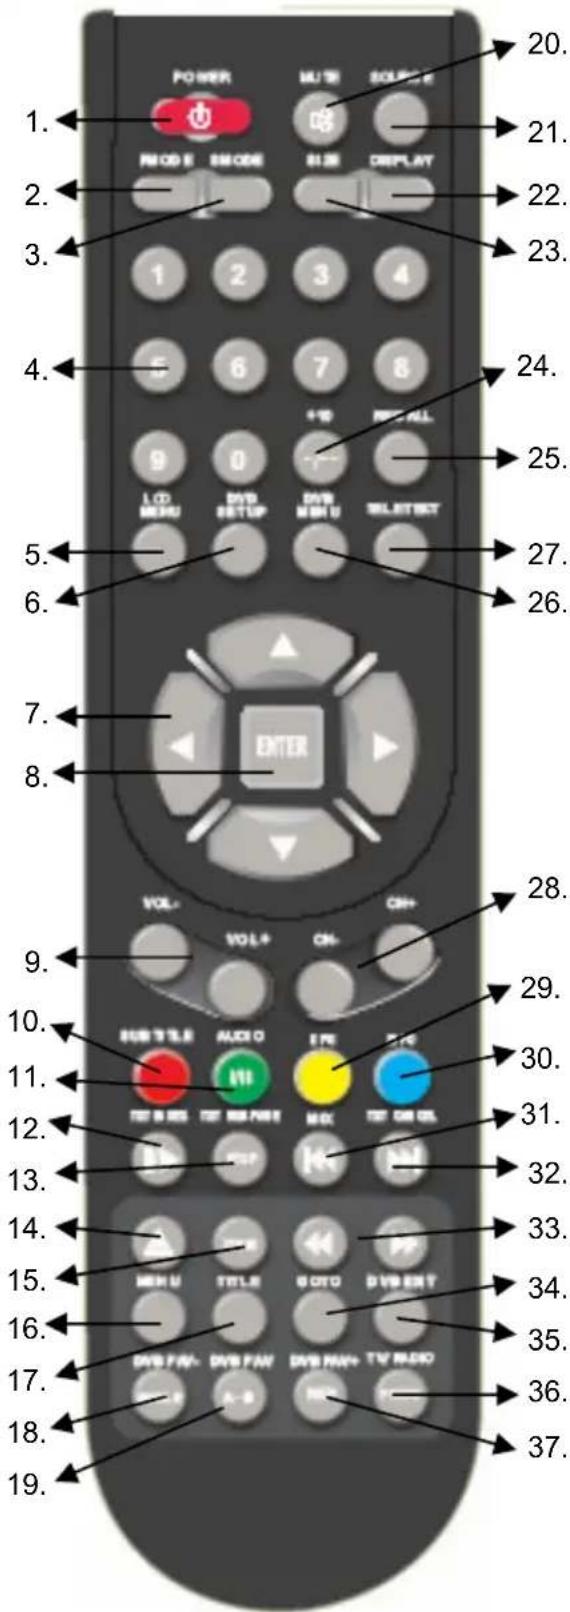
ATV:AHaIorOBbI TB TIOHeP DVB-T:UnpoBoT TB TIOHeP DVD:DVD npOnrpBbTaTeJb
- ATV: DISPLAY: BBIBOD Ha 3KpaH INHΦopMaIIN 06 NCTOHTHKe.
DVB-T INFO: BBIOH Ha 3KpaH INHOpMaUN O TEKYUeM KaHaJe.
- ATV: TELETEXT: Bключени ржима TeNETEKCT:
DVB-T:TELETEXT:BkIIOueHnepeKIMa TeneTeKCT.
- ATV: CH-/CH+: cneyuoyu/ npedbyuyn KaHai:
DVB-T:CH-/CH+:cneyuouu/npedbinyu KaHai.
- ATV: Kejnta KhONka pexmTa TeTeKeCT;
DVB-T:KenTaN KONa peXnMa TeIeTeKCT;
DVD: STOP: octaHOBka BocnpOn3BeJeHnA.
30.ATV+DVB-T:CNHRAKHONKapeKmA TeJIeTeKT;
DVD: OPEN/CLOSE: n3Bneuey dnck.
31.DVD:<<:yckopeHHoe Bocnpoun3BeJeHne BO6paTHOM HappBHeHN.
32.DVD:>>:yCKOpEHoeBocnpOn3BeDeHne B nPROM HnPaBHeHH.
- ATV: OTo6paXeHHe cKpbIToHnΦopMaunpeXmTaTeTKeCT;
DVB-T: OTo6paKeHHe CkpyToI INHΦOpMaIIN peKIma TeneTeKCT;
DVD: PROGRAM: nporpammpoBaHne nocJeIOBaTeIbHOCTN BOCnpon3BedeHn.
34.DVB-T:EPG:3neKtpoHHa nporpaMa nepeya;
DVD: ANGLE: Bb6op paKypca npocMToPa.
35.DVD: GOTO: nepexoK npyromy pa3enny
36.DVD:D DISPLAY: BBIOHa 3KpaH INΦopMaUO BOCIPON3BeDEHN.
- ATV^+ :MIX: BKJIIOUeHHepeXIMa npo3paHOro TeneTeKCTA:
DVB-T:TV/RADIO:nepeKIOUeHHe MEJy TeJIeBUNHOHBIMn paDAIOKAHaJaAMN.
- ATV+: HOLD: Фнксюване ИЗобрахеня TeletekeCTa;
DVB-T:FAV:ПрсмOTлбиMbIXKaHaJIIOB.
ПОДКЛЮЧЕНЕ BHESHHIX YCTPOИСТВ
BkIoueHue/ebIKIOueHue 3JekmponumaHua
IoiCoeHnHTe Hyp aanTepa 3JIeKtpoNTaHna K pa3bemy DC IN Ha TBIOBOI nAHeN MOHO6noka.
Приnomоши Кабеля элкгponntаня NOДСоEDINHITE aДАТЕ рсрпсгнNTAHЯ Kpo3eTke.ИндиКаTOp ПИТAHЯ LED 3aROpNTcKpaCHbIM CBETOM.MOHOBLOK haxODHTC B pexIME 3hepros6pexeHЯ Standby. BKIOHHTe MOHO6LOK, Haxab KONky POWER Ha BepxHЯ NaHEJI MOnHO6LOKA ИИ NaIY. INDInKaTOp ПИТAHЯ LED 3aROpNTc 3eJIeHbIM CBETOM.
NodKnOyeHue aHmeHHbI
MOno6nok IMeET BCTpoEHbIe aHaIoroBbI N cHpOBoN TIOHepbI. IOncoEINHIne aHTeHHbI Ka6eJIb K aHTeHHOMy RF pa3bemy Ha TbIOBOI NaHeII MOHO6noka.
Длг npиema aHaIorOBoro TeNecrHana Bbl moKTe nCnoJIb3ObaTb BHeUHIO aHTeHHy 3ФnPHo BeuaHn IIN KOMHaTHy oAHTEHy IIaTHORo BeuHn.Длг npиema zuΦpOBoro TeNecrHana Ha3emHO BoUHn Bbl MOxTe NcNoJIb3OBaTb CneuaJIbHyO BHeUHIO IIN KOMHaTHy oAHTEHy.ДлгakTNB3aun aHaIorOBoro TIOhepa Bbl6epnte npn NOMou n KHONK Source B KaueCTBe nCTOuHnKa CNrHaNa TV, aДлгakTNBaUnu ZΦpOBoro THOhepa Bbl6epnte B KaueCTBe nCTOuHnKa CNrHaNa DTV.
PpumueaHue:
DTV TIOHEP Ha3eMHoro cHpOBOrO BeaHnA
TV TOpHep aHaIorOBoR BoaHnra
SCART BxoHno pa3bem SCART
YPbPr BxoHn pa3bem KOMnoHeHTHO RINDeOBXOda
DVD BcTpoeHHbI DVD-nponrpblBaTeJIb
PC-RGB BxoHno pa3bem VGA
HDMI BxoHno pa3bem HDMI
S-Video BxoHou pa3bem S-Video.

Input Source
DTV
TV
SCART
YPbPr
DVD
PC-RGB
HDMI
S-VIDEO
EXIT
OK

BbIbePte HxHbI Bam nCTOuHk CnHaIa npn NOMoU KHOPOK / . HaXMeTe KHOKNy OK DnA NOdTBePckDeHnBaJero BbIbopa.
YTo6bI npocMaTpBAt nporpaMMbl cHpOBoro Ha3eMHoro TeJeBeaHnra (DVB-T), Bam Heo6xOIMo BbIbPaT B KaueCTBe NcToUHaKa BnDeocnHaHa onuio DTV. HaxMnte KhoNky SOURCE, NaNTe B NOBbWeMcra Ha 3KpaHe MeHIO ONuio DTV npn nOMoun KHOJOK A/ N HAXMTe KONKy OK IINr noITBepXdEHHa BaWero BbIbopa.
BaxHeiShne KhoNkn Iy n nx yHkCnn
Cnucok kaHao
HaxMMTe KhoNky LIST Ha Nv Ha 3KpaHe MOHO6noka NOBNTcCNCOK DOCTyNHbIX KaHaIOB. BbI6epnte HxKnbl Bam KaHaII npn NOMOu KNoK / . HaxMMTe KhoNky OK n CnICOK KaHaIOB IcYe3HeT cKpaHa.
CmeHa TB KaHaJa
Iyepexoanda K cneyuouemy/npebdyuemy no cnncky TB kaHany nCnoJb3yTe KhoNKn CH+ nn CH-.
PpMoB eb6Op TB KaHaJa
Bb mojete 6bictpo nepeHTN K HyxHomy TB kaHaNy, BBeJa erO Homep npn NOMoUncpobbx KHOIOK PdY.
Bo3epam K npedydyuemy TB kaHaIy
Дя ВОЗВРATA K TB KAHAny, KOToPbI npocMaTpPbANcdo nepexOda K TeKyuSceMy KaHany, HAnMTe KONKy RECALL.
PeaynupoKa apomkocmu
Дяperулровkn rpoMocTи nCNoJb3yIe KhoNk VOL- nIIN VOL+.
BbI6op Mekdy TB u paduokaHaJaMaMu
IcnoJb3yIte KhoNky TV/RADIO nIpepeXoDa ot npocMoTpa TB KaHaNoB K npocnyuBaHIO paDnOKaHaNoB nHaobopoT.
PpumeyaHue:
LippoBbpepaNokaHaJIbIMoRyOTcyTCTBOBaTbBHEKOTOpbIX CTpaHax.
EPG 3JIeKmpOnHna npoapamma nepeda
BaxHeiShne KhoNkI pDy n nx φyHKcnn
BbI6Op np3bika 3eyko0e02 conpooKdeHua
HaxMnte KhoNky AUDIO nIy BbIbopa dpyrOra 3bIka 3ByKOBO rCnPOBOXKeHnna IIN dpyrOra ayDnOKaHaIa. Nocne HaxKaTnKHOKNuAudiO BO BCnIbBAIOUeM OKHe NOBNTcCnICoK, B KOtOpOM Bbl MoKeTe npn NOMOnu KHONOK ▲/▼ Bbl6paTb HyxHbI Bam Ra3bIK N NOdTBePdINTb CBOB BbIbOp, HaxaB KhoNky OK.
PpumeyaHue:
HeKOTOpbIe BeaTeJI NODepXnBaOT HeCKoJIbKO 3ByKOBO CoPpOBoXdEHHN IIN 3ByKObIX KaHaIOB.
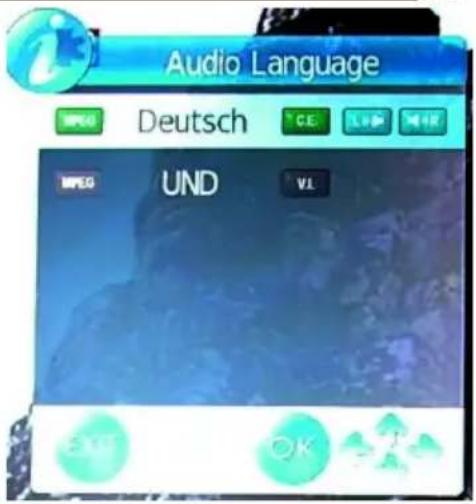
HOpmauO KaHaJe
Haxmte KhONky OK dny oTo6paxeHna 3kpaHe nobepx BndeOn3o6paxeHnHOpMaunHO HorO OKHa, KOtOpoe CoepXHT Ha3BaHne TeJekHaJa, TeKyuDaty INBpeMn, npDoJNKeTbHocTb BeaHnY TeKyuIero KaHaJa, pa3peSeHne BnDeOnOToka

(hanpimep, 576i), n doctynhoctb TeneTekcta.
B npaBoi qactn 3tOrO OKHa Bbl MoKeTe BuIeTb CmBOJ .HaxMnte KhONky DJIy BBIODa B 3TO Xe OKHO INHOpMaUIn O cJeDyUoUeM TB kaHaNe.
demaJIbHa uHΦopMaUa
Haxmte KhoNky INFO dIy OTo6paKeHn Ha 3KpaHe NOBepx BIndeOn3o6paKeHn OkHa C 60nee noDpo6Ho nHΦopMaunne.
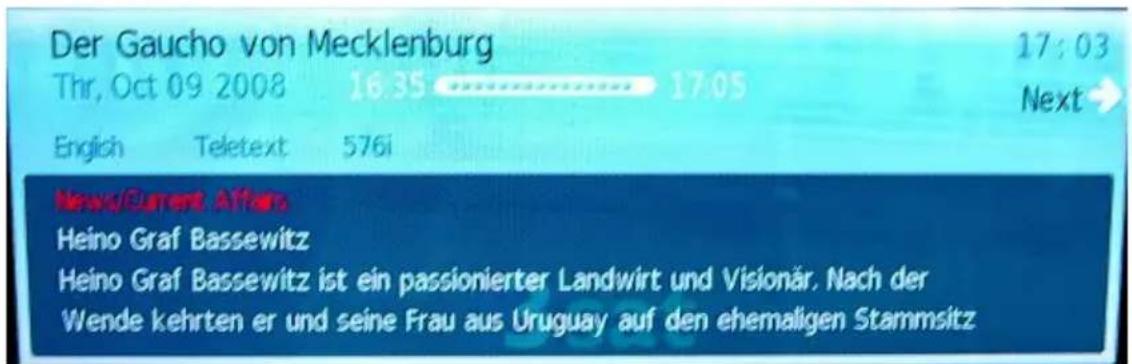

HACTPOIKA IPNEMHNIKA ZINΦPOBOTO HA3EMHO TEGEBUAHNIA
BaxHeiShne KhoNkI pDy n nx φyHKcnn
Kpome Ha3BaHnI TeNeKaHaIa, TeKyuei DaTbI N BpeMeHn, npoOnJxTeNbHOCTN BeuaHn TaKeUe Ro KaHana, pa3peuHn BundeONOTOKa n DOctynHOCTN TeJeTEKCTA, Bby yBvndnte 3JIeKTPOHHyO nporpamMy nepeaay Tekyueero KaHana. Ppi nOMouN KhoNOK A/V Bby MoXeTe npemEuaTbcra No BceN 3JIeKTPOHHoN nporpamme nepeaay, daXe ecnn Oha COCTOIT IN HeCKoJIbKnX cTaHnC. KaN B npedbIduysem Clyuae, Haxab KhONKy , Bby BBBeIDNTe Ha 3KpaH InHOpMaunio O cneDuOuem TB KaHane I erO 3JIeKTPOHHyo
3JIeKToHHa npoRpaMa nepeDaU EPG
nporpaMmy nepea.
Haxmte KhoIky EPG IJIy BbIOda Ha 3KpaH 3JIeKTOHHo npOrpamMbI nepeaay B
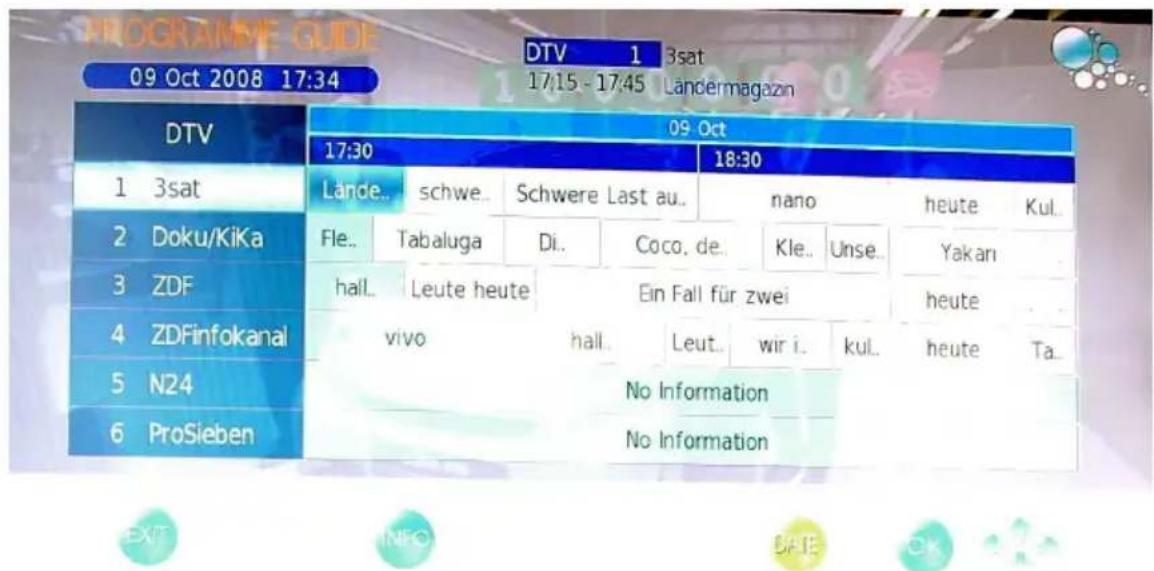
CneIyUOuEM BnDE:
OknO 3neKtpoHHo nporpaMMbl nepeauch coCTOnT n3 Tpex YacTei, B KOToPbIX oTo6paXaETc:
BepxHyaactb
Homep Tekyuzero TB kahana (hanpumep DTV 1), Ha3BaHne cnyTHnka, Tekyuaa daTaN BpeM, npoJOnKInTeNbHocTb BeuHaHn Tekyuzero KaHana, Ha3BaHne nduue nepeDaun.
CpeHnaHaCTb
Cama 3neKtpoHHa nporpaMa nepeDa.
HnKHa Yactb
KhoNkynpaBneHn.
AknBnI KaHn I TpaHcNpyEma TB nporpMa BblJeIeHb CnHM cBeTom. BHyTpN BblpaHHoro KaHana Bbl MoXeTe nepemaeatbcra NO TB nporpAmam npn nOmoi KHOIOK 1nn ▶. NcnoJIb3yIte KHOKN ▲/▼ДЯ CmHb KaHana. CneyuOnne KHOKN NOMOT Bam pa6oTaT b cJNeKtpOHn nporpAMMo nepeDaY:
EXIT
BbIXoN 13 OKHa 3JIeKTPoHHO nporpaMMbI nepeJaU.
INFO
DocTyn K noDpo6Hoi 3neKtpoHHo nporpamme nepeaay BbI6paHHoro KaHana.
XEJITAR
Ipeeknuehenme mexdy pexmom exeJHeBHO nnoheJeBHO.
HACTPOIKA IPNEMHNIKA ZNΦPOBOTO HA3EMHO TELEBEUSAHNA
3JIeKToHnHa IporpamMa IpepaE PPG
B eKeHeIeIbHOM pEkmE HOpMaunOHbI INDnKaTOp CMeHIT CBOI CBET CInHeO Ha XeJIbI. InpaMMbl NCNoJIb3yIte KHOINK NII ▷
Haxmte JeIyIO KhONky eue pa3 dna BO3Bpata KeJeDHeBHomy peKIMy.
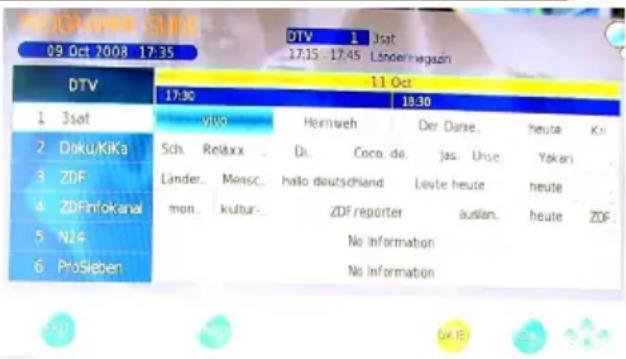
Приимechаиме:
MoHobok noDepKnBaet 7-HeBHyo 3NeKtpOHHyIO nporpaMMy nepea.
KauecTBo n3o6paXeHn
KaueCTBO n3o6paXeHnra, noIyuaemoro ot DVB-T npneMnka, cyueCTBeHHO 3aBnCIT OT MeCTHOCTN I pa3JIuYhblx ycIOBn npneMa. Han6OJee BaxKbIe dIЯ KaueCTBa n3o6paXeHnra napameTpbl - 3TO CKOpocTb nepeDaun nHΦopMaun (bit rate) n pa3peWeHne, o6ecneuBaemoe nepeDaabaembIM DVB-T cnHaJOM.
Ckopoctb nepedaun HnΦopMaunn (Bit rate)
Ckopocb nepeaun HΦopMaunonpeJeTcBeaTeJem N MoKet 6bIb pa3nHoh dna KaKdoRo KaHaJa. Pa3hBMn BeaTeJAMN NOdEprXNBaOTcra p3hle cKOpoctn nepeaun CnHaJa.Ecn npnpneMe DVB-TCnHaJa Bb Ha6nOaTe Ha ekpahe Mo3aNKy, apTePakbl nnn pacnblBvatoe n06paKeHne, To noCTapaNTecb yBeuHTb yPOBeHb CnHaJa nn ero kaueCTBO, OTPeryuNPoBaB noLoKeHne Bawe KOMHaTHoH aHTHe. NonpoByte 3aMeHNb KOMHaTHyO aHTeHHy Ha BHeuHIO. Ecn Bbl DoCTurIn ONTMaJIbHOrKaueCTBa CnHaJa, Ho n06paKeHne He yLyUHNoCb, To npHHMaembl DVB-T cnHaImeT HeoCTaTOHyO cKOpocb nepeaun HΦopMaun.
Yem Bblwe ckopocTb nepedaun HOpmaun, Tem 6one KaueCTBeHHbIM 6ydet N3o6paXeHne, C MeHbUIM KOJIuYeCTBOM apTeqakTOB IN Mo3aUNHbIX BKpAnIeHn.
Pa3peWeHne
CneIyIOUHm npaMeTpOM, BJIraHOUHm Ha KaueCTBO n3o6paXeHnA, YBnAeTcR pa3peWeHne.
Yem Bblwe pa3peSeHne, Tem KaueCTBeHHee N YeTc 6yDeT n3o6paXeHne.
ycno8puema
EcnBb Bnnte, yTo MOHOCtB npHmAmOro CnHaMa MaNa IIN erO KaueCTBO Hn3Koe, Bbl MoKeTe nonpo6oBaTb n3MeHnTb nIoXeHne aHTeHHbI dNyBeJIuYeHn yKa3aHHbIX napametpOB. BnIMbIM cIeDcTBnEM pIOXOrO npHeMa MoKeT cJyXnTb 3aMep3Wee Ha ekpaHe coo6uHHe "No Signal" (Het cnHana).
KaueCTBO npHema 3aBnCHT, HAnpMep, OT TnA aHTeHHbl. BbInyckaTcT pr pa3NHybIX TnA aHTeHH: naccNBhIe N aKTNBhIe KOMHaTHbIe N BHeUHne aHTeHHbl. HAcTpOte Bauy KOMHaTHyHO aHTeHHy TakIM o6pa30M, YTObI KaueCTBO npHema 6bIIO MaKcImaNbHbIM. BaxHo 3HaTb, B KaKOM HApPabNeHm HaxoDITcT pAhCnpyUOaJ aHTeHHa, YTO6bl HAnpABNTb CBOIO aHTeHHy B 3TOM npaBLeHnn.
Ecnn Baawa naccnBna aHTeHHa He MoXe T pInrAa CnHaJ uΦpOBO r Ha3emHO TeNeBnDeHn, nonpo6yTe nCNoIb3oBaT b AKTNBHy oAHTeHny. MakcmaJIbHOe KaueCTBO npnema MOxET ObecneuTb TOJbKO BHeUHra aHTeHHa.

HACTPOIKA IPNEMHNIKA AHANOROBOTO TEJEBEUHAHNA
YTo6bI npocMaTpBAtb nporpaMMbl aHaIoroBOro TeNeBeUaHnra, Bam Heo6xOdHMo Bb6paTb B KaueCTBe nCTouHnka BnDeocnHaHa oOnu TV. HaxMnte KhONky SOURCE, NaIITe B NOBnBWeMcRa Ha 3KpaHe MeHIO ONuTV npn NOMOu KNHOOK A/▼ n HaxMnte KhoNkOy OK drr noTBePjdeHnBaWero Bb6opa.
Cnucok KaHaJIO8
HaKMTe KhoNky LIST Ha Ndy Hn Ha 3KpaHe MOHObIoka NOBNTcra CnICOK DOCTyINHbIX KaHaJIOB. Bb6epTe HxKnbl Bam KaHaJI npn NOMOu KNHOK / .HaKMTe KhoNky OK n CnICOK KaHaJIOB Icye3HeT c 3KpaHa.
CmeHa TB kaHaJa
Auto Tuning (Aemomamuueckuouck KaHaNo8)
Pn NOMOuN 3ToN OUuB Bb MoKeTe HaHTN BCE DOCTyINHbIe BAWeM perNoHE TeJIeBUNOHHbIE KaHaJIbI aHaIoroBOrO IIN UcPOBOrO BeuaHn.
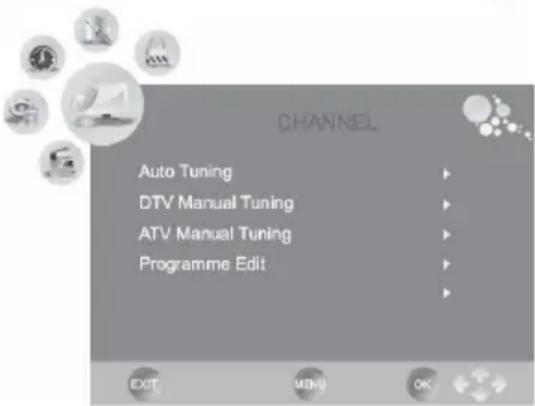
- Дяп_epекда К onци „Auto Tun-ing" (Aemomamuecku поck KaHaNoe) Испь3уITE KHONky ▼. AKTNbpyTe npoueDpy abTomatueckoro noncKaHaNoB, Haxab KHONky ▷.
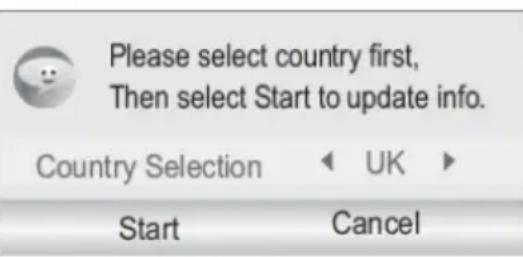
- Ha ekpahe NOBITcH HOBoe MeHc aKTHBHO onuien "Country Selection" (BbI6op cmpaHbI). BbI6epnte HxKHyO Bam cTpaHy npn NOMoU KHOJOK 一 I I I
- Bb6paB cTpaHny, HaxMnte KhONky Dnna nepexoJa K onuun "Start" (Cmapm), KOtopa npn 3OM NOcBETTCNHNUM CBETOM, NOdTBePjdaOuIm ee Bb6op. HaxMnte KhONky OK nONCK IOCTyINbIX KAHaNoB HaUHeTcR HeMeP
- Ha 3kpaHe nOBtC HOBoe OKHO, OTo6paxaIOoee Tekyoee COCTOaHne npOeDpybI noncKa KaHAnOB. B Hem 6ydyT OTo6paxaTbcra NaHdEHHbI KaHaNbI aHaIOrOBOrO, cHpOBOrTO TeneBecAHnra, a TaKxhe NaJdeHHbI paDnOKaHnbl.
- После завершени поцудypы ABIТOMATИЧЕСКОТ NOИСКА KAHANoB BCE HAnDEHHbIe KaHaNbl 6byT coxpaHEnbI B cINcKe KaHANOB. Bbl BCERda MOKTe npocMOTpeTB 3TO T CnICOK,нжав кнONkY LIST.
PpumeyaHue:
ДяЗаВершени npоцдуры abTomatNueckoro noncka KaHaoBNotpe6yeTcHecKoJIbKO MHyT.
DTV Manual Tuning (PyuHou nouck uΦpoebix KaHaNoe)
- Дnia nepexoак onци „DTV manual Tuning" (Pyнουпουck zuфpoьix kaHaNoB) ИспльзуITE кногК .ВоДиTe B npoцeдуpy рунorO noncKa KaHaNoB,нжав КногК .
- Bbl MoXeTe N3MeHnTb Homep KaHaJI, nCNoJIb3yJ KHOIIK INI . TakIM o6pa3OM, Bbl cMOxTe onpeJeINrB, nonck kaKOrO kaHaJa Bbl npOn3BOJNTe.
- Hauhnte nonck KaHaJa, HaxaB KhoNkY OK.
Дя Вьхда ИЗ peжima руню NOИСКА ζИФpoВьIX KaHaNoB NaЖмTe KhoNkY EXIT nIII TV MENU.
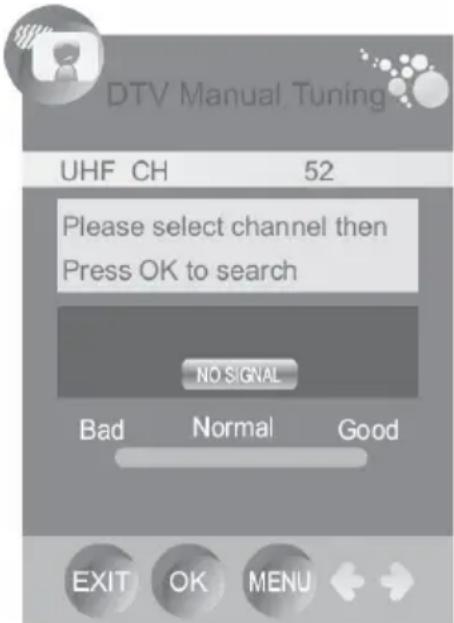
HACTPOIKA TEJIEBN3OPA
Hac troponka kaHaNoB
ATV Manual Tuning (Pychoi nouck aHaJIOeOeBIX KaHaJIOE)
1.ДЯ nepexoJa K onuIn „ATV manual Tuning" (PyHou noucK aHaNo2ObIx KaHaNoe) NcNoJIb3yIte KHOkKy . BoiDITE B npOeDpy pyHoro noncka KaHaNoB, HaxaB KHOkKy 3deCb DOCTynHbl DJIa HAcTpoiKn CneDyuOnne onuIN:
Storage To (Homep kaHana B cnncke)
System (CnCTema 3Byka): B/G Dnna 3a npaHoi EbpOnbI, I Dnna BeNko6pntaHnD/K Dnra BoctOuHoi EbpOnbI n PhpaHnL Lnn LL Dnna oBnacte Npau
Current CH (Tekyuzn TB kaHaan)
Search (Ponck)
- Fine Tuning (Tochna Hactpoika)
- Skip (Пponуск Кана)
Frequency (Yactota).
2. C NOMOusbKHOJOK A/V Bbl MoXeTe NepemueatbCmEkyOnuMn.
3. C NOMOJIIO KHOIOK 111 BbI MOXeTe BbI6paTb I03nIOB CnNcKe KaHAnOB, B KOtOpoi 6ydt COxpaHeH HauDeHHbI TB KaHaJ.
4. Перейдente Ha onциу "System" (Cucmema 3eyka) и ппnomоци Кногok « ИИ BBiбepnte cnCTeMy 3Byka, coOTBeTcTByIoU yu BaшeMy pernoHy.
5. Ipeennte Ha onuio "Search" n HauHnTe nonck, HaxaB KhoNky
Fine Tuning (Tochna Hacmpouka)
IcnoJb3yK HONK NII Bbl MoKeTe OcyueCTBNTb ToHyH hAcTpoKy KaJdOro TB KaHa,ecn erO CnIHan CnNtKom Cna6bI nn NCKaKeHHbI.
Skip (Pponyck KaHana)
IcnoJIb3yK HONK N, Bbl MoXeTe yCTaHOBnTB 3HaueHne 3TOro npaMeTp a nn TeKyUero KaHaJa:
Yes (a) - Pponyckatb KaHaJI npn n3MeHeHm HOMepa KaHaJa HaKaTneM KHOKN CH- nn CH+ Ha Ndy.
No (HeT) - OTMeHnTB npOnyck daHHoro KaHaJa.
Dpyaue KhoNku Habuau
C nomoou Kpachon KhoN, Bbi Moxete coxpaHntb cdeNaHHbIe N3MeHeHn, ecnn, Hanpimep, Bbi N3MeHnncnCTemy 3Byka dny daHHoro KaHana.
IyBixOda n3 peKIMa pyHOro noncKa aHaIorOBbIX KaHaIOB HaxMnte KHNky EXIT nnn TV MENU.
HACTPOIKA TEJIEBN3OPA
Hac troponka kaHaNoB
Programme Edit (PedakmupoeaHue
KaHaIoe).
Дляпесхобдд К орци "Programme Edit" (Pedakmupobahue kaHanoe) ИспьзуITE KhoNKY .АктувирTe Meню peDAKTIPOBaHЯ KaHANOB, Haxab KHOKNy .MeHIO "Programme Edit" (PedakmupobaeHue KaHANOe) BkJIIOUaET B c6e CNeDyUOuHe onци: Moving (IpepeMeSeHne) n Sorting (CoptipOBka), Skip (Iponyck) n Define Favourites (CnncOK IIObIMbIX KaHANOB).
IepemeueHue TB kaHaJa(
3Ta OOnuO NTBeUaET 3a COPTnPOBky TeJIeBN3N0HHbIX KaHaIOB.C NOMOUsHO Hee Bb MoXTe NoCTpOHTb CBOI CO6CTBeHHbI CNICOK KaHaIOB.
- C nomoBIO KHOHOK ▲/▼ BbI6epnte TB KaHaJ, KOtOpBb 6ydtpepaTPOBaTbcra.
- HaxMnte XeNTyIO KHONky n pIaOM C BbIbpaHHbIM TB KaHaIOM NOBITcR CNMBOJ
- Nepemecnte TB KaHaJI c NOMOuHo KHOIOK / Ha HOByIO3Ntio.
- Haxmte KhoNky TV MENU nnoTBepeHnue coXpaHeHnnepeMeuneHn.
- IЯ BbIXOJa n3 3ToI OJIuH HaxMnTe KHOkY EXIT.
Cnucok JIO6umbix TB kaHanoe (FAV)
Pn nOmoOn 3ToI onuBb MoKeTe Nmecntb npednoHTaembIe Bam TB kaHaJI B cnCOK IIO6MbIX. Bbl MoKeTe aKTINBupoBaTb CNICOK, Haxab KONky FAV.
- HcnoJb3y KhoNk N △/▼, Bbl6epnte TB kaHaJ, KOtOpBn Bbl XOTNTe nOmeCTNTb CnncOK JIO6mbix KaHaJOB.
- Haxmte KhoNky FAV n pAOM c BbIbpaHHbIM KaHaJOM NOBNTcC NMBOJ
3.ДЯ BBIXOda n3 3TOI ONUH HAXMNTe KONky EXIT.
PpumeyaHue:
EcnBbXOTnTe ydaNTb TB kaHaj n3 cnNcKa IIO6MbIX, TO Bbl6epnTe erO npn NOMOu KHOJOK / (pAOM c KaHApom pacNoIoxKeH CmBOJ ) n HaxMITE KHOJky FAV. CmBOJ nponaet n 3tot TB kaHaj bdyet ydaJeH n3 cnNcKa IIO6MbIX.
HACTPOIKA TEJIEBN3OPA
Hac troponka kaHaNoB
Pponyck meenebu3uOHHO20 kaHana (SKIP)
Pn NOMOu 3ToI OUu Bb MoKeTe NCKHouHTb TB KaHaN n3 CNNcKa NocJeDoBaTeJbHo Bbl6npaEmbIX KaHaNoB, TaKIM o6pa3OM, YTO nepeTn Ha Hero MOxHO 6yDet TOnbKO BBeJa ero HOpE np NOMOu UePpOBbx KhoNOK PdY.
- C NOMOJIbIO KHOJOK ▲/V BbIePnte TB KaHJI, KOToPbI 6yJeT NcKJIuYeH n3 cnNcKa NocJIeIOBaTeJIbHO BbIbIpaEMbIX KaHaJOB.
- HaxMnte CnHIOU KHOKNY PRAOM C BbIbpaHHbIM TB KaHaJIOM NOBITcR CnHn CmBOJ.
3.ДЯВБIXOДи3эTOIOnHаЖMITEKHONKV EXIT
Ipeumehoahue mele6u3uoHoo kaHaJa (RENAME)
3Ta onu npimehma Toblko JTB kaHaoB aHaIorOBoro BeuaHna.
C nOMOuH Hee Bbl MoKeTe nepeMeHOBaTb OTdJIbHbI aHaJorOBbI TB KaHaI nn npNCBOHTb Emy m.
- C NOMOJI KHOJOK A/▼ BBI6epHTe TB KaHaJI, KOToPbI 6yDeTe IpeHMeHOBbIbA Tb.
- Haxmte 3eJeHyo KhoIky n pIOM C Bbl6paHHbIM TB KaHApom IORBnTcra 3eJIeHbIM CMMBQJ.
3.CnMOUbKHOKOKA/VBbI6epTe HOByo 6yKBy IJIa TeKyuero NOJIOXeHna Kypcopa BaHaBHn KaHaHa.
4.C NOMOUBKHOJN BbMOKeTe nepeTn K cJeDyUoSe/NpeDbIyUeB6yKBe. - CoxpaHInTe HOBoE Ha3BaHHe TB KaHaJa, HaxaB KhoNky TV MENU.
6.ДЯ BbIXOda n3 3ToI ONUH HAXMITE KHOKNY EXIT
YdaJIeHue TB kaHaHa(DELEE)
Pn nomouu 3toon onu BmyoKeTe ydaanntb otJeIbHbT b KaHaan n3 cnNcKaHaIOB.
- C nOMOJIbIO KHOJOK / BBI6epnte TB kaHJI, KOToPbI 6yET ydaJIeH.
- Haxmte KpachyIO KHONky n pIOM C Bbl6paHHbIM TB KaHApom NORBNTcKpachbIM CMBOJ.
- Повтбердente удалени, Нжав Кразсню Кногку[eze pa3.
4.ДЯ BBIXOda n3 3TOI ONUH HAXMITE KHOKNY EXIT
PpumeyaHue:
BbipahHbI KaHAn Tepeb 6yTe TdAeH n3 cnNcKa KaHaNoB.
HACTPOIKA TEJIEBN3OPA
Hac troponka n3o6paXeHHa
Mehio hactpoikn n3o6paXeHncoepKNT cIeDyOuIne onu: "Picture Mode" (Pexim n3o6paXeHn), "Contrast" (KoHTpactHOCTb), "Brightness" (ApKocTb), "Colour" (UBeTHOCtB), "Sharpness"(Pe3KocTb), "Hue" (ToHaJIbHOCTb), "Colour Temperature" (Tempepatypa UBeTHOCtN), "Aspect Ratio" (Opomat ekpana), "Noise Reduction" (UymonodabHeHne) n "Screen" (3KpaH).
- C nomoIbH KHOJOK A/V Bbl MoXeTe nepemeeaTbcra MExdy onuymn.
- AKTINBpynte MeHIO n3MeHeHHN Bbl6paHHoro napameTpα, HaxkAB KHOKNy
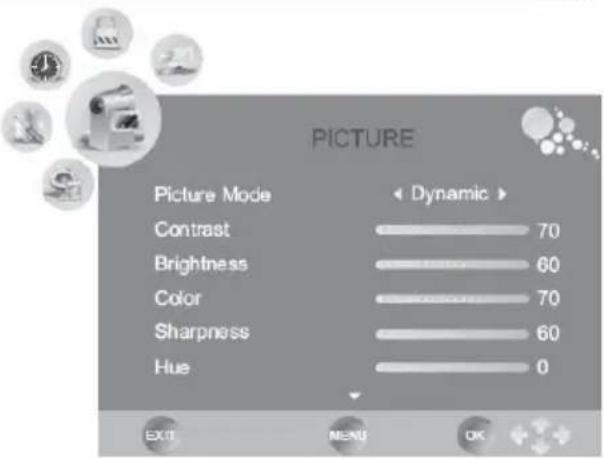
Picture Mode (Pexum u3o6paKeHua)
C NOMOJIIO KHOIOK AINB BbI BbI6epnte pexIM n3o6paXeHn. TpaHCJIpyeMOE BnDeON3o6paXeHne n3MeHReTc rcpa3y Xe B COOTBETCTBn C HOBBIMn HAcTpOJaMn. DocTyNbl cNeDyUOnne 3NaueHn 3TOrnpaMetpa:
Dynamic (Диhamчecкoe)
Standard (CTaHdapTHoe)
Mild (Märkoe).
Bbl mokeTe 3aTb CBOI CO6CTBeHHbIe HAcTpoKn, BblpaB 3HaueHne USER (Hacmpouku noIb3oBamena).
Brightness (Apkocmb)
C nomoukho KNONOK uHn yctahOBnte ypoBHeb npKoCTn. 3TOT napaMeTp dOcTyneH TOIbKO npN BbOpe onuIN USER (Haempu Knu nonb30aemen) B pexmue n3o6paxenra.
Contrast (KoHmpacmHocmb)
C NOMOJIIO KHOJOK <IIN YCTAHOBITE ypoBeHb KOHTpactHOCTN. 3TOT npaMeTp DoCTypeH ToJIbKO pRn Bbl6ope onuIN USER (Hacmpouku noIb3o8ameJ) B peXIMe I306paXeHnA.
Colour (L'eeemHocmb)
C NOMOUIKHOHONOKIINYCTAHOBNTe ypoBHeb cBeTHoCTn.3TOTnapaMeTpdoCTypeH TOJIbKO pN BbIbope onuIN User (HaempuKu nonb30aeme) B peXmE n3o6paKeHna.
Sharpness (Pe3Kocmb)
C nOMOuKHOHOKnIyCTaHOBHTe ypoBeHpe3KoCTn. 3TOT npaMeTp DOCTynEH TOJIbKO npu BbIbope onuIN USER (HaempuKu nonb30aeme) B pexime u306paxenHna.
Hue (ToHaJIbHocMb)
C nOMOuK HONOK uHn yTaHOBnte yPoBeHb ToHaJIbHOCTn. 3TO T npaMeTp dOCTyneH TOIbKO npu BbIbope onuIN USER (Hacmpouku nonb3o6ameJ) B pexmE u3o6paxeHnA.
HACTPOIKA TEJIEBN3OPA
Hac troponka n306paXeHnA
Colour Temperature (Temnepamypa ueemHocmu)
C NOMOJI KHOJOK nHn BBbepnte ypoBeH TeMnepaTpybl CBeTHoCTn. DocTyHbI cNeDyUOuNE TPN Ou:
Cool (XoJIoHa)
- Warm (Tennna)
Medium (CpeHna).
Bb MoKTe 3aTaB CBOI CO6CTBeHHbIE HAcTpoKn, Bb6paB 3HaueHne USER (Hacmpouku nonb3oAmen).Pn tOM Bbl MoKTe NOnyUHTb DOCTyn K TpeM npaMeTpam:
"Red" (Kpachbl), "Green" (3eJeHbI) n "Blue" (CnHn).
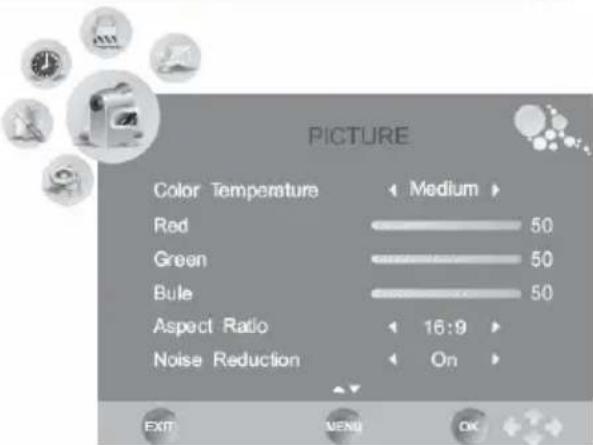
HacbIeHHOCTN KaKDoRo UBeTa, INCNoJIb3yKHOJKN IIN
Aspect Ratio (ΦopMam 3KpaHa)
C nOMOJIbKHOJIK BBI MOKeTe Bbl6paTb FOpmaT 3KpaHa N MacuTa6nPoBaHne 1306paXeHn. DocTyHbI CJIeDyUoUne OU:
16:9 - 1306paXeHne BcERda 3aNoHNReT BeCb 3KpaH He3aBnMo OT oOpMaTa 3kpaHa.
4:3 - Изобрахени 6удт помаьсь в Кадр размером 4:3, a с левов и павов CTороны зараза на 6удут вдны черные посяи He3aBnCmO OT φормanta зараза.
- Auto - ΦopMaT Ι3o6paXeHnO npEeJIeTcABToMaTHueckn B 3aBNCUMOCtN OT φOpMaTa ΕKpaHa. Прн HaIInuHm ΕKpaHa TeIeBn3Opa CO CTOpOHamn 16:9 Ι3o6paXeHne 6ydt Na IONHbI ΕKpaH, a PpN ΕKpaH e TeneBn3Opa CO CTOpOHamn 4:3 C npaBoN I neBOI CTOpOHbI Ι3o6paXeHn 6yDy T UepHbI NOnocbl.
Zoom 1 - Θa onця moKet nCNoB3OBaTbC npn npocmOte Ha uHpOKoΦopMaTHOM TeIeBn3ope n3o6paXeHnФopMaTa 4:3. N3o6paXeHne pactrNBaETcHa nONHbI 3kpan C COxpaHeHem npOpOpu, Ho HuxHry n BepxHra Yactn n3o6paXeHn6yDyT OTpe3aHbI n He BVnHbI Ha 3kpaHe.
Zoom 2 - Θa onu MoKet NcNoB3OBaTbC npn npocmOte WnpokoOpMaTHoro n3obpaKeHne Ha 3kpaHe oPmata 4:3. N3obpaKeHne pacuupreTc H naonHbI 3kpaH c coXpaHHeM npOnOpu, Ho IeBaN npabA qactn N3obpaKeHn6yDyT OTpe3aHbI He BnHbI Ha 3kpaHe.
Pn JIO6OM aKTHBOM nCTOuHKe CnHa, nckIIOUa BcTpoEHbI DVD npoINpBIBateJIb, Bbl MoKeTe N3MeHrTb fOpMaT 3kpaHa, HAKIMAR KONky ZOOM Ha Iy.
PpumeyaHue:
He nCnoJb3yIte noCToHNo fOpMaT 3KpaHa 4:3, TAK KAK 3TO MOKeT PnIBeCTN K NOABJIeHIO NOLOc Ha N3O6paXeHNN (Ha 6OKOBbIX rpaHnucx KapTNKn).
Noise Reduction (Uymonodaenheue)
C nOMOsbKHOHOKnIaKTNBpyTe nn3anpeTne yMOnoDaBJeHne. ON (BKnIOyeHo) aKTHBpyeT yMOnoDaBJeHne, a onuN r OFF (ebkIOyeHo) 3anpeaet ero.
Hac troponka n3o6paXeHnA
Ecnn Bbl nCnoB3yeTe BXoJ VGA,To y Bac noBnEETc HecKOJIbKO DOnONHITeJIbHbIX npaMeTpOB HAcTpoKn I3O6paXeHn. 3Tu NpapMeTpbl MoxHO HaHTN, Bbl6paB OIcuIO Screen (3KpaH).
Для BXOda B MeHIO Screen (3KpaH) HaxMITE KhoNky ▷.ДocTyHbI OOnn N3MeHeHnA cIeDyUoXn NapaMeTpOB:
- Auto Adjust (Автуарынская Настюка)
Horizontal Position (PoiDcTpoiKa no ropu3oHTaII)
Vertical Position (PoctpoKa no BepTnKaJI)
Size (Pa3mep) - Phase (Фаза раьертук).
Auto Adjust (Aemomamuecka Hacmpouka)
IcnoJb3yIte onu Auto adjust (Aemomamuecka Hacmpouka) nIa cnHxpoHn3aun n3o6paJxHn, nOCTynapUeTo C KOMNbOTepa Ype3 nOpT VGA ONTImaJIbHbIM cNoCobom. HaxMnte KHONK y DnA kTNBaUN CNHXPOHN3aUN n3o6paJxHnHa 3kPaHe TeJeBn3opa.
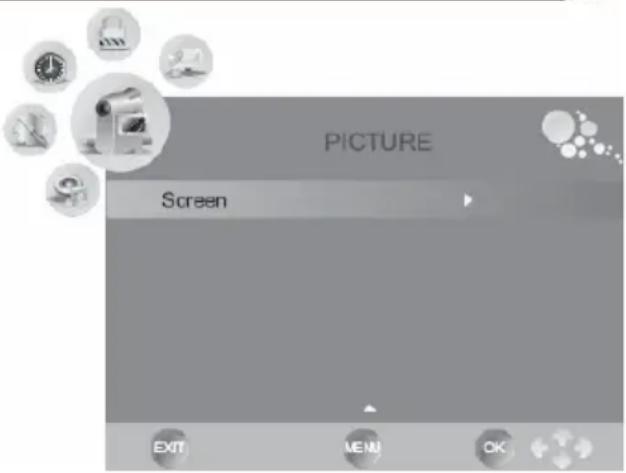
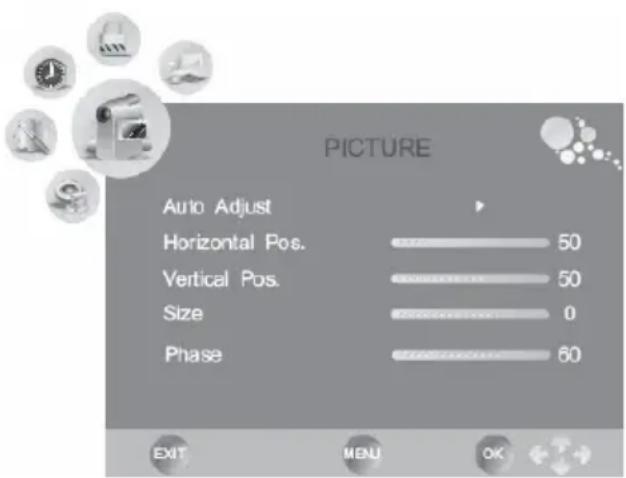
Horizontal Pos/Vertical Pos. (Iodcmpouka no 20pu3ohmanu u eepmukanu)
C nOmoUbIO 3ToI ONuIN Bbl MoXeTe HAcTpOnTb N3o6paXeHne VGA Ha 3KpaHe BpyHyIO.
NcnoB3yIe KHOKN IJIN IJn IepemeueHn I3o6paXeHn no BepTuKaJI NJIN
ROPUNOTaJI.
Size (Pa3Mep)
Icnonb3ynte KHONKn IINI DnI IN3MeHnpa3Mepa n3o6paxeHn VGA Ha 3kpaHe do Tex np, noka He noJyHTc yctOuHBOe n3o6paxeHne.
Phase (Φa3a pa3eepmku)
IcnoIb3yIte KhoIKN 1nn 1npepyIInpOBKn pa3bpa3BepTKn CnHaJaBepTkaJIbHO cnHxpoHn3aun (H-sync), noka He noIyHTc yToIuHBOe I3O6paKeHne.
CoXpaHnTe HOBbIe HAcTpoiKn, HaxaB KHOnKy TV MENU.
ДЯ BbIXOJa n3 3ToI ONuN HaxMnTe KHOnKy EXIT.
HACTPOIKA TEJIEBN3OPA
Hac troponka 3Byka
MeHou HacTpoKn 3Byka coDepeXHT
cIeDyUoUne onu: "Sound Mode" (Pexm3Byka), "Treble" (BbICOKne yactOTbl), "Bass" (HnzKe yactOTbl), "Balance" (PerynpOBKa cTepeo-6aHaHca), "Auto Volume" (ABTomatNuecka
perynipOBKa ypOBn rPOMKOCTn) n "Surround" (Pexm okpyxauoero 3ByaHna).
Sound Mode (Pexum 38yka)
C NOMOUIKHOHONOK HINBbIMOXKeTe BbI6paTb peXnM 3Byka. OocTyNHBi CneNyIOUne ONUIN:
Music (My3bika)
Movie (Фильм)
Sport (Cnopt)
Standard (CTaHApTbI).
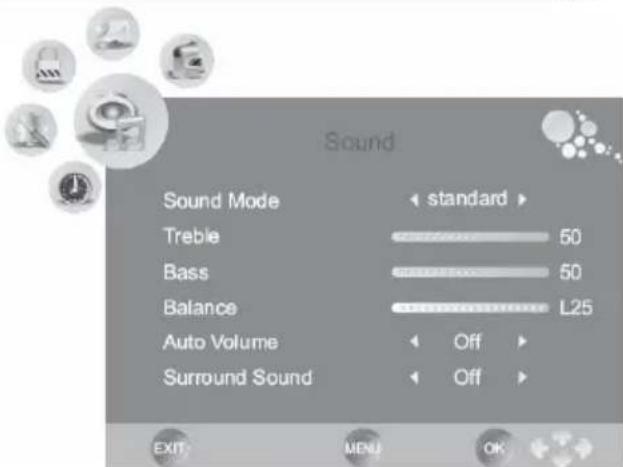
Bbl moxete 3aatab cboi co6ctbeHHbIe hactpoKn, Bbl6pab 3naueHne USER (Haempuku nonb30aeme).Ppn 3tOM Bbl moxete noJyHTb doCTyn K DByM dOnoJIHNTeJIbHbIM napametpam "Treble" (BbICOKne yacTOTbl), "Bass" (Hn3Kne yacTOTbl).
Treble/Bass (BbCokue yacmombu u HU3Kue yacmombi)
C NOMOJIbIO KHOJOK 1IJI YcTaHOBInTe yPoBHn BbICOKx Hn3Kxu cAcToT. 3TN npaMeTpbl DoCTyINHbI ToIbKO npn BbIbope onuIN User (Hacmpouku noIb3oBaem) B peXmme n3O6paXeHn.
Balance (PeaylupoKa cmepe0aHaHca)
C nOMOJIIO KHOJOK IINI OTPeryIpyuTe ayDnObaJaHc MeKdy npaBBIM n NeBBIM rPOMKOrOBOpNTeYMaN TeNEBUN3opa.
Auto Volume (Asmomamuuecka pezynlupo6ka ypo6n aporkocmu)
IcnoJb3yIe 3Ty OOnuO DnA aKTHBaun PexIMa ABTomaTneCKOro yMeHbWeHn yPOBHa rPOMKOCTn npn BocnpOn3BeDeHn n3nnuHe rPOMKx 3ByKOB. 3TO T pEXMn noDo6eH «HOCHOMy peXIMy》. C NOMOuBIO KHONoK AINN BbIepeNTe ONDHy n3 DOCTynbIX ONU:
ON (BkHouHTb) - BkHouHTb peXIM aBtOMaTnueckoro yMeHbSeHn yPoBn rPOMKoCTn.
OFF (BbIKJIIOuHTb) - BbIKJIIOuHTb peKIM aBTOMaTnueckoro yMeHbSeHn ypoBHa rpomKOCTn.
Surround Sound (Pekum okpykaioezo 3yuaHua)
Icnoj3yTe 3Ty onuIO dJa AKTnBaun peKmAp OkpykaUoero 3ByaHn. C nOmoBIO KHOONK IIN BbIepeITe OndHy N3 DoCTynhIx ONU:
ON(BkHouHTb)-BkHouHTbpeKIM OKpykaIoIero 3ByaHnA
OFF(BbIKIOHTb)-BbIKIOHTbpeXIMOKpyKaHOero3ByaHnA.
HACTPOIKA TEJIEBN3OPA
Hac troka BpeMeHH
MeHIO HAcTPOkN BpEmEH CoepKNT CJeDyUOJIne OOnu: "Clock" (YcTaHOBka BpEmEH), "On Time" (BpEma OTKJIIOUeHn), "Off Time" (BbIKIIOUHTb BpEma), "Sleep"timer (Taimep OTKJIIOUeHn), "Time zone" (BpEmenHa 3oHa) n "Auto Standby" (PexmM 3HeprocoXpaHeHn).
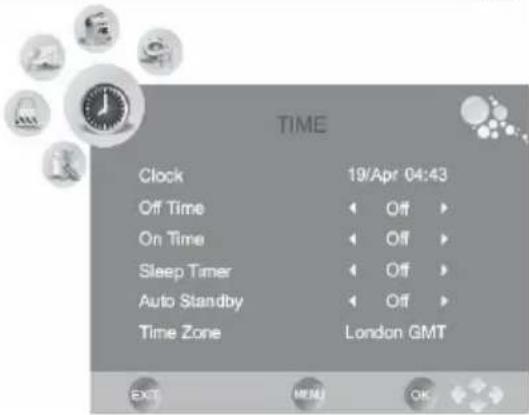
Clock (YcmaHo8ka epemeHu)
-
Дяп néр exoda к onци „Clock" (YcmaHO6ka bpeMeHu) И сплььуй Te KhoNky .Актувир Te npоц edpy yctaHOBKn BpeMeHn, HabKb KhoNky OK. Ha ekpaHe nOraBNTcH HoBOe MeHIO yctaHOBKn Tekuero BpeMeHn.
-
C NOMOJI KHOKONK A/V BbIMoXe TepemEuaTcMexyOnuMaMeHIO
- C NOMOJIIO KHOIOK 1IIN BbIMoKeTe N3MeHHTb 3HaueHHe BbI6paHHoN OIuNN. IOCTyINbI CJIeDyUOJIne OIuNN:
Date (Deneb Mecra)
Month (Mecra)
Year (T0d)
- Hour (Yac)
- Minute (MnHyTa).
IocJe yCTaHOBKn BpeMeHn NcNoJIb3yIte KHOJky DJIa nepexoJa K onuun "Close" (3aKpbimb) n HaxMnte KHOJky OK dJa COxpaHeHry HOBbIX yCTaHOBOK.
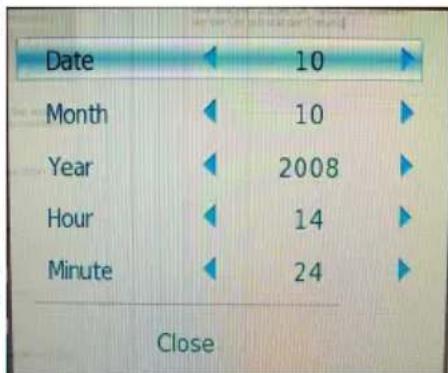
Off Time (Bpem omknoueHua)
Pn nmoOn 3Toon OnuBb MoKeTe yCTaHOBntb BpeMa ABOMaTneCKoro OTKnIOueHn MOHO6Joka.
- Дяп_epexoda к onци "Off Time" (Bpema omknoyehua) IncnoJIb3yIte KhoNky . AktubnyTe npoceDpy yctaHOBN BpeMeHn, Haxab KhoNky OK. Ha 3kpaHe nOBITcH HOBOE MeHIO yCTaHOBN BpeMeHn OTKnIOUeHn. Doctynbl cneDuOuine onuIN:
Repeat (IepuoduHocmb)
Bb mokeTe Bb6paTb Ondy n3 onCn nepnoDnHocTn OTKIOueHnA:
A. ODHOKpaTHO
B. KaKdbi IeHb
C. C noHeJeBnKa no nTnUy
D. C noHeJeBnKa no cy66OToY
E. No cy660TaM IN BockpeceHbAm
F. B BockpeceHbe
G. OTMeHa peKIma.
- 4ac
YCTaHOBNTe Yac OTKJIIOUeHnna (HaNPIMep 12 YacOB).
MnHyTa
YcTaHOBnte MNHyTy OTKJIIOUeHnra (HaNPmep 00 MNHyT).
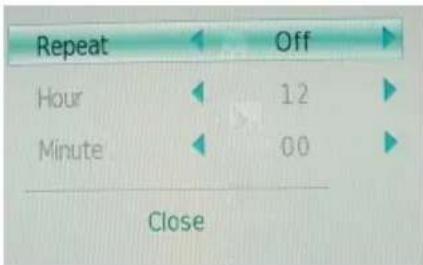
HACTPOIKA TEJIEBN3OPA
Hac troka BpeMeHH
On Time (Bpem 6kIoueHua)
Pn nOMOuN 3ToN onuN Bbl moKeTe yCTaHOBntb BpeM aBTOMaTNUeCKoR O BKJIoueHn MOHO6JOKa.
- Дяпсяхая К onци „On Time" (BpeM omKIOUeHua) Испь3уITE KhoNKy .Актуриte поцетур установки BpeMeHn, Нжав КhoNKу OK. Ha зране поВITсЯ HOBOE MeHIO yCTaHOBKN BpeMeHn BKIOUeHna. Дocтуны сдуюше onци:
Repeat (IepuoduyHocmb)
BbMOKeTe Bb6paTb Ondy n3 onCn nepoOnuHOCtN OTKnIOueHHe:
A. ODHOKpaTHO
B. KaKdIy IeHb
C. C noHeJeIbHnka no nTnUy
D. C noHeJeBnka no cy66Oty
E. No cy660tam IN BockpeceHbAm
F. B BocckpeceHbe
G. OTmeHa peKIma.
- Yac
YCTaHOBtTe Yac OTKJIIOUeHn (HaNPmep 00 YacOB).
MnHyTa
YCTaHOBNTe MNHyTy OTKJIIOUeHnra (HaNPmep 00 MNHyT).
Volume
YCTaHOBtTe yPOBeHb rPOMKoCTn npn BKNHoueHm MOHO6NoKa.
Mode
YCTAHOBNTe pexm (NCTOCHNK CnHaJa), KOtOpbI 6ydt YCTaHOBJeH npB BKJIIOUeHN MOHObloka. Bbl MoKeTe BblpaTb OINH n3 cJeDyUx xpeXIMOB: DTV (npneM ZnΦpOBoro Ha3EMHOro TeJeBeuHaH), ATV (npneM aHaJorOBoro TeJeBeuaHna) n Radio (npneM padnoBeeHna).
Hanpimep, Bbl moke Te b6paTb onu: "C noHeJeBnka no nTnuy", "8:05", "40" and "DTV". Pn 3tOM MOHO6k6ydt AToMaTHueCKN BKIOUaTbCnI npHeMa cnpPOBOrO HAsEMHO TcJIeBeUaHnE xKeIDHeBHO C noHeJeBnKa no nTnuy B 8:05 yTp a c ypOBhem rpoMkoCTn 40.
Sleep Timer (Taumep omKIOueHua)
Pn nmoOn 3ToI OnuB Bbl MoKeTe yCTaHOBtB BpeM, yepe3 KOtOpoe MOHO6NOK ABTomatueeCKN OTKIOUHTcB. BpeM 3aJaETcB MInHyTax.
PpumeyaHue:
Bbl mojkeTe yctaHObntb TaMep OTKJIIOUeHn I npn NOMOuN KONKn SLEEP Ha Iy. Pnp KaJDOM HaxaTN 3ToI KHONK BpeMa OTKJIIOUeHn B MmHyTaX 6yDeT n3MeHrTbcR.
Auto Standby (Pexum 3HepzocoxpaHeu)
При поши StOn OnuBn Bbl MoKeTe yCTaHObITb BpeM, Quee3 KOTOpoe MOHO6NOK ABToMaTHueCKN OTKIIIOHTcRпр OTCyTCTBnB T TeueHne HeCKOJIbKnx MInHyT CnIHaJa OT nCTOChnka (HDMI, DVD, VGA n T.D.).
Hac troka BpeMeHH
Time Zone (BpeMeHHa 30Ha)
Pn nOMOu 3ToI OUu Bb MoKeTe yCTaHOBntb BpeMeHHyIO 3OHy, COOTBeTCTByHouyIO BaWemy perNoHy.
DOnoJIHnTeJIbHbIe HacTpoIKN
MeHIO donoONHnTeIbHbIX HAcTpoEe CoepKIn T CneJeUOuNe onu: Language (3bIK 3kpaHHoro MeHIO), Audio language (3bIK 3BykoBOrO cOnpBoXdEHHa), Subtitle language (3bIK cy6TntPoB), Country (CTpaHa), Default (3abODckne HAcTpoKn).
- C NOMOJIbIO KHOJOK A/V Bbl MoKTe TepemeIaTbcra MeKdy ONUJMA MHeIO.
- C NOMOUsbKHOHOK HNN BbIMoXeTe N3MeHHTb 3HaueHHe Bbl6paHHoI ONcNt.
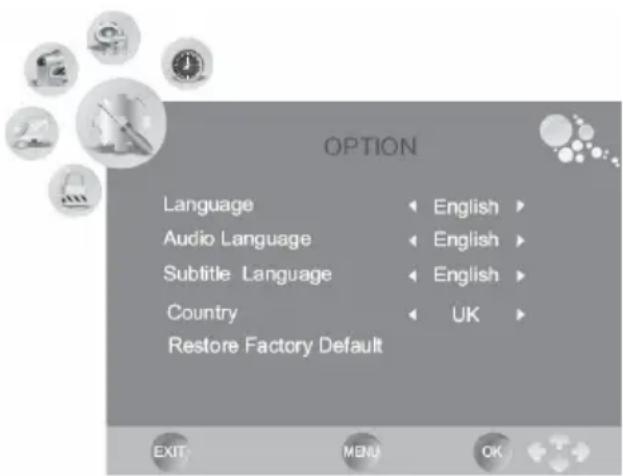
Language (R3bIK 3KpaHHO2o MeHIO)
Pn nOMOuN 3ToN OUuN Bb MoKeTe BB6paTb RaBk EKpaHoro MeHo.
Audio language (R3bIK 38yko0o coppooxdeHua)
Pn nomou n 3Toon Onu N Bbl MoKeTe BbIpaTb 3bIK 3ByKOBO CoNPoBOXdHnna KaHaOB uΦpOBO r HaemHOro TeJeBeUaHn. HeKOTOpBle BeuataeN noDepxNBaIOT HeckoJIbKO r3bIKOB 3ByKOBO CoNPoBOXdHn n CBOUX TB KaHaOB.
Subtitle language (Язбксум Pumpoe)
Pn nOMOu 3ToI OUu Bbl MoKeTe Bb6paTb 3bIK cy6TuTPOB dJa KaHAnOB cHpOBOrHa3eMHoro TeNeBeUaHn. HeKOTOpBle BeaTeJI NODepxNBAOT HeCKoJbKO 3bIKOB cy6TuTPOB dJa CBoNX TB KaHAnOB.
Country (CmpaHa)
Pn nmoOn 3ToI onuN Bb moKeTe Bb6paTb CBOIO CTpaHy. Bb6Op CTpaHbCyueCTBeHHo Bnraet He HeKOTOpBle dpyrne Oun, TaKne, KaK Time Zone (BpeMeHHa 30Ha) nn DoctynHOCTb KaHaNoB aHaNoROBoro N cUΦpOBOr Ha3eMHOro TeJeBeuaHna.
Restore Factory Defaults (3abodckue hacmpouku)
Pn nOMOuN 3ToN OOnuB Bbl MoKeTe BOCCTaHOBntb HAcTpoKn BCEx napameTpOB, ycTaHOBJIeHHbIe Ha 3aBoDe npOn3BOdnteJeM. Bce n3MeHeHnaHCTpoEk, cdeHaHHbIe NOlb3OBaTeJem, 6ydyT OTMeHEnbl.
HACTPOIKA TEJIEBN3OPA
HactpoJa 6JoknpoBOK
MeHIO HacTpoiKn 6JokIpOBOK coepKNT cIeDyUoUne onuN: Lock Channel (BloKIpOBKa TeJeBeuaHnA, Set Password (PapOJIb IaI DoCTyna K HacTpoiKaM), Block Channel (BloKIpOBKa KaHaJa), Parental Guidance (PoIteJIbckn KOHTpoJIb).
Ipeed BXODOM MeHIO 6JOKIpOBOK Bam npednojkat BBecTN npoJIb DOCTyna K HacTpoiKaM. Napoi, yCTaHOBJIeHHbI no yMOJUHaHIO Ha 3aBOJe: "000".
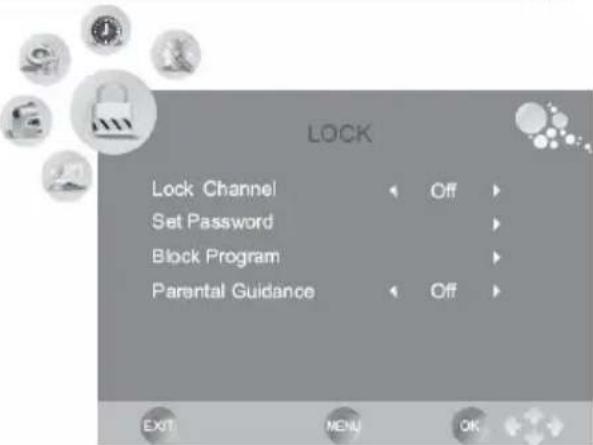
Omkpbimb u 3akpbimb noddoh 3aay3yuka ducko8
HaxmTe KhoNky OPEN/CLOSE Ha npaBoi 6okOBoi nHaHeJIM MOHOJIoka HnHa Iy.

PpumeyaHua:
- Пουьбiamь He moxem ocyuecmbnpepoxod epeod unu ha3ad no pa3deam DVD ducka 60 epemra oocnpou3eedeHua pa3deHa WARNING (PENYPNPEXKDEHNE).
He8o3MoXHo uCnoB3oBamb KOMaHdy SKIP, eCnu duck cocmoum u3 odHou 2naBbI (DVD) unu odHoo mpeka (CD).
Hayano bocnpou3eedenu nay3a.
Haxmte KhONky PLAY/PAUSE nHaayala BocnpOn3BeDeHnra Dncka. IpaBpeMeHHo npnoCTaHOBKn BOCpOn3BeDeHnna HaxmTe KhONky PLAY/ PAUSE eue pa3. HaxmTe KhONky PLAY/PAUSE eue pa3, nBOcnpOn3BeDeHnne npoDoJXnTcra.

OchOBhble npaBnla ynpaBHeHna BocnpOn3BeDeHneM
OcmaHoKa 8ocnpou3eedeHua
HakatneM KhoNkN STOP MOxHO BBecTN Dba peXnMa:

- Haxmte KhoNky STOP oINH pa3. Pn 3ToJ octaHOBKe B nAmrTb 6ydet coXpaHeHa ToUka ocTaHOBa, a Ha INHOpMauOnHHoC TPOKe NOrBntc CoO6eHne PRESTOP (PpNOCTAHOBKA).ДЯ BO3O6HOBJIeHnB BOCpON3BeDEHnC TOTKn OCTaHOBa Haxmte KhoNky PLAY/PAUSE.
- Haxmte KhoNky STOP DBaXdbI, YTO6bl NOJHOCbIO OCTaHOBtB BocnpOn3BeDeHne. Ha
- HΦopMaunOHnO CTPOKe NOBTCa COo6eHne STOP (OCTAHOBKA). Дя
- BO306HOBNeHnBOcPON3BeDEHnC hauJa DNCKa Haxmte KhoNky PLAY/PAUSE.
Iepexod K cneedyoue Inae/Tpeky

Haxmte 3ty KhoNky, YTo6bl IpeeTn K BocnpOn3BeDeHnO cIeDyUoSei rnaBbI DVD nCKa nn TpeKa CD nCKa.
IepexoK npedbiodyueInae/Tpeky

Haxmnte 3ty KhoNky, yTo6bl npeiTu K BocnpOn3BeJeHIO npeIbIyUeI rnaBbI DVD Dncka nn Tpeka CD dncka.
YckopeHHoe 8ocnpou3eedeHue 8 o6pamHom HanpaenHuu

HaxmTe 3Ty KONky Dnay yCKopeHHoro BOCpOu3BeDeHnB O6paTHOM HnPaBHeHn. HeckoIbko pa3 HaxmTe KONky Dnay yBeNueHnckOpocTu BOCpOu3BeDeHn.

YckopeHHoe 8ocnpou3aedHue e npramom HanpaeJehuu

HaKmTe 3Ty KONky dIy yCKOpEHNO BOCIpOn3BeDeHnB IprMOM HAnpaBJIeHn. HeckoIbKO pa3 HaKmTe KONky dIy yBEJIInueHnB CKOpOCTu BOCIpOn3BeDeHnR.
PpumeyaHua:
- Изменные скорocMu yckopehno2o bocnpou3bdeHua e npamom unu obpamHom hapaeneHu npoucxodum e cneyioue m npaKe: HopmaNbHa x2 x4 x8 20 HopMaNbHa.
- Pn yckopeHHOM Bocnpoun3BeHn 8 npMOM uu ObpamHom HapaeHeHu 36yko0e conpo0xdeHue omKluoyaemc aemomamuuecku.
- Празьбамь He можem осуесмь yckopehhoe BOCPou3BedeHne 6 npamom unu obpamHom Hanpa6nEHuu npu bocnpou3eHuu ceMeHma WARNING (РЕДУПЕХДEHNE) DVD ducka.

3KpaHHoe MeHIO DVD ducka
При ВOCироИЗБeДeHи DVD ДИСКа НАЖМЛТЕ KНОПКУ DVD.MENU ДЯ BO3ВpaТа B MEнJO DVD ДИСКa.

BOCPON3BDEEHNE CДИCKOB,USBПОТАИΚAPTПAMЯТN
OchOBHbIe npaBnla ynpaBJeHnBaocpOn3BeDeHnEm
Ucfoobie KhoNku
- UTo6bI OcyuieCTBnTb 6bICTpbI nepexoK ONpeJeHHOI rnaBe DVD ncka nn Tpeky CD ncka, nCnoJIb3yIte cNΦpOBbie KHOJKN dnn BBOJa COOTBeTCTByIOUe HOMepa.
2.Испльзугт ecфpoьькногиВMeHDOVDДИSCa.


MeHpo pa3deNoe DVD ducka
REP. TITLE Nobtop pa3deena
REP. OFF NobTop OTKnIOueH
PnBocnpo3BeHeHm CD ncka
REP.1 NobTop Tpeka
REP. ALL Повтор диска
REP. OFF NOBTOP OTKNIUOHe
PpumeyaHue:
HekomopbE DVD duCKu He nooepxuaH om pekum noemopno 8ocnpou3eHna.
Bb6op paKpca npocMompa
YCTaHOBkaNo yMOJIyAHHIO:4:3Pan Scan.
CnCTeMHbIe HAcTpOuKn
PASSWORD - Napoь Дд ДocTyna K HacTpOyKaM
Selection DES SOURCE 24
MODE TNT 25
Présentation 25
Luminosite (Brightness)
Langue audio (Audio Language)
- Enfants
- G
- PG
- PG13
- PG-R
- R
- NC-17
- Adultes
U.S. Patens Nos. 4,631,603; 4,577,216; 4,819,098; 4,907,093; 5,315,448 and 6,516,132 "This product incorporates copyright protection technology that is protected by U.S. patents and other intellectual property rights. Use of this copyright protection technology must be authorized by Macrovision, and is intended for home and other limited viewing uses only unless otherwise authorized by Macrovision. Reverse engineering or disassembly is prohibited."
Dolby
Manufactured under license from Dolby Laboratories. "Dolby" and the double-D symbol are trademarks of Dolby Laboratories. Confidential Unpublished works. 1992-1997 Dolby Laboratories, Inc. All rights reserved.
Notas
Reciclaje
Tono de color (Color Temperature)
- G; 3.
- PG
- PG13
- PG-R
- R
- NC-17
- ADULT
FREE TO CHOOSE INNOVATIONS

XORO by MAS Elektronik AG
Pollhornbogen 19
21107 Hamburg
Deutschland
Tel: +49(040) 77 11 09 17
Fax: +49(040) 77 11 09 33
xoro@mas.de
www.xoro.de