EH1556 - Heating Prem-I-Air - Free user manual and instructions
Find the device manual for free EH1556 Prem-I-Air in PDF.


User questions about EH1556 Prem-I-Air
0 question about this device. Answer the ones you know or ask your own.
Ask a new question about this device
Download the instructions for your Heating in PDF format for free! Find your manual EH1556 - Prem-I-Air and take your electronic device back in hand. On this page are published all the documents necessary for the use of your device. EH1556 by Prem-I-Air.
USER MANUAL EH1556 Prem-I-Air
EH1550/EH1552/EH1554/EH1556
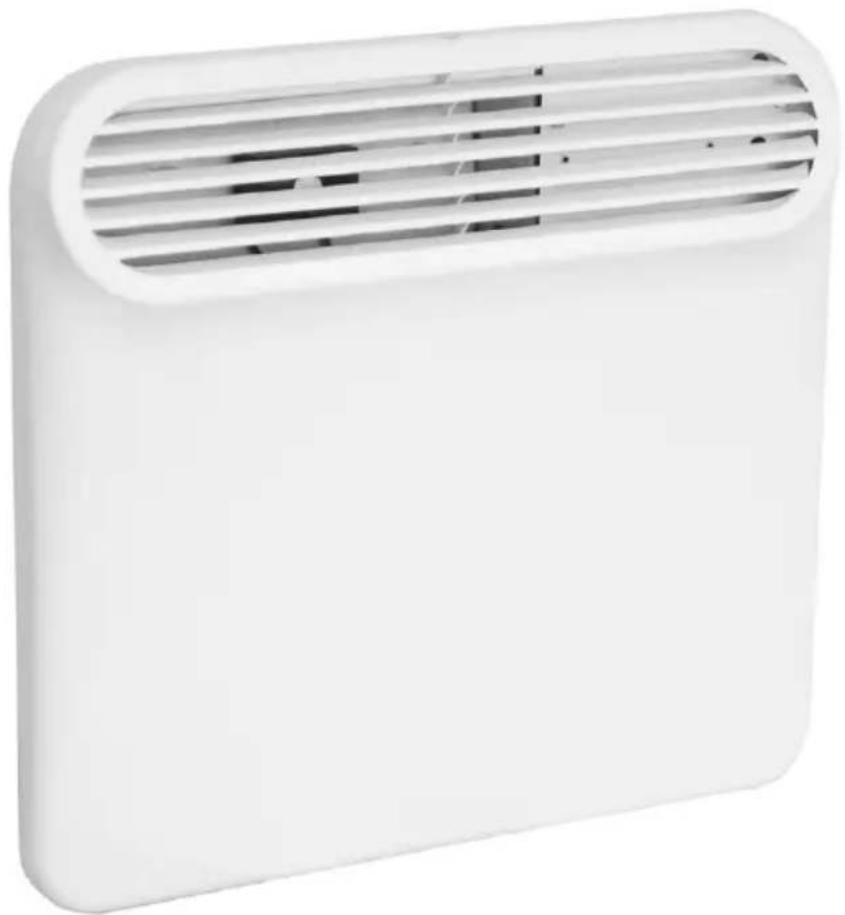
500 W / 1 kW / 1.5 kW / 2kW Programmable Panel Heater Chauffage Radiant Programmable
IMPORTANT
Installer and Users please note:
These instructions should be read carefully and left with the user of the product for future reference.
BEFORE USE
You must inspect the appliance including its cable and plug for any signs of damage. If the product is damaged, DO NOT use it, and contact your supplier immediately.
INSTALLATION
For free-standing use: Attach the two castor-wheel brackets to the underneath of the heater using the eight M4x8 mm screws (four in each bracket). The longer side of the bracket goes at the back of the heater. Attach two castor-wheels to each bracket using the dome-nuts provided.
To wall-mount: Depress the two clips and remove the wall-mounting bracket from the heater. Using the bracket as a template, and using a spirit level to makes sure that the bracket is fitted level, drill four holes in the wall, the lower holes should be at least 160mm above the floor. Insert a wall-plug into each hole. Fix the bracket to the wall with the four screws supplied. Align the two raised areas on the back of the heater with the lower part of the bracket, then clip the heater into the bracket at the top (see photo).
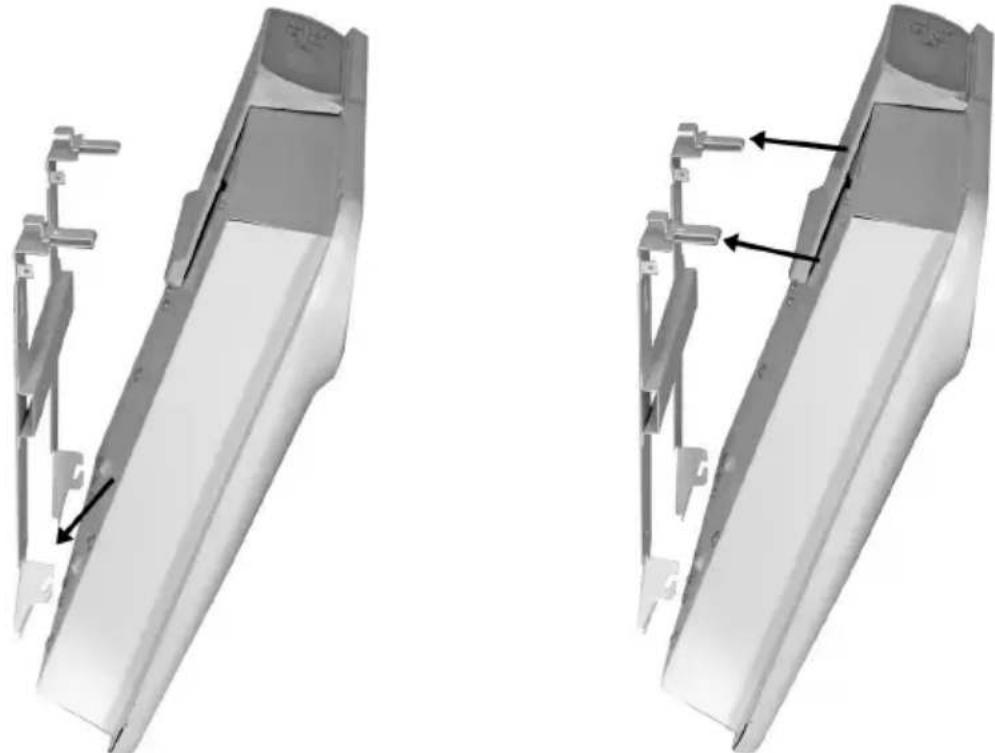
If correctly installed the heater will be firmly fixed at both top and bottom.
PAT TESTING
When used in a workplace, this product must be safety-tested yearly by a qualified electrician (PAT Tested) in order to comply with the Electricity at Work Regulations.
We recommend that it is PAT tested regularly when used in a domestic environment.
PRODUCT SAFETY
- This appliance can be used by children aged from 8 years and above and persons with reduced physical, sensory or mental capabilities or lack of experience and knowledge if they have been given supervision or instruction concerning use of the appliance in a safe way and understand the hazards involved.
- Children shall not play with the appliance.
- Cleaning and user maintenance shall not be made by children without supervision.
- Place the heater on a firm flat surface. Ensure that the air inlets (at the bottom) and the air outlets (at the top) are not obstructed.
- Ensure that curtains are at least 900mm (3') from the top of the heater
- Leave a gap of at least 50mm (2") at the sides of the heater.
- If used free-standing, do not operate unless the feet are correctly attached.
- Do not place on soft surfaces.

-
Do not cover. This symbol shown on the casing of the heater means that the heater should not be covered in order to avoid overheating.
-
For indoor use only.
- Do not use in the immediate surroundings of a bath, a shower or a swimming pool. (refer to Section 701 of the 17^th Edition of the IEE Wiring Regulations)
- Do not place the mains lead beneath a carpet or rug.
- Do not use the heater in locations where paint, petrol or other flammable liquids are used or stored.
- Do not locate the appliance immediately below a socket outlet
GENERAL SAFETY REQUIREMENTS
Domestic wiring must be tested periodically by a qualified electrician at least once every 10 years or at every change of occupancy.
For office and retail premises, and buildings such as village halls, the wiring must be inspected at least once every 5 years.
It is recommended that all buildings be fitted with smoke alarms (it is mandatory for new buildings)
OPERATING COSTS
At time of going to press, the average cost of electricity is £0.13 per unit (kilowat-hour). The amount you are being charged will be shown on your electricity bill.
At this cost, the running costs will be as follows:
EH1550 £0.07 per hour
EH1552 £0.13 per hour
EH1554 £0.21 per hour
EH1556 £0.26 per hour
These figures apply with the temperature programmed to its highest setting.
The running costs will be lower if programmed to a lower temperature, or if the ambient temperature is higher.
OPERATION
Plug the mains lead into a 13 Amp mains socket.
If connecting via an extension lead, make sure that the lead is rated at 13 Amps, and that it is fully unwound.
Switch the unit on at the mains socket, and at the switch on the side of the heater. The display will flash briefly, then will show the current room temperature, and the operating mode. There are six operating modes:
, -1, -2), ,and ±bP
The modes are as follows:
= comfort mode.
-1 = 1°C below comfort mode temperature
-2 = 2^ below comfort mode temperature
= economy mode (31 / 2^ below comfort mode temperature)
= frost protection mode (keeps the temperature above 7^ )
P = program mode - the heater is controlled by a 7-day programmable timer, which can be programmed as detailed below.
To change mode press MODE repeatedly until the symbol for the required mode is displayed.
To set the operating temperature, press MODE repeatedly until is displayed, then press the + and - repeatedly until the required temperature for comfort modes is displayed. (The °C symbol on the display flashes whilst the operating temperature is being set, and appears constant when room temperature is being displayed)
Do not touch the case when the heater is in operation, because it will be hot. Unplug the heater from the mains when not in use.
PROGRAMMING THE TIMER
Press MODE repeatedly until P is displayed.
At the top left of the display, the numerals 1 to 7 are displayed, these correspond to the days of the week (Sunday to Saturday). In the lower half of the display, twenty-four symbols are displayed. These represent the operating mode of the heater for each hour of the day.
represents Comfort mode
represents 1^ below comfort mode
represents 2^ below comfort mode
represents Economy mode (31 / 2^ below comfort mode)
represents Frost protection mode.
Press the + or - keys until the symbol is above the correct day of the week.
Press P again, and the clock will be displayed, with the hours digits flashing. If the clock is not correct adjust the hours using the + and - buttons.
Press P again, and the clock will be displayed, with the minutes digits flashing. If the clock is not correct adjust the hours using the + and - buttons.
Press P again and the symbol will flash above the figure "1" indicating that the settings for the first day of the week are being programmed.
The first segment of the 24-segment display will be flashing, indicating the setting for the first hour (between midnight and 1 am) is being programmed.
Press the MODE button repeatedly until the required mode for this time period is shown, then press the + button to go on to the next hour period.
Repeat until all 24 hour periods have been programmed.
At any time it is possible to press the “-” button to return to the previous hour period.
Then press P to save the settings for the first day, and move on to the second day of the week. The symbol will flash above the figure "2".
Repeat until all seven days have been programmed.
When all seven days have been programmed, press P again and the heater will run the program that has been entered (P shown in the display).
The programming function can be locked to prevent tampering by pressing both the + and - keys together and holding down for 3 seconds.
The function can be unlocked to allow programming by pressing both the + and - keys together again and holding down for 3 seconds.
The display shows [_ ] to indicate that the panel is locked.
Do not touch the case when the heater is in operation, because it will be hot.
Unplug the heater from the mains when not in use.
MAINTENANCE
Before cleaning, turn the heater off, and disconnect from the mains supply. The heater may then be cleaned using a damp cloth with a drop of washing-up liquid to remove any dust or dirt from the case. Do no use stronger detergents or solvents as these may damage the plastic.
If the mains lead is damaged, it must be replaced by the manufacturer or and authorised service centre.
If the mains plug needs to be replaced, proceed as follows:
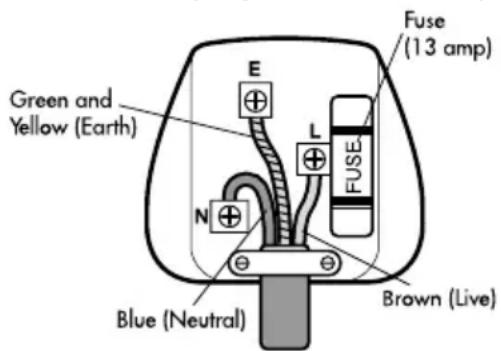
cable) and it fully tightened.
- Connect the brown wire to the terminal labelled "L".
- Connect the blue wire to the terminal labelled "N".
- Connect the green/yellow wire to the terminal labelled with the earth symbol or "E".
- Make sure that the cord-grip is positioned correctly (over the outer sheath of the
FAULT-FINDING
The heater has an overheat protection switch, which disconnects the power if the element gets too hot. The usual reason for this is because the air-flow has been obstructed. If the heater ceases to operate, leave it for 20 minutes to cool down, then check that the grilles are not being obstructed.
Switch back on, and check that the unit is operating normally. If not, contact an authorised service agent for repair.
If the keypad is unresponsive, and the display shows [ ] then the panel has been locked. Press + and - together and hold for 3 seconds to unlock it.
DISPOSAL AND RECYCLING
You must not dispose of this appliance with domestic household waste.
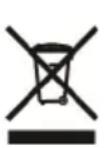
Most local authorities have specific collection system for appliances and disposal is free of charge to the end-user.
When replacing an existing appliance with a similar new appliance your retailer may take the old appliance for disposal.
TECHNICAL SPECIFICATION
Dimensions (wall mounting): EH1550 440x402x119 mm
EH1552 543x402x119 mm
EH1554 683x402x119 mm
EH1556 983x402x119 mm
Dimensions (floor standing): EH1550 440x450x238 mm
EH1552 543x450x238 mm
EH1554 683x450x238 mm
EH1556 983x450x238 mm
Weight: EH1550 3.2 kg
EH1552 4.01 kg
EH1554 4.85 kg
EH1556 6.5 kg
Power supply: 230 V AC
Power consumption: EH1550 500 W
EH1552 1kW
EH1554 1.5 kW
EH1556 2 kW
Operating current: EH1550 2.2 A
EH1552 4.3A
EH1554 6.5A
EH1556 8.7A
SERVICE WARRANTY
- Prem-i-Air guarantees the product free from defects in materials and workmanship for a period of twelve months.
- Should this appliance be operated under conditions other than those recommended, at voltages other than the voltage indicated on the appliance, or any attempts made to service or modify the appliance, then the warranty will be rendered void.
- The product you buy may sometimes differ slightly from illustrations. This warranty is in addition to, and does not affect, your statutory rights.
- Our guarantee is administered by our retailers.
- If your product arrives damaged, you must contact the retailer from whom you bought it. The retailer's contact details will be on the invoice that arrived with the product, or on the e-mail you received when you placed the order. Do not contact Prem-i-air, only your retailer can arrange a replacement.
- If your product fails within the guarantee period, firstly read the "fault finding" section of this manual, because temperature and weather conditions can affect the performance of certain products. If the product needs to be repaired or replaced, you must contact the retailer from whom you bought it.
- The retailer's contact details will be on the invoice that arrived with the product, or on the e-mail you received when you placed the order.
- If you have just received your product and require technical help in using it, please call our Help Desk on (0845) 459 4816
- If you have any other technical queires about the product, please call our Help Desk on (0845) 459 4816
Prem-i-Air Appliances Ltd.,
Lancots Lane, Sutton, St. Helens, Merseyside.
WA93EX
website: www.prem-i-air.com
IMPORTANT
= mode comfort
Alimentation: 230 V CA
Consommation: EH1550 500W
EH1552 1 kW
EH1554 1,5 kW
EH1556 2 kW