USER MANUAL ET475MY11E SIEMENS
Operating instructions
Mode d'emploi
Gebruiksaanwijzing
Inhaltsverzeichnis
Before installation 22
Safety instructions 23
How to avoid damage 24
Before first use 25
Your new appliance 25
This is your new teppan yaki 25
Control panel 26
Setting the teppan yaki 27
Switching the teppan yaki on and off 27
Setting the temperature 27
Residual heat indicator 28
Keeping warm setting 28
Switching the rear heating zone off 28
Automatic time limit 29
Timer 29
Tables and tips 30
Settings table 30
Tips and tricks 33
Basic settings 34
Changing the basic settings 35
Care and cleaning 36
Rectifying faults 38
After-sales service 39
Read these instructions carefully. Only after reading these will you be able to operate the appliance safely and correctly.
Please keep the operating and installation instructions in a safe place. If the appliance is passed to another person, please enclose the instructions.
Before installation
Environmental protection Remove the packaging from the appliance and dispose of the packaging in an environmentally-friendly way.
This appliance is labelled in accordance with the European Directive 2002/96/EG concerning used electrical and electronic appliances (waste electrical and electronic equipment - WEEE). The guideline determines the framework for the return and recycling of used appliances as applicable.
Transport damage Check the appliance after removing the packaging. If it has suffered any damage during transport, do not connect the appliance.
Electrical connection The connecting lead must be replaced if it has been damaged. This can only be carried out by one of our after-sales service technicians, in order to guarantee the safety.
Installation and connection Please refer to the installation instructions.

Safety instructions
This appliance should only be used for domestic cooking.
Safe operation Do not let adults or children operate the appliance
unsupervised:
- if they are mentally or physically unable to use the appliance safely and correctly
- if they don't have the knowledge and experience to use the appliance safely and correctly.
Never allow children to play with the appliance.
Do not operate this appliance with an external timer or a separate telecontrol system.
Only use the appliance to prepare meals directly on the frying surface - without pots or pans.
Overheated oil and fat Caution, fire risk! Overheated oil and fat can ignite
easily. Do not leave hot oil and fat unattended. Never attempt to extinguish burning oil and fat with water.
Use a lid to smother flames. Switch off the appliance.
Hot appliance Caution, risk of burns! The appliance heats up during
operation. Keep children away!
Caution, fire risk! Do not use the appliance to store items. Do not place any objects made out of plastic or with a plastic handle onto the hot frying surface.
Caution, fire risk! Do not store any combustible objects in drawers or shelves under the appliance (for example cleaners, aerosols).
Risk of short circuits! The connecting cables of electric appliances must not come into contact with the hot appliance. The cable insulation can be damaged.
Glass ceramic cover Caution, risk of burns! Wait until the appliance has cooled down completely before placing the glass ceramic cover on the appliance. Do not switch on the appliance with the glass ceramic cover placed on it.
Cleaning Switch off the appliance after use. Clean the appliance after every use when it has cooled down. Do not use high-pressure or steam jet cleaning devices.
Repairs Incorrect repairs are dangerous. Risk of electric shock! Repairs must be carried out by one of our experienced after-sales engineers.
If the appliance is damaged, switch off the corresponding household fuse. Call after-sales service.
How to avoid damage
Stainless-steel frying surface The stainless-steel frying surface is tough and smooth. However, the surface will show signs of use after some time, just like a good cast iron pan. This does not interfere with the use of the appliance. A slight yellowing of the stainless-steel frying surface is normal. Do not cut with knives on the stainless-steel frying surface, this might scratch the surface. Use the spatulas to turn food. Note: do not hit the frying surface with the spatula. This might leave marks on the surface.
Hard or pointed objects Hard or pointed objects may cause damage if they fall onto the glass ceramic panel or the glass ceramic cover.
Glass ceramic cover Wait until the appliance has cooled down completely before placing the glass ceramic cover on the appliance. Do not switch on the appliance with the glass ceramic cover placed on it. Do not use the glass ceramic cover as a surface for placing objects or for keeping things warm.
Before first use
Heat up the appliance Thoroughly clean the frying surface before using the appliance for the first time. Then heat up the appliance without any food placed on it at 240^ for 30 minutes. This will eliminate any 'newness' smells.
Your new appliance
Your new appliance and its accessories are described in this section.
This is your new teppan yaki
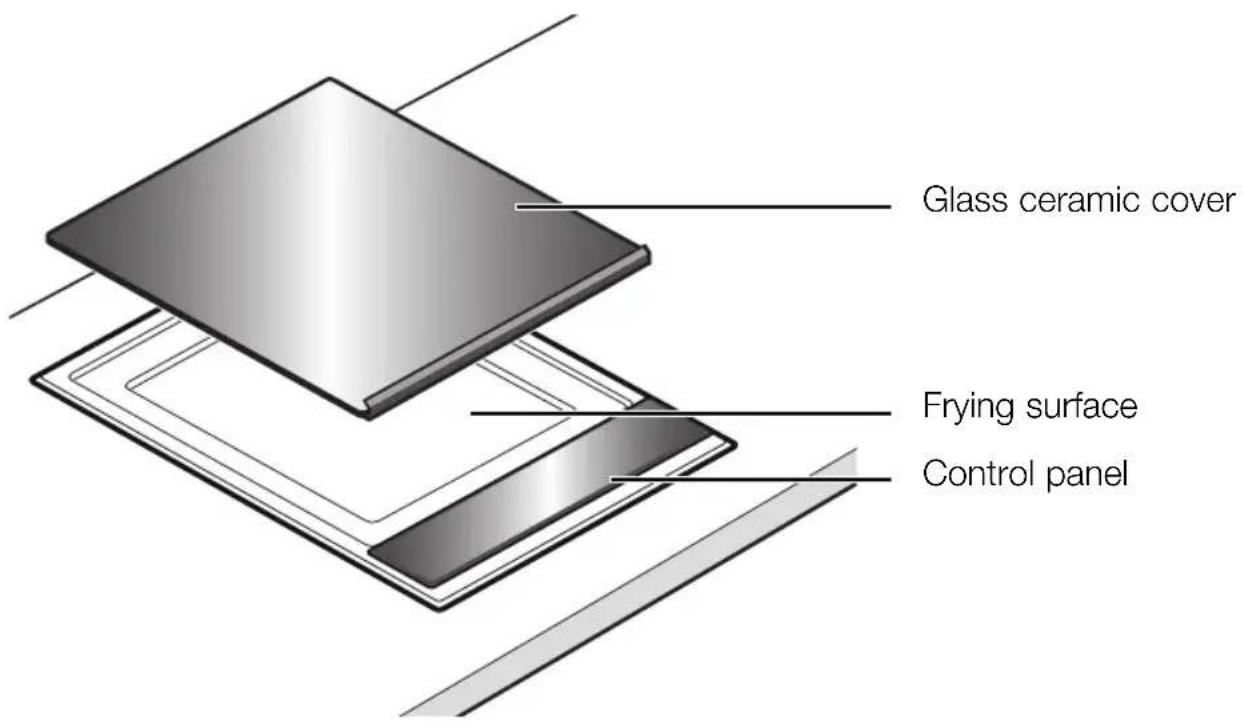
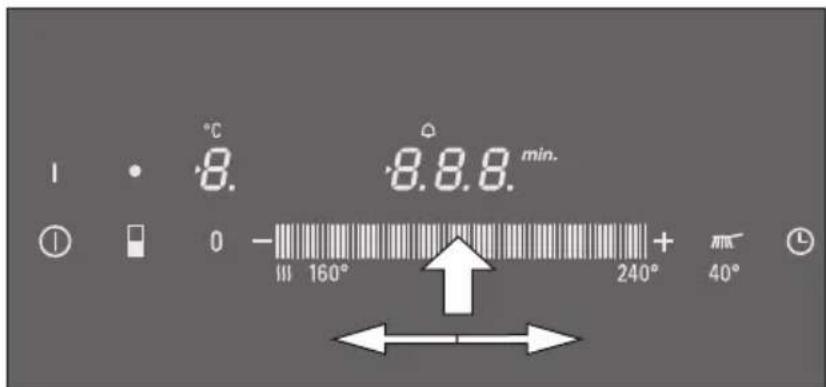
Control panel
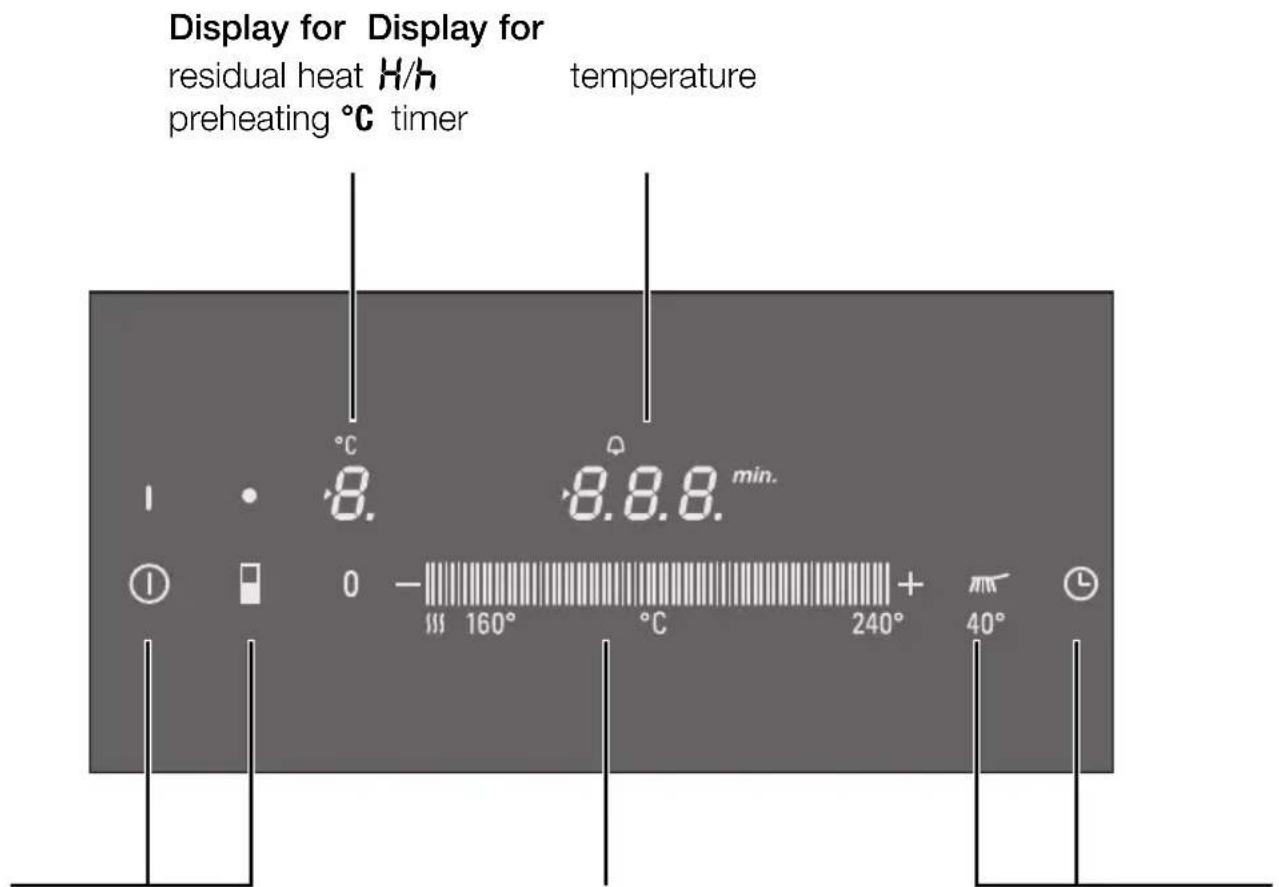
Control panel for Control panel for Control panel for main switch ① selecting the temperature timer L rear heating zone off keeping warm setting cleaning setting
Control panels When you touch a symbol, the respective function is activated.
Note Always keep the control panels dry. Moisture reduces their effectiveness.
Setting the teppan yaki
Switching the teppan yaki on and off
Switch the teppan yaki on and off using the main switch.
To switch on: touch the ① symbol. The indicator above the main switch lights up. The teppan yaki is ready.
To switch off: touch the ① symbol until the indicator above the main switch goes out. The teppan yaki is switched off. The residual heat indicator remains on until the teppan yaki has cooled down sufficiently.
Note The teppan yaki switches off automatically if the temperature setting has been set to 0 for more than 20 seconds.
Setting the temperature
Set the required temperature on the control panel. The teppan yaki must be switched on by the main switch.
- Set the temperature. Slide your finger along the control panel until the desired temperature appears on the display.
- Wait until the appliance has heated up and a signal is sounded. The preheating symbol goes off. Now you can place the food on the frying surface.
Residual heat indicator
The teppan yaki has a two-stage residual heat indicator.
If H appears on the display, the teppan yaki is still hot. As the teppan yaki cools down further, the display changes to h . The display remains lit until the teppan yaki has cooled down sufficiently.
Only clean the teppan yaki when the residual heat indicator has changed from H to h .
Keeping warm setting
The teppan yaki must be switched on by the main switch.
Select the keeping warm setting in the control panel.
Do not keep warm large amounts of food. All the food should have contact with the frying surface, otherwise it might cool down. Do not keep food warm for a longer time as it will dry out.
Switching the rear heating zone off
When frying small amounts of food you can switch off the rear frying zone and use only the front half of the frying zone. You can use the rear frying zone to keep food warm.
The teppan yaki must be switched on by the main switch.
Touch the symbol. The indicator above the symbol lights up. The rear frying zone is switched off.
When switching on the appliance the next time, the chosen setting remains activated. You can change this option in the basic settings.
Automatic time limit
If the teppan yaki is in use for a long time without the setting being changed, the automatic time limit is activated.
The appliance stops heating. F and B flash alternately on the display.
The display goes out when you touch any control panel. You can make new settings.
When the time limit is activated, depends on the temperature selected.
Timer
You can use the timer as a kitchen timer. The timer will not switch the teppan yaki on or off.
You can set a time of up to 99 minutes. You can also use the timer when the teppan yaki is switched off.
Setting procedure
- Touch the 已 symbol until the indicator lights up. 00 lights up on the timer display.
- Set the required time on the control panel.
When the time has elapsed A signal sounds once the time has elapsed.
00 lights up on the timer display. After 10 seconds, the indicator switches off.
Changing the time Touch the
symbol, reset the time on the control
panel.
Switching the timer off Touch the
念 symbol, reset to 0 on the control
panel.
Tables and tips
Settings table
These values are to be regarded as guidelines only.
The frying times apply to a preheated appliance and will depend on the quality and the amount of the food.
Wait until the appliance has heated up before placing the food on the frying surface.
Food Temperature Time Quantity / Thickness
Meat / Poultry
Beef steak, medium* sear at 230 - 240 °C 2 - 3 min. each side approx. 2 cm continue at 180 °C 5 - 7 min.
Roast neck of pork 210 - 220 °C 15 - 20 min. approx. 2 cm (without bone)
Médaillon of pork** 170 - 180 °C 13 - 17 min. max. 2 cm
Cutlet of pork or veal, 190 - 200 °C 10 - 13 min. 0,5 - 1 cm breaded***
Turkey steak 210 - 220 °C 8 - 15 min. 1 - 1,5 cm
Chicken breast fillet 180 - 190 °C 15 - 20 min. 2,5 - 3 cm
Beef or chicken stir fry, 200 - 210 °C 8 - 10 min 600 - 700 g marinated****
Turkey breast stir fry**** 180 - 190 °C 7 - 9 min. 600 - 700 g
Minced meat 230 - 240 °C 9 - 11 min. approx. 600 g
Hamburgers 180 - 190 °C 13 - 16 min. max. 1 cm
- For example entrecôte, fillet steak, rump steak. The steak is medium, when meat juices appear.
Press the pieces of meat flat onto the frying surface, turn frequently.
* Use plenty of oil to avoid the breadcrumbs drying out and burning.
**** Keep the pieces of meat apart.
Food Temperature Time Quantity / Thickness
Fish
Fish fillet* 190 - 200°C 7 - 10 min. approx. 2 cm
Salmon fillet 170 - 180^ 18 - 20 min. approx. 3 cm
Tuna steak 190 - 200^ 18 - 20 min. approx. 3 cm
King prawns 210 - 220^ C 8 - 10 min. 30 g each
Vegetables
Carrots, in batons 190 - 200^6 - 8 min. approx. 500g
Red peppers, in strips 200 - 210^4 - 6 min. approx. 500 g
Aubergines, sliced** 200 - 210°C 6 - 8 min. approx. 500 g
Courgette, sliced 190 - 200°C 6 - 8 min. approx. 500 g
Onion rings 190 - 210°C 5 - 7 min. approx. 500 g
Mushrooms, sliced 230 - 240 10 - 12 min. approx. 500 g
Boiled potatoes, sliced 210 - 220°C 10 - 12 min. approx. 500 g
- Use fish that is suitable for frying, for example salmon, tuna, monkfish, perch or pikeperch. Cover the fish fillets with flour to keep them from sticking to the frying surface. Start frying on the skin, turn once.
** Salt aubergines before frying, leave for 30 minutes and dry.
| Food Temperature Time Quantity / Thickness |
| Egg dishes / sweet dishes |
| Fried egg, scrambled egg 170 - 180°C 6 - 9 min. 6 eggs |
| American pancakes* 190 - 200°C 2 - 3 min. each side 4 pancakes |
| Crêpes* 200 - 210°C 1 - 2 min. each side 2 crêpes |
| Fruit, in slices or cubes* / ** 180 - 190°C 5 - 7 min. 500 g |
| Other |
| Croûtons* / *** 160°C 15 - 20 min. 150 g |
| Roast pine nuts / almonds | 160°C 5 - 7 min. 400 g |
| Precooked noodles 200 - 210°C 10 - 15 min. | 500 g |
| Tofu | 210 - 220°C 3 - 5 min. 400 g |
- Best fried with concentrated butter.
Sweeten to taste with honey or sugar.
* Turn frequently.
Tips and tricks
Before frying Always preheat the appliance. This also applies
when raising the temperature to fry a second item which requires a higher setting.
Use oil and fat that is suitable for frying, for example plant oil or concentrated butter.
Do not salt meat, poultry or fish before frying, to prevent liquid and soluble nutrients from escaping.
Avoid pricking or cutting meat or poultry before or during frying, in order to retain meat juices.
Frying Keep the pieces of meat apart so that they do not draw any liquid.
Press the pieces of meat flat onto the frying surface using the spatula. Only turn the meat, when it comes away from the surface easily, in order to protect the structure of the meat. Damaging the structure can cause juices to escape and results in the meat drying out.
Basic settings
Your appliance has various basic settings. You can adapt these settings to your needs.
Indicator Function
C Audible signal
Confirmation signal and operation error signal switched off
Only operation error signal switched on
Confirmation signal and operation error signal switched on*
c6 Duration of the timer end signal
1 10 seconds*
2 30 seconds
3 1 minute
Combination of the heating zones
When switching on the teppan yaki, both heating zones are switched on.
When switching on the teppan yaki, the rear heating zone is switched off.
2 When switching on the teppan yaki, the previously chosen setting is activated.*
Reset to basic settings
Switched off
Switched on
Changing the basic settings The
teppan yaki must be switched off.
- Switch on the teppan yaki.
- Within the next 10 seconds, touch the symbol for 4 seconds. c^2 appears on the left-hand display and on the right-hand display.
- Touch the symbol repeatedly until the desired symbol appears on the left-hand display
- Set the desired value on the control panel.
- Touch the symbol for 4 seconds. The setting is stored.
Switching off without storing To exit the basic setting, switch off the teppan yaki the settings with the main switch. The changes of the settings will not be saved.
Care and cleaning

Do not use high-pressure or steam jet cleaning devices.

Caution, risk of burns! Only clean the teppan yaki when the residual heat indicator has changed from H to h.
Clean the appliance after every use. Burnt in residues may be difficult to remove.
Remove food remnants with the spatula.
Always remove any residues of cleaning agents from the frying surface!
Cleaning the warm appliance
Caution, risk of burns! When pouring water onto the hot frying surface steam will rise and hot water splashes occur.
Leave the teppan yaki to cool down for at least 15 minutes before using water to clean it. We recommend to use ice cubes. Add a few drops of washing-up detergent and leave to soak (not more than 1 hour).
Caution, risk of burns! Only clean the teppan yaki when the residual heat indicator has changed from H to h.
Cleaning the cold appliance
Cover the frying surface with some soapy water.
Switch on the appliance. Select the cleaning setting. Leave to soak (not more than 1 hour). Clean the frying surface when the soiling has been loosened.
Cleaning between frying We
recommend to use ice cubes. Switch off the appliance. Put 4-5 ice cubes onto the frying surface and use the spatula to move the ice cubes around.
Caution! Hot steam will rise from the frying surface!
Remove the soiling with the spatula. You can continue frying when the remainder of the water has evaporated and the appliance has heated up to the required temperature.
Suitable cleaning agents Use soapy water to remove greasy residues. Some food can leave white marks on the frying surface after cleaning the appliance. You can remove these marks using lemon juice, vinegar or a weak descaling solution. Wipe clean with a moist cloth. Carefully remove any residues of descaling solution.
Stainless-steel cleaner If the frying surface or the metal frame turn matte after some time, you can clean them with a stainless-steel cleaner. You can order a suitable stainless-steel cleaner from your specialist dealer or in our webshop (order number 311137).
Cleaning the frame Wipe clean the metal frame using warm soapy water.
Do not hit the metal frame with the spatula.
Glass ceramic panel and Remove light soiling using a damp cloth, or with glass ceramic cover warm soapy water.
Rinse any left-over detergent with cold water and dry the surface well.
Do not clean the glass ceramic cover in a dish washer.
Unsuitable cleaning agents Do not use any chemically aggressive cleaners such as oven sprays or stain removers.
Do not use metal pot cleaners, steel wool, wire brush or similar.
The frying surface will show signs of use after some time from the spatulas, and also from abrasive cleaners or abrasive sponges. This does not interfere with the use of the appliance.
Rectifying faults
Malfunctions often have simple explanations. Please read the following notes before calling the after-sales service.
| Indicator Fault Action |
| Blank There is no power supply. Check the household fuse for the appliance. Check whether there is a power cut by trying other electrical appliances |
| E is flashing The control panel is Dry the control panel or remove the object. Then damp or an object is touch any control panel. resting on it. |
| Er + number | Appliance fault Switch the appliance off and on again. If the indicator does not go off, call the after-sales service. |
| FO | Appliance fault Switch the appliance off and on again. If the indicator does not go off, call the after-sales service. |
| F4 | The electronics have Wait until the electronics have cooled down overheated and have sufficiently. Then touch any control panel. switched off the appliance. |
| F6 / F7 | Appliance fault Switch the appliance off and on again. If the indicator does not go off, call the after-sales service. |
| F8 | The appliance was in use You can switch the appliance back on again for too long and has immediately. switched itself off. |
After-sales service
Our after-sales service is there for you if your appliance should need to be repaired. You will find the address and telephone number of your nearest after-sales service centre in the phone book. The after-sales service centres listed will also be happy to inform you of a service point in your local area.
E-number and FD-number
Please quote the E number (product number) and the FD number (production number) of your appliance when contacting the after-sales service. The nameplate containing these numbers can be found on the appliance. For future reference you can note these numbers here:
Sommaire
Remarques importantes 41
Comment remedier aux incidents 57