
Alias 6608 - Remote control toy LaTrax - Free user manual and instructions
Find the device manual for free Alias 6608 LaTrax in PDF.

| Product type | RC quadcopter helicopter (toy) |
| Brand | LaTrax |
| Model | Alias 6608 |
| Helicopter power supply | Rechargeable LiPo 650 mAh battery |
| Transmitter power supply | 4 AAA alkaline batteries (included) |
| Charger | Built-in USB charger |
| Flight modes | Easy (default), Fast, Expert |
| Operating frequency | 2.4 GHz (2406-2453 MHz) |
| Approximate range | 100 meters (estimated) |
| Flight time | 8 to 10 minutes (estimated) |
| Low voltage detector | Built-in (LED warning and auto-land) |
| Acrobatic functions | Twister, flips, jumps in Fast mode |
| Main material | Plastic |
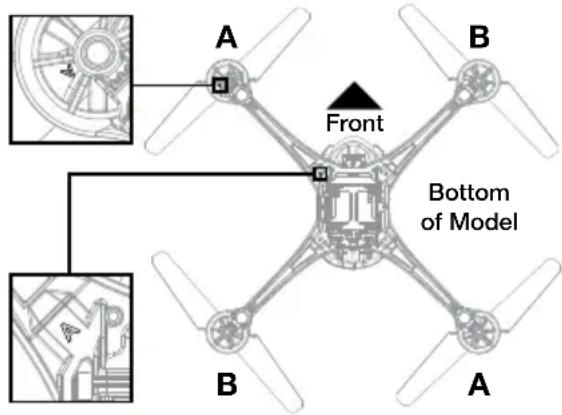
| Rotor blades | Labeled A and B (colored and white) |
| Safety system | Signal loss → disarm and controlled landing |
| Warranty (electronic parts) | 30 days from purchase |
| Technical support | 1-888-872-9927 (USA), support@LaTrax.com |
| Maintenance | Clean after flight; store battery at 50% charge |
| Replacement parts | Rotor blades, motors, screws, 1.5 mm Allen key |
| Recommended use | Indoor (10 x 10 ft area) or outdoor without obstacles |
| Recommended minimum age | 14 years (adult supervision required) |
| Precautions | Small parts dangerous for children under 3; wear eye protection |
Frequently Asked Questions - Alias 6608 LaTrax
User questions about Alias 6608 LaTrax
0 question about this device. Answer the ones you know or ask your own.
Ask a new question about this device
Download the instructions for your Remote control toy in PDF format for free! Find your manual Alias 6608 - LaTrax and take your electronic device back in hand. On this page are published all the documents necessary for the use of your device. Alias 6608 by LaTrax.
USER MANUAL Alias 6608 LaTrax
- Never fly the helicopter with low batteries. Low battery indicators include:
- The transmitter or the receiver battery level indicator on the transmitter LCD starts flashing, and the transmitter starts beeping continuously.
- The rear-facing blue LED on the helicopter is flashing fast (4 times per second).
- The helicopter loses power and lands itself (low voltage cutoff).
- The helicopter has rotating blades that move at high speed, posing danger of damage and injury. Pilots are responsible for any actions that result in damage or injury from the improper operation of the helicopter. Choose an adequate flying space without obstacles. Do not operate the helicopter near buildings, crowds of people, high-voltage power lines, or trees to ensure the safety of yourself, others, and your model. Wear eye protection when operating your helicopter and keep your hands, face, hair, loose clothing, and foreign objects away from the rotating blades.
- This model has small parts that may pose a choking hazard. Keep all small parts and electrical devices out of the reach of children and animals.
- Pets can become excited by radio-controlled models. Keep pets away from your model at all times.
- Keep the model in sight at all times during operation and flight. Discontinue operation immediately if the model flies out of your field of view.
- Because your model is controlled by radio, it is subject to radio interference from many sources that are beyond your control. Radio interference can cause momentary losses of radio control; always allow a safety margin in all directions around the model to prevent collisions.
- When flying indoors, avoid locations with ceiling fans, hanging light fixtures, heating or air conditioning vents, or any other obstacles that may interfere with or damage your model.
- Never attempt to retrieve your model from any location higher than your reach (such as rooftops or trees) or from any location that poses a safety hazard.
- Do not operate your model anytime your line of sight to the model may be obstructed or impaired in any way. Do not operate the model if you are tired or otherwise impaired.
- Moisture causes damage to electronics. Avoid exposing your helicopter, transmitter, and battery to water.
- The motor, batteries, and speed control can become hot during use. Allow parts to cool before handling.
- Do not leave the model unattended while it is turned on. Immediately turn the model and the transmitter off after you have safely landed the model.
- Most importantly, use good common sense at all times.

All instructions and precautions outlined in this manual should be strictly followed to ensure safe operation of your model. Failure to comply with the warnings, instructions, and precautions in this manual could lead to product damage and personal injury.
LiPo Batteries
Lithium Polymer (LiPo) batteries are popular for use in R/C models due to their compact size, high energy density, and high current output. However, these types of batteries require special care and handling procedures for long life and safe operation. WARNING: LiPo batteries are intended only for advanced users that are educated on the risks associated with LiPo battery use. LaTrax does not recommend that anyone under the age of 14 use or handle LiPo battery packs without the supervision of a knowledgeable and responsible adult.
Your model is able to use LiPo batteries. LiPo batteries have a minimum safe discharge voltage threshold that should not be exceeded. The LaTrax Alias is equipped with built-in Low-Voltage Detection that alerts the pilot when LiPo batteries have reached their minimum voltage (discharge) threshold. It is the pilot's responsibility to stop immediately to prevent the battery pack from being discharged below its safe minimum threshold.
Low-Voltage Detection is just one part of a comprehensive plan for safe LiPo battery use. It is critical to follow all instructions for safe and proper charging, use, and storage of LiPo batteries. Make sure you understand how to use your LiPo batteries. Be aware that LaTrax shall not be liable for any special, indirect, incidental, or consequential damages arising out of the installation and/or use of LiPo batteries in LaTrax models. If you have questions about LiPo battery usage, please consult with your local hobby dealer or contact the battery manufacturer. As a reminder, all batteries should be recycled at the end of their useful life.
LaTrax Technical Support Line: 1-888-872-9927
(Toll-free support is available to U.S. residents only, 972-549-3000 outside the U.S.)
INTRODUCTION
Thank you for purchasing the LaTrax Alias quad rotor high-performance helicopter. This manual contains all the necessary operating procedures that allow you to unlock the performance and potential that our engineers designed into your model. Even if you are an experienced R/C enthusiast, it's important to read and follow the procedures in this manual.
We want you to feel confident that you own one of the best-performing models in the market and that it is backed by a team of professionals who aim to provide the highest level of factory support possible. Our Customer Support team is with you every step of the way. If you have any questions about your model or its operation, call the LaTrax Technical Support Line toll-free at: 1-888-872-9927 (Toll-free support is available to U.S. residents only).
QUICK START GUIDE
See the included Quick Start Guide for initial setup of your helicopter. The Quick Start Guide is not intended to replace the full operating instructions available in this manual. Please read this entire manual for complete instructions on the proper use and maintenance of your helicopter.
INCLUDED SUPPORT EQUIPMENT
- 650mAh LiPo battery
• USB-powered battery charger
• 1.5mm hex wrench (to assist with repairs)
• 4 Traxxas AAA alkaline batteries - Spare rotor blade set
- Spare hardware
- Control sticks
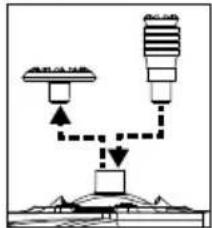
Accessory Control Stick Installation
The included accessory control sticks are interchangeable with the thumb pads on your transmitter. Twist and pull on the thumb pad to remove it from the transmitter, and install the control stick in its place.
natural_image
Simple line diagram showing two buildings connected by a dashed line to a central building (no text or symbols)FLIGHT CONTROLS
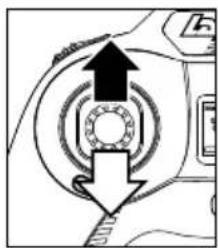
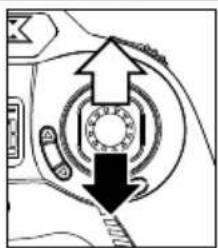
Throttle Control
- Increase throttle/altitude: Push throttle stick forward
- Decrease throttle/altitude: Pull throttle stick back
natural_image
Diagram of a mechanical component with arrows indicating direction (no text or symbols)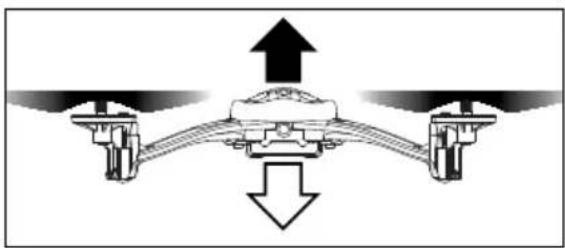
natural_image
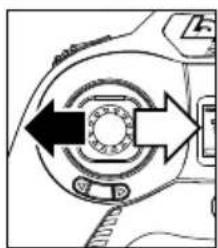
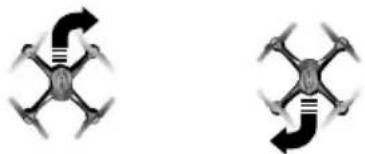
Diagram of a mechanical or fluid system with upward and downward arrows indicating flow or movement (no text or symbols)Rudder Control
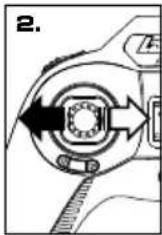
- Rotate left: Move throttle stick left
- Rotate right: Move throttle stick right
natural_image
Diagram of a mechanical or electrical component with directional arrows indicating rotation or movement (no text or symbols)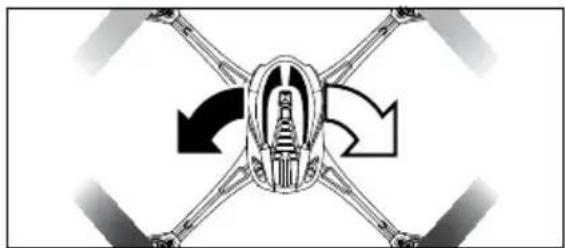
natural_image
Diagram of a mechanical assembly with four arms and a central body, showing rotational motion arrows (no text or labels)Elevator Control
• Fly forward:
Push flight stick forward
• Fly backward: Pull flight stick back
natural_image
Mechanical assembly diagram showing a bearing mechanism with arrows indicating direction (no text or labels)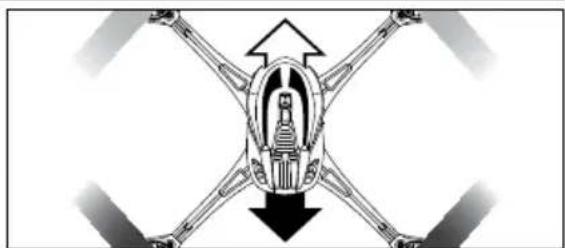
natural_image
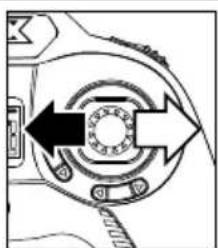
Diagram of a mechanical assembly with four arms and a central body, showing directional arrows (no text or labels)Aileron Control
- Sideways left: Move flight stick left
- Sideways right: Move flight stick right
natural_image
Diagram of a mechanical component with directional arrows indicating rotation or movement (no text or symbols)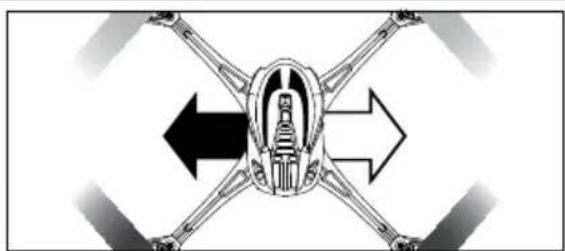
natural_image
Diagram of a mechanical assembly with four arms and a central body, showing directional arrows (no text or labels)MODEL ORIENTATION
REAR
Black Rotor Blades White Lights
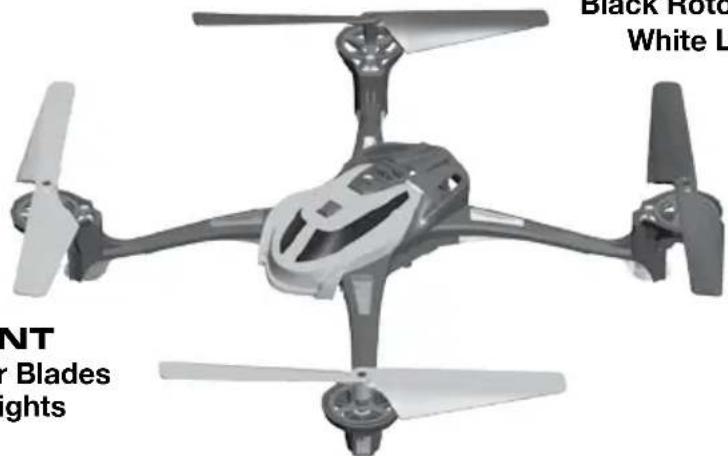
FRONT Color Rotor Blades Color Lights
FLYING YOUR MODEL
- The model will react quickly to your commands. At first, move the controls SLOWLY and make small, gentle control movements to avoid loss of control. If you ever feel you don't have complete control of the helicopter, maintain altitude with the throttle stick and release the opposite stick to return to level flight (Easy and Fast Mode).
- Fly 2-3 feet above the ground to avoid ground turbulence for a more stable and controllable flight.
-
Find a suitable flying area. Alias is approved for both indoor and outdoor flight. The recommended minimum area for indoor flight is 10 x 10 feet, with a ceiling height of 8 feet or more. Be aware that the spinning rotor blades may damage furniture and wall coverings. When flying outdoors, choose a wide open area away from crowds, buildings, power lines, or other hazards.
-
Switch the transmitter on. The transmitter will emit a tone. Observe the battery level indicator on the LCD. Replace the batteries when only one segment is displayed. Do not fly the model with low transmitter batteries or loss of control may result.

Alias does not have a power switch.
The model is ON when the battery is connected. To power the model off, disconnect the battery.

WARNING: To prevent permanent damage to your battery pack, ALWAYS disconnect the battery whenever the helicopter is not in use.
3. Power the model.
- Connect the battery to the model. The model is now powered on.
-
When the green LED on the transmitter and the blue LED on the helicopter are both solid (not blinking), and the "RX" battery level indicator appears on the LCD screen, linking is complete.
-
Place the model on a level surface in the center of your flying area, with the front of the model facing away from you (nose out).
-
Arm your model for flight. Place the model on a level surface with the blue LED facing you (nose out). Move the throttle stick to the full down position (throttle off). The helicopter will not arm unless the throttle stick is in the down position (A). Push in and release the throttle stick to arm your model for flight. The transmitter will emit a fast-rising double tone indicating that the
helicopter is armed and ready to fly (B). Note: When the throttle stick is left idle for 5 seconds or the helicopter detects an impact, the helicopter will automatically disarm.
-
Fly the helicopter. Gently push the throttle stick forward to increase the RPM of the main rotors until the model begins to lift off. Reduce throttle to maintain a hover when the model is at least 2–3 feet off the ground. This height will keep the model away from ground turbulence for more stable flight.
-
Practice maintaining the hover position. Minor control inputs are required to keep the model hovering in one spot and at one altitude.
- Practice increasing and reducing altitude. To land, slowly and smoothly pull the throttle stick back until the helicopter touches down.
- Practice flying forward and backward. Operate the elevator and aileron controls separately to familiarize yourself with the helicopter's response.
- Practice rotating and stopping the helicopter precisely. Operate the rudder control while hovering.
- Combine control commands. When you are comfortable operating the controls independently, you can combine controls to make very precise maneuvers.
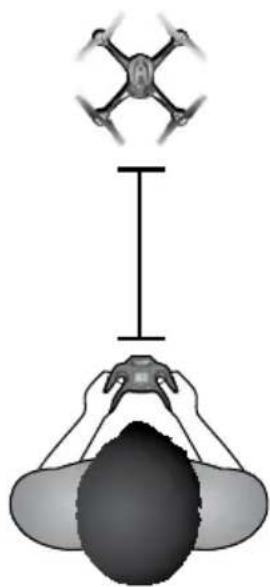
natural_image
Diagram showing a drone above a person holding a camera, with no text or symbols present.The transmitter and receiver are equipped with an automatic fail-safe system. In the event of signal loss or interference, the flight control will be shut down and the helicopter will execute a controlled landing. If failsafe activates, determine the reason for signal loss and resolve the problem before operating the helicopter again.
If one or more of the rotor blades are obstructed, the helicopter will disarm itself and all of the LED lights on the helicopter will flash. Move the helicopter to a clear area, arm the helicopter again, and continue flying. If the helicopter will not fly correctly or the LED lights start flashing again, unplug the battery and inspect the helicopter for damage.
FLYING TIPS
Controls are reversed as the model flies toward you.
- When your model is flying away from you, the helicopter reacts to direction changes just as you command. If you command the model to move right, it will move to your right as you commanded.
- When the helicopter is coming toward you and you command the model to move right, the model will move to your left. Always remember that the model flies forward, reverse, right, and left relative to the position of itself, not relative to your position.
- Until you become used to reversing your control inputs as the model changes direction, allow yourself extra flying room to accommodate pilot error.
- To help with directional control, it may help to imagine yourself sitting in the cockpit of the helicopter.
Indoor Flying Tips:
- The helicopter is sensitive to air currents in the room and turbulence that is created when the helicopter is near the ground, walls, and ceilings. Pilot correction will be required. Stay 2-3 feet away from ceilings and walls.
- Note that air vents, air conditioners, room fans, and other devices that circulate air may affect your model and cause unpredictable movements. Avoid obstacles such as ceiling fans and fire sprinkler heads.
natural_image
Two identical black-and-white diagrams of a drone with four propellers and directional arrows, no text or symbols present.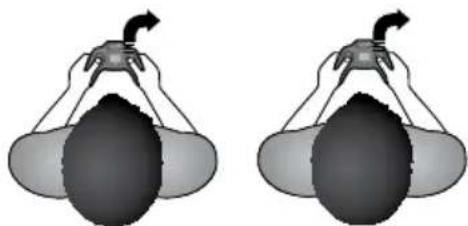
natural_image
Two identical diagrams showing a hand holding a bulb with a curved arrow, no text or symbols present.Outdoor Flying Tips:
- Choose a location that allows you to fly over grass or another soft surface.
- Do not fly near power lines, trees, rooftops, or other obstacles. Do not retrieve the model from any location higher than your reach.
- If the helicopter flies too far away from you and you can't determine its orientation, move the throttle stick to the full down position to immediately land the helicopter.
- If you encounter wind gusts that disrupt the model, fly into the direction of the wind to maintain control.
- If a strong wind overpowers the model, land immediately to avoid loss of control.

Be prepared for altitude changes as you fly. Forward/reverse and left/right movements may increase or reduce lift, causing the helicopter to gain or lose altitude. Be prepared to react to altitude changes by adjusting the throttle as you fly the model.
ADJUSTING THE CONTROLS FOR STABLE FLIGHT
If your helicopter pulls or drifts in any direction (unrelated to air currents) when the sticks are at neutral, you can use the trim controls to tune out any unwanted flight motions.
- The trim buttons will adjust each control in a small increment with each 'click'. Press the trim button as many times as is required until the model holds a steady hover with little or no correction required.
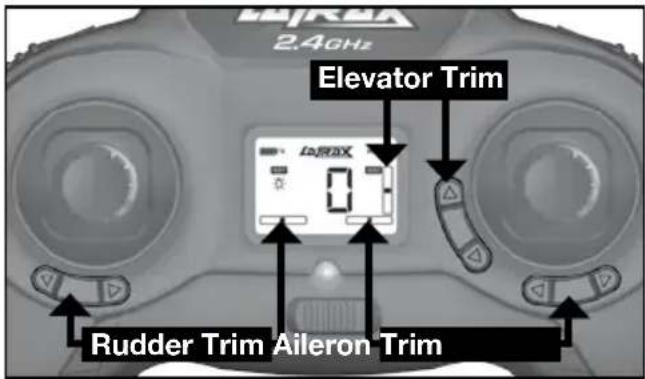
- As you adjust each trim, the transmitter LCD will show you the trim position as a numeric value. There are 25 trim steps in each direction for Rudder, Elevator, and Aileron. Tones indicate the center and end points. When your model is trimmed for stable flight, the trim display may not indicate that the neutral setting is zero. This is normal.

Note: If your helicopter still doesn't perform correctly, visit LaTrax.com for more information and troubleshooting tips.
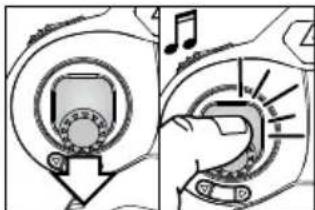
FLIGHT MODES
Easy, Fast, Expert
- The transmitter is set to Easy Mode by default (the easiest flight mode), and it will always power up in Easy Mode. Easy mode limits control input (low rate) and uses the full capability of the flight control system (auto leveling).
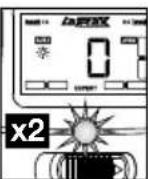
- Activate Fast Mode or Expert Mode for even greater performance capability and access to tricks (the model and transmitter must both be on). Modes are toggled by clicking the flight stick. From Easy Mode, click the flight stick for mode selection.
- Fast Mode: From Easy Mode, click the flight stick once. The transmitter will beep 2 times, the green LED will begin flashing, and the LCD will display FAST. Fast Mode uses the full capability of the flight control system (auto leveling), but allows greater control input (high rate). Fast Mode also enables trick functions.
Selecting Fast Mode
Click Once
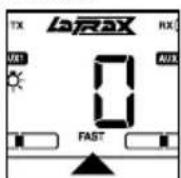
Flashing
Selecting Expert Mode
Click Twice
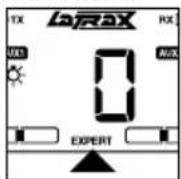
(Click again to return to Easy Mode)
Double
Flashing
- Expert Mode: From Easy Mode, click the flight stick twice. The transmitter will beep 3 times, the green LED will begin double flashing, and the LCD will display EXPERT. Expert Mode is a rate mode. The flight control system (auto leveling) is disabled allowing the pilot to have full control over all aspects of flight. WARNING: This mode is intended for expert level pilots only! For more information on how to perform expert tricks and flips, visit LaTrax.com.
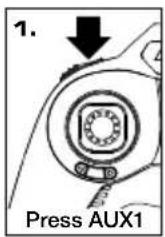
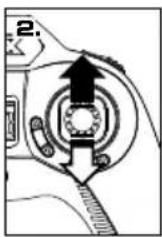
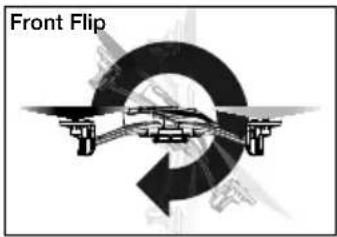
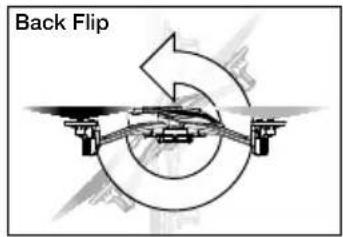
ADVANCED FLIGHT: PERFORMING TRICKS
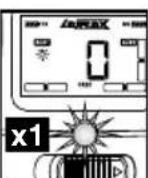
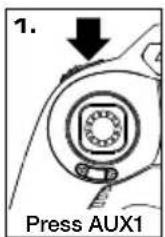
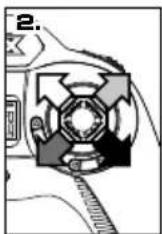
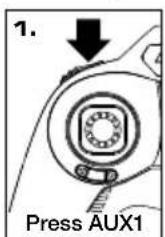
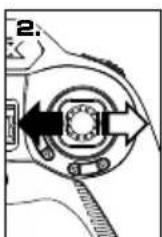
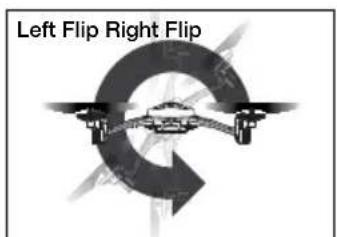
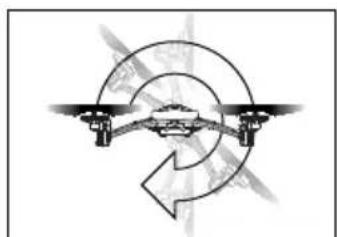
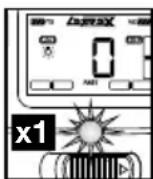
In Fast Mode (FAST), Alias can perform automated expert tricks and flips when you press the AUX1 button, and then enter a quick stick command in the chosen direction. Do not attempt these flight tricks until you are able to fly confidently in Fast Mode. Choose an area that will provide a soft landing (carpet or grass) and maintain enough altitude to allow room to recover control as you practice flipping the model.
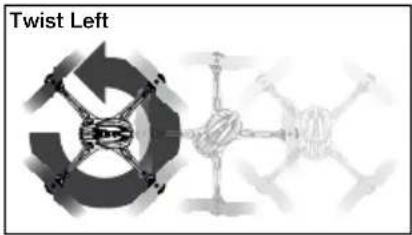
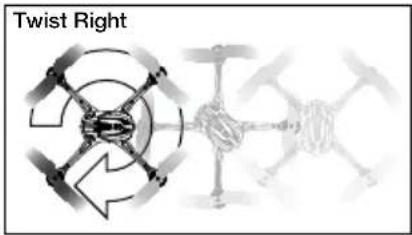
Twister: Continuous spin while maintaining normal directional and altitude control. The helicopter will spin 5 times, and then stop at its starting orientation.

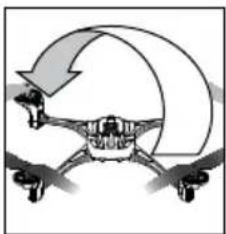
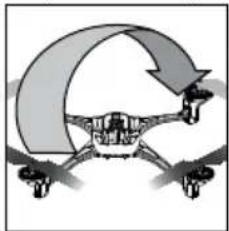
Front and Back Flips
Diagonal Front and Back Flips
natural_image
Diagram of a drone with a curved arrow indicating rotation or movement (no text or symbols)Diagonal Front Right Diagonal Front Left Diagonal Right Left
natural_image
Diagram of a robotic or mechanical system with curved arrows indicating motion or force direction (no text or symbols)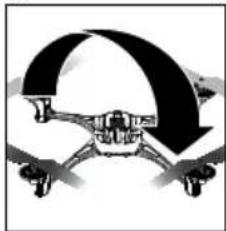
natural_image
Diagram of a drone with a curved arrow indicating rotational motion (no text or symbols)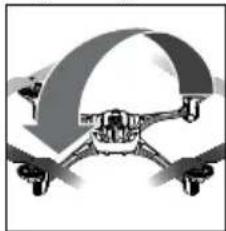
natural_image
Illustration of a drone with a curved roof-like structure (no text or symbols)Side Flips
natural_image
Diagram of a drone flying around a circular path with an arrow indicating rotation (no text or symbols)Expert Level Pilots
Alias is designed with the capability to program your tricks (multiple flips), change lighting modes, and program the action of the AUX1 and AUX2 buttons on the transmitter. To learn how to access the menu and advanced controls, visit LaTrax.com/moretricks for additional details and instructions.
CARING FOR YOUR HELICOPTER
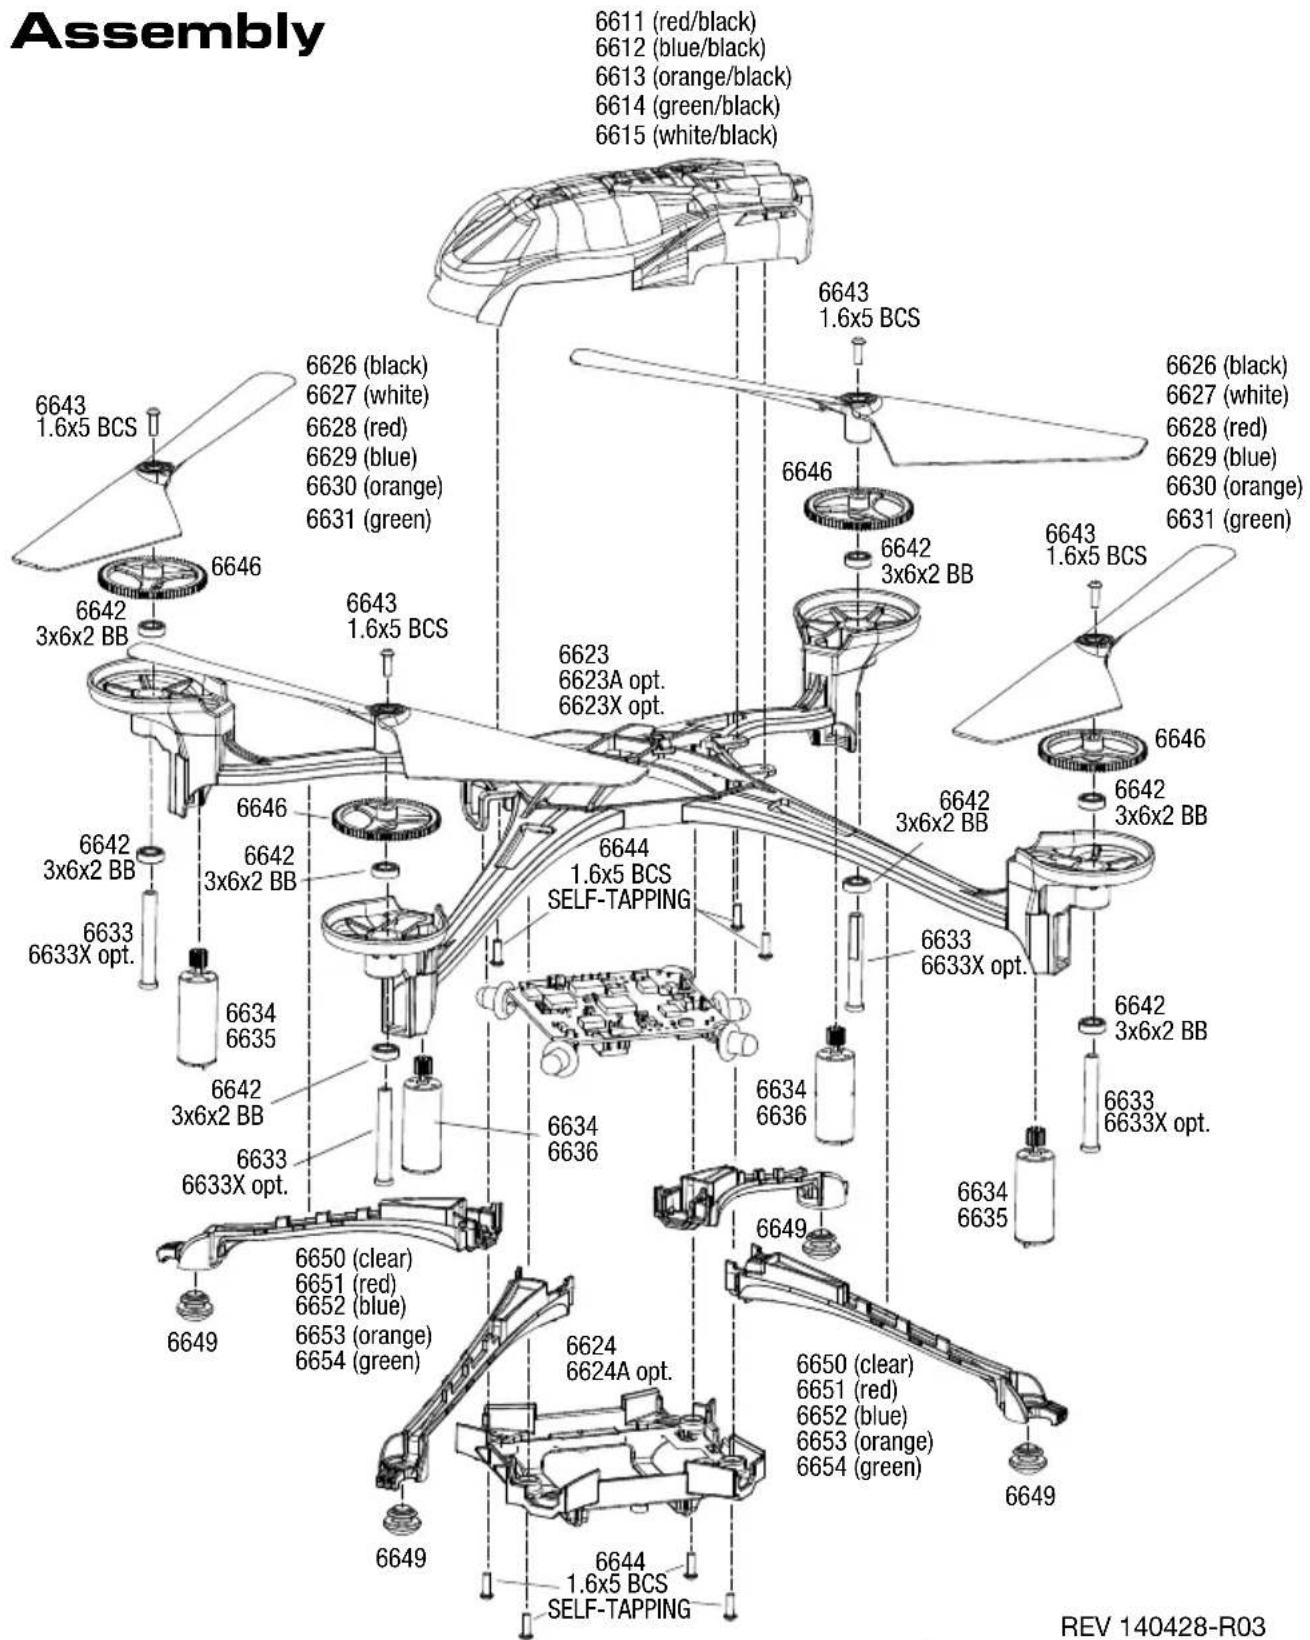
- After each flight and immediately after any crash, inspect your model for worn or damaged parts. If required, parts are available at your local LaTrax dealer or at LaTrax.com. For a complete parts list and exploded view of your model, refer to the Service and Support Guide in this manual.
- When not in use, store your model in its original packaging with the batteries removed from the transmitter and helicopter.
- If you do not plan to fly your model for a week or more, store the battery approximately 50% charged to maintain battery performance and life. To achieve a 50% charge, fly the model until the battery requires recharging. Charge the battery for half the time typically required to fully charge the battery.

WARNING! Do not store or attempt to charge a swollen or damaged battery!
See LiPo Batteries section for more information.
ROTOR BLADE INSTALLATION
The Alias' rotor blades are not identical. Each blade is labeled with an A or B. When installing replacement rotor blades, be certain to install the rotor blades with the corresponding A or B for each of the legs (A or B labels for the legs are molded on the bottom of the helicopter chassis). The helicopter will not fly if the rotor blades are not installed in the proper locations.
TROUBLESHOOTING GUIDE
- The transmitter and the helicopter are on, but the helicopter won't fly.
- The model is not armed or has timed-out. See step 5 of the "Flying Your Model" section to arm your helicopter.
- The helicopter does not perform a trick when the AUX1 button is pressed and then a stick command is given.
- The transmitter is not in Fast Mode. See the "Flight Modes" section.
- All of the LED lights on the helicopter are flashing.
- The helicopter has gone into over-current protection mode. Move the helicopter to a clear area, arm the helicopter again, and continue flying. If the helicopter will not fly correctly or the LED lights start flashing again, unplug the battery and inspect the helicopter for damage.
• The helicopter is drifting on its own.
- The helicopter is out of trim. Correct this by using the trim buttons. See "Adjusting The Controls for Stable Flight."
- The helicopter landed by itself, and now the throttle will not respond.
- The helicopter battery needs to be recharged.
- The blue LED on the helicopter is blinking, and the LED on the transmitter is solid.
- The helicopter battery needs to be recharged.
- The LED is blinking on the transmitter, and the transmitter will not control the model.
-
The transmitter is in binding mode. Confirm that the helicopter is powered on and in binding mode (blinking LED, LCD displays rotating segments). Move the transmitter to within one foot of the helicopter. The transmitter and helicopter should bind (indicated by a tone from the transmitter, solid LEDs on both the transmitter and helicopter, and the Disarmed Flight Screen on the transmitter LCD).
-
There was a problem with the binding process. Power down the transmitter and the helicopter, and then power them on again (transmitter first, then helicopter). The transmitter and helicopter should bind (indicated by a tone from the transmitter, and solid LEDs on both the transmitter and the helicopter, and the Disarmed Flight Screen on the transmitter LCD).
-
The model is not armed or has timed-out. See step 5 of the "Flying Your Model" section to arm your helicopter.
- The transmitter settings have been adjusted incorrectly for optimal flight.
- Return the transmitter to the default settings.
A. Ensure the transmitter is off.
B. Press and hold both AUX buttons.
C. While holding the AUX buttons, turn the transmitter on.
D. Continue holding the AUX buttons for 3 seconds until the transmitter beeps.
E. The transmitter is reset and is in bind mode.
- The battery charger has been connected to a computer USB port and the helicopter battery has been connected to the charger, but the battery will not charge.
- Some computer USB ports will not support fast charging. Switch the charger to the Normal charge setting. For the best charging performance, use the Fast charge setting with a USB wall adapter rated at 1 amp or greater output.
- The helicopter battery is fully charged and the rotor blades are spinning, but the helicopter will not lift off.
- The rotor blades have been installed incorrectly. See "Rotor Blade Installation."
- The helicopter does not fly as expected or the helicopter performs erratically.
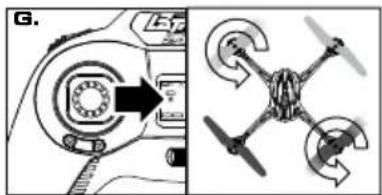
- Confirm proper control operation. Place the model on a smooth surface with the front of the model facing away from you.
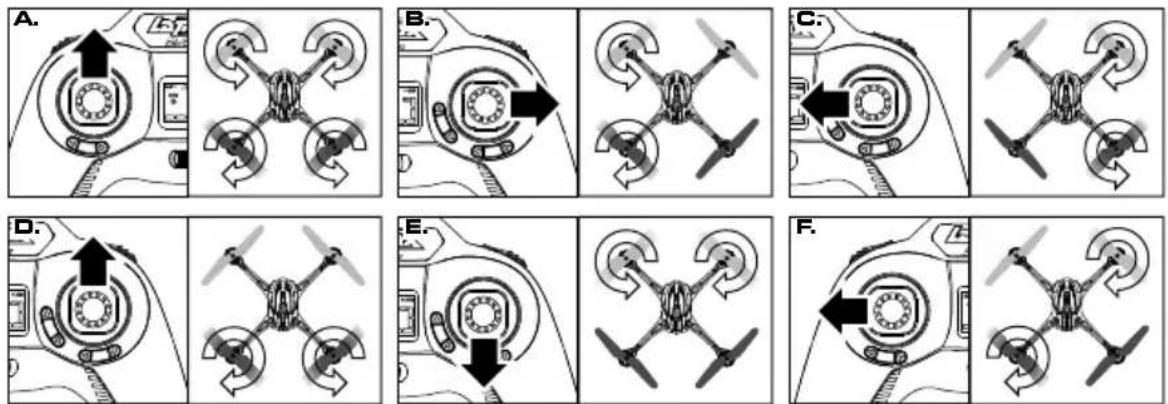
A. Gently push the throttle stick forward. All four rotors will spin.
B. Hold the flight stick to full right and gently push the throttle stick forward. The left rotors will spin.
C. Hold the flight stick to full left and gently push the throttle stick forward. The right rotors will spin.
D. Hold the flight stick full forward and gently push the throttle stick forward. The rear rotors will spin.
E. Hold the flight stick full rearward and gently push the throttle stick forward. The front rotors will spin.
F. Gently push the throttle stick forward as you hold the throttle stick to the left. The right front and left rear rotors will spin.
G. Gently push the throttle stick forward as you hold the throttle stick to the right. The left front and right rear rotors will spin.
natural_image
Diagram showing a mechanical device with a circular component and a four-wheeled drone with directional arrows (no text or symbols)- One or more of the motors is damaged.
A. The motors in the helicopter are high-performance motors that will wear over time and require replacement. If one motor fails and requires replacement, it is likely the remaining motors are equally worn. We recommend replacement of all four motors at the same time, but each motor can be replaced individually without affecting performance. Visit LaTrax.com to learn how to identify motor issues and to find more information on motor replacement.
- The accelerometer needs to be reset. Go to LaTrax.com for additional information and instructions or call the LaTrax Technical Support Line toll-free at: 1-888-872-9927.
Visit LaTrax.com for more information on the advanced functions and additional features of your LaTrax Alias!
MESURES DE SÉCURITÉ
natural_image
Diagram showing a mechanical or electrical component with arrows indicating direction (no text or symbols)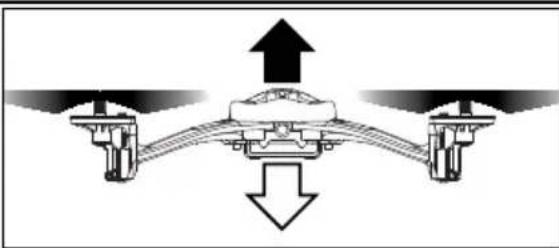
natural_image
Diagram of a mechanical or fluid system with directional arrows indicating flow or movement (no text or symbols present)natural_image
Diagram of a mechanical or electrical component with directional arrows and circular features (no text or symbols)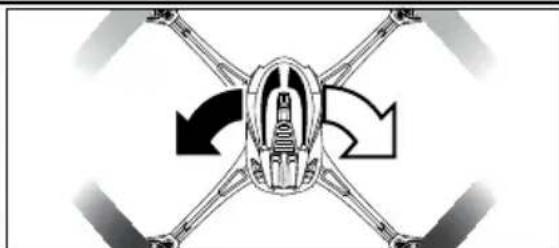
natural_image
Diagram of a drone with four wings and directional arrows indicating rotation or movement (no text or symbols)natural_image
Mechanical assembly diagram showing a rotating component with arrows indicating direction (no text or labels)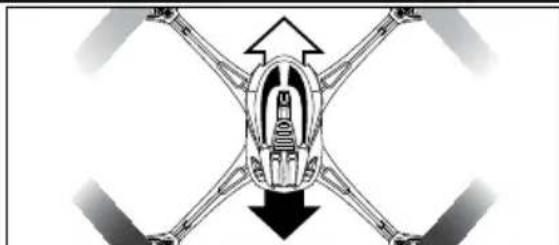
natural_image
Diagram of a drone with four wings and central body, showing directional arrows (no text or symbols)Commande d'aileron
natural_image
Mechanical component diagram showing a circular housing with directional arrows indicating motion (no text or symbols)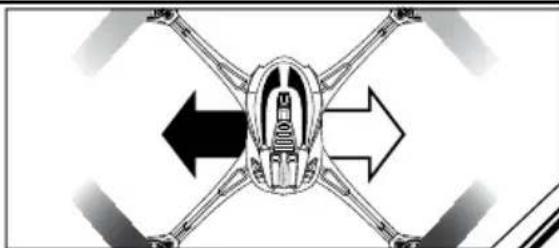
natural_image
Diagram of a mechanical or robotic device with four arms and directional arrows indicating flow or movement (no text or symbols)ORIENTATION DU MODÈLE
ARRIÈRE
natural_image
Diagram showing a drone above a person's head, with no text or symbols present.natural_image
Illustration of a person holding a small object, possibly a lamp or device, with no visible text or symbols.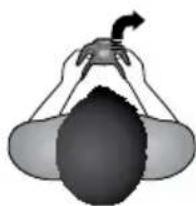
natural_image
Illustration of a person holding a small object with a curved arrow, no text or symbols present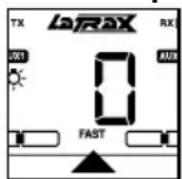
The Ground Truth image displays a single, solid horizontal line. According to Rule 2 (UNDERSCORE & LINE RULES), this is a stylistic or background line, not a placeholder underscore. Therefore, the OCR result must ignore it and output nothing or only meaningful text. The provided OCR content is "____", which consists of four underscores. This is an incorrect interpretation of the line as a placeholder, violating the rule that stylistic lines must be ignored. The OCR has hallucinated underscores where none should exist based on the GT's visual context. Hence, the OCR result is inconsistent with the Ground Truth.
Clignoter
natural_image
Diagram of a mechanical or electrical system with rotating components and directional arrows (no text or symbols)natural_image
Abstract graphic with a circular arrow and a drone-like structure (no text or symbols)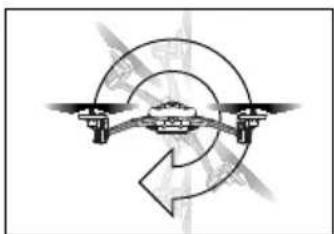
natural_image
Pure diagram of a rotating mechanical system with no text or symbolsPilotes experts
natural_image
Diagram showing a drone with four blades and a circular control dial, alongside a mechanical component (no text or symbols)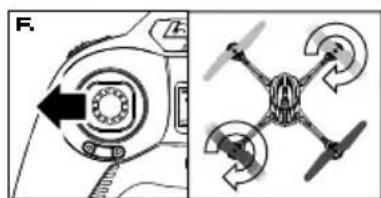
natural_image
Two diagrams showing a mechanical component before and after rotation, with no visible text or symbols.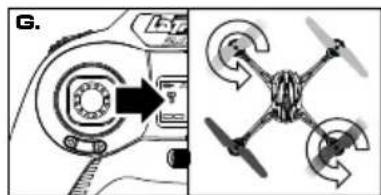
natural_image
Diagram showing a drone with directional arrows and control panel, no readable text or symbols presentCONTROLES DE VUELO
natural_image
Diagram showing directional arrows and a circular component with a central ring, no text or symbols present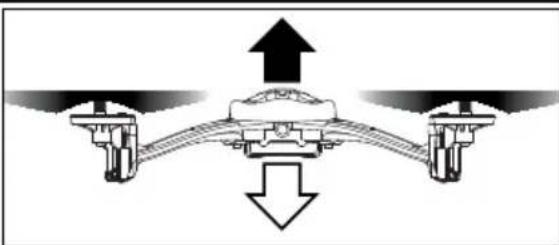
natural_image
Diagram of a mechanical or hydraulic system with upward and downward arrows indicating flow or movement (no text or symbols present)Control del timón
natural_image
Diagram of a mechanical or electrical component with directional arrows indicating rotation or movement (no text or symbols)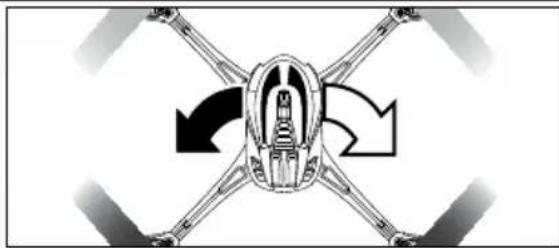
natural_image
Diagram of a drone with four wings and central body, showing rotational arrows (no text or symbols)natural_image
Mechanical component diagram showing a rotating ring with directional arrows (no text or symbols)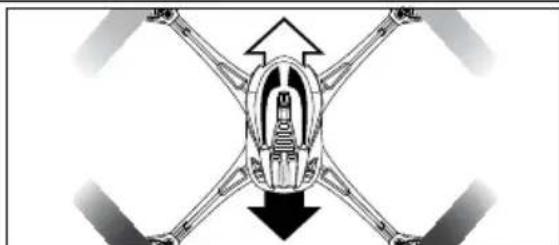
natural_image
Diagram of a drone with four wings and central body, showing directional arrows indicating movement or force (no text or symbols)Control del alerón
natural_image
Mechanical component diagram showing a circular housing with internal components and directional arrows (no text or symbols)
natural_image
Diagram of a drone with four wings and directional arrows indicating flight or movement (no text or symbols)natural_image
Diagram showing a drone above a human head with hands holding the camera (no text or symbols present)natural_image
Illustration of a person holding a small object, possibly a device or tool, with no visible text or symbols.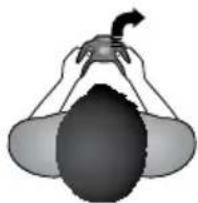
natural_image
Illustration of a person holding a small object above their head, with no visible text or symbols.natural_image
Diagram of a drone with a curved arrow indicating rotation or movement (no text or symbols)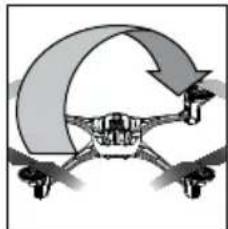
natural_image
Diagram of a drone with a curved arrow indicating rotation or movement (no text or symbols)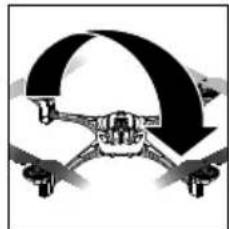
natural_image
Illustration of a drone with a curved arrow indicating rotational motion (no text or symbols)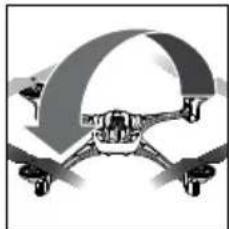
natural_image
Illustration of a drone with a curved roof and propeller (no text or symbols)natural_image
Abstract graphic with circular arrow and mechanical components (no text or symbols)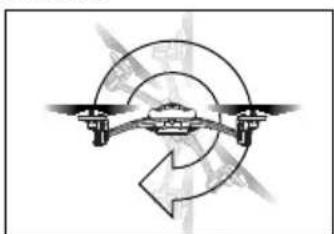
natural_image
Diagram of a drone flying around a circular path with directional arrows (no text or symbols)natural_image
Diagram showing a mechanical device with a circular component and a multi-blade drone with directional arrows (no text or symbols)SICHERHEITSHINWEISE
natural_image
Simple line drawing of two light bulbs above a building, connected by dashed lines to a central platform (no text or symbols)FLUGSTEUERUNG
natural_image
Illustration of a person holding a small object above their head, with no visible text or symbols.
natural_image
Illustration of a person holding a small object, possibly a device or tool, with no visible text or symbols.natural_image
Diagram of a drone flying around a curved trajectory with directional arrows (no text or symbols)Fortgeschrittene Piloten
Online: LaTrax.com/support
E-mail: support@LaTrax.com
*Monday through Friday from 8:30am to 9:00pm central time.
Warranty Coverage
Your new helicopter is considered to be a hobby-class model. We have made every effort in component design, material selection, and assembly to make our products as durable as possible. Because our products are not considered to be “toys,” no warranties are expressed or implied that cover damage caused by normal use or wear, or cover or imply how long any part will last before requiring replacement due to wear. Parts will wear from use and occasionally require replacement. The helicopter and its components are only covered against manufacturer’s defects in materials, workmanship, or assembly when new (before being used).
If any component is found to be defective, incorrectly made, or incorrectly assembled within the warranty coverage time period (where applicable), it will be repaired or replaced at the sole discretion of LaTrax. This will be done within a reasonable time period and free of charge. If you believe a defect in materials, workmanship, or assembly was not apparent when the product was new and only became evident after the product was used, then please contact LaTrax Technical Support. We stand behind our products and reputation and pledge to do our best to make sure you are satisfied with your LaTrax product.
Electronic Components
LaTrax electronic components are warranted to be free from defects in materials and workmanship for a period of thirty (30) days from the date of purchase. Electronic components consist of the radio system (transmitter, receiver, servos, switches, AC chargers, adapters, and receiver battery holders) and any other LaTrax electronic component. See the additional limitations that apply.
Limitations
Any and all warranty coverage does not cover replacement of parts and components damaged by abuse, neglect, improper or unreasonable use, crash damage, water or excessive moisture, chemical damage, improper or infrequent maintenance, accident, unauthorized alteration or modification, or items that are considered consumable. LaTrax will not pay for the cost of shipping or transportation of a defective component to us. This warranty is limited to the charger only and does not cover batteries, vehicles, and other accessories used in conjunction with the charger.
Your Hobby Dealer's Role
All warranty claims are handled directly by LaTrax. Your dealer can assist you in contacting LaTrax and determining which components might be defective, but he is under no obligation to provide free replacement parts or service. LaTrax does not authorize dealers to make over-the-counter exchanges or refunds for LaTrax products that have been used. LaTrax will make the sole and final determination if a product or component can be covered under warranty.
Limitations of Liability
LaTrax makes no other warranties expressed or implied. LaTrax shall not be liable for any special, indirect, incidental, or consequential damages arising out of the assembly, installation, or use of their products or any accessory or chemical required to use their products. By the act of operating/using the product, the user accepts all resulting liability. In no case shall LaTrax's liability exceed the actual purchase price paid for the product. LaTrax reserves the right to modify warranty provisions without notice. All warranty claims will be handled directly by LaTrax. This warranty gives the customer specific legal rights and possibly other rights that vary from state to state. All dollar amounts stated are in United States dollars. The term "lifetime" shall refer to the product's production life at LaTrax. LaTrax is not obligated to provide upgraded products at a reduced rate when a previous product's production cycle has ended.
LaTrax encourages you to register your model online at LaTrax.com.

FCC Compliance
This device contains a module that complies with the limits for a Class B digital device as described in part 15 of the FCC rules. Operation is subject to the following two conditions: (1) This device may not cause harmful interference, and (2)
this device must accept any interference received, including interference that may cause undesired operation.
The limits for a Class B digital device are designed to provide reasonable protection against harmful interference in residential settings. This product generates, uses, and can radiate radio frequency energy, and, if not operated in accordance with the instructions, may cause harmful interference to radio communications.
The user is cautioned that changes or modifications not expressly approved by the party responsible for compliance could void the user's authority to operate the equipment.
Canada, Industry Canada (IC)
This Class B digital apparatus complies with Canadian ICES-003 and RSS-210. This device complies with Industry Canada license exempt RSS standard(s). Operation is subject to the following two conditions: This device may not cause interference, and this device must accept any interference, including interference that may cause undesired operation of the device.
Radio Frequency (RF) Exposure Information
This equipment complies with radio frequency exposure limits set forth by FCC and Industry Canada for an uncontrolled environment. This equipment should be installed and operated with a minimum distance of 20 centimeters between the radiator and your body or bystanders and must not be co-located or operated in conjunction with any other antenna or transmitter.

Battery Recycling (for U.S.A.)
The Rechargeable Battery Recycling Corporation (RBRCTM) seal on your model's included battery indicates that LaTrax is voluntarily participating in an industry program to collect and recycle these batteries at the end of their useful lives, when taken out of service within the United States. The RBRC program provides a convenient alternative to placing used NiMH
batteries into the trash or municipal waste system, which is illegal in some areas. Please call 1-800-8-BATTERY(1-800-8-228-8379) for information on battery recycling in your area. LaTrax's involvement in this program is part of its commitment to protecting the environment and natural resources that we all share. RBRCTM is a trademark of the Rechargeable Battery Recycling Corporation.
CE Compliance for Users in the European Union
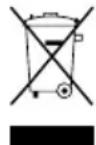
WEEE Compliance:
Please help the environment by disposing of your product responsibly at the end of its life. The wheeled bin symbol indicates that this product should not be disposed of in your household waste containers. Instead, the product should be disposed of by using a designated collection point for the recycling of waste electrical and
electronic equipment. The Waste of Electrical and Electronic Equipment (WEEE) Directive (2002/96/EC) requires that the best available recycling techniques be employed to minimize the impact on the environment.
Recycling electronics helps by keeping harmful chemicals out of the environment, and also saves money by reusing precious metals. Remove any batteries and dispose of them and the product at your local authority's recycling facility. For more information about where you can drop off your waste equipment for recycling, please contact your local city office, your household waste disposal service, or the location where you purchased this product.
Declaration of Conformity for R&TTE Directive
In accordance with IEC 17050-1
This is to certify that the following products conform to the requirements of the R&TTE Directive 99/5/EC and that all essential test suites have been carried out.
Product: LaTrax Alias Quad-Rotor Helicopter (6608) Operating Frequency Range: 2406MHz to 2453MHz
Standards applied:
EN 300 328 V1.7.1
EN 301 489-1V1.8.1; EN 301 489-17 V2.1.1
EN 62311:2008; EN 60950-1:2006+A11:2009
Signed:

Date: October 15, 2015
LaTrax, 6200 Traxxas Way, McKinney, Texas 75070
THIS MODEL IS NOT INTENDED FOR USE BY CHILDREN UNDER THE AGE OF 14 WITHOUT THE SUPERVISION OF A RESPONSIBLE ADULT.
WARNING! POTENTIAL CHOKING HAZARD! KEEP THIS MODEL, ITS TRANSMITTER, AND EXTRA EQUIPMENT OUT OF THE REACH OF CHILDREN UNDER 3 YEARS OF AGE!
SERVICE DE SOUTIEN À LA CLIENTÈLE DE LATRAX
Canada, Industry Canada (IC)
Online: LaTrax.com/support
E-Mail: support@LaTrax.com
Parts shown in bold are optional accessories. Part categories and individual part listings are arranged numerically. Prices are shown in US Dollars.
CANOPIES & BLADES
| 6611 Canopy, Alias, red/ 1.6x5mm BCS (self-tapping) (3) | 5.00 |
| 6612 Canopy, Alias, blue/ 1.6x5mm BCS (self-tapping) (3) | 5.00 |
| 6613 Canopy, Alias, orange/ 1.6x5mm BCS (self-tapping) (3) | 5.00 |
| 6614 Canopy, Alias, green/ 1.6x5mm BCS (self-tapping) (3) | 5.00 |
| 6615 Canopy, Alias, white/ 1.6x5mm BCS (self-tapping) (3) | 5.00 |
| 6626 Rotor blade set, black (2)/ 1.6x5mm BCS (2) | 2.00 |
| 6627 Rotor blade set, white (2)/ 1.6x5mm BCS (2) | 2.00 |
| 6628 Rotor blade set, red (2)/ 1.6x5mm BCS (2) | 2.00 |
| 6629 Rotor blade set, blue (2)/ 1.6x5mm BCS (2) | 2.00 |
| 6630 Rotor blade set, orange (2)/1.6x5mm BCS (2) | 2.00 |
| 6631 Rotor blade set, green (2)/ 1.6x5mm BCS (2) | $2.00 |
HARDWARE
| 6642 Bearings: 3x6x2mm (8)...... | 11.00 |
| 6643 Screws, 1.6x5mm button-head machine (hex drive) (6)...... | 1.50 |
| 6644 Screws, 1.6x5mm button-head, self-tapping (hex drive) (6)...... | 1.50 |
| 6649 Feet, non-skid (4)...... | 1.50 |
MAIN FRAME & LED LENSES
| 6623 | Main frame (black)/ 1.6x5mm BCS (self-tapping) (4).... | 10.00 |
| 6623A | Main frame (white)/ 1.6x5mm BCS (self-tapping) (4).... | 10.00 |
| 6623X | Main frame (black chrome)/ 1.6x5mm BCS (self-tapping) (4).... | 15.00 |
| 6624 | Main frame, lower (black)/ 1.6x5mm BCS (self-tapping) (4).... | 4.00 |
| 6624A | Main frame, lower (white)/ 1.6x5mm BCS (self-tapping) (4).... | 4.00 |
| 6649 | Feet, non-skid (4).... | 1.50 |
| 6650 | LED lens, clear (4).... | 3.00 |
| 6651 | LED lens, red (4).... | 3.00 |
| 6652 | LED lens, blue (4).... | 3.00 |
| 6653 | LED lens, orange (4).... | 3.00 |
| 6654 | LED lens, green (4).... | 3.00 |
| LED lightbar, Alias /harness (7 clear lights)/ | ||
| 6655 | 1.5x5mm BCS (self-tapping) (2).... | 25.00 |
| 6656 | Lens, LED lightbar/ LED housing.... | 5.00 |
| Camera, Alias, 720P HD, 12MP, standard lens/ 1.6x5mm BCS (self-tapping) (2). | ||
| 6660 | MicroSD card required (not included).... | 62.50 |
| Lens, wide angle, 120 degrees, Alias (for | ||
| 6661 | 6660 camera).... | $31.00 |
MAIN SHAFT & GEARS
| 6633 Main shaft (2)/ 1.6x5mm BCS (2) | 3.00 | |
| 6633X | Main shaft, 7075-T6 aluminum, blue-anodized (4)/ 1.6x5mm BCS (4) | 12.00 |
| 6646 | Spur gear, 78-tooth (2) | $1.50 |
MOTORS & ELECTRONICS
| 6634 Motor, clockwise (high output, red connector)(2)/ Motor, counterclockwise (high output,black connector) (2)...... | 40.00 |
| 6635 Motor, counter-clockwise (high output, blackconnector) (1)...... | 10.00 |
| 6636 Motor, clockwise (high output, red connector)(1)...... | $10.00 |
| 2911 Battery, Power Cell AAA Alkaline (4) | 3.99 |
| 6637 Battery, LaTrax, 650mAh, LiPo...... | 12.00 |
| 6638 Charger, USB, dual-port (high output)...... | 12.00 |
| 6639 Transmitter, LaTrax, 2.4GHz, 6-channel (transmitter only)...... | 60.00 |
| 6640 Gimbals, transmitter (lever (2), pad (2))...... | 3.00 |
| 6641 Battery door, transmitter...... | 3.00 |
READY-TO-FLY & EZ-CONNECT MODELS
| 6608 | LaTrax Alias Quad-Rotor Helicopter...... | Call |
If you have questions or need technical assistance, call:
1-888-872-9927
(U.S. residents only)
For orders, calls outside the U.S., and other information, call 972-549-3000, or fax to 972-549-3011 E-mail: support@latrax.com
ALIAS

ALIAS™
MODEL 6608
LBRAX
LaTrax, 6250 Traxxas Way, McKinney, Texas 75070 • Phone: 972-549-3000 • 1-888-TRAXXAS (U.S. Only) • LaTrax.com • E-mail: support@LaTrax.com ©2014 LaTrax. No part of this manual may be reproduced or distributed in print or electronic media without the express written permission of LaTrax. The product may vary from the images contained within. Specifications are subject to change without notice. Aucune partie de ce manuel ne peut être reproduite ou distribuée dans les médias imprimés ou électroniques sans l'autorisation expresse écrite de LaTrax. Le produit peut différer des images qu'il contient. Les spécifications sont sujettes à changement sans préavis. Ninguna parte de este manual puede ser reproducido o distribuido en medios impresos o electrónicos sin autorización expresa por escrito de LaTrax. El producto puede diferir de las imágenes que contiene. Las especificaciones están sujetas a cambios sin previo aviso. Kein Teil dieses Handbuchs darf kopiert oder verbreitet werden in Print-oder elektronischen Medien ist ohne ausdrückliche schriftliche Genehmigung von LaTrax. Die Spezifikationen können ohne Ankündigung geändert werden. Das Produkt kann von den Bildern enthaltenen variieren.