Kraton 6S - Remote control toy ARRMA - Free user manual and instructions
Find the device manual for free Kraton 6S ARRMA in PDF.

| Brand | ARRMA |
| Model | Kraton 6S |
| Product type | Radio-controlled toy |
| Power | 4S or 6S LiPo battery (14.8V to 22.2V) |
| ESC Input Voltage | 14.8V - 22.2V |
| BEC Output | 6.0V / 7.4V, 5A |
| Motor | Brushless |
| Drivetrain | 4-wheel drive |
| Water resistance | Yes, waterproof components (do not submerge) |
| Recommended age | 14 years and up (adult supervision required) |
| Radio frequency | 2.4GHz (Spektrum SLT3) |
| Operation mode | Forward/brake/reverse (adjustable) |
| LVC protection | Yes (low voltage cutoff) |
| Thermal shutdown | Yes (thermal overload protection) |
| Main features | Off-road driving, jumps, drifting |
| Maintenance | Clean after wet use, lubricate bearings, differentials |
| Safety | Read the manual, do not use on streets or inhabited areas |
| Spare parts | Available from official dealers (Horizon Hobby) |
| Warranty | Subject to proper use |
Frequently Asked Questions - Kraton 6S ARRMA
User questions about Kraton 6S ARRMA
0 question about this device. Answer the ones you know or ask your own.
Ask a new question about this device
Download the instructions for your Remote control toy in PDF format for free! Find your manual Kraton 6S - ARRMA and take your electronic device back in hand. On this page are published all the documents necessary for the use of your device. Kraton 6S by ARRMA.
USER MANUAL Kraton 6S ARRMA
All instructions, warranties and other collateral documents are subject to change at the sole discretion of Horizon Hobby, LLC.
For up-to-date product literature, visit horizonhobby.com or towerhobbies.com and click on the support tab or resources for this product.
Meaning of Special Language
The following terms are used throughout the product literature to indicate various levels of potential harm when operating this product:
WARNING: Procedures, which if not properly followed, create the probability of property damage, collateral damage, and serious injury OR create a high probability of superficial injury.
CAUTION: Procedures, which if not properly followed, create the probability of physical property damage AND a possibility of serious injury.
NOTICE: Procedures, which if not properly followed, create a possibility of physical property damage AND a little or no possibility of injury.

WARNING: Read the ENTIRE instruction manual to become familiar with the features of the product before operating. Failure to operate the product correctly can result in damage to the product, personal property and cause serious injury.
This is a sophisticated hobby product. It must be operated with caution and common sense and requires some basic mechanical ability. Failure to operate this Product in a safe and responsible manner could result in injury or damage to the product or other property. This product is not intended for use by children without direct adult supervision. Do not use with incompatible components or alter this product in any way outside of the instructions provided by Horizon Hobby, LLC. This manual contains instructions for safety, operation and maintenance. It is essential to read and follow all the instructions and warnings in the manual, prior to assembly, setup or use, in order to operate correctly and avoid damage or serious injury.

WARNING AGAINST COUNTERFEIT PRODUCTS: Always purchase from a Horizon Hobby, LLC authorized dealer to ensure authentic high-quality Spektrum product. Horizon Hobby, LLC disclaims all support and warranty with regards, but not limited to, compatibility and performance of counterfeit products or products claiming compatibility with Spektrum technology.
Age Recommendation: Not for children under 14 years. This is not a toy.
Safety Precautions and Warnings
As the user of this product, you are solely responsible for operating in a manner that does not endanger yourself and others or result in damage to the product or property of others.
This model is controlled by a radio signal subject to interference from many sources outside your control. This interference can cause momentary loss of control, so it is advisable to always keep a safe distance in all directions around your model as this margin will help avoid collisions or injury.
- Never operate your model with low transmitter batteries.
• Always operate your model in open spaces away from full-size vehicles, traffic and people. - Never operate the model in the street or in populated areas for any reason.
- Carefully follow the directions and warnings for this and any optional support equipment (chargers, rechargeable battery packs, etc.) you use.
-
Keep all chemicals, small parts and anything electrical out of the reach of children.
-
Never lick or place any portion of the model in your mouth as it could cause serious injury or even death.
• Exercise caution when using tools and sharp instruments.
• Take care during maintenance as some parts may have sharp edges. - Immediately after using your model, do NOT touch equipment such as the motor, electronic speed control and battery, because they generate high temperatures. You may burn yourself seriously touching them.
- Do not put fingers or any objects inside rotating and moving parts, as this may cause damage or serious injury.
- Always turn on your transmitter before you turn on the receiver in the car. Always turn off the receiver before turning your transmitter off.
- Keep the wheels of the model off the ground when checking the operation of the radio equipment.
WATER-RESISTANT VEHICLE WITH WATERPROOF ELECTRONICS
Your new Horizon Hobby vehicle has been designed and built with a combination of waterproof and water-resistant components to allow you to operate the product in many "wet conditions," including puddles, creeks, wet grass, snow and even rain.
While the entire vehicle is highly water-resistant, it is not completely waterproof and your vehicle should NOT be treated like a submarine. The various electronic components used in the vehicle, such as the Electronic Speed Control (ESC), servo(s) and receiver are waterproof, however, most of the mechanical components are water-resistant and should not be submerged.
Metal parts, including the bearings, hinge pins, screws and nuts, as well as the contacts in the electrical cables, will be susceptible to corrosion if additional maintenance is not performed after running in wet conditions. To maximize the long-term performance of your vehicle and to keep the warranty intact, the procedures described in the "Wet Conditions Maintenance" section below must be performed regularly if you choose to run in wet conditions. If you are not willing to perform the additional care and maintenance required, then you should not operate the vehicle in those conditions.

CAUTION: Failure to exercise caution while using this product and complying with the following precautions could result in product malfunction void the warranty.
General Precautions
- Read through the wet conditions maintenance procedures and make sure that you have all the tools you will need to properly maintain your vehicle.
- Not all batteries can be used in wet conditions. Consult the battery manufacturer before use. Caution should be taken when using Li-Po batteries in wet conditions.
- Most transmitters are not water-resistant. Consult your transmitter's manual or the manufacturer before operation.
- Never operate your transmitter or vehicle where lightning may be present.
- Do not operate your vehicle where it could come in contact with salt water (ocean water or water on salt-covered roads), contaminated or polluted water. Salt water is very conductive and highly corrosive, so use caution.
- Even minimal water contact can reduce the life of your motor if it has not been certified as water-resistant or waterproof. If the motor becomes excessively wet, apply very light
throttle until the water is mostly removed from the motor. Running a wet motor at high speeds may rapidly damage the motor.
- Driving in wet conditions can reduce the life of the motor. The additional resistance of operating in water causes excess strain. Alter the gear ratio by using a smaller pinion or larger spur gear. This will increase torque (and motor life) when running in mud, deeper puddles, or any wet conditions that will increase the load on the motor for an extended period of time.
Wet Conditions Maintenance

CAUTION: Always keep hands, fingers, tools and any loose or hanging objects away from rotating parts when performing the above drying technique.
- Remove the battery pack(s) and dry the contacts. If you have an air compressor or a can of compressed air, blow out any water that may be inside the recessed connector housing.
- Remove the tires/wheels from the vehicle and gently rinse the mud and dirt off with a garden hose. Avoid rinsing the bearings and transmission.
NOTICE: Never use a pressure washer to clean your vehicle.
- Use an air compressor or a can of compressed air to dry the vehicle and help remove any water that may have gotten into small crevices or corners.
- Spray the bearings, drive train, fasteners and other metal parts with a water-displacing light oil. Do not spray the motor.
- Let the vehicle air dry before you store it. Water (and oil) may continue to drip for a few hours.
- Increase the frequency of disassembly, inspection and lubrication of the following: - Front and rear axle hub assembly bearings.
- All transmission cases, gears and differentials.
- Motor—clean with an aerosol motor cleaner and re-oil the bearings with lightweight motor oil.
hinwies
| Contents | Page Pa |
| Warnings | 2 |
| Kit Overview 6 | |
| Required 7 | |
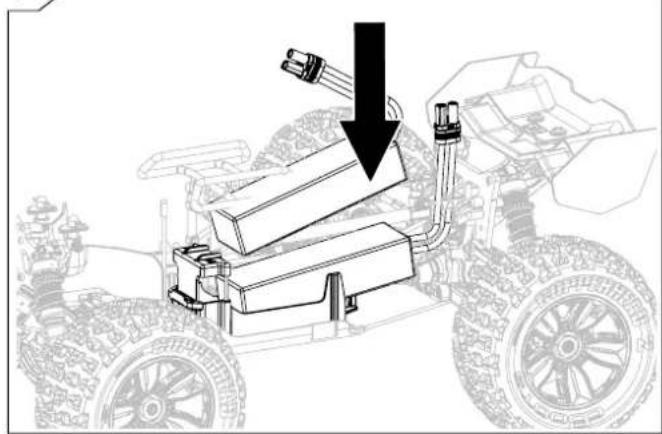
| Battery Fitting 8 | |
| Running 9 | |
| Radio Gear 10 | |
| Electronic Speed Controller (ESC) 12 | |
| Recommended Tools 16 | |
| Maintenance Schedule 17 | |
| Wheel and Tire Maintenance 18 | |
| F/R Differential Removal and Replacement 19 | |
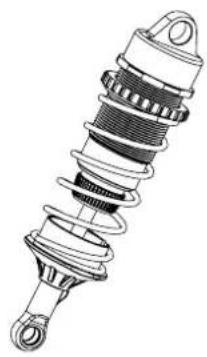
| Shock Maintenance 21 | |
| How To...Remove the roll over tower | 22 |
| Center Differential Maintenance | 23 |
| e | |
| How To...Change the Pinion/Motor | 25 |
| How To...Remove the Receiver | 26 |
| How To...Adjust Ride Height 27 | |
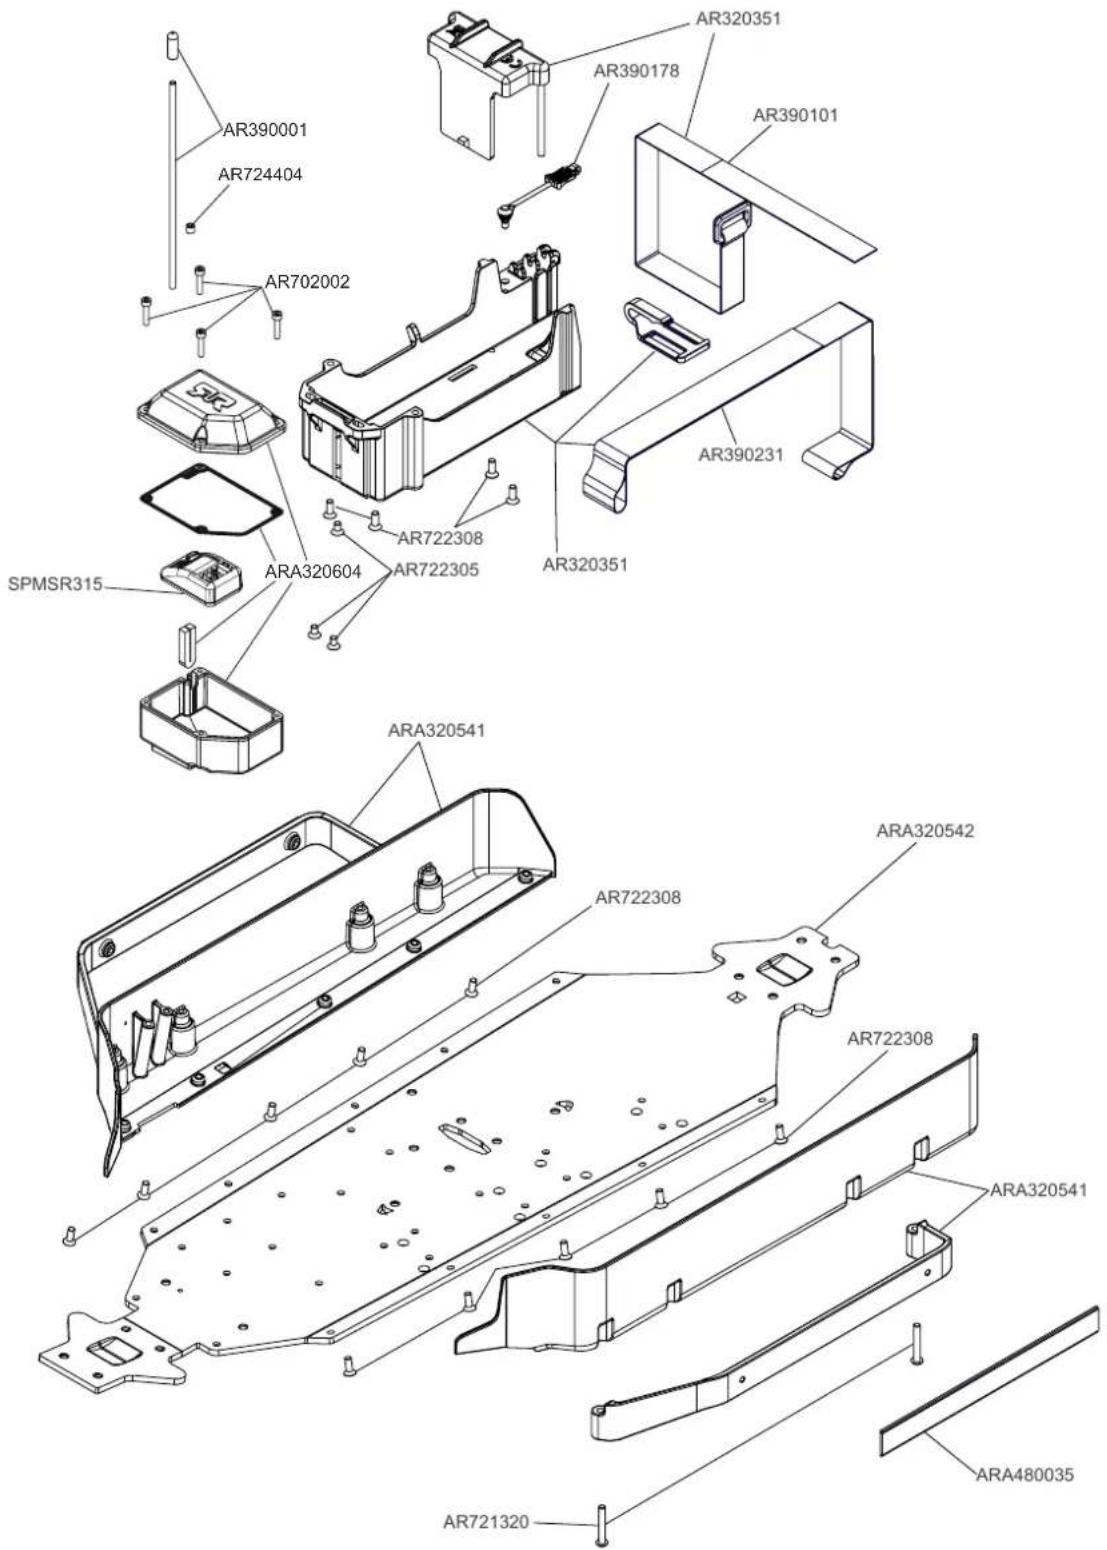
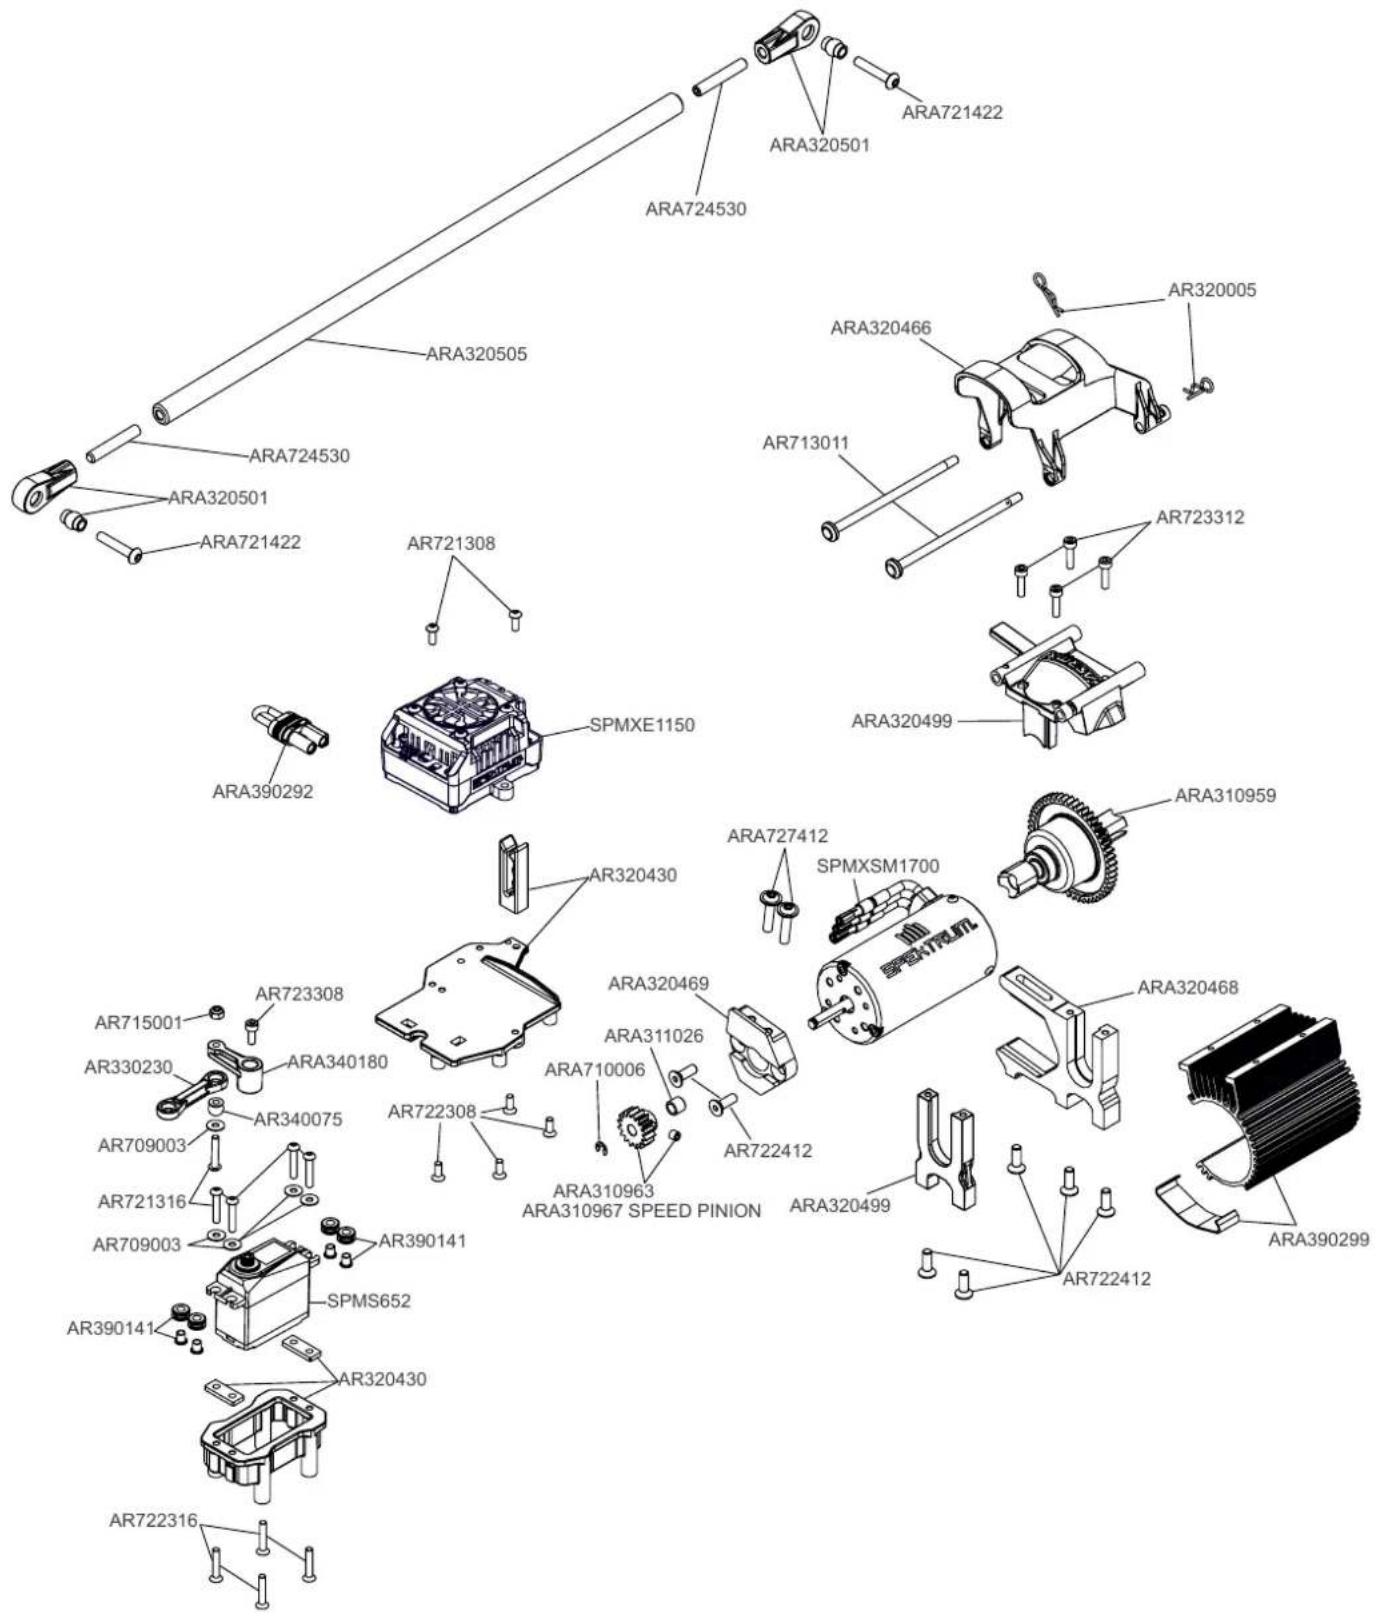
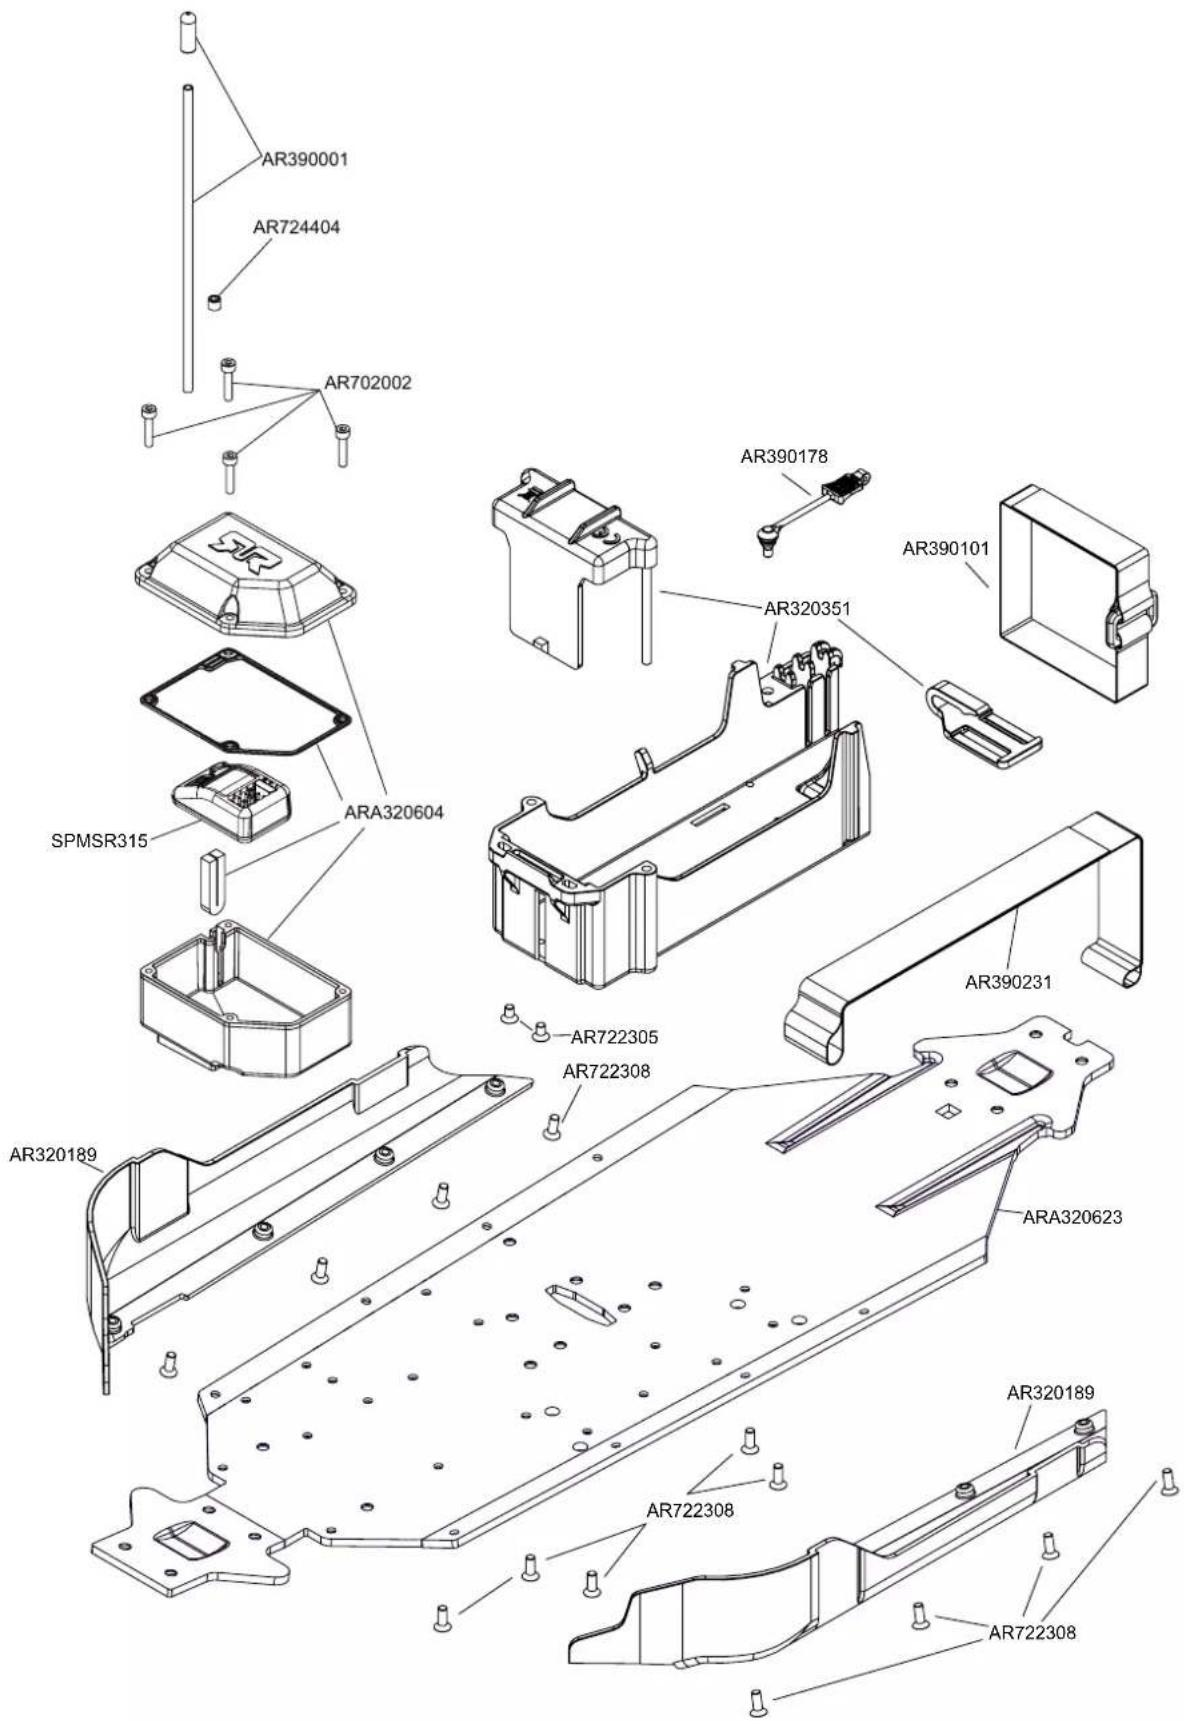
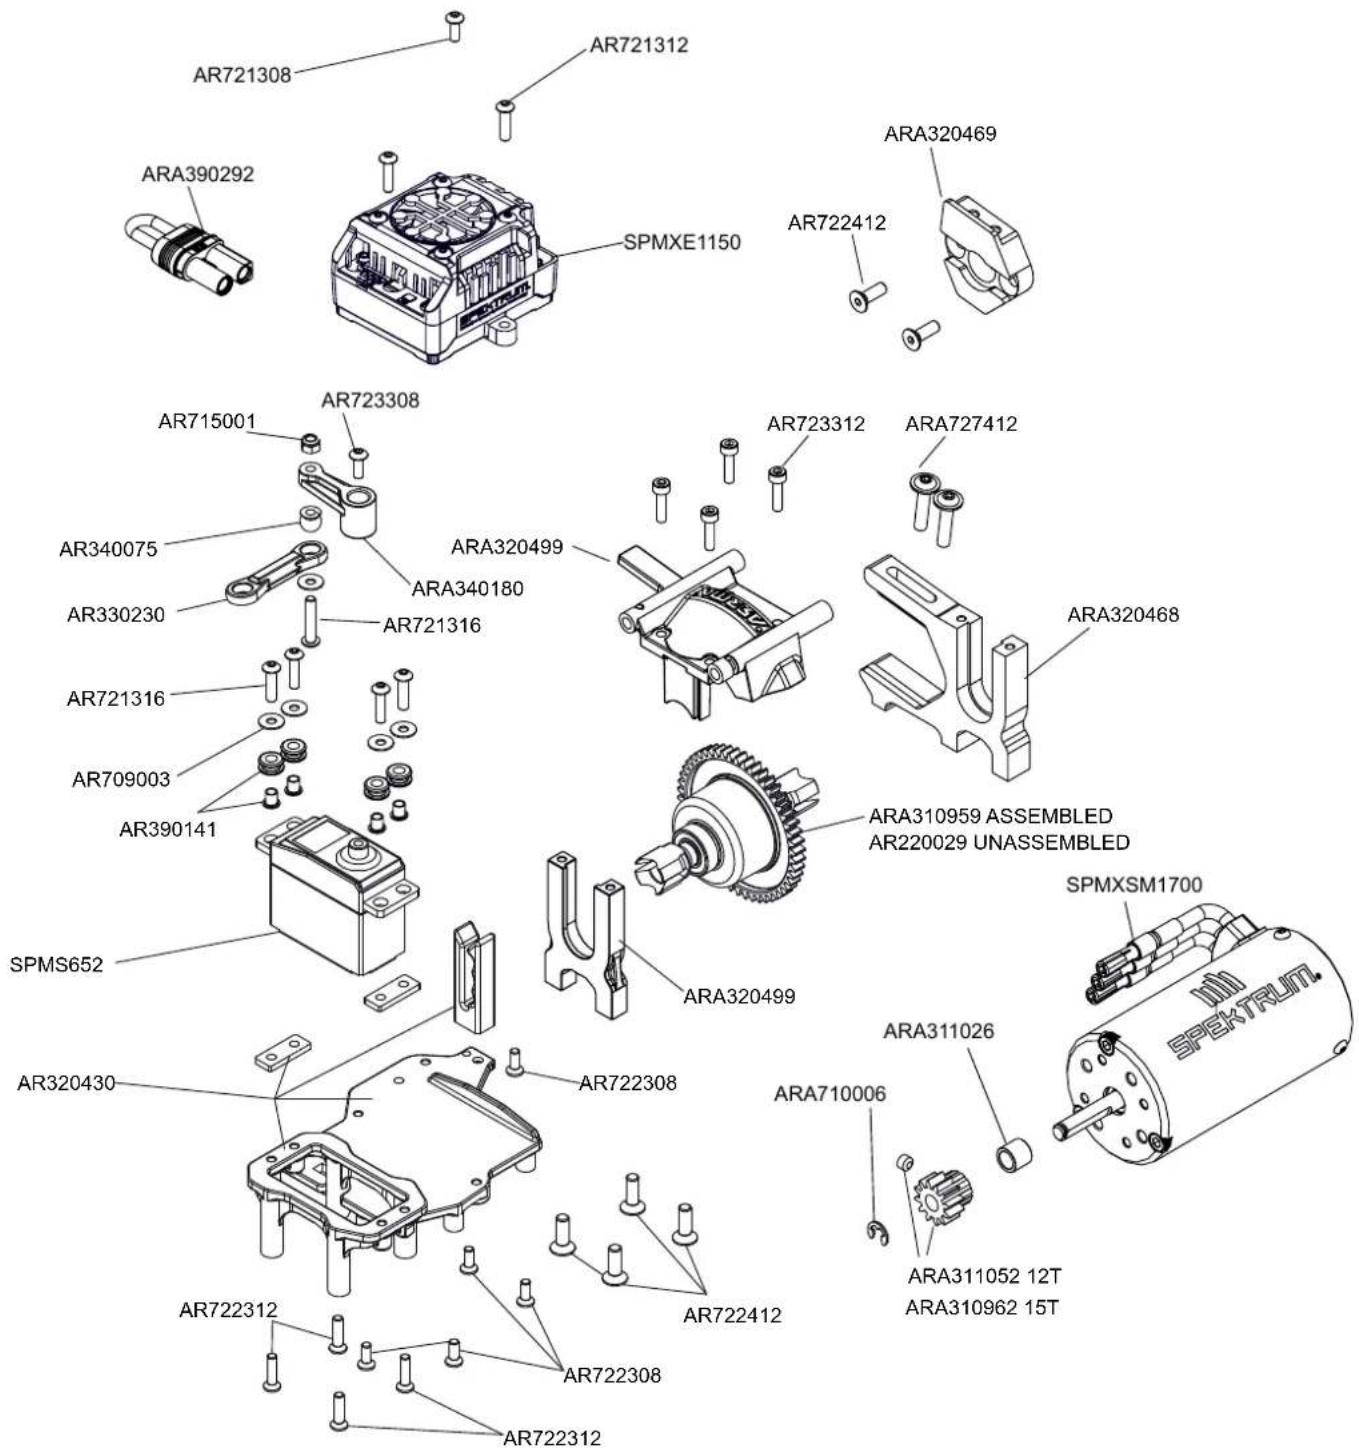
| Exploded View | 28 |

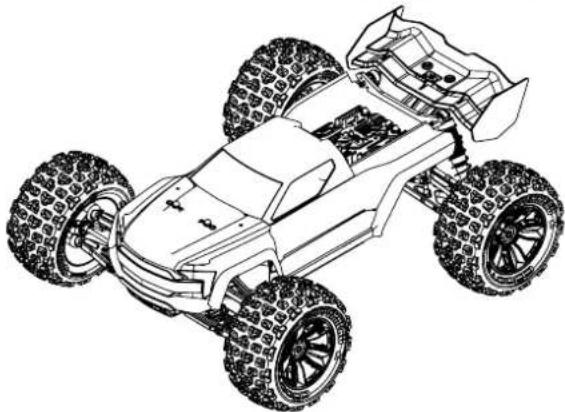
natural_image
Line drawing of a toy car with four wheels and suspension components (no text or symbols)KRATON
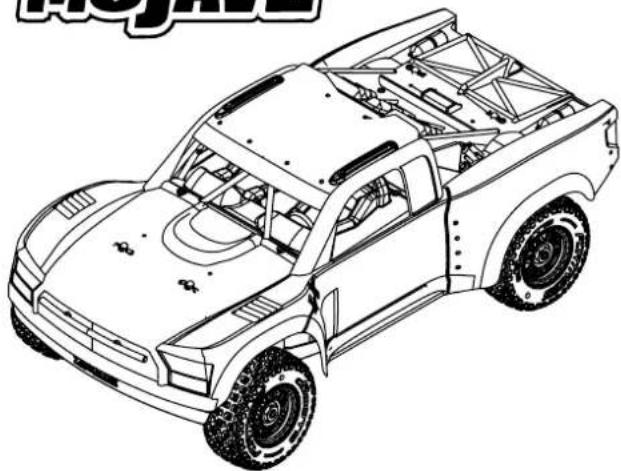
natural_image
Line drawing of a four-wheeled toy car with visible tires and suspension (no text or symbols)MOJAVE
natural_image
Line drawing of a pickup truck chassis with visible frame structure and suspension components (no text or symbols)NOTORIOUS

natural_image
Line drawing of a two-wheeled toy car with large tires and roof rack (no text or symbols)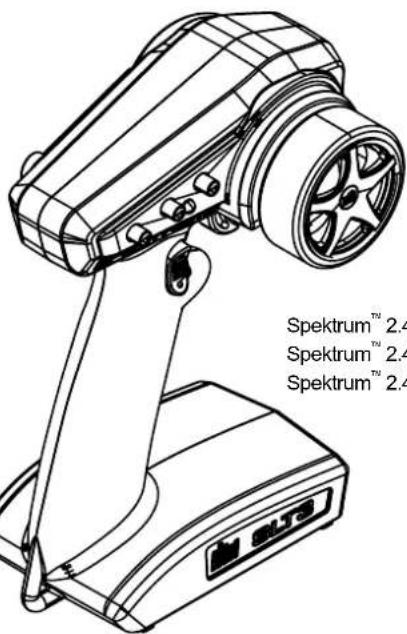
1x4S LiPo, 1x6S LiPo Battery
1x4S LiPo, 1x6S LiPo Akku
1x4S LiPo, 1x6S LiPo Batteries
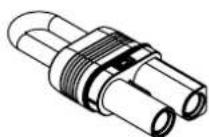
natural_image
Line drawing of a rectangular electronic device with two connectors and a lid (no text or symbols)EC5 / IC5

LiPo Charging Bag
LiPo Ladetasche
LiPo Sac Charge
natural_image
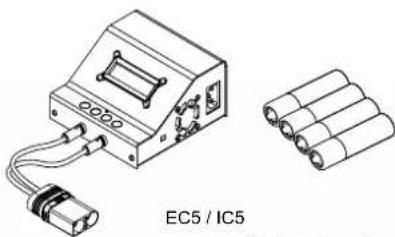
Technical line drawing of an EC5/IC5 battery pack and its internal components (no text or symbols on the diagram itself)Charger
Ladegerät
Chargeur
AA batteries x4
AA Batterien x4
AA Batteries x4
natural_image
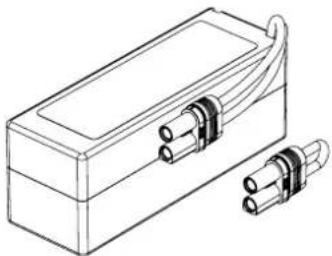
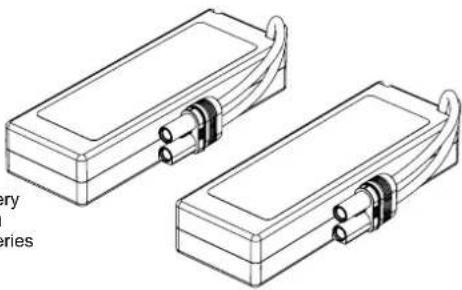
Technical line drawing of two rectangular electronic components with connectors and leads (no text or symbols)2x2S LiPo, 2x3S LiPo Battery
2x2S LiPo, 2x3S LiPo Akku
2x2S LiPo, 2x3S LiPo Batteries
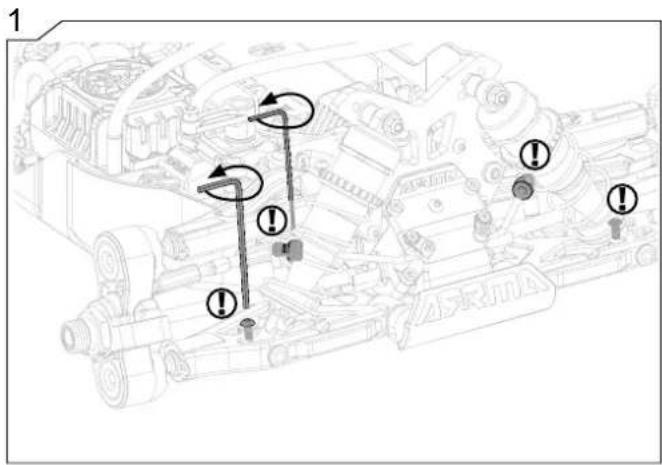
1
natural_image
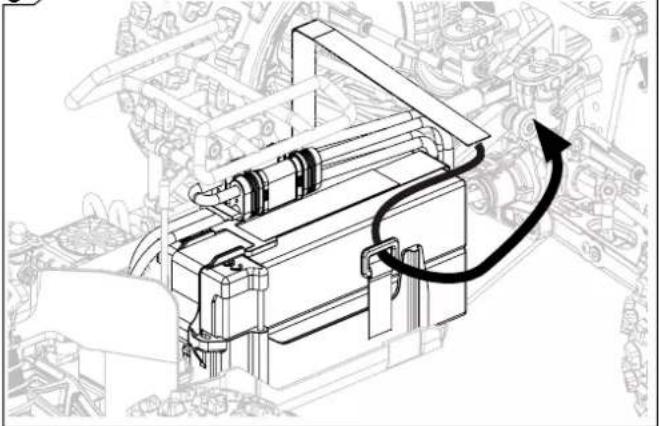
Diagram of a vehicle-mounted launcher system with a downward arrow indicating force or movement (no text or symbols present)2
natural_image
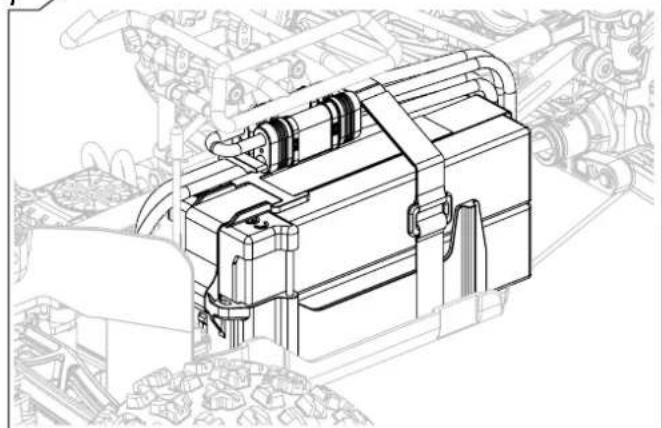
Technical line drawing of a mechanical assembly with no visible text or symbols3
natural_image
Technical line drawing of a mechanical assembly with a directional arrow indicating motion (no text or symbols present)4
natural_image
Technical line drawing of a mechanical assembly with no visible text or symbols5
natural_image
Technical line drawing of a mechanical assembly with no visible text or symbols6
natural_image
Technical line drawing of a mechanical assembly with no visible text or symbols7
natural_image
Technical line drawing of a mechanical assembly with no visible text or symbols
Running Fahr Conduite
natural_image
Mechanical component diagram showing a button with a downward arrow, no text or symbols present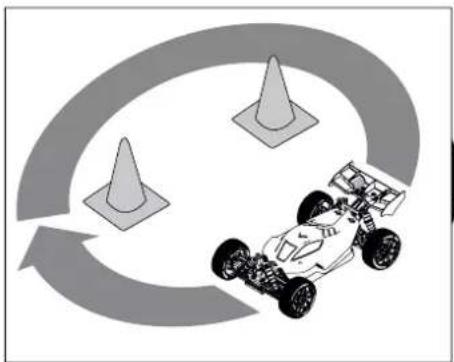
natural_image
Illustration of a racing car with three cones and a circular arrow, no text or symbols present.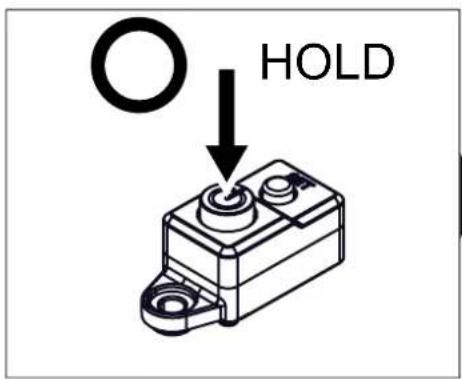
natural_image
Diagram of two mechanical components with arrows indicating direction, labeled 'x2' (no text or symbols on the components themselves)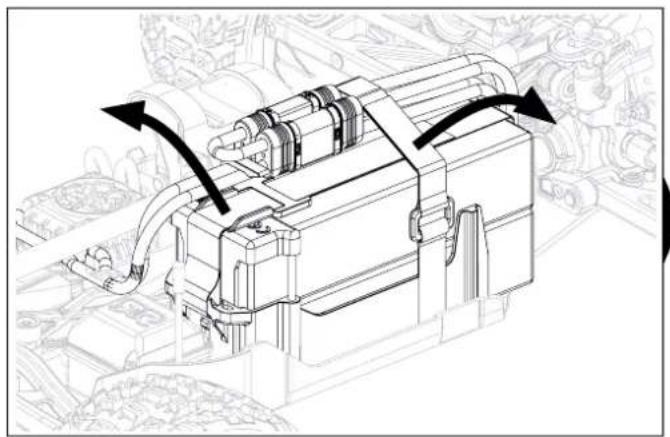
natural_image
Technical line drawing of a mechanical device with directional arrows indicating motion or flow (no text or symbols present)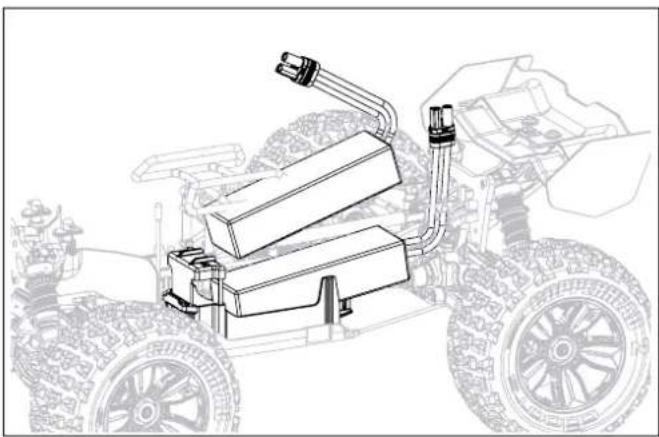
natural_image
Line drawing of a wheeled vehicle with attached mechanical components (no text or symbols)
SPEKTRUM®
Steering dual rate
Lenkungs-Dual-Rate
Dual Rate de direction
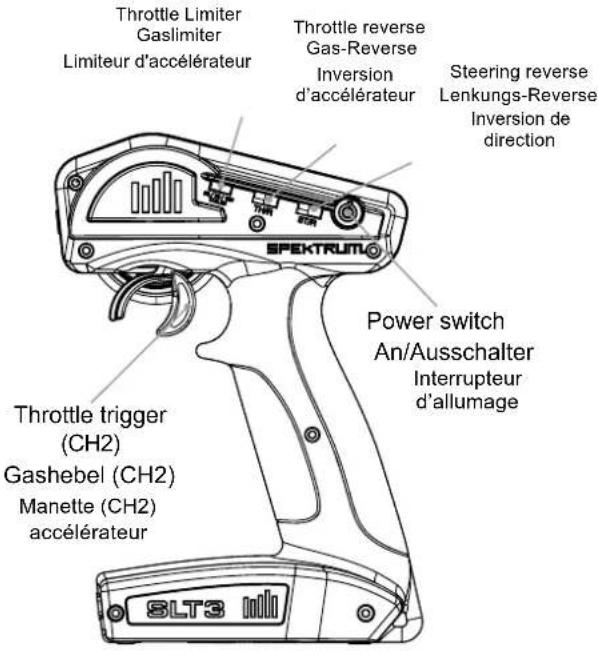
Throttle trim
Gastrimmung
Trim d'accélération
SLT3 3CH
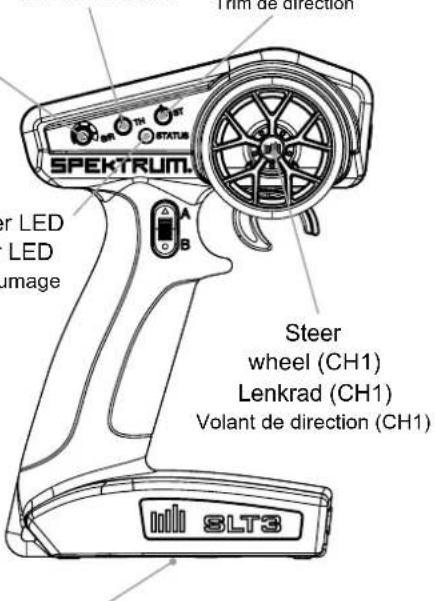
Battery compartment
Batteriefach
Compartiment Batterie
2.4GHZ DIGITAL
RADIO SYSTEM
Connect a fully charged battery pack to the ESC.
Press and hold the bind button on the receiver. Power on the receiver. The orange LED flashes, indicating the receiver is in bind mode. Release the bind button after the orange LED illuminates.
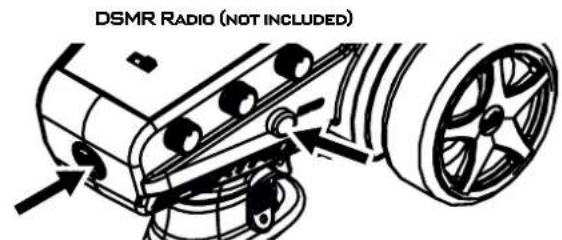
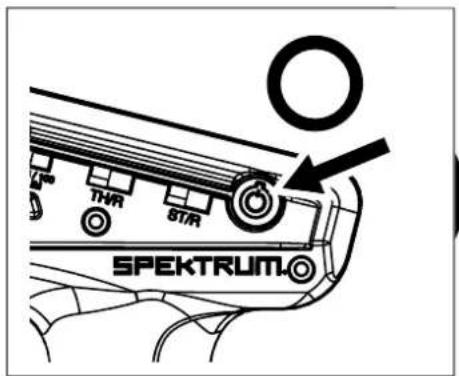
Put your transmitter in bind mode.
The bind process is complete when the orange LED on the receiver remains lit.
Schließen Sie einen vollständig geladenen Akku an den Regler an.
Halten Sie den Bindungsschalter am Sender gedrückt.
Den Empfänger einschalten. Die orangefarbene LED blinkt und zeigt an, dass sich der Empfänger im Bindungsmodus befindet. Den Bindungsschalter loslassen, wenn die orangefarbene LED erleuchtet.
Den Sender in den Bindungsmodus bringen.
Der Bindungsvorgang ist abgeschlossen, wenn die orangefarbene LED auf dem Empfänger beständig leuchtet.
Connectez une batterie entièrement chargée au contrôleur.
Appuyez sur le bouton d'affectation et maintenez-le enfoncé sur le récepteur.
Mettez le récepteur en marche. La DEL orange clignote, indiquant que le récepteur est en mode d'affectation. Relâchez le bouton d'affectation lorsque la DEL orange s'allume.
Mettez votre émetteur en mode d'affectation.
Le processus d'affectation est terminé lorsque la DEL orange du récepteur se fixe.
IMPORTANT: Only use fully charged LiPo batteries (4.2V per cell) to prevent battery/ ESC damage.
Place vehicle off the ground
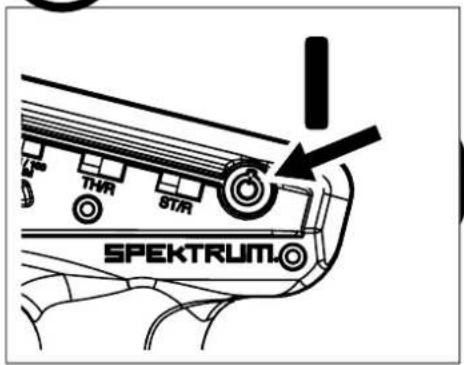
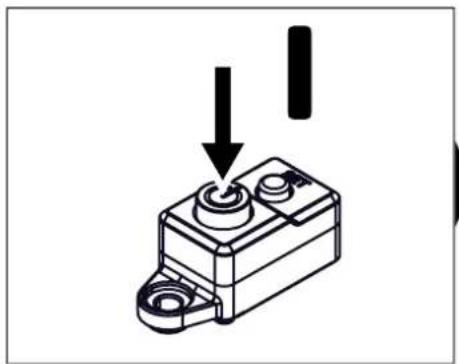
Connect batteries, turn on TX and press/hold the set button 'A'. Press the switch on 'B' and release the set button when the RED light flashes on the ESC.
natural_image
Line drawing of a ship's steering wheel and bow, showing no text or symbols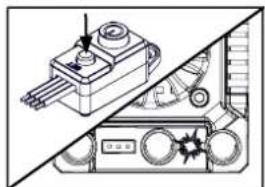
natural_image
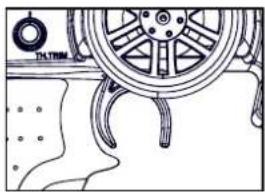
Technical illustration of a mechanical device with no visible text or symbols- TX in neutral - press set button (1 Green flash)
- Sender in Neutralposition - drücken Sie den Knopf (1 grünes Blinksignal)
- TX au point mort - appuyez sur le bouton de réglage (1 flash vert)
natural_image
Line drawing of a car wheel with attached sensors and dashboard (no text or symbols)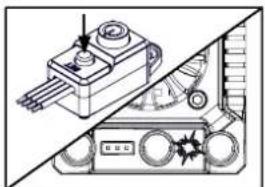
natural_image
Technical diagram of a mechanical device with no visible text or symbolsnatural_image
Technical line drawing of a ship's wheel and steering wheel assembly (no text or symbols)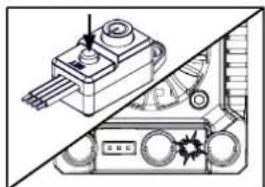
natural_image
Technical line drawing of a mechanical device with no visible text or symbolsnatural_image
Line drawing of a ship's wheel and deck structure (no text or symbols)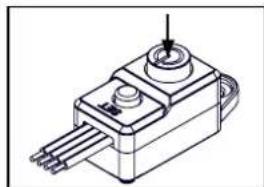
natural_image
Technical line drawing of a mechanical component with a cylindrical pin and three leads (no text or symbols)The brushless ESC is setup for use straight from the factory. If you want to alter the settings for your track or driving style please see the table and steps below:
| LED Indicator | LED Code |
| ESC turned On, LED indicator is Off | Throttle trigger is in the neutral zone |
| Red LED illuminated | ESC is operating in forward throttle |
| Red and Green LED illuminated | ESC is at full throttle, full brake or full reverse |
| LED flashes red with short single pulses | LVC protection activated |
| LED flashes green with short single pulses | The ESC is in thermal shutoff mode |
| LED flashes green with three short pulses repeating | The ESC has exceeded the continuous current limit |
| LED flashes green with four short pulses repeating | The ESC has failed the self test |
| LED flashes green with five short pulses repeating | Capacitor temp has been exceeded |
ESC LED-ANZEIGE
TROUBLESHOOTING GUIDE
| Problem and LED Indicator Error Mode Possible Causes Solution | |||
| Motor won't operate. LED flashes red with short single pulses. | LVC has been activated. | Battery voltage is below the LVC setting. | Verify the battery is charged. |
| Motor won't operate. LED flashes green with short single pulses. | The ESC is in thermal shutoff mode. | The ESC is taking too much load. | Turn off the ESC and allow it to cool before resuming operation. Consider making changes to gear ratio to reduce load to the ESC. |
| Motor won't operate. LED flashes green with four short pulses repeating. | The ESC has failed the self test. | The ESC is damaged. | Send the ESC to a Horizon Hobby service center for service. |
| Motor won't operate. LED flashes green with five short pulses repeating. | Capacitor temp has been exceeded | There is too much load on the drive system for the ESC to support. | Consider changing the battery or gearing to reduce the load on the ESC, or change your driving habits to reduce the load. |
| No throttle or steering on start up. LED flashes red with single short pulse repeating. | N/A Throttle trim not at neutral. | Turn off ESC. Adjust throttle trim on transmitter to neutral. Turn back on. | |
When operating your Spektrum receiver, please be sure to maintain a separation distance of at least 20 cm between your body (excluding fingers, hands, wrists, ankles, and feet) and the antenna to meet RF exposure safety requirements as determined by FCC regulations.
IC INFORMATION
CAN ICES-3 (B)/NMB-3(B)
IC: 6157A-SPMSLT300 and IC: 6157A-SRIRVINGV1
This device contains license-exempt transmitter(s)/receivers(s) that comply with Innovation, Science, and Economic Development Canada's license-exempt RSS(s). Operation is subject to the following 2 conditions:
Supplier's Declaration of Conformity
NOTE: This equipment has been tested and found to comply with the limits for a Class B digital device, pursuant to part 15 of the FCC Rules. These limits are designed to provide reasonable protection against harmful interference in a residential installation. This equipment generates, uses and can radiate radio frequency energy and, if not installed and used in accordance with the instructions, may cause harmful interference to radio communications. However, there is no guarantee that interference will not occur in a particular installation. If this equipment does cause harmful interference to radio or television reception, which can be determined by turning the equipment off and on, the user is encouraged to try to correct the interference by one or more of the following measures:
—Reorient or relocate the receiving antenna.
—Increase the separation between the equipment and receiver.
—Connect the equipment into an outlet on a circuit different from that to which the receiver is connected.
—Consult the dealer or an experienced radio/TV technician for help.
Horizon Hobby, LLC
2904 Research Rd.,
Champaign, IL 61822
Email: compliance@horizonhobby.com
Web: HorizonHobby.com
COMPLIANCE INFORMATION FOR THE EUROPEAN UNION

EU Compliance Statement: Horizon Hobby, LLC hereby declares that this product is in compliance with the essential requirements and other relevant provisions of the RED and EMC directives.
A copy of the EU Declaration of Conformity is available online at:
http://www.horizonhobby.com/content/support-render-compliance.
Operating Frequency
Band: 2402.0 - 2478.0 MHz
Max EIRP for SLT300 is 16.6dBm Max EIRP for SR315 is -1.33dBm
INSTRUCTIONS FOR DISPOSAL OF WEEE BY USERS IN THE EUROPEAN UNION
This product must not be disposed of with other waste. Instead, it is the user's responsibility to dispose of their waste equipment by handing it over to a designated collections point for the recycling of waste electrical and electronic equipment. The separate collection and recycling of your waste equipment at the time of disposal will help to conserve natural resources and ensure that it is recycled in a manner that protects human health and the environment. For more information about where you can drop
off your waste equipment for recycling, please contact your local city office, your household waste disposal service or where you purchased the product.

Maximal EIRP for SLT300 is 16.6dBm Maximal EIRP for SR315 is -1.33dBm
natural_image
Illustration of a pair of needle tips (no text or symbols)We recommend a Service Schedule to keep your vehicle in the best working condition possible. Our recommended schedule appears as the below icon:
Number of battery packs used.
Duration vehicle has been used for.
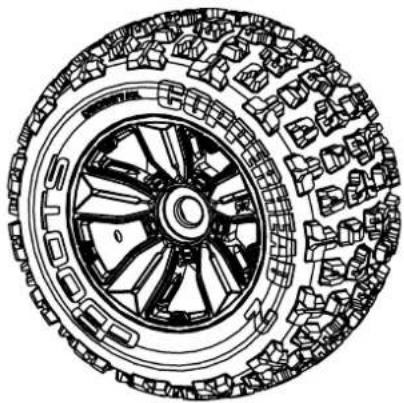
Wheel and Tire Maintenance
natural_image
Technical illustration of a car wheel assembly (no text or symbols)F/R Differential Removal and Replacement
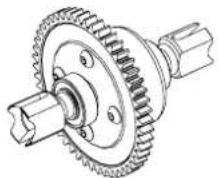
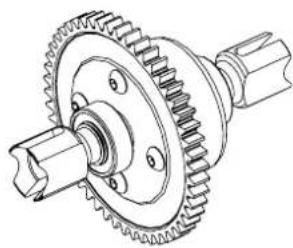
Centre Differential Maintenance
Mitteldifferential-Wartung Entretien du différentiel central
Page Seite Page
23

Tools required will appear in this box
Online Videos Available when you see this icon
natural_image
Technical line drawing of a tire with visible wheel and tread pattern (no text or symbols)

Check the areas highlighted in the image to the left after the duration of usage above. Replace parts where necessary to ensure maximum durability and enjoyment from your vehicle.
natural_image
Technical illustration of a vehicle's wheel assembly and suspension system (no text or symbols)
natural_image
Illustration of five different mechanical parts: a pipe fitting, a nut, a notebook, a pen, and a paintbrush (no text or symbols present)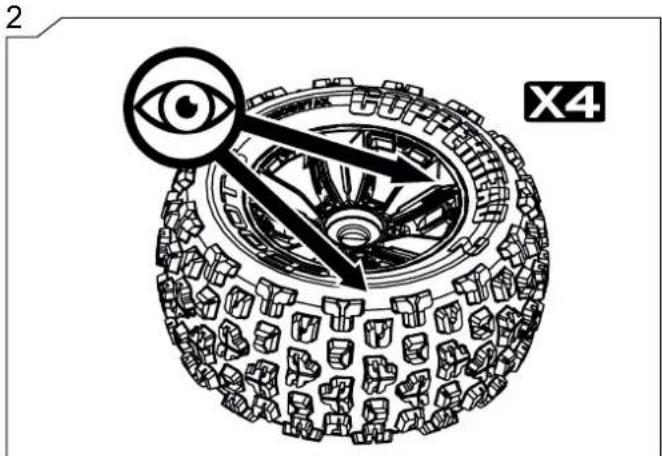
natural_image
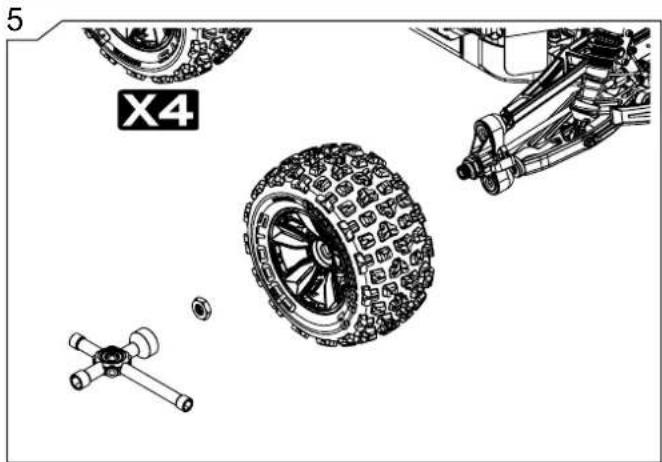
Diagram of a mechanical gear system with an eye symbol and directional arrows, labeled X4 (no text or symbols on the diagram itself)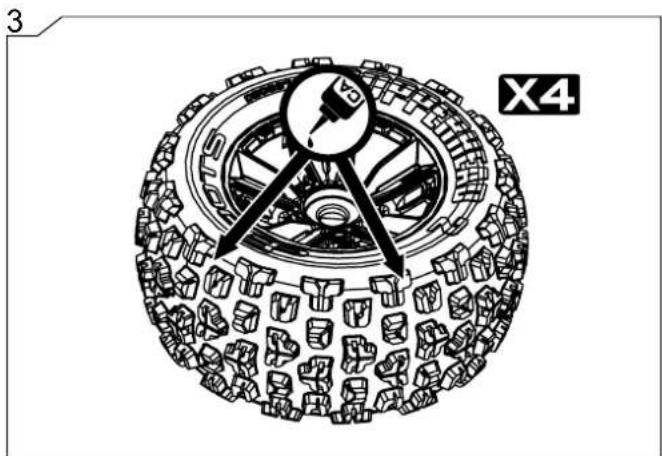
natural_image
Technical illustration of a tire assembly with visible tracks and components (no text or symbols)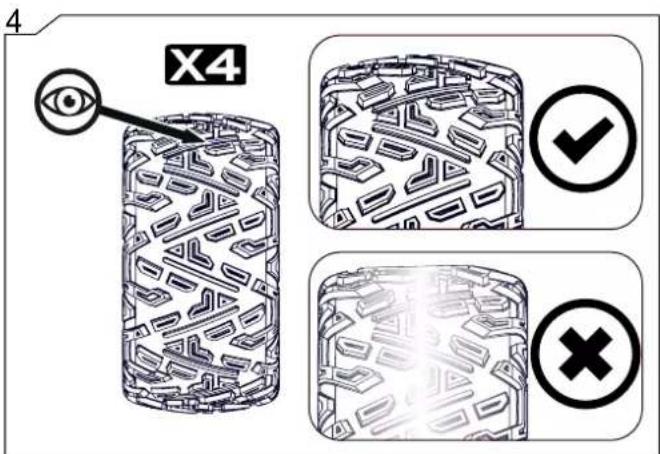
natural_image
Technical illustration of vehicle tire assembly components including wheels, suspension parts, and a mechanical assembly (no text or symbols)

natural_image
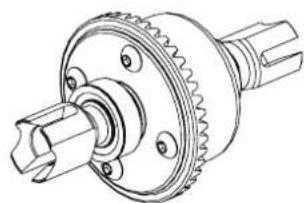
Technical line drawing of a mechanical gear assembly (no text or symbols)Check the areas highlighted in the image to the left after the duration of usage above. Replace parts where necessary to ensure maximum durability and enjoyment from your vehicle.

natural_image
Technical line drawing of a mechanical assembly with springs and gears, showing no text or symbols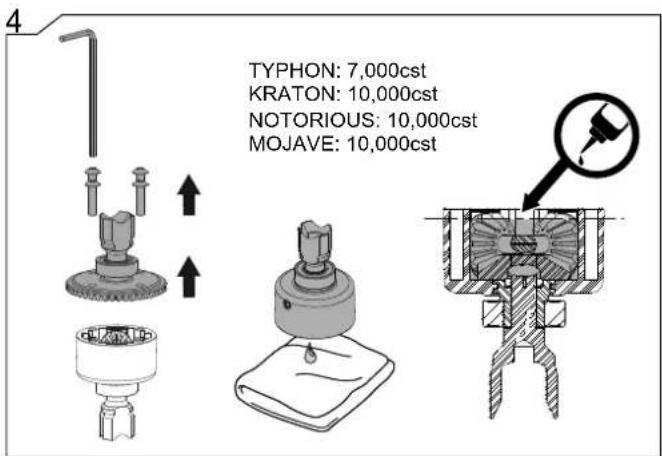
5
natural_image
Technical line drawing of a mechanical assembly with gears and a motor, showing no text or symbols8
9
natural_image
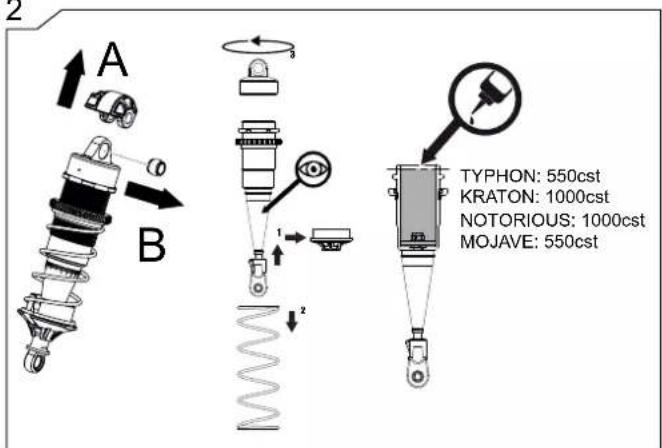
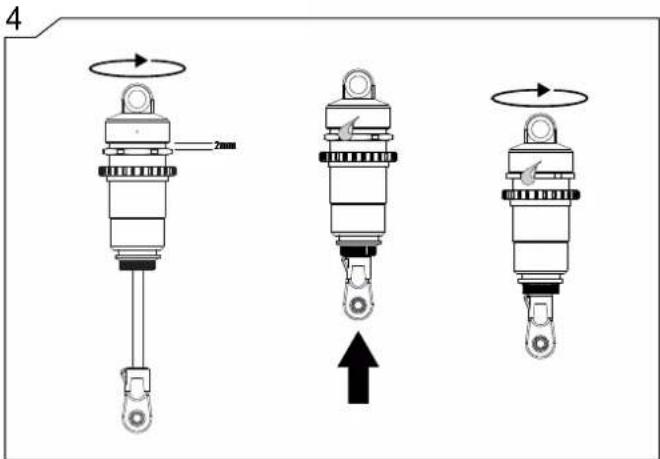
Illustration of a mechanical suspension or shock absorber assembly (no text or symbols)1
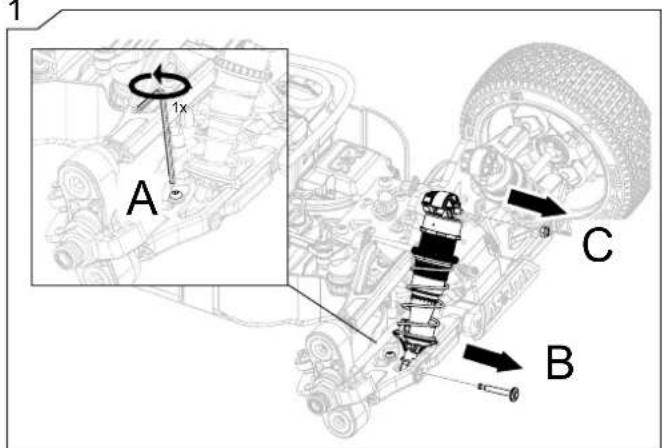
3
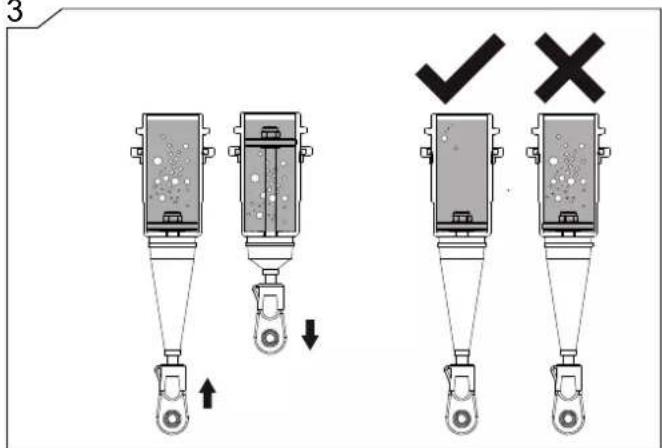
5


Check the areas highlighted in the image to the left after the duration of usage above. Replace parts where necessary to ensure maximum durability and enjoyment from your vehicle.
2
natural_image
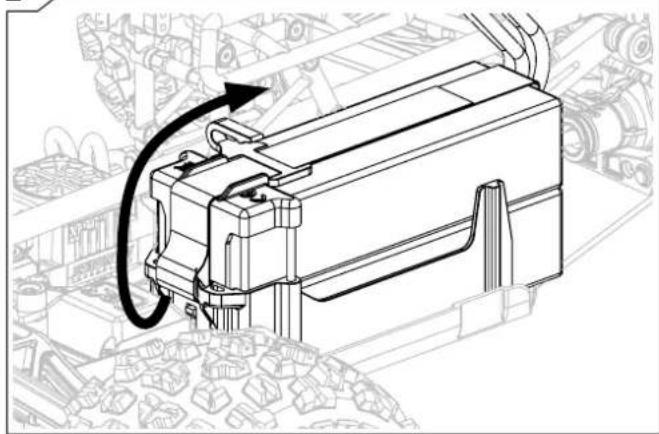
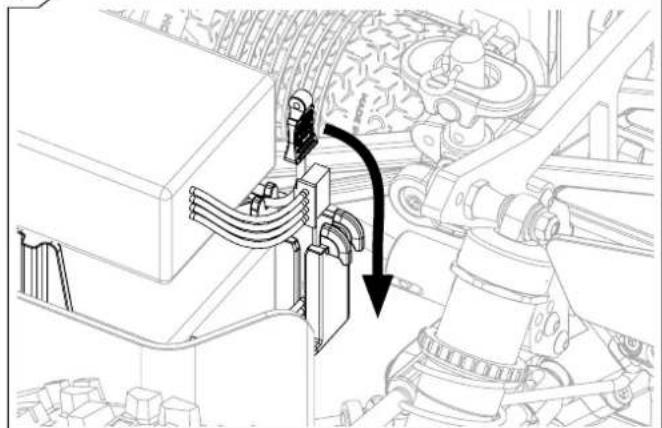
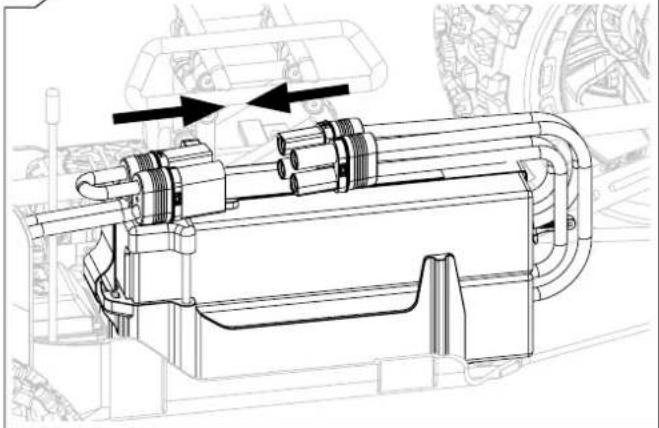
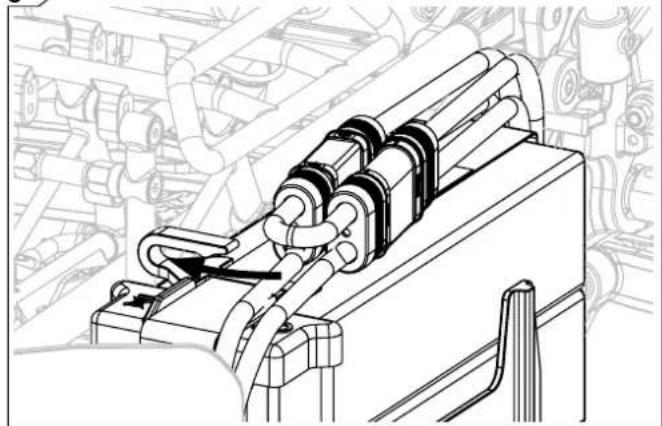
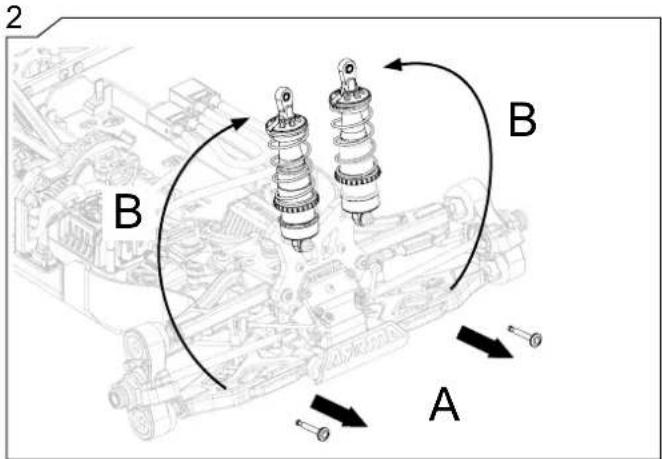
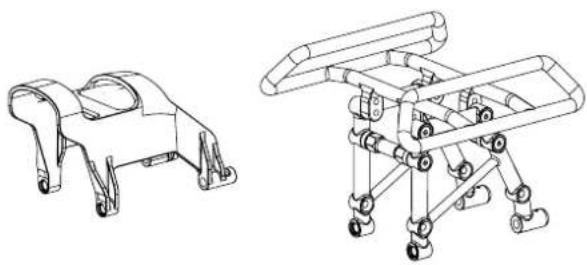
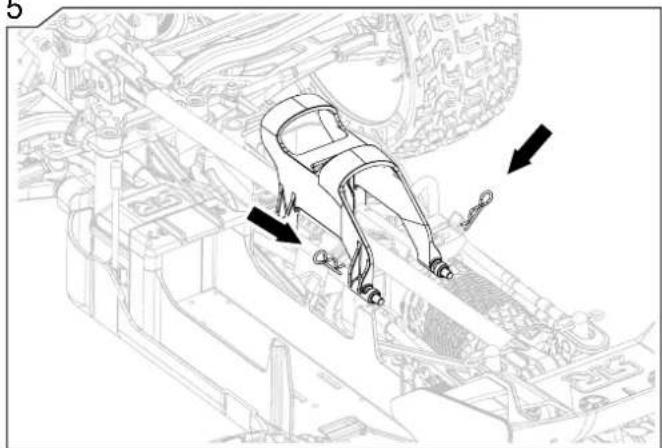
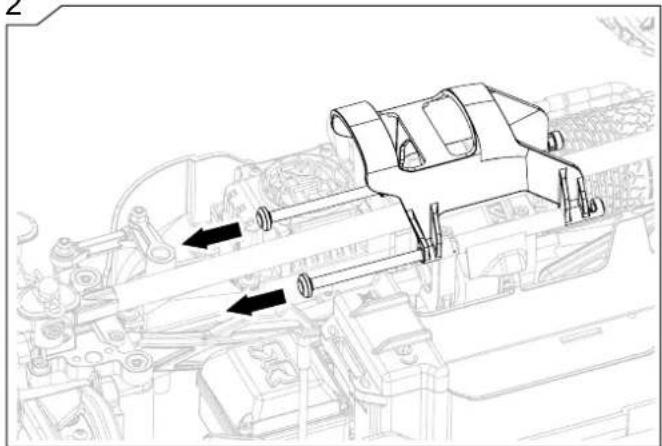
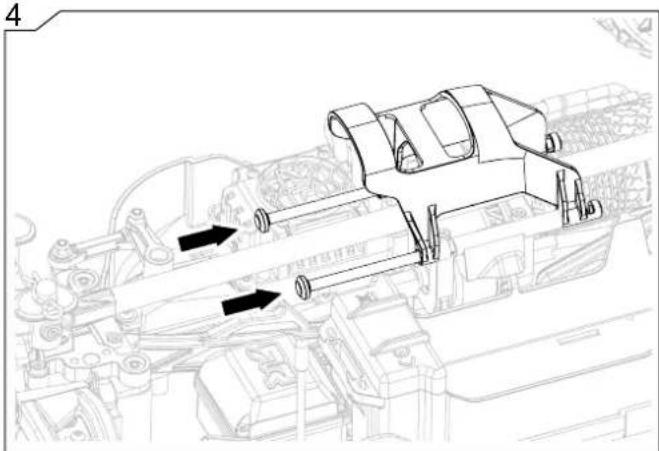
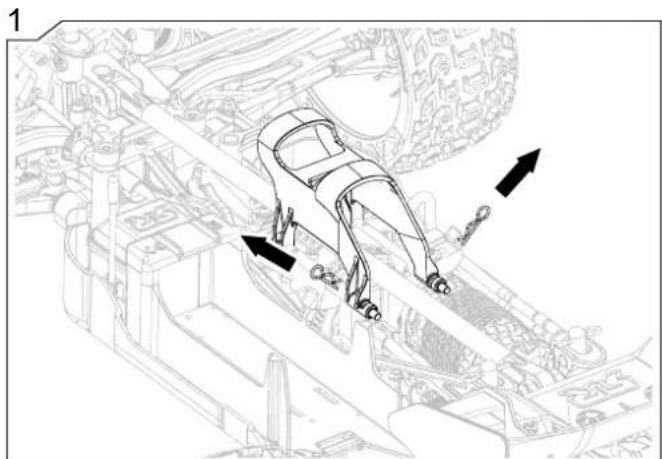
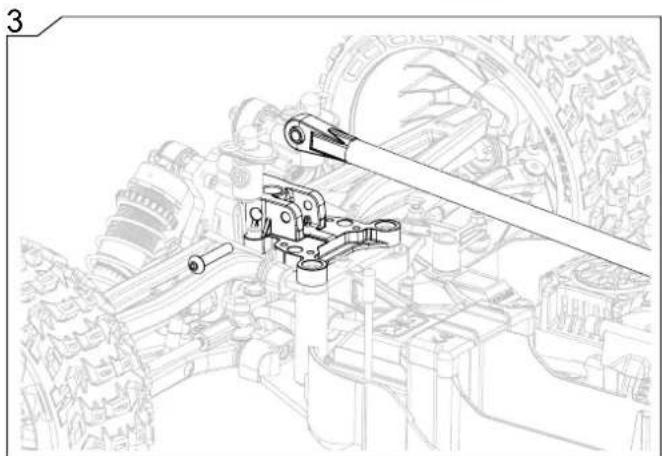
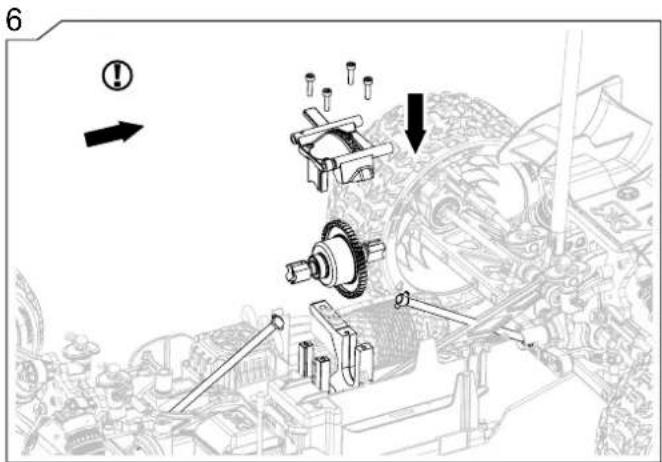
Technical line drawings of two mechanical or robotic device assemblies (no text or symbols)The below steps will show you how to remove the roll over tower
natural_image
Technical line drawing of a mechanical assembly with directional arrows indicating motion or force (no text or symbols present)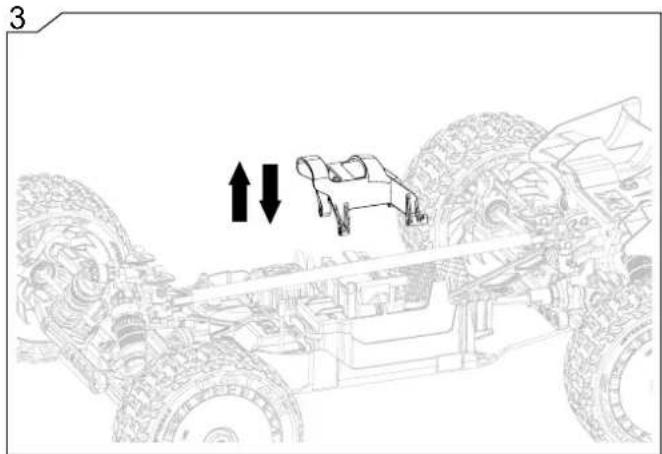
natural_image
Technical line drawing of a vehicle chassis with two upward and downward arrows indicating movement or assembly (no text or symbols present)5
natural_image
Technical line drawing of a mechanical assembly with arrows indicating motion or force direction (no text or symbols present)2
natural_image
Technical line drawing of a mechanical assembly with no visible text or symbols4
natural_image
Technical line drawing of a mechanical assembly with no visible text or symbols

natural_image
Technical line drawing of a mechanical gear assembly (no text or symbols)Check the areas highlighted in the image to the left after the duration of usage above. Replace parts where necessary to ensure maximum durability and enjoyment from your vehicle.
natural_image
Technical line drawing of a mechanical assembly with directional arrows indicating motion or force (no text or symbols present)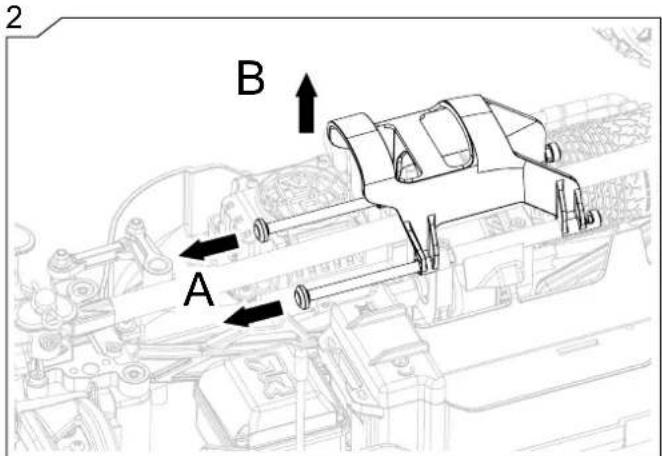
natural_image
Technical line drawing of a mechanical assembly with no visible text or symbols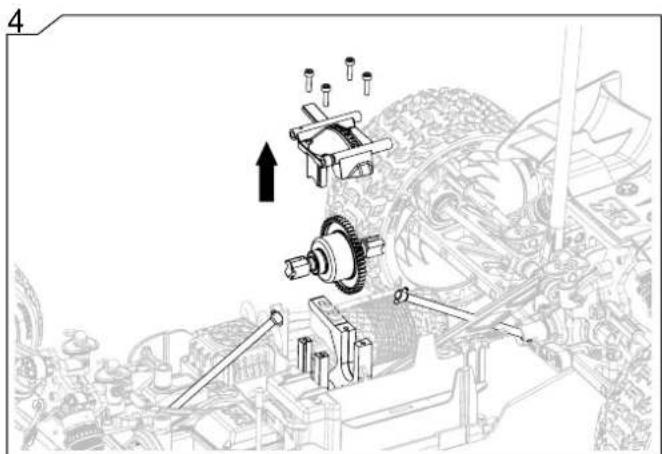

7
8
natural_image
Technical line drawing of a mechanical assembly with gears and shafts (no text or symbols)9
10
natural_image
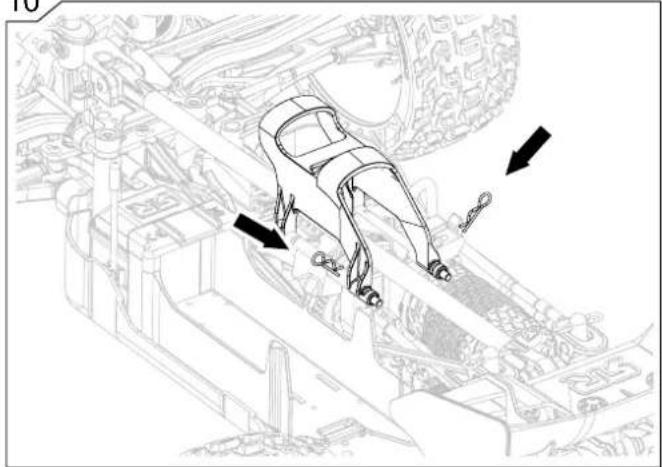
Technical line drawing of a car interior with directional arrows indicating movement or force (no text or symbols present)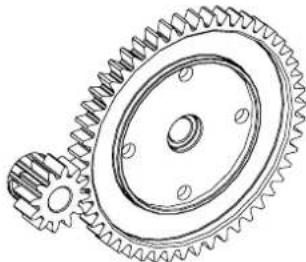
natural_image
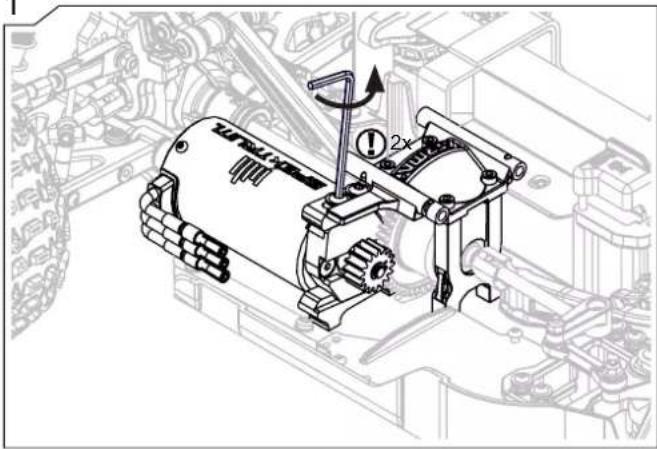
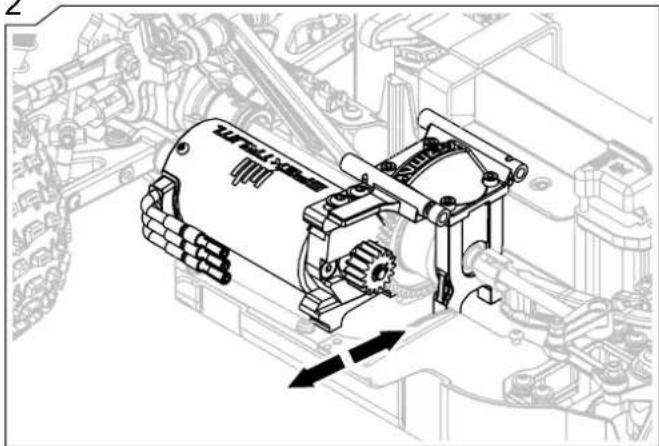
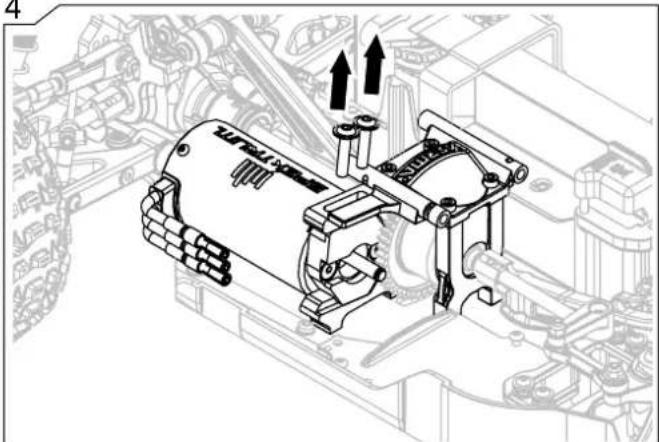
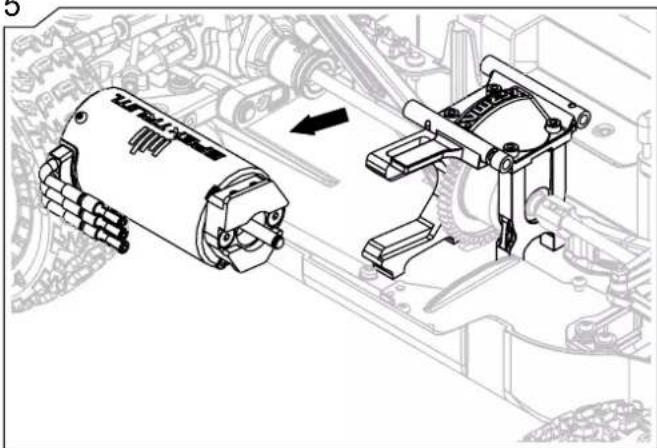
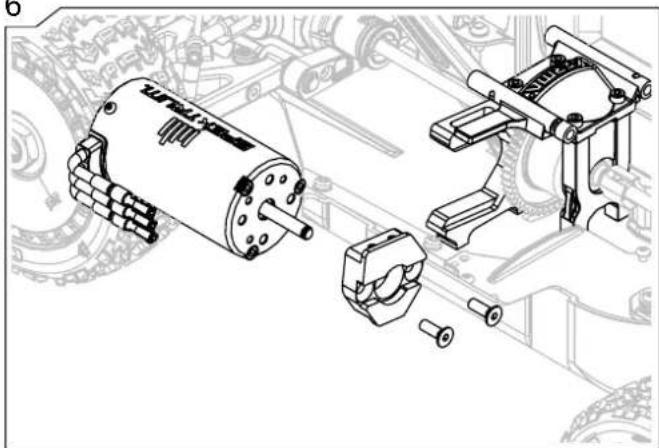
Technical line drawing of a gear with teeth and central bore (no text or symbols)The below steps will help you to change the pinion which will alter the speed of the vehicle. Removing the motor can also be done at the same time.
1
2
natural_image
Technical line drawing of a mechanical assembly with gears and linkages (no text or symbols)3

natural_image
Mechanical assembly diagram showing gear and motor components (no text or labels)4
natural_image
Technical line drawing of a mechanical assembly with no visible text or symbols5
natural_image
Technical illustration of mechanical components inside a vehicle assembly (no text or symbols)6
natural_image
Technical line drawing of an electric motor assembly with exploded view (no text or labels)natural_image
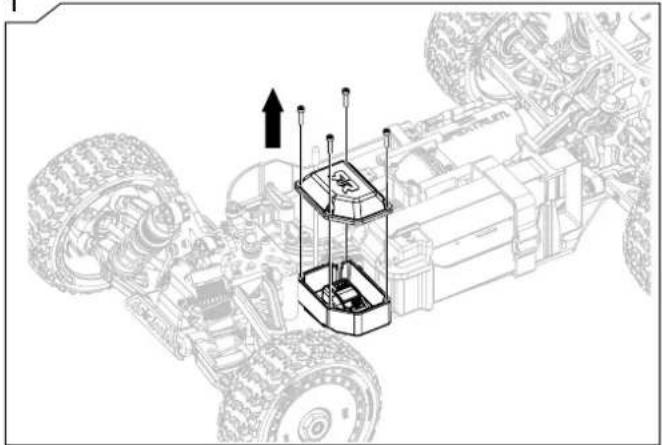
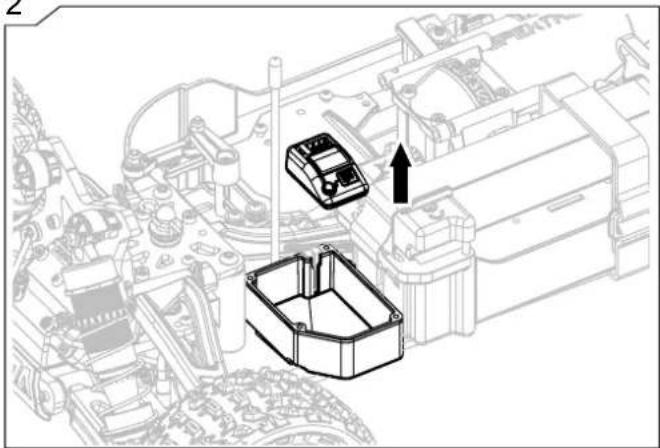
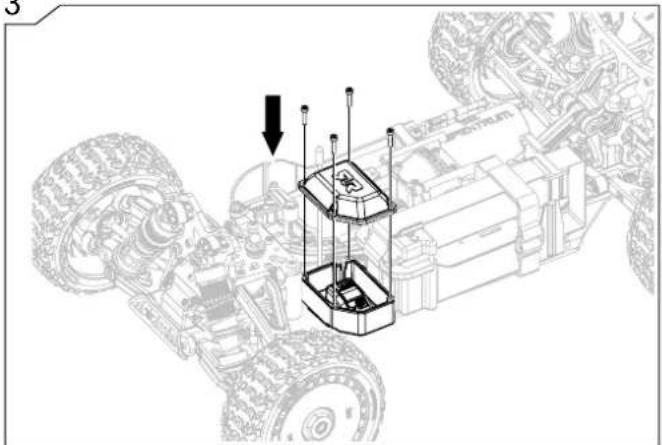
Technical line drawing of a vehicle chassis with visible engine, motors, and structural components (no text or labels)The below steps will show you how to remove the Receiver for maintenance or troubleshooting.
natural_image
Simple illustration of a screwdriver and hexagonal nut (no text or symbols)1
natural_image
Technical line drawing of a vehicle chassis with suspension components and upward arrows indicating motion (no text or symbols)2
natural_image
Technical line drawing of a mechanical assembly with two components and an upward arrow (no text or symbols)3
natural_image
Technical line drawing of a mechanical assembly with two large tires and a central control unit (no text or symbols)Adjust Ride Height
natural_image
Top-down technical line drawing of a toy car showing front wheel, tires, and engine components (no text or symbols)The below steps will help you to adjust the vehicle's ground clearance to suit the terrain you choose to drive on.
natural_image
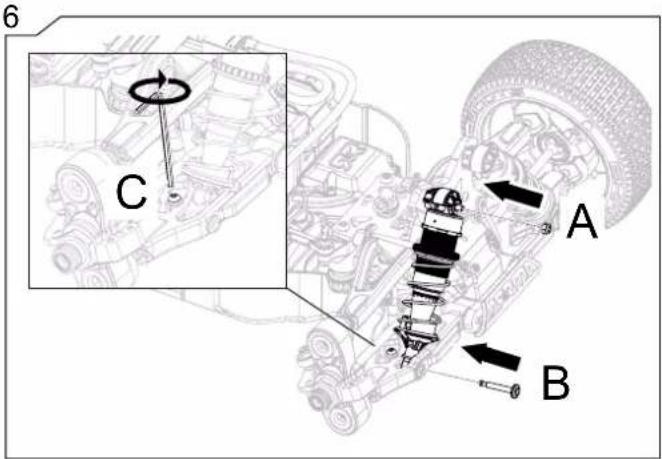
Technical line drawing of a vehicle suspension system with labeled components (no readable text or symbols)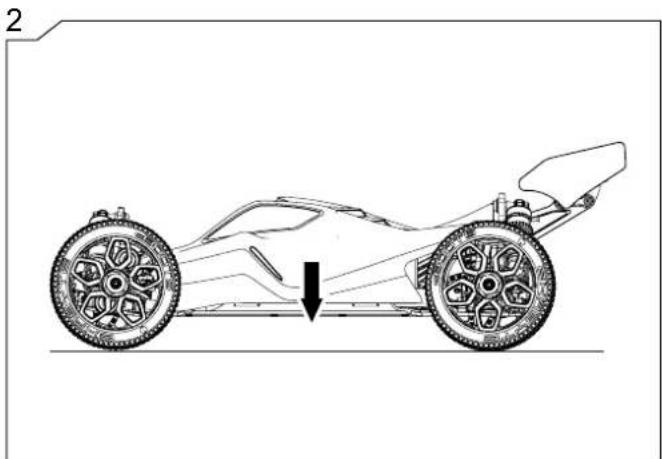
natural_image
Line drawing of a car's front view showing steering wheel and suspension components (no text or symbols)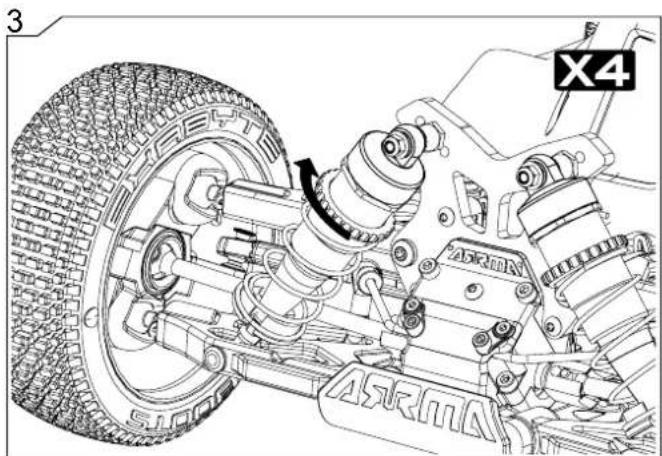
natural_image
Technical line drawing of a vehicle suspension system with tire, springs, and chassis components (no text or symbols)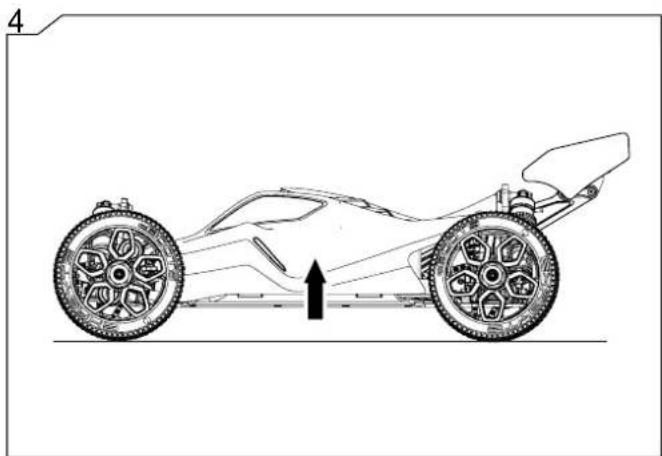
natural_image
Side-view technical illustration of a racing car showing front wheel, rear wheel, and center bull (no text or symbols)Exploded View Explosionszeichnungen Vues Éclatées
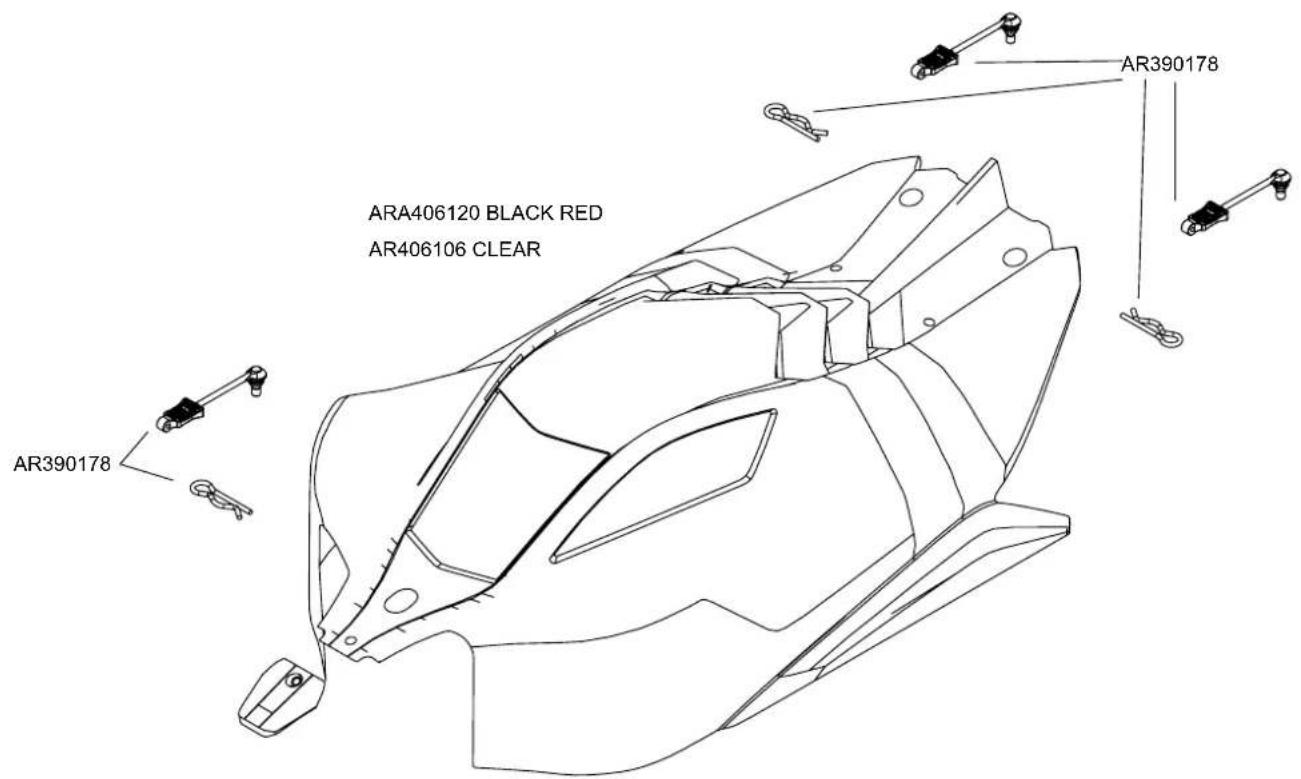
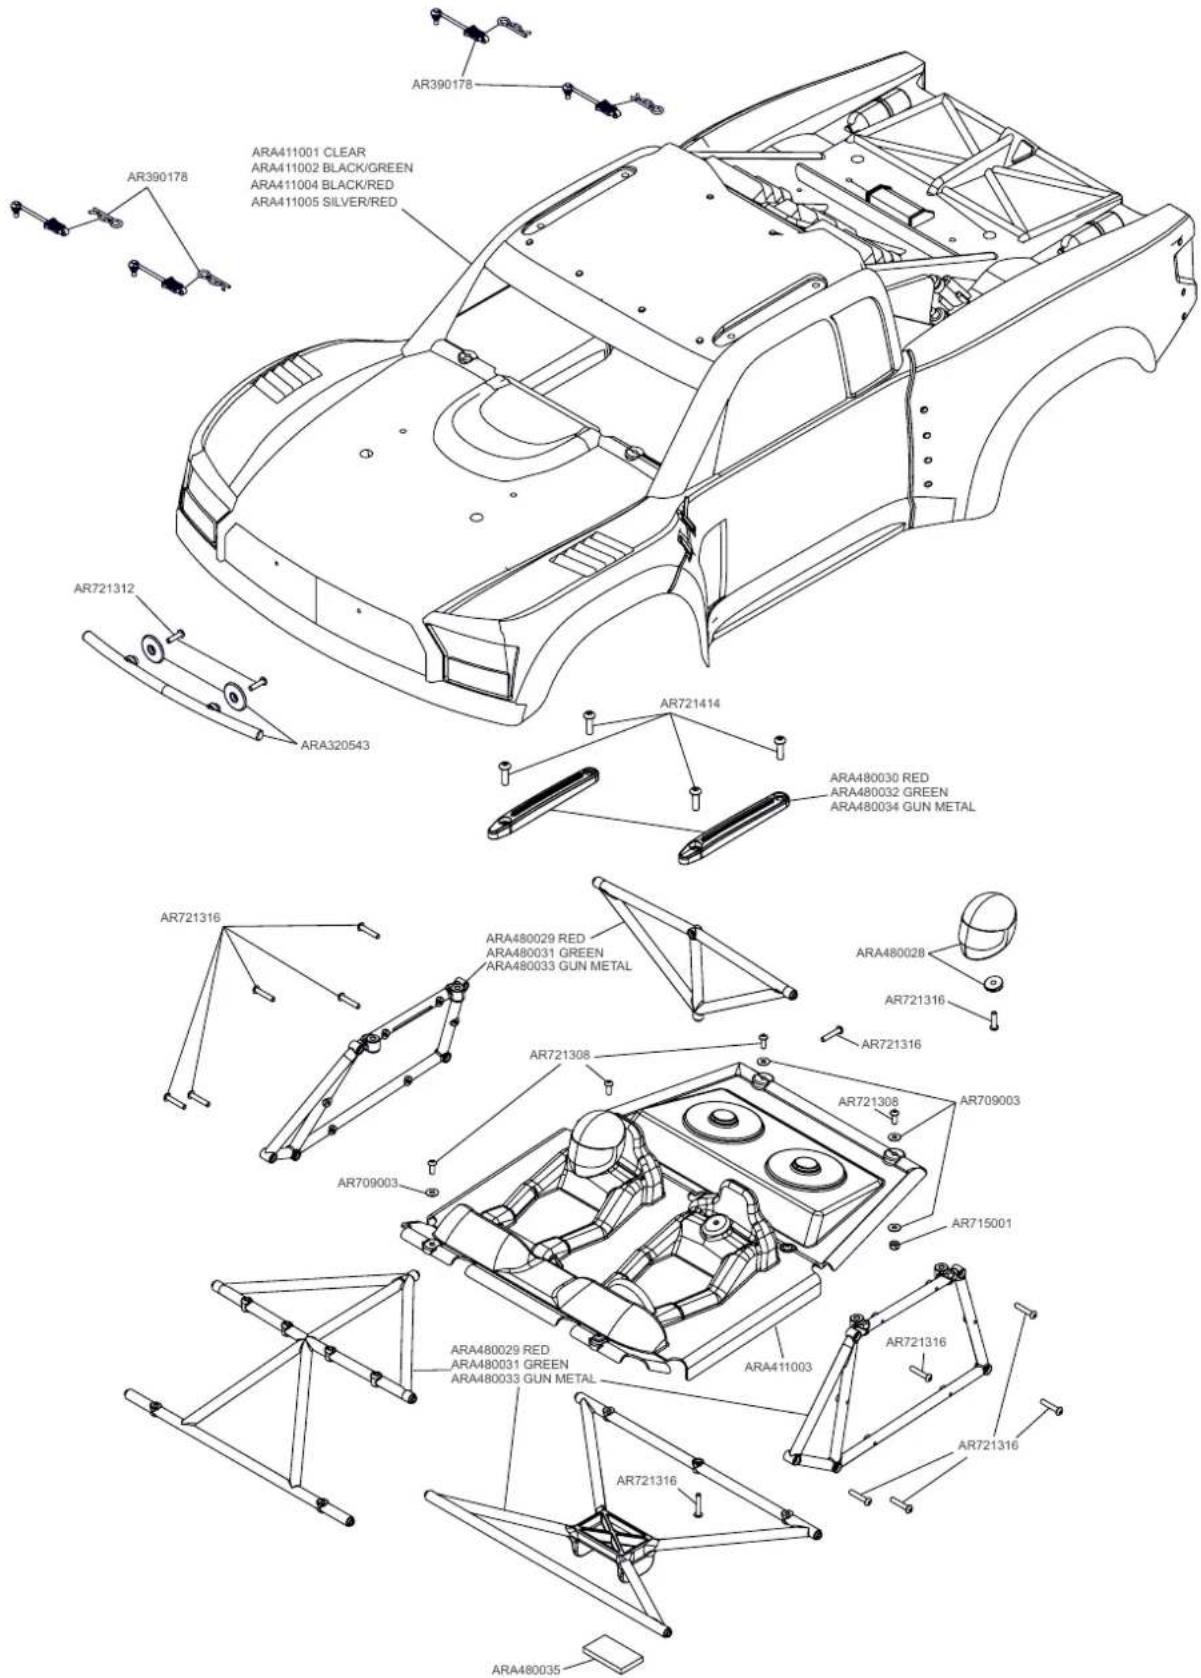
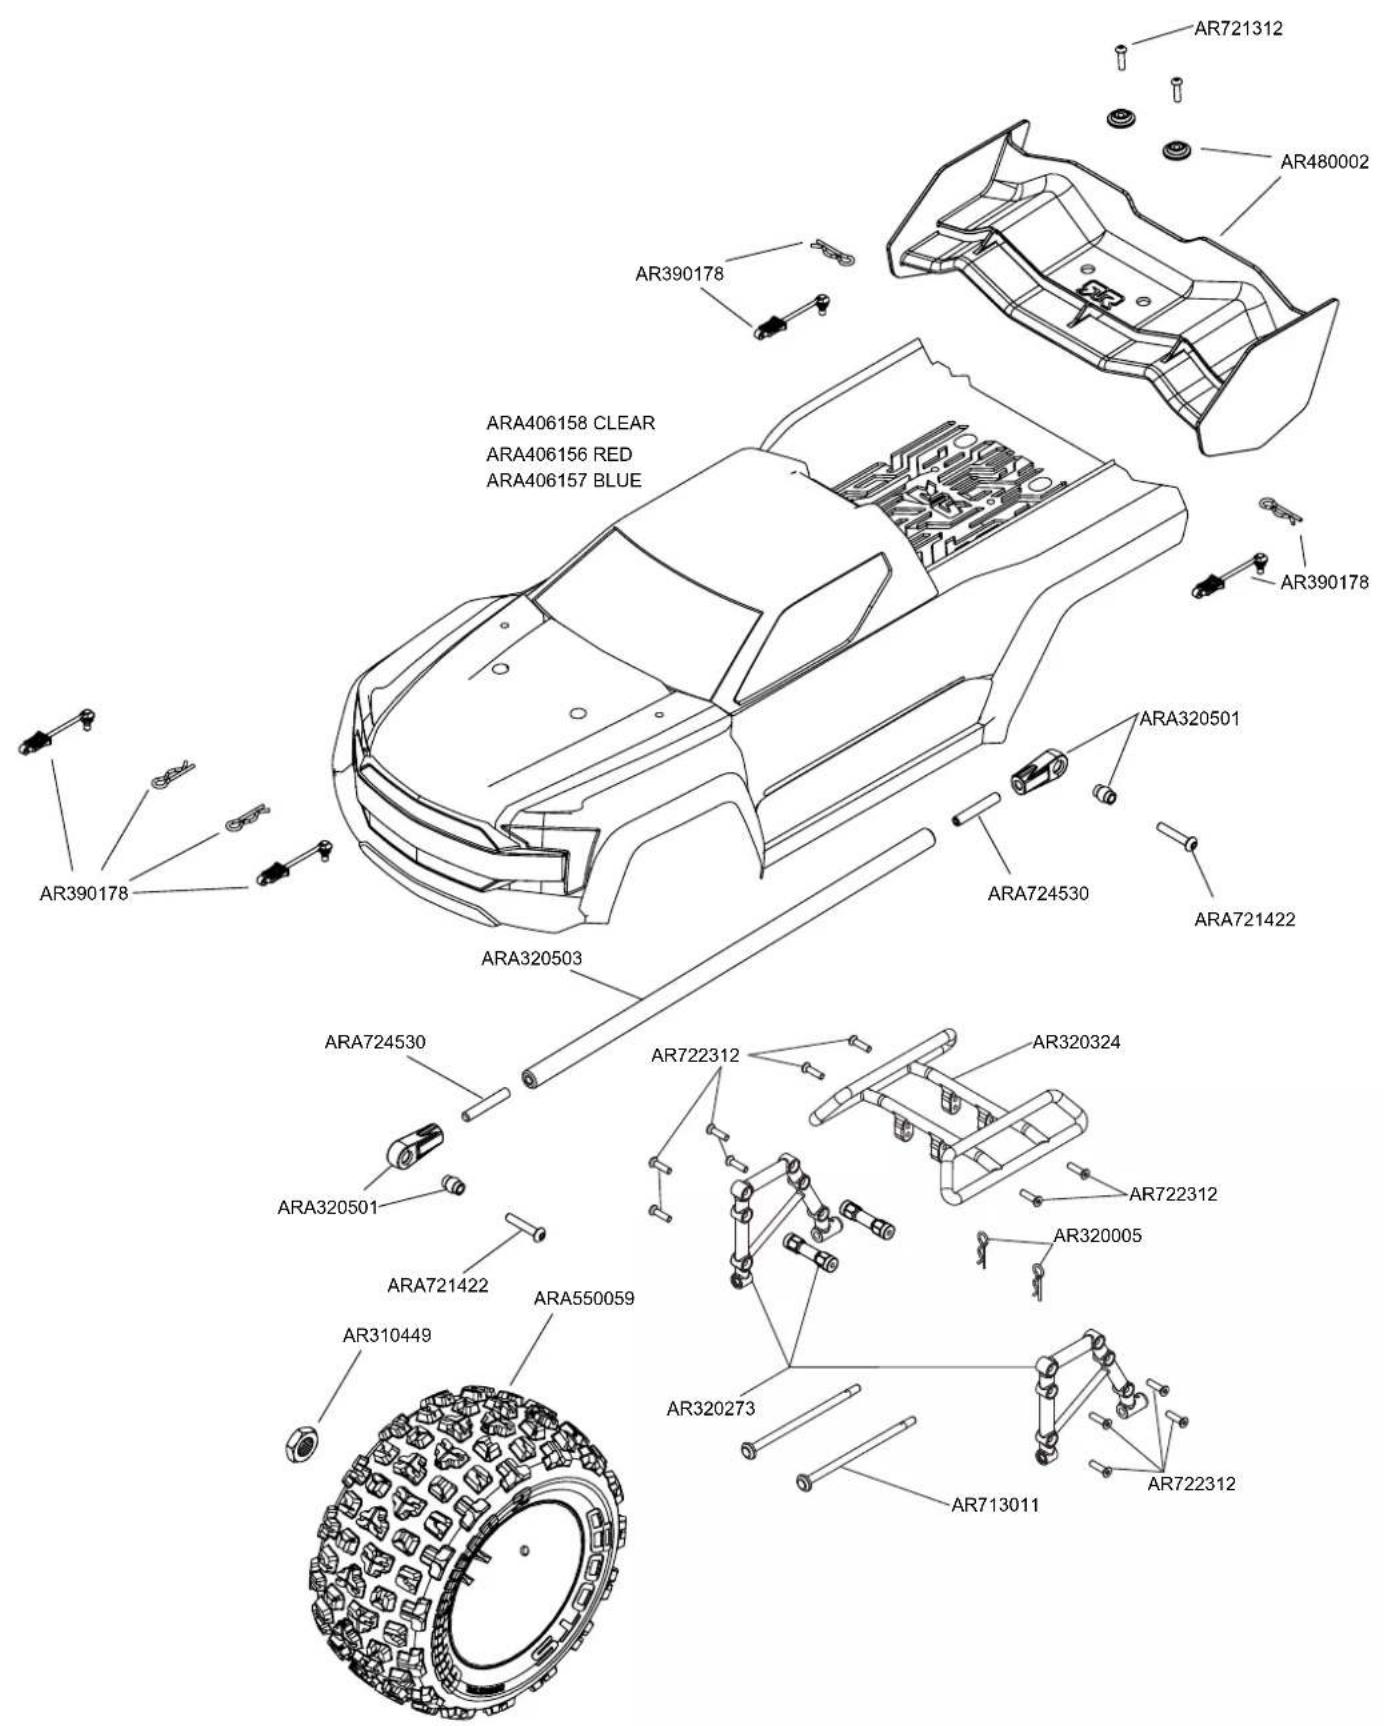
Body & Tire Karosserie & Reifen Carrosserie & Pneu
TYPHON

Exploded View Explosionszeichnungen Vues Éclatées
Body Karosserie Carrosserie
MOJAVE
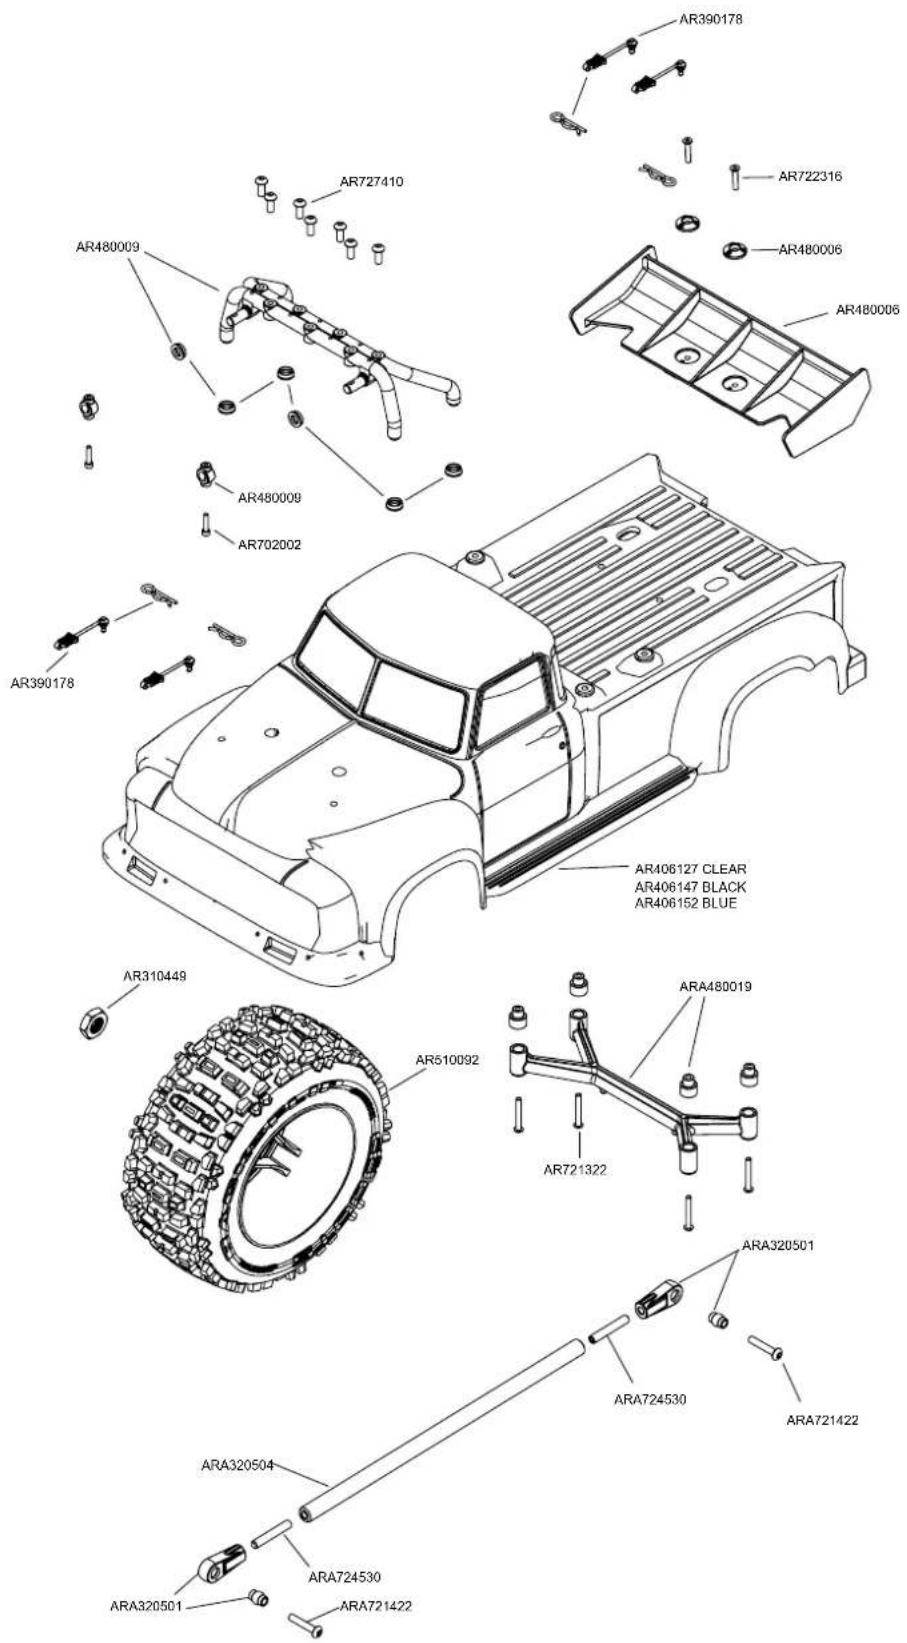
Exploded View Explosionszeichnungen Vues Éclatées
Body & Tire Karosserie & Reifen
Carrosserie & Pneu
KRATON
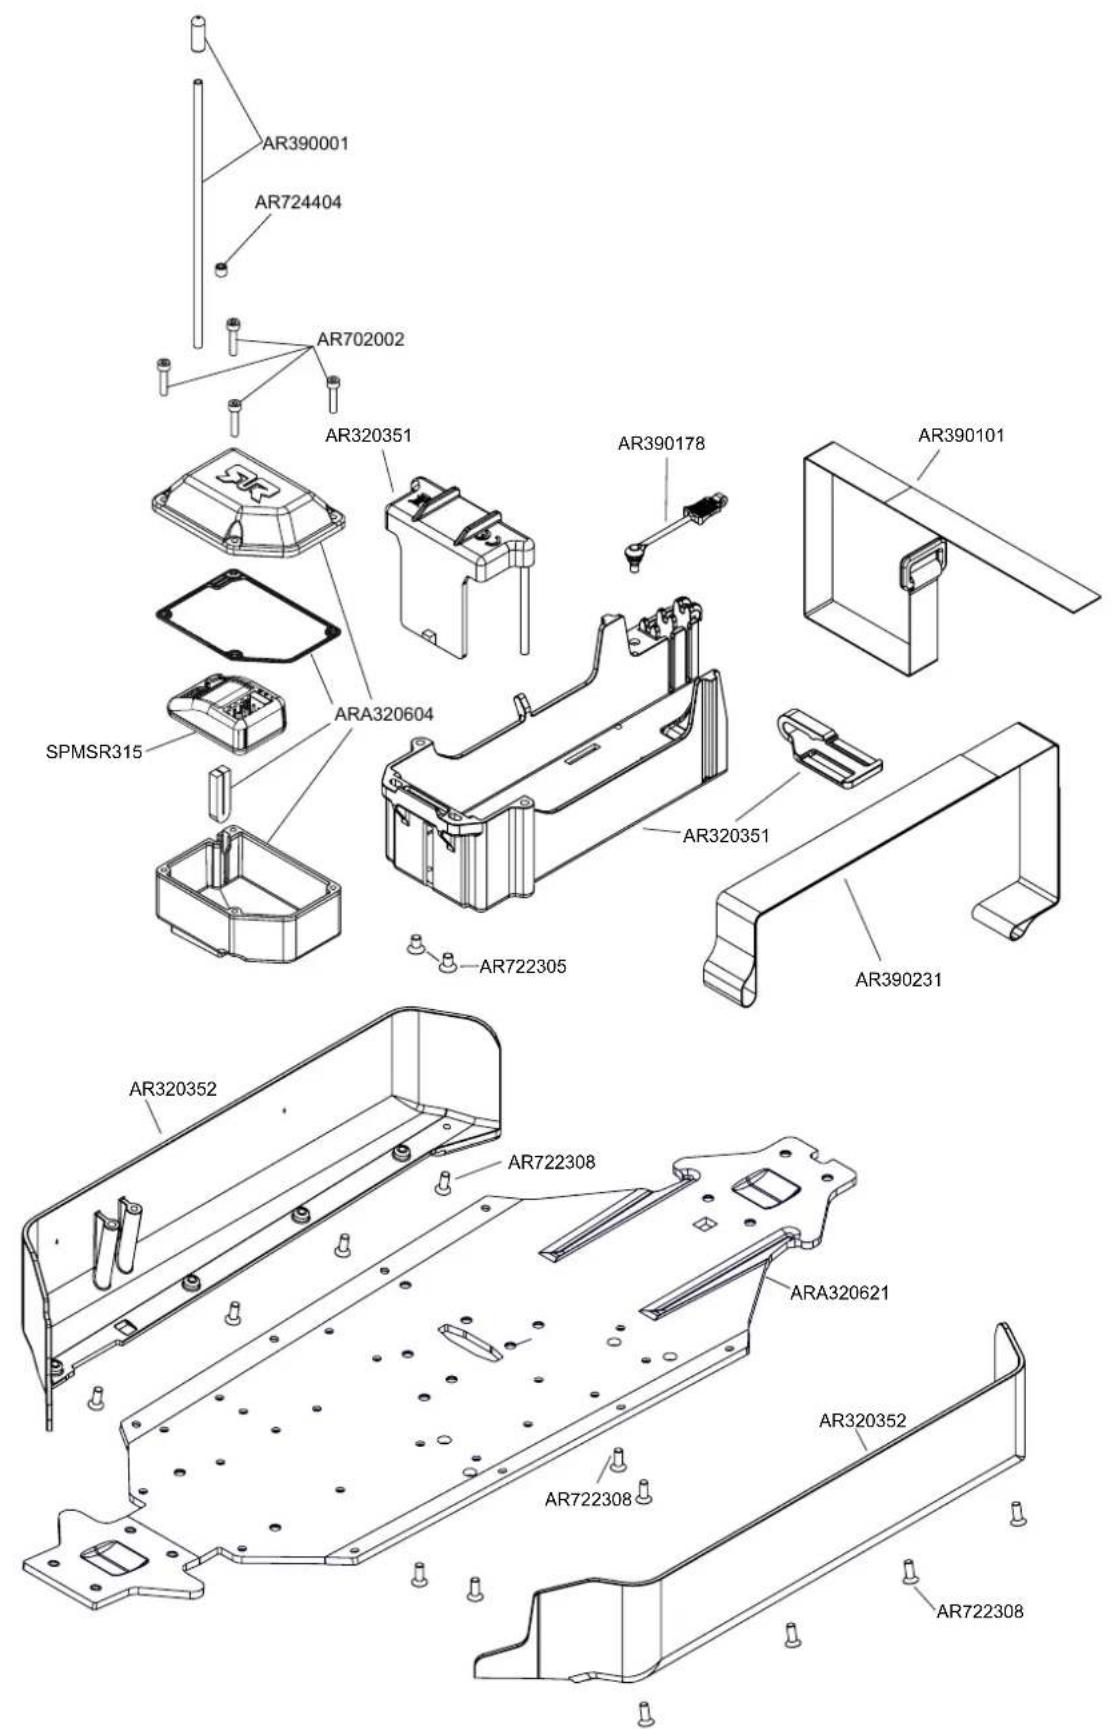
Exploded View Explosionszeichnungen Vues Éclatées
Body & Tire Karosserie & Reifen
Carrosserie & Pneu
NOTORIOUS
TYPHON
Differential Differential Différentiel
Center Centre Center
TYPHON
Exploded View Explosionszeichnungen Vues Éclatées
Center Centre Center
TYPHON
Exploded View Explosionszeichnungen Vues Éclatées
Center Centre Center

Exploded View Explosionszeichnungen Vues Éclatées
Center Centre Center
MOJAVE
Exploded View Explosionszeichnungen Vues Éclatées
Center Centre Center
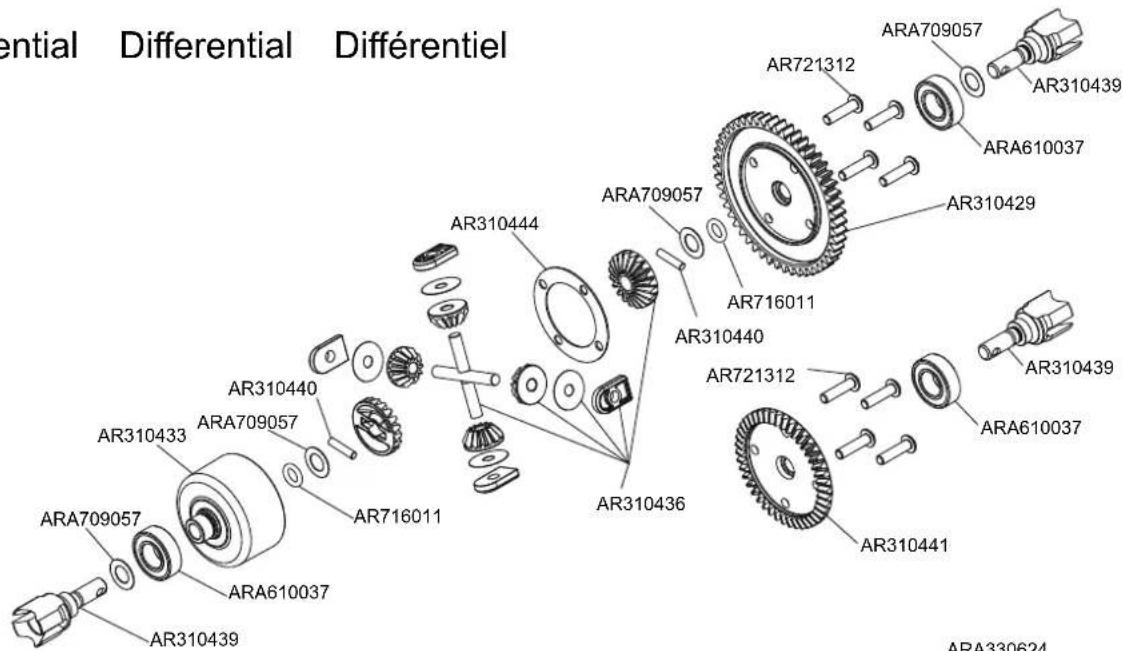
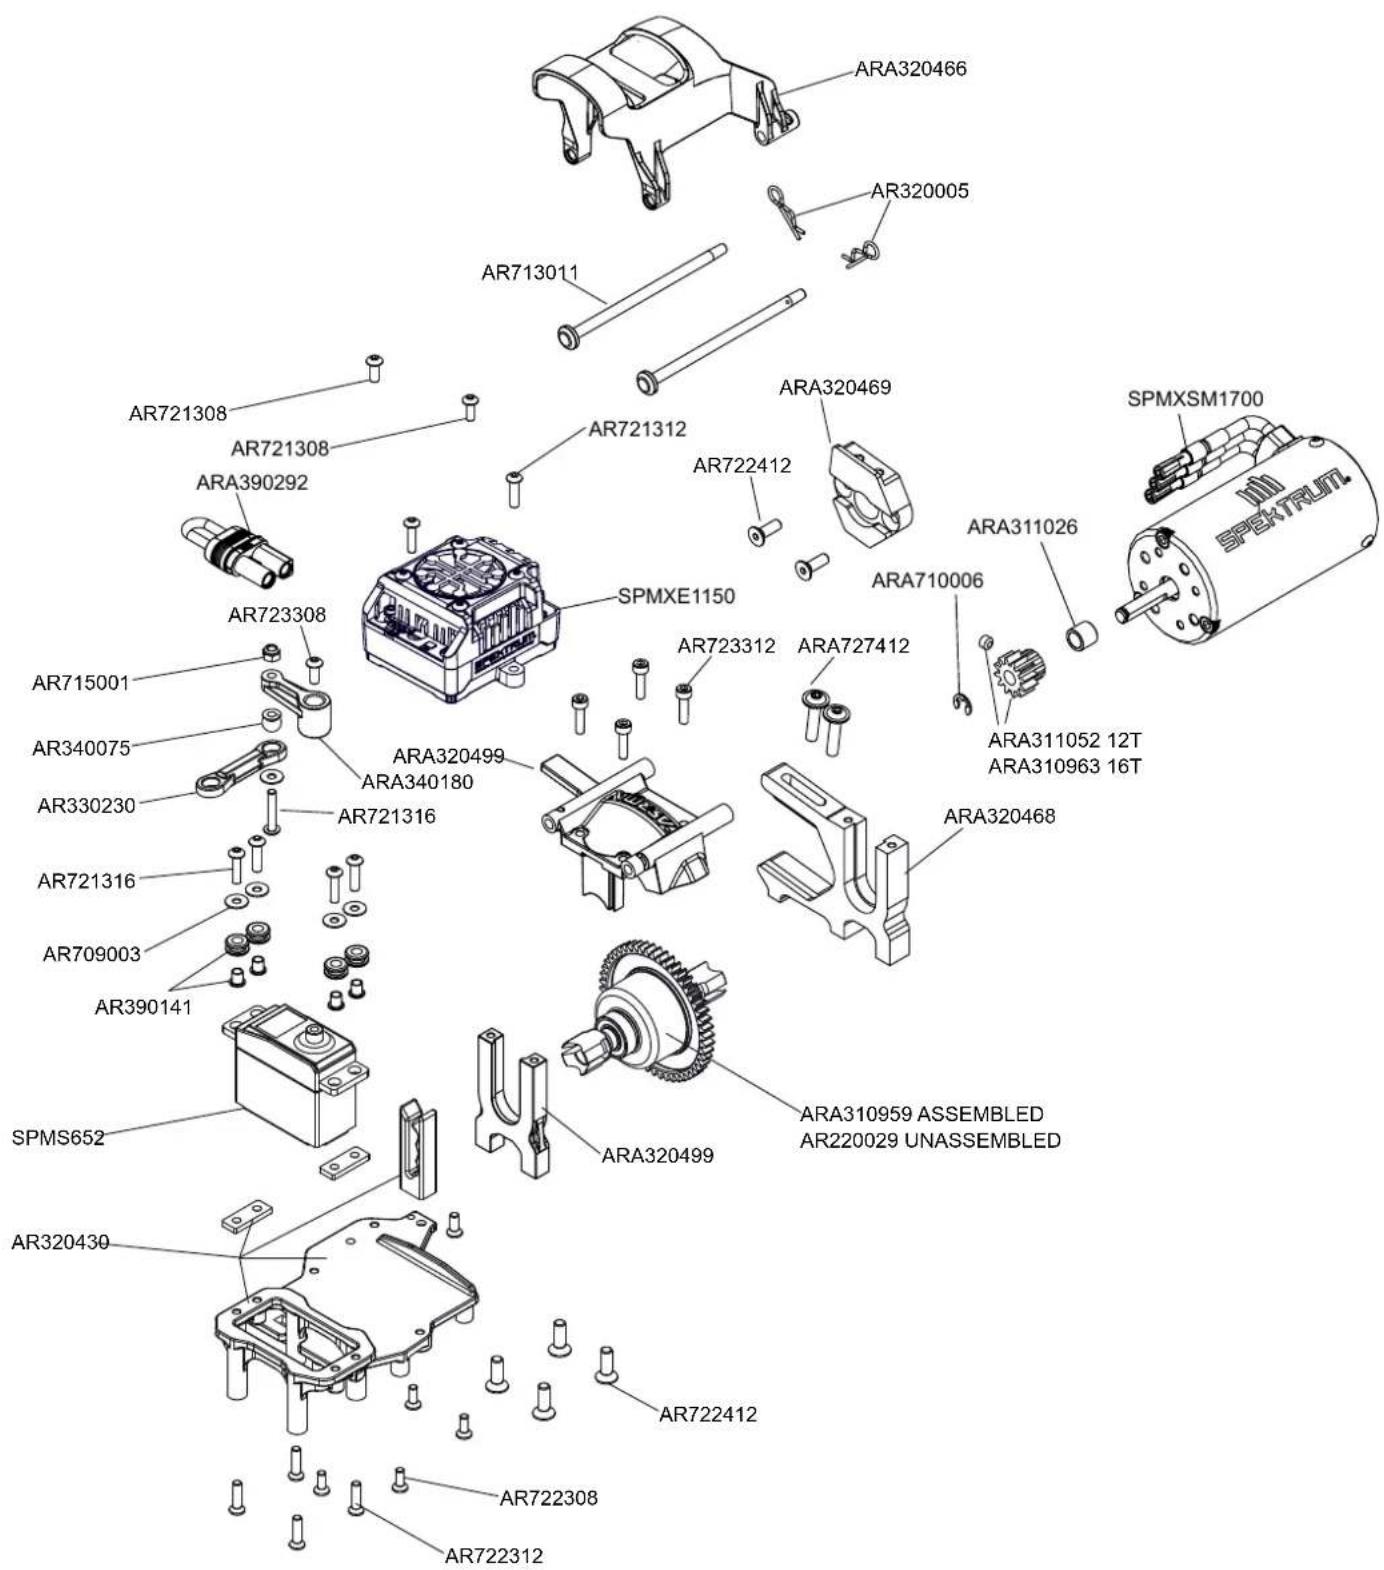
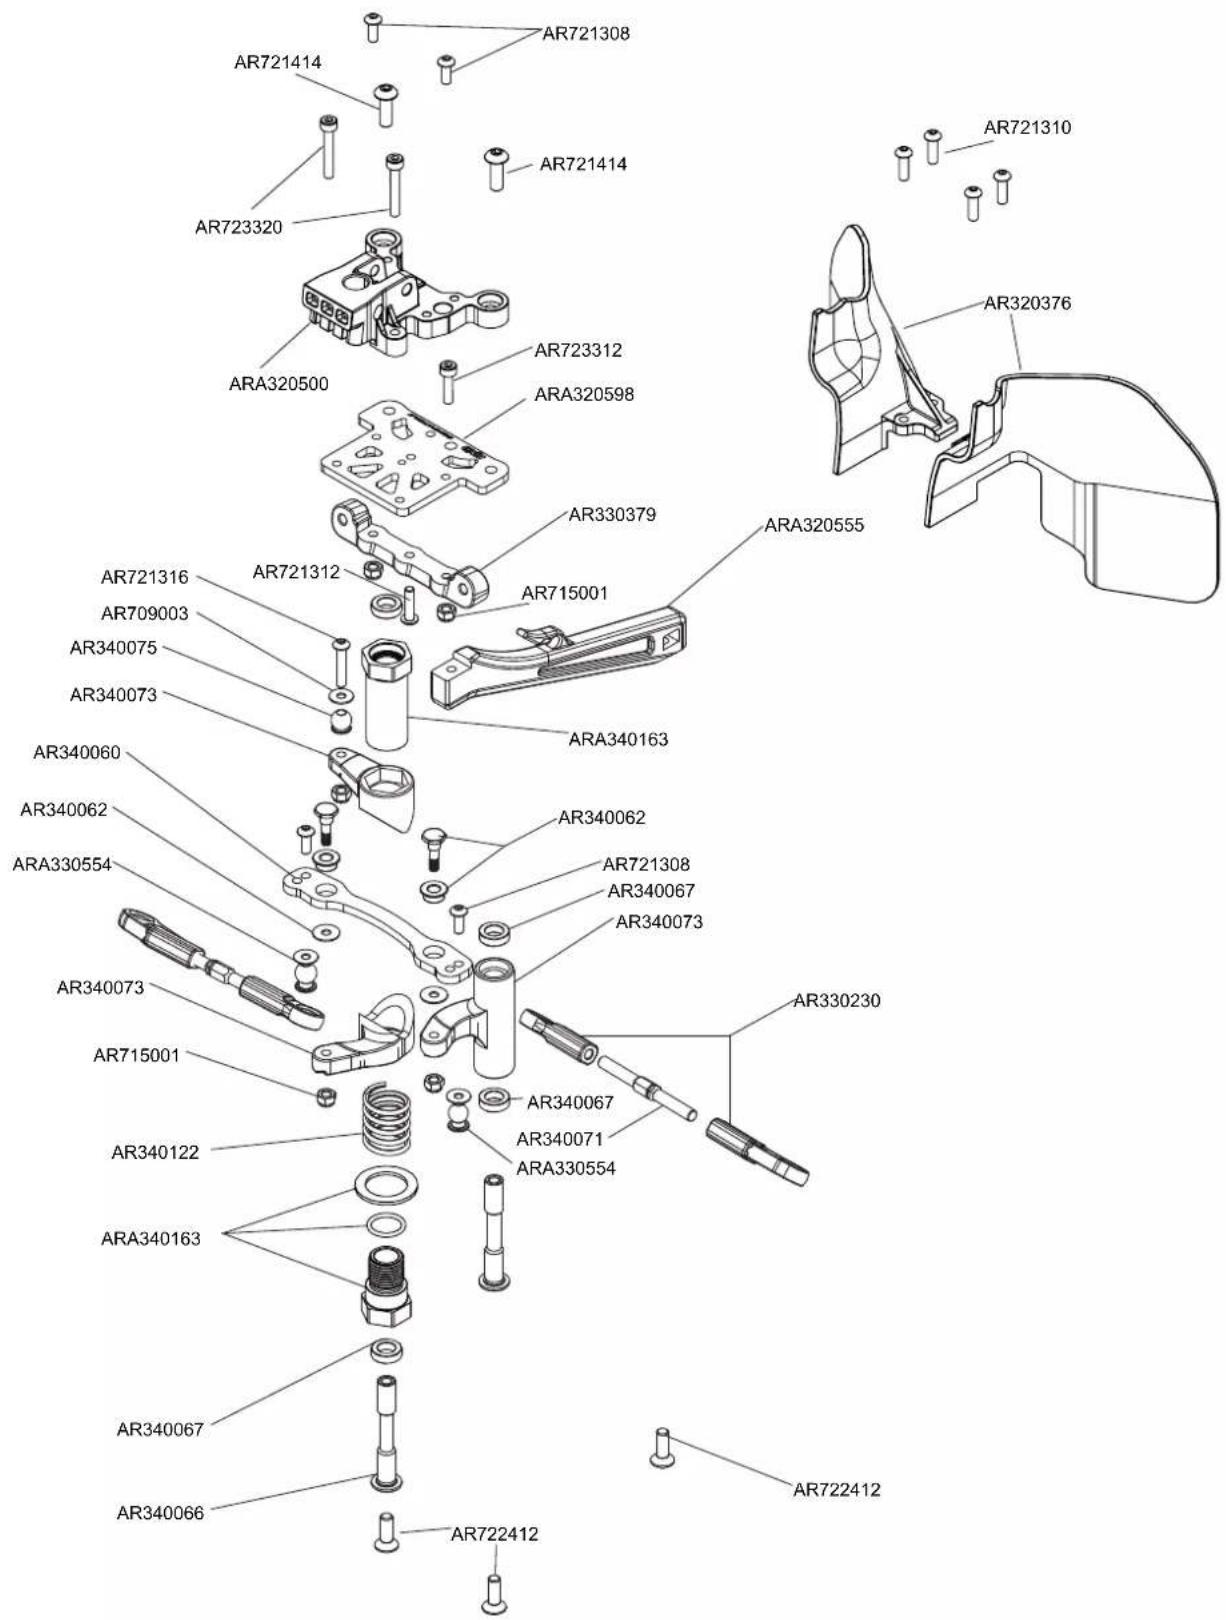
KRATON
Exploded View Explosionszeichnungen Vues Éclatées
Center Centre Center
KRATON
Exploded View Explosionszeichnungen Vues Éclatées
Center Centre Center
NOTORIOUS
Exploded View Explosionszeichnungen Vues Éclatées
Center Centre Center
NOTORIOUS
TYPHON
Rear Hinten Arrière
MOJAVE
Rear Hinten Arrière
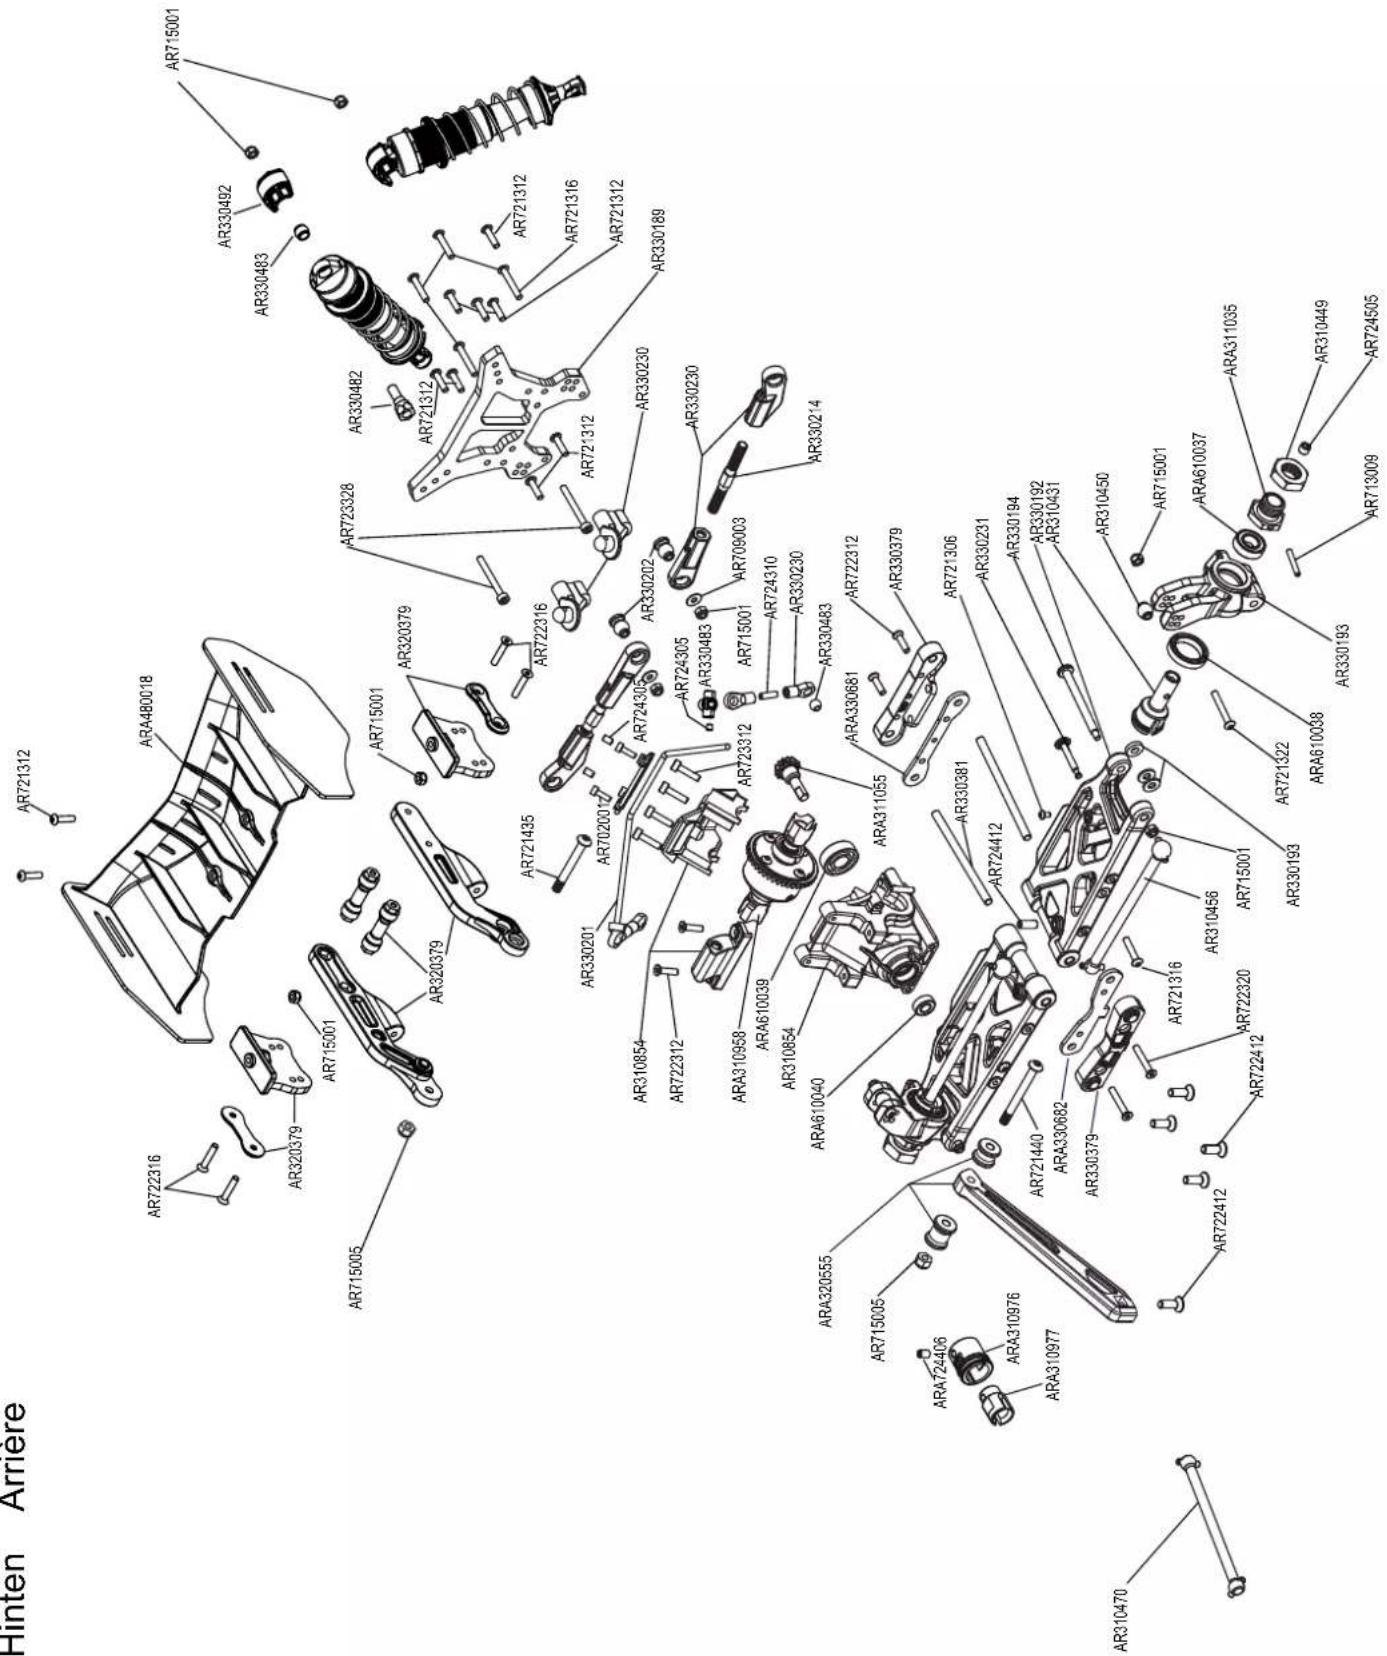
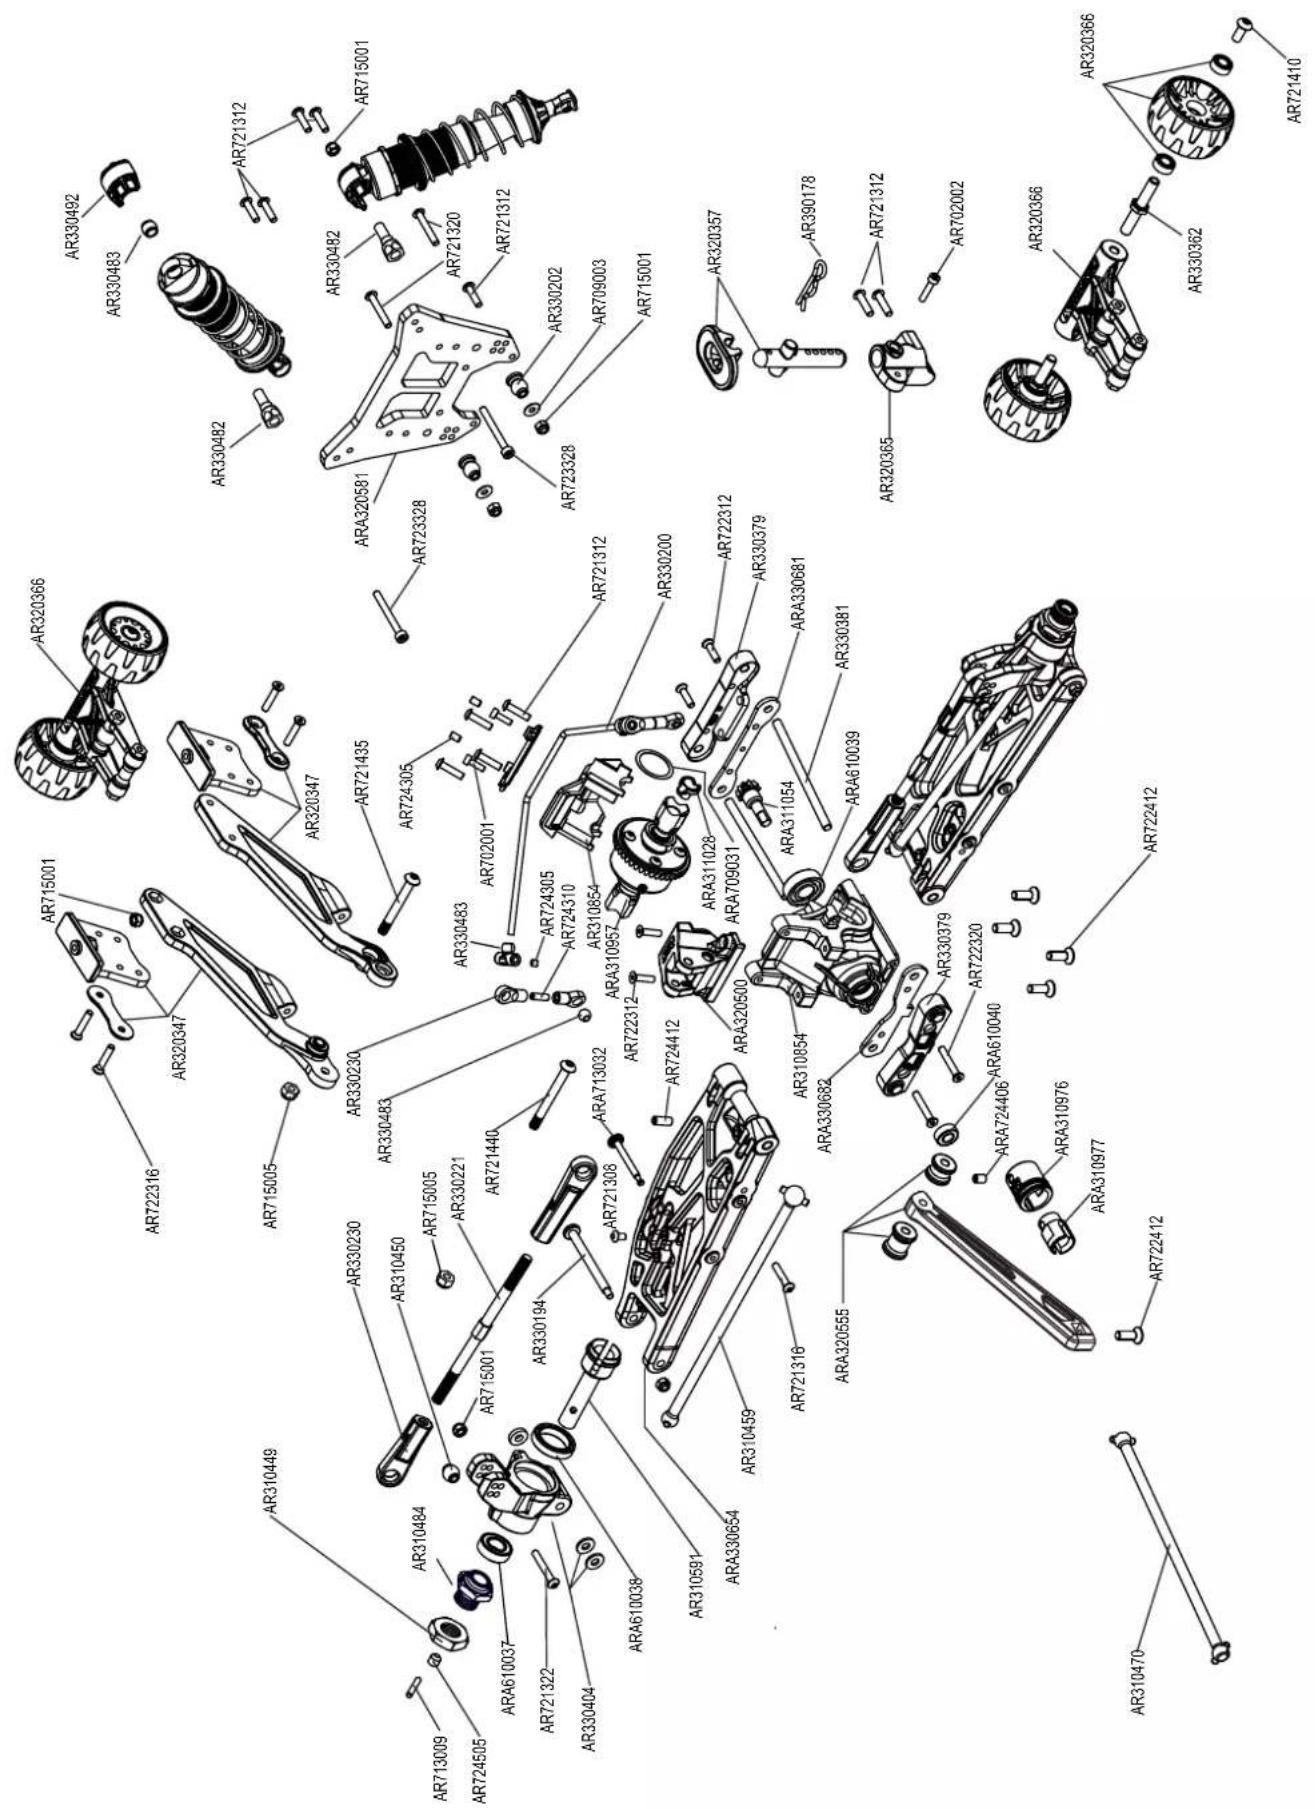
KRATON
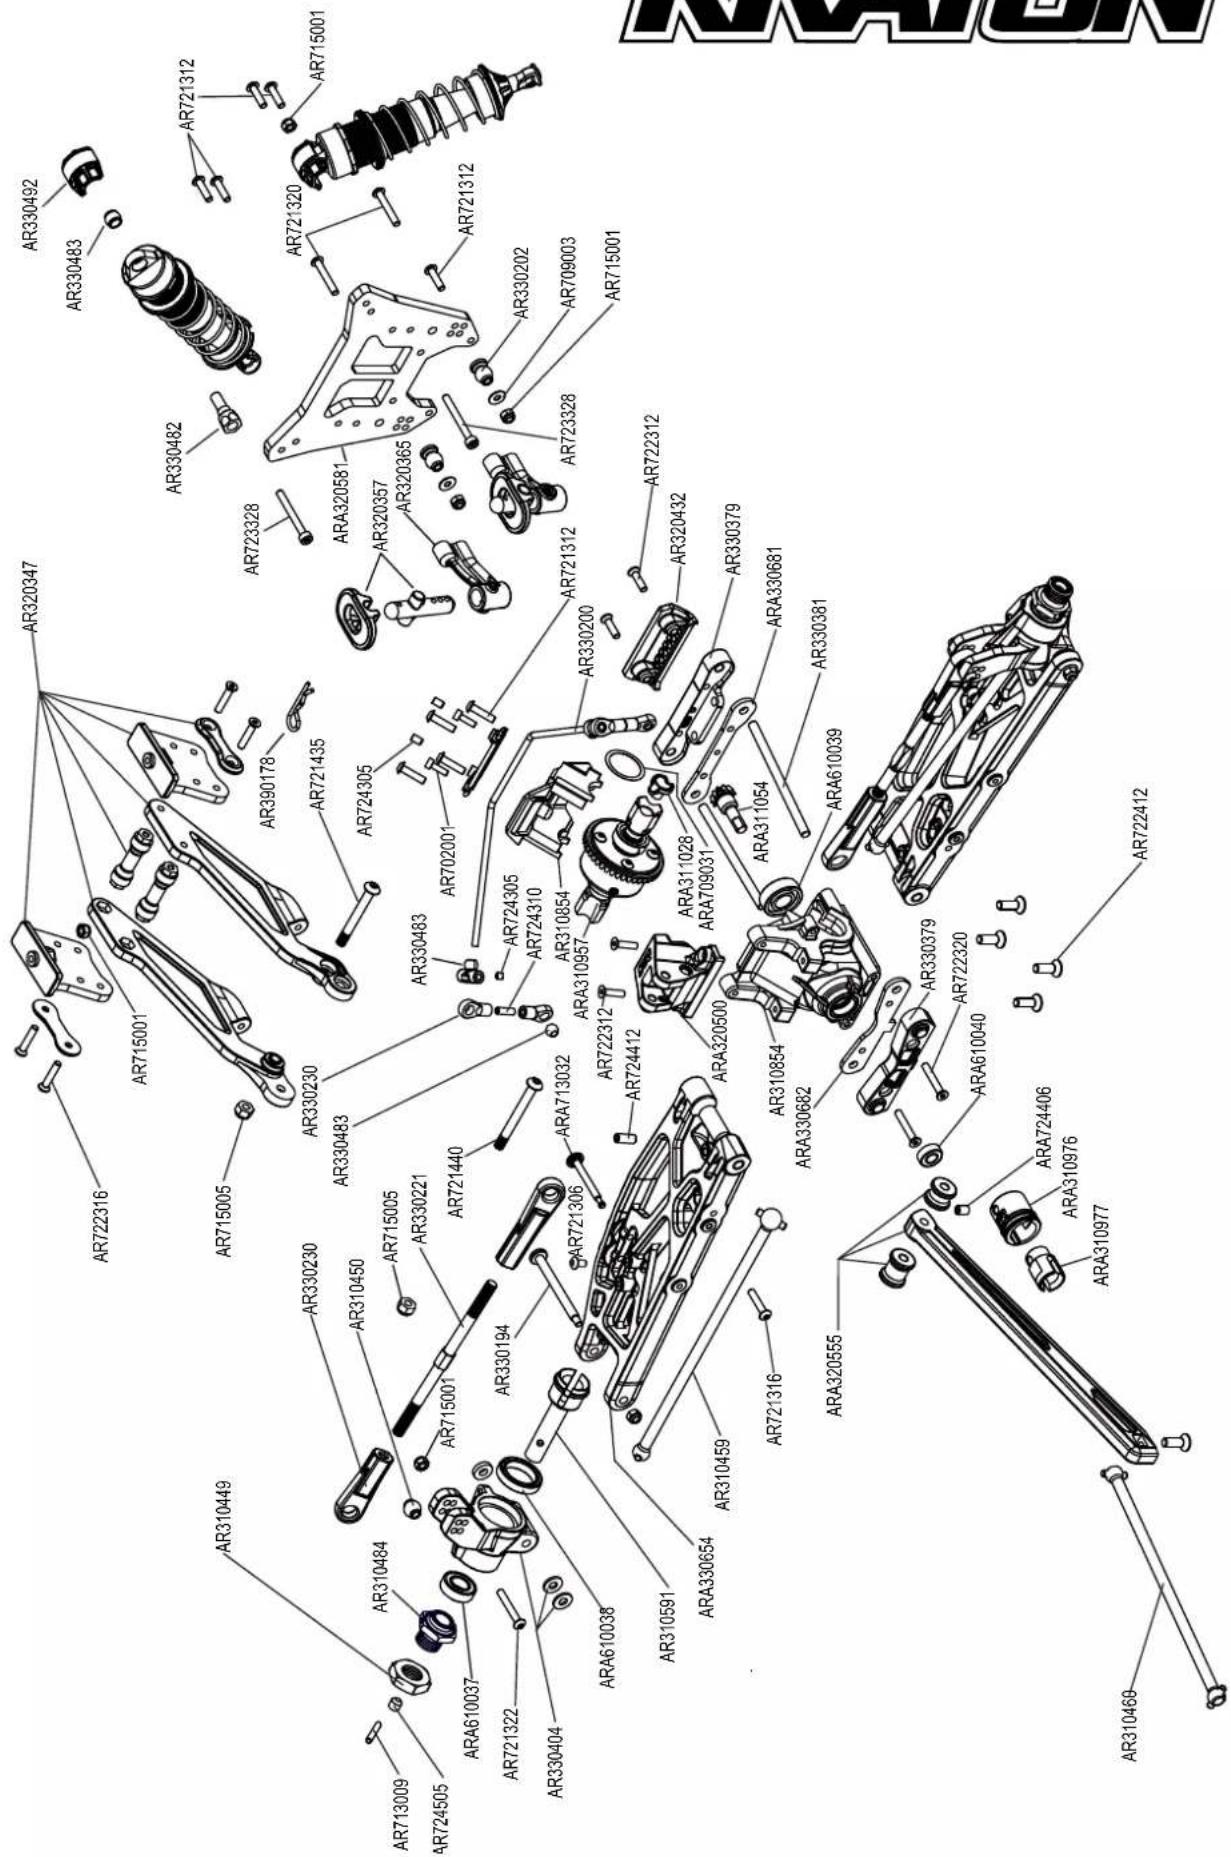
Rear Hinten Arrière
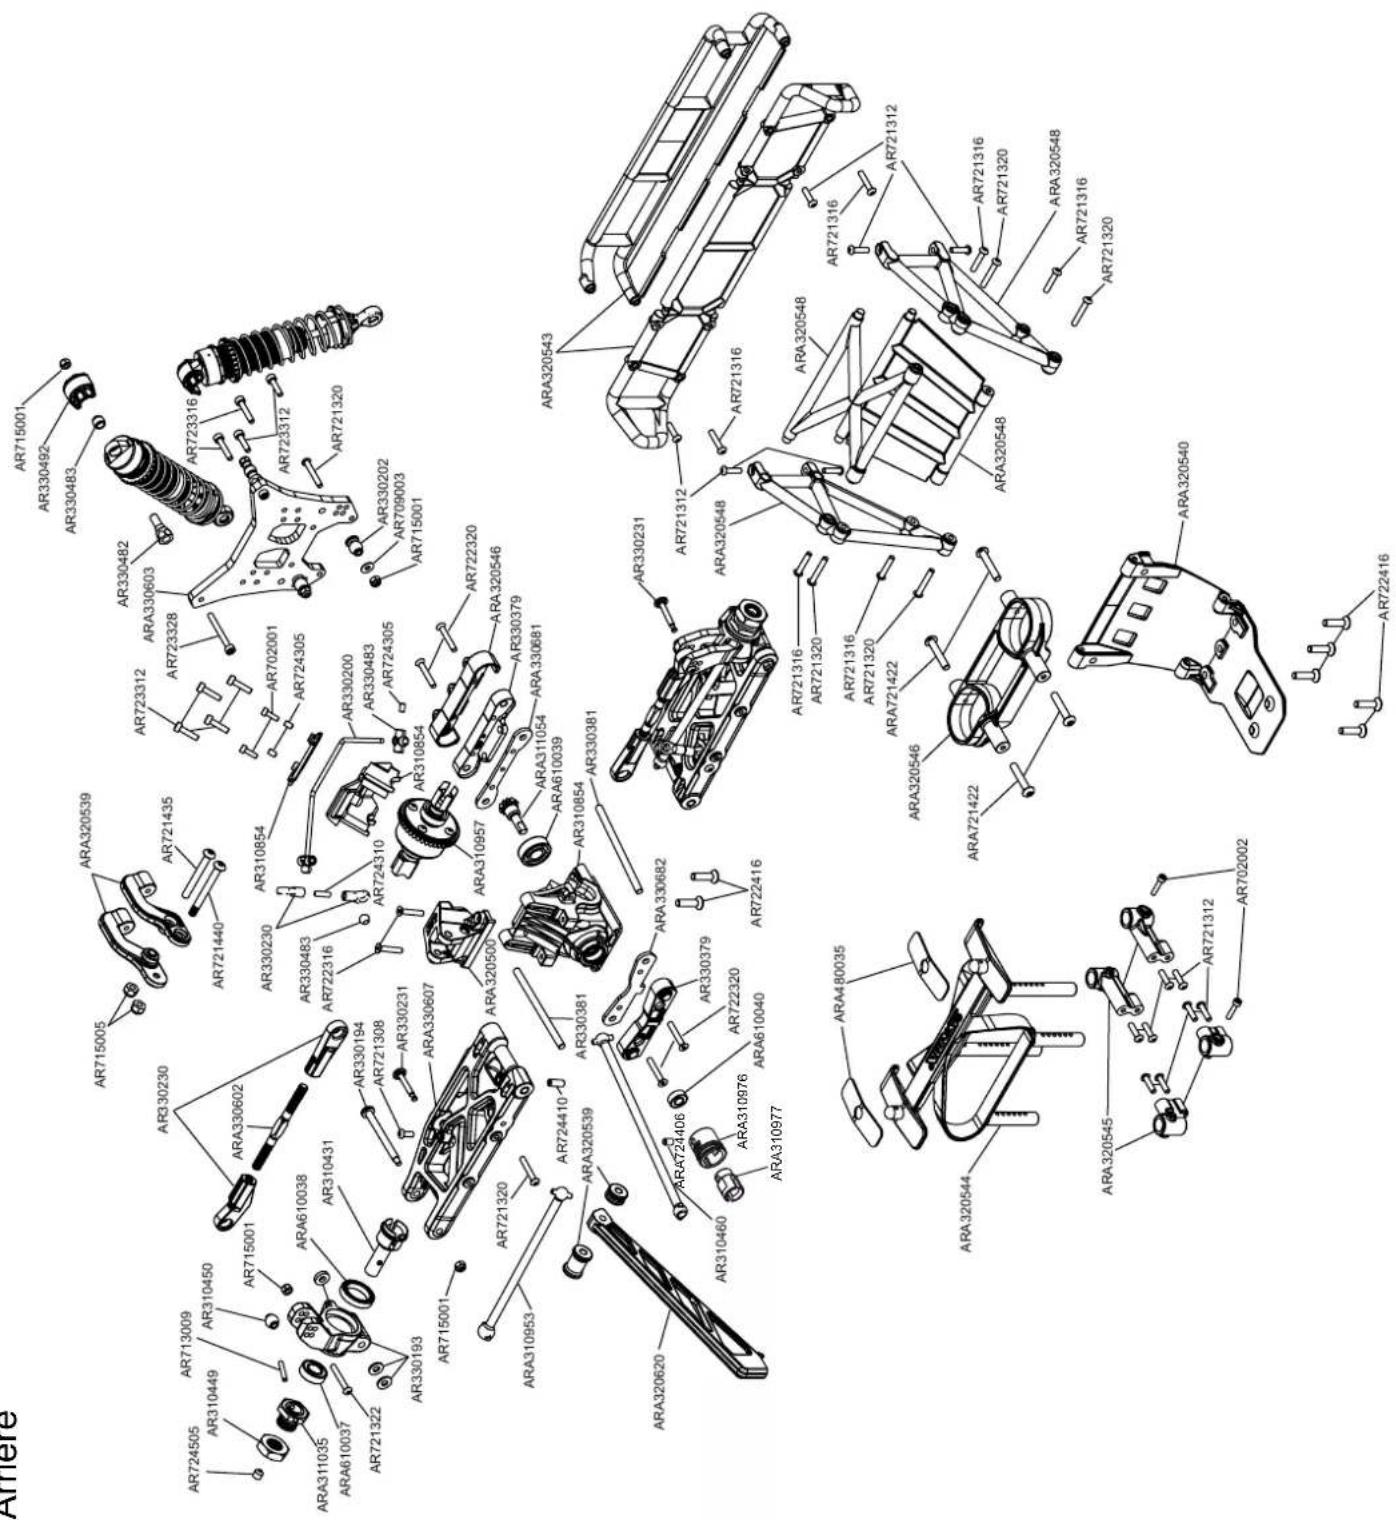
NOTORIOUS
Rear Hinten Arrière
Exploded View Explosionszeichnungen Vues Éclatées
Steering Lenkung Pilotage
TYPHON
Exploded View Explosionszeichnungen Vues Éclatées
Steering Lenkung Pilotage
MOJAVE
Exploded View Explosionszeichnungen Vues Éclatées
Steering Lenkung Pilotage
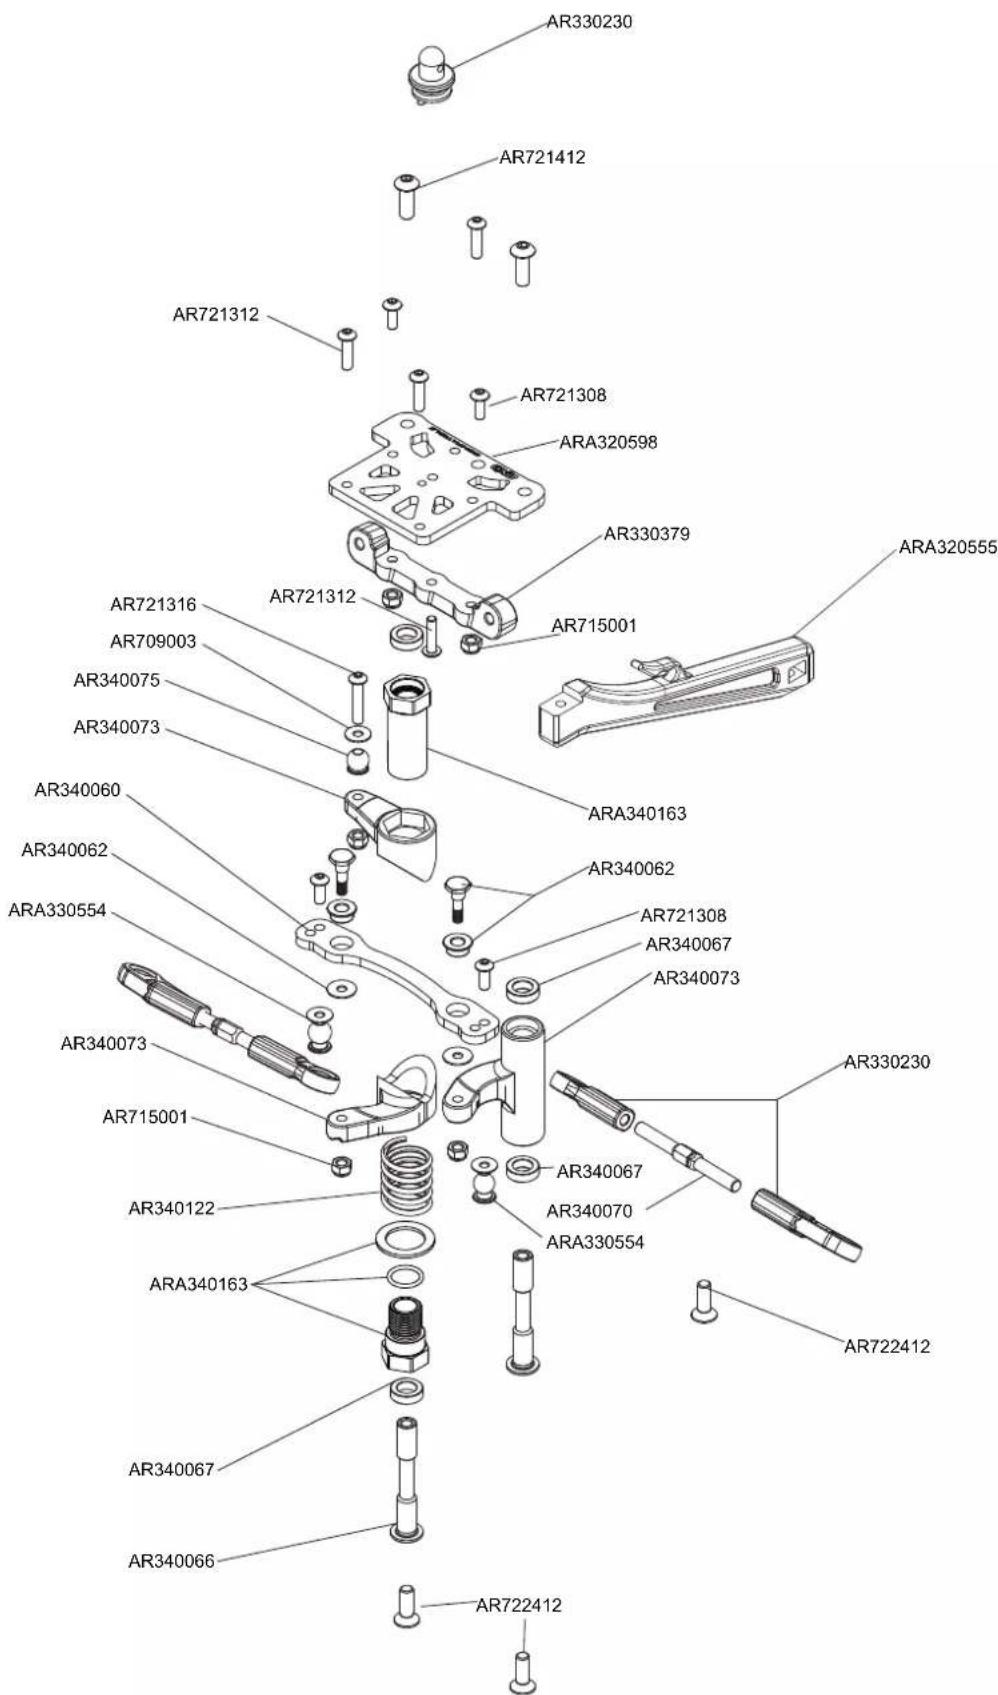
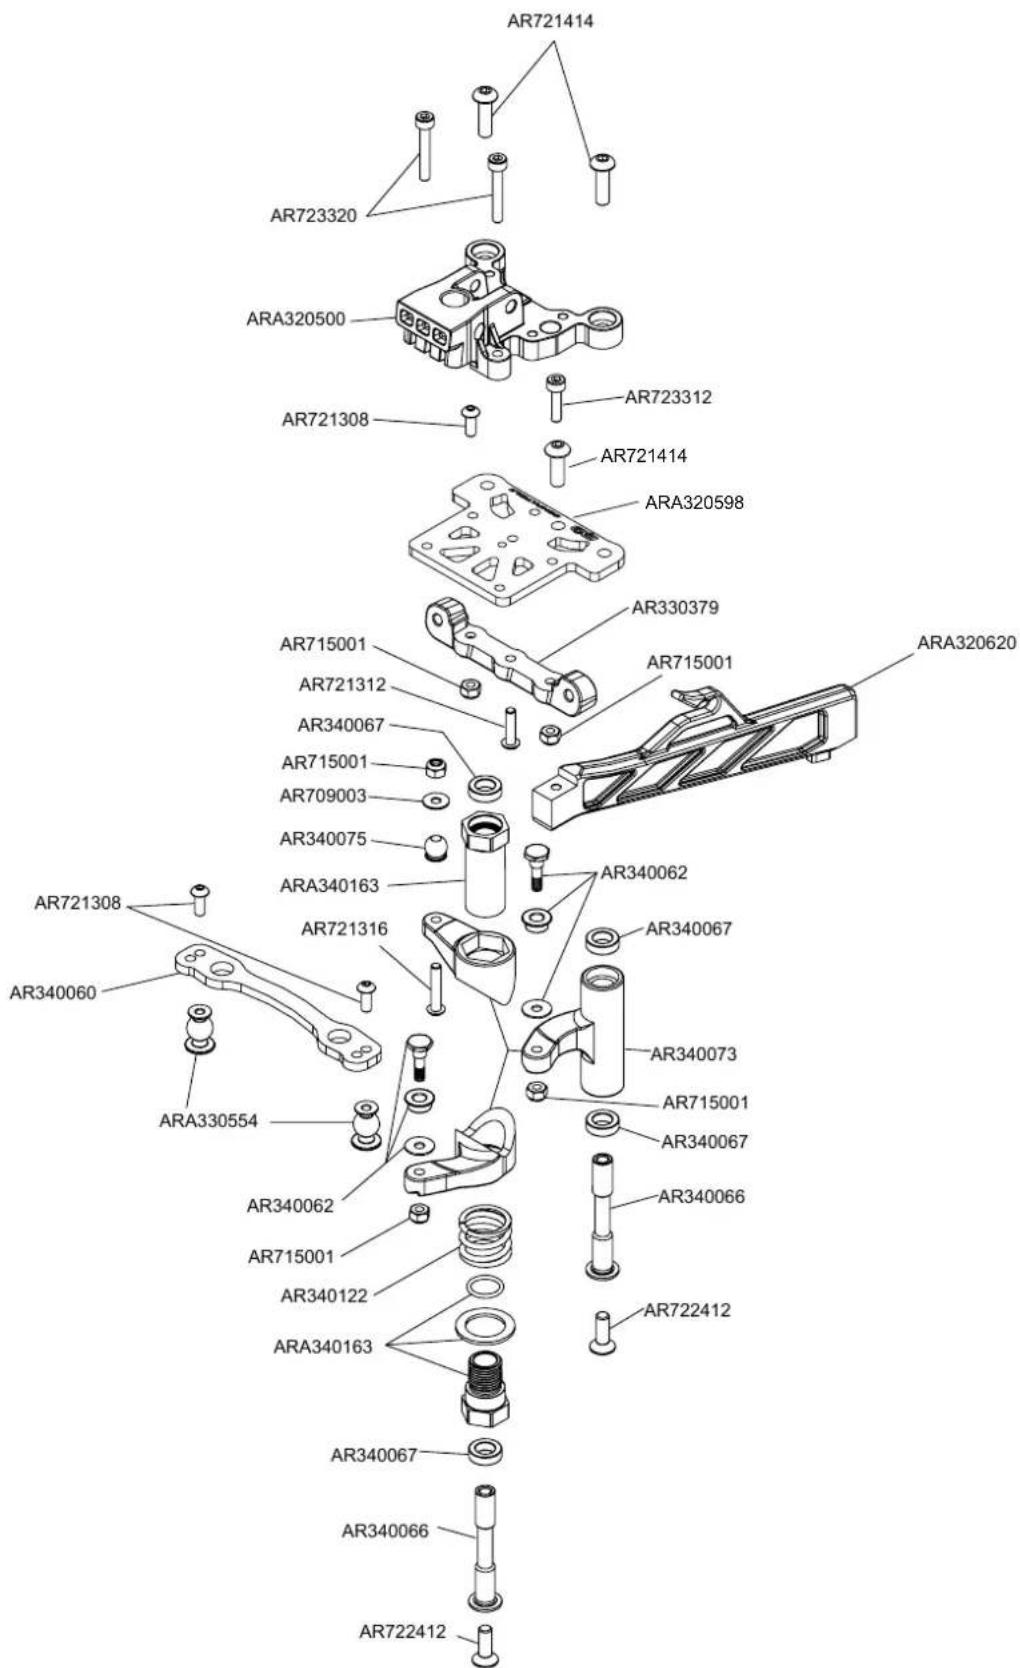
KRATON

Exploded View Explosionszeichnungen Vues Éclatées
Steering Lenkung Pilotage
NOTORIOUS
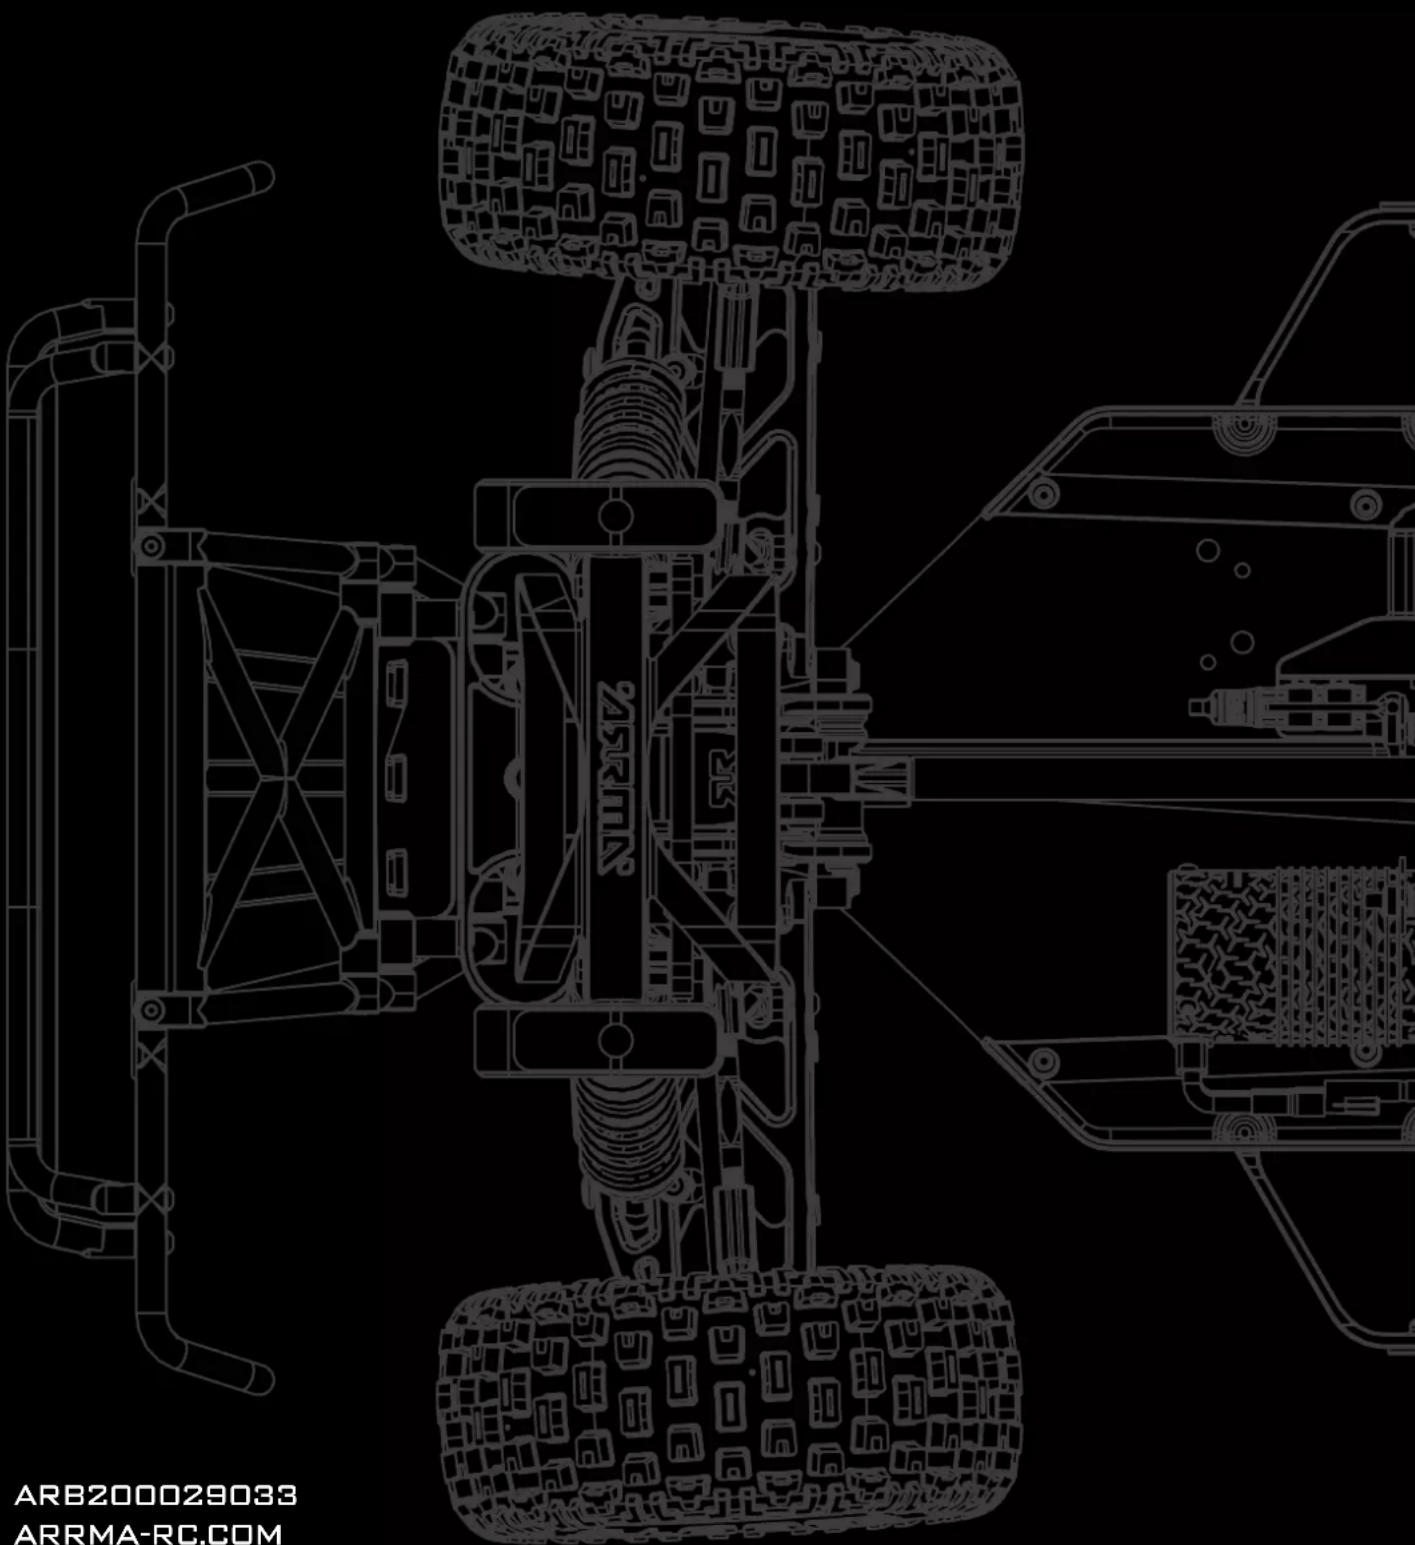
natural_image
Top-down technical line drawing of a vehicle chassis with suspension components (no text or symbols on the diagram itself)ARB200029033
ARRMA-RC.COM
©2020 Horizon Hobby, LLC. ARRMA RC is a trade name of Horizon Hobby Ltd. Horizon Hobby Ltd is a subsidiary of Horizon Hobby, LLC. ARRMA, the ARRMA logo, KRATON, MOJAVE, TYPHON, NOTORIOUS, DSMR, EC5, IC5, dBoots and the Horizon Hobby logo are trademarks or registered trademarks of Horizon Hobby, LLC. The Spektrum trademark is used with permission of Bachmann Industries, Inc. Twitter® logos are trademarks of Twitter, Inc. Facebook® and its logo are trademarks or registered trademarks of Facebook, Inc. The YouTube® logo is a trademark of Google Inc. All other trademarks or registered trademarks are property of their respective owners. US 9,930,567. US 10,419,970. Other patents pending.