TYPHON 4X4 V3 MEGA - Remote control toy ARRMA - Free user manual and instructions
Find the device manual for free TYPHON 4X4 V3 MEGA ARRMA in PDF.

| Product type | Radio-controlled hobby vehicle (scale model) |
| Brand | ARRMA |
| Model | TYPHON 4X4 V3 MEGA |
| Category | Brushed motor 4x4 buggy |
| Motorization | ARRMA Mega 550 12T brushed motor |
| Speed controller (ESC) | ARRMA Mega ESC (waterproof) |
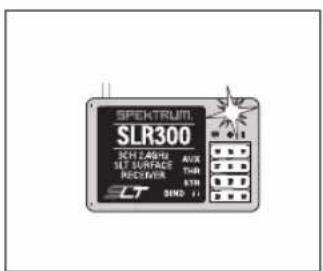
| Receiver | Spektrum SLR300 2.4 GHz |
| Transmitter | Spektrum SLT3 3-channel 2.4 GHz |
| Steering servo | Spektrum S650, 5 kg, plastic, 23T |
| Battery power | 7.2–8.4 V NiMH (6–7 cells) or 7.4 V 2S LiPo |
| ESC input voltage | 6–7 cell NiMH (7.2–8.4 V) / 2S LiPo (7.4 V) |
| BEC output | 6.0 V / 2 A max |
| ESC thermal protection | Yes (cutoff at 80 °C) |
| Configurable battery modes | NiMH or LiPo (via jumper) |
| Reverse | Enable/disable (via jumper) |
| Transmitter speed limiter | Yes (adjustable) |
| Dual rate steering | Yes (adjustable on transmitter) |
| Water resistance | Waterproof electronics; water-resistant body (not fully waterproof) |
| Recommended age | 14 years and up (with adult supervision) |
| Maintenance after wet use | Required: rinsing, drying, lubrication of metal parts |
| Replacement parts and support | Available at ARRMA-RC.com |
| Warranty | Limited (6 months depending on country) |
Frequently Asked Questions - TYPHON 4X4 V3 MEGA ARRMA
Note: Make sure the transmitter is turned on before the receiver.
Important: The trims must be centered.
Note: Do not use a LiPo battery in wet conditions.
Note: Never use a pressure washer.
Tip: Do not touch the motor after use; it may be hot.
Factory setting: Reverse enabled.
Important: Never submerge the electronics in water.
Note: Never leave a battery charging unattended.
User questions about TYPHON 4X4 V3 MEGA ARRMA
0 question about this device. Answer the ones you know or ask your own.
Ask a new question about this device
Download the instructions for your Remote control toy in PDF format for free! Find your manual TYPHON 4X4 V3 MEGA - ARRMA and take your electronic device back in hand. On this page are published all the documents necessary for the use of your device. TYPHON 4X4 V3 MEGA by ARRMA.
USER MANUAL TYPHON 4X4 V3 MEGA ARRMA
All instructions, warranties and other collateral documents are subject to change at the sole discretion of Horizon Hobby, LLC. For up-to-date product literature, visit www.horizonhobby.com or www.towerhobbies.com and click on the support or resources tab for this product.
MEANING OF SPECIAL LANGUAGE
The following terms are used throughout the product literature to indicate various levels of potential harm when operating this product:
WARNING: Procedures, which if not properly followed, create the probability of property damage, collateral damage, and serious injury OR create a high probability of superficial injury.
CAUTION: Procedures, which if not properly followed, create the probability of physical property damage AND a possibility of serious injury.
NOTICE: Procedures, which if not properly followed, create a possibility of physical property damage AND little or no possibility of injury.

WARNING: Read the ENTIRE instruction manual to become familiar with the features of the product before operating. Failure to operate the product correctly can result in damage to the product, personal property and cause serious injury.
This is a sophisticated hobby product and NOT a toy. It must be operated with caution and common sense and requires some basic mechanical ability. Failure to operate this product in a safe and responsible manner could result in injury or damage to the product or other property. This product is not intended for use by children without direct adult supervision. Do not use with incompatible components or alter this product in any way outside of the instructions provided by Horizon Hobby, LLC. This manual contains instructions for safety, operation and maintenance. It is essential to read and follow all the instructions and warnings in the manual, prior to assembly, setup or use, in order to operate correctly and avoid damage or serious injury.
Age Recommendation: Not for children under 14 years. This is not a toy.
SAFETY PRECAUTIONS AND WARNINGS
As the user of this product, you are solely responsible for operating in a manner that does not endanger yourself and others or result in damage to the product or property of others.
This model is controlled by a radio signal subject to interference from many sources outside your control. This interference can cause momentary loss of control, so it is advisable to always keep a safe distance in all directions around your model as this margin will help avoid collisions or injury.
- Never operate your model with low transmitter batteries.
• Always operate your model in open spaces away from full-size vehicles, traffic and people. - Never operate the model in the street or in populated areas for any reason.
- Carefully follow the directions and warnings for this and any optional support equipment (chargers, rechargeable battery packs, etc.) you use.
- Keep all chemicals, small parts and anything electrical out of the reach of children. Never lick or place any portion of the model in your mouth as it could cause serious injury or even death.
• Exercise caution when using tools and sharp instruments.
• Take care during maintenance as some parts may have sharp edges.
- Immediately after using your model, do NOT touch equipment such as the motor, electronic speed control and battery, because they generate high temperatures. You may burn yourself seriously touching them.
- Do not put fingers or any objects inside rotating and moving parts, as this may cause damage or serious injury.
• Always turn on your transmitter before you turn on the receiver in the car. Always turn off the receiver before turning your transmitter off.
- Keep the wheels of the model off the ground when checking the operation of the radio equipment.

WARNING AGAINST COUNTERFEIT PRODUCTS: Always purchase from a Horizon Hobby, LLC authorized dealer to ensure authentic high-quality Spektrum product. Horizon Hobby, LLC disclaims all support and warranty with regards, but not limited to, compatibility and performance of counterfeit products or products claiming compatibility with DSM or Spektrum technology.
WATER-RESISTANT VEHICLE WITH WATERPROOF ELECTRONICS
Your new Horizon Hobby vehicle has been designed and built with a combination of
waterproof and water-resistant components to allow you to operate the product in many "wet conditions," including puddles, creeks, wet grass, snow and even rain.
While the entire vehicle is highly water-resistant, it is not completely waterproof and your vehicle should NOT be treated like a submarine. The various electronic components used in the vehicle, such as the Electronic Speed Control (ESC), servo(s) and receiver are waterproof, however, most of the mechanical components are water-resistant and should not be submerged.
Metal parts, including the bearings, hinge pins, screws and nuts, as well as the contacts in the electrical cables, will be susceptible to corrosion if additional maintenance is not performed after running in wet conditions. To maximize the long-term performance of your vehicle and to keep the warranty intact, the procedures described in the "Wet Conditions Maintenance" section below must be performed regularly if you choose to run in wet conditions. If you are not willing to perform the additional care and maintenance required, then you should not operate the vehicle in those conditions.

CAUTION: Failure to exercise caution while using this product and complying with the following precautions could result in product malfunction and/or void the warranty.
General Precautions
- Read through the wet conditions maintenance procedures and make sure that you have all the tools you will need to properly maintain your vehicle.
- Not all batteries can be used in wet conditions. Consult the battery manufacturer before use. Caution should be taken when using Li-Po batteries in wet conditions.
- Most transmitters are not water-resistant. Consult your transmitter's manual or the manufacturer before operation.
- Never operate your transmitter or vehicle where lightning may be present.
- Do not operate your vehicle where it could come in
contact with salt water (ocean water or water on salt-covered roads), contaminated or polluted water. Salt water is very conductive and highly corrosive, so use caution.
- Even minimal water contact can reduce the life of your motor if it has not been certified as water-resistant or waterproof. If the motor becomes excessively wet, apply very light throttle until the water is mostly removed from the motor. Running a wet motor at high speeds may rapidly damage the motor.
- Driving in wet conditions can reduce the life of the motor. The additional resistance of operating in water causes excess strain. Alter the gear ratio by using a smaller pinion or larger spur gear. This will increase torque (and motor life) when running in mud, deeper puddles, or any wet conditions that will increase the load on the motor for an extended period of time.
Wet Conditions Maintenance
- Remove the battery pack(s) and dry the contacts. If you have an air compressor or a can of compressed air, blow out any water that may be inside the recessed connector housing.
- Remove the tires/wheels from the vehicle and gently rinse the mud and dirt off with a garden hose. Avoid rinsing the bearings and transmission.
NOTICE: Never use a pressure washer to clean your vehicle.
- Use an air compressor or a can of compressed air to dry the vehicle and help remove any water that may have gotten into small crevices or corners.
- Spray the bearings, drive train, fasteners and other metal parts with a water-displacing light oil or lubricant. Do not spray the motor.
- Let the vehicle air dry before you store it. Water (and oil) may continue to drip for a few hours.
-
Increase the frequency of disassembly, inspection and lubrication of the following:
-
Front and rear axle hub assembly bearings.
- All transmission cases, gears and differentials.
- Motor—clean with an aerosol motor cleaner and re-oil the bushings with lightweight motor oil.
- Drain any water that has collected in the tires by spinning them at high speed. With the body removed, place the vehicle upside down and pull full throttle for a few short bursts until the water has been removed.
NOTICE: This appliance is not intended for use by persons with reduced physical, sensory or mental capabilities, or lack of experience and knowledge, unless they have been given supervision or instruction concerning use of the appliance by a person responsible for their safety.
BATTERY CHARGER SAFETY PRECAUTIONS AND WARNINGS

DANGER: To reduce the risk of fire or electric shock, carefully follow these instructions.

WARNING: Before charging, read the instructions. Failure to follow all instructions many result in excessive heat, FIRE, and ultimately injury and damage.
- For indoor use, do not expose to rain.
- Never leave charging batteries unattended. Disconnect charger if batteries become hot or puff.
- Never charge batteries overnight.
- Never leave batteries near fire, water, or in extreme temperatures.
- Never impact or alter the batteries.
- Never leave the charger and battery unattended during use.
- Never attempt to charge dead, damaged or wet battery packs.
- Never attempt to charge a battery pack containing different types of batteries.
- Never allow children under 14 years of age to charge battery packs.
- Never charge batteries in extremely hot or cold places or place in direct sunlight.
- Never charge a battery if the cable has been pinched or shorted.
- Never connect the charger if the power cable has been pinched or shorted.
- Never attempt to dismantle the charger or use a damaged charger.
- Never attach your charger to both an AC and a DC power source at the same time.
- Never connect the input jack (DC input) to AC power.
• Always use only rechargeable batteries designed for use with this type of charger in the correct programming mode.
• Always inspect the battery before charging.
• Always keep the battery away from any material that could be affected by heat.
• Always monitor the charging area and have a fire extinguisher available at all times.
• Always end the charging process if the battery becomes hot to the touch or starts to change form (swell) during the charge process.
• Always connect the charge cable to the charger first, then connect the battery to avoid short circuit between the charge leads. Reverse the sequence when disconnecting. - Always connect the positive red leads (+) and negative black leads (−) correctly.
• Always disconnect the battery after charging, and let the charger cool between charges.
• Always charge in a well-ventilated area.
• Always terminate all processes and contact Horizon Hobby if the product malfunctions.
- Charge only rechargeable batteries. Charging non-rechargeable batteries may cause the batteries to burst, resulting in injury to persons and/or damage to property.
- The socket-outlet shall be installed near the equipment and shall be easily accessible.

WARNING: Never leave charger unattended, exceed maximum charge rate, charge with non-approved batteries or charge batteries in the wrong
mode.Failure to comply may result in excessive heat, fire and serious injury.
CAUTION: Use only with compatible batteries in the correct program mode. Not doing so can result in excessive heat and other related product malfunctions, which can lead to user injury or property damage. Please contact Horizon Hobby or an authorized retailer with compatibility questions.

WARNUNG
HINWEIS
At ARRMA we want you to love running your kit and make owning a high performance RC car as simple as possible. If you have any questions about running, maintaining, tuning or repairing your ARRMA product there are two options for you to use to get help and advice. Visit ARRMA-RC.com for support, parts and upgrades for your kit. If you can't find what you're looking for then you can always email us at supportUSA@ARRMA-RC (USA) or support@ARRMA-RC.com (ROW) 24hrs a day and we will do our best to help you with your query.

Hilfestellung
| Quick Start Guide | 13 |
| How to Drive 16 | |
| Electronic Speed Controller (ESC) 19 | |
| Radio Gear 21 | |
| Troubleshooting 24 | |
| Warranty Information 52 |

INHALT
natural_image
Top-down view of a Honda utility vehicle with visible tire tracks and warning symbols (no text or labels)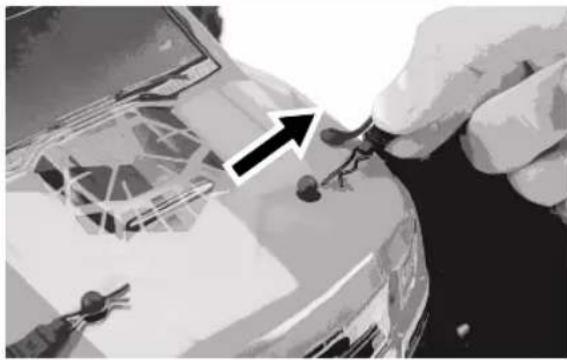
natural_image
Close-up of hands installing or adjusting a car's panel with tools, no visible text or symbols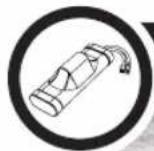
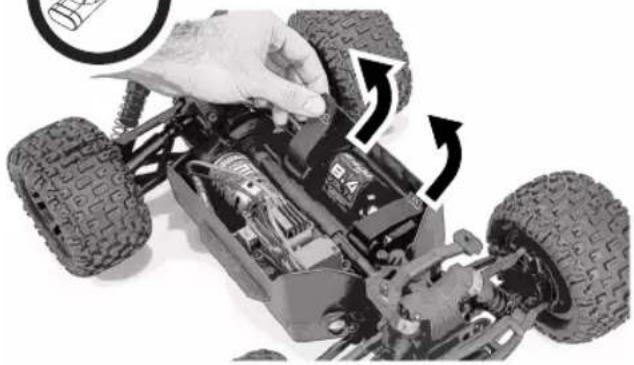
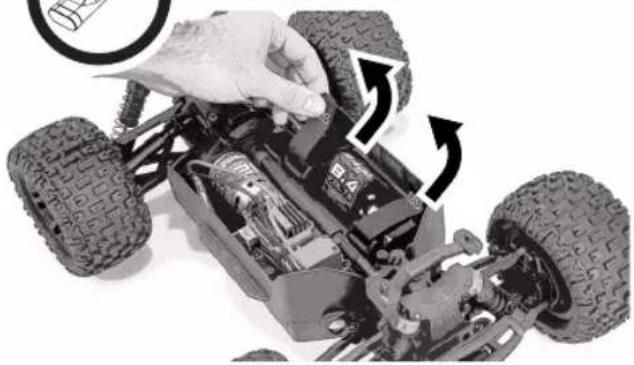
REMOVE CAR BATTERIES
natural_image
Close-up of a toy car's internal components with visible tire tracks and wiring, showing no text or symbols.
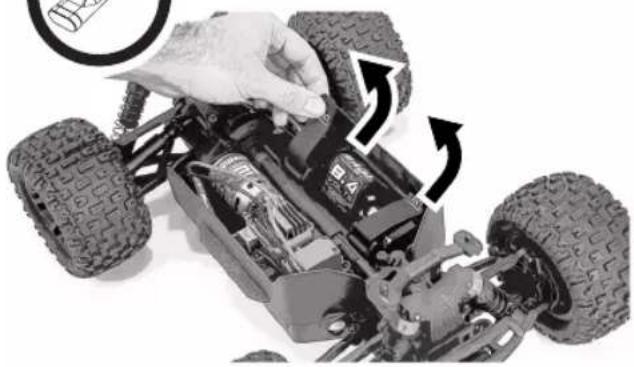
natural_image
Close-up of a toy car's internal components, showing tire tracks and suspension parts (no text or symbols visible)
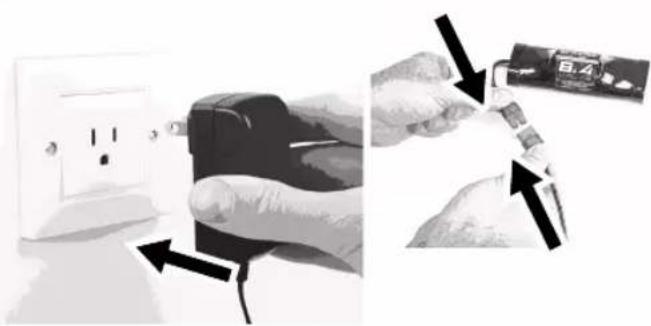
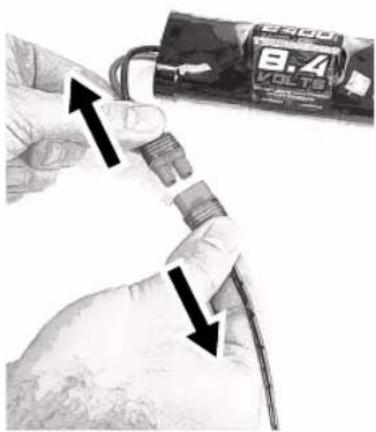
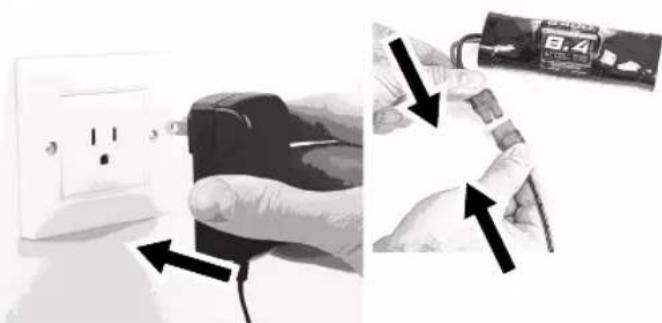
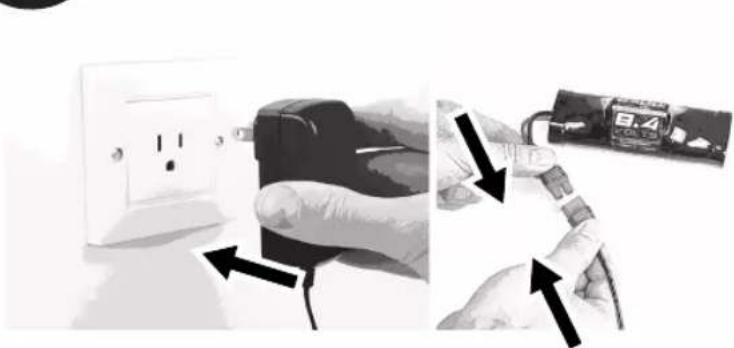
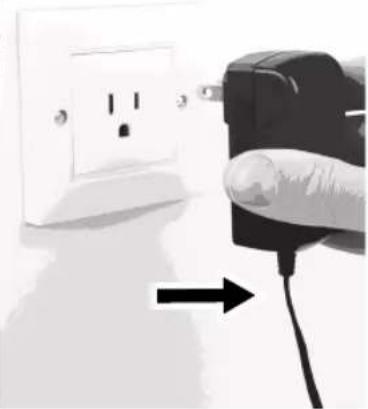
CHARGE CAR BATTERIES
natural_image
Close-up of hands installing a black electrical socket with a 6.4-pin card (no text or symbols visible)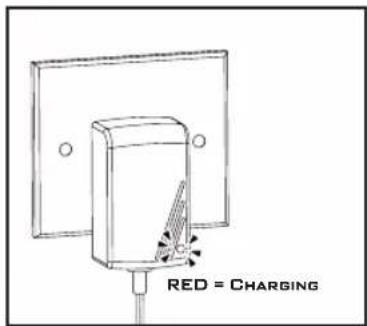
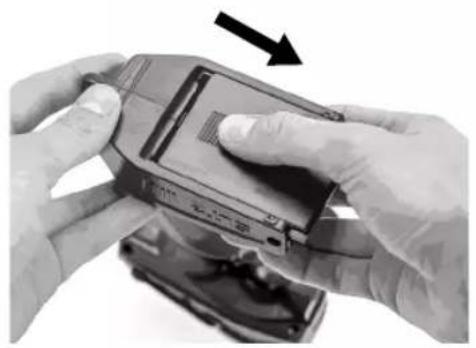
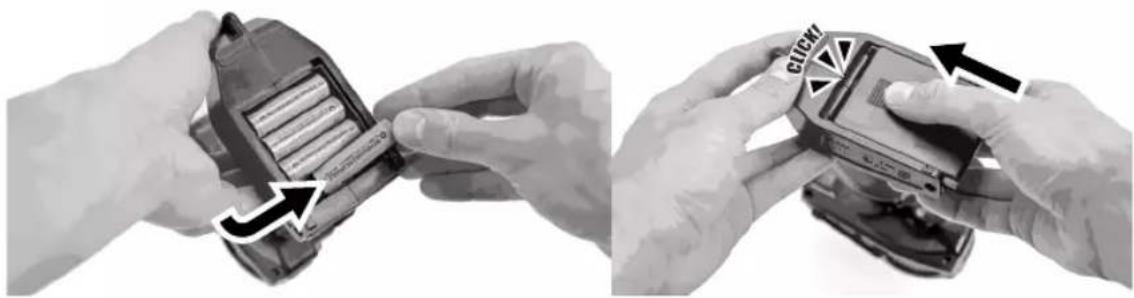
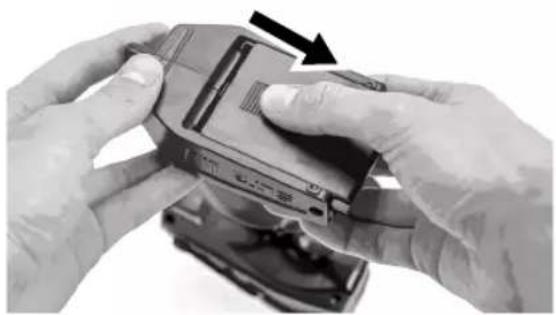
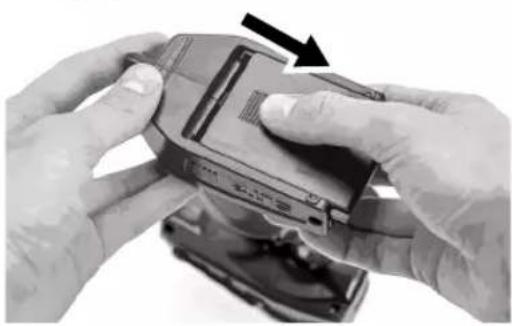
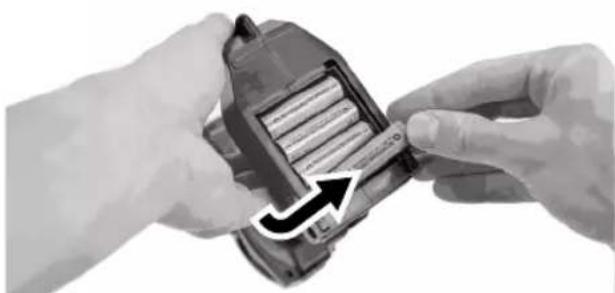
INSTALL AA BATTERIES IN CONTROLLER
natural_image
Close-up of hands holding a handheld electronic device with a black arrow pointing to the screen (no visible text or symbols)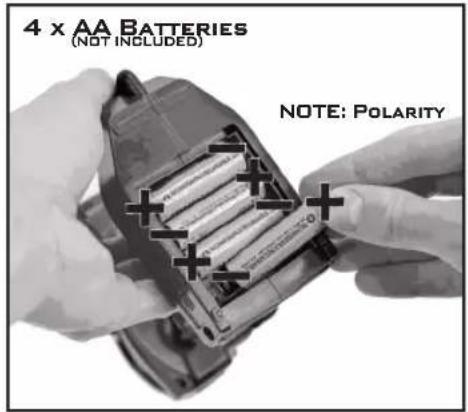
natural_image
Two-panel black-and-white photo showing hands assembling a battery pack and a handheld device with a scroll wheel (no visible text or symbols)
CAUTION: Only charge rechargeable batteries. Charging non-rechargeable batteries may cause the batteries to burst, resulting in injury to persons and/or damage to property.

CAUTION: Risk of explosion if battery is replaced by an incorrect type. Dispose of used batteries according to national regulations.
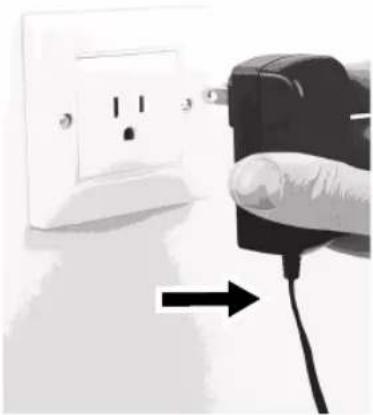
FULLY CHARGED BATTERIES

natural_image
Hand holding a black plug inserted into an open electrical outlet, with an arrow indicating direction (no text or symbols visible)
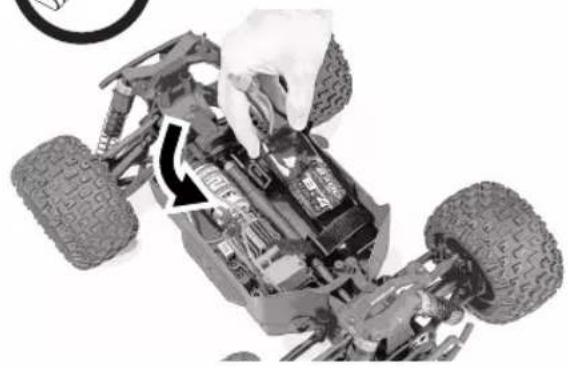
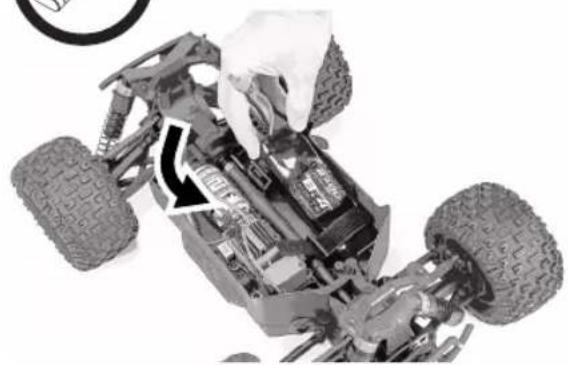
INSTALL CHARGED BATTERIES IN CAR
natural_image
Close-up of a mechanical assembly showing a hand adjusting the chassis with visible tire and battery (no text or symbols)
natural_image
Close-up of a hand adjusting a toy car chassis with visible tire tracks and mechanical components (no text or symbols)
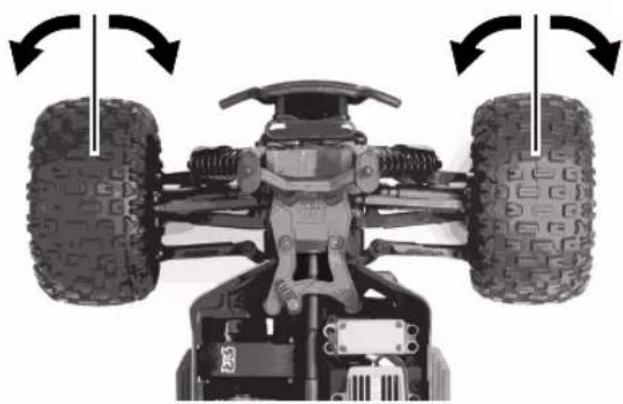
STEERING NEUTRAL
natural_image
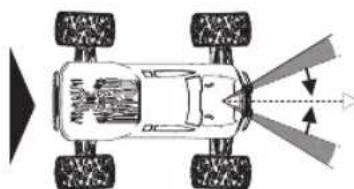
Top-down view of a toy car showing front and rear tires with directional arrows indicating rotation (no text or symbols)
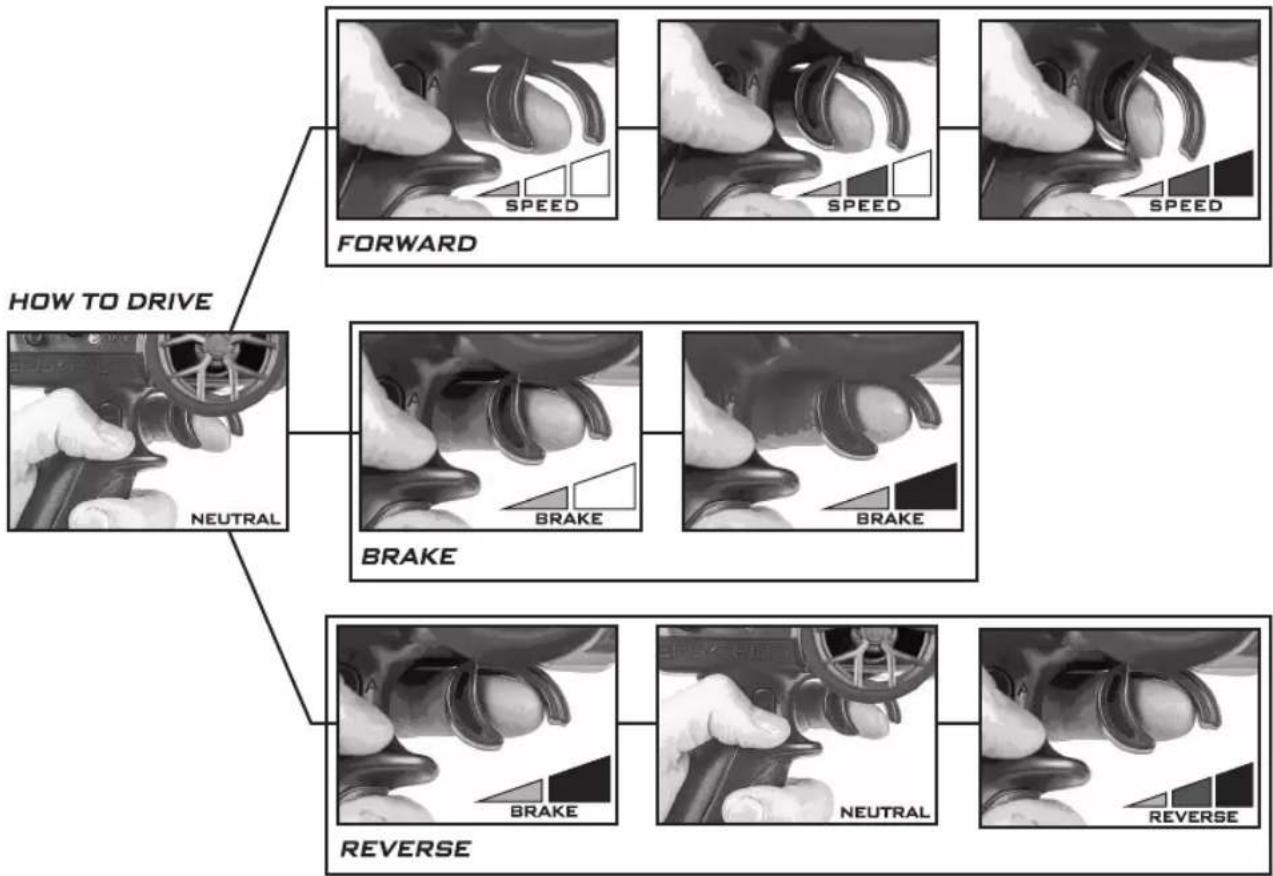
How to Drive

flowchart
graph TD
    A["HOW TO DRIVE"] --> B["NEUTRAL"]
    B --> C["FORWARD"]
    C --> D["SPEED"]
    C --> E["SPEED"]
    C --> F["SPEED"]
    B --> G["BRAKE"]
    G --> H["BRAKE"]
    G --> I["BRAKE"]
    B --> J["REVERSE"]
    J --> K["BRAKE"]
    J --> L["NEUTRAL"]
    J --> M["REVERSE"]

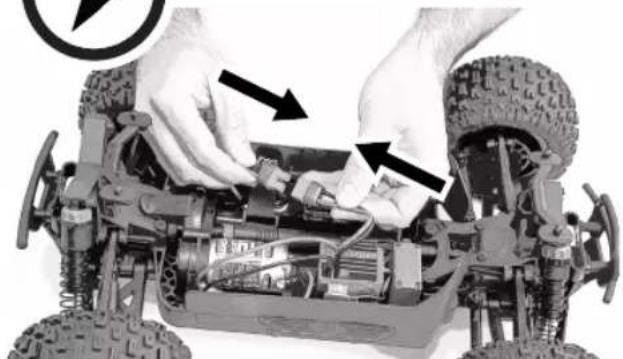
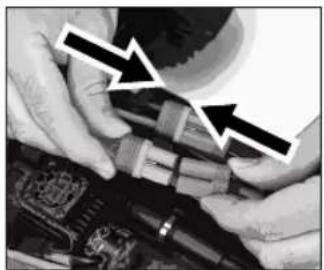
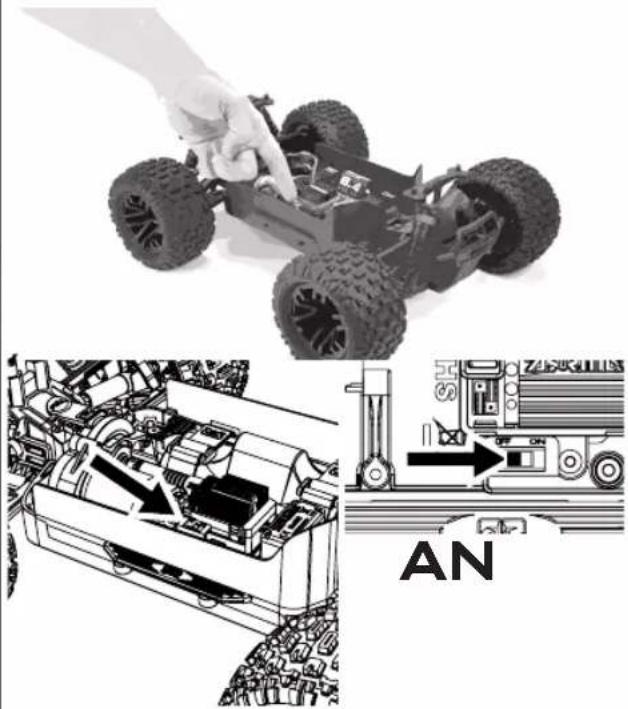
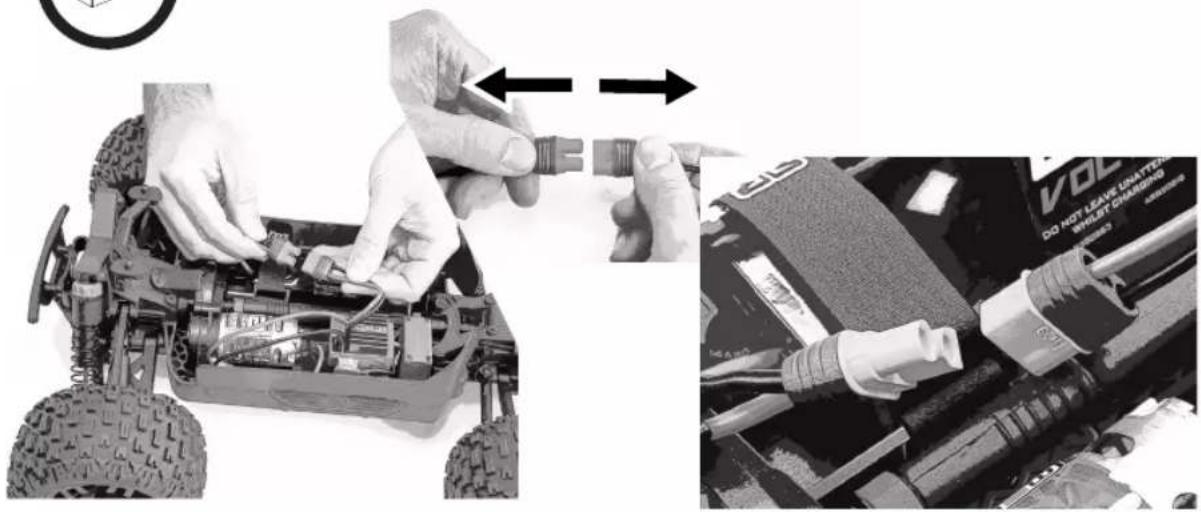
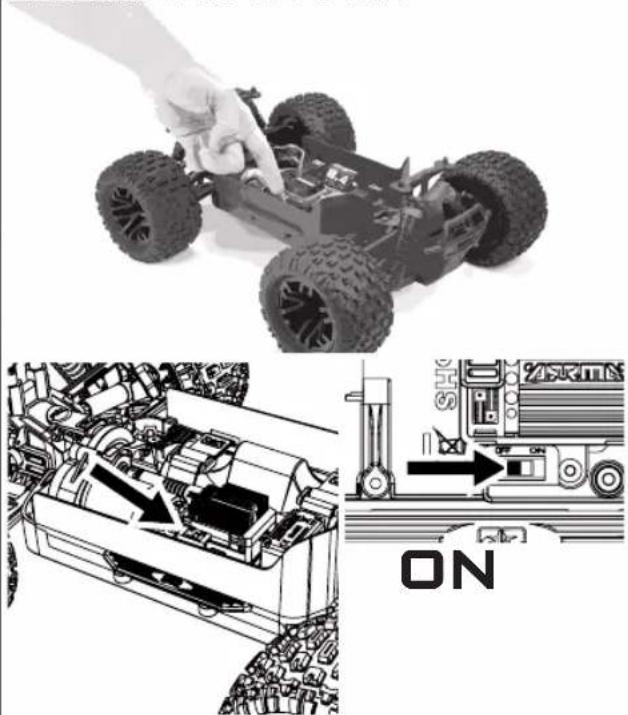
CONNECT ESC AND POWER ON
natural_image
Close-up of hands installing or adjusting a mechanical component on a toy car chassis (no visible text or symbols)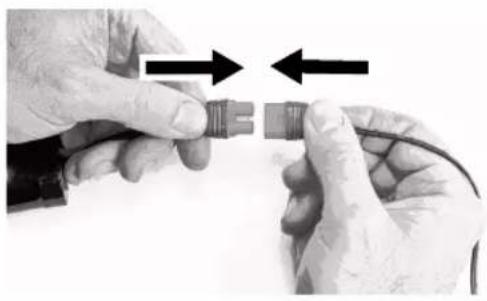
natural_image
Close-up of hands holding a small connector with two arrows indicating direction (no text or symbols visible)CONTROLLER ON FIRST CAR ON SECOND
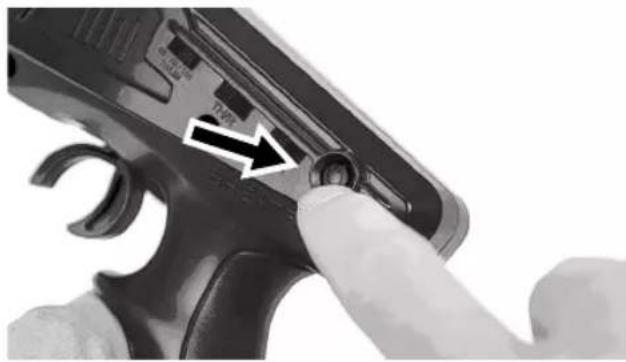
natural_image
Close-up of a hand inserting a handgun into a grip, with an arrow indicating the grip area (no text or symbols visible)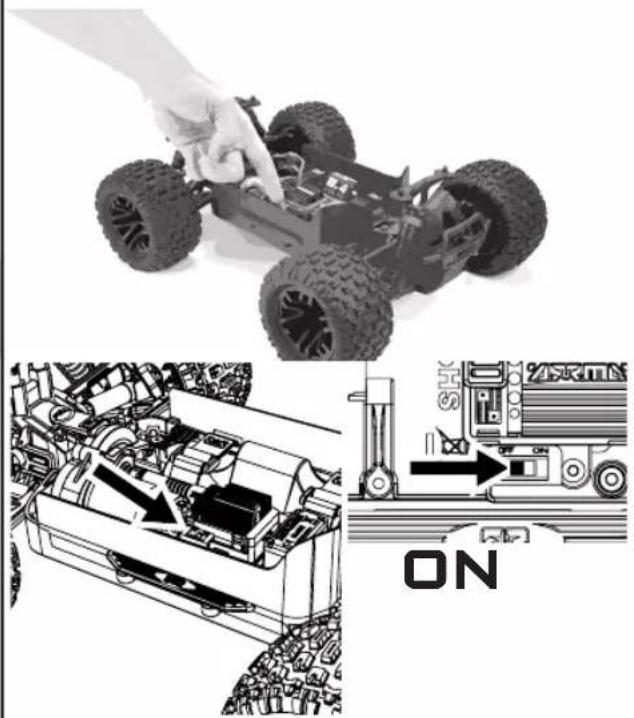
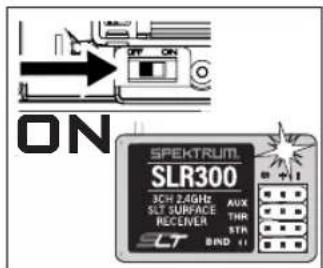
natural_image
Composite image showing a hand adjusting a small off-road vehicle, and a close-up of an automotive engine assembly with a 'ON' label (no readable text or symbols in the main visual elements)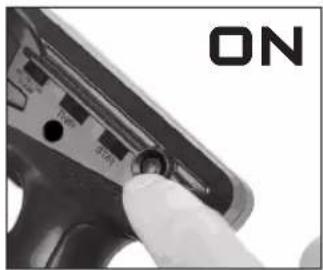
natural_image
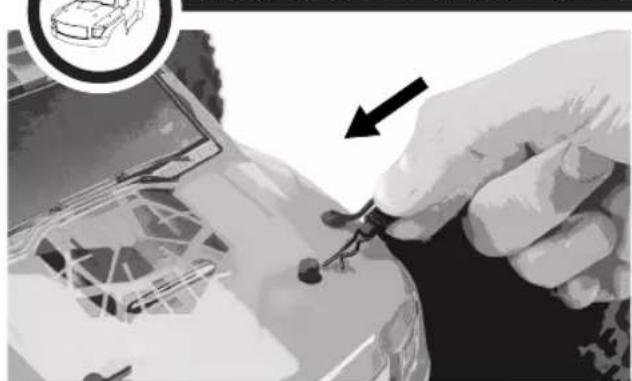
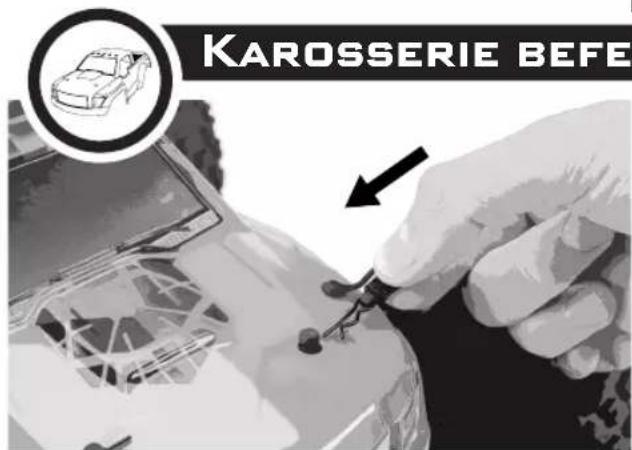
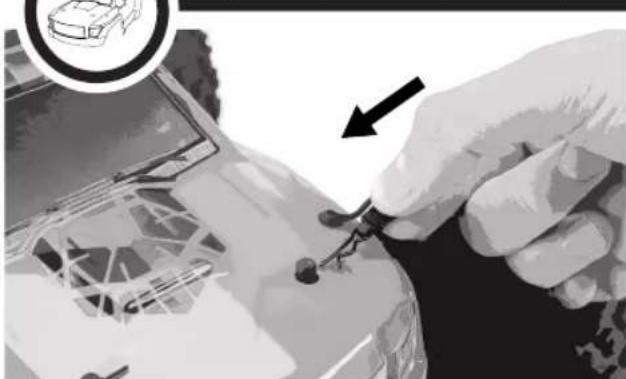
Close-up of a handheld electronic device with a finger inserted, showing internal components (no readable text or symbols)INSTALL CAR BODY
natural_image
Close-up of a hand holding a small electronic component with an arrow pointing to it, next to a car icon (no text or symbols visible)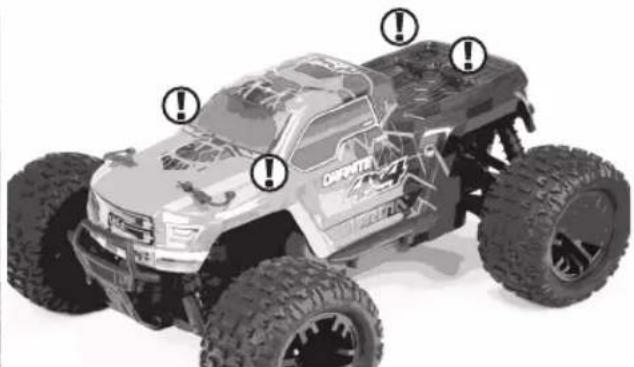
natural_image
Exterior view of a large off-road vehicle with visible tire tracks and mounting features (no text or symbols)NOW GET SHREDDING!

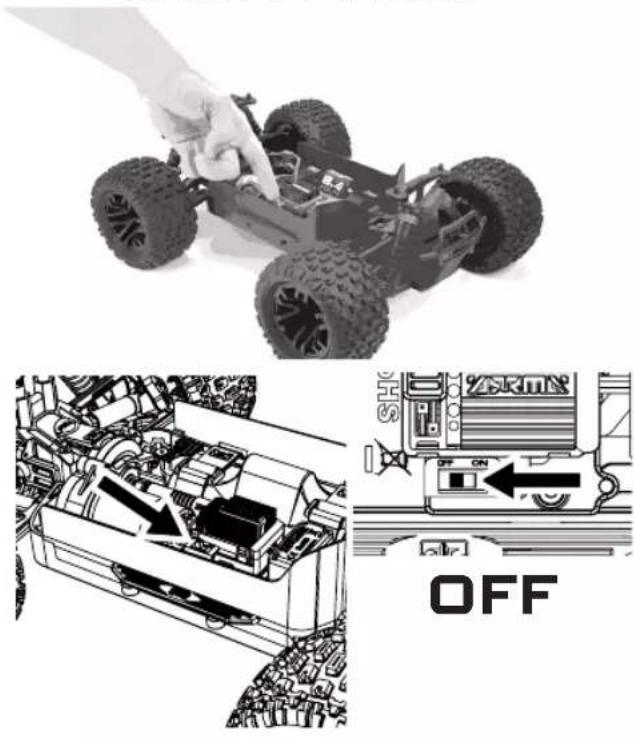
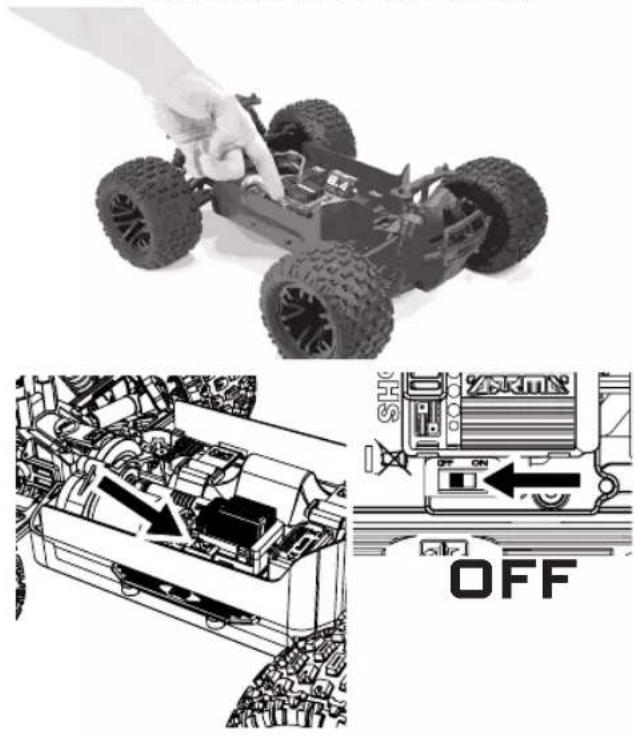
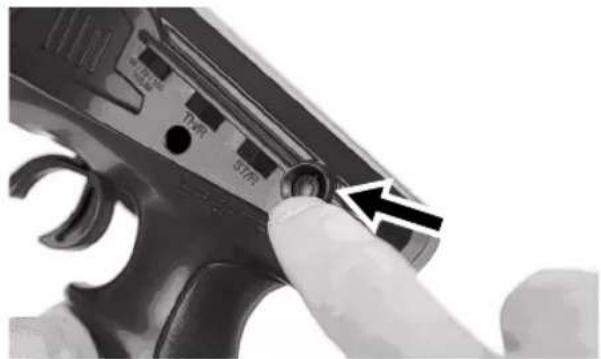
POWER OFF
CAR OFF FIRST
natural_image
Composite image showing a hand adjusting a small off-road vehicle, and a close-up of internal engine components with no visible text or symbols.natural_image
Close-up of a hand holding a black handheld gun with a finger pointing to the grip (no visible text or symbols)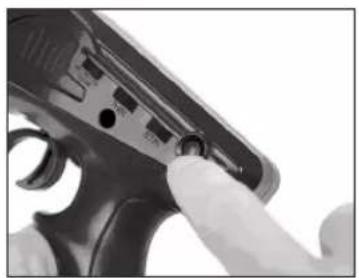
natural_image
Close-up of a handgun with fingers adjusting the grip (no visible text or symbols)
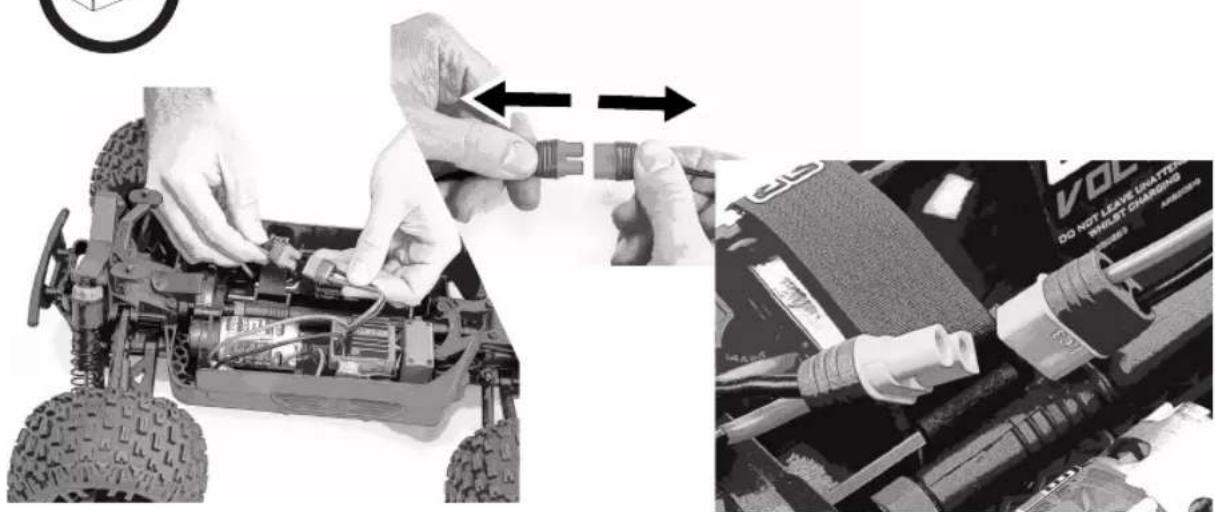
STORAGE
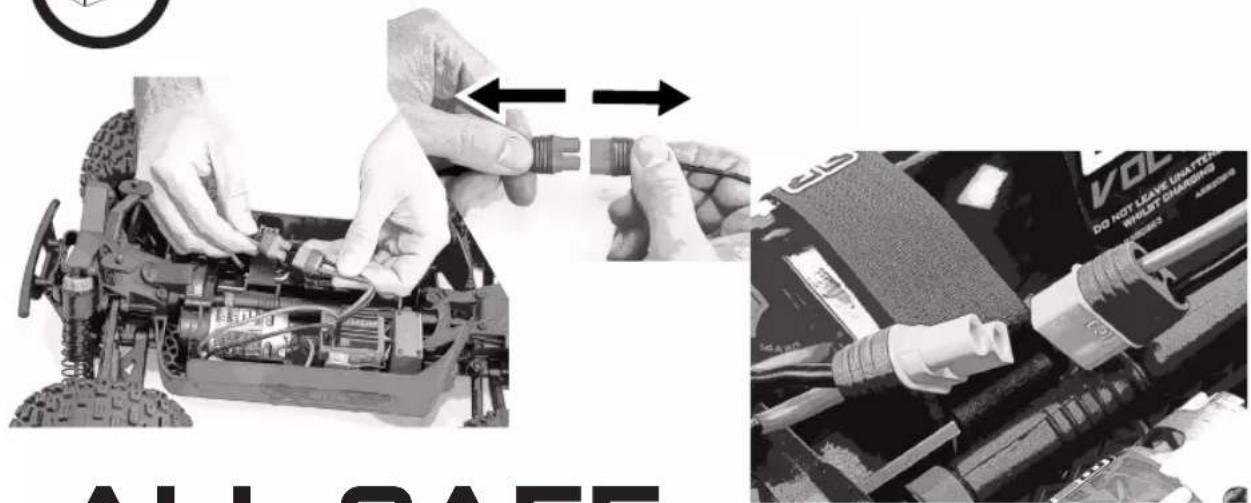
ALL SAFE... UNTIL NEXT TIME!

ELECTRONIC SPEED CONTROLLER (ESC)

If using LiPo batteries you must set the correct battery mode on the ESC (electronic speed controller) to prevent battery damage.

Throttle Setup
Do not move the throttle when switching the model on as the ESC will automatically set the throttle neutral. A long beep will sound to confirm setup.
ESC Specifications
| Input Voltage | 6-7 NiMh (7.2-8.4v) / 2S Lipo (7.4v) | BEC Output | 6.0v/2A Max |
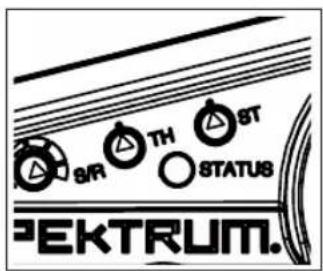
ESC Status LED
LED off: Neutral throttle
LED blinking slowly: Partial Forward/Reverse/Brake
LED solidly on: Full Forward/Reverse/Brake
Low Voltage Cut Off
| Battery Mode | NiMh LiPo | |
| Cut-off Voltage | 4.5v 6.4v |
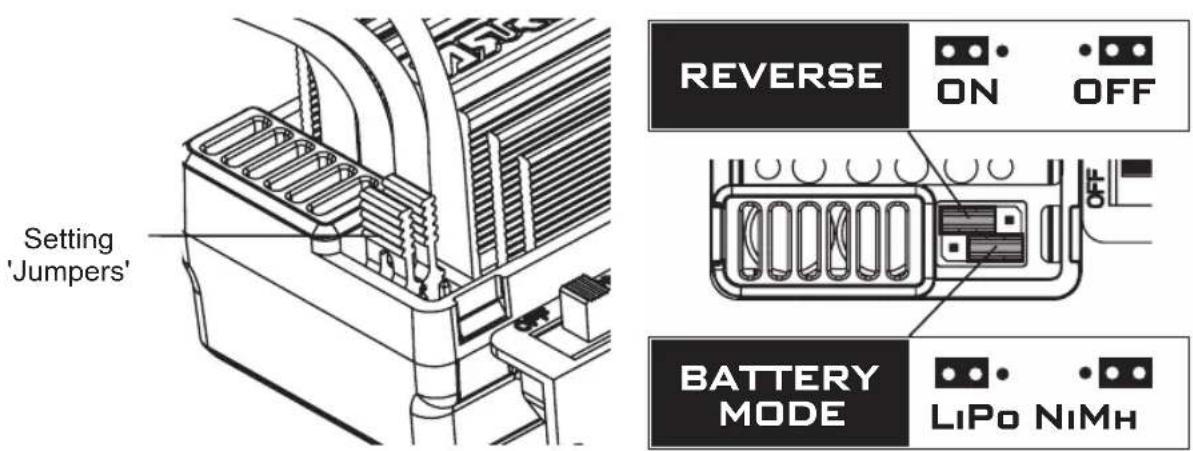
Factory Defaults
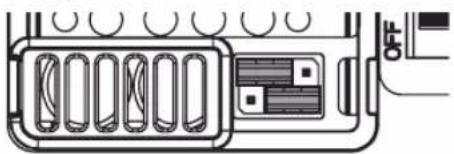
natural_image
Diagram of an electronic device rear panel with slots and connectors (no text or symbols)Battery Mode: NiMh
Reverse: On
ESC Tuning Options
The MEGA brushed ESC has two tuning options - battery mode and reverse lock out. The setting of these modes can be changed by moving the position of the setting 'jumpers'

Temperature Protection
If the ESC temperature exceeds 80 degrees Celsius, the ESC will enter temperature protection mode and the green status LED will blink. Once the ESC has cooled down it will resume normal operation.

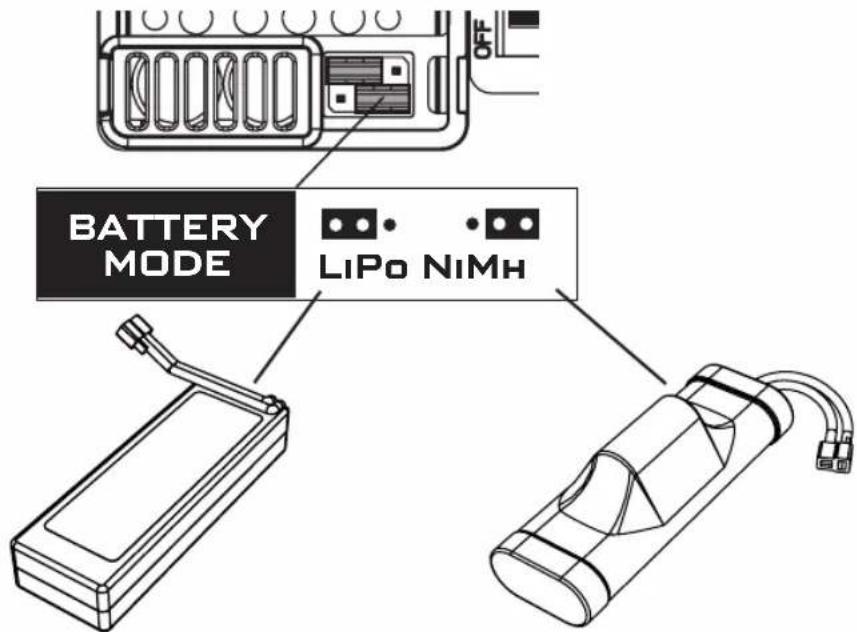
BATTERY MODES
If using LiPo batteries you must set the correct battery mode on the ESC (electronic speed controller) to prevent battery damage.

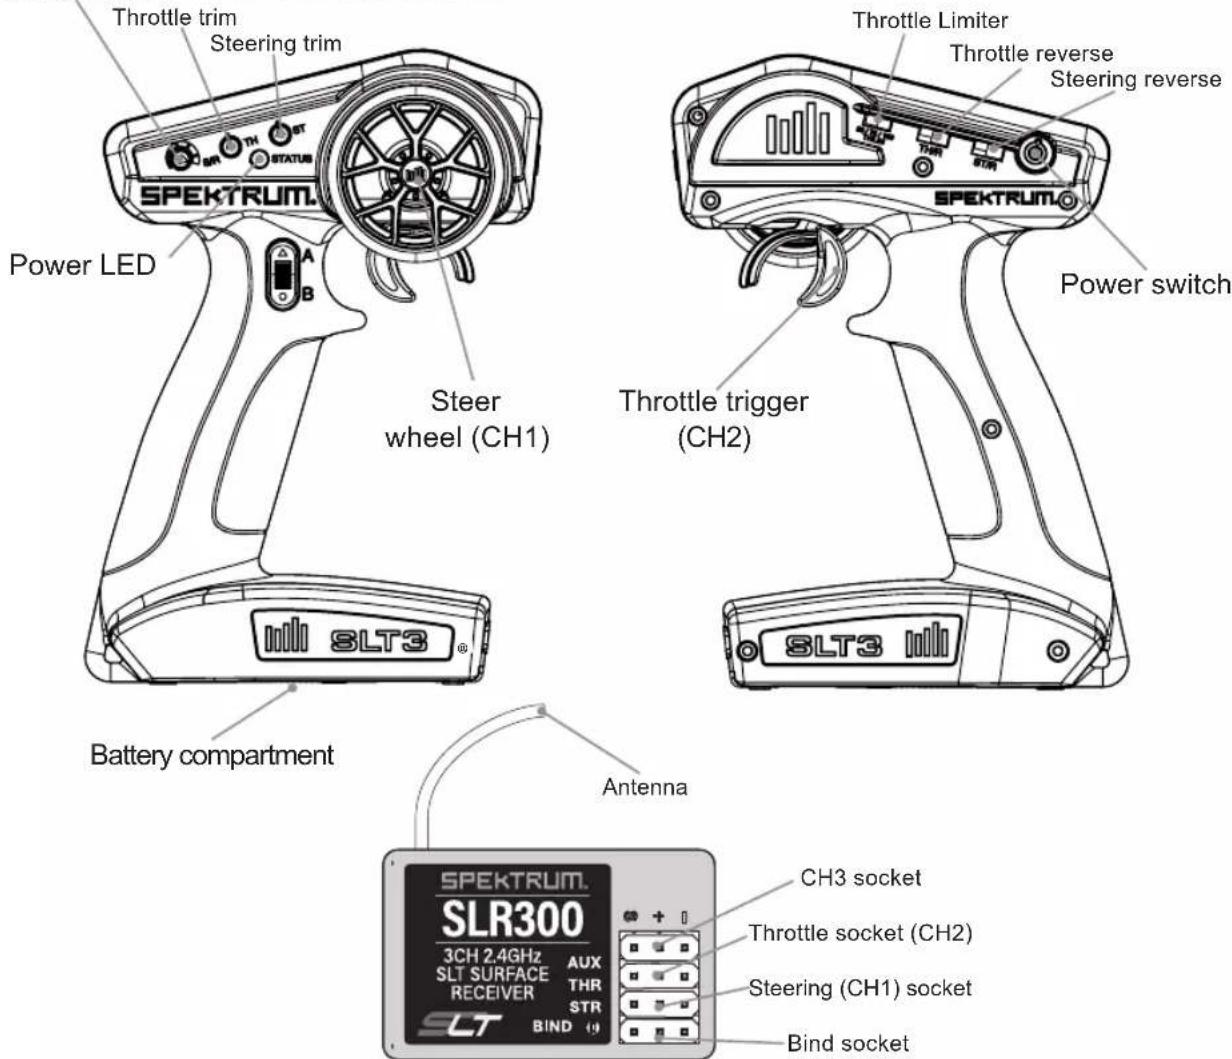
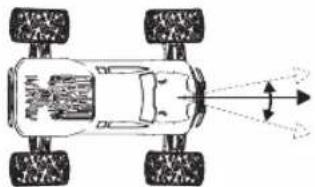
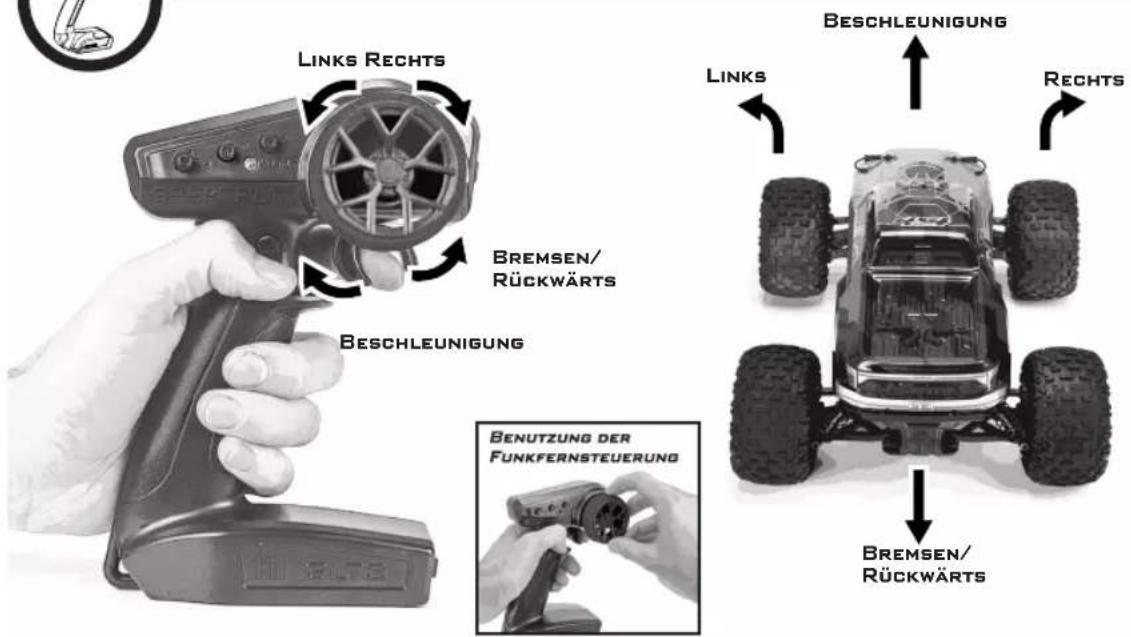
RADIO GEAR
SPEKTRUM SLT3 3CH 2.4GHZ DIGITAL RADIO SYSTEM
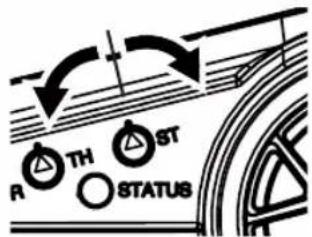
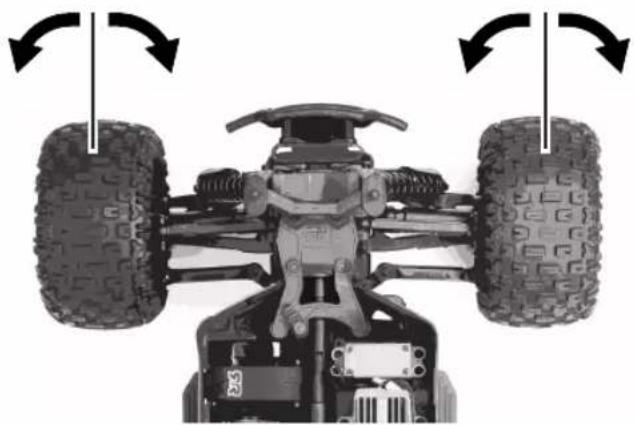
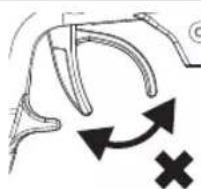
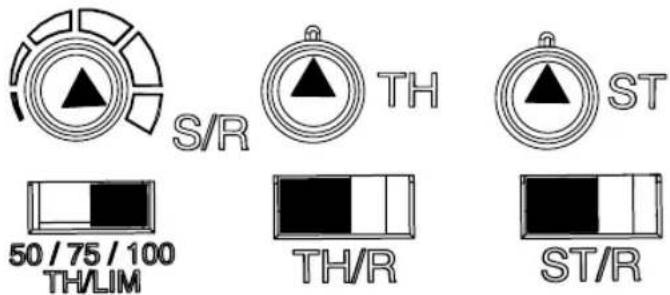
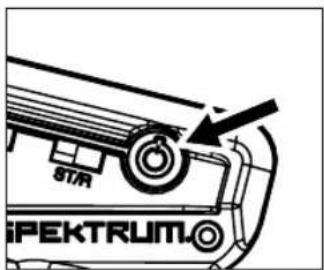
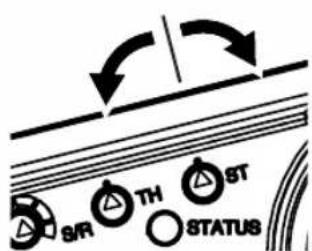
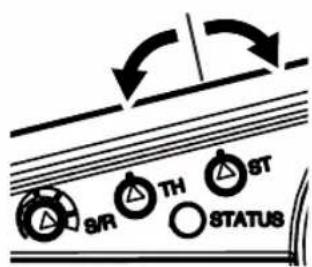
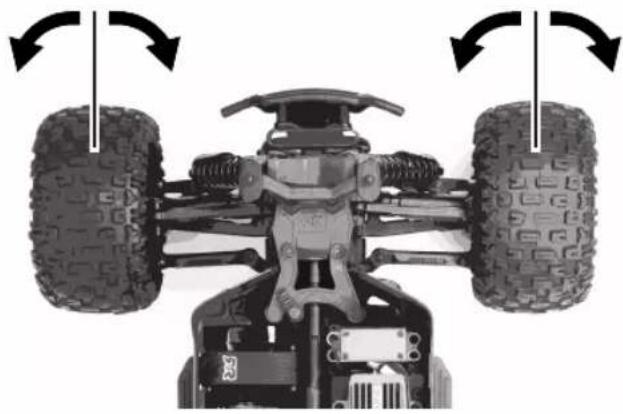
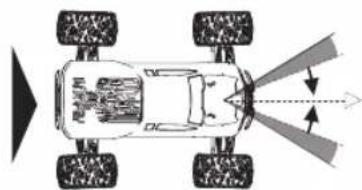
Steering dual rate
STEERING TRIM ST RATE


natural_image
Top-down line drawing of a car with four wheels and visible exhaust arrows (no text or symbols)
natural_image
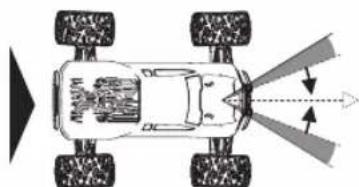
Top-down diagram of a vehicle showing front wheel, rear wheels, and exhaust airflow direction (no text or symbols)THROTTLE TRIM
Throttle Trim: factory default neutral, adjustment is not necessary.

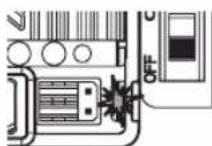
BATTERY STATUS
If battery status LED is flashing, the batteries need to be replaced.
FACTORY DEFAULTS
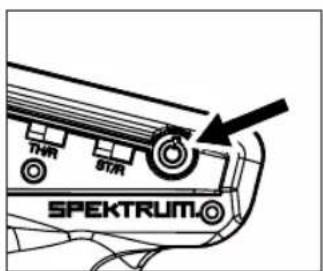
BINDING

Insert the Bind Plug in the BIND port on the receiver.
natural_image
Close-up of hands assembling mechanical components with arrows pointing to specific parts (no visible text or symbols)Connect a fully charged battery pack to the ESC.
Power on the ESC. The red LED flashes, indicating the receiver is in bind mode.
Center the ST TRIM and TH TRIM dials on the transmitter.
Power the transmitter on. The receiver LED will stop flashing.
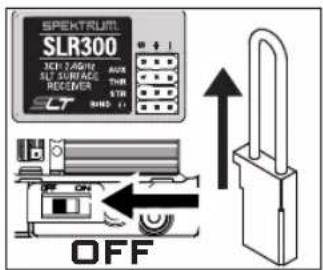
Remove the Bind Plug, then power off the ESC to save the settings.
Power off the transmitter.

FCC ID: BRWSPMSLT300; BRWSPMSLR300
This device complies with part 15 of the FCC Rules. Operation is subject to the following two conditions: (1) This device may not cause harmful interference, and (2) this device must accept any interference received, including interference that may cause undesired operation.
CAUTION: THE MANUFACTURER IS NOT RESPONSIBLE FOR ANY RADIO OR TV INTERFERENCE CAUSED BY UNAUTHORIZED MODIFICATIONS TO THIS EQUIPMENT. SUCH MODIFICATIONS COULD VOID THE USER'S AUTHORITY TO OPERATE THE EQUIPMENT.
NOTE: This equipment has been tested and found to comply with the limits for a Class B digital device, pursuant to part 15 of the FCC Rules. These limits are designed to provide reasonable protection against harmful interference in a residential installation. This equipment generates, uses and can radiate radio frequency energy and, if not installed and used in accordance with the instructions, may cause harmful interference to radio communications. However, there is no guarantee that interference will not occur in a particular installation. If this equipment does cause harmful interference to radio or television reception, which can be determined by turning the equipment off and on, the user is encouraged to try to correct the interference by one or more of the following measures:
• Reorient or relocate the receiving antenna.
- Increase the separation between the equipment and receiver.
- Connect the equipment into an outlet on a circuit different from that to which the receiver is connected.
- Consult the dealer or an experienced radio/TV technician for help.
Approved under the verification provision of FCC Part 15 as a Class B Digital Device.
This equipment complies with FCC and IC radiation exposure limits set forth for an uncontrolled environment. This equipment should be installed and operated with minimum distance 5mm between the radiator and your body. This transmitter must not be co-located or operating in conjunction with any other antenna or transmitter
Caution: Changes or modifications not expressly approved by the manufacturer could void the user's authority to operate this device.


Hereby, Horizon Hobby, LLC declares that the device is in compliance with the following: European Union Restriction of Hazardous Substances Recast (RoHS2) Directive 2011/65/EU; European Union Registration, Evaluation, Authorization and Restriction of Chemicals (REACH) Directive 1907/2006 European Radio Equipment Directive (RED) 2014/53/EU
This product contains batteries that are covered under the 2006/66/EC European Directive, which cannot be disposed of with normal household waste. Please follow local regulations
A copy of the EU Declaration of Conformity is available online at: http://www.horizonhobby.com/content/support-render-compliance.
Frequency Band: 2405-2474 MHz
Max EIRP: 8.30 dBm
Industry Canada Notice: IC: 6157A-SPMSLT300 6157A-SPMSLR300
CAN ICES-3 (B)/NMB-3(B)
This device complies with Industry Canada license-exempt RSS standard(s). 1. Operation is subject to the following two conditions: (1) this device may not cause interference, and (2) this device must accept any interference, including interference that may cause undesired operation of the device. 2. Changes or modifications not expressly approved by the party responsible for compliance could void the user's authority to operate the equipment.
This equipment complies with FCC and IC radiation exposure limits set forth for an uncontrolled environment. This equipment should be installed and operated with minimum distance 5mm between the radiator and your body. This transmitter must not be co-located or operating in conjunction with any other antenna or transmitter

INSTRUCTIONS FOR DISPOSAL OF WASTE EQUIPMENT BY PRIVATE USERS IN THE EUROPEAN UNION: This symbol on the product or its packaging indicates this product must not be disposed of with other household waste. Instead, it is the user's responsibility to dispose of their waste equipment by handing it over to a designated collection point for the recycling of waster electrical and electronic equipment. The separate collection and recycling of your waste equipment at time of disposal will help to conserve natural resources and ensure that it is recycled in a manner that protects human health and the environment. For more information about where you can drop off your waste equipment for recycling, please contact your local city office, your household waste disposal service or location where you purchased the product.
TROUBLESHOOTING
| Problem Possible Cause Solution | ||
| Vehicle does not move | Batteries are incorrectly installed in transmitter | Check transmitter batteries and refit - see model/transmitter manual |
| Weak, damaged or no drive battery in model Install fresh, charged batteries | ||
| Frayed or broken motor or ESC wires | Check condition, reconnect and insulate | |
| ESC has shut down due to overheating | Stop driving and allow ESC or motor to cool down | |
| Electric motor is damaged | Replace with new unit - visit ARRMA-RC.com for advice and upgrades! | |
| Waterproof ESC is damaged | Replace with new unit - visit ARRMA-RC.com for advice and upgrades! | |
| Possible damage to transmission/drive-line | Check components and replace - visit ARRMA-RC.com for advice | |
| ESC low voltage cutoff has activated to protect batteries | Remove drive battery, leave to cool down if necessary, and re-charge | |
| Vehicle does not reverse | Waterproof ESC is damaged | Replace with new unit - visit ARRMA-RC.com for advice and upgrades |
| Vehicle drives without input | Transmitter throttle trim incorrectly set | Throttle trim needs to be set to zero/neutral - see model/transmitter manual |
| Neutral throttle position of ESC Unit incorrect Re calibrate the ESC | ||
| Short runtime | Battery damaged or not fully charged Check condition, replace or recharge | |
| Electric motor dirty or damaged | Clean, check condition and/or replace - visit ARRMA-RC.com for more information | |
| Incorrect ESC battery mode - voltage cutoff too high for the battery you are using | Adjust the battery mode of the unit | |
| Sluggish performance | Battery damaged or not fully charged Check condition, replace or recharge | |
| Transmitter throttle trim incorrectly set | Throttle trim needs to be set to zero/neutral - see model/transmitter manual | |
| Electric motor dirty or damaged | Clean, check condition and/or replace - visit ARRMA-RC.com for more information | |
| Drivetrain dirty or damaged | Clean, check condition and/or replace - visit ARRMA-RC.com for more information | |
| No control of vehicle or short range | Transmitter batteries are weak or fitted incorrectly | Check transmitter batteries and refit - see model/transmitter manual |
| Servo wires to receiver loose or connected incor-rectly | Reinstall signal wires to receiver | |
| Transmitter and receiver unit are not 'bound' cor-rectly | Transmitter and receiver need to be bound - see model/transmitter manual | |
| Steering/Throttle operation intermittent | ESC has shut down due to overheating | Stop driving and allow ESC or motor to cool down |
| Transmitter and receiver unit are not 'bound' cor-rectly | Check for sources of interference and re-bind transmitter/receiver - see transmitter manual | |
| Vehicle wanders left/right without steering input | Steering trim setting out | Adjust steering trim - see model/ transmitter manual |
| Damaged steering components | Check components and replace - visit ARRMA-RC.com for advice | |
| Drivetrain dirty or damaged | Clean, check condition and/or replace - visit ARRMA-RC.com for more information | |
| Steering/Throttle operation reversed | Relevant channel of transmitter is reversed | Reverse relevant channel on transmitter - see model/ transmitter manual |
| Check that the wires from the ESC to the motor are connected correctly | Reconnect in the correct orientation (red to red and black to black) ensuring fit is tight; if not pinch female connector with pliers | |
| Limited steering angle | Transmitter steering dual-rate set incorrectly | Adjust transmitter dual-rate - see transmitter manual |
| Damaged steering components | Check components and replace - visit ARRMA-RC.com for advice | |
natural_image
Black-and-white photo of a toy car with visible tire tracks and warning symbols (no text or labels)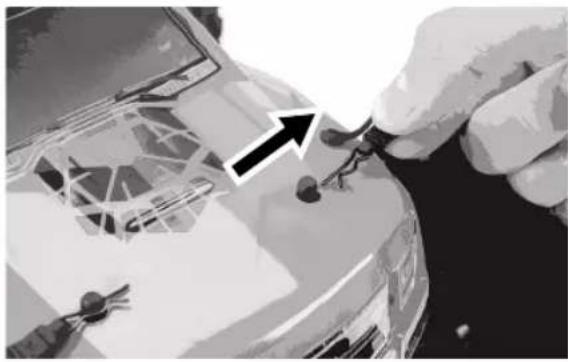
natural_image
Close-up of hands installing or adjusting a car interior panel with tools (no visible text or symbols)
ENTFERNEN SIE DIE FAHRZEUGBATTERIE
natural_image
Close-up of a toy car's internal components with visible tire tracks and suspension, showing no text or symbols.
natural_image
Close-up of a toy car's internal components with visible tire tracks and suspension, no text or symbols present
FAHRZEUGBATTERIE LADEN
natural_image
Illustration showing hands installing or adjusting a wall socket with a battery pack (no text or symbols present)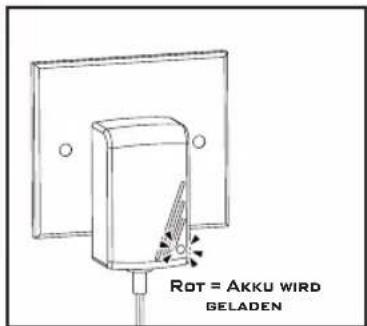

LEGEN SIE DIE AA BATTERIEN IN DAS STEUERGERÄT EIN
natural_image
Close-up of hands holding a smartphone with an arrow indicating the change (no visible text or symbols)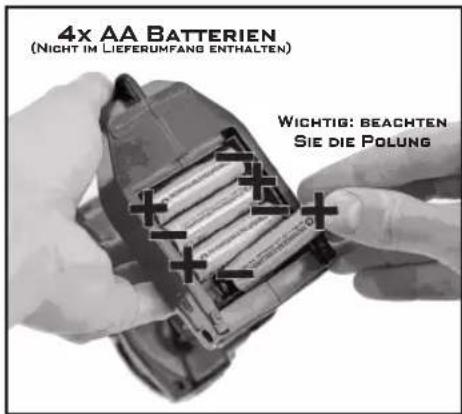
natural_image
Close-up of hands assembling a mobile phone into a slot (no visible text or symbols)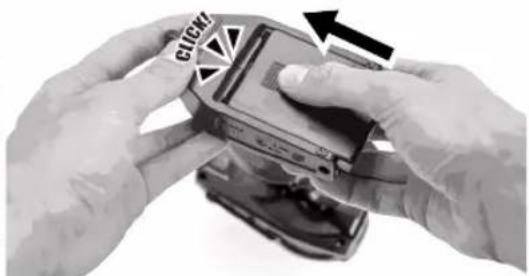
natural_image
Close-up of hands holding a payment terminal device with a black arrow indicating rotation (no visible text or symbols)
natural_image
Close-up of hands holding a small electronic component with arrows indicating direction (no text or symbols visible)
natural_image
Hand holding a plug inserted into an electrical outlet, with a black arrow indicating direction (no text or symbols)natural_image
Close-up of a toy car chassis with visible tire, wheels, and a hand adjusting the component (no text or symbols)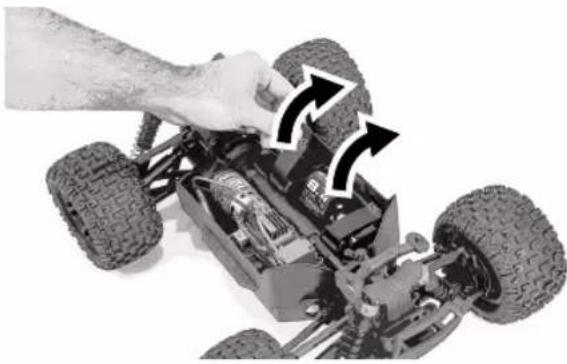
natural_image
Close-up of a hand adjusting a mechanical component with arrows indicating motion direction (no text or symbols visible)
LENKUNG NEUTRALPOSITION
natural_image
Top-down view of a toy car showing front and rear tires with directional arrows indicating rotation (no text or symbols)
WIE MAN FÄHRT
natural_image
Close-up of hands installing or adjusting a small electronic component on a toy car chassis (no visible text or symbols)natural_image
Close-up of a hand holding a black handheld device with a white arrow pointing to the button (no text or symbols visible)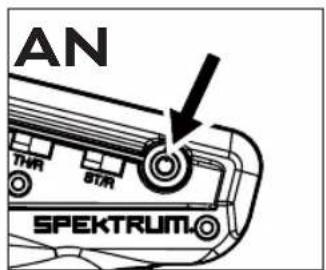
natural_image
Composite image showing a hand adjusting a small off-road vehicle, and a close-up of an internal engine bay with a battery labeled 'AN' (no text or symbols on the diagram itself)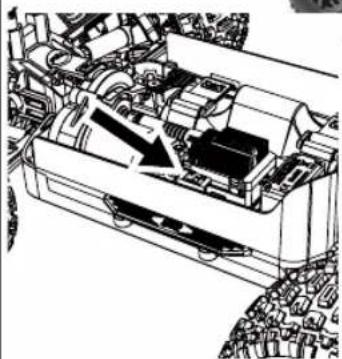
natural_image
Technical line drawing of a mechanical assembly (no text or symbols visible)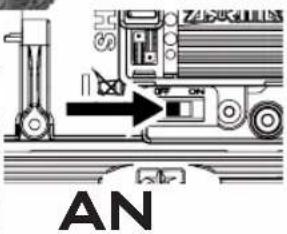
natural_image
Top-down view of a CAVR-TRI Go on a heavy-duty off-road vehicle, showing front, rear, and side tires with warning symbols (no text or labels beyond warning indicators)NUN KANN ES LOSGEHEN!

AUSSCHALTEN
natural_image
Composite image showing a toy car with a hand adjusting the chassis, and its internal engine assembly with a valve labeled 'AUS' (no text or symbols on the main components)natural_image
Close-up of a handgun with a finger pointing to the grip, showing no text or symbols on the gun itself.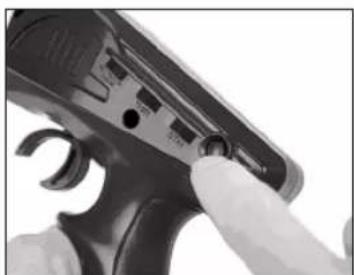
natural_image
Close-up of a handheld electronic device with a finger pointing to the button (no visible text or symbols)
LAGERN
natural_image
Close-up of hands installing a cable component on a toy car, with no visible text or symbols in the main image area.natural_image
Diagram of an electronic device rear panel with internal connectors and a labeled connector (no text or symbols present)Batteriemodus: NiMH
Rückwärtsgang: ein
Reglerabstimmung
natural_image
Top-down line drawing of a four-tremy car with visible exhaust arrows (no text or symbols)ST RATE

natural_image
Top-down diagram of a vehicle showing four wheels and a light source, with arrows indicating direction (no text or symbols)natural_image
Close-up of hands assembling electronic components with arrows indicating direction (no visible text or symbols)natural_image
Black-and-white photo of a toy car with visible tire tracks and warning symbols (no text or labels)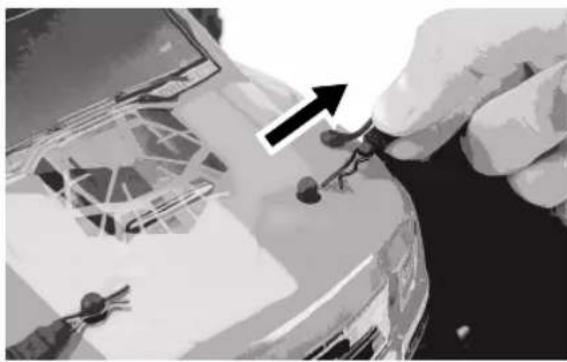
natural_image
Close-up of hands installing or adjusting a car interior panel with tools (no visible text or symbols)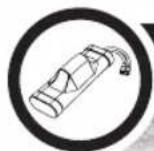
ENLEVER LES BATTERIES DE LA VOITURE
natural_image
Close-up of a toy car's internal components with visible tire tracks and mechanical parts, no text or symbols present.
natural_image
Close-up of a small toy car showing internal components and tire tracks (no visible text or symbols)
CHARGEZ LES BATTERIES DE LA VOITURE
natural_image
Illustration showing hands connecting a wall socket to a device with cable (no text or symbols visible)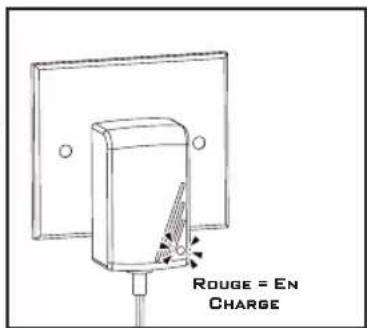

INSTALLER LES PILES AA DANS LA RADIOCOMMANDE
natural_image
Close-up of hands holding a handheld electronic device with a black arrow pointing to the screen (no visible text or symbols)
natural_image
Close-up of hands holding a battery pack with a black arrow indicating rotation (no text or symbols visible)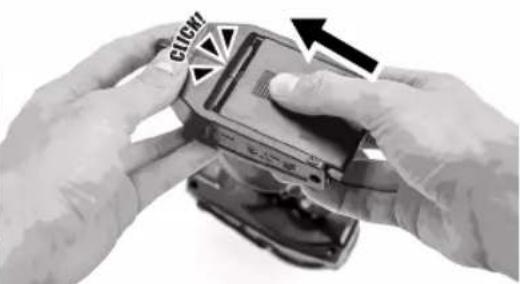
natural_image
Close-up of hands holding a handheld electronic device with a partially open lid, no visible text or symbols
natural_image
Hand holding a black electrical plug with a power outlet, pointing at it (no text or symbols visible)
INSTALLER LES BATTERIES CHARGÉES DANS LA VOITURE
natural_image
Close-up of a toy car chassis with visible tire, suspension, and wheel assembly (no text or symbols)
natural_image
Close-up of a hand adjusting a toy car chassis with visible tire tracks and mechanical components (no text or symbols)
NEUTRE DE DIRECTION
natural_image
Top-down view of a toy car showing front and rear tires with directional arrows indicating rotation (no text or symbols)
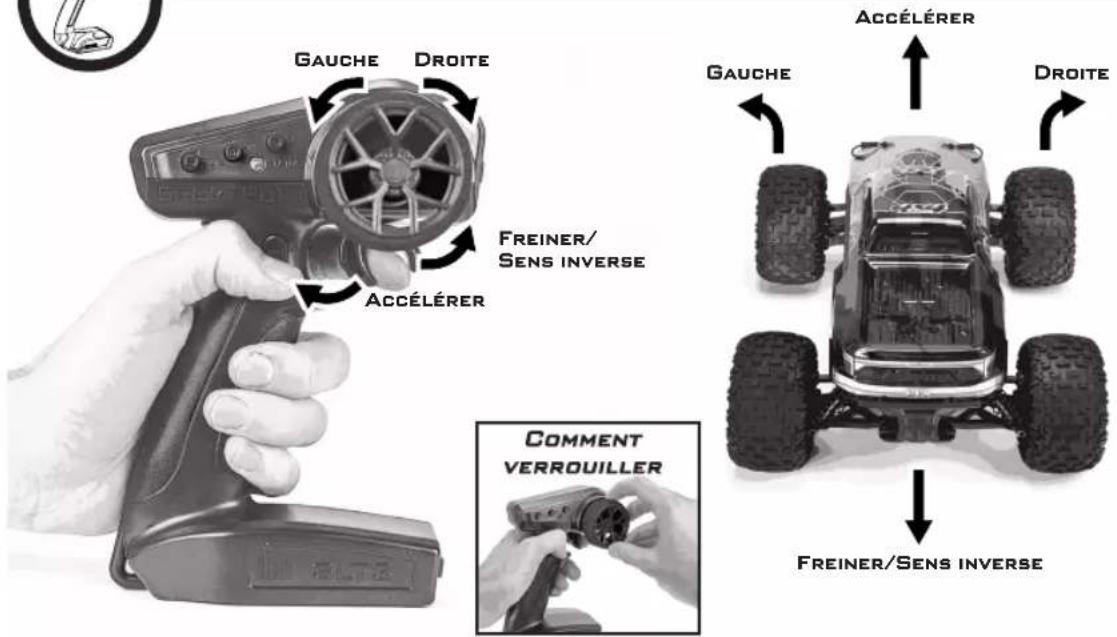
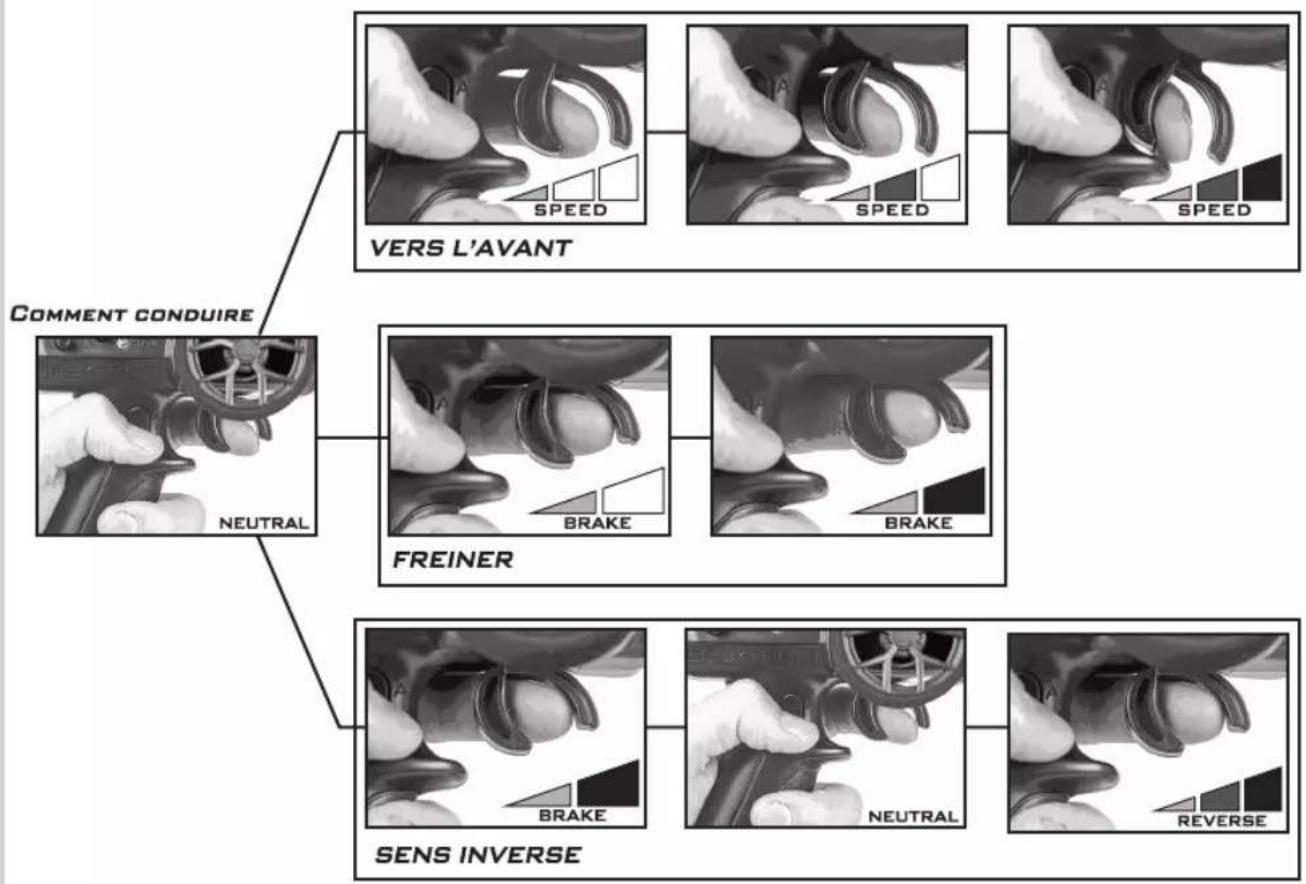
COMMENT CONDUIRE
flowchart
graph TD
    A["Comment Conduire"] --> B["NEUTRAL"]
    B --> C["FREINER"]
    C --> D["SENS INVERSE"]
    D --> E["VER S L'AVANT"]
    A --> F["STEEL HEADS"]
    F --> G["SPEED"]
    F --> H["SPEED"]
    F --> I["SPEED"]
    A --> J["STEEL HEADS"]
    J --> K["BRAKE"]
    J --> L["BRAKE"]
    A --> M["STEEL HEADS"]
    M --> N["NEUTRAL"]
    M --> O["NEUTRAL"]
    M --> P["NEUTRAL"]
    A --> Q["SPEED"]
    Q --> R["BEAT"]
    Q --> S["BEAT"]
    Q --> T["BEAT"]
natural_image
Close-up of hands installing or adjusting a small electronic vehicle chassis with cable and plug (no visible text or symbols)RADIOCOMMANDE EN PREMIER

natural_image
Close-up of a hand pressing a black handgun with an arrow pointing to the grip (no text or symbols visible)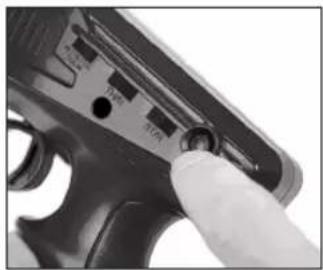
natural_image
Close-up of a handgun with a finger pointing to the grip (no visible text or symbols)VOITURE EN SECOND
natural_image
Composite image showing a hand adjusting a small off-road vehicle chassis, and a close-up of internal components with a right-hand tool labeled 'ON' (no text or symbols on the diagram itself)INSTALLER LA CARROSSERIE DE LA VOITURE
natural_image
Close-up of a hand holding a small electronic component with an arrow pointing to it, next to a car outline (no text or symbols visible)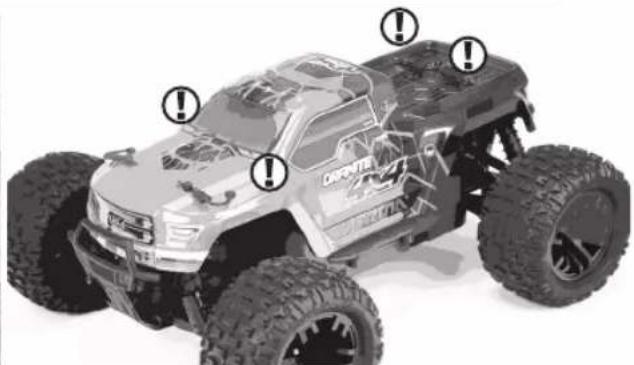
natural_image
Top-down view of a Long March 300km off-road vehicle with visible tire tracks and front suspension (no text or symbols)MAINTENANT, COMMENCEZ À VOUS AMUSER !

ÉTEINDRE
VOITURE EN PREMIER
natural_image
Composite image showing a hand adjusting a small off-road vehicle chassis, and its internal components with a 'OFF' button (no text or symbols on the diagram itself)RADIOCOMMANDE EN SECOND
natural_image
Close-up of a handgun with a finger pointing to the grip, showing internal components and a black arrow indicating a specific part (no text or symbols present)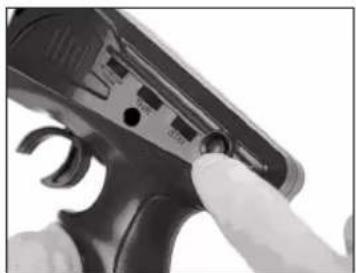
natural_image
Close-up of a black handheld device with a finger pointing to its button (no visible text or symbols)
STOCKAGE
natural_image
Two-panel image showing a hand adjusting a small cable component and a close-up of a VOL-branded vehicle with attached hoses (no visible text or symbols)TOUT EN SÉCURITÉ ...
JUSQU'À LA PROCHAINE FOIS
Coupure Basse Tension
natural_image
Diagram of an electronic device rear panel with internal connectors and a labeled connector (no text or symbols present)natural_image
Top-down diagram of a vehicle showing four wheels and exhaust arrows (no text or symbols)ST RATE

natural_image
Top-down diagram of a vehicle showing four wheels and a directional arrow, with no text or symbols present.natural_image
Close-up of hands assembling electronic components with arrows pointing to specific parts (no visible text or symbols)What this Warranty Covers
Horizon Hobby, LLC, (Horizon) warrants to the original purchaser that the product purchased (the "Product") will be free from defects in materials and workmanship for a period of 2 years from the date of purchase.
What is Not Covered
This warranty is not transferable and does not cover (i) cosmetic damage, (ii) damage due to acts of God, accident, misuse, abuse, negligence, commercial use, or due to improper use, installation, operation or maintenance, (iii) modification of or to any part of the Product, (iv) attempted service by anyone other than a Horizon Hobby authorized service center, (v) Product not purchased from an authorized Horizon dealer, (vi) Product not compliant with applicable technical regulations, or (vii) use that violates any applicable laws, rules, or regulations.
OTHER THAN THE EXPRESS WARRANTY ABOVE, HORIZON MAKES NO OTHER WARRANTY OR REPRESENTATION, AND HEREBY DISCLAIMS ANY AND ALL IMPLIED WARRANTIES, INCLUDING, WITHOUT LIMITATION, THE IMPLIED WARRANTIES OF NON-INFRINGEMENT, MERCHANTABILITY AND FITNESS FOR A PARTICULAR PURPOSE. THE PURCHASER ACKNOWLEDGES THAT THEY ALONE HAVE DETERMINED THAT THE PRODUCT WILL SUITABLY MEET THE REQUIREMENTS OF THE PURCHASER'S INTENDED USE.
Purchaser's Remedy
Horizon's sole obligation and purchaser's sole and exclusive remedy shall be that Horizon will, at its option, either (i) service, or (ii) replace, any Product determined by Horizon to be defective. Horizon reserves the right to inspect any and all Product(s) involved in a warranty claim. Service or replacement decisions are at the sole discretion of Horizon. Proof of purchase is required for all warranty claims. SERVICE OR REPLACEMENT AS PROVIDED UNDER THIS WARRANTY IS THE PURCHASER'S SOLE AND EXCLUSIVE REMEDY.
Limitation of Liability
HORIZON SHALL NOT BE LIABLE FOR SPECIAL, INDIRECT, INCIDENTAL OR CONSEQUENTIAL DAMAGES, LOSS OF PROFITS OR PRODUCTION OR COMMERCIAL LOSS IN ANY WAY, REGARDLESS OF WHETHER SUCH CLAIM IS BASED IN CONTRACT, WARRANTY, TORT, NEGLIGENCE, STRICT LIABILITY OR ANY OTHER THEORY OF LIABILITY, EVEN IF HORIZON HAS BEEN ADVISED OF THE POSSIBILITY OF SUCH DAMAGES. Further, in no event shall the liability of Horizon exceed the individual price of the Product on which liability is asserted. As Horizon has no control over use, setup, final assembly, modification or misuse, no liability shall be assumed nor accepted for any resulting damage or injury. By the act of use, setup or assembly, the user accepts all resulting liability. If you as the purchaser or user are not prepared to accept the liability associated with the use of the Product, purchaser is advised to return the Product immediately in new and unused condition to the place of purchase.
Law
These terms are governed by Illinois law (without regard to conflict of law principals). This warranty gives you specific legal rights, and you may also have other rights which vary from state to state. Horizon reserves the right to change or modify this warranty at any time without notice.
WARRANTY SERVICES
Questions, Assistance, and Services
Your local hobby store and/or place of purchase cannot provide warranty support or service. Once assembly, setup or use of the Product has been started, you must contact your local distributor or Horizon directly. This will enable Horizon to better answer your questions and service you in the event that you may need any assistance. For questions or assistance, please visit our website at www.horizonhobby.com, submit a Product Support Inquiry, or call the toll free telephone number referenced in the Warranty and Service Contact Information section to speak with a Product Support representative.
Inspection or Services
If this Product needs to be inspected or serviced and is compliant in the country you live and use the Product in, please use the Horizon Online Service Request submission process found on our website or call Horizon to obtain a Return Merchandise Authorization (RMA) number. Pack the Product securely using a shipping carton. Please note that original boxes may be included, but are not designed to withstand the rigors of shipping without additional protection. Ship via a carrier that provides tracking and insurance for lost or damaged parcels, as Horizon is not responsible for merchandise until it arrives and is accepted at our facility. An Online Service Request is available at http://www.horizonhobby.com/content/_service-centerRender-service-center. If you do not have internet access, please contact Horizon Product Support to obtain a RMA number along with instructions for submitting your product for service. When calling Horizon, you will be asked to provide your complete name, street address, email address and phone number where you can be reached during business hours. When sending product into Horizon, please include your RMA number, a list of the included items, and a brief summary of the problem. A copy of your original sales receipt must be included for warranty consideration. Be sure your name, address, and RMA number are clearly written on the outside of the shipping carton.
NOTICE: Do not ship LiPo batteries to Horizon. If you have any issue with a LiPo battery, please contact the appropriate Horizon Product Support office.
Warranty Requirements
For Warranty consideration, you must include your original sales receipt verifying the proof-of-purchase date. Provided warranty conditions have been met, your Product will be serviced or replaced free of charge. Service or replacement decisions are at the sole discretion of Horizon.
Non-Warranty Service
Should your service not be covered by warranty, service will be completed and payment will be required without notification or estimate of the expense unless the expense exceeds 50% of the retail purchase cost. By submitting the item for service you are agreeing to payment of the service without notification. Service estimates are available upon request. You must include this request with your item submitted for service. Non-warranty service estimates will be billed a minimum of 12 hour of labor. In addition you will be billed for return freight. Horizon accepts money orders and cashier's checks, as well as Visa, MasterCard, American Express, and Discover cards. By submitting any item to Horizon for service, you are agreeing to Horizon's Terms and Conditions found on our website
http://www.horizonhobby.com/content/_service-center_render-service-center.
ATTENTION: Horizon service is limited to Product compliant in the country of use and ownership. If received, a non-compliant Product will not be serviced. Further, the sender will be responsible for arranging return shipment of the un-serviced Product, through a carrier of the sender's choice and at the sender's expense. Horizon will hold non-compliant Product for a period of 60 days from notification, after which it will be discarded.

GARANTIEINFORMATIONEN
Warnung
INFORMATIONS DE GARANTIE
natural_image
Empty white square frame with gray border and corner markers, no text or symbols present
natural_image
Empty white square frame with gray border and corner markers, no text or symbols presentJOIN OUR GLOBAL ARRMA COMMUNITY

natural_image
Facebook logo icon (no text or symbols present)


natural_image
Simple icon of a retro television with antenna (no text or symbols)


natural_image
Silhouette of a bird in flight (no text or symbols)

natural_image
Gray play button icon with white triangle (no text or symbols)


ARB100028421.1
ARRMA-RC.COM
65011
©2020 Horizon Hobby, LLC. ARRMA RC is a trade name of Horizon Hobby Ltd. Horizon Hobby Ltd is a subsidiary of Horizon Hobby, LLC. ARRMA, the ARRMA logo, Granite, Senton and Typhon are trademarks or registered trademarks of Horizon Hobby, LLC. The Spektrum trademark is used with permission of Bachmann Industries, Inc. All other trademarks, service marks and logos are property of their respective owners.