LE 160 - Dehumidifier STEBA - Free user manual and instructions
Find the device manual for free LE 160 STEBA in PDF.
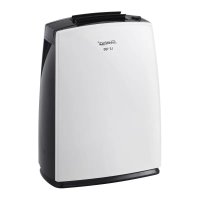
| Product type | Dehumidifier |
| Brand | Steba |
| Model | LE 160 |
| Power supply | 220-240 V ~ 50 Hz (estimated) |
| Drainage types | Water tank (approx. 2 L) or continuous drainage via hose |
| Tank capacity | Not specified (estimated 2 L) |
| Humidity setting | RH 50%, 60%, 70%, 80%, comfort mode (AU) and continuous operation (CO) |
| Timer | From 1 to 24 hours |
| Fan speeds | 2 speeds: High (Hi) and Low (Low) |
| Operating temperature | 5 °C to 31 °C |
| Automatic defrost | Yes, below 5 °C (Defrost indicator) |
| Air filter | Washable, located at the rear |
| Tank maintenance | Daily emptying, clean every 2 weeks with dish soap |
| Filter cleaning | Remove and rinse with warm soapy water every week |
| Full tank protection | Full tank indicator (WF) with automatic shut-off |
| Child safety | Do not let children use the appliance unsupervised (minimum age 8 years) |
| Safety distance from water | At least 60 cm from water points, 120 cm from taps |
| Repairs | Reserved for an authorized after-sales service |
| Spare parts available | Filter, tank, drainage hose (ordered separately) |
| Intended use | Private and non-commercial |
Frequently Asked Questions - LE 160 STEBA
- < 5°C: compressor stopped
- 5-20°C: 60% RH
- 20-27°C: 55% RH
- >27°C: 50% RH
User questions about LE 160 STEBA
0 question about this device. Answer the ones you know or ask your own.
Ask a new question about this device
Download the instructions for your Dehumidifier in PDF format for free! Find your manual LE 160 - STEBA and take your electronic device back in hand. On this page are published all the documents necessary for the use of your device. LE 160 by STEBA.
USER MANUAL LE 160 STEBA
text_image
Sieba® LE 160 ElectronicInstructions for use 11
Mode d'emploi 18
natural_image
Line drawing of a computer tower with ventilation slots and a door handle, showing internal components without any text or symbols.
natural_image
Pure technical line drawing of a mechanical component or bracket (no text or symbols)Fig. 2
Permanenter Ablauf

text_image
Schlauch Fig. 3Filterreinigung

natural_image
Diagram of an air purifier with a drain outlet and internal grid structure, showing no text or symbolsThis appliance is for private and indoor use only and must not be used commercially. Please read the instruction manual carefully and keep it at a safe place. When the appliance is given to another person the instruction manual should be passed to that person, too. Only use the appliance as described in the instruction manual and pay attention to the safety information. No liability for damages or accidents will be accepted, which are caused by not paying attention to the instruction manual.
Safety information
- Connect and operate the appliance in accordance with the specifications shown on the rating label
- Do not plug with wet hands.
- Do not plug into a socket where several other appliances are plugged in.
- Do not use if the plug cord is damaged or when the power plug does not fit the socket securely.
- Do not modify the parts, or repair the unit by yourself.
- Do not use the unit near a flame.
- Do not use where children can easily touch the unit, nor let children use the unit by themselves.
The appliance can be used by children aged 8 and above and persons with limited physical, sensory or mental capabilities or lack of experience/knowledge, provided that are supervised or have been provided with instruction in the safe use of the appliance and have understood the resulting dangers. Children must not use the packaging as a toy. Cleaning and user maintenance must not be carried out by children unless they are 8 years or older and are supervised.
- Children under the age of 8 must be kept away from the appliance and the connecting cable.
- The appliance must not be operated using a timer or a separate remote system!
- Never pull at the power cord or chafe it over sharp edges.
- Never leave the appliance unattended when in use.
- The manufacturer is not liable for damage which is occurring due to the usage of the appliance in a different way as described or a mistake in the handling has been made.
- Place the appliance on a flat, stable, water resisting surface.
- The appliance must stand this way that it cannot tip over.
- Do not cover the ventilation openings and take care that no curtains etc can be hindered the air circulation.

Attention! In case of overheating, risk of fire! Keep a safety distance of min 60cm to wet areas (e.g. Shower, bath tubes, sinks) and min 120cm to water taps!
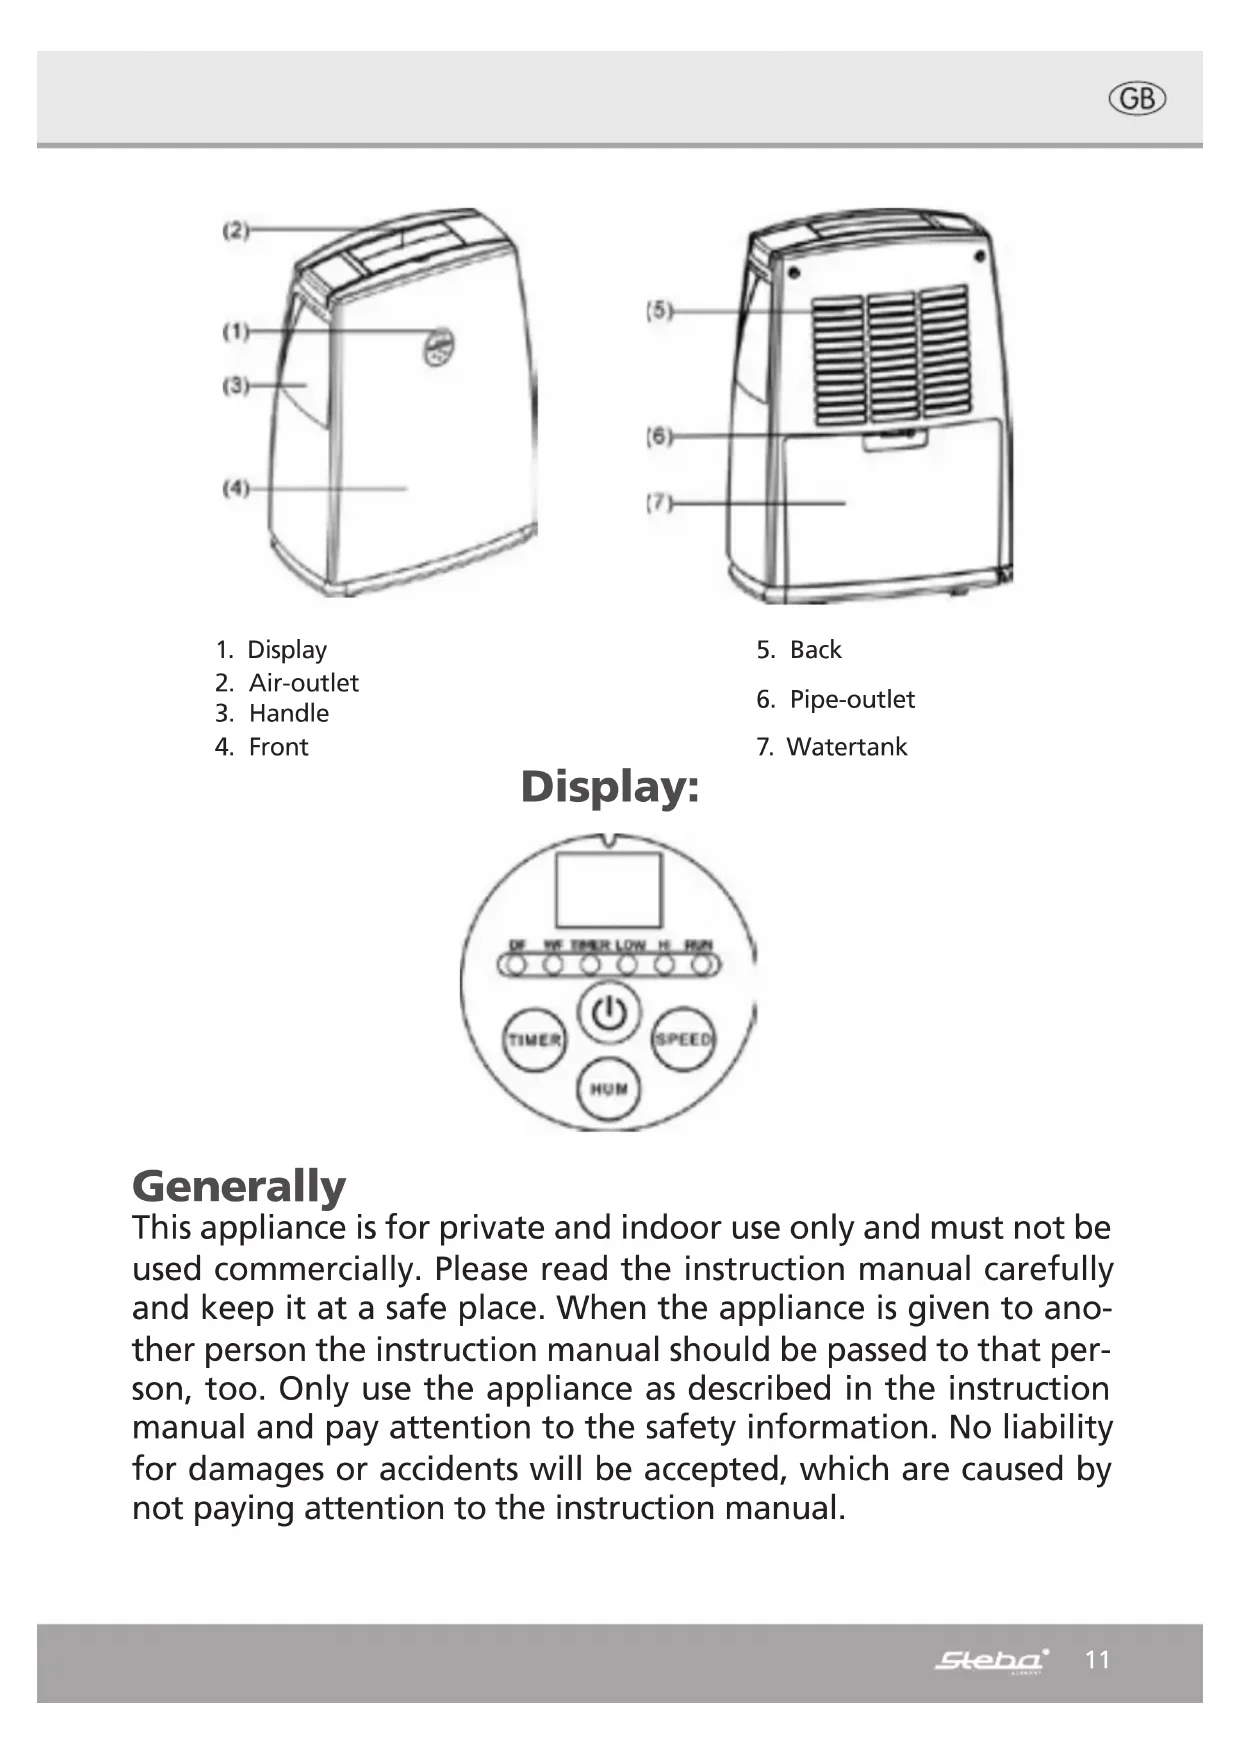
1. Operation:
- When the unit is unpacked, place the appliance vertical on the floor and leave it for 12h, that the cooling liquid is bubble free
• Take care that the water tank is inserted correctly.
- Turn the humidity regulator is turned to "Off"
- Plug the appliance in with dry hands.
- Ensure that the ventilation openings are open.
- Press the ON/OFF button 📄. The „Hi“ lamp is on and the „Run” is blinking. The ca humidity of the room is shown in the display. The dehumidifier is programmed to start with continuous dehumidification (CO). Important: When the unit is unplugged then the appliance will start the next time with the programmed setting. The light “Operation” is flashing. In the display “Low” is shown, after that the humidity of the room. The compressor starts working from a humidity higher than 50%.
- The compressor is only working when the real humidity in the air is higher than the adjusted.
- The unit is suitable to work at temperatures from 5°C to 31°C.
- The humidity performance is depending on the surrounding humidity and temperature. A good dehumidification is achieved at temperatures higher than 22°C and a humidity above 70%.
- When the dehumidifier reaches the adjusted value, the compressor will stop working and starts again when the humidity is again above the programmed value.
- Keep doors and windows closed of the room which should be dehumidified.
• Take care that nothing can drop on the appliance.
- During use, the appliance will create warm air.
- To run the appliance continuously, turn the humidity regulator to "cont".
2. Air speed:
The air speed can be changed, by pressing the button "Speed". In the display "Hi" is shown for air speed or "Low" for low air speed. The adjusted air speed is shown in the panel with "High" or "Low" lamp.
3. Timer:
a) When the time should be adjusted, then press the "Timer" button. The time can be adjusted in steps of one hour from one to 24 hours. The „Timer" lamp at the panel is on.
b) When the time runs out then the appliance will switch off automatically.
c) When the appliance will be switched off by pressing the "Power" button before the timer runs out, then the rest time of the timer will be deleted.
Empty water tank

natural_image
Line drawing of a computer tower with ventilation slots and a highlighted internal component (no text or symbols)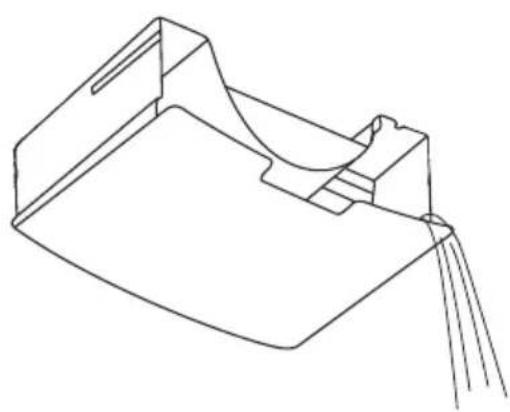
natural_image
Pure technical line drawing of a mechanical component or bracket (no text or symbols)Fig. 2
Continuous drainage
text_image
Tube Fig. 3Cleaning the filter

natural_image
Diagram of an air purifier with a drain outlet and internal grid structure, showing no text or symbols4. Adjusting the humidity
Press the key to set the desired humidity (RH50%,60%,70%,80%AU,CO). The adjusted humidity is shown at the display for a short time. Then the display switches and the humidity of the room is shown. When the room humidity is 3% less than the set humidity the compressor of the unit will turn off automatically. When the humidity of the room is getting 3% higher than the set humidity, then the compressor will restart again automatically. If the „Run“ lamp is blinking, then the compressor does not work. The humidity in the room is lower than the adjusted value. If the “Run” lamp is permanently on, then the compressor is working.
Comfort mode (indicate AU in the display)
a) When ambient temperature is below 5, the compressor will stop working.
b) When ambient temperature is at or above 5 and below 20, the appliance will automatically set the humidity level at 60%.
c) When ambient temperature is above 20 and below 27, the appliance will automatically set the humidity level at 55%.
d) When ambient temperature is above 27, the appliance will automatically set the humidity level at 50
5. TANK FULL
If this indicator (WF) illuminates, it means tank is full of water, and unit will operate with fan only(The compressor will stop running automatically, until the tank is emptied).
PRECAUTIONS
- The dehumidifier shall not operate if the humidity setting is higher than the ambient humidity.
- Drain the water in the water storage tank when the water in the tank is full and the water level indicator light(WF) illuminates. Then install the empty water tank back to its position, so the unit can continue its operation.
- When the unit stops, you have to wait for 3 minutes before you can restart the unit to protect the compressor from damage.
- The operational temperature range for this unit is 5-35 C°.
- If the dehumidifier does not start (The „Run“ light is blinking or off) or the dehumidifier makes intermediate stop on unknown reasons, please check the plug and power supply for poor connection. If the plug and power supply are in normal condition, wait for 10 minutes and restart the unit (because take about 10 minutes to reposition). If the unit still does not start in 10 minutes, please contact your local distributor service station for repair.
- When the dehumidifier is in operation, the running compressor will produce heat and make the room temperature higher. That is normal.
Water drainage:
- If the water tank is full, then a red light will go on and the appliance will stop working. Wait ca 15min before the water tank is removed. Residual water can drop into the water tank at that time. Remove the water tank carefully, that the floater is not damaged and pour out the water (Fig 1+2).
- The water is not suitable for personal usage (drinking, washing etc.).
- After the water tank is inserted wait for ca 3min then the appliance can be restarted.
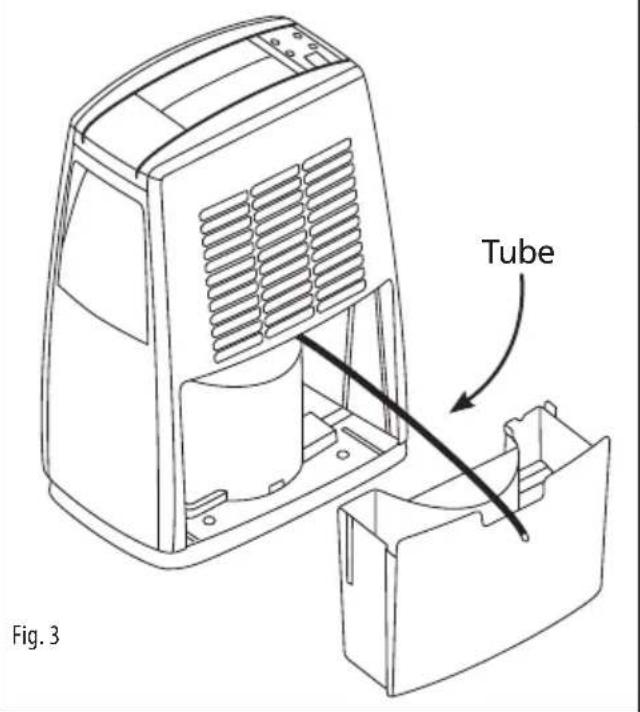
Continuous drainage:
With a pipe (not supplied with the appliance, can be ordered at Steba as an additional accessory), which is applied to the water out hole (Fig3), the water can be drained into a sink. Take care that the appliance is not placed lower than the sink. Remove the water tank and attach the pipe at the water out hole. Insert the water tank carefully again.
Defrost:
At room temperatures bellow 5°C the appliance will defrost. The compressor stops working, the fan keeps running. At the panel the „Defrost“ lamp is on.
Cleaning and maintenance:
- Before cleaning the appliance the humidity regulator should be turned to "Off" and the plug should be pulled out of the socket.
- The water tank should be emptied every day. Take care that the floater is not damaged. Rinse the tank every 2 weeks with a normal wash-up liquid.
- Open every week the filter at the back and pull the filter gently downwards (Fig4). Rinse the filter in warm soap water and dry it completely. Re-insert the filter and close it.
• Attention: The appliance is heavy! - The outer shell should be cleaned with a damp cloth.
- When the appliance is not used for quite a while the filter and the water tank should be cleaned.
- Store the appliance in a vertical way.
Failure list
| Problem Possible Reason | |
| Dehumidifier is not working | · No power supply (Check Fuse or the socket)· Water tank is not inserted completely· Check if the floater is in the water tank. |
| Dehumidifier produces no or only little water | · Air humidity too low· Air inlet or outlet covered or blocked· Doors or windows of the room are open· Filter full |
| Vibrating dehumidifier Floor not plane | · Place some foam material bellow the appliance |
Correct Disposal of this product

This marking indicates that this product should not be disposed with other household wastes throughout the EU. To prevent possible harm to the environment or human health from uncontrolled waste disposal, recycle it responsibly to promote the sustainable reuse of material resources. To return your used device, please use the return and collection systems or contact the retailer where the product was purchased. They can take this product for environmental safe recycling.
Packaging disposal: Do not throw away the package materials. Please put it in the recycling bin.

Gift box: Paper, should be put to the old paper collection point. Plastic packaging material and foils should be collected in the special collection containers.
Service and Repair:
If the appliance must be repaired, please get in touch with your trader or with the manufacturer:
natural_image
Line drawing of a computer tower with ventilation slots and a highlighted internal component (no text or symbols)
natural_image
Pure technical line drawing of a mechanical component or bracket (no text or symbols)Fig. 2
natural_image
Diagram of a portable air purifier with internal cooling unit and attached circuit board (no text or symbols)1. Mise en service
natural_image
Line drawing of a computer tower with ventilation slots and a highlighted internal component (no text or symbols)
natural_image
Line drawing of a mechanical component or bracket with no visible text or symbolsFig. 2
Permanente Afvoer

text_image
Slang Fig. 3Reiniging de Filter

natural_image
Diagram of an air purifier with a drain outlet and internal grid structure, showing no text or symbols1. Ingebruikname
natural_image
Line drawing of a computer tower with ventilation slots and a highlighted internal component (no text or symbols)
natural_image
Line drawing of a mechanical component or bracket with no visible text or symbolsFig. 2
Konstant afløb

text_image
slange Fig. 3Rengøring af filter