
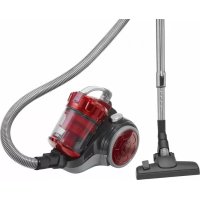
BS 1714 A CB - Vacuum Cleaner BOMANN - Free user manual and instructions
Find the device manual for free BS 1714 A CB BOMANN in PDF.

| Product type | Cordless stick vacuum cleaner |
| Brand | Bomann |
| Model | BS 1714 A CB |
| Color | White and gray |
| Net weight (unit only) | 1.24 kg |
| Battery type | NiMH, 10 x 1.2 V, 1800 mAh |
| Runtime | 20 minutes maximum |
| Charging time | 12 hours (first charge 12-14 h) |
| Adapter input | AC 100-240 V, 50/60 Hz, 0.3 A |
| Adapter output | DC 18 V, 200 mA |
| Adapter protection class | II |
| Suction type | Dry only, small amounts of dirt |
| Dust container capacity | Not specified in the manual |
| Filtration system | Coarse dust filter and fine dust filter |
| Included accessories | Floor nozzle with turbo brush, telescopic crevice tool, wall charging base, wall bracket, screws and plugs |
| Use | Floor vacuum or table vacuum (detachable base unit) |
| Filter maintenance | Washable in water, dry before reassembly |
| Housing cleaning | Slightly damp cloth, do not immerse |
| Storage | On the charging base or in its original packaging |
| Recommended charging temperature | 0 °C to +40 °C |
| Safety | Use by children >8 years under supervision; do not vacuum liquids or sharp objects |
Frequently Asked Questions - BS 1714 A CB BOMANN
User questions about BS 1714 A CB BOMANN
0 question about this device. Answer the ones you know or ask your own.
Ask a new question about this device
Download the instructions for your Vacuum Cleaner in PDF format for free! Find your manual BS 1714 A CB - BOMANN and take your electronic device back in hand. On this page are published all the documents necessary for the use of your device. BS 1714 A CB by BOMANN.
USER MANUAL BS 1714 A CB BOMANN
natural_image
Black and white photo of a compact vacuum cleaner with green handle and black body (no text or symbols visible)CE
natural_image
Simple line drawing of a device with a downward arrow indicating motion (no text or symbols)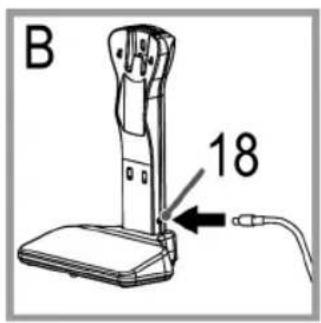
natural_image
Technical line drawing of a mechanical device with a labeled component (no text or symbols present)
natural_image
Line drawing of a vacuum cleaner's side view showing the hood and arm (no text or symbols)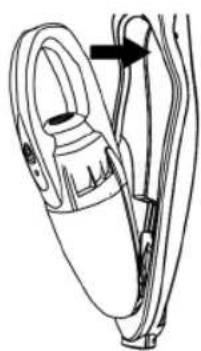
natural_image
Line drawing of a handheld device with a loop and cable, no text or symbols present
natural_image
Line drawing of a mechanical device with internal components and mounting brackets (no text or symbols)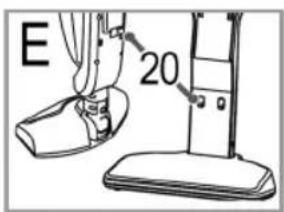
natural_image
Technical line drawing of a mechanical component with an arrow indicating direction (no text or symbols)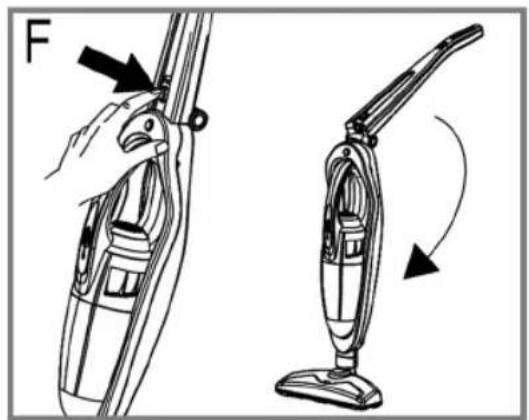
natural_image
Line drawing of a hand using a vacuum cleaner to adjust the air gap (no text or symbols present)Demontage/Wartung
Demontage / Onderhoud • Démontage / Entretien • Desmontaje / Mantenimiento
Thank you for choosing our product. We hope you will enjoy using the appliance.
Symbols in these Instructions for Use
Important information for your safety is specially marked. It is essential to comply with these instructions in order to avoid accidents and prevent damage to the machine:

WARNING:
This warns you of dangers to your health and indicates possible injury risks.

CAUTION:
This refers to possible hazards to the machine or other objects.

NOTE: This highlights tips and information.
Contents
Overview of the Components ....3
Assembly 4
Disassembly/Maintenance....5
General Notes......32
Special Safety Instructions for this Device ....32
Overview of the Components / Delivery Scope ....33
Unpacking the Device 33
Notes on Use....33
On/off Switch (3 and 15)....33
Assembly and Battery Charging....34
Installing the Charging Station on a Wall....34
Assembly of the Appliance....34
Charging the Battery 34
Using the Device....34
Telescopic Crevice Nozzle on the Basic Unit 34
Emptying the Collection Container 34
Cleaning 35
Components 6 to 8....35
Floor Nozzle 35
Storage....35
Troubleshooting....35
Technical Data....35
Disposal 36
Removing the Battery/Battery Disposal....36
Meaning of the "Dustbin" Symbol 36
General Notes
Read the operating instructions carefully before putting the appliance into operation and keep the instructions including the warranty, the receipt and, if possible, the box with the internal packing. If you give this device to other people, please also pass on the operating instructions.
- The appliance is designed exclusively for private use and for the envisaged purpose. This appliance is not fit for commercial use.
- The mains adaptor is only suitable for use in dry rooms.
- Check if the output current, voltage and the polarity of the mains adaptor match the information on the connected appliance!
- Do not touch the connected mains adapter with wet hands!
- If necessary, disconnect the appliance from the power adaptor.
- Ensure that the cable of the mains adapter does not become kinked, jammed, driven over or come into contact with heat sources.
- Do not use a damaged mains adapter.
- Do not repair the appliance yourself, but visit an authorized specialist.
- The device and the mains lead have to be checked regularly for signs of damage. If damage is found the device must not be used.
- Use only original spare parts.
- In order to ensure your children's safety, please keep all packaging (plastic bags, boxes, polystyrene etc.) out of their reach.

WARNING:
Do not allow small children to play with the foil. There is a danger of suffocation!
Special Safety Instructions for this Device
-
This appliance can be used by children aged from 8 years and above and persons with reduced physical, sensory or mental capabilities or lack of experience and knowledge if they have been given supervision or instruction concerning use of the appliance in a safe way and understand the hazards involved.
• Children shall not play with the appliance. -
Cleaning and user maintenance shall not be made by children without supervision.
- The device is intended for use with safety extra-low voltage. Connect only to a power supply according to the specifications on the rating label.
- If the connection cable of this device has been damaged, it must be replaced with a special connection cable available from the manufacturer or its customer service.
- Use only the mains adapter "YLS0041A-E180020" included in the scope of deliveries.
- Do not suck in combustible substances or liquids!
- Avoid vacuuming sharp or pointed objects!
- Never vacuum without the filter installed.
Overview of the Components / Delivery Scope
Page 3
1 Basic unit
2 Charging indicator lamp
3 On / off switch on the basic unit
4 Handle on the basic unit
5 Telescopic crevice nozzle
6 Dirt collection container
7 Coarse dust filter
8 Fine dust filter
9 Suction inlet
10 Motor housing with air outlet
11 Floor nozzle with turbo brush
12 Unlock button for the basic unit
13 Unlock button for folding handle
14 Folding handle with appliance holder
15 On / off switch for device with floor nozzle
Page 4
16 Wall holder
17 Base
18 Socket for mains adapter
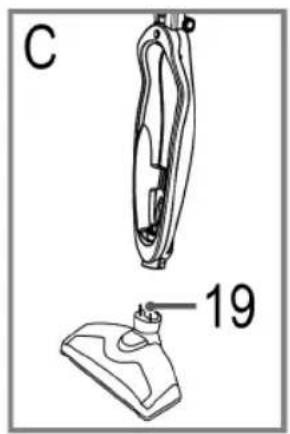
19 Contact pins
20 Charging contacts
Page 5
21 Locking / Unlocking for floor nozzle
22 Turbo brush
23 Locking / Unlocking for floor crevice nozzle
24 Locking / Unlocking for catch tray
Not shown:
1x Mains adapter
3x Dowel
3x Bolt
Unpacking the Device
- Remove the device from its packaging.
- Check the delivery scope for completeness.
- Check the device for any transport damage, in order to prevent hazards.

NOTE:
In case of any transport damage, contact your dealer immediately. Do not use a damaged device!
- Remove the transport locks on the two On / off switches.
Notes on Use
- The device is especially suitable for quickly vacuuming small amounts of dry dirt or dust.
- The device is operated via charged battery. The battery is charged with the supplied charging station. Before that, you must assemble the device and must hang it into the charging station.
- The charging station can be installed on a wall.
- Direct power supply via mains adapter is not possible.
On / off Switch (3 and 15)
O Appliance off
I Appliance on
Assembly and Battery Charging
Installing the Charging Station on a Wall

WARNING:
Make sure beforehand whether there are cables in the wall which could be damaged!

NOTE:
• A power outlet must be near.
- Assemble the wall holder without the base.
-
Hold the wall holder against the wall and mark the 3 holes.
-
Drill the holes and insert the dowels into the wall.
-
Screw the screws into the dowels and suspend the wall holder.
-
Tighten the screws by hand.
Assembly of the Appliance
Refer to the illustrations on page 4.
A If you do not want to fasten the charging station to a wall, set the wall holder onto the base. It must engage. Set the assembled charging station onto a level, solid surface.
B Connect the power cable to the connection socket on the charging station.
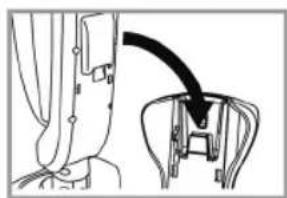
C Connect the appliance holder with the floor nozzle. It must engages. Take note of the contact pins on the floor nozzle.
D Fix the basic unit in the appliance holder.

CAUTION:
The telescopic crevice nozzle must be pushed in! If the basic unit is set into the appliance holder with extended crevice nozzle, the crevice nozzle will jam.
First, insert the crevice nozzle into the opening of the appliance holder. Then push the handle of the basic unit into the appliance holder. It must audibly engage.
E When you want to charge the battery, hang the completely assembled appliance into the charging station. Make sure of stability and correct assembly. The contacts of the appliance holder must touch the contacts on the charging station. The 4 contacts must be clean and dry. Otherwise the battery will not be charged.
F For space-saving storage, you can fold the handle of the appliance holder. To do this, press the button (13).
Charging the Battery
- Turn off the device (Position of both switches: O).
- Connect the mains adapter to a certified wall socket. Charge the device for 12 - 14 hours before first-time use.

NOTE:
• The pilot lamp flashes during charging.
- The pilot lamp is lit continuously when the battery has been charged completely.
- It is normal for the device to heat up during charging.
- Stop any charging operation after a maximum of 12 hours.

CAUTION:
Always disconnect the plug from the wall socket after 12 hours of charging.

NOTE on battery life:
Observe the following in order to prolong battery life:
- Charge the battery only when it is almost empty.
- Charge the device at an ambient temperature between 0^ and +40^ .
Using the Device
- You can use the appliance as a floor vacuum cleaner or as a handheld and upright vacuum cleaner (basic unit).
- To separate the basic unit from the appliance holder, press the button (12) and at the same time use the handle to pull out the appliance. (Page 5, Fig. G)
- Turn the appliance on or off with the on / off switch (3) or (15).

NOTE:
When you use the appliance as a floor vacuum cleaner, it can be turned on also with the on / off switch on the basic unit. In this case, it can be turned off only with the switch on the basic unit.
Telescopic Crevice Nozzle on the Basic Unit
You can extend the crevice nozzle.
- Pull out the crevice nozzle until the lock (23) on the rear of the appliance engages.
- To retract the crevice nozzle again, press the unlock button (23).
Emptying the Collection Container
Refer to fig. K on page 5.
- Turn off the device (Position of both switches: O).
- Keep the device horizontal when opening the collection container.
- Slide the unlock button (24) and at the same time turn the motor housing off the catch tray.
- Pull first the fine dust filter and then the coarse dust filter from the catch tray.
- Empty the components.
- Reinstall the components into the collection container in reverse order.
- Proceed as follows to reattach the catch tray to the motor housing:
Confirm the 3 projections on the motor housing and the 3 recesses on the catch tray. Set the projections into the recesses and at the same time tighten the motor housing. The lock (24) must engage.
Cleaning

WARNING:
Under no circumstances should you immerse the motor housing in water in order to clean it. Otherwise this might result in an electric shock or fire.

CAUTION:
- Do not use a wire brush or any abrasive items.
- Do not use any acidic or abrasive detergents.
-
The single components are not dishwasher-safe.
-
Wipe the casing with a damp cloth.
- You can wipe the mains adapter unit with a dry cloth.
Components 6 to 8
- These components can be rinsed off under running water. If need be, clean the components in warm soapy water using a soft brush.
- Allow the components to dry before you reassemble the device.
Floor Nozzle
Refer to Fig. H to J on Page 5.
- Press the unlock button (21) to pull the floor nozzle off the appliance holder.
- Remove threads and hair wound to the brush. Use scissors, if required.
Storage
- Clean the appliance as described and allow it to dry.
- You can use the previously installed charging station for storage.
- We recommend that you keep the appliance in the original packaging if it will not be used for long periods.
- Always store the appliance out of the reach of children in a dry, well ventilated place.
Troubleshooting
| Problem Possible cause Remedy | ||
| The device does not function. | The switch position has not been set correctly. | Check the switch position. |
| The rechargeable battery is empty. | Recharge the battery. | |
| Problem Possible cause Remedy | ||
| Weak suction power. | The battery is nearly discharged. | Charge the battery. |
| The filters are dirty. | Clean the filters as described under “Cleaning”. | |
| CAUTION: Restart operation only with dry filters. | ||
| Noise during operation. | A foreign body has been sucked into the floor nozzle. | Remove the foreign body. If required, separate the floor nozzle from the appliance holder. |
Technical Data
Model:....BS 1714 A CB Net weight (only battery-powered vacuum cleaner):.....approx. 1,24 kg
Mains adapter
Protection class: II
Input: AC 100 - 240 V, 50 / 60 Hz, 0.3 A
Output: DC 18 V, 200 mA
Polarity:
Battery: 10x 1.2V, 1800mAh NiMH Operating time: 20 minutes maximum Charging time: 12 hours
The right to make technical and design modifications in the course of continuous product development remains reserved. This device has been tested according to all relevant current CE guidelines, such as electromagnetic compatibility and low voltage directives, and has been constructed in accordance with the latest regulations.
Disposal
Removing the Battery / Battery Disposal
This appliance contains rechargeable nickel-metal-hydride batteries.
Remove these batteries before you dispose of the appliance.
As a consumer you are legally obliged to return the spent batteries / battery packs.

WARNING:
- Disconnect the appliance from the mains before you remove the batteries!
-
Only remove the batteries if spent.
-
Separate the motor housing from the catch tray.
- Use a small Phillips screwdriver to remove the 6 screws from the motor housing.
- Remove both halves of the housing.
- Use scissors to cut the wires on the batteries.
- Remove the batteries.
- You may dispose of them at a collection site for spent batteries or special waste. Ask your local authority for details.
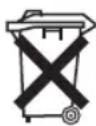
Meaning of the "Dustbin" Symbol
Protect our environment: do not dispose of electrical equipment in the domestic waste.
Please return any electrical equipment that you will no longer use to the collection points provided for their disposal.
This helps avoid the potential effects of incorrect disposal on the environment and human health.
This will contribute to the recycling and other forms of reutilisation of electrical and electronic equipment.
Information concerning where the equipment can be disposed of can be obtained from your local authority.
Instrukcja obsługi
CTC Clatronic Sp. z o.o
- Demontage/Wartung
- Symbols in these Instructions for Use
- WARNING:
- CAUTION:
- Contents
- General Notes
- Special Safety Instructions for this Device
- Overview of the Components / Delivery Scope
- Page 3
- Page 4
- Page 5
- Not shown:
- Unpacking the Device
- NOTE:
- Notes on Use
- On / off Switch (3 and 15)
- Assembly and Battery Charging
- Installing the Charging Station on a Wall
- Assembly of the Appliance
- Charging the Battery
- NOTE on battery life:
- Using the Device
- Telescopic Crevice Nozzle on the Basic Unit
- Emptying the Collection Container
- Cleaning
- Components 6 to 8
- Floor Nozzle
- Storage
- Technical Data
- Mains adapter
- Disposal
- Removing the Battery / Battery Disposal
- Meaning of the "Dustbin" Symbol
- Instrukcja obsługi
Brand : BOMANN
Model : BS 1714 A CB
Category : Vacuum Cleaner