
TCM4TR - Cassette player SONY - Free user manual and instructions
Find the device manual for free TCM4TR SONY in PDF.
| Product type | Cassette recorder/player |
| Dimensions (W x D x H) | 90.9 x 113.0 x 39.5 mm |
| Weight | Approx. 200 g (without batteries) |
| Power supply | 2 R6 (AA) batteries or 3 V DC AC adapter (not supplied) |
| Main functions | Playback/Recording 2/4 tracks, DPC (Digital Pitch Control), CUE MARKER search, auto stop, built-in flat microphone |
| Maintenance and cleaning | Clean heads, pinch roller and capstan with alcohol-moistened cotton swab every 10 hours; exterior with damp cloth |
| Safety | Do not expose to heat, avoid dust and shocks; remove batteries if not in use; keep magnetic cards away from speaker |
| Spare parts and repairability | Consult Sony dealer; AC adapter not supplied; optional external microphone |
| General information | Frequency range 250 Hz - 6,300 Hz, output power 270 mW, speaker Ø 3.6 cm |
Frequently Asked Questions - TCM4TR SONY
User questions about TCM4TR SONY
0 question about this device. Answer the ones you know or ask your own.
Ask a new question about this device
Download the instructions for your Cassette player in PDF format for free! Find your manual TCM4TR - SONY and take your electronic device back in hand. On this page are published all the documents necessary for the use of your device. TCM4TR by SONY.
USER MANUAL TCM4TR SONY
Operating Instructions.
EN
Mode d'emploi
F
TCM-4TR
For the customers in the U.S.A. Owner's Record
The model number is located at the bottom and the serial number is located inside the tape holder. Record the serial number in the space provided below. Refer to whenever you call upon your Sony dealer regarding this product.
Model No. TCM-4TR Serial No.
INFORMATION
This equipment has been tested and found to comply with the limits for a Class B digital device, pursuant to Part 15 of the FCC Rules. These limits are designed to provide reasonable protection against harmful interference in a residential installation. This equipment generates, uses, and can radiate radio frequency energy and, if not installed and used in accordance with the instructions, may cause harmful interference to radio communications. However, there is no guarantee that interference will not occur in a particular installation. If this equipment does cause harmful interference to radio or television reception, which can be determined by turning the equipment off and on, the user is encouraged to try to correct the interference by one or more of the following measures:
- Reorient or relocate the receiving antenna.
- Increase the separation between the equipment and receiver.
- Connect the equipment into an outlet on a circuit different from that to which the receiver is connected.
- Consult the dealer or an experienced radio/TV technician for help.
This device complies with Part 15 of the FCC Rules. Operation is subject to the following two conditions:
(1) This device may not cause harmful interference, and (2) this device must accept any interference received, including interference that may cause undesired operation.
You are cautioned that any changes or modifications not expressly approved in this manual could void your authority to operate this equipment.
Table of Contents
Welcome!...... 4
Getting Started
Preparing a Power Source 6
Dry Batteries 6
House Current 11
Operating the Unit
Playing a Tape 12
Playing a 4-track Tape .... 12
Playing a 2-track Tape .... 16
Adjusting the Playback Speed (DPC Function) ... 17
Recording 20
Recording Cue Marks 26
Recording from Various Sound Sources ...... 28
Recording with an External Microphone ..... 28
Recording from Another Equipment...... 29
Additional Information
Precautions 30
Maintenance 32
Troubleshooting 33
Specifications 36
Location of parts and controls 38
Index 40
LIMITED WARRANTY 41
Welcome!
Thank you for purchasing the Sony Cassette-Corder.
This Cassette-Corder is a product which Sony Corporation developed specially for visually impaired people. You can play back a tape recorded on 4 tracks at 2.4 cm/s.
Some features are:
- You can play back a 4-track tape as well as a normal 2-track tape.
- You can play back and record with two tape speeds (4.8cm/s and 2.4cm/s).
- DPC (Digital Pitch control) allows you to increase or decrease the speed of the playback sound (page 17). If you change the playback tape speed, the pitch will be automatically adjusted.
- The CUE MARKER function locates a specific point on a recording (page 26).
-
Built-in flat microphone for clear recording of speaker's voice.
-
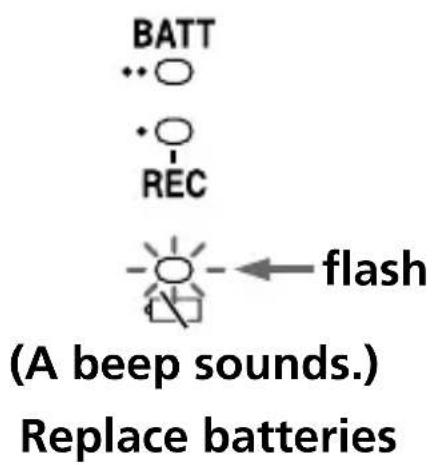
When the batteries are running out of power, a beep sounds (page 9).
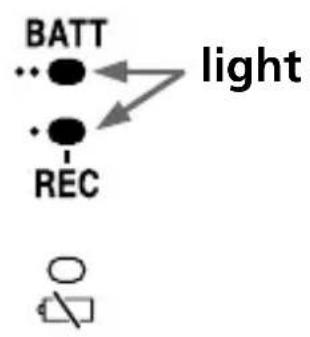
- The BATT/REC lamps indicate the remaining battery power in two steps. A beep sounds and the └ ┌ lamp shows when to replace the batteries (page 9).
- Automatic shut-off mechanism at the end of the tape (in the recording/playback mode only).
- Stop-pause-release function —The pause switch is released automatically when the ■ STOP button is depressed, so that you won’t miss a recording chance (pages 15, 22).
Notes
- Recording can be made with 2 speeds but only on 2 tracks. Note that 4-track recording cannot be made.
- A tape recorded in stereo cannot be played back properly.
- A tape recorded with 2.4cm/s tape speed using this unit cannot be played back on a normal tape recorder.
Preparing a Power Source
Choose either one of the following power sources: dry batteries (see below) or house current (see page 11).
Dry Batteries
Make sure that nothing is connected to the DC IN 3 V jack.
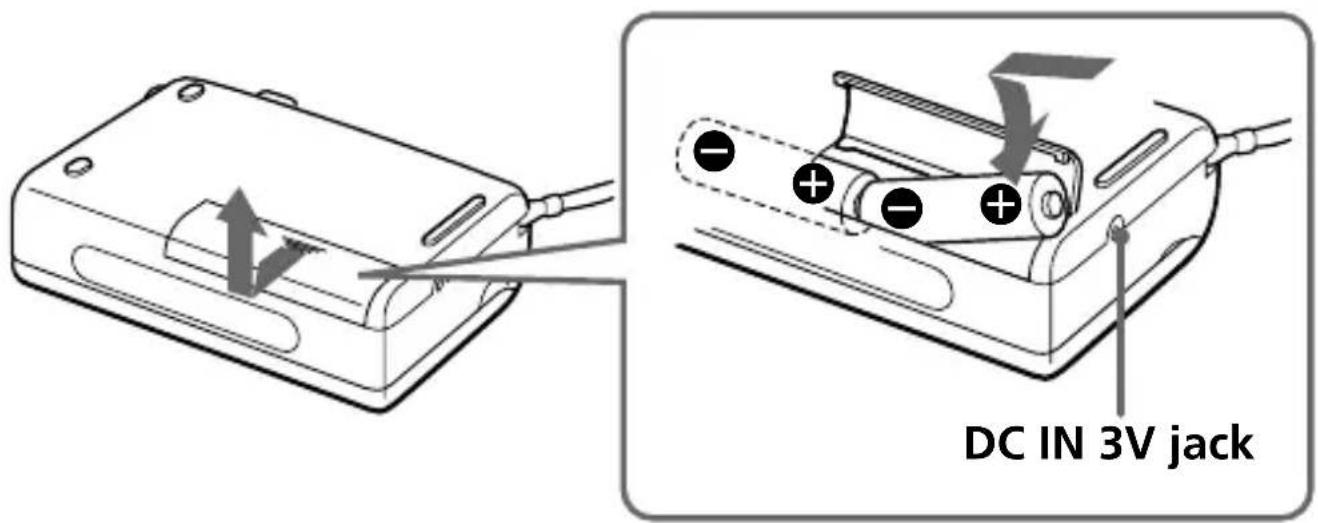
1 Open the battery compartment lid.
2 Insert two R6 (size AA) batteries (not supplied) with correct polarity and close the lid.
Notes
- Do not charge a dry battery.
- Do not use a new battery with an old one.
- Do not use different types of batteries.
- When you do not use the unit for a long time, remove the batteries to avoid any damage caused by battery leakage and subsequent corrosion.
- Dry batteries will not be expended when another power source is connected.
To take out the batteries
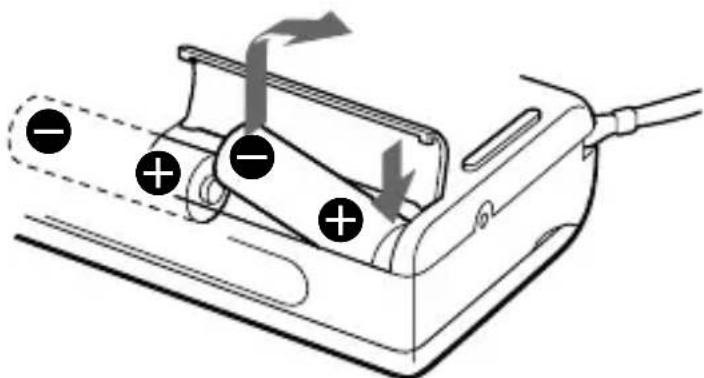
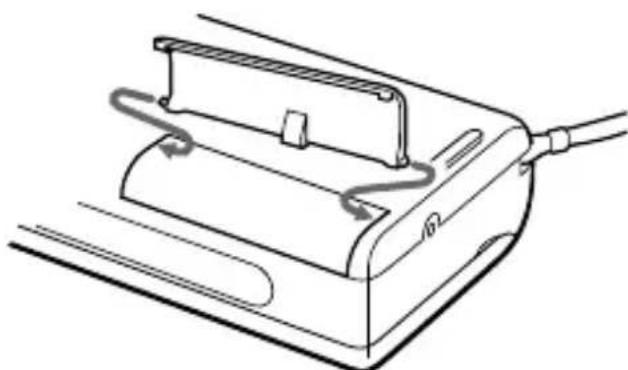
To attach the battery compartment lid if it is accidentally detached
Attach it as illustrated.
natural_image
Line drawing of a mechanical device with attached cable and scroll (no text or symbols)Continued
Preparing a Power Source (continued)
Battery life (Approximate hours) (EIAJ\*)
| Sony alkaline Sony LR6(SG) R6P(SR) |
| Recording (4.8cm/s) 6.5 1.0 |
| Recording (2.4cm/s) 7.0 1.5 |
| Playback (4.8cm/s) 6.5 1.0 |
| Playback (2.4cm/s) 7.0 1.5 |
* Measured value by the standard of EIAJ (Electronic Industries Association of Japan)(Using a Sony HF-series cassette tape)
We recommend to use long-life alkaline batteries.
Note
The battery life may shorten depending on the operation of the unit.
When to replace the batteries
When the batteries are running out of power, a beep sounds and the BATT/REC lamps go off and the └ ┌ lamp flashes. When this happens, replace the batteries with new ones.
The BATT/REC lamps change as illustrated.
flowchart
graph TD
    A["BATT"] --> B["light"]
    C["REC"] --> B
    style A fill:#fff,stroke:#000
    style C fill:#fff,stroke:#000
    style B fill:#fff,stroke:#000
    style_D["O"]
When batteries are new
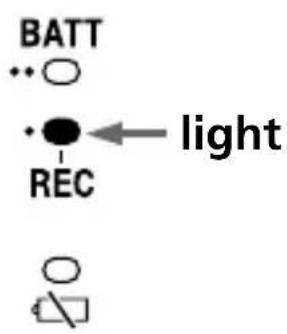
When batteries become weak
Continued
Preparing a Power Source (continued)
Notes
- During recording, you will hear the beep through the earphone. During playback, you will hear the beep through the earphone and the speaker.
- During FF (CUÊ) or REW (REVIEW), the └ ┌ lamp may flash with a beep. Only when the tape does not run properly, replace the batteries.
- In some cases when the unit is used with rechargeable batteries, only one BATT/REC lamp will light even though the batteries have been fully charged.
- After the batteries have been used for a while, the BATT/REC lamp(s) may flash with the playback sound when you turn up the volume; however, this does not mean that you need to replace the batteries.
- The unit will play back normally for a while even after lamp flashes with a beep. However, replace the batteries as soon as you can. If you do not, a loud noise may be emitted by the built-in speaker or subsequent recording will not be done correctly.
- When the tape starts running or at the end of the tape the ┌ lamp may momentarily light with a short beep. If the lamp goes off, you do not need to replace the batteries.
House Current
to the wall outlet
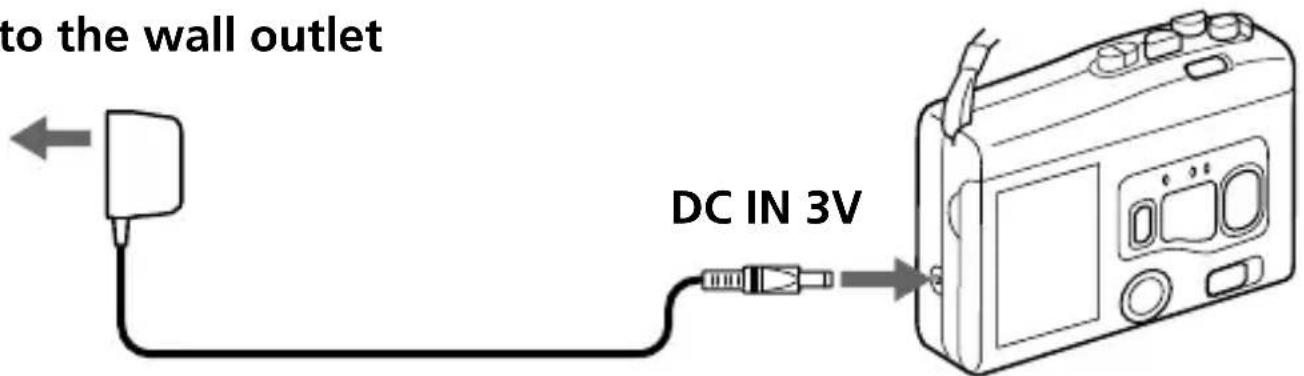
AC power adaptor (not supplied)
Connect the AC power adaptor to DC IN 3V and to the wall outlet. Use a commercially-available AC power adaptor (rated output voltage/current: 3 V DC/700 mA). Do not use any other AC power adaptor.
Polarity of the plug

natural_image
Pure electrical circuit lines without any symbolsNotes
- The voltage of power supply is different depending on the country. Please buy an AC power adaptor in the country where the product is to be used.
- Depending on the AC power adaptor, noise may be heard while using the unit. Refer to the operating instructions of the AC power adaptor.
Playing a Tape
Playing a 4-track Tape
natural_image
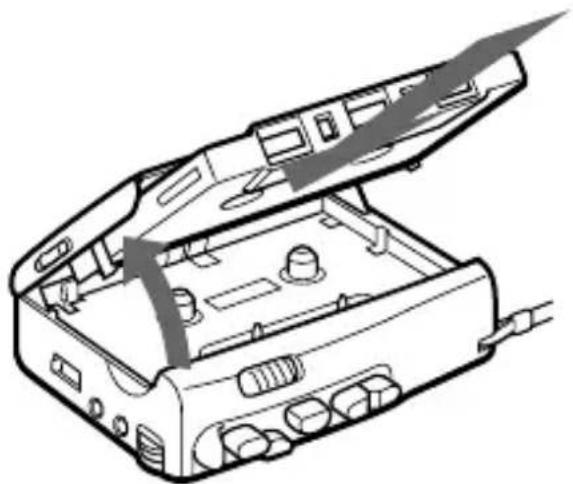
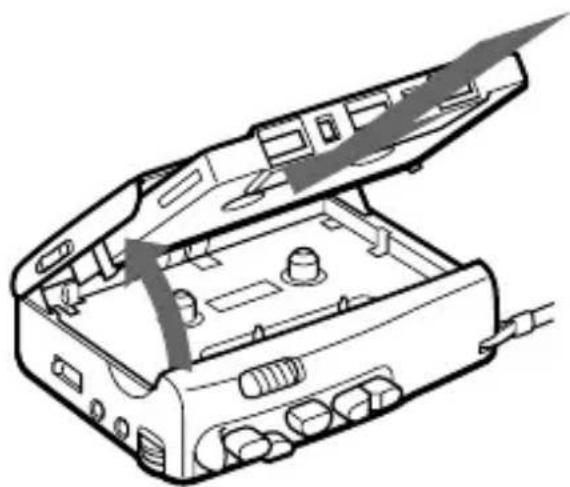
Line drawing of an open electronic device case with ports and connectors (no text or symbols)1 Open the cassette compartment lid.
2 Insert a cassette with the side to start playing facing the lid.
3 Close the cassette compartment lid.
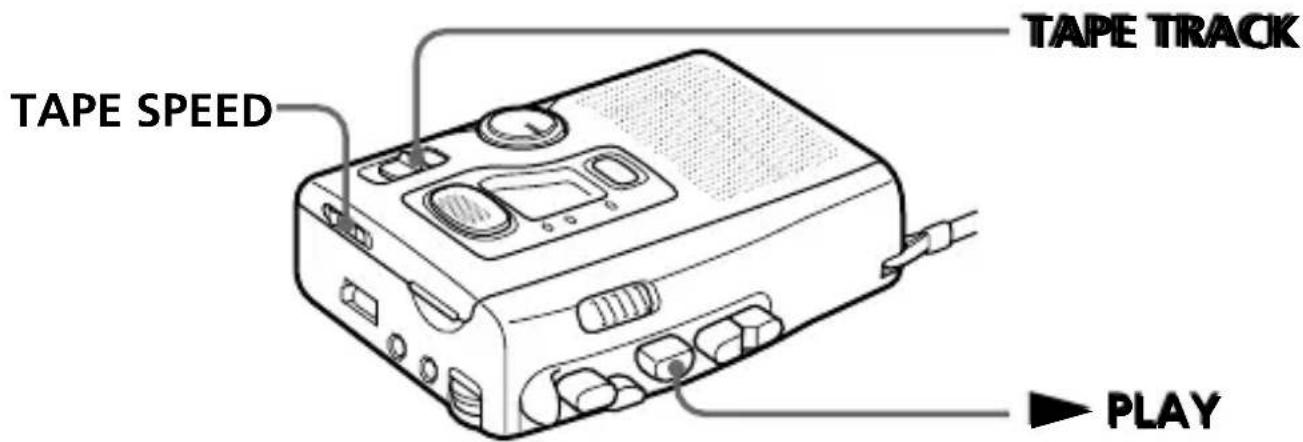
4 Set TAPE SPEED to 2.4 (cm/s).
5 Set TAPE TRACK to 1-2 or 3-4 and start playback.
To play the tape from the beginning, follow the procedure below. Make sure that side A is facing the lid.
①Set TAPE TRACK to 1-2 and press ▶ PLAY. Track 1 will be played. At the end of the tape, playback stops automatically.
②Take out the cassette and reinsert the cassette with side B facing the lid.
③Leaving TAPE TRACK at 1-2, press ▶ PLAY. Track 2 will be played.
④Take out the cassette and reinsert the cassette with side A facing the lid.
⑤Set TAPE TRACK to 3-4 and press ▶ PLAY.
Track 3 will be played.
⑥Take out the cassette and reinsert the cassette with side B facing the lid.
⑦Leaving TAPE TRACK at 3-4, press ▶ PLAY. Track 4 will be played.
When the tape comes to an end
Playback stops and the unit turns off automatically (Automatic shut-off mechanism).
After fast forward or rewind, press ■ STOP, as the unit does not automatically enter the stop mode at the end of the tape.
Continued
Playing a Tape (continued)
| To | Do this |
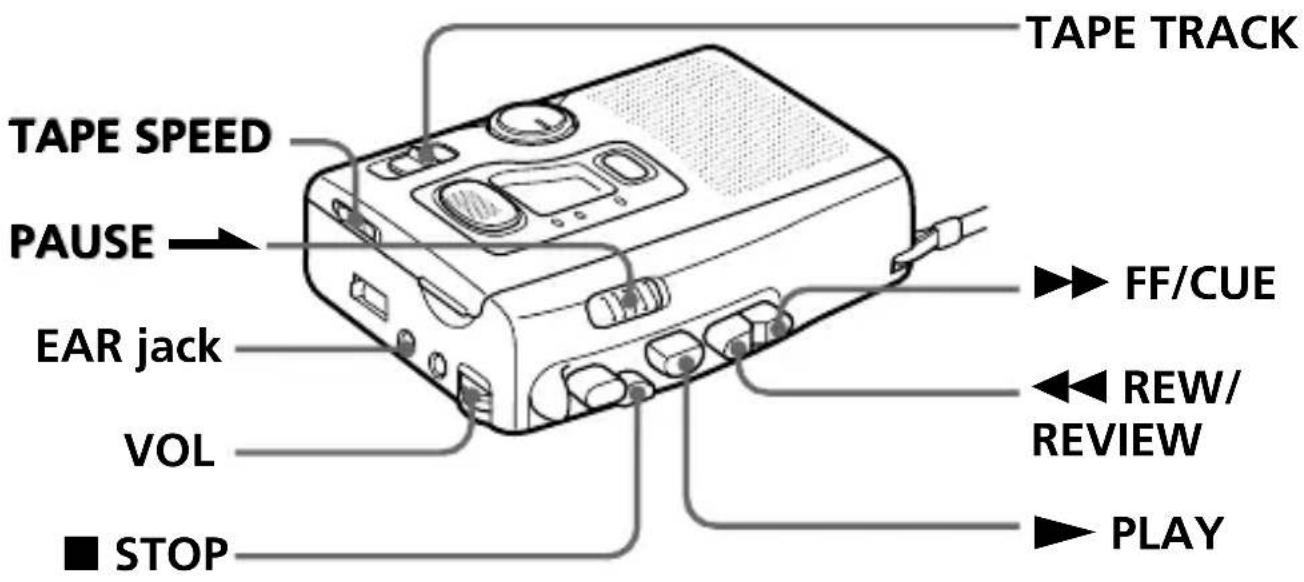
| Adjust the volume | Turn VOL. |
| Stop playback/stop fast forward or rewind | Press ■ STOP. |
| Pause playback | Slide PAUSE ➔. To release pause playback, release PAUSE ➔*. |
| Fast forward** | Press ▶▶ FF/CUE during stop. |
| Rewind** | Press ◀◀ REW/REVIEW during stop. |
* PAUSE → will be also automatically released when ■ STOP is pressed (stop-pause-release function).
**If you leave the unit after the tape has been wound or rewound, noise will be heard. Be sure to depress
■ STOP. Otherwise, the batteries will be consumed rapidly.
| To | Do this |
| Search forward during playback (CUE) | Press and hold ▶▶ FF/CUE and release it at the point you want. |
| Search backward during playback (REVIEW) | Press and hold ◀◀ REW/REVIEW and release it at the point you want. |
| Take out a cassette | Press ■ STOP and open the cassette compartment lid by hand. |
To listen through the earphones
Connect the supplied earphones to the EAR jack.
Continued
Playing a Tape (continued)
Playing a 2-track Tape
1 Proceed with steps 1 to 3 on page 12.
2 Set TAPE SPEED to 2.4 (cm/s) or 4.8 (cm/s) to match the tape speed used for recording.
3 Set TAPE TRACK to 1-2.
4 Press ▶ PLAY.
Other operations are the same as those of playing a 4-track tape described on pages 14 and 15.
Note
If the recording is made in stereo, only the L channel is heard.
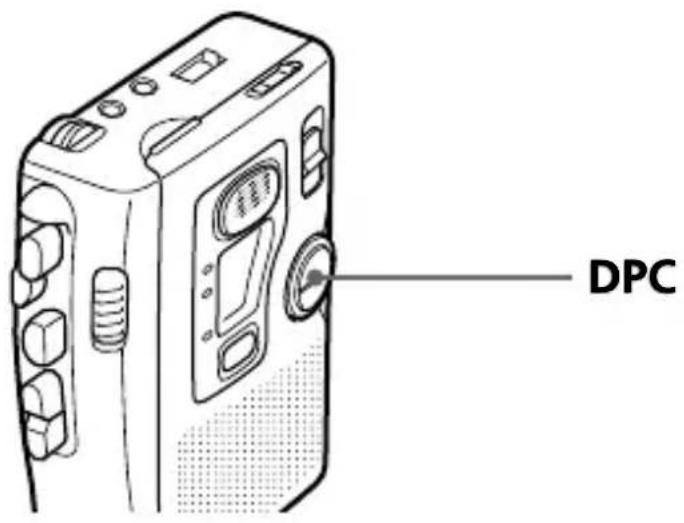
Adjusting the Playback Speed (DPC Function)
The DPC (Digital Pitch Control) function allows you to increase or decrease the playback speed.
When playing back a tape with 2.4cm/s tape speed such as a 4-track tape, the playback speed will be adjusted from approximately +100% to 0%.
When playing back a tape with 4.8cm/s tape speed, the playback speed will be adjusted from approximately +100% to -50%.
If you change the playback tape speed, the pitch will be automatically adjusted.
Continued
Adjusting the Playback Speed (DPC Function) (continued)
Adjust DPC as follows:
To play back Set DPC to
faster (2.4 cm/s tape) FAST
(4.8 cm/s tape) FAST
at normal speed Center
slower (2.4 cm/s tape) Not available
(4.8 cm/s tape) SLOW
Notes
- When playing back a tape with 2.4cm/s tape speed, the playback speed will be normal even if you set DPC to SLOW.
- Even though you use DPC, you cannot acquire the same pitch as the original. The tone will be somewhat different from the original.
- When the power of the batteries is weak, the DPC may make noise if you turn it fast. In that case turn it slowly or change the batteries.
- When DPC is turned or the volume is adjusted during playback, BATT/REC lamps may flicker.
Recording
You can record the sound easily with the built-in microphone. Use a normal (TYPE I) tape.
Make sure that nothing is connected to the MIC jack.
natural_image
Line drawing of an open electronic device casing with internal components and cable (no text or symbols)1 Open the cassette compartment lid.
2 Take out any slack in the tape and insert the cassette with the side to start recording facing the lid.
3 Close the cassette compartment lid.

4 Set TAPE SPEED to the desired tape speed.
4.8 (cm/s) for optimum sound (recommended for normal use): A 60-minute recording can be made using both sides of a C-60 cassette. 2.4 (cm/s) for longer recording time: A 120-minute recording can be made using both sides of a C-60 cassette.
5 Press ● REC.
Recording starts.
Place the unit on a hard surface such as a desk with the cassette holder side up so that the flat microphone can record effectively.
While the tape runs, the REC lamp lights and flashes depending on the strength of the sound. Recording level is fixed.
Continued
Recording (continued)
When the tape comes to an end
Recording stops and the unit turns off automatically (Automatic shut-off mechanism).
Note
2-track recording only is possible. Setting of the TAPE TRACK selector does not affect the recording. You cannot record on 4 tracks.
To Press or slide
| Stop recording ■ STOP |
| Pause recording PAUSE →To release pause recording, release PAUSE →*. |
| Take out a cassette Press ■ STOP and open the cassette compartment lid by hand. |
* PAUSE → will be also automatically released when ■ STOP is pressed (stop-pause-release function)
Note
Do not use a CrO_2 (TYPE II) or metal (TYPE IV) tape, otherwise the sound may be distorted when you play back the tape, or the previous recording may not be erased completely.
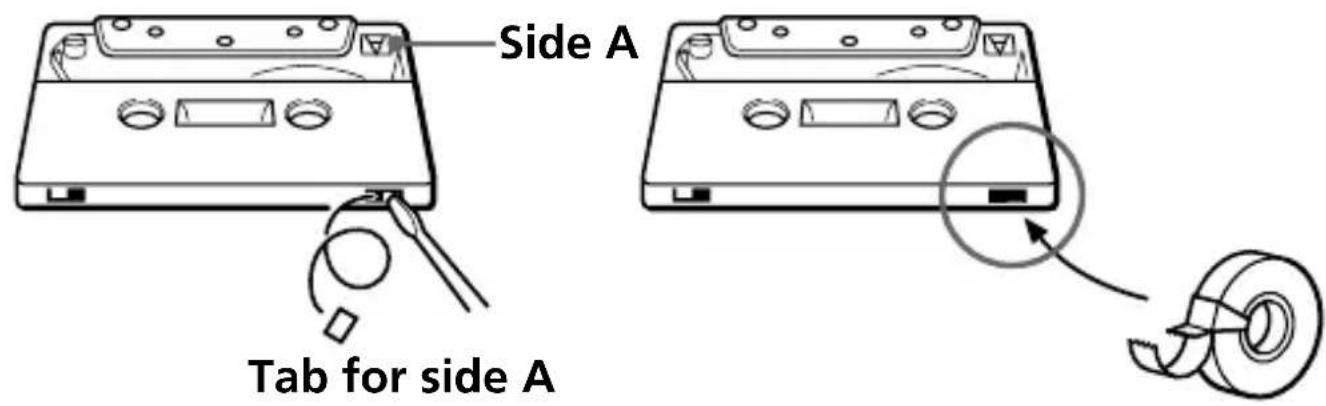
To prevent a tape from being accidentally recorded over
Break out and remove the cassette tabs. To reuse the tape for recording, cover the tab hole with adhesive tape.
Continued
Recording (continued)
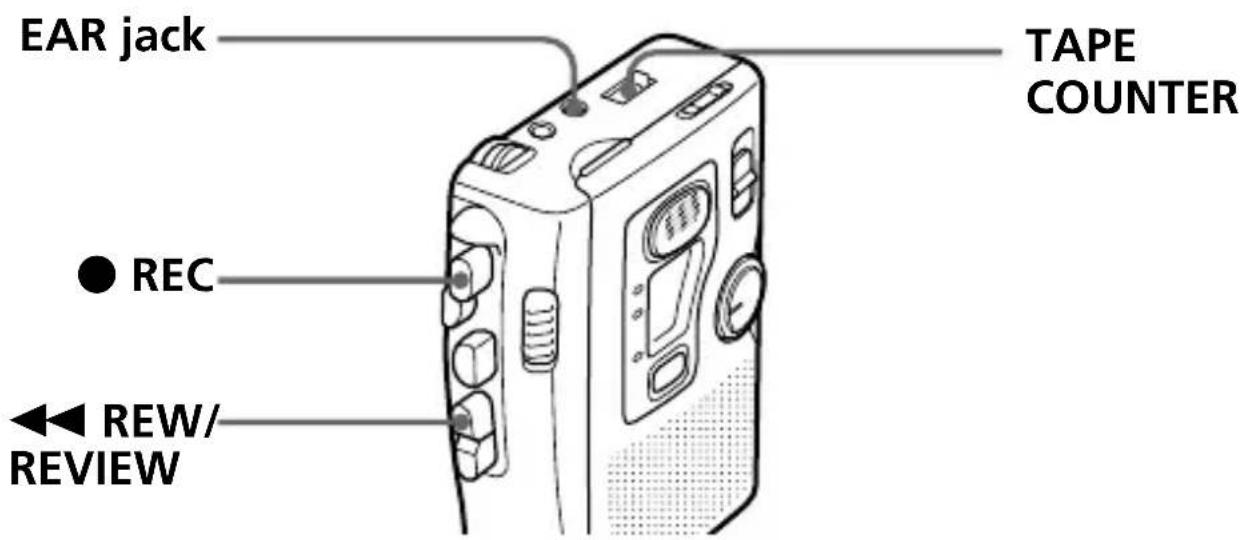
To use tape counter
Before recording, press the counter reset button to set the TAPE COUNTER to 000. It is useful to search the beginning of the recording.
To monitor the sound while recording
Connect the supplied earphone firmly to the EAR jack. The sound of monitoring can be adjusted by VOL but the recording level is fixed.
To start recording during playback
Press ● REC during playback, recording starts immediately. It is useful when you want to re-record the portion which was just recorded.
To review the portion just recorded
Press ◀◀ REW/REVIEW during recording. Release the button at the point to start playback.
Recording Cue Marks
While recording, you can record a special signal on the tape to mark a specific position.
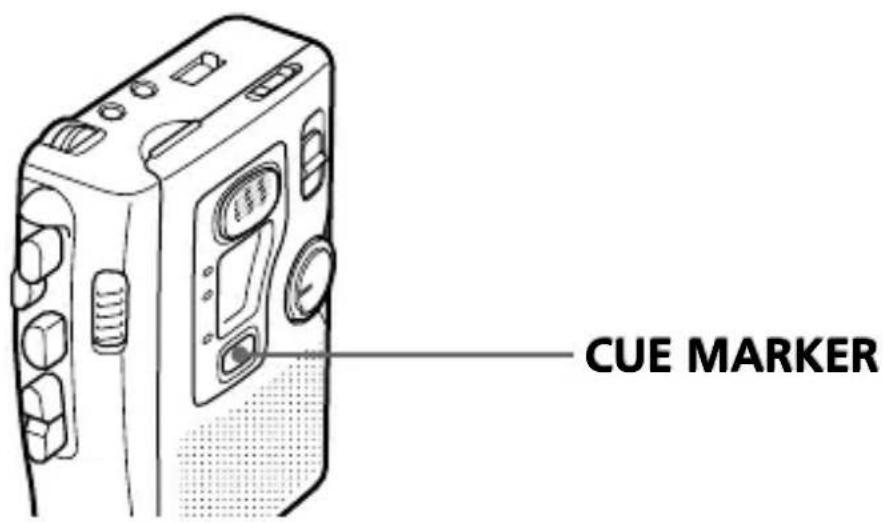
At the desired position, press CUE MARKER to record a signal.
The REC lamp goes off and a signal will be recorded on the tape. If you want to record a signal longer than that, press CUE MARKER as long as you want.
During cue and review, you will hear the beep sound at the marked position. During playback, you will not always hear the beep sound at the marked position, and even if you hear it, the sound will be very soft.
Notes
- We recommend recording cue marks when there is a break in the sound.
- During cue and review, the beep sounds differently.
- The beep may sound differently depending on the marked position on the tape because the winding speed varies from the beginning to the end of the tape.
- When you press CUE MARKER to record a signal, the REC lamp goes off for about 8 seconds, however, the recording continues.
Recording from Various Sound Sources
Notes (Before recording)
- Be sure you connect plugs firmly.
- Make a trial recording to make sure that you made connections correctly and adjusted the volume properly.
- The following examples use Sony products. If you have any problem when using other products, read the instruction manual of those products.
Recording with an External Microphone
Connect a microphone to the MIC jack. The built-in microphone will be disconnected and the sound through the external microphone will be recorded. When using a plug-in-power system microphone, the power to the microphone is supplied from this unit.
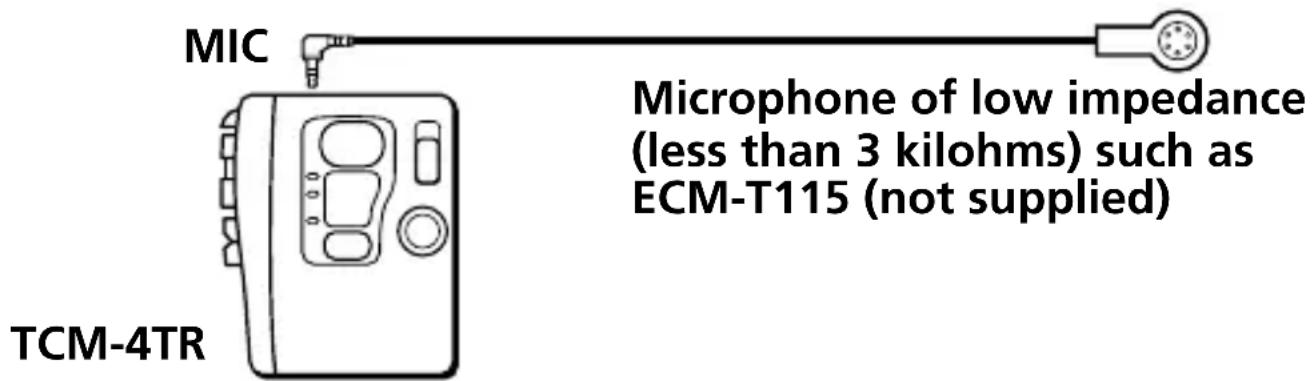
To start recording, insert a cassette and press
● REC.
Recording from Another Equipment
Connect another equipment to the MIC jack using the RK-G64HG connecting cord (not supplied).
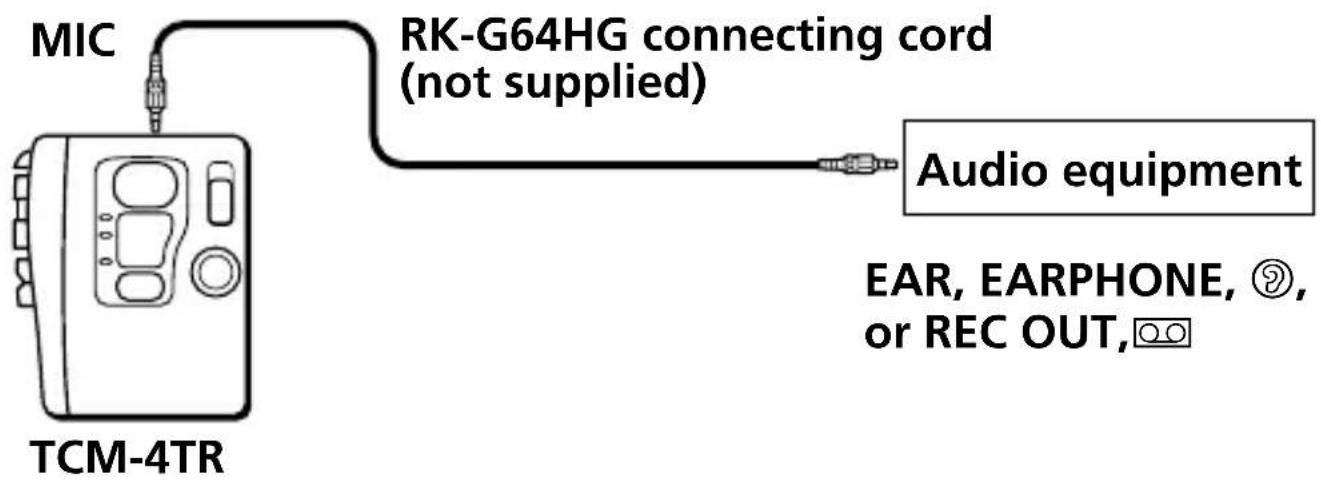
1 Insert a cassette.
2 Adjust the sound of the connected equipment.
3 Press ● REC.
Precautions
On power
Operate the unit only on 3V DC. For AC operation, use the AC power adaptor recommended for the unit. Do not use any other type. For battery operation, use two R6 (size AA) batteries.
On the unit
- Do not leave the unit in a location near heat sources, or in a place subject to direct sunlight, excessive dust or mechanical shock.
- Should any solid object or liquid fall into the unit, remove the batteries or disconnect the AC power adaptor, and have the unit checked by qualified personnel before operating it any further.
- If the unit has not been used for a long time, set it in the playback mode and warm it up for a few minutes before inserting a tape.
Keep personal credit cards using magnetic coding or spring-wound watches etc. away from the unit to prevent possible damage from the magnet used for the speaker.
On tapes longer than 90 minutes
We do not recommend the use of tapes longer than 90 minutes except for a long continuous recording or playback. They are very thin and tend to be stretched easily.
If you have any questions or problems concerning your unit, please consult your nearest Sony dealer.
Maintenance
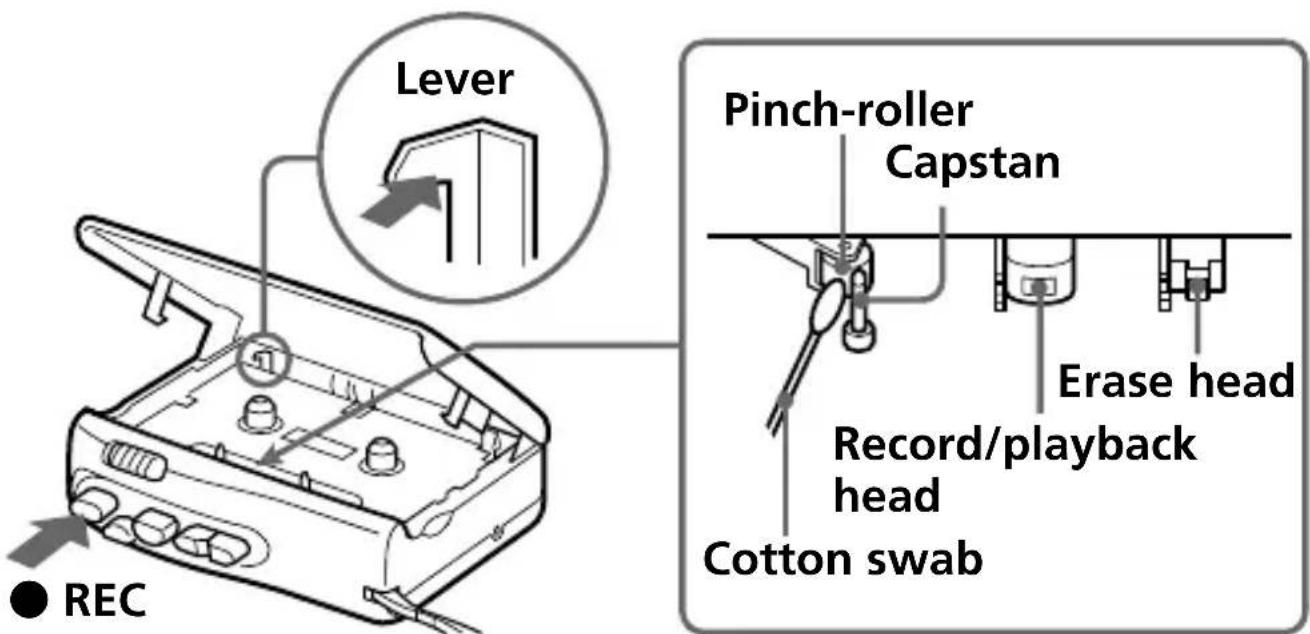
To clean the tape heads and path
Depress ● REC while pushing the lever.
Wipe the heads, pinch roller, and the capstan with a cotton swab moistened with alcohol every 10 hours of use.
To clean the exterior
Use a soft cloth slightly moistened in water. Do not use alcohol, benzine or thinner.
Troubleshooting
Should any problem persist after you have made these checks, consult your nearest sony dealer.
Recording cannot be made.
→No cassette is inserted.
→The tab on the tape has been removed. To reuse the tape for recording, cover the tab hole with adhesive tape.
→The batteries are weak. Replace both batteries with new ones.
→The record/playback head is contaminated.
The unit does not operate.
→The batteries have been inserted with incorrect polarity.
→The batteries are weak. Replace both batteries with new ones.
→PAUSE → is slid in the direction of the arrow.
→The AC power adaptor or car battery cord is not firmly connected.
→The batteries have been inserted, but simultaneously the AC power adaptor is connected and not to be done to the wall outlet.
Playback cannot be made.
→The tape has reached the end. Rewind the tape.
→The record/playback head is contaminated.
Troubleshooting (continued)
During CUE/REVIEW the tape stops or does not run. You cannot fast-forward or rewind.
→The batteries are weak. Replace both batteries with new ones.
No sound comes from the speaker.
→The earphone is plugged in.
→The volume is turned down completely.
→Set the TAPE SPEED selector firmly at the correct position.
The sound drops out, sound quality becomes worse or sound has excessive noise.
→The batteries are weak. Replace both batteries with new ones.
→The record/playback head is contaminated.
→If the cassette has been put on a speaker without its case, the sound quality may be distorted.
→CrO _2 (TYPE II) or metal (TYPE IV) tape is used.
The sound is not stable and becomes out of pitch suddenly.
→DPC is set at a point other than the center.
→The batteries are weak. Replace both batteries with new ones.
→The capstan and pinch-rollers are contaminated.
Recording cannot be erased completely.
→The erase head is contaminated.
→CrO _2 (TYPE II) or metal (TYPE IV) tape is used.
Tape speed is too fast or too slow in the playback mode.
→Improper setting of the TAPE SPEED selector. Set it to the same speed as that used for recording.
→DPC is set at a point other than the center.
While operating, some noise is heard.
→The counter reset button is pressed incorrectly. Press it correctly to set to 000.
When the tape has reached the end after fast forward or rewind, noise is heard.
→ The unit is not in stop mode. Press ■ STOP.
The sound is not normal when playing back a tape other than a 4-track tape.
→Set TAPE TRACK to 1-2.
→You cannot play back a stereo-recorded tape with this cassette-corder (see page 16).
Specifications
Recording system
2-track 1 channel monaural
Playback system
4-track 1 channel monaural
Frequency range
250 Hz - 6,300 Hz
Speaker
Approx. 3.6 cm ( 1^7/_16 in.) dia.
Power output
270 mW (at 10% harmonic distortion)
Input
Microphone input jack (minijack) sensitivity 0.21 mV for 3 kilohms or lower impedance microphone
Output
Earphone jack (minijack) for 8 ohms - 300 ohms impedance earphone
Variable range of the tape speed
from +100% to -50% (at 4.8cm/s tape speed) from +100% to 0% (at 2.4cm/s tape speed)
Power requirements
3V DC
Two R6 (size AA) batteries
Dimensions (w/h/d) (incl. projecting parts and controls)
Approx. 90.9 × 113.0 × 39.5 mm
(3^5 / 8× 4^1 / 2× 1^1 / 2in.)
Mass
Approx. 200 g (7.1 oz.) not incl. batteries
Supplied accessories
Earphone (1)
Design and specifications are subject to change without notice.
Location of parts and controls
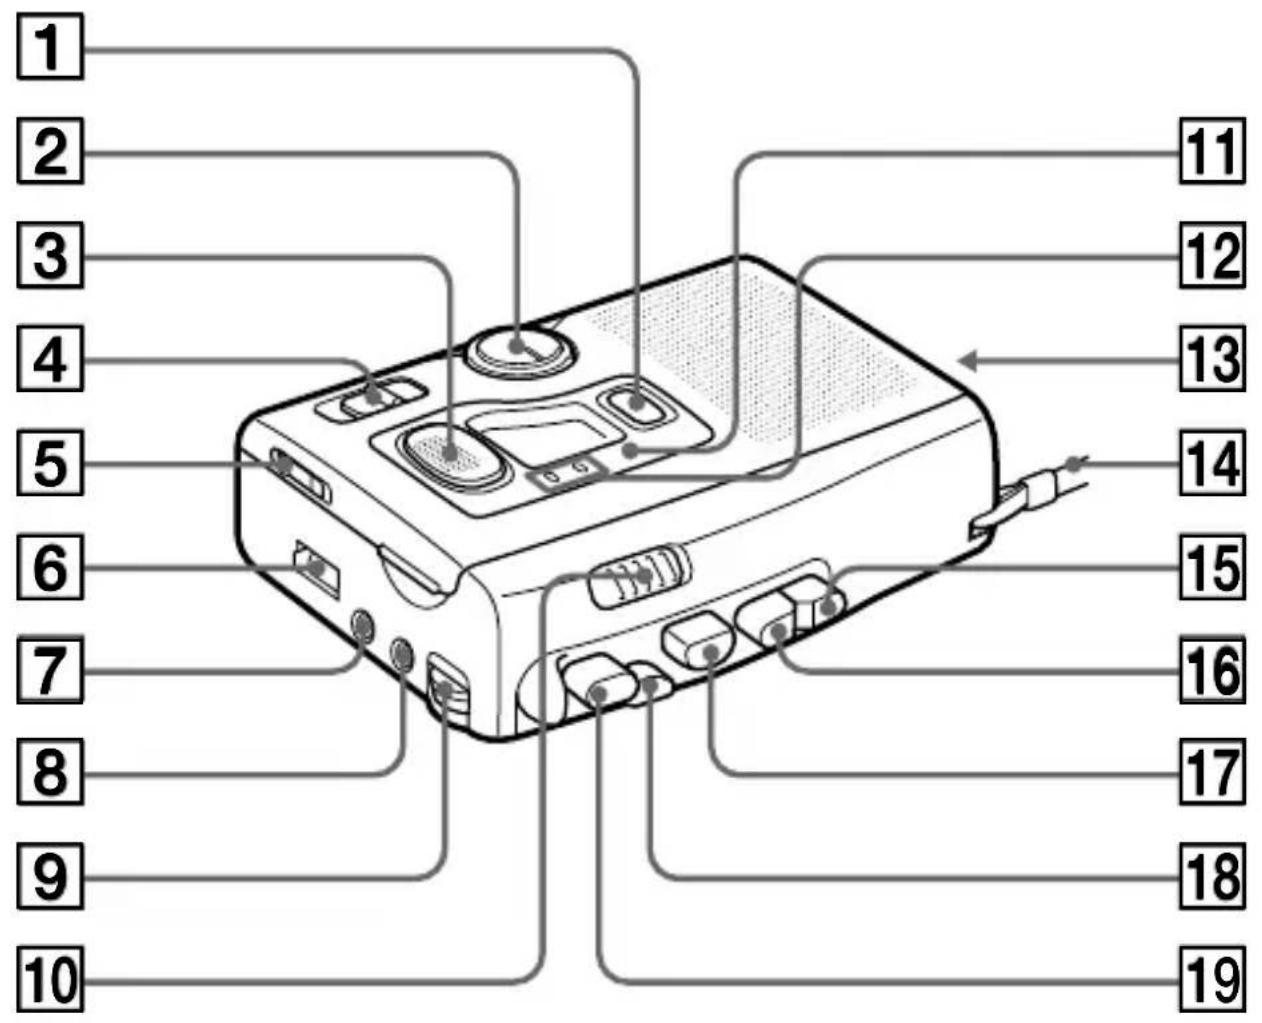
① CUE MARKER button (page 26)
② DPC (Digital Pitch Control) dial (page 17)
3 Flat mic (page 21)
4 TAPE TRACK selector (page 12)
5 TAPE SPEED selector (pages 12, 21)
6 TAPE COUNTER (page 24)
7 EAR (earphones) jack (page 24)
8 MIC (microphone) jack (pages 28, 29)
9 VOL (volume) control (page 14)
10 PAUSE → (pages 14, 22)
11 (battery) lamp (page 9)
12 BATT (battery)/REC (recording) lamps (pages 9, 21)
13 DC IN 3V jack (page 11)
14 Hand strap
15 ▶▶ FF/CUE button (page 14)
16 ◀◀ REW/REVIEW button (pages 14, 25)
17 ▶ PLAY button (pages 12, 16)
18 ■ STOP button (pages 14, 22)
19 ● REC (recording) button (page 21)
Index
A
Automatic shut-off mechanism .... 13, 22
B
Beep 9
Built-in microphone (Flat mic) ...... 21
C
Cassette tab 23
Connection -external microphone .. 28 -other equipment ...... 29
Cue marks 26
D
DPC function ...... 17
House current ...... 11
M, N, O
Microphone –built-in (flat) microphone .... 21
-external microphone .. 28
Monitoring the recording sound .... 24
P, Q
Pause
- playback 14
- recording 22
Playback
- 2-track tape ...... 16
- 4-track tape ...... 12
R
Recording 20
Rewind 14
S
Search
-backward....15
-forward 15
Stop-pause-release function .... 15, 22
T, U, V, W, X, Y, Z
Tape counter 24
Tape speed ...... 12, 21
Tape track 13
This warranty is valid only in the United States.
Table des matières
Félicitations !...... 4
Préparation
natural_image
Line drawing of a mechanical device with a cable and scroll, no text or symbols presentnatural_image
Pure electrical circuit lines without any symbolsRemarques
natural_image
Line drawing of an open electronic device casing with internal components and cable (no text or symbols)natural_image
Diagram of an open electronic device casing with internal components and a directional arrow indicating flow or movement (no text or symbols present)Sony Corporation Printed in China
M, N, O
- For the customers in the U.S.A. Owner's Record
- INFORMATION
- Table of Contents
- Getting Started
- Operating the Unit
- Additional Information
- Welcome!
- Notes
- Preparing a Power Source
- Dry Batteries
- To take out the batteries
- To attach the battery compartment lid if it is accidentally detached
- Preparing a Power Source (continued)
- Battery life (Approximate hours) (EIAJ\*)
- Note
- When to replace the batteries
- House Current
- Playing a Tape
- Playing a 4-track Tape
- Set TAPE TRACK to 1-2 or 3-4 and start playback.
- When the tape comes to an end
- Playing a Tape (continued)
- To listen through the earphones
- Playing a 2-track Tape
- Adjusting the Playback Speed (DPC Function)
- Adjusting the Playback Speed (DPC Function) (continued)
- To play back Set DPC to
- Recording
- Set TAPE SPEED to the desired tape speed.
- Press ● REC.
- Recording (continued)
- To prevent a tape from being accidentally recorded over
- To use tape counter
- To monitor the sound while recording
- To start recording during playback
- To review the portion just recorded
- Recording Cue Marks
- At the desired position, press CUE MARKER to record a signal.
- Recording from Various Sound Sources
- Notes (Before recording)
- Recording with an External Microphone
- Recording from Another Equipment
- Precautions
- On power
- On the unit
- On tapes longer than 90 minutes
- Maintenance
- To clean the tape heads and path
- To clean the exterior
- Troubleshooting
- Recording cannot be made.
- The unit does not operate.
- Playback cannot be made.
- Troubleshooting (continued)
- During CUE/REVIEW the tape stops or does not run. You cannot fast-forward or rewind.
- No sound comes from the speaker.
- The sound drops out, sound quality becomes worse or sound has excessive noise.
- The sound is not stable and becomes out of pitch suddenly.
- Recording cannot be erased completely.
- Tape speed is too fast or too slow in the playback mode.
- While operating, some noise is heard.
- When the tape has reached the end after fast forward or rewind, noise is heard.
- The sound is not normal when playing back a tape other than a 4-track tape.
- Specifications
- Recording system
- Playback system
- Frequency range
- Speaker
- Power output
- Input
- Output
- Variable range of the tape speed
- Power requirements
- Dimensions (w/h/d) (incl. projecting parts and controls)
- Mass
- Supplied accessories
- Location of parts and controls
- Index
- A
- B
- C
- D
- M, N, O
- P, Q
- R
- S
- T, U, V, W, X, Y, Z
- This warranty is valid only in the United States.
- Table des matières
- Préparation
- Remarques
Brand : SONY
Model : TCM4TR
Category : Cassette player