
FD 772 P - Oven Ariston Thermo - Free user manual and instructions
Find the device manual for free FD 772 P Ariston Thermo in PDF.
| Product type | Built-in oven |
| Brand | Ariston Thermo |
| Model | FD 772 P |
| Power supply | 230 V 1+N 50 Hz, 2.99 kW, fuse 16 A, wire section 1.5 mm² |
| Cooking modes | 9 modes: Traditional, Assisted traditional, Pastry, Fan-assisted, Pizza, Grill, Fan-assisted grill, Pyrolytic self-cleaning, Lighting |
| Number of shelves | 5 |
| Timer | Electronic 24 h with timer, immediate or delayed start |
| Temperature range | From 70 °C to 300 °C (depending on mode) |
| Rotisserie | Yes, with removable handle and timer |
| Safety | Automatic door lock during pyrolysis, heating indicator, thermal circuit breaker |
| Cleaning | Pyrolysis (75-100 min); dishwasher-safe accessories |
| Included accessories | Large grid, enamel tray, rotisserie (spit, handle, cradle, forks) |
| Spare parts references | Grid 137 833, Enamel tray 137 834, Spit 137 835, Spit handle 124 180, Cradle 125 645, Forks + screws 124 188 |
| Installation | Standard built-in, fixing with 2 screws, connection via plug or connection box |
| Standards | CE compliant (DBT 73/23 EEC amended 93/68/EEC, EMC 89/336/EEC) |
Frequently Asked Questions - FD 772 P Ariston Thermo
User questions about FD 772 P Ariston Thermo
0 question about this device. Answer the ones you know or ask your own.
Ask a new question about this device
Download the instructions for your Oven in PDF format for free! Find your manual FD 772 P - Ariston Thermo and take your electronic device back in hand. On this page are published all the documents necessary for the use of your device. FD 772 P by Ariston Thermo.
USER MANUAL FD 772 P Ariston Thermo
- Parties chaudes accesses
Safety: a Good Habit
Before you use your appliance, read this booklet carefully. It contains very important safety instructions for the installation, use and maintenance of your oven. Keep this booklet in a safe place for future reference.
- This appliance has been designed for non-professional use in the home.
- Before unpacking the appliance, make certain that it is intact. If you have any doubt, contact a qualified person before you use the appliance. Do not leave potentially hazardous packing materials within the reach of small children (plastic bags, expanded polystyrene, nails, etc.).
- The appliance must be installed by a qualified person according to the manufacturer's instructions. The manufacturer is not responsible for any damage incurred to persons, animals or possessions due to improper installation.
- The electric safety of this appliance is guaranteed only if the appliance is properly earthed upon installation, in compliance with electrical safety standards. It is indispensable to make certain that this fundamental condition is met. If you have any doubt, contact a qualified person for a thorough check of the electrical installation. Under no circumstance can the manufacturer be held responsible for any damages which might arise if the appliance is not properly earthed.
- Do not block the aeration or heat-releasing vents.
- The electrical power cord of this appliance must not be replaced by the user. If it is damaged or must be replaced, contact one of the customer service centres approved by the manufacturer.
-
This appliance is to be used exclusively for the use for which it is intended. Any other use (such as for warming a room) is unsuitable and therefore hazardous. The manufacturer cannot be held responsible for any damages caused by the improper use of the appliance.
-
The use of any electric appliance requires compliance with a few basic safety rules, as follows:
-
Never touch the appliance with wet or damp hands or feet.
- Never use the appliance when barefoot. Avoid using extension cords. If you must use one, take every precaution.
- Never try to disconnect the plug from the electrical outlet by pulling on the power supply cord or on the appliance itself.
- Do not expose the appliance to the atmospheric elements (rain, direct sunlight, etc.)
-
Do not let children or incompetent persons use the appliance unsupervised.
-
Prior to any cleaning or maintenance operation, disconnect the appliance by unplugging it or by turning off the main power switch to cut off the electrical supply.
- In case of failure and/or malfunction, turn off the appliance. For any repairs that might be necessary, contact an approved customer service centre and ensure that only original replacement parts are used. Failure to comply with these instructions may jeopardise the safety of your appliance.
- If you decide to discontinue using the appliance, be sure to render it inoperable by unplugging it and cutting the power cord. We strongly recommend that you neutralise any parts of the appliance which could be hazardous in any way, especially regarding children who might play with the appliance.
- When the grill or the oven is on, accessible parts may become very hot. Keep children at a safe distance.
- The appliance becomes hot when it is in use. Never touch the heating elements located inside the oven.
- Make quite sure that the knobs are in the " · /0 " position when you are not using the appliance.
- Use insulated oven mitts to put in or remove cooking vessels.
- Never use the oven to store flammable material.
- Never use flammable solutions (alcohol, petroleum products, etc.) near the appliance when it is in use.
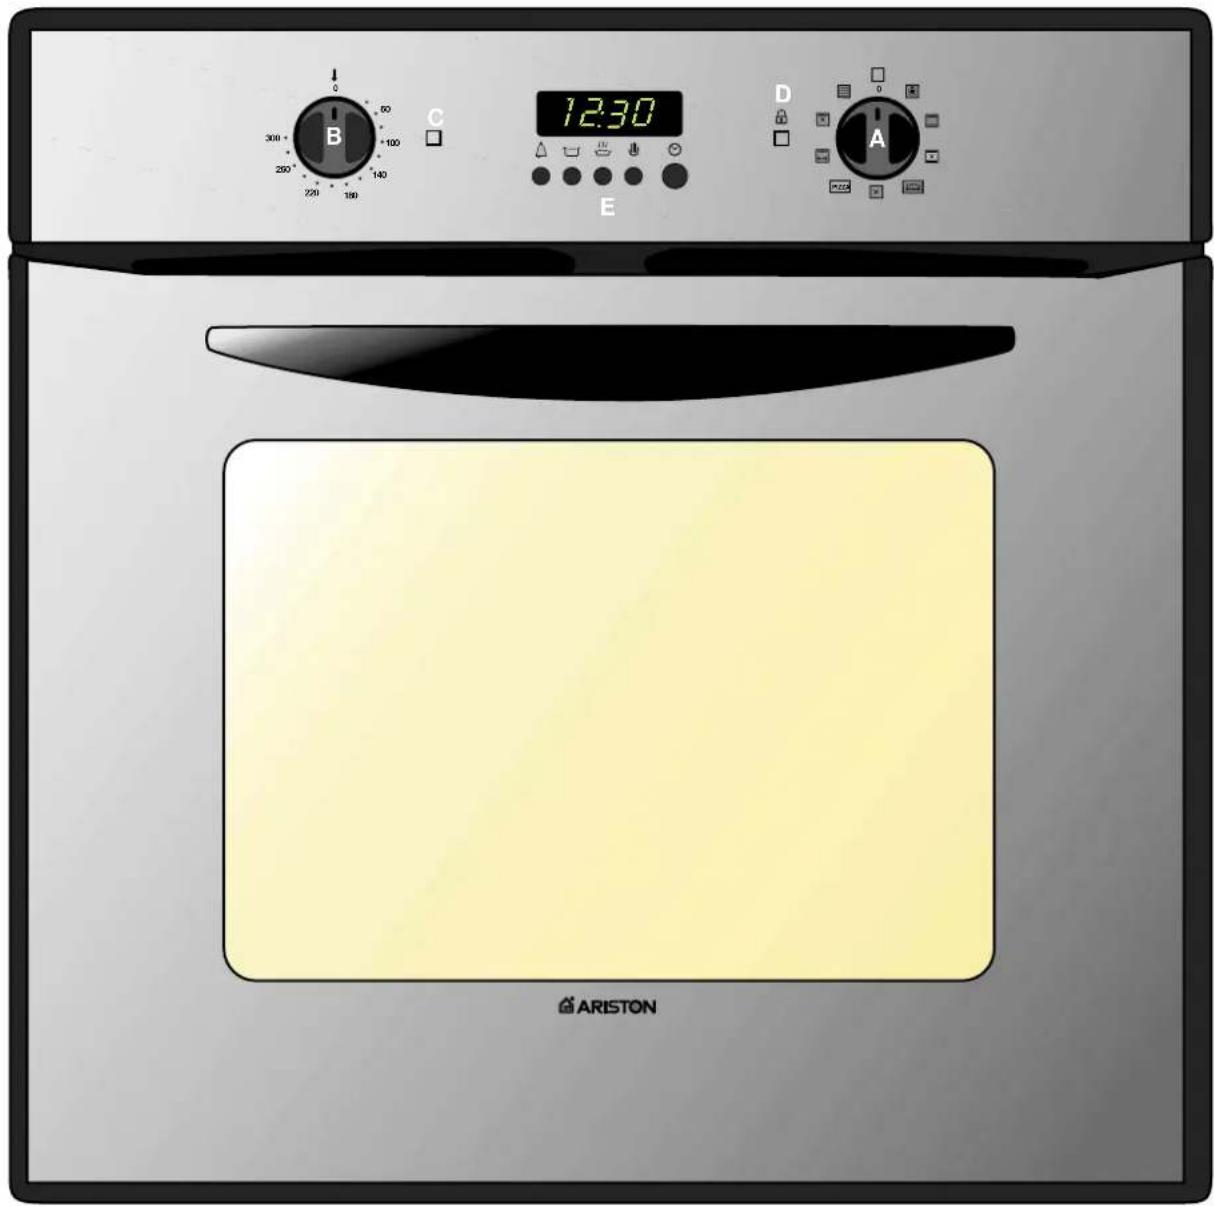
Front View
A. Function selector
B. Temperature Selector
C. Heat indicator light
D. Locking display
E. Programmer
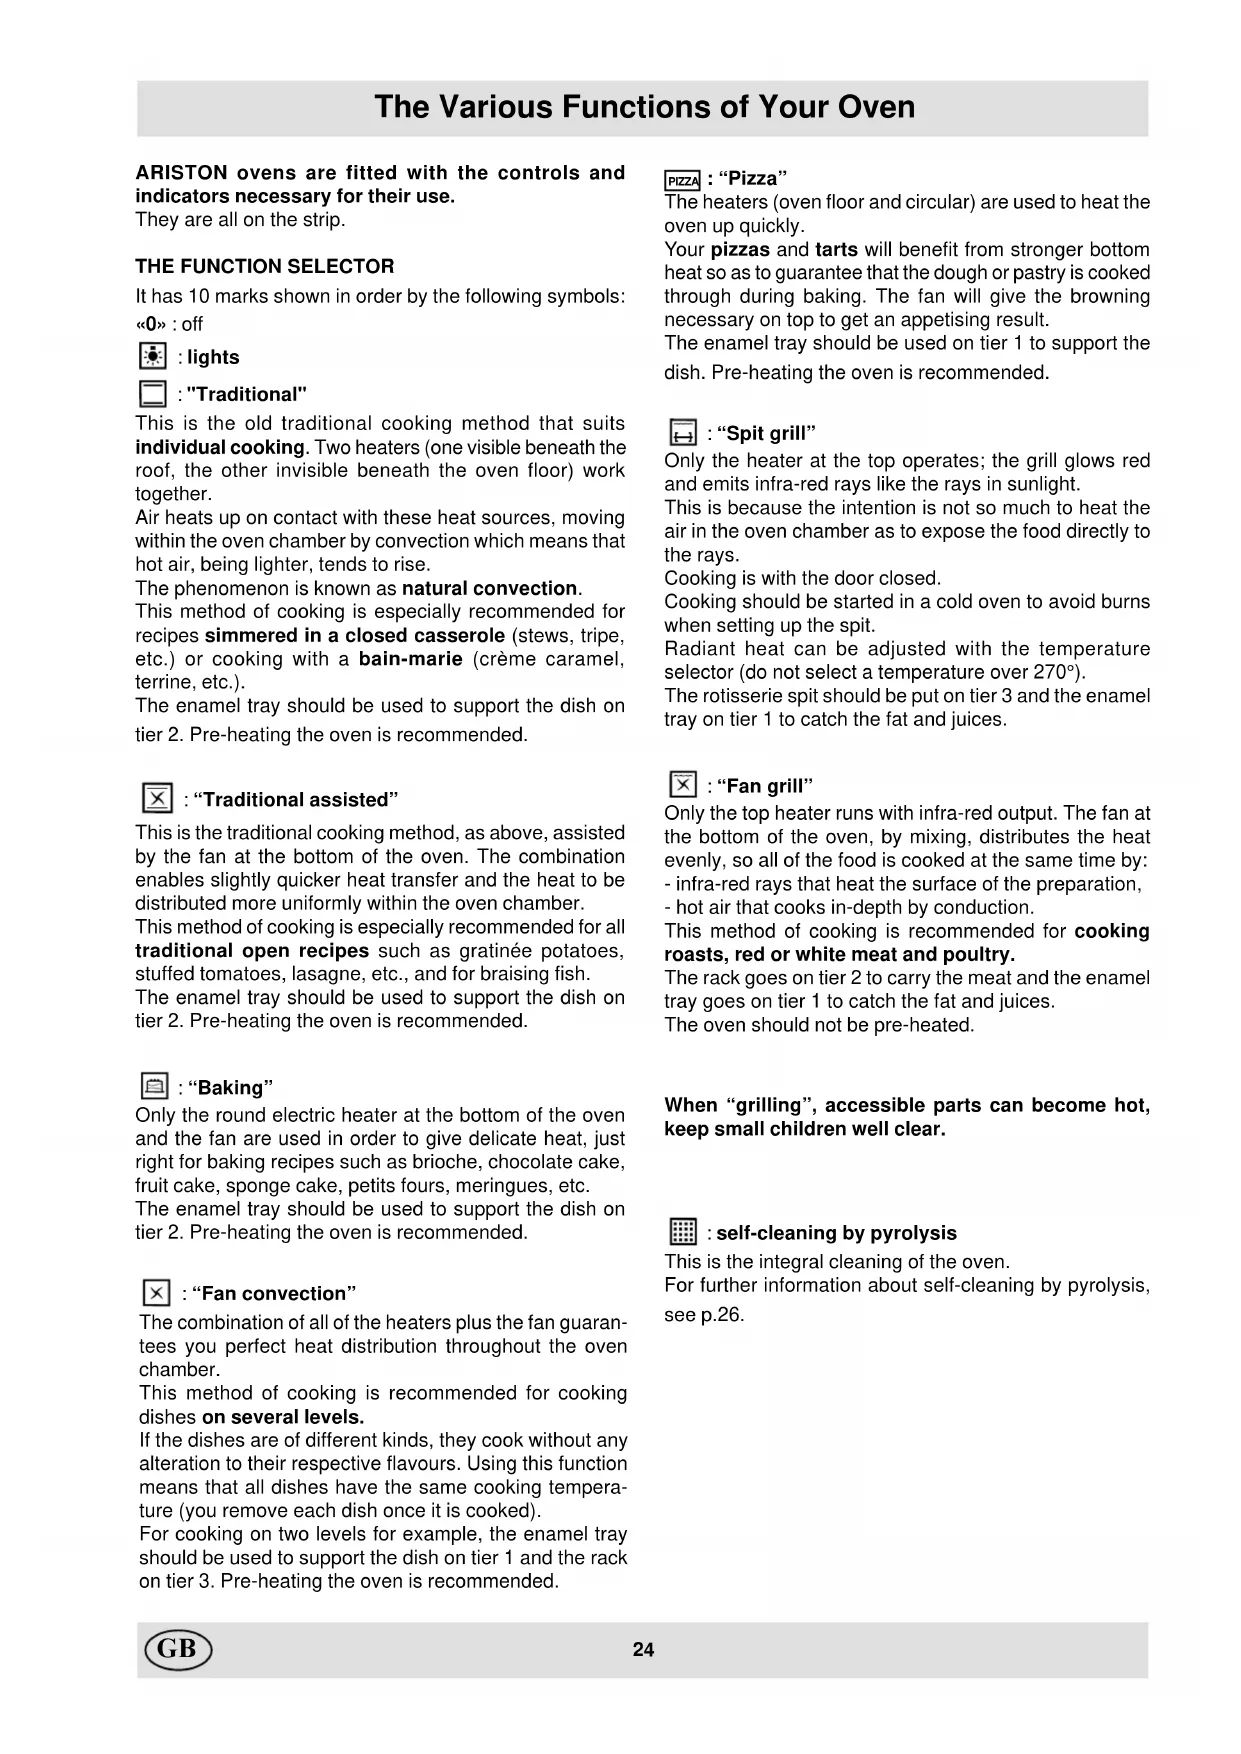
The Various Functions of Your Oven
ARISTON ovens are fitted with the controls and indicators necessary for their use.
They are all on the strip.
THE FUNCTION SELECTOR
It has 10 marks shown in order by the following symbols:
<0>off
:lights
: "Traditional"
This is the old traditional cooking method that suits individual cooking. Two heaters (one visible beneath the roof, the other invisible beneath the oven floor) work together.
Air heats up on contact with these heat sources, moving within the oven chamber by convection which means that hot air, being lighter, tends to rise.
The phenomenon is known as natural convection.
This method of cooking is especially recommended for recipes simmered in a closed casserole (stews, tripe, etc.) or cooking with a bain-marie (crème caramel, terrine, etc.).
The enamel tray should be used to support the dish on tier 2. Pre-heating the oven is recommended.

: "Traditional assisted"
This is the traditional cooking method, as above, assisted by the fan at the bottom of the oven. The combination enables slightly quicker heat transfer and the heat to be distributed more uniformly within the oven chamber.
This method of cooking is especially recommended for all traditional open recipes such as gratinée potatoes, stuffed tomatoes, lasagne, etc., and for braising fish.
The enamel tray should be used to support the dish on tier 2. Pre-heating the oven is recommended.

"Baking"
Only the round electric heater at the bottom of the oven and the fan are used in order to give delicate heat, just right for baking recipes such as brioche, chocolate cake, fruit cake, sponge cake, petits fours, meringues, etc.
The enamel tray should be used to support the dish on tier 2. Pre-heating the oven is recommended.

: "Fan convection"
The combination of all of the heaters plus the fan guarantees you perfect heat distribution throughout the oven chamber.
This method of cooking is recommended for cooking dishes on several levels.
If the dishes are of different kinds, they cook without any alteration to their respective flavours. Using this function means that all dishes have the same cooking temperature (you remove each dish once it is cooked).
For cooking on two levels for example, the enamel tray should be used to support the dish on tier 1 and the rack on tier 3. Pre-heating the oven is recommended.
Pizza : "Pizza"
The heaters (oven floor and circular) are used to heat the oven up quickly.
Your pizzas and tarts will benefit from stronger bottom heat so as to guarantee that the dough or pastry is cooked through during baking. The fan will give the browning necessary on top to get an appetising result.
The enamel tray should be used on tier 1 to support the dish. Pre-heating the oven is recommended.
“Spit grill”
Only the heater at the top operates; the grill glows red and emits infra-red rays like the rays in sunlight.
This is because the intention is not so much to heat the air in the oven chamber as to expose the food directly to the rays.
Cooking is with the door closed.
Cooking should be started in a cold oven to avoid burns when setting up the spit.
Radiant heat can be adjusted with the temperature selector (do not select a temperature over 270^
The rotisserie spit should be put on tier 3 and the enamel tray on tier 1 to catch the fat and juices.
区:“Fan grill”
Only the top heater runs with infra-red output. The fan at the bottom of the oven, by mixing, distributes the heat evenly, so all of the food is cooked at the same time by: - infra-red rays that heat the surface of the preparation, - hot air that cooks in-depth by conduction.
This method of cooking is recommended for cooking roasts, red or white meat and poultry.
The rack goes on tier 2 to carry the meat and the enamel tray goes on tier 1 to catch the fat and juices.
The oven should not be pre-heated.
When "grilling", accessible parts can become hot, keep small children well clear.
: self-cleaning by pyrolysis
This is the integral cleaning of the oven.
For further information about self-cleaning by pyrolysis, see p.26.
Your oven's different functions and their applications
TEMPERATURE SELECTOR
The temperature selector is graduated from 60^ to 300^ .
HEATING INDICATOR
The indicator light is steady red when the temperature is rising and goes off when the desired temperature is reached.
DOOR LOCK INDICATOR
The indicator l is off at the start of pyrolysis. It comes on when the temperature inside the oven is high: it is then impossible to open the door. Before pyrolysis, remember to set the temperature selector at 300^ .
About 20 minutes after the end of pyrolysis, the temperature inside the oven will have fallen to about 300^
the indicator goes off and you can than open the door.
SPIT
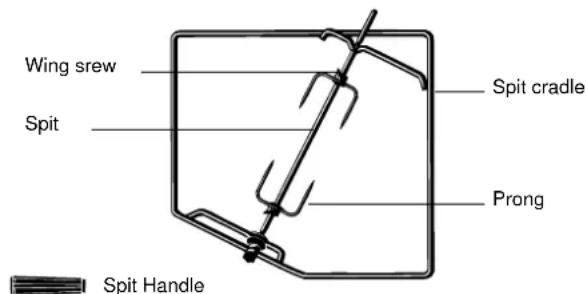
This accessory is ideal for food to be roasted that turns slowly and browns evenly until it is fully cooked. It consists of:
- a cradle that goes on the 3^rd tier of the racking so that the spit is able to locate in the hollow shaft of the drive motor at the back of the oven, behind the perforated panel.
- a skewer that goes through the meat to be roasted and has a sliding fork at either end, each fixed to the shaft by means of a wing bolt.
Watch-point: when setting up the spit, check that the skewer is properly located in the hollow shaft of the motor. Ensure you correctly position:
- the skewer in the centre of the meat for roasting,
-
the meat for roasting at an equal distance from each end of the skewer.
-
a removable handle made of insulating material that screws onto the skewer so that you can:
-
have a spit long enough to take meat for roasting of large dimensions
- avoid burning yourself when you remove the meat at the end of cooking.
Screw the handle fully on to remove the skewer:
(the handle should be removed during cooking).
Timed spit-roasting
ARISTON ovens are fitted with a spit timer. At the end of cooking, the motor continues to turn the skewer.
It does not stop when the temperature is sufficiently lowered.
All risk of carbonisation is thus avoided.
At the end of cooking, leave the function selector on the current method of cooking and raise the temperature selector to its minimum.
Accessories
Your oven has numerous cooking options.
They can only be used successfully with a number of accessories that we have chosen.
The accessories slide into different tiers of the racking inside the oven chamber and so can be put at the right height for the cooking to be done.
The ovens include 7 positions.
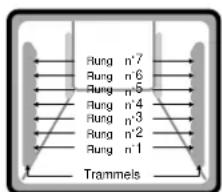
For each cooking method and in each example given, we indicate the rung number.
If you want to add to or replace the accessories below, you can get them from your retailer under the following references:
Description Ref. Description Ref.
Big rack 137 833 Skewer 137 835
Enamel tray 137 834 Skewer handle 124 180
Spit cradle 125 645 Forks (2) + bolts(2) 124 188
ENAMELTRAY
It is used:
- to support the dish for all one-level and bain-marie cooking
- to support preparations (petits fours, etc.)
- to catch juices and fat from cooking when combined with the big rack or spit.
BIG RACK
It is always used detached at the bottom.
combined with the enamel tray
- Put on tier 2, it is used to take meat, the enamel tray being on tier 1 to catch fat and juices.
- Put on the upper tier (depending on the thickness of the food) for grilling, the enamel tray is on tier 1 to catch fat and juices.
- Put on the upper tier for multi-level cooking.
We recommend that meat to be cooked is not put on the bottom of the enamel tray when "Fan grill" cooking because juices and fat heated from underneath by this method of cooking risk carbonising, being splashed onto the side panels and causing the oven to smoke.
Cleaning by Pyrolysis
SAFETY MEASURES
During pyrolysis, the temperature inside the oven reaches 450^ to 500^ . These high temperatures are needed for breaking down the residues inside the oven (see above).
Your oven is therefore equipped with the following safety devices:
- The door automatically locks as soon as the temperature reaches a certain level in order to prevent any risk of injury by burning.
The power for the heating elements cuts off in case an anomaly occurs.
Comments
1 - Despite the high interior temperature throughout the pyrolysis operation, the exterior walls of the oven remain only slightly warm, due to:
- Reinforced insulation of the cooking chamber,
- A fan which circulates air to cool the walls.
2 - Looking through the oven window, you might see particles that flare up during their destruction by pyrolysis upon contact with a heating element. This is merely a phenomenon of combustion. It is perfectly normal and poses no risk.
PRECAUTIONS TO TAKE BEFORE PYROLYSIS
1 - Be sure to eliminate any large spills with a damp sponge. We strongly advise against the use of detergents or any other oven cleaning products.
2 - Remove all accessories. They are not designed to resist the high temperatures of pyrolysis. Furthermore, some of them might obstruct the circulation of heat on the oven walls, thus harming the performance of the operation. The accessories can easily be cleaned like regular dishes, even in a dishwasher.
3 - Do not leave dish towels on the oven handle.
Important:
During pyrolysis, the surfaces may become hot. Keep young children away.
How to start pyrolysis:
- Remove all accessories from the oven. Eliminate large spills, in order to avoid any risk of producing fumes or flames.
-
Close the door.
-
Set the Function Selector to
-
Set the programme. You can choose between:
- Immediate start: same procedure as for a cooking operation,
- Delayed start: same procedure as for a cooking operation.
Pyrolysis usually takes about 75 minutes. It can last as long as 75 to 100 minutes depending on how dirty the oven is.
What happens during pyrolysis?
The indicator light comes on when pyrolysis starts: either immediately, or at the preset time if you have programmed a delayed start.
The indicator light is off when pyrolysis starts. It comes on when the temperature inside the oven reaches a certain level. It is then impossible to open the door.
What happens at the end of pyrolysis?
The indicator light goes off and stays off,
The indicator light goes off when the temperature inside the oven has dropped sufficiently. It is then possible to open the door, with the Function Selector still on
Some white dust may remain on the bottom and walls of the oven. Remove it with a damp sponge after the oven has cooled completely.
If you wish to use the residual heat to start a cooking operation, do not worry about the dust—it is harmless.
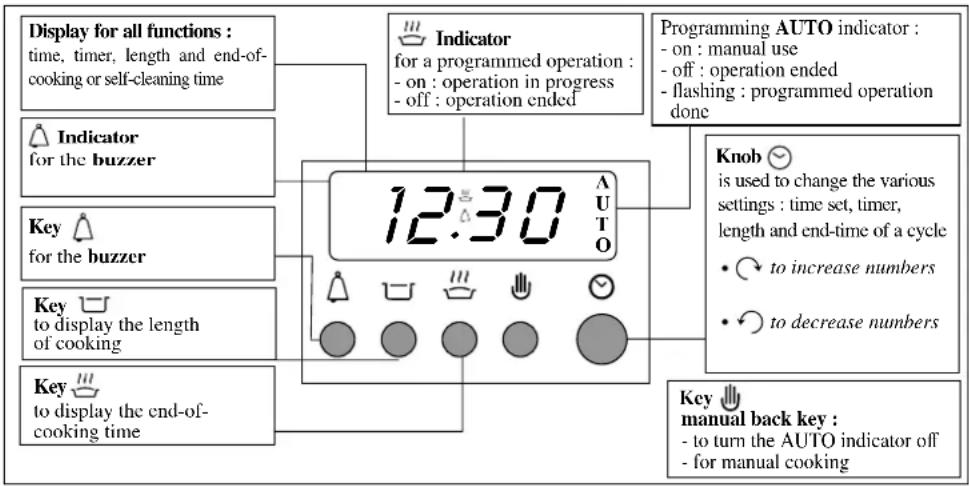
These functions are set by using four keys (pressing them) and the knob (turning it), the four keys only work together with the knob.
The "24 hour" electronic programmer enables you, at the chosen time, to program the end and the length of a cooking cycle within a time range between now and a waiting period of 24 hours.
You can check the end-of-cooking time the length of cooking and the timer by rotating just the programmer knob and selecting the appropriate symbol.
-
Time set: press both keys and at the same time and turn the knob until you get the right time.
-
Buzzer timer: to use the buzzer timer incorporated in the oven, press the key while turning the knob to display the time you want. Once you release the key, the time begins to run (the time reappears on the display).
At the end of the time set, a buzzer sounds. To stop it, press any of the four keys. The timer is independent of the operation of the oven.
Cooking without the programmer (manual mode)
- press the key if the AUTO indicator is flashing
- set the function selector to the chosen cooking mode.
- set the temperature selector to the desired temperature
: the oven heats up at once, the heating indicator cpmes on, then goes off each time the temperature is reached. - Remember to turn the oven off (by setting the function selector to "0") when the cooking is finished.
Programmed cooking
1 - Instant start
The oven starts at once and stops heating automatically at the end of the period programmed.
-
set the function selector to the position chosen.
-
set the temperature selector to the desired temperature.
display the cooking time with the key land the setting knob.
The AUTO and indicators are on, the display shows the time.
When the time has elapsed, the indicator goes off; the AUTO indicator flashes and a buzzer sounds.
To stop it, press the key and set the function selector back to "0".
2 - Delayed start
The programmer automatically determines the start-of-cooking time in accordance with the displays and the oven stops heating at the end-of-cooking time chosen.
You then:
- Check the clock is at the correct time.
- Display the end-of-cooking time: e.g. 12h30, press the key while turning the knob.
- Display the length of cooking: e.g. 50' , press the key while turning the knob During the waiting
period, the AUTO indicator is on, the indicator 山 is off, the display shows the time.
- Set the function selector to the function chosen.
- Set the temperature selector to the desired temperature.
| SOME EXAMPLES OF COOKING ON A SINGLE LEVEL | ||||||
| Recipe | Cooking method | Temperature | Time | Tier | Comments | Pre-heat |
| Bread (1kg loaf) | Traditional assisted | 210°C 30-35' | 2 On enamel tray | Yes | ||
| Individual puff pastries | Fan 200°C | 20-25' depending on thickness | 2 On | enamel tray Yes | ||
| Pizza (bread dough) | Pizza | 240°C | 10-15' | 1 | On enamel tray | Yes |
| Quiche lorraine(short pastry) | Pizza | 220°C | 30' | 1 | Dish on enamel tray | Yes |
| Cheese soufflé | Traditional assisted | 200°C 30-40' | 2 | 20 cm diam. dish on enamel tray | Yes | |
| Pâté | Tradition 180°C | 50-60' | 2 | In bain-marie in enamel tray (hot water) | Yes | |
| Leg of lamb | Fan grill 210°C | 1 hour for 1,5 to 2 kg | 2-1* Meat on grill No | |||
| Gratinée potatoes | Traditional assisted | 200°C | 40-45' depending on thickness | 2 Dish on enamel tray Yes | ||
| Fish | Tradition Fan grillSpit | 200°C240°C300°C | Depending on type of fish and thickness | 22-1*5-1* | Fillets+liquid, enamel trayWhole on grillGrilling fish on grill | Yes |
| Chicken | Fan grillSpit | 210°C270°C | 1 hour for 1,2 to 1,5 kg | 2-1*3-1* | Meat on grillSpit door closed | No |
| Roast beef | Fan grill 210°C | Variable depending on the degree of cooking | 2-1* | Meat on grill No | ||
| Roast pork | Fan grill | 210°C | 1 hour for 1kg | 2-1* | Meat on grill | No |
| Roast veal | Fan grill | 210°C | 1 hour for 1kg | 2-1* | Meat on grill | No |
| Stuffed tomatoes | Traditional assisted | 200°C | 20-25' | 2 | Dish on enamel tray | Yes |
| Brioche | Baking | 160°C 35-45' | 2 | Aluminium mould on enamel tray | Yes | |
| Cake | Baking | 160°C 60' | 2 | Aluminium mould on enamel tray | Yes | |
| Choux pastry | Baking | 200°C 20-25' | 2 | Small, non-sweetened profiteroles on enamel tray | Yes | |
| Crème caramel | Tradition 180°C | 30' | 2 | Individual ramekins in bain-marie start with hot water | Yes | |
| Sponge cake | Baking | 190°C | 30' | 2 | On enamel tray | Yes |
| Macaroons | Baking | 180°C | 15-20' depending on size | 2 On | enamel tray Yes | |
| White meringues | Baking 70-80°C | 3 hours depending on size | 2 | Drying for small meringues | Yes | |
| Golden meringues | Baking | 110°C | 2 hours depending on size | 2 | Drying for small meringues | Yes |
| Baked apples | Traditional assisted | 210°C | 20-25' depending on size | 2 Dish on enamel tray Yes | ||
| Shortbread | Baking | 190°C | 10-15' | 2 | Enamel tray | Yes |
| Apple tart | Pizza | 220°C | 30' | 1 | Mould on enamel tray | Yes |
X - Y* in the tier column

X = grill or spit put at tier X
Y = enamel tray put at tier Y to recover the juices and fat
NB the grill is always used indented downwards
Cooking tips
Cooking is by definition the change from the raw to the cooked state.
The result obtained is assessed according to various criteria: colouring, any rise in the preparation, moisture, the degree of cooking wanted, etc..
The oven settings (cooking temperatures and times) clearly depend on two important parameters:
-
the volume of the preparation,
-
the ability of the food to colour (amount of sugar or egg in the recipe).
The cooking settings suggested in the table are given with very precise parameters so you may need to alter them slightly in order to adapt them to your own dishes and the degree of cooking you want.
Advice and recommendations
MAINTENANCE, HYGIENE AND OVEN CLEANING
-
You are recommended to clean the oven every time it is used, especially after roasting. This is because you should avoid allowing stains splashed during cooking to accumulate: they will get cooked again every time the oven is used and carbonise, giving off smoke and unpleasant smells.
-
Using aluminium foil
To prevent having to clean the oven floor, you may be tempted to cover the surface with aluminium foil. We strongly advise you not to.
Aluminium foil in direct contact with the hot enamel may melt and irreparably damage the enamel.
SAFETY
- Accessible hot parts
In pyrolysis (self cleaning), the outer surfaces are hotter than during cooking: keep young children well clear.
DO NOT WORRY IF...
Minor operating problems may occur, but these are generally due to a mistaken setting or a wrong assessment of an occurrence.
-
If during cooking your oven gives off a lot of smoke:
-
Check that you have selected the right function as regards the cooking you wanted, chosen the right accessories and put the food into the oven at the recommended temperature.
- Also check the temperature selected, it may well be too high for the type of cooking in question.
- Check whether the oven may require cleaning. When stains resulting from food waste being projected on to the enamelled sides carbonise, they give off smoke and acid smells.
- Splashed fat or spillages on very hot surfaces can produce smoke.
2. If the door of your oven is locked
- if the indicator is on, set the function selector After a minute, the door of your oven unlocks.
- if the indicator is , set the function selector to d temperature selector to 0.
When the indicator on, proceed as above.
-
If cooking has finished but the fan continues to run:
-
Even with the selector on "0", do not be surprised. It will stop when the oven has cooled down sufficiently.
-
If your oven does not heat up:
Check that:
- the fuses have not blown
- the main in-feed circuit breaker has not tripped,
- that there is not a power cut.
Built-in Installation
This oven can be built into any standard space in cabinetry whose dimensions meet European standards.
No special precautions are needed for its installation, due to:
-
Reinforced insulation which limits heat exchanges,
-
Frontal ventilation requiring no air inlet.
Installation must be carried out by a qualified professional and meet all applicable safety standards. The guarantee for the appliance does not cover any damage caused by improper installation.
Proper installation is also required to ensure the users' safety and a long useful life for the appliance.
To fix the oven in place, open the door and fasten the 2 screws (provided with the appliance) in the 2 corresponding holes.
Power connection
Before connecting the power, the meter must be checked to verify the conditions for the delivery of the available electrical energy—number of phases, voltage, maximum power necessary—which must be compatible with the Ariston appliance in question.
Ariston ovens can be adapted to the following electrical installations:

Appliance meeting CE standards according to directives: DBT 73/23 CEE modified by directive 93/68/CEE CEM 89/336/CEE
There are two ways to connect the oven during installation:
- By using an electrical plug,
- By using a connection panel.
In both cases, refer to the table above for the minimum diameters of the wires and the calibration of the protective components according to the type of connection.
If the appliance is connected using a connection panel, an omnipolar switchgear with a minimum distance between contacts of 3mm must be installed upstream from the connection of the appliance.
We recommend that you use a power cord that is long enough to allow the oven to be pulled out for maintenance operations. Use only cables of HAR - H 05 - RRF quality equipped with a plug that complies with the regulations of the country where the installation takes place. The plug must be accessible.
Before any maintenance or repair operation, including replacing the light bulb, you must first disconnect the appliance.
It is hazardous to operate an appliance that has not been properly earthed.
Important: After connecting the appliance to the flexible cable, tighten all the screws of the terminal plate.
| Electrical connection | Voltage Frequency | Power | Fuse |
| 12345 N L | FR-BE-CH-DE-DK-ES-IL-GB-IT-NL-AT-GR-RE-MA-LU-IE-FI-PT-NZSE-IS230 V 1+N 50 Hz | 2,99 kW | 16 A1,5 mm |
| 12345 L2 L1 | FR-BE-NO230 V 2 50 Hz | 2,99 kW | 16 A1,5 mm |
| 12345 L L | CY-MT-AU-NZ-KW240 V 1+N 50 Hz | 3,26 kW | 16 A1,5 mm |

- Safety: a Good Habit
- Front View
- The Various Functions of Your Oven
- ARISTON ovens are fitted with the controls and indicators necessary for their use.
- THE FUNCTION SELECTOR
- : "Traditional assisted"
- "Baking"
- : "Fan convection"
- Your oven's different functions and their applications
- TEMPERATURE SELECTOR
- HEATING INDICATOR
- DOOR LOCK INDICATOR
- SPIT
- Timed spit-roasting
- Accessories
- ENAMELTRAY
- BIG RACK
- Cleaning by Pyrolysis
- SAFETY MEASURES
- Comments
- PRECAUTIONS TO TAKE BEFORE PYROLYSIS
- Important:
- How to start pyrolysis:
- What happens during pyrolysis?
- What happens at the end of pyrolysis?
- Cooking without the programmer (manual mode)
- Programmed cooking
- - Instant start
- - Delayed start
- Cooking tips
- Advice and recommendations
- MAINTENANCE, HYGIENE AND OVEN CLEANING
- SAFETY
- DO NOT WORRY IF...
- If the door of your oven is locked
- Built-in Installation
- Power connection
- There are two ways to connect the oven during installation:
Brand : Ariston Thermo
Model : FD 772 P
Category : Oven