Butler 2510C - Phone TOPCOM - Free user manual and instructions
Find the device manual for free Butler 2510C TOPCOM in PDF.

User questions about Butler 2510C TOPCOM
0 question about this device. Answer the ones you know or ask your own.
Ask a new question about this device
Download the instructions for your Phone in PDF format for free! Find your manual Butler 2510C - TOPCOM and take your electronic device back in hand. On this page are published all the documents necessary for the use of your device. Butler 2510C by TOPCOM.
USER MANUAL Butler 2510C TOPCOM
To use 'Caller ID' (display caller), this service has to be activated on your phone line. Normally you need a separate subscription from your telephone company to activate this function. If you don't have the Caller ID function on your phone line, the incoming telephone numbers will NOT be shown on the display of your telephone.
!! Wichtig!!
GB The features described in this manual are published with reservation to modifications.
2.1 Connections 8
2.2. Rechargeable batteries 8
3. USING THE TELEPHONE 9
3.1 Handset ON/OFF 9
3.2 Receiving a call 9
3.3 Making an external call 9
3.4. Making an internal call 9
3.5 Hands free mode (only butler 2510 version) 9
3.6 Internal call transfer 9
3.7. Conference Call 10
3.8 Display of call duration 10
3.9 Microfoon mute 10
3.10 Pause Key 10
3.11 Caller Identification 10
3.11.1 List of calls 10
3.11.2 Delete all entries in the call list 11
3.12 Redial memory 11
3.13 Calling from the phonebook 11
3.14 Using the alphanumeric keypad 11
3.15 Using the menu 11
4. PERSONALISATION
4.1 Adjusting speaker volume 12
4.1.1 Speaker volume during call 12
4.1.2 Set the default speaker volume 12
4.2 Adjusting the ring volume 12
4.2.1 Handset ring 12
4.2.2 Base ring 12
4.3 Choosing the ring melody 12
4.3.1 Base melody 12
4.3.2 Handset melody, external call 13
4.3.3 Handset melody, internal call 13
4.4 Activation / Deactivation of beeps 13
4.4.1 Key pressed beeptone on/off 13
4.4.2 Low battery 13
4.4.3 Handset out of range 13
4.5 handset name 13
4.6 Choosing menu language 13
4.7 Changing the PIN code 14
4.8 Setting the dialling mode 14
4.9. Flash time duration 14
4.10. Automatic answer 14
4.11 Reset 14
ENGLISH
- ADVANCED FUNCTIONS 15
5.1 Phonebook 15
5.1.1 Add an entry into the phonebook 15
5.1.2 Modify a name or number 15
5.1.3 Deleting an entry 15
5.2 Searching a handset from the base 15
5.3 choosing priority ringing 16
5.4 Using your telephone with a PABX 16
- MANAGING MULTIPLE HANDSETS 17
6.1. Setting up an additional handset 17
6.2 Removing a handset 17
6.3 Setting up a handset on another base 17
6.4 Selecting a base 17
- QUICK REFERENCE 18
- TROUBLESHOOTING 19
- GUARANTEE 19
- TECHNICAL CHARACTERISTICS 19
ENGLISH
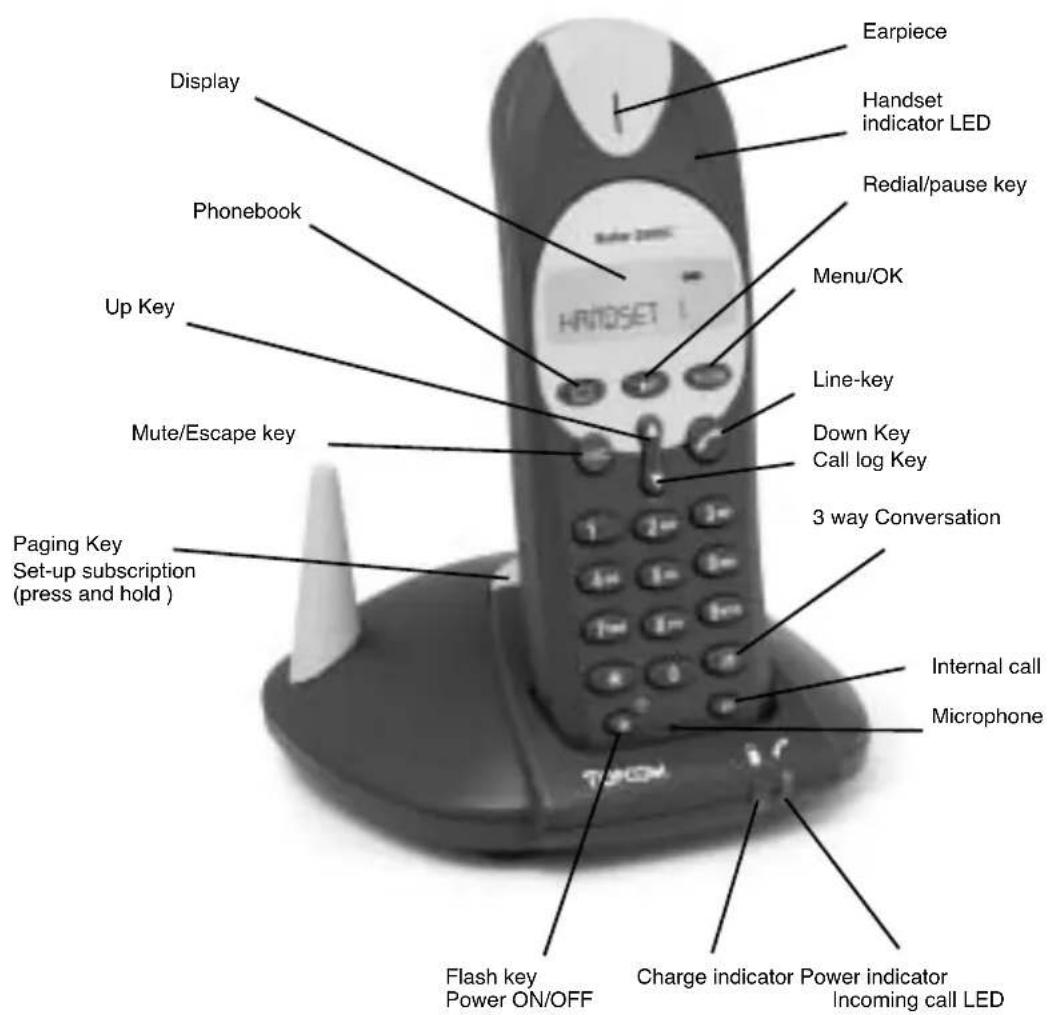
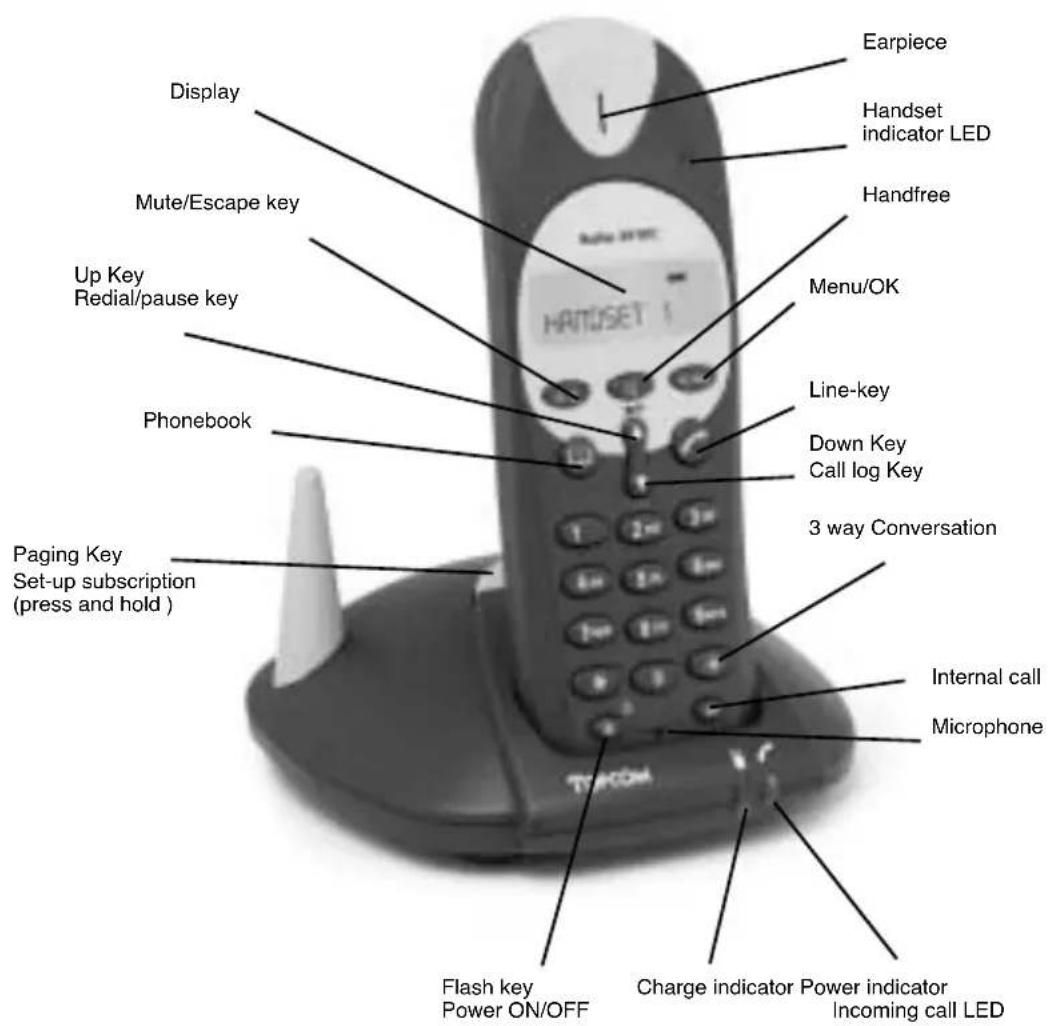
1.DESCRIPTION OF TELEPHONE
1.1 HANDSET/BASE BUTLER 2505


ENGLISH
1.2 HANDSET/BASE BUTLER 2510


ENGLISH
1.3 DISPLAY
Icon line Character display line.
(12 characters maximum)
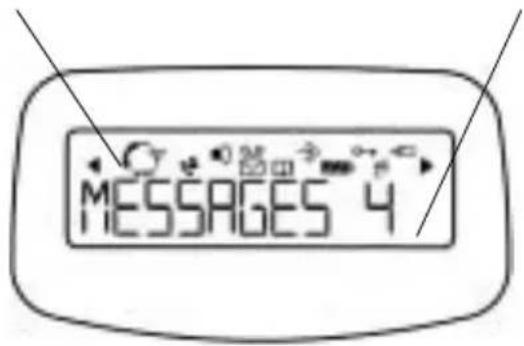
Each operation has an associated icon
Icon:Meaning:
You are online
EXT You are in external communication
INT You are in internal communication
ou are in 3 way conversation
New numbers in call list
Hands free mode activated (Only Butler 2510)
You are opening your address book.
You are in the menu.
rechargeable battery level indicator
1 segment: weak, 2 segments: medium, 3 segments:
full. The segments scroll during battery recharging
The antenna indicates the quality of reception.
The antenna flashes when the handset is not
r registered on the base.
or Indicates that the displayed number is longer than the screen (12 digits)
or Possible scroll direction in the menu
1.3.1 Standby display
In stanby mode, the display shows the handset name and the handset number:
B2505 HS1 or
B2510 HS1
1.4. HANDSET INDICATOR (LED)
The handset LED has following function:
- O N when the external line is busy
OFF when all handset are in stanby mode
F lashes on all handset when there is an incoming call
Topcom Butler 2505/2510 7


ENGLISH
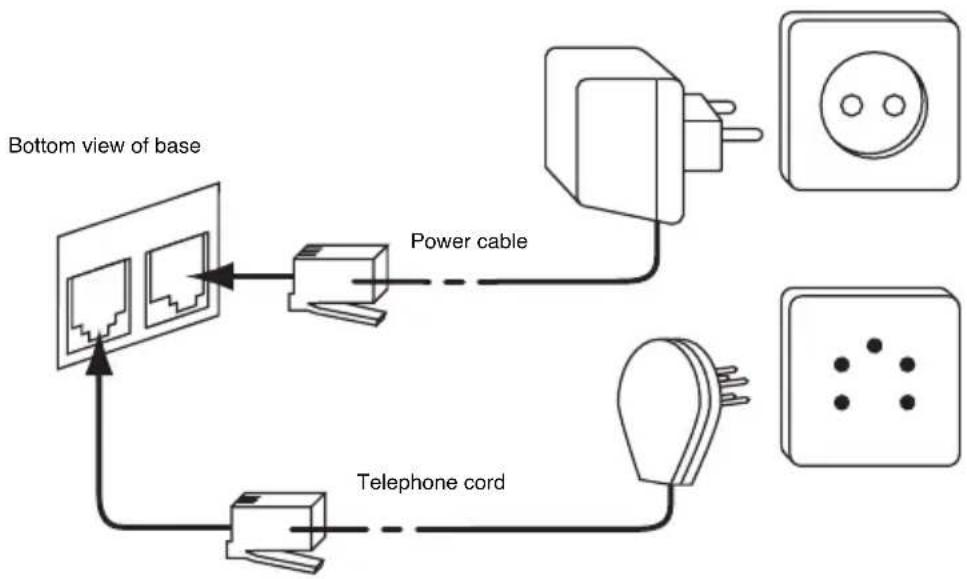
2. TELEPHONE INSTALLATION
2.1 CONNECTIONS
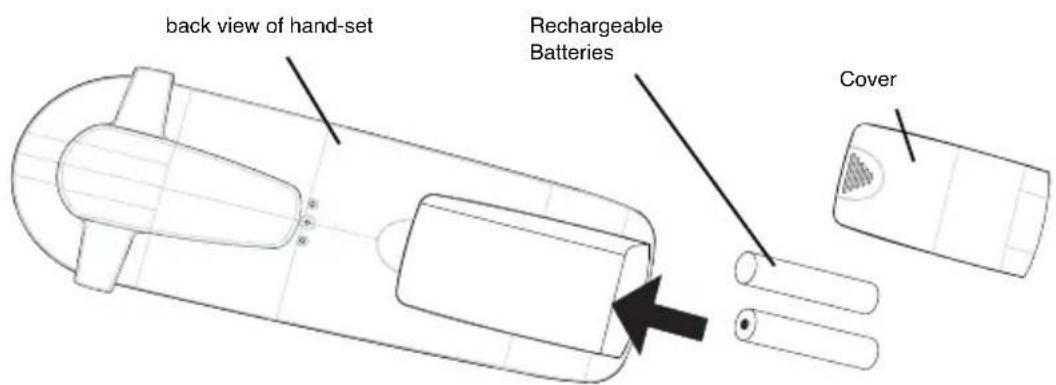
2.2. RECHARGABLE BATTERIES
Before you use your Butler 2505/2510 for the first time, you must first make sure that the batteries are charged for 6-8 hour. The telephone will not work optimally if not properly charged.
To change or insert a rechargeable battery:
1. Slide the cover towards the bottom and then lift it up.
2. Insert the batteries respecting the (+ and -) polarity.
3. Replace the battery cover
8 Topcom Butler 2505/2510
ENGLISH
Note: The maximum working time of the batteries is approx. 250h and the maximum talk time is 15hours! In the course of time the batteries will start to drain faster. The batteries must be replaced. You can buy new batteries from any DIY outlet (2 rechargeable batteries, type AAA NiMH)!
3. USING THE TELEPHONE
3.1 HANDSET ON/OFF
- T urn ON handset: Press for 2s. The handset will search the base.
- T urn OFF handset: Press for 2s. The display will go OFF.
3.2 RECEIVING A CALL
When the handset rings, press to answer. You are then connected to your correspondent. If the hand-set is on the base when the telephone rings, you just need to pick up the hand-set to answer the call (if the option autoanswer is set ON: See 4.10. Automatic answer).
If you press when the telephone rings, you pick-up the line and automatically change to handsfree mode (only butler 2510 version).
3.3 MAKING AN EXTERNAL CALL
Normal numeration:
- Press
- Enter telephone number
Block dialling:
- Dial your correspondents number
- Press
To correct a number use the key to delete an entered digit
3.4. MAKING AN INTERNAL CALL
Only possible when more then one handsets are registered to the base!!
Normal numeration:
- Press INT
- Enter the number of the internal handset (1 to 5)
Prenumération:
- Enter the number of the internal handset (1 to 5)
- Press INT
3.5 HANDS FREE MODE (ONLY BUTLER 2510 VERSION)
You can converse with your correspondent without picking up the handset.
To activate or deactivate the hands free mode, press the key during a call.
To adjust the volume, refer to the chapter "Personalisation" - adjusting speaker volume.
3.6 INTERNAL CALL TRANSFER
Only possible when more then one handset are registered to the base!!
When you want to transfer an external call to another handset:
- During a conversation press INT
- Select the number of the internal handset, the external caller is put on hold.
- When the other handset picks up, press to hang up and transfer the call.
If the internal correspondent does not pick-up, press INT again to reconnect to the external caller on line.

ENGLISH
3.7.CONFERENCECALL
Only possible when more then one handset are registered to the base!!
You can converse simultaneously with an internal correspondent and an external correspondent.
When you are on line with an external correspondent:
- Press INT
- Enter the number of the internal handset that you want to call
- When the internal correspondent picks- up, press and hold
- If the internal correspondent does not answer, press INT again to reconnect to the external correspondent on-line.
3.8 DISPLAY OF CALL DURATION
The call duration is displayed after 15 seconds, in minutes - seconds; "00-20"
At the end of each call, the total call duration is displayed for 5 seconds.
3.9 MICROFOON MUTE
It is possible to mute the microphone during a conversation.
Press during the conversation, the microphone is then deactivated, you can talk freely without being heard by the calling party.
"MUTE" is displayed. Press again to return to normal mode.
3.10 PAUSE KEY
When dialling a number you can add a pause between two digits by pressing the redail/pause key for 2s.
3.11 CALLER IDENTIFICATION
Caller identification is only available if you have subscribed to this service with your telephone operator.
When you receive an external call, the callers number will appear on the display as the telephone rings.
If the network sends it, or if the name of the caller is in the address book, the caller is identified by his or her name.
The caller identity is replaced by the call duration after 15 seconds in communication. It is still possible to display the caller's identity after this time by pressing OK-key repeatedly for the name and number.
3.11.1 List of calls
Your telephone keeps a list in memory of the last 20 calls received. This function is only available if your are subscribed to the caller ID information. The correspondents that have called are identified by their telephone number or name in the same way as in caller identification.
The presence of new / unanswered calls is indicated by the flashing icon on the display. To consult the list of calls:
-
Press . If there are no calls in the list 'EMPTY' will appear.
-
Scroll through the calls using the up or down arrows. The callers names will be shown if the name is send by the network or is stored in the phonebook. If you are at the end of the list you will hear a beep tone.
-
If you press OK, the telephone number will be shown. Note: if the telephone number is longer then 12 digits, press OK again to see the complete number.
-
Press OK again to see the time and date when the call is received**
-
Pressing OK again will give you the option to delete or add this entry in the phonebook if it's not already stored: Select 'ADD' and press OK. Enter or modify the name and press OK. The entry will be stored in the phonebook and deleted from the call list!
-
S elect 'DELETE' and press OK to delete this entry, or to return to the previous menu.
-
To call back a correspondent, simply press the key when their telephone number or name are displayed.
If a caller is in the phonebook, they are identified by their name in the list of calls.
**ONLY WHEN THE NETWORK SEND THE TIME/DATE TOGETHER WITH THE TELEPHONE NUMBER!!! On networks with caller ID in DTMF, no time and date will be displayed.


ENGLISH
3.11.2 Delete all entries in the call list
You can delete all entries in the call list:
E nter the call list by pressing the -Key
- Press and DEL ALL' appears.
- Press OK to delete all entry, or to cancel the delete operation.
3.12 REDIAL MEMORY
Your telephone keeps a list of the 5 last calls (of 20 digits) you have made in memory; The correspondents called are identified by their telephone number or by their name if they appear in the phonebook.
To consult the radial list:
- Press
- Scroll through the calls with the up and down arrows.
- To call by the selected correspondent, simply press when their telephone number or name is displayed.
Note: When name is displayed, you can toggle between name and number by pressing the OK key!
3.13 CALLING FROM THE PHONEBOOK
To call a correspondent whose name you have saved in the phonebook:
- Press to enter the phonebook
- Press the first letter of the name. The first name that starts with this letter or the nearest letter in the alphabet will be displayed.
- Go through the list of names with the up and down keys The list scrolls in an alphabetical order.
- Press to dial the number of the correspondent whose name is displayed.
To see the number before dialling, carry out steps 1 to 3 from before and press Ok. The number then appears and you can modify it using the button before dialling it.
3.14 USING THE ALPHANUMERICAL KEYPAD
With your telephone you can also enter alphanumeric characters. This is useful for entering a name into the phonebook, giving a name to a hand-set, ...
To select a letter, press the corresponding key as many times as is necessary. For example to select an 'A', press '2' once, to select a 'B', press '2' twice and so on. To select 'A' and then B consecutively, select 'A', wait until the cursor moves on to the next character, then press '2' twice.
To select a space, press 1
To select a dash, press '1' twice
The keypad characters are as follows:
| Key | First press press press press | Third press press | Fourth | Fifth | |||||
| 1 | s | pace - 1 | |||||||
| 2 | A | B | C | 2 | |||||
| 3 | D | E | F | 3 | |||||
| 4 | G | H | I | 4 | |||||
| 5 | J | K | L | 5 | |||||
| 6 | M | N | O | 6 | |||||
| 7 | P | Q | R | S | 7 | ||||
| 8 | T | U | V | 8 | |||||
| 9 | W | X | Y | Z | 9 | ||||
3.15 USING THE MENU
A wide range of telephone functions are accessible through a user friendly menu.
- To enter the menu, press OK
- Scroll through the selections using the up and down keys the selections scroll in a loop ( you return to the first after the last). The arrows on the right of the display indicate that there are other possible selections to scroll through
- To validate a selection, press OK
4.To return to the previous menu, press
Topcom Butler 2505/2510 11


- Press
- Scroll through the calls with the up and down arrows.
- To call by the selected correspondent, simply press when their telephone number or name is displayed. Note: When name is displayed, you can toggle between name and number by pressing the OK key! 3.13 CALLING FROM THE PHONEBOOK To call a correspondent whose name you have saved in the phonebook:
- Press to enter the phonebook
- Press the first letter of the name. The first name that starts with this letter or the nearest letter in the alp be displayed.
- Go through the list of names with the up and down keys. The list scrolls in an alphabetical order.
- Press to dial the number of the correspondent whose name is displayed.
ENGLISH
4. PERSONALISATION
4.1 ADJUSTING SPEAKER VOLUME
There are two ways to set the speaker volume:
4.1.1 Speaker volume during call
During conversation, press the up or down key to change the volume accordingly.
4.1.2 Set the default speaker volume
- Enter the menu by pressing OK
- Select HANDSET using the up and down keys
- Press OK
- Select EAR VOL using the up and down keys
- Press OK
- Select the desired volume (1 to 5) by means of the up and down key.
- Press OK
A double bleep confirms the validation of your choice
Note: The handsfree volume is also adjust together with the receiver in the handset as above described (Butler 2510)!
4.2 ADJUSTING THE RING VOLUME
4.2.1 Handset ring
- Enter the menu by pressing OK
- Select HANDSET using the up and down keys
- Press OK
- Select RING VOL using the up and down keys
- Press OK
- Select the desired volume (OFF or 1 to 5)
- Press OK to confirm or to return to the previous menu.
Note: Every programmation is confirmed at the end by a double or single long beep. A double bleep confirms the validation of your choice
A long bleep signifies that the modification has not been taken into account.
4.2.2 Base ring
- Enter the menu by pressing OK
- Select SETUP using the up and down keys
- Press OK
- Select BASE VOL using the up and down keys
- Press OK
- Select the desired volume (OFF or 1 to 5)
- Press OK to confirm or to return to the previous menu.
4.3 CHOOSING THE RING MEODY
The base and each hand set can ring with a different melody.
The handsets can ring with a different melody according to whether the incoming call is internal or external.
4.3.1 Base melody
- Enter the menu by pressing OK
- Select SETUP using the up and down keys
- Press OK
- Select BASE MEL using the up and down keys
- Press OK
- Select the melody of your choice ( 1 to 5 ) using the up and down keys
- Press OK to confirm or to return to the previous menu.
ENGLISH
4.3.2 Handset melody, external call
- Enter the menu by pressing OK
- Select HANDSET using the up and down keys
- Press OK
- Select EXT MEL using the up and down keys
- Press OK
- Select the melody of your choice ( 1 to 5 ) using the up and down keys
- Press OK to confirm or to return to the previous menu.
4.3.3 Handset melody, internal call
- Enter the menu by pressing OK
- Select HANDSET using the up and down keys
- Press OK
- Select INT MEL using the up and down keys
- Press OK
- Select the melody of your choice (1 to 5) using the up and down keys
- Press OK to confirm or to return to the previous menu.
4.4 ACTIVATION / DEACTIVATION OF BEEPS
The handsets can emit beeptone when a key is pressed, when the batteries are low and when the handset is out of range.
4.4.1 Key pressed beeptone on/off
- Enter the menu by pressing OK
- Select HANDSET using the up and down keys
- Press OK
- Select BEEP using the up and down keys
- Press OK
- Select KEYTONE using the up and down keys
- Press OK
- Select ON to activate, OFF to deactivate
- Press OK to confirm.
4.4.2 Low battery
Proceed as before, but select at point 6 "LOW BATT" instead of "KEYTONE".
4.4.3 Handset out of range
Proceed as before, but select at point 6 "OUTRANGE" instead of "KEYTONE".
4.5 HANDSET NAME
This function allows you to personalise each handset.
- Enter the menu by pressing OK
- Select HANDSET using the up and down keys
- Press OK
- Select NAME using the up and down keys
- Press OK
- Enter the name
- Press OK to validate
While entering the name, press to delete a character and press and hold to exit the menu without taking any modifications into account.
4.6 CHOOSING MENU LANGUAGE
- Enter the menu by pressing OK
- Select HANDSET using the up and down keys
- Press OK
- Select LANGUAGE using theup and down keys
- Press OK

ENGLISH
- Select the language of choice by means of the up and down keys. 7. Press OK to validate
4.7 CHANGING THE PIN CODE
Certain functions are only available to users who know the PIN code. By default this is PIN code = 0000.
To change the PIN code:
- Enter the menu by pressing OK
- Select SETUP using the up and down key
- Press OK
- Select pin code using the up and down key
- Press OK
- Enter the old 4 figure PIN code.
- Press OK
- Enter the new 4 figure PIN code
- Press OK
- Enter the new PIN code a second time
- Press OK to validate
4.8 SETTING THE DIALLING MODE
There are two types of dialling mode:
D TMF/Tone dialling (the most common)
P pulse dialling (for older installations)
To change the dialling mode:
- Enter the menu by pressing OK
- Select setup using the up and down keys
- Press OK
- Select DIALMODE using the up and down keys
- Press OK
- Select the dialling mode using the up and down keys
- Press OK to validate
- Enter the menu by pressing OK
- Select SETUP using the up and down keys
- Press OK
- Select RECALL using the up and down keys
- Choose RECALL 1 for short flash time (100ms) or RECALL 2 for long flash time (250ms)
4.10.AUTOMATIC ANSWER
When there is a incoming call and the handset in on the base, the phone automatically takes the line when lifted. This is the default setting, but can be set OFF:
1 E nter the menu by pressing /OK
2 S elect HANDSET using the up and down keys
3 Press OK
4 S elect Auto ans using the up and down keys
5 S elect ON (for automatic answer) or OFF
6 Press OK
4.11 RESET
It is possible to return the phone to the original default configuration. This is the configuration which was installed when you first received the telephone.
To return to default settings:
1. Enter the menu by pressing OK
2. Select SETUP using the up and down keys
3. Press OK
14 Topcom Butler 2505/2510


ENGLISH
- Select DEFAULT using the up and down keys
- Press OK
- Enter the 4 digit PIN code (default =0000)
- Press OK to validate
WARNING! Returning to default settings will delete all entries in the phonebook and call log. The PIN code will also be reset to 0000
5. ADVANCED FUNCTIONS
5.1 PHONEBOOK
The Phonebook allows you to memorise 50 telephone numbers and names. You can enter names of up to 8 characters length and numbers of up to 20 digits length.
To call a correspondent whose number is stored in the phonebook, refer to the section 3.13
To enter alphanumeric characters, refer to the section 3.14.
5.1.1 Add an entry into the phonebook
- Enter the menu by pressing OK
- Select PHONEBK using the up and down keys
- Press OK
- Select Add using the up and down keys
- Press OK
- Enter the name
- Press OK to validate.
- Enter the telephone number
- Press OK to validate
5.1.2 Modify a name or number
To modify a number in the phonebook:
- Enter the menu by pressing OK
- Select PHONEBK using the up and down keys
- Press OK
- Select MODIFY using the up and down keys
- Press OK
- Move through the list of names with the up and down keys The list scrolls in alphabetical order.
- Press OK when you find the name to modify
- Use the key to go back and enter the new name
- Press OK to validate
- Enter the new telephone number
- Press OK to validate
Warning, if you enter the Phonebook first with the key and modify a telephone number with the key the modification will be taken into account only for this call and will not be stored in the phonebook!
5.1.3 Deleting an entry
To delete an entry:
- Enter the menu by pressing OK
- Select PHONEBK using the up and down keys
- Press OK
- Select DELETE using the up and down keys
- Press OK
- Move through the list of names using the up and down keys the list scrolls in alphabetical order.
- Press OK when you find the name you wish to delete
- The phone number is displayed, press OK
- CONFIRM appears, press OK to confirm or stop.
5.2 SEARCHING A HANDSET FROM THE BASE
When the paging button on the base is pressed all the handsets will ring. This ringing will help you locate a lost handset. By simply pressing one of the handset keys the ringing stops.
ENGLISH
5.3 CHOOSING PRIORITY RINGING
This function allows you to make the base or one of the handsets ring before the others when there is an external call. The priority unit will ring a number of times, then the others units will start to ring in turn.
To use this function, you must choose the priority unit, this can be the base or one of the handsets. You can set the number of rings before the other units start ringing.
Setting the priority unit
- Enter the menu by pressing OK
- Select SETUP using the up and down keys
- Press OK
- Select priority using the up and down keys
- Press OK
- Select "SELECT" using the up and down keys
- Press OK
- Select "BASE" or "HANDSET X" using the up and down keys
- Press OK to validate
- Choose the number of rings using the up and down keys
- Press OK to validate
Activate/Deactivate the priority ring
- Enter the menu by pressing OK
- Select Setup using the up and down keys
- Press OK
- Select priority using the up and down keys
- Press OK
- Select "ON" or "OFF" using the up and down keys
- Press OK to validate
5.4 USING YOUR TELEPHONE WITH A PABX
It is possible to use your telephone with a PABX or a local telephone network.
Use of your telephone with a recent system does not require any special adjustment. With certain older systems, it is necessary to insert a pause between dialling a prefix and dialling the rest of the number. Your telephone can inserts this pause automatically during the numeration.
In order to do this you must enter the prefix and the pause length.
It is possible to choose 2 prefixes for 2 different PABX.
To remove the pause, delete the prefix in memory in the same way as you entered it.
Setting the prefix
- Enter the menu by pressing OK
- Select Setup using the up and down keys
- Press OK
- Select PABX using the up and down keys
- Press OK
- Select PBX1 or PBX2 using the up and down keys
- Press OK
- Enter the PIN code (default = 0000)
- Press OK to validate
- Enter the PABX prefix
- Press OK to validate
Setting the pause duration
- Enter the menu by pressing OK
- Select Setup using the up and down keys
- Press OK
- Select PABX using the up and down keys
- Press OK
- Select PAUSE using the up and down keys
- Press OK
- Select the PAUSE time using the up and down keys
- Press OK to validate
16 Topcom Butler 2505/2510
ENGLISH
6. MANAGING MULTIPLE HANDSETS
6.1. SETTING UP AN ADDITIONAL HANDSET
You can subscribe new handsets on the base if these handsets support the DECT GAP protocol. The base can support a maximum of 5 handsets. If you already have 5 handsets, and you wish to add another one or change one handset, you must first delete a handset, then associate the new handset.
To register any handset, the base must be put into a special registration mode:
-
Press and hold the paging key of the base for 6 seconds.
-
The base will then emit a beepitone. The base is now ready to register a new handset. You have 90 seconds after pressing the button to register a new handset.
After putting the base into registration mode, start the procedure on the new handset:
if your additional handset is a butler 2505/2510/2550/2605/2610/2650/2705/2710/2750/2805/2810/2850
- Enter the menu by pressing OK
- Select Register using the up and down keys
- Press OK
- Enter a base number (from 1 to 4). The flashing numbers are already in use.
- Enter the Base PIN code (0000 by default)
- Press OK. The handset will start searching for the DECT base
- If the handset has located the base, it will display the base identification number, validate the base registration by pressing OK or stop by pressing
- If the handset does not locate the base, it will return to the standby mode after a few seconds. Try again by changing the base number and check that you are not in a environment where there is interference. Move closer to the base.
if your handset is another model
After starting the registration procedure on the base, refer to the handset manual to find out how to register the handset. The handset must be GAP compatible.
The icon and the text "NOT REG" flashes on the display when the handset is not associated with the base.
When a handset is associated with a base, it is attributed a handset number by the base. It is this number that is displayed on the handset after the name and must be used for internal calls.
6.2 REMOVING A HANDSET
You can remove a handset with a base to allow another handset to be registered.
- Enter the menu by pressing OK
- Select setup using the up and down keys
- Press OK
- Select del hs using the up and down keys
- Press OK
- Enter the 4 digit base PIN code
- Press OK
- Select the handset to be removed
- Press OK to validate
6.3 SETTING UP A HANDSET ON ANOTHER BASE
If you want to use a Butler 2505 or Butler 2510 handset with a base of another model. The base must be GAP compatible.
- To put the base in registration mode, refer to the base user manual.
- Carry out operations 3 to 9 from the paragraph 6.1.
6.4 SELECTING A BASE
The handsets can be registered up to 4 bases simultaneously.
To select a base:
- Enter the menu by pressing OK
- Select setup using the up and down keys
Topcom Butler 2505/2510 17


ENGLISH
-
Press OK
-
Select SEL BASE using the up and down keys
- Press OK
- Select a base or select AUTO using the up and down keys
- Press OK
When selecting the base, the correct selected base in indicated by a 'o' sign after the base number. If you select 'Auto' the handset will automatically search for another base when you are out of range!
7. QUICK REFERENCE
| PHONEBK ADD NAME NUMBER | ||||
| DELETE | ||||
| MODIFY | ||||
| SETUP BASE VOL OFF | ||||
| VOLUME 1/5 | ||||
| BASE MEL MELODY 1/5 | ||||
| SEL BASE BASE 1 /4 | ||||
| DEL HS PIN? HANDSET | 1 /5 | |||
| PIN CODE PIN? NEW PIN | RETYPE | |||
| PRIORITY OFF | ||||
| ON | ||||
| SELECT BASE RINGS 1/9 | ||||
| HANDSET 1 /5 | ||||
| DIALMODE TONE | ||||
| PULSE | ||||
| RECALL RECALL 1/2 | ||||
| PABX | PBX1 | PIN? | ||
| PBX2 | PIN? | |||
| PAUSE | ||||
| DEFAULT PIN? | ||||
| HANDSET | BEEP KEYTONE | ON/OFF | ||
| LOW BATT ON/OFF | ||||
| OUTRANGE | ON/OFF | |||
| RING VOL | OFF | |||
| VOLUME 1/5 | ||||
| EAR VOL EAR VOL 1/5 | ||||
| INT MEL | MELODY 1/5 | |||
| EXT MEL MELODY 1/5 | ||||
| AUTO ANS ON/OFF | ||||
| NAME | ||||
| LANGUAGE | ENGLISH | |||
| 2 ...11 languages | ||||
| REGISTER | BS 1 /4 | PIN? SEARCH _ | ||
ENGLISH
8. TROUBLESHOOTING
| Symptom | Possible cause | Solution |
| No display | Batteries uncharged | Check the position of the batteries |
| Recharge the batteries | ||
| Handset turned OFF | Turn ON the handset | |
| No tone | Telephone cord badly connected | Check the telephone cord connection |
| The line is occupied by another handset | Wait until the other handset hangs up | |
| The icon 1® flashes | Handset out of range | Bring the handset closer to the base |
| The base has no power supply | Check the mains connection to the base | |
| The handset is not registered on the base | Register the handset on the base | |
| Base or handset do not ring | The ringing volume is zero or low | Adjust the ringing volume |
| Tone is good, but there is no communication | The dialling mode is wrong | Adjust the dialling mode (pulse/tone) |
| Not possible to transfer a call on PABX | The FLASH time is too short | Set the unit to Long Flash time |
| Telephone does not react to pressing the keys | Manipulation error | Remove the batteries and put them back in place |
9. GUARANTEE
This equipment comes with a 24-month warranty. The warranty will be honoured on presentation of the original bill or receipt, provided the date of purchase and the unit type are indicated.
During the time of the warranty Topcom will repair free of charge any defects caused by material or manufacturing faults. Topcom will at its own discretion fulfil its warranty obligations by either repairing or exchanging the faulty equipment.
Any warranty claims will be invalidated as a result of intervention by the buyer or unqualified third parties.
- Damage caused by inexpert treatment or operation, and damage resulting from the use of non-original parts or accessories not recommended by Topcom is not covered by the warranty.
The warranty does not cover damage caused by outside factors, such as lightning, water and fire, nor does it apply if the unit numbers on the equipment have been changed, removed or rendered illegible.
Note: Please do not forget to enclose your receipt if you return the equipment.
10. TECHNICAL CHARACTERISTICS
- Standard: DECT (Digital Enhanced Cordless Telecommunications)
GAP (Generic Access Profile)
Frequency range: 1880 MHz to 1900 MHz
Number of channels: 120 duplex channels
M odulation: GFSK
S peech coding: 32 kbit/s
E mission power: 10 mW (average power per channel)
R ange: 300 m in open space /50 m maximum inhouse
Base power supply: 220V / 50Hz for the base
H andset Batteries: 2 rechargeable batteries AAA, NiMh 550mAh
H andset autonomy: 250 hours in standby
T alk time: 15 hours
C hargting time:
N ormal conditions of use: +5^ to +45^
D ialling mode:
F lash time 100 or 250 ms
Topcom Butler 2505/2510 19


B2505_eur.book Page 20 Tuesday, December 31, 2002 11:49 AM

ENGLISH


20 Topcom Butler 2505/2510


NEDERLANDS
1. BESCHRIJVING VAN DE TELEFOON 23
1.1 HANDSET EN BASISTOESTEL VAN DE BUTLER 2505 23
1.2 HANDSET EN BASISTOESTEL VAN DE BUTLER 2510 24
1.3 DISPLAY 25
1.3.1 Standby-schem
1.4 HANDSETINDICATOR (LED)
25
2. TELEFOONINSTALLATIE
2.1 AANSLUITINGEN
26
2.2. HERLAADBARE
BATTERIJEN
26
3. DETELEFOON GEBRUIKEN 27
3.1. HANDSET AAN/UIT 27
3.2. OPROEPEN ONTVANGEN 27
3.3. EEN EXTERNE OPROEP
3.4. EEN INTERNE OPROEP (INT)
3.5 HANDENVRIJE MODUS (ENKEL BIJ DE BUTLER 2510)
3.6 INTERNE OPROEP DOORSCHAKELEN
3.7. CONFERENTIEGESPREK
3.8 TONEN VAN DE GESPREKSDUUR
3.9 MICROFOON UITSCHAKELEN (MUTE)
3.10 PAUZE TOETS
3.11 IDENTIFICATIE VAN DE BELLER
3.11.1 Lijst van oproepen
3.11.2 De oproeiljst volledig wissen
3.12 HERKIES-GEHEUGEN
3.13 BELLEN VANUIT HET TELEFOONBOEK
3.14 HET ALFANUMERIEKE TOETSENBORD GEBRUIKEN
3.15 HET MENU GEBRUIKEN
4. PERSONALISERING
Each operation has an associated icon
Icone: Signification:
- Standard: DECT (Digital Enhanced Cordless Telecommunications)
GAP (Generic Access Profile)
Frequency range: 1880 MHz to 1900 MHz
N umber of channels: 120 duplex channels
M odulation: GFSK
S peech coding: 32 kbit/s
E mission power: 10mW (average power per channel)
R ange: 300 m in open space /50 m maximum inhouse
Base power supply: 220V / 50Hz for the base
H andset Batteries: 2 rechargeable batteries AAA, NiMh 550mAh
H andset autonomy: 250 hours in standby
T alk time: 15 hours
C hargting time: 6-8 hours
N ormal conditions of use: +5^ to +45^
D ialling mode: Pulse/Tone
F lash time 100 or 250 ms
DEUTSCH
1.DESCRIPTION OF TELEPHONE 59
1.1 HANDSET/BASE BUTLER 2505 59
1.2 HANDSET/BASE BUTLER 2510 60
1.3 DISPLAY 61
1.3.1 STAND-BY-DISPLAY 61
1.4. HANDGERAT-ANZEIGE (LED) 61
2. INSTALLATION DES TELEFONS 62
- MEHRERE HANDGERATE VERWALTEN 71
Each operation has an associated icon
Icono: Significado:
3.6 TRANSFERIR LLLAMADAS INTERNAS
DECLARATION OF CONFORMITY
We, TTS Nv, Grauwmeer 17, 3001 Heverlee, Belgium, declare that our product :
Product name: TOPCOM
Model type: Butler 2505/2510
is in conformity with the essential requirements of the R&TTE directive 1999/5/EC and carries the CE mark accordingly.
Supplementary information:
The product complies with the requirements of:
TBR21
EN60950
EN301489-6
TBR6
TBR10
TBR22
Date: 16/12/2002
Place: Heverlee, Belgium
Name: Verheyden Geert
Function: Technical Director
Signature:
European contact: TTS Nv, R&D department, Research Park, Grauwmeer 17, 3001 Heverlee, Belgium. Tel: +32 16 398920, Fax: +32 16 398939

TOPCOM
it's nice t@lking to you