PG 1524 - Barbecue SEVERIN - Free user manual and instructions
Find the device manual for free PG 1524 SEVERIN in PDF.
Download the instructions for your Barbecue in PDF format for free! Find your manual PG 1524 - SEVERIN and take your electronic device back in hand. On this page are published all the documents necessary for the use of your device. PG 1524 by SEVERIN.
USER MANUAL PG 1524 SEVERIN
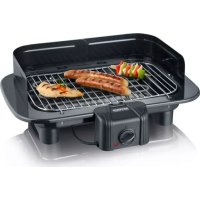
Barbecue grill it must not be touched until it has sufficiently cooled down - there is otherwise a severe danger of burns. ● To avoid the risk of electric shock, the heating element and the power cord must not be immersed in liquid or even allowed to come into contact with it. ● Do not allow the power cord to touch any hot parts of the appliance. ● The power cord should be regularly examined for any signs of damage. In the event of such damage being found, the appliance must no longer be used. ● Always remove the plug from the wall socket - after use, - in case of any malfunction, and - during cleaning. ● The use of an extension-lead reel causes a loss of power, possibly combined with a subsequent heat build-up in the cable. It is therefore necessary to unwind the cable completely if a cable reel is used. Make sure that the reel is approved for outdoor use by the manufacturer. ● The appliance is not intended to be operated by means of an external timer or separate remote-control system. ● Before carrying, transporting or storing the grill, ensure that is has sufficiently cooled down. Pour out any remaining water after use. ● Ensure that the grill is not stored outdoors, or in any other location where it might be subjected to extremes of temperature or high humidity. ● No responsibility can be/will be accepted if damage results from improper use, or if these instructions are not complied with. ● This barbecue grill is intended for domestic use only and not for commercial applications. ● In order to comply with safety regulations and to avoid hazards, repairs of electrical appliances must be carried out by qualified personnel. If repairs are needed, please send the appliance to one of our customer service departments. The address can be found in the appendix to this manual. Grill with additional base stand: Assemble the base stand according to the schematic diagram supplied, and then place the grill onto the stand. The small feet under the grill connect with the tops of the vertical legs of the base stand. Ensure that the grill and base stand are placed in a safe and stable position. The power cord should be routed in such a way that no one is likely to trip over it. Heating element The junction box contains a safety switch. Place the grill pan into the plastic housing first, and then fit the heating element inside the grill pan and housing. The safety switch is activated automatically when the heating element has been properly fitted. If not fitted correctly, the appliance can not be switched on. Before using for the first time
Remove any packaging materials from the appliance.
Clean the grill rack and grill pan with warm soapy water.
2. Place the heating element into the grill
3. Fit the grill rack on top.
4. If required, additional accessories may
be fitted according to the diagram shown in the instructions.
Fill the grill pan with water up to the ‘Max’ marking.
Let the grill heat up for approximately 5 minutes without any food on the rack. This will lessen the smell typically encountered when first switching on a new grill (a slight smell and a little smoke may be emitted - ensure sufficient ventilation). 11Grilling
The grill pan must be filled with water up to the ‘Max’ marking.
Fit the heating element; then ensure that the grill rack is placed correctly on to the element.
Insert the plug into a suitable earthed power-outlet.
Set the thermostat control knob to its ‘Max’ position. The indicator light comes on, and the heating element is permanently switched on.
After approximately 5-10 minutes, the heating element reaches the right temperature for grilling.
The grill can also be used to keep the food warm: by turning the thermostat control back, the intervals between the heating element switching on and off can be reduced to a minimum. Caution: to prevent a possible build-up of heat and subsequent damage to the appliance, the food to be cooked must be placed directly onto the grill rack. Do not place any objects (e.g. aluminium foil, barbecue plates or other items) between the food and the heating element. After an operating time of around an hour, approx. 1 litre of water will have evaporated and replenishment will be necessary. The filler opening in the grill rack facilitates the re-filling process. Once the grilling process is finished:
Set the thermostat control knob back to
Remove the plug from the power outlet and allow the grill to cool down. General care and cleaning
Ensure that the grill is thoroughly cleaned after use. ● Before cleaning the grill, ensure it is disconnected from the power supply and has completely cooled down. ● Do not use metallic pads or abrasive cleaning agents.
Remove the grill rack and clean it with warm soapy water. To remove persistent food residues, it can be left soaking for a while. ● The heating element can be removed for cleaning. To avoid the risk of electric shock, do not clean the heating element with water and do not immerse it in water. The junction box may be wiped with a slightly damp lint-free cloth.
All other parts can be cleaned with a cloth soaked in soapy water, and should be wiped completely dry afterwards.