USER MANUAL SEMM 1470 A1 SILVERCREST
ESPRESSOMASCHINE / ESPRESSO MACHINE / MACHINE À EXPRESSO SEMM 1470 A1
DE AT CH
ESPRESSOMASCHINE
Bedienungsanleitung
FR BE
MACHINEÀ EXPRESSO
Mode d'emploi
PL
EKSPRES CIsNIENIOWY DO KAWY
Instrukcja obstugi
SK
KAVOVAR
Návod na obsluhu
GB IE
ESPRESSOMACHINE
Operating instructions
NL BE
ESPRESSOMACHINE
Gebruiksanawijzing
CZ
ESPRESSOKAVOVAR
Návod k obsluze
IAN 341821_2001
DE AT CH
Before reading, unfold the page containing the illustrations and familiarise yourself with all functions of the device.
FR BE
KOMPERNASS HANDELS GMBH
BURGSTRASSE 21
44867 BOCHUM
DEUTSCHLAND
www.kompernass.com
Contents
Introduction 36
Copyright 36
Limitation of liability 36
Warnings 37
Proper use 37
Package contents/Transport inspection 38
Disposal of the packaging 38
Appliance elements. 42
Before first use
43
Operation 44
Filling the water tank 44
Filling the milk tank 44
Inserting the espresso sieves in the sieve holder 45
Adding espresso powder 46
Inserting the sieve holder 46
Setting the milk nozzle 47
Preparing drinks 48
Selecting a suitable cup 48
Preparing espresso 49
Preparing cappuccino 51
Cleaning and care 57
Cleaning the milk nozzle and milk tank 57
Cleaning the espresso sieves, sieve holder and espresso outlet 60
Cleaning the water tank. 61
Cleaning the housing 61
Cleaning the accessories 62
Dscaling the appliance 62
Troubleshooting 64
Technical details 65
Ordering replacement parts 65
Disposal 66
Kompernass Handels GmbH warranty 67
Service 68
Importer 68
Introduction
Congratulations on the purchase of your new appliance.
You have selected a high-quality product. The operating instructions are part of this product. They contain important information about safety, usage and disposal. Before using the product, please familiarise yourself with all operating and safety instructions. Use the product only as described and for the range of applications specified. Please also pass these operating instructions on to any future owner.
Copyright
This documentation is protected by copyright.
Any copying or reproduction, including in the form of extracts, or any reproduction of images (even in a modified state), is permitted only with the written authorisation of the manufacturer.
Limitation of liability
All technical information, data and information for installation and operation contained in these operating instructions corresponds to the latest version(s) at the time of printing and, to the best of our knowledge, takes into account our previous experience and know-how.
No claims can be derived from the details, illustrations and descriptions in these instructions.
The manufacturer assumes no responsibility for damage caused by failure to observe these instructions, improper use, incompetent repairs, unauthorised modifications or for the use of non-approved replacement parts.
Warnings
The following types of warning are used in these operating instructions:
WARNING!
A warning at this hazard level indicates a potentially hazardous situation.
Failure to avoid this hazardous situation could result in injury.
Follow the instructions in this warning notice to prevent injury.
CAUTION
A warning notice at this hazard level indicates a risk of material damage.
Failure to avoid this situation could result in material damage.
Follow the instructions in this warning notice to prevent material damage.
NOTE
A note provides additional information which will assist you in using the appliance.
Proper use
This appliance is intended exclusively for preparing drinks in domestic households. It is exclusively intended for use in private households. Do not use it for commercial applications.
The appliance is not intended for any other purpose, nor for use beyond the scope described.
WARNING!
Danger if not used as intended!
Failure to use the appliance for its intended purpose and/or any other type of use can be hazardous.
Use the appliance only for its intended purpose.
Observe the procedures described in these operating instructions.
No claims of any kind will be accepted for damage arising as a result of incorrect use.
The risk shall be borne solely by the user.
Package contents/Transport inspection
WARNING!
Risk of suffocation!
- Do not allow children to play with packaging materials. There is a risk of suffocation.
The appliance is supplied with the following components as standard:
- Espresso Machine
- Sieveholder
Large espresso sieve
- Small espresso sieve
- Measuring spoon with compactor
- Descalerr (125 ml)
- Operating instructions
NOTE
Check the package for completeness and signs of visible damage.
- If the contents are incomplete or damaged due to defective packaging or through transportation, contact the Service Hotline.
Disposal of the packaging
The packaging protects the appliance from transport damage. The packaging materials are selected from the point of view of their environmental friendliness and disposal technology and are therefore recyclable.
The recirculation of packaging into the material circuit saves on raw material and reduces the amount of waste generated. Dispos of packaging material that is no longer needed according to the regionally established regulations.
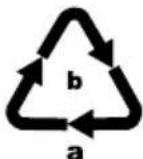
Dispose of the packaging in an environmentally friendly manner. Note the labelling on the packaging and separate the packaging material components for disposal if necessary. The packaging material is labelled with abbreviations (a) and numbers (b) with the following meanings:
1-7:Plastics,
20-22: Paper and cardboard,
80-98: Composites.
NOTE
If possible, keep the original packaging of the appliance for the entire duration of the warranty period so that the appliance can be packed properly for return shipment in the event of a warranty claim.
To ensure safe operation of the appliance, follow the safety guidelines set out below:
WARNING! RISK OF INJURY!
- Check the appliance for visible external damage before use. Do not operate a appliance which has been damaged or dropped.
The appliance and its connecting cable must be kept away from children younger than 8 years old.
This appliance may be used by children aged 8 years or over if they are supervised or have been instructed how to use the appliance safely and have understood the potential risks.
This appliance may be used by people with reduced physical, sensory or mental capabilities or lack of experience and/or knowledge if they are supervised and have been instructed in how to use the appliance safely and have understood the potential risks.
- Cleaning and user maintenance must not be carried out by children, unless they are aged 8 or over and are supervised.
Do not allow children to use the appliance as a plaything.
- All repairs must be carried out by authorised specialist companies or by the Customer Service department. Improper repairs can pose significant risks to the user. It will also invalidate any warranty claims.
Never submerse the appliance in water or other liquids! Danger of electric shock!
- Do not allow any liquid to run over the appliance's plug connections.
- Never touch the appliance with wet or moist hands.
- To avoid risks, arrange for defective plugs and/or power cables to be replaced at once by qualified technicians or our Customer Service Department.
Risk of burns! Some parts can become very hot during use!
Hot steam is produced while using the appliance. Ensure that you do not scald yourself. Keep a safe distance away from the steam.
The appliance should only be connected to correctly installed and earthed mains power sockets.
- Clean the appliance and, in particular, the parts that come into contact with food regularly as described in the section "Cleaning and care".
After use, the surfaces of the heating elements will still have some residual heat.
- Use the appliance only for its intended purpose. Risk of injury if appliance is used incorrectly.
CAUTION! PROPERTY DAMAGE!
Defective components must always be replaced with original replacement parts. Compliance with safety requirements can only be guaranteed if original replacement parts are used.
Protect the appliance from penetration by moisture and liquids.
- Protect the appliance against knocks, dust, chemicals, extremes of temperature, etc. and keep it away from sources of heat (ovens, radiators).
Never immerse the appliance in water or other liquids!
Always remove the mains plug from the mains outlet; never pull on the power cable.
- Never leave the appliance unattended during operation.
- Do not use an external timer switch or a separate remote control system to operate the appliance.
- Never operate the appliance in rooms in which the temperature is under or around 0^ . If water freezes in the pipes or the water tank, the appliance could be damaged.
- Never operate the appliance outdoors. This appliance is intended for indoor use only.
NOTE
Repairs to the appliance during the warranty period may only be carried out by a customer service department authorised by the manufacturer. Otherwise, no warranty claims will be held for any subsequent damages.
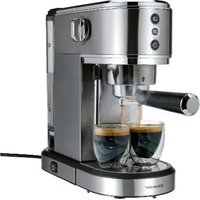
Appliance elements
1 "Double" espresso button (with adjacent control lamp)
"Large" cappuccino button (with adjacent control lamp)
"Large" latte button (with adjacent control lamp)
Milk tank lid
5 "Milk quantity" knob
Milk tank
Drip tray
8 Drip grille
9 Extendable tray for small cups
10 Milk nozzle
10 Espresso outlet
"Small" latte button (with adjacent control lamp)
"Small" cappuccino button (with adjacent control lamp)
14 "Small" espresso button (with adjacent control lamp)
15 Water tank lid
16 Water tank
17 Holders
18 On/off switch
15 Lever for positioning the milk nozzle
20 Sieve holder
Sieve block
Large espresso sieve
23 Small espresso sieve
24 Measuring spoon with compactor
25 Descaler
Before first use
1) Clean the sieve holder 20, the measuring spoon 24, the espresso sieves 22 23, the drip grille 8, the drip tray 7, the tray for small cups 9 the milk tank 6, the milk tank lid 4, the water tank lid 15 and the water tank 16 as described in the section "Cleaning and care".
2) Place the appliance on a level and heat-resistant surface. Ensure that the mains outlet is in easy reach.
3) Insert the drip tray 7 and place the drip grille 8 on it.
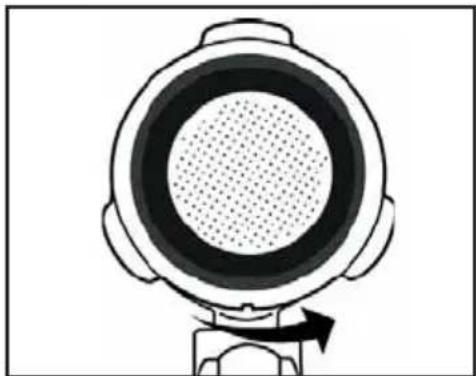
4) Insert the sieve holder 20 together with the espresso sieve (22 or 23) into the appliance by inserting it at the "O" marking on the appliance and then turning it anticlockwise until the handle of the sieve holder 20 is pointing to the "O" symbol.
5) Insert the plug into a mains power socket.
NOTE
Remove the orange transport restraint from the bottom of the water tank 16!
6) Before first use, proceed as follows to clean the internal pipes:
- fill the water tank with water (approx. 200 ml), and also the milk tank (approx. 100 ml).
- Insert the water tank ⑥ and the milk tank ⑥ in the appliance.
- Place a large cup on the drip grille 8.
- Set the milk nozzle 10 so that the milk nozzle 10 is pointing into the cup.
- Switch the appliance on using the on/off switch (position 1). All the control lamps begin to flash. As soon as all the lamps light up permanently the appliance has heated up.
- Press the "Large" cappuccino button ②. Wait until water stops coming out of the espresso outlet ① and all control lamps light up permanently. Repeat this process 2x.
- Switch the appliance off using the on/off switch 18 (position O).
Empty the remaining water from the water tank 16 and the milk tank 6.
NOTE
- You should also clean the appliance as described here after long periods out of use.
The appliance is now ready for use.
Operation
Filling the water tank
NOTE
- Use only fresh drinking water to prepare espresso/cappuccino/latte macchiatto.
1) Remove the water tank lid ⑤ and pull the water tank ⑥ upwards and out of the appliance.
2) Fill it with water to at least the Min marking. Never fill it with more water than up to the Max marking.
3) Push the water tank 16 back onto the appliance. Ensure that the water tank 16 clicks back into place on the appliance.
4) Put the water tank lid 15 back on.
Filling the milk tank
If you want to prepare drinks that contain milk froth, such as cappuccino or latte macchiato, you must fill the milk tank with milk.
NOTE
You can use cow's milk or soy milk in this appliance.
1) Tilt the milk tank 6 lightly upwards and, at the same time, pull it upwards and forwards out of the appliance.
2) Take off the milk tank lid 4.
3) Fill it with milk to at least the Min marking. Never fill it with more milk than up to the Max marking.
4) Replace the milk tank lid 4 on the milk tank 6.
5) Push the milk tank ⑥ back into the appliance so that it clicks into place.
NOTE
After preparing your drink, if you want to keep the milk in the milk tank 6 put the milk tank 6 into the refrigerator for storage.
NOTE
If the milk tank is not in place or not properly inserted, both of the espresso control lamps 1/14 light up. This shows that you can only prepare espresso, as this does not require any milk.
Inserting the espresso sieves in the sieve holder
1) Place the large 22 or the small espresso sieve 23 in the sieve holder 20:
- Make sure that the small indentation on the large 22 or small espresso sieve lies on the indentation on the sieve holder 20 when you put it in.
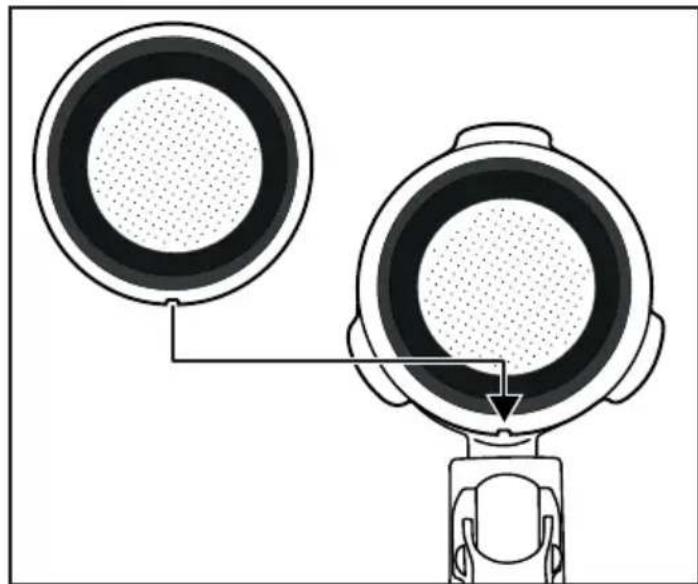
- Then turn the large 22 or small espresso sieve 23 a little so that it cannot fall out.
NOTE
Do not remove the used espresso sieve 22 23 until it has cooled down!
To remove the espresso sieve 22 23 from the sieve holder 20 turn the espresso sieve 22 23 until the indentation on the espresso sieve 22 23 is over the indentation on the sieve holder 20. You can now remove the espresso sieve 22 23.
Adding espresso powder
1) Fill the small espresso sieve to the Max marking with espresso powder.
This corresponds to around 7g of powder or a level measuring spoon 24. Or...
Fill the large espresso sieve 22 to the Max marking with espresso powder. This corresponds to around 7g + 7g of powder or two level measuring spoons 24.
2) Push down the espresso powder using the compactor on the measuring spoon 24. Add more espresso powder, if required, until the espresso sieve 22
23 is filled up to the Max marking. Then compact the espresso powder again.
NOTE
- Compacting the espresso powder is a fundamentally important process during the preparation of an espresso. If the espresso powder is compacted very strongly, the espresso runs through more slowly and there is more crema. If the espresso powder is not so strongly compacted, the espresso runs through more quickly and it creates very little crema.
Inserting the sieve holder
1) Insert the sieve holder 20 together with the espresso sieve (22 or 23) in the appliance by inserting it at the "O" marking on the appliance and then turning it anticlockwise until the handle of the sieve holder 20 is pointing to the "O" symbol.
NOTE
To remove the sieve holder after preparing a drink, turn it slowly back to the "O" position to prevent any coffee from spraying out.
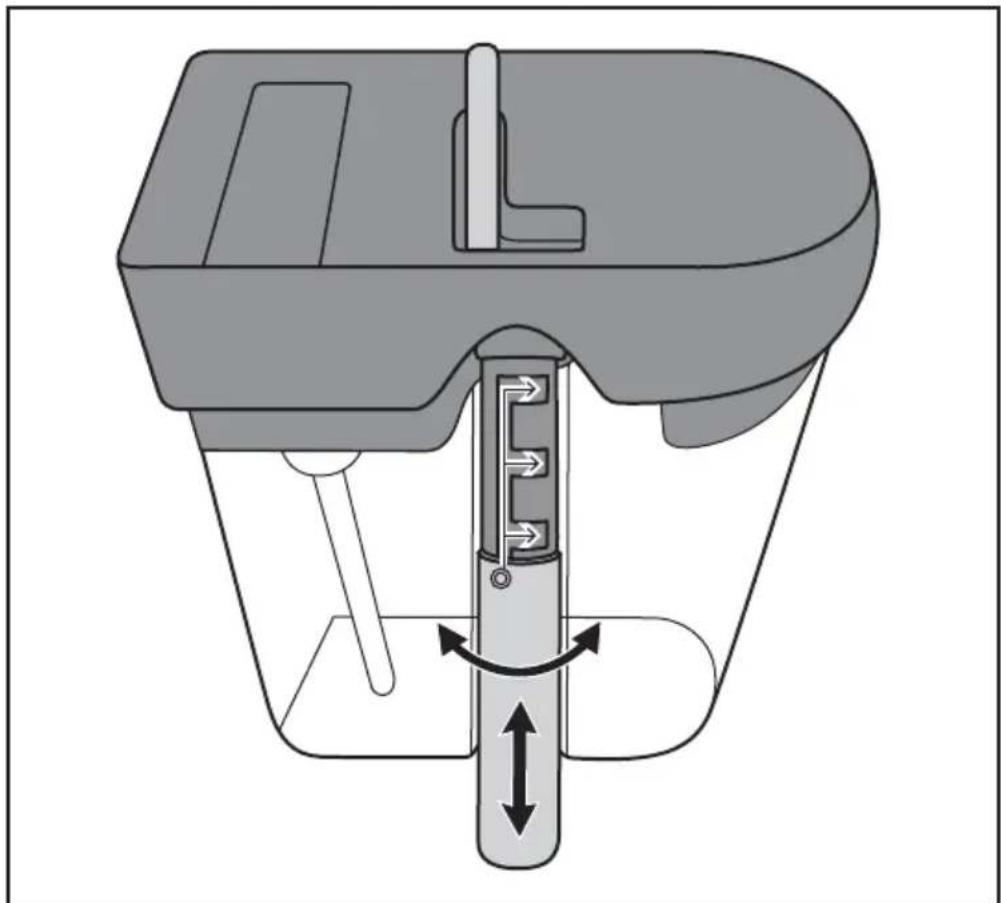
Setting the milk nozzle
For cappuccino and latte macchiato you will need to adjust the milk nozzle ⑩ depending on the cup size.
1) Swing the milk nozzle 10 so that it is pointing into the glass/cup. Always use the milk nozzle lever 19 to position the milk nozzle 10.
2) Turn the silver attachment on the milk nozzle 10 a little to the rear so that it is released.
3) Depending on the size of the glass/cup, push the silver attachment on the milk nozzle ⑩ downwards a little (or upwards, depending on its previous position). The milk nozzle ⑩ should extend down into the glass/cup to prevent splashes. You can choose between 3 heights.
4) Once you have selected a height, turn the silver attachment on the milk nozzle 10 back to the front so that it clicks into place and no longer moves.
For the purpose of clarity, the adjustment of the milk nozzle 10 is shown here with the milk tank 6 removed. There is, however, no need to remove the milk tank 6 from the appliance if you want to adjust the length of the milk nozzle 10.
Preparing drinks
CAUTION! PROPERTY DAMAGE!
Insufficient descending can damage or destroy the appliance! Descale the appliance regularly. Please refer to the section "Descaling mode".
Selecting a suitable cup
Select a suitable cup for the kind of drink you are preparing. When choosing a cup, bear in mind that beverages with milk froth, such as cappuccino and latte macchiato, require a larger volume due to the frothed milk than the millilitre specifications listed.
| Drink Size | Preset quantity Programmable | |
| Espresso | Single approx. 40 ml approx. 20 - 70 ml | |
| Double approx. 80 ml approx. 40 - 150 ml | |
| Cappuccino | Single approx. 150 ml | Time for preparation of frothed milk:
5 - 40 sec |
| Double approx. 250 ml | Time for preparation of frothed milk:
5 - 70 sec |
| Latte macchiato | Single approx. 300 ml | Time for preparation of frothed milk:
5 - 70 sec |
| Double approx. 400 ml | Time for preparation of frothed milk:
5 - 90 sec |
| Note: The various drink quantities are controlled via the duration of the drink output. In other words, for a double espresso the espresso flows for twice as long out of the espresso outlet ① as for a single espresso. |
1) For small espresso or coffee cups, pull the tray for small cups out of the appliance and place the cup on it.
2) For large cups or glasses, push the tray for small cups into the appliance and place the glasses/cups on the drip grille.
3) If there is not enough room, remove the drip tray ⑦ from the appliance and place the glass directly on the base of the appliance.
Preparing espresso
1) Ensure that there is enough water in the water tank 16. Add more water if necessary.
2) Select whether you want a single or double espresso and fit the corresponding espresso sieve 24 or 23 in the sieve holder 20.
3) Add the espresso powder to the espresso sieve 22 23 and fit the sieve holder 20.
4) Pull the tray for small cups ⑨ out of the appliance.
5) Place a suitable cup on the tray for small cups 9.
6) Switch the appliance on using the on/off switch 18 and wait until all control lamps light up permanently. The appliance has now heated up.
7) Press the "Small" espresso button if you want to prepare a single.
espresso. The control lamp for the "Small" espresso button 1 lights up. Press the Double" espresso button 1 if you want to prepare a double espressor. The control lamp for the Double" espresso button 1 lights up.
8) The appliance starts the brewing process; the corresponding control lamp flashes during the preparation.
9) Wait until the espresso has stopped flowing out of the espresso outlet 11 and all control lamps light up. You can now remove your espresso.
NOTE
- You can stop the preparation at any time by pressing any button.
10) Switch the appliance off using the on/off switch 18.
11) Clean the appliance as described in the section "Cleaning and Care".
NOTE
If you do not turn off the appliance with the on/off switch 18, the appliance will switch itself into power saving mode automatically after approx. 15 minutes if no other button is pushed. If you want to make another drink, simply press any button. The appliance heats back up.
Setting the amount of espresso
You can set the quantity of espresso for the programmes "Small espresso" and "Double espresso" individually:
"Small"presso
- If you want to set a custom amount of espresso for the "Small" espresso button 14, press and hold the "Small" espresso button 14 for about 3 seconds until the pump starts working. Espresso starts flowing from the espresso outlet 11.
- Stop the flow of espresso by pressing the "Small" espresso button again as soon as the required amount has flowed out. You can set a quantity between 20 and 70 ml.
The next time you prepare an espresso using the "Small" espresso button 14 the new amount of espresso will be made.
NOTE
If you want to reset the setting to the preprogrammed 40ml switch the appliance off using the on/off switch 18. When you switch the appliance back on using the on/off switch 18 press and hold the "Small" espresso button 14 until the control lamp for the "Small" espresso button 14 flashes 5 times. You can now release the button 14. The programme has been reset to 40ml .
"Double"presso
- If you want to set a custom amount of espresso for the "Double" espresso button 1, press and hold the "Double" espresso button 1 for about 3 seconds until the pump starts working. Espresso starts flowing from the espresso outlet 1.
- Stop the flow of espresso by pressing the "Double" espresso button 1 again as soon as the required amount has flowed out. You can set a quantity between 40 and 150 ml.
The next time you prepare an espresso using the "Double" espresso button 1 the new amount of espresso will be made.
NOTE
If you want to reset the setting to the preprogrammed 80ml switch the appliance off using the on/off switch 13. When you switch the appliance back on using the on/off switch 18 press and hold the "Double" espresso button 1 until the control lamp for the "Double" espresso button 1 flashes 5 times. You can now release the button 1. The programme has been reset to 80ml .
Preparing cappuccino
1) Ensure that there is enough water in the water tank 16. Add more water if necessary.
2) Ensure that there is enough milk in the milk tank ⑥ . Add more milk if necessary.
3) Select whether you want prepare a cappuccino with a single or double espresso and fit the corresponding espresso sieve 22 in the sieve holder 20.
4) Add the espresso powder to the espresso sieve 22 23 and fit the sieve holder 20.
5) Place a suitable cup on the drip grille 8. Depending on the size of the cup, you may also want to pull out the tray for small cups 9 and place the cup on this.
6) Set the milk nozzle 10 so that it is pointing into the cup.
7) Use the "Milk quantity" knob ⑤ to set how much milk you want to use for your cappuccino:
Turn the "Milk quantity" knob 5 to the left to reduce the amount of milk. Turn the "Milk quantity" knob 5 to the right to increase the amount of milk. Make sure you do not turn the knob further than the "A" marking. Otherwise you will be in cleaning mode (see section "Cleaning and care").
NOTE
- You can even correct the amount of milk during preparation by turning the "Milk quantity" knob ⑤.
8) Switch the appliance on using the on/off switch 13 and wait until all control lamps light up permanently. The appliance has now heated up.
9) Press the "Small" cappuccino button 13 if you want to prepare a single cappuccino. The control lamp for the "Small" cappuccino button 13 lights up. Press the "Large" cappuccino button 2 if you want to prepare a large cappuccino. The control lamp for the "Large" cappuccino button 2 lights up.
10) The appliance starts the brewing process; the corresponding control lamp flashes during the preparation.
11) Wait until the espresso has stopped flowing out of the espresso outlet ①, the milk has stopped flowing out of the milk nozzle ⑩ and all control lamps light up. You can now remove your cappuccino.
NOTE
- You can stop the preparation at any time by pressing any button.
NOTE
If you want to add a little extra frothed milk to your drink: press the "Large" cappuccino button 2x in a row. The control lamp for the "Small" cappuccino button 13 and the control lamp for the "Large" cappuccino button 2 light up and frothed milk comes out of the milk nozzle 10. Stop the milk output by pressing any button. The milk will stop coming out automatically after 70 seconds.
12) Switch the appliance off using the on/off switch 18.
13) Clean the appliance as described in the section "Cleaning and Care". For hygienic reasons, the milk tank 6, the milk tank lid 4 and the milk nozzle 10 must be cleaned thoroughly after every time you make milk froth. Failure to do so will affect the quality of the milk froth and may lead to the formation of germs!
NOTE
If you do not turn off the appliance with the on/off switch 13, the appliance will switch itself into power saving mode automatically after approx. 15 minutes if no other button is pushed. If you want to make another drink, simply press any button. The appliance heats back up.
Changing the duration of the milk froth output
NOTE
- You can adjust the amount of the milk froth by turning the "Milk quantity" knob 5 and also the duration of the milk output. The further you turn the "Milk quantity" knob 5 toward "A" the more milk/milk froth will come out of the milk nozzle 10 over the same amount of time. Make sure you do not turn the "Milk quantity" knob 5 further than the "A" marking. Otherwise you will be in cleaning mode (see section "Cleaning and care").
You can customise the duration of the milk froth output for the "Small cappuccino" and "Large cappuccino" programmes:
"Small" cappuccino
Press and hold the "Small" cappuccino button for about 3 seconds until the pump starts to work. Milk froth comes out of the milk nozzle.
Once the desired quantity of milk froth has been produced, stop milk froth production by pressing the "Small" cappuccino button again. You can set a duration of 5 - 40 seconds.
- Following the milk froth production, the espresso comes out of the espresso outlet to prepare the cappuccino.
- The next time you prepare a cappuccino using the "Small" cappuccino button 13 the newly programmed duration will be used for milk output.
"Large" cappuccino
Press and hold the "Large" cappuccino button 2 for about 3 seconds until the pump starts to work. Milk froth comes out of the milk nozzle 10.
Once the desired quantity of milk froth has been produced, stop milk froth production by pressing the "Large" cappuccino button again. You can set a duration of 5 - 70 seconds.
- Following the milk froth production, the espresso comes out of the espresso outlet to prepare the cappuccino.
The next time you prepare a cappuccino using the "Large" cappuccino button 2 the newly programmed duration will be used for milk output.
1) Ensure that there is enough water in the water tank 16. Add more water if necessary.
2) Ensure that there is enough milk in the milk tank 6. Add more milk if necessary.
3) Select whether you want prepare a latte macchiato with a single or double espresso and fit the corresponding espresso sieve 22 in the sieve holder 20
4) Add the espresso powder to the espresso sieve 22 23 and fit the sieve holder 20.
5) Place a suitable cup on the drip grille 8.
6) Set the milk nozzle 10 so that it is pointing into the cup.
7) Use the "Milk quantity" knob 5 to set how much milk you want to use for your latte macchiato. Turn the "Milk quantity" knob 5 to the left to reduce the amount of milk. Turn the "Milk quantity" knob 5 to the right to increase the amount of milk. Make sure you do not turn the knob further than the "marking. Otherwise you will be in cleaning mode (see section "Cleaning and care").
NOTE
- You can even correct the amount of milk during preparation by turning the "Milk quantity" knob ⑤.
8) Switch the appliance on using the on/off switch 18 and wait until all control lamps light up permanently. The appliance has now heated up.
9) Press the "Small" latte button if you want to prepare a small latte macchiato. The control lamp for the "Small" latte button lights up. Press the "Large" latte button if you want to prepare a large latte macchiato. The control lamp for the "Large" latte button lights up.
10) The appliance starts the brewing process; the corresponding control lamp flashes during the preparation.
11) Wait until the espresso has stopped flowing out of the espresso outlet ①, the milk has stopped flowing out of the milk nozzle ⑩ and all control lamps light up. You can now remove your latte macchiato.
NOTE
You can stop the preparation at any time by pressing any button.
NOTE
If you want to add a little extra frothed milk to your drink: Press the "Large" cappuccino button 2x in a row. The control lamp for the "Small" cappuccino button 13 and the control lamp for the "Large" cappuccino button 2 light up and frothed milk comes out of the milk nozzle 10. Stop the milk output by pressing any button. The milk will stop coming out automatically after 70 seconds.
12) Switch the appliance off using the on/off switch 18.
13) Clean the appliance as described in the section "Cleaning and Care". For hygienic reasons, the milk tank 6, the milk tank lid 4 and the milk nozzle 10 must be cleaned thoroughly after every time you make milk froth. Failure to do so will affect the quality of the milk froth and may lead to the formation of germs!
NOTE
If you do not turn off the appliance with the on/off switch 18, the appliance will switch itself into power saving mode automatically after approx. 15 minutes if no other button is pushed. If you want to make another drink, simply press any button. The appliance heats back up.
Changing the duration of the milk froth output
NOTE
- You can adjust the amount of the milk froth by turning the "Milk quantity" knob 5 and also the duration of the milk output. The further you turn the "Milk quantity" knob 5 toward "A" the more milk/milk froth will come out of the milk nozzle 10 during the same amount of time. Make sure you do not turn the "Milk quantity" knob 5 further than the "A" marking. Otherwise you will be in cleaning mode (see section "Cleaning and care").
You can customise the duration of the milk froth output for the programmes "Small latte" and "Large latte".
"Small" latte
- Press and hold the "Small" latte button for about 3 seconds until the pump starts to work. Milk froth comes out of the milk nozzle.
Once the desired quantity of milk froth has been produced, stop milk froth production by pressing the "Small" latte button again. You can set a duration of 5-70 seconds.
- Following the milk froth production, the espresso comes out of the espresso outlet to prepare the latte macchiato.
- The next time you prepare a latte macchiato using the "Small" latte button 12 the newly programmed duration will be used for milk output.
"Large" latte
- Press and hold the "Large" latte button 3 for about 3 seconds until the pump starts to work. Milk froth comes out of the milk nozzle 10.
Once the desired quantity of milk froth has been produced, stop milk froth production by pressing the "Large" latte button again. You can set a duration of 5-90 seconds.
- Following the milk froth production, the espresso comes out of the espresso outlet ① to prepare the latte macchiato.
- The next time you prepare a latte macchiato using the "Large" latte button ③ the newly programmed duration will be used for milk output.
Frothed milk
You can also produce only frothed milk, for instance, to make hot chocolate.
1) Fit the sieve holder 20.
2) Ensure that there is enough milk in the milk tank 6. Add more milk if necessary.
3) Place a suitable cup on the drip grille 8. If you are using a small container, pull out the tray for small cups 9 and place the container on it.
4) Set the milk nozzle 0 so that it is pointing into the cup.
5) Switch the appliance on using the on/off switch 18 and wait until all control lamps light up permanently. The appliance has now heated up.
6) Press the "Large" cappuccino button 2x in a row. The control lamp for the "Small" cappuccino button 13 and the control lamp for the "Large" cappuccino button 2 light up and frothed milk comes out of the milk nozzle 10.
7) Stop the milk output by pressing any button. The milk will stop coming out automatically after 70 seconds.
8) Switch the appliance off using the on/off switch 18.
9) Clean the appliance as described in the section "Cleaning and Care".
Cleaning and care

WARNING! RISK OF INJURY!
Always remove the plug from the mains power socket before you clean the appliance. Danger of electric shock!

Never immerse the appliance in water or other liquids. Danger of electric shock!
Always allow the appliance to cool down before cleaning it. Risk of burns!
Cleaning the milk nozzle and milk tank
CAUTION! PROPERTY DAMAGE
Never use abrasive, aggressive or chemical cleaning agents to clean the appliance. These could damage the outer surfaces of the appliance.
1) Switch the appliance off using the on/off switch 13 and pull the mains plug from the wall socket.
2) Remove the milk tank 6 from the appliance and take off the milk tank lid 4.
3) Clean the milk tank lid 4 and the milk tank 6 in warm water with a little mild washing-up liquid.
4) Rinse both parts off with clear water and then dry them well.
5) Fill the milk tank with water (approx. 100 ml), replace the milk tank lid and push the milk tank back into the appliance.
6) Place a suitably large, empty container onto the drip grille 8 and move the milk nozzle 10 so that it points into the container.
7) Insert the plug into a mains power socket and switch on the appliance using the on/off switch 18.
8) Wait until all control lamps light up permanently.
9) Set the "Milk quantity" knob 5 to the position "Clean" 0 .
10) Press the "Large" latte button 2x in a row. The control lamps of the "Large" and "Small" cappuccino buttons as well as the "Large" and "Small" latte buttons flash alternately and hot steam comes out of the milk nozzle.
11) Wait until no more steam comes out of the milk nozzle ⑩. If you want to stop the cleaning process at anytime, press the "Large" latte button ③
12) Remove the milk tank ⑥ and empty out any remaining water.
13) Switch the appliance off using the on/off switch 18.
NOTE
If you want to descale the milk nozzle 10 and the milk tank 6 add a little standard commercial descaler for coffee machines to the milk tank 6 and proceed as described above. You should also observe the instructions for the descaler.
After descending, clean once again using clean water only.
NOTE

The milk tank 6 is suitable for cleaning in the dishwasher. Make sure that the milk tank 6 does not get jammed in the dishwasher.
For additional cleaning, you can remove the milk nozzle 10:
1) Take off the milk tank lid 4.
2) Move the milk nozzle into an upright position so that the milk nozzle lever is pointing directly upwards.
3) Then press the positioning lever 19 and the milk nozzle 10 at the same time towards the recess on the milk tank lid 4 so that they disconnect.
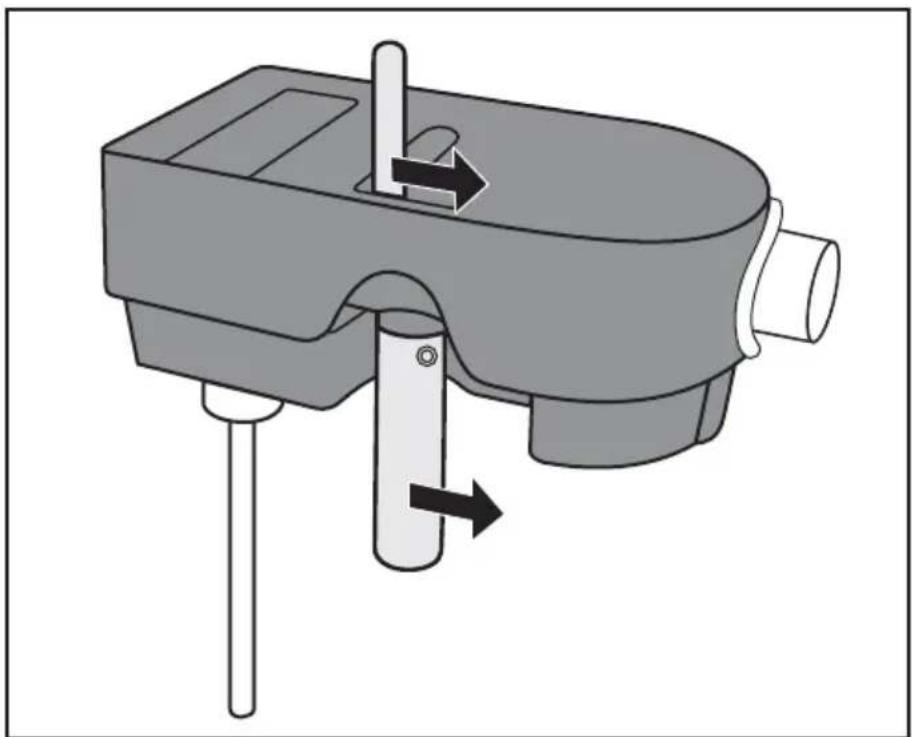
4) Pull the milk nozzle 10 with the positioning lever 19 downwards and out of the milk tank lid 4.
5) Undo the silver attachment on the milk nozzle (see section "Setting the milk nozzle") and pull it downwards and off.
6) Clean the silver attachment and the milk nozzle 10 that you have removed from the milk tank lid 4 along with the positioning lever 19 in warm water with a little washing-up liquid. Rinse all parts afterwards with plenty of clean water.
7) Afterwards, replace the silver attachment onto the milk nozzle ⑩ and set it at the desired height (see section "Setting the milk nozzle").
8) Push the milk nozzle 10 and the positioning lever 19 back into the milk tank lid 4 and push the connector assembly all the way back into the appliance.
For thorough cleaning, the connecting plug can be removed from the milk tank lid 4:
1) Turn it towards the symbol and pull it out.
2) Clean connecting plug with tap water. Afterwards, dry it thoroughly.
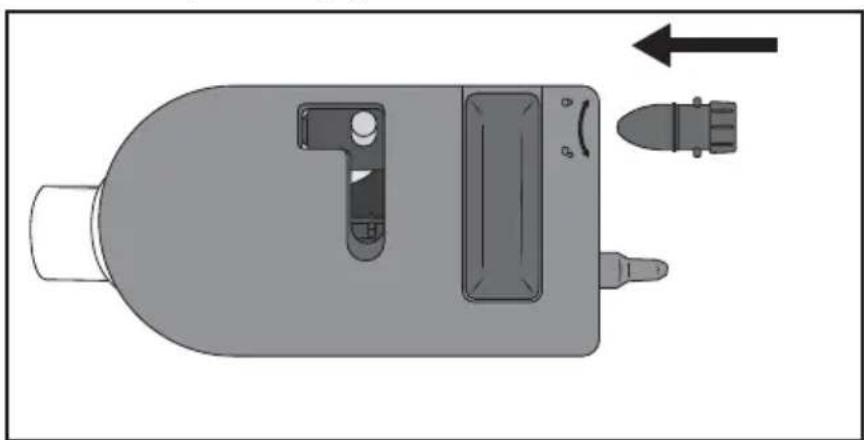
3) Refit the connecting plug on the milk tank lid by turning it towards the symbol.
To clean the milk tank lid ④ thoroughly, proceed as follows:
1) Take off the milk tank lid 4.
2) Remove the rubber cover from the milk tank lid 4.
3) Turn the knob ⑤ clockwise until the marking on the knob ⑤ is pointing downwards.
4) Allow fresh water to run through the openings while moving the milk tank lid gently from side to side.

5) Allow the milk tank lid 4 to dry if you do not want to use it again immediately.
6) Close the rubber cover again.
Cleaning the espresso sieves, sieve holder and espresso outlet
Remove all used powder from the espresso sieves 22 23 after every drink preparation.
Clean the espresso sieves 22 23, the sieve holder 20 and the espresso outlet 11 regularly.
1) After you have prepared espresso/cappuccino/latte macchiato and removed the sieve holder 20:
Fix the espresso sieve 22 3 in place by flipping the sieve blocker 1 upwards and holding it in place.
- Knock the espresso powder out of the espresso sieve 22 23.
- Flip the sieve blocker ② back down again.
- Remove the espresso sieve 22 23 from the sieve holder 20.
Clean the espresso sieve 22 23 and the sieve holder 20 in warm water with a little mild washing-up liquid. Rinse all the parts off afterwards using clean water.
NOTE

The espresso sieves 22 23 are also suitable for cleaning in the dishwasher.
2) Replace the sieve holder 20 in the appliance without the espressosieve 22 23.
3) Fill the water tank 6 with water (approx. 200ml ).
4) Place a suitably large, empty container onto the drip grille 8.
5) Switch the appliance on using the on/off switch 18 and wait until all control lamps light up permanently.
6) Press the "Small" espresso button 14. The water comes out of the espresso outlet 11 and rinses out the pipes. As soon as the water stops coming out of the espresso outlet 11, the cleaning process is complete.
NOTE
If you want to descale the water tank 16 and the pipes, proceed as described in the section "Dscaling mode".
NOTE
- You can store the sieve holder 20 and the espresso sieves 22 23 in the holders 17 next to the water tank 16.
Cleaning the water tank
1) Pull the plug from the mains socket and switch the appliance off using the on/off switch 13.
2) Remove the water tank 16 from the appliance and pour out any remaining water.
3) Clean the water tank 16 and the water tank lid 15 in warm water with a little mild washing-up liquid. Rinse both parts off with clear water to remove any remaining detergent and then dry them well.
4) Dry the parts thoroughly and replace them in the appliance.
Cleaning the housing
Clean the housing with a damp cloth. For stubborn soiling use a mild detergent on the cloth.
Ensure that the appliance is completely dry before the next use.
Cleaning the accessories
1) Pull the tray for small cups ⑨ forwards out of the appliance to clean it.
2) Clean the measuring spoon 24, the drip tray 7, the extendable tray for small cups 9 and the drip grille 8 in warm water with a little washing-up liquid. Rinse all parts afterwards with plenty of clean water.
3) Dry all parts thoroughly, before replacing them in the appliance.
NOTE
The drip tray 7 and the tray for small cups 9 are also suitable for cleaning in the dishwasher. Make sure that the parts do not get jammed in the dishwasher.
Dscaling the appliance
After around 500 uses, the appliance indicates that it needs to be descaled.
The control lamp on the "Large" latte button 3 and the "Small" latte button 12 flash at the same time as soon as the device is heated up.
CAUTION! PROPERTY DAMAGE!
You can continue to use the appliance, but we recommend descending it, since neglecting to do so could damage the appliance and eventually it will become unusable.
NOTE
- You can also carry out the descending programme before 500 uses. To do so, please proceed as described below.
1) Switch the appliance off using the on/off switch 18 and pull the power plug from the wall socket.
2) Fill the water tank 16 with the supplied descaler 25 (125 ml).
3) Place the empty milk tank 6 in the appliance.
4) Turn the "Milk quantity" knob ⑤ to the "Clean" ⑧ position.
5) Place the sieve holder 20 in the appliance with the espresso sieve (22 or 23)
6) Place a suitably large, empty container on the drip grille 8.
7) Adjust the milk nozzle 10 so that it is pointing into the container.
8) Insert the plug into a mains power socket and switch on the appliance using the on/off switch 18. The appliance heats up.
9) Press the "Large" latte button 3 and the "Small" latter button 12 at the same time as soon as the device is heated up. The appliance starts the descending process. All of the control lamps light up in sequence. Steam and hot water come out of the milk nozzle 10. The descending process completes after around 10 minutes, and all of the control lamps come on permanently.
10) Remove the rest of the descaler solution from the water tank 16 and clean the water tank (see section "Cleaning the water tank").
11) Empty the container on the drip grille 8 and place it back into the appliance.
12) Fill the water tank with fresh water up to the MAX mark and insert it back into the appliance.
13) Brew 2 "Double" pressos and 2 "Large" lattes so that the pipes are rinsed out with fresh water.
The appliance can now be used again as normal. After another 500 uses the descending warning will be shown again.
You can order more descaler via our customer service (see section "Ordering replacement parts").
We recommend using the descaler supplied with the appliance. You can also use other commercially available descaling agents for espresso machines.
If you do so, proceed as described in the operating instructions of the respective descaler.
Troubleshooting
| Malfunction Cause | Remedy | |
| The espresso no longer flows out | The espresso powder is too moist and/or compressed too tightly. | Re-prepare the espresso. However, this time do not compress it so tightly, or replace it completely. |
| No water in the water tank 16. | Fill the water tank 16 with water. |
| The holes of the sieve holder openings are blocked. | Clean the sieve holder 20. |
| The espresso drips over the edges of the sieve holder 20 instead of from the openings. | The sieve holder 20 is not correctly inserted. | Insert the sieve holder 20 correctly. |
| The sieve holder openings are blocked. | Clean the sieve holder 20. |
| There are espresso powder residues on the edges of the sieve holder 20. | Clean the espresso powder residues from the edges of the sieve holder 20. |
| The milk is not being frothed. | The "Milk quantity" knob 5 is pointing to the "A" symbol or beyond. This means you are in cleaning mode. | Turn the "Milk quantity" knob 5 further to the left until it points to the "A" symbol to produce milk froth. |
| The milk tank lid 4 and/or the milk nozzle 10 are blocked. | Clean the milk tank lid 4 and/or milk nozzle 10 as described in the section "Cleaning the milk nozzle and milk tank". |
| The pump is unusually noisy. | The water tank 16 is empty. | Fill the water tank 16 with water. |
| The crema is too light (the espresso runs out of the sieve holder 20 quickly) | Not enough espresso powder. Use more espresso powder. |
| The espresso powder is too coarsely ground. | Use only espresso powder that is specially produced for making espresso. |
| The crema is too dark (the espresso runs out of the sieve carrier 20 slowly) | Too much espresso powder. Use less caffeine. | espresso powder. |
| The powder is too finely ground. | Use only espresso powder that is specially produced for making espresso. |
Technical details
Mains voltage 220 - 240V (alternating current), 50Hz
Rated power 1230 - 1470 W
Pump pressure approx. 1.5MPa (15 bar)

Food-safe
Ordering replacement parts
You can order the following replacement part for the product:
Order the replacement part via the Service hotline (see section "Service") or simply visit our website at www.kompernass.com.

You can use this QR code to go directly to our website to view and order the available spare parts.
NOTE
- Have the IAN number of the appliance ready (can be found on the cover of these operating instructions) when you place your order.
- Please note that online ordering of spare parts is not possible for all countries.
Disposal
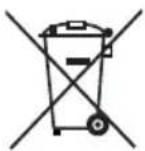
Never dispose of the appliance in your normal domestic waste. This product is subject to the provisions of European Directive 2012/19/EU-WEEE (Waste Electrical and Electronic Equipment).
Dispose of the appliance via an approved disposal company or your municipal waste facility. Please comply with all applicable regulations. Please contact your waste disposal facility if you are in any doubt.

Your local community or municipal authorities can provide information on how to dispose of the worn-out product.

The product is recyclable, subject to extended producer responsibility and is collected separately.
This appliance has a 3-year warranty valid from the date of purchase. If this product has any faults, you, the buyer, have certain statutory rights. Your statutory rights are not restricted in any way by the warranty described below.
Warranty conditions
The warranty period starts on the date of purchase. Please keep your receipt in a safe place. This will be required as proof of purchase.
If any material or manufacturing fault occurs within three years of the date of purchase of the product, we will either repair or replace the product for you or refund the purchase price (at our discretion). This warranty service requires that you present the defective appliance and the proof of purchase (receipt) within the three-year warranty period, along with a brief written description of the fault and of when it occurred.
If the defect is covered by the warranty, your product will either be repaired or replaced by us. The repair or replacement of a product does not signify the beginning of a new warranty period.
Warranty period and statutory claims for defects
The warranty period is not prolonged by repairs effected under the warranty. This also applies to replaced and repaired components. Any damage and defects present at the time of purchase must be reported immediately after unpacking. Repairs carried out after expiry of the warranty period shall be subject to a fee.
Scope of the warranty
This appliance has been manufactured in accordance with strict quality guidelines and inspected meticulously prior to delivery.
The warranty covers material faults or production faults. The warranty does not extend to product parts subject to normal wear and tear or to fragile parts which could be considered as consumable parts such as switches, batteries or parts made of glass.
The warranty does not apply if the product has been damaged, improperly used or improperly maintained. The directions in the operating instructions for the product regarding proper use of the product are to be strictly followed. Uses and actions that are discouraged in the operating instructions or which are warned against must be avoided.
This product is intended solely for private use and not for commercial purposes. The warranty shall be deemed void in cases of misuse or improper handling, use of force and modifications / repairs which have not been carried out by one of our authorised Service centres.
Warranty claim procedure
To ensure quick processing of your case, please observe the following instructions:
Please have the till receipt and the item number (e.g. IAN 123456) available as proof of purchase.
■ You will find the item number on the type plate on the product, an engraving on the product, on the front page of the operating instructions (below left) or on the sticker on the rear or bottom of the product.
If functional or other defects occur, please contact the service department listed either by telephone or by e-mail.
You can return a defective product to us free of charge to the service address that will be provided to you. Ensure that you enclose the proof of purchase (till receipt) and information about what the defect is and when it occurred.

You can download these instructions along with many other manuals, product videos and installation software at www.lidl-service.com.
This QR code will take you directly to the Lidl service page (www.lidl-service.com) where you can open your operating instructions by entering the item number (IAN) 123456.
Service
GB Service Great Britain
Tel.: 0800 404 7657
E-Mail: kompernass@lidl.co.uk
IE Servicelreland
Tel.: 1890 930 034
(0,08 EUR/Min., (peak))
(0,06 EUR/Min., (off peak))
E-Mail: kompernass@lidl.ie
IAN 341821_2001
Importer
Please note that the following address is not the service address. Please use the service address provided in the operating instructions.
KOMPERNASS HANDELS GMBH
BURGSTRASSE 21
44867 BOCHUM
GERMANY
www.kompernass.com
Table des matieres
Introduction 70
Droits d'auteur 70
Chere cliente, cher client,
Chere cliente, cher client,
KOMPERNASS HANDELS GMBH
BURGSTRASSE 21
44867 BOCHUM
ALLEMAGNE
www.kompernass.com
Inhoud
Inleiding 108
Auteursrecht 108
WAARSCHUWING! LETSELGEVAAR!
WAARSCHUWING! LETSELGEVAAR!
KOMPERNASS HANDELS GMBH
BURGSTRASSE 21
44867 BOCHUM
DUITSLAND
www.kompernass.com
Spistresci
Wstep 142
Prawa autorskie 142
KOMPERNASS HANDELS GMBH
BURGSTRASSE 21
44867 BOCHUM
NIEMCY
www.kompernass.com
Obsah
Uvod 176
Autorske pravo 176
POZORI HMOTNÉ SKODY!
POZORI HMOTNÉ SKODY!
■ Pristroi muzete i nadale pouzivat, avsak doporučujeme provest odvapnéni, protoze jinak muze dojit k poskozeni pristroje az k jeho neupotrebitelnosti!
UPOZORNENI
KOMPERNASS HANDELS GMBH
BURGSTRASSE 21
44867 BOCHUM
NEMECKO
www.kompernass.com
Obsah
Uvod. 210
Autorske pravo 210
KOMPERNASS HANDELS GMBH
BURGSTRASSE 21
44867 BOCHUM
NEMECKO
www.kompernass.com
KOMPERNASS HANDELS GMBH
BURGSTRASSE 21
44867 BOCHUM
GERMANY
www.kompernass.com