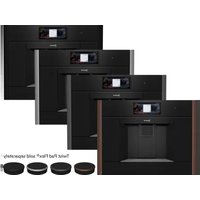
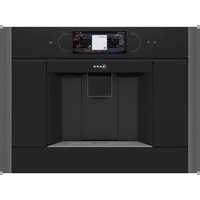
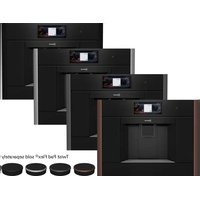
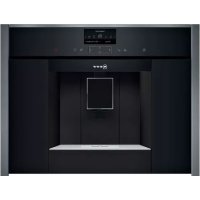
CV 7760 N - Coffee machine NEFF - Free user manual and instructions
Find the device manual for free CV 7760 N NEFF in PDF.
| Product type | Built-in fully automatic coffee machine |
| Brand | Neff |
| Model | CV 7760 N |
| Power supply | 220-240 V ~ 50/60 Hz |
| Coffee type | Whole beans and ground coffee |
| Main functions | Espresso, Coffee, Cappuccino, Latte macchiato, Café au lait, Milk foam, Hot milk, Hot water, My coffee, 2 cups |
| Extraction system | Built-in automatic (2 positions) |
| Display | Display with navigation and menu |
| Adjustments | Grind fineness, water hardness, temperature, aroma, quantity, contrast, lighting |
| Milk frother | Removable, produces milk foam and hot milk |
| Maintenance programs | Descaling, cleaning, Calc'nClean |
| Brew unit cleaning | Removable, clean with water |
| Safety | Automatic shut-off (Eco mode), anti-burn protection |
| Included accessories | Measuring spoon, milk flexible hose |
Frequently Asked Questions - CV 7760 N NEFF
User questions about CV 7760 N NEFF
0 question about this device. Answer the ones you know or ask your own.
Ask a new question about this device
Download the instructions for your Coffee machine in PDF format for free! Find your manual CV 7760 N - NEFF and take your electronic device back in hand. On this page are published all the documents necessary for the use of your device. CV 7760 N by NEFF.
USER MANUAL CV 7760 N NEFF
DC Deutschland, Germany
Deutschland, Schleswig-Plakson,
Dienstlandorf,
DSF,
DSF Pro Apparate Bss.,
DSF,
DSF,
DSF,
DSF,
DSF,
DSF,
DSF,
DSF,
DSF,
DSF,
DSF,
DSF,
DSF,
DSF,
DSF,
DSF,
DSF,
DSF,
DSF,
DSF,
DSF,
DSF,
DSF,
DSF,
DSF,
DSF.
DSF,
DSF,
DSF,
DSF,
DSF,
DSF,
DSF,
DSF,
DSF,
DSF,
DSF,
DSF,
DSF,
DSF,
DSF,
DSF,
DSF,
DSF,
DSF,
DSF,
DSF,
DSF,
DSF,
DSF,
DSF
CZ Czaru Republika,
Czaru Republika,
Czaru Republika,
Czaru Republika,
Czaru Republika,
Czaru Republika,
Czaru Republika,
Czaru Republika,
Czaru Republika,
Czaru Republika,
Czaru Republika,
Czaru Republika,
CZ Czaru Republika,
CZ Czaru Republika,
CZ Czaru Republika,
CZ Czaru Republika,
CZ Czaru Republika,
CZ Czaru Republika,
CZ Czaru Republika,
CZ Czaru Republika,
CZ Czaru Republika,
CZ CZ Czaru Republika,
CZ CZ Czaru Republika,
CZ CZ Czaru Republika,
CZ CZ Czaru Republika,
CZ CZ Czaru Republika,
CZ CZ CzuluRepublika,
CZ CZ CzuluRepublika,
CZ CZ CzuluRepublika,
CZ CZ CzuluRepublika,
CZ CZ CzuluRepublika,
CZ CZ CzuluRepublika,
CZ CZ CzuluRepublika,
CZ CZ CzuluRepublika,
CZ CZE CZERepublkiA,
CZ CZE CZERepublkiA,
CZ CZE CZERepublkiA,
CZ CZE CZERepublkiA,
CZ CZE CZERepublkiA,
CZ CZE CZERepublkiA,
CZ CZE CZERepublkiA,
CZ CZE CZERepublkiA,
CZ CZE CZE RepublkiA,
CZ CZE CZERepublkiA,
CZ CZE CZERepublkiA,
CZ CZE CZERepublkiA,
CZ CZE CZERepublkiA,
CZ CZE CZERepublkiA,
CZ CZE CZERepublkiA,
CZ CZE CZERepublkiA,
CZ CZ CZ CZRepublkiA,
CZ CZ CZ CZRepublkiA,
CZ CZ CZ CZRepublkiA,
CZ CZ CZ CZRepublkiA,
CZ CZ CZ CZRepublkiA,
CZ CZ CZ CZRepublkiA,
CZ CZ CZ CZRepublkiA,
CZ CZ CZ CZRepublkiA,
CZ CZ CZ CZRepublikiA,
CZ CZ CZ CZRepublikiA,
CZ CZ CZ CZRepublikiA,
CZ CZ CZ CZRepublikiA,
CZ CZ CZ CZRepublikiA,
CZ CZ CZ CZRepublikiA,
CZ CZ CZ CZRepublikiA,
CZ CZ CZ CZRepublikiA,
CZ CZ CZ CZRepublikiA,
OJ ZO OJ ZO OJ RepublkiA,
OJ ZO OJ ZO OJ RepublkiA,
OJ ZO OJ ZO OJ RepublkiA,
OJ ZO OJ ZO OJ RepublkiA,
OJ ZO OJ ZO OJ RepublkiA,
OJ ZO OJ ZO OJ RepublkiA,
OJ ZO OJ ZO OJ ReubllkA,
GB Great Britain
BSC Buses, buses and trains
BCT-Business Care
CAB Commercial Banking
CBM Credit Card
CBN Credit Card
CBP Credit Card
CBT Credit Card
CBU Credit Card
CBV Credit Card
CBW Credit Card
CBX Credit Card
CBY Credit Card
CBZ Credit Card
CBZ Credit Card
CBZ Credit Card
CBZ Credit Card
CBZ Credit Card
CBZ Credit Card
CBZ Credit Card
CBZ Credit Card
CBZ Credit Card
CBZ Credit Card
CBZ Credit Card
CBZ Credit Card
CBZ Credit Card
CBZ Credit Card
CBZ Credit Card
CBZ Credit Card
CBZ Credit Card
CBZ Credit Card
CBZ Credit Card
CBZ Credit Card
CBZZ Credit Card
CBZZ Credit Card
CBZZ Credit Card
CBZZ Credit Card
CBZZ Credit Card
CBZZ Credit Card
CBZZ Credit Card
CBZZ Credit Card
CBZZ Credit Card
CBZZ Credit Card
CBZZ Credit Card
CBZZ Credit Card
CBZZ Credit Card
CBZZ Credit Card
CBZZ Credit Card
CBZZ Credit Card
CBZZ Credit Card
CBZZ Credit Card
CBZZ Credit Card
CBZZ Credit Card
CBzzCreditCard
CBZZCreditCard
CBZZCreditCard
CBZZCreditCard
CBZZCreditCard
E. Caputofliand
A. Cai, M. D. L. Gao, S. A. K.
SAPApplBio Care
B. Li, F., B. Le, Y., H. Liu, J.
Liu, P., E. Guo, D. Zhu, X.,
Wang, Z., and Y. Zhang, J.
J. Appl. Physiol. 105 (2006), 347-358.
http://dx.doi.org/10.1098/japs.105.
1007-0006 (2006)
1007-0007 (2006)
1007-0008 (2006)
1007-0009 (2006)
1007-0010 (2006)
1007-0011 (2006)
1007-0012 (2006)
1007-0013 (2006)
1007-0014 (2006)
1007-0015 (2006)
1007-0016 (2006)
1007-0017 (2006)
1007-0018 (2006)
1007-0019 (2006)
1007-0020 (2006)
1007-0021 (2006)
1007-0022 (2006)
1007-0023 (2006)
1007-0024 (2006)
1007-0025 (2006)
1007-0026 (2006)
1007-0027 (2006)
1007-0028 (2006)
1007-0029 (2006)
1007-0031 (2006)
1014:335
14:335
14:335
14:335
14:335
14:335
14:335
14:335
14:335
14:335
14:335
14:335
14:335
LV Lefkova, Linda
Lefkova 10000000000000000000000000000000000000000000000000000000000000000000000000000000000000000000000000000
Sulayya 765
Sulayya 765
Sulayya 765
Sulayya 765
Sulayya 765
Sulayya 765
Sulayya 765
Sulayya 765
Sulayya 765
Sulayya 765
Sulayya 765
Sulayya 765
Sicherheitshinweise
... on purchasing this product. With this deployable fully automatic espresso machine you have acquired a high-quality modern kitchen appliance of innovative design which combines a multitude of functions with easy operation.
It will enable you to prepare a variety of delicious hot drinks quickly and simply – whether you're in the mood for a traditional cup of coffee, a smooth milk coffee or latte macchiato, a creamy cappuccino or an invigorating espresso. At the same time the appliance offers you a wide range of options for adapting it to your individual taste. To ensure that you can use this fully automatic espresso machine with all its functions and features reliably and safely, we would like you to familiarize yourself with its components, functions, displays and controls. These instructions are designed to help you. So please take the time to read them before you switch on the appliance.
How to use these instructions
If you unfold the front cover of these instructions you will find illustrations of the appliance with numbered parts. These numbers are referred to throughout the text, e.g. "Water tank (8)".

Tip: If you leave the cover page unfolded, you can always refer back to it quickly, wherever you are in the instructions.
Displays and lettering on buttons are always shown in a different font from the text of the instructions so that you can easily recognize what is displayed or printed on the appliance. Example: Espresso
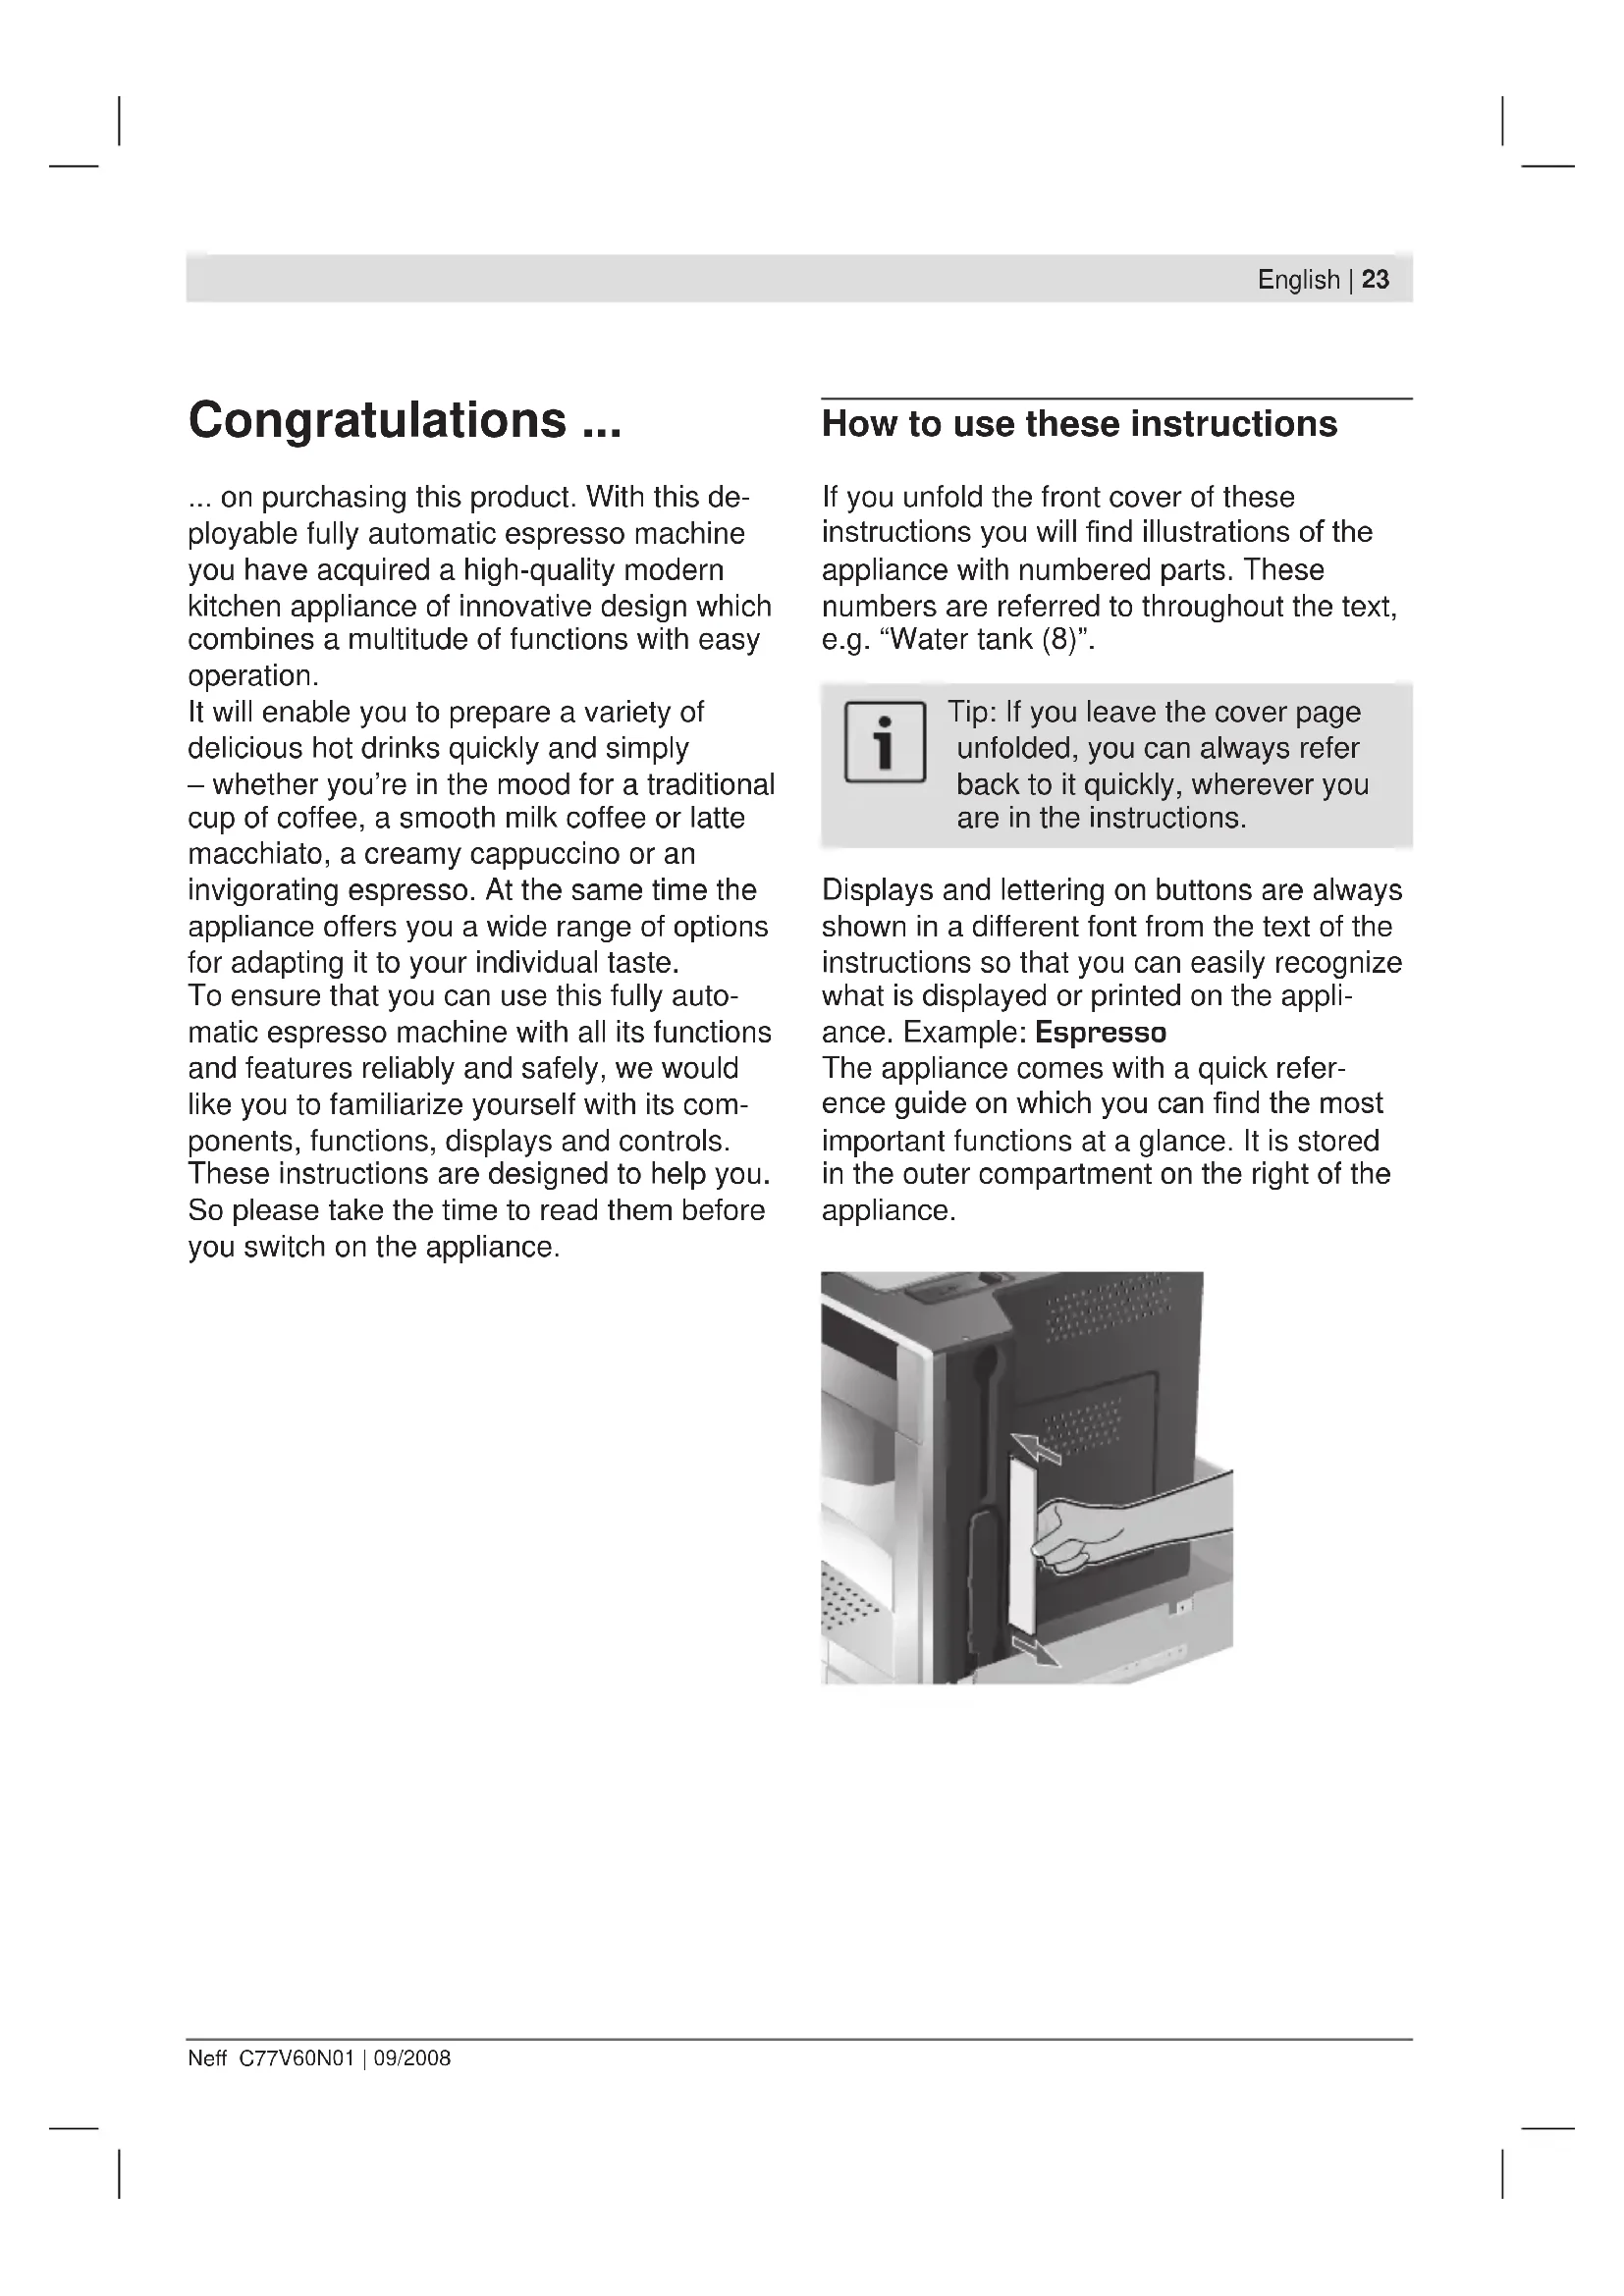
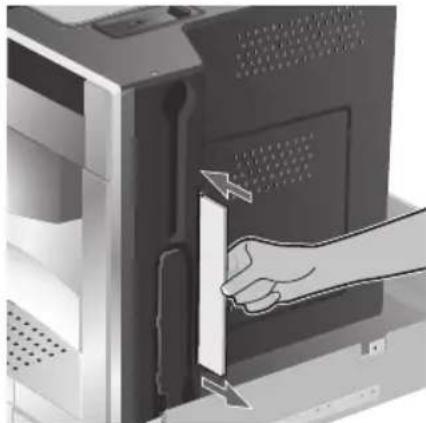
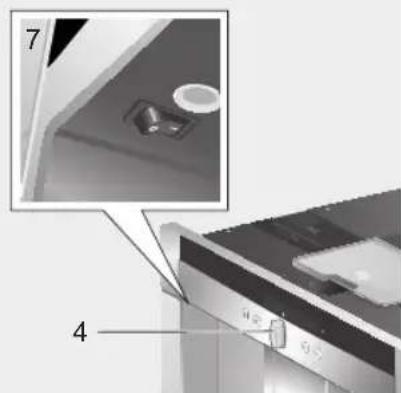
The appliance comes with a quick reference guide on which you can find the most important functions at a glance. It is stored in the outer compartment on the right of the appliance.
Contents
25 Safety instructions
25 The appliance and its parts
26 Controls and display
26 Power switch O/I
26 Menu and display
27 Deployment system
27 Accessories
27 Display messages
28 Operation
28 General
29 Setting up the appliance
30 Preparing drinks
30 Drink selection
30 Example
31 Preparation using pre-ground coffee
31 Preparation using milk
32 Two cups at once
32 My coffee
33 Preparing milk froth and hot milk
33 Dispensing hot water
34 Information and settings
34 Displaying information
34 Displaying settings
35 Adjusting the grinding unit
36 Checking and setting the water hardness
36 Tips on energy saving
36 Daily maintenance and cleaning
36 Daily maintenance
37 Cleaning the milk system
38 Cleaning the brewing unit
39 Service programmes
39 Descaling
40 Cleaning
41 Calc'nClean
42 Simple troubleshooting
43 Accessories, storage, disposal, guarantee
43 Accessories
43 Storage
43 Disposal
43 Guarantee
Safety instructions
Please read the operating instructions carefully before using the appliance and keep them for future reference. You should also note the enclosed quick reference guide, which is stored in a special outer compartment on the right of the appliance.
This fully automatic espresso machine is designed for domestic use and not commercial use. It should only be filled with fresh water and the substances described in these instructions (coffee, cleaning/descaling agents).
Use indoors and at room temperature only. Do not allow persons (including children) with reduced physical, sensory or mental capabilities, or lack of experience and knowledge, to use this appliance, unless they are being supervised or have been given instruction concerning use of the appliance by a person responsible for their safety. Keep children away from the appliance. Children should be supervised to ensure that they do not play with the appliance.
Risk of electric shock! Connect and operate the appliance only in accordance with the
specifications on the rating label.
Do not use if either the power cord or the appliance is damaged. In the event of a malfunction, switch off the appliance immediately by the power on/off switch. Then pull out the power plug. Do not open the appliance or dismantle it. Never immerse the power cord in water.
To avoid potential hazards, repairs such as replacing a damaged power cord should only be performed by our service personnel.
Risk of injury! Do not reach into the grinding unit.
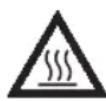
Risk of burns! The milk frother for milk and hot water gets very hot.
After use, allow to cool down first before touching.
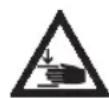
Risk of injury!
Be careful when pulling the appliance out of the built-in unit and it back in, so that fingers are not
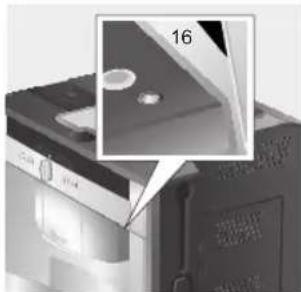
The appliance and its parts
(See illustration on the fold-out front cover of these instructions)
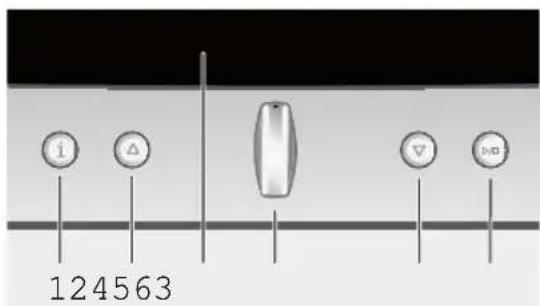
1 Button i (information/settings)
2 Selection button (up)
3 Display
4 Retractable navigation button
5Selection button down)
6 Start/Stop button
7 Power switch 0/I
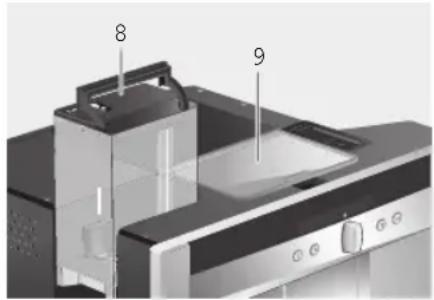
8 Removable water tank
9 Bean container with aroma cover
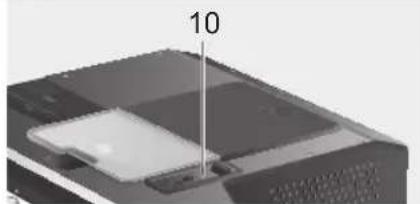
10.7.2.3.4.5.6.7.8.9.10.11.12.13.14.15.16.17.18.19.20.21.22.23.24.25.26.27.28.29.30.31.32.33.34.35.36.37.38.39.40.41.42.43.44.45.46.47.48.49.50.51.52.53.54.55.56.57.58.59.60.61.62.63.64.65.66.67.68.69.70.71.72.73.74.75.76.77.78.79.80.81.82.83.84.85.86.87.88.89.90.91.92.93.94.95.96.97.98.99.
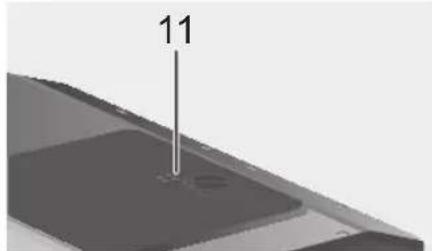
11 Selector for adjusting the grind
12 Milk tube
13 Measuring spoon
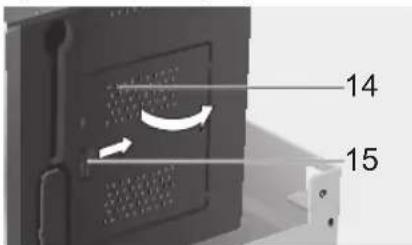
14 Door to brewing unit
15 Door opener to brewing unit
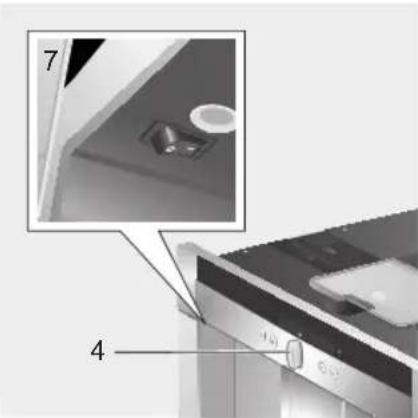
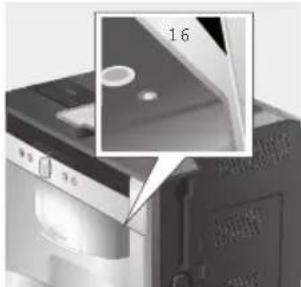
16 Deployment button
17 Milk container
18 Drip tray unit
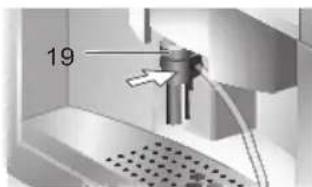
19 Removable milk frother (for milk/hot water)
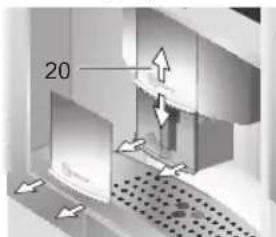
20 Height-adjustable coffee outlet
Controls and display
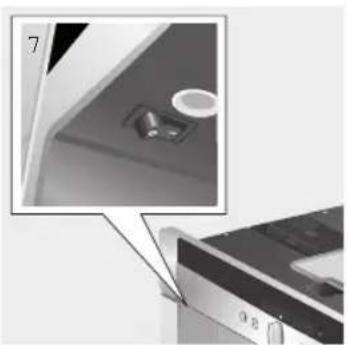
Power switch O/I
The power switch 0/1 (7) is used to switch the appliance on or to switch it off fully (power supply off).

Important:
Do not press the power switch while the appliance is operating. You should only switch off the appliance after putting it into "energy saving mode" by retracting the navigation button. This initiates automatic rinsing of the appliance.
Menu and display
The appliance features user-friendly menu navigation to ensure that operation is as easy as possible while at the same time offering a wide range of functions. It allows you to select from a multitude of options in only a few steps once you know how. The display shows which programme you have selected and lets you know when you need to top up the appliance with water or coffee, or run one of the service programmes.
Basic menu operation is described in the following pages.
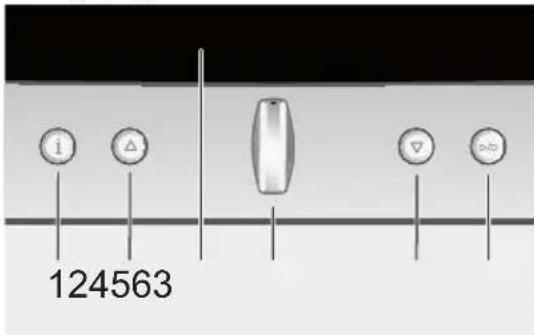
1 i: If you press i briefly, information is shown on the display (see "Displaying information"). If you keep i pressed for at least three seconds, you open the settings menu (see "Displaying settings").
2: This button is used to navigate upwards in the display (3). The currently active menu item is shown in a larger font.
3 Display: The display uses symbols and texts to indicate settings, ongoing processes and messages.
4 Retractable navigation button: Not retracted: The appliance is switched on. After it is switched on the appliance rinses, unless it is still warm from its last use. Retracted: The appliance is in "energy saving mode". After the appliance has been switched to "energy saving mode" it rinses, unless coffee has not been dispensed.
The appliance is ready for use when the drink selection menu is shown in the display (3). Press the navigation button in the required direction to enter or change settings (e.g. coffee strength or per-cup quantity).
5: This button is used to navigate downwards in the display (3). The currently active menu item is shown in a larger font.
6 Start/Stop : This button is used to start drink preparation or to start a service programme.
Press / (6) again during drink preparation to stop the dispensing process.
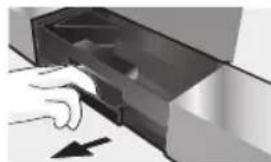
Deployment system
The appliance can be pulled out of the built-in unit automatically. To do this,
press deployment button (16) (appliance must be switched on for this) or
remove grate and pull on the handle underneath which is now accessible:
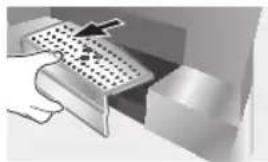
The appliance now moves automatically into deployment position 1. In this position it can be filled with water, coffee beans, ground coffee and cleaning/descaling tablets, and the accessories on the right of the appliance can be removed.
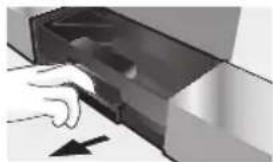
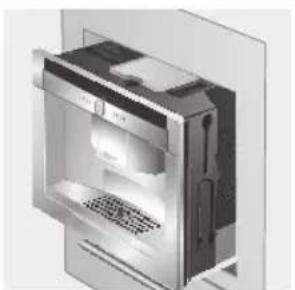
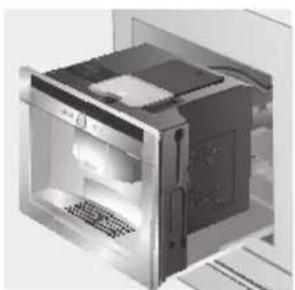
To pull the appliance out fully,
press deployment button (16) again and pull the appliance out by hand into position 2 or
pull the appliance out fully by the handle. In deployment position 2 the brewing unit can be removed and the grinding unit adjusted.
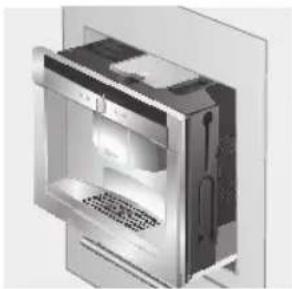
Deployment position 1
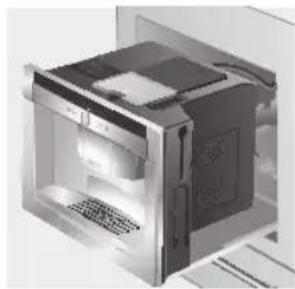
Deployment position 2
Then push the appliance back fully into the built-in unit.

During the brewing process, automatic deployment is prevented.
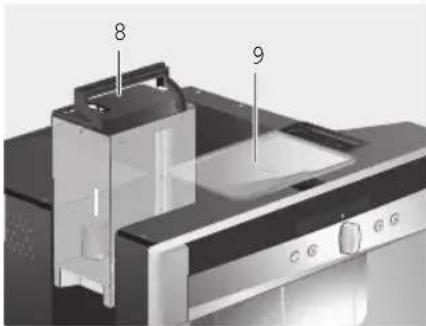
Accessories
The fully automatic espresso machine has special compartments for storing the accessories (12, 13) and quick reference guide with the appliance. These are located on the right side and are accessible when the appliance is pulled out into deployment position 1.
Display messages
The display shows not only the current operating status, but also various messages that give you status information or let you know when you need to take action. As soon as you have taken the necessary action, the message disappears and the menu for drink selection is displayed again.
Information:
| Display message Meaning | |
| Water tank almost empty | Water tank must be refilled soon |
| Bean container almost empty | Bean container must be refilled soon |
| Please wait | Appliance is working; please wait a moment |
Prompts:
| Display message What you need to do | |
| Refill water tank | Refill water tank |
| Replace water tank | Replace water tank |
| Check water tank | Remove water tank and replace correctly |
| Replace drip tray | Replace drip tray |
| Empty drip tray | Empty drip tray and clean |
| Refill bean container | Refill bean container |
| Set up milk frother | Set up milk frother |
| Replace brewing group unitClose door | Replace brewing unit and close door |
| Check brewing group unit | Remove brewing unit and replace correctly |
| Service - change filter | Change water filter |
| Service - descale | Run “Descaling” service programme |
| Service - clean | Run “Cleaning” service programme |
| Display message What you need to do | |
| Service - Calc'n'Clean | Run "Calc'n'clean" service programme |
Operation
General
Fill the water tank with fresh, uncarbonated water only, and preferably use only beans for fully automatic coffee and espresso machines. Do not use coffee beans that have been glazed, caramelised or treated with other additives containing sugar, since they will block the brewing unit.
If the appliance is being used for the first time or has not been operated for a long period, the first cup of coffee will not have the full aroma.
The factory settings of the fully automatic es- presso machine are programmed for optimal performance. The appliance switches to "energy saving mode" automatically after one hour. This setting, like many others, can be changed (see "Auto off after" under "Displaying settings").
Do not press the power switch while the appliance is operating. The appliance should only be switched off when it is in "energy saving mode", so that it can rinse automatically.
Setting up the appliance
- Press the power switch (7).
- The language selection is shown in the display:

- Use the navigation button (4) to select the language in which you want the display texts to appear. The following languages can be selected:
Deutsch
English
PYCCKM
Nederlands
Francais
Italiano
Espanol
Polski
- Press Start/Stop (6)6). The language you selected is saved and the appliance is in "energy saving mode".
You can change the language setting at any time (see "Displaying settings"). - Deploy the appliance (see "Deployment system").
- Remove the water tank (8) by pulling it upward, rinse and fill it with fresh cold water. Do not fill above the "max" mark.
- Replace the water tank and push it firmly downward into place.

Fill the water tank with fresh water every day. The tank should always contain sufficient water for operating the appliance.
Fill the bean container (9) with coffee beans (for preparation using ground coffee, see page 31).
- Push the appliance back into the built-in unit.
- Press Start/Stop (6). The company logo lights up in the display. The appliance now heats up and rinses. Some water will run out of the coffee outlet. The menu for drink selection is shown in the display:

- Set the water hardness.
Preparing drinks
Drink selection
You can use the navigation button (4) to select your drink in the drink selection menu.
| Espresso Coffee |
| regular |
| medium cup |
Espresso
Coffee
Macchiato
Cappuccino
White coffee
My coffee
Milk froth
Hot milk
Hot water
Short rinse
For most types of drink you can use buttons (2) and 5 to select further options, e.g. coffee strength and per-cup quantity. The available options are always shown under the type of drink. Among the options you select with (2) and 6 you can then change other settings using the navigation button (4). Under coffee preparation you have the following options:
Strength
mild regular strong
Size
small medium large
Example
Let's assume you would like a large cup of mild coffee made from coffee beans.
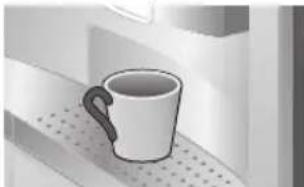
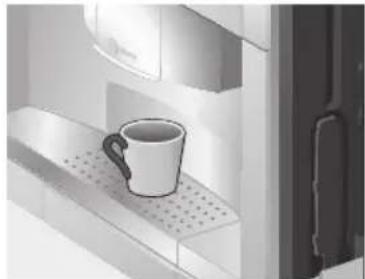
- Place the cup under the coffee outlet (20):
- Keep pressing the navigation button (4) until Coffee is displayed in the centre of the top line (the currently active setting is shown in a larger font):
| Espresso | Coffee | Macchiato |
| regular | ||
| medium cup |
- Now press (5) once to get to the strength setting. The strength setting is highlighted:
| Coffee | ||
| mild | regular | strong |
| medium cup | ||
- Press the navigation button (4) to the left until "mild" appears in large letters in the centre.
| Coffee | |
| mild | regular |
| medium cup | |
- Press (5) again to get to the per-cup quantity setting. The per-cup quantity setting is now highlighted:
| Coffee mild | |
| small cup | medium cup large cup |
- Press the navigation button (4) to the right until "large cup" appears in the centre:
| Coffee | ||
| mild | ||
| medium cup | large cup | 2 small cups |
- Press (6).
The coffee you have selected is prepared. Proceed in the same way to prepare other types of coffee in different strengths and per-cup quantities.
Preparation using pre-ground coffee
This fully automatic espresso machine also offers the option of making coffee with pre-ground coffee. A measuring spoon in included with the appliance (on delivery it is stowed in the outer compartment on the right of the appliance, [13]).
- Deploy the appliance and remove the measuring spoon.
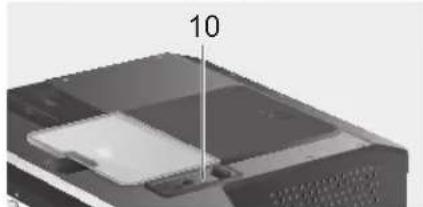
- Open the drawer (10).
- Pour in no more than two level spoons of ground coffee.

Do not use whole beans or instant coffee.
- Close the drawer again.
- Push the appliance back in.
- Select the required drink and per-cup quantity with the navigation button (4):

- Place a cup under the coffee outlet (20):
- Press
The coffee is brewed and then dispensed into the cup(s). For another cup of coffee, pour in more ground coffee and repeat the procedure. If no coffee is taken within 90
seconds, the brewing chamber empties automatically to avoid overfilling. The appliance rinses.
Preparation using milk

For optimal milk froth, use cold low-fat milk (1.5% fat) if possible.
- Slide the coffee outlet (20) downwards. Remove the cover and pull out the milk frother (19):

- Deploy the appliance (see "Deployment system").
- Take the milk tube supplied with the appliance (on delivery it is stowed in the outer compartment on the right of the appliance [12]) and connect it to the attachment point on the milk frother (19). Close the cover again.

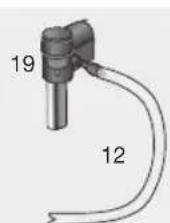
- Attach the milk frother (19) and push the milk tube (12) into the indentation.
-
Close the cover.
-
Place container with milk next to the milk frother. Introduce the milk tube into the container. The notched end of the tube should be fully immersed in the milk.

- Place a cup or glass under the coffee outlet.
- Use the navigation button to select Macchiato, Cappuccino, White coffee or My coffee (your own special coffee/milk mix). The display shows the selected drink along with the setting for coffee strength and per-cup quantity for this drink:
- Choose your settings for strength and per-cup quantity.
- Press
First milk is drawn in, prepared and dispensed into the cup or glass. Immediately after that the coffee is brewed and then runs into the cup or glass.
Two cups at once
- Place two cups under the two coffee outlets left and right:
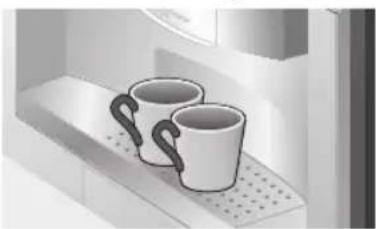
- Select Espresso or Coffee with the navigation button (4). Press 5 and the navigation button to set the required strength.
- Press 5 to switch to the per-cup quantity menu. In the per-cup quantity menu, keep pressing the navigation button (4) to the right until the display shows "2 small cups".
Coffee
mild
large cup
2 small cups
2 medium cups
- Set the required quantity for the two cups by turning the navigation button (4) (small, medium, large).
- Press Coffee is dispensed into the two cups.

The appliance brews twice in succession; wait for the complete process to finish.
My coffee
The My coffee setting allows you to define the exact mix of coffee and frothed milk that suits your own individual taste.
- Connect the milk tube (12) to the milk frother (19) (see "Preparation using milk").
- Place container with milk on the grate. Introduce the milk tube (12) into the
container. The notched end of the tube should be fully immersed in the milk.
- Place a cup under the coffee outlet.
- Select My coffee with the navigation button (4). (4).

- Press 5 to switch to the coffee strength selection. Set the required strength with the navigation button (4).

- Press 5 to go on to the per-cup quantity selection. Set the required per-cup quantity with the navigation button (4)..

- Press 5 to switch to selection of the coffee/milk ratio. Set the required mix in 20% steps with the navigation button (4).

- Press / (6); the drink is prepared in the required coffee/milk ratio.
Preparing milk froth and hot milk
Risk of burns! The milk frother (19) gets very hot. After use, allow to cool
down first before touching.

For optimal milk froth quality, use cold low-fat milk (1.5% fat) if possible.
- Take the milk tube (12) and connect it to the milk frother (19) (see "Preparation using milk").
- Place a cup or glass under the outlet of the milk frother.
- Select the required setting for Milk froth or Hot milk with the navigation button 0 (4):

- Press / (6); milk froth or hot milk runs out of the milk frother outlet for about 60 seconds.
Press / (6) again to cut the process short.

Dried milk residue is difficult to remove, so clean the milk frother immediately after use (see "Cleaning the milk system").
Dispensing hot water
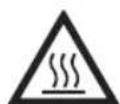
Risk of burns! The milk frother (19), from which the hot water flows, gets
very hot. After use, allow to cool down first before touching.
The appliance can also be used to dispense hot water, e.g. for tea.
- Place a cup or glass under the coffee outlet.
- Select Hot water with the navigation button (4):

- Press (5) to switch to the temperature selection. Set the required temperature with the navigation button (4):

- Press hot water runs out of the milk frother outlet for about 40 seconds. Press again to cut the process short.
Information and settings
Use i (1) to display information (press briefly) and adjust settings (hold down for at least three seconds).
Displaying information
In the Info menu (press i (1) briefly) you can call up the following information:
when it is necessary to descale the appliance
when it is necessary to clean the appliance
when it is necessary to change the filter
how much coffee has been dispensed since the appliance was first put into operation
how many milk drinks have been dispensed
how much hot water has been prepared
Displaying settings
Hold down i (1) for at least 3 seconds; the different setting options are then displayed:

Use (2) and 5) to switch between the different setting options. The currently active setting is always shown in a larger font. You can change the setting that is currently displayed using the navigation button ()4). To exit the menu, press i (1) again.

The changes you have made are saved automatically. It is not necessary to confirm them additionally.
The following setting options are available to you:
Language: Press the navigation button to select the display language.
Water hardness: Press the navigation button to select the required water hardness (1, 2, 3 or 4) (refer also to "Checking and setting the water hardness").
Coffee temperature: Press the navigation button to set the coffee temperature.
Auto off after: Press the navigation button to enter the time span after which the appliance should automatically switch to "energy saving mode" following the last drink preparation. A time between 5 minutes and 8 hours can be set. The default time is one hour, but this can be shortened to save energy.
Contrast: The display contrast can be set from -20 to +20 with the navigation button (4). The default setting is 0.
Illumination: The lighting can be set to on, off or off after 10 minutes (factory setting).
Water filter: Each time a new water filter is inserted in the water tank (8), it must be rinsed:
- Place the water filter in the water tank (8) and fill the tank with water up to the "max" mark.
- Use the navigation button to select START and press
- Place a container with a capacity of 0.5 litres under the milk frother (19).
- Press Water will now run first through the filter to rinse it and then into the container.
Empty the container. The appliance is ready to use once more.
The filter is no longer effective when the Change filter display appears, or at the latest after two months. It needs to be replaced for reasons of hygiene and so that there is no build-up of limescale (this could damage the appliance). Replacement filters can be obtained from retailers or customer service (see "Accessories").
After every filter change the filter must first be rinsed. Proceed as described at the beginning of this section.
If no new filter is used, turn the water filter setting to Off.

If the appliance has not been used for a prolonged period (e.g. during your vacation) the filter should be rinsed before the appliance is used again. To do this, simply dispense a cup of hot water.
Further entries in the Settings menu:
Service - descale: If you want to descale the appliance, press and run the descending programme (see "Dscaling").
Service - clean: If you want to clean the appliance, press 6 and run the cleaning programme (see "Cleaning").
Service - Calc'nClean: If you want to descale and clean the appliance at the same time, press and run the Calc'nClean programme (see "Calc'nClean").
Factory settings: You can cancel your own settings and reset the factory settings. To activate the factory settings, press

The appliance can also be reset to the factory settings as follows:
- Switch the appliance off fully at the power switch 0/1 (7).
- Press 42) and (5) at the same time, hold them down, and switch the appliance on again at the power switch 0/1 (7).
The factory settings are reactivated.
Adjusting the grinding unit
The rotary selector (11) on the top of the appliance adjusts the degree of grinding from coarse to fine as required.

Warning:
Adjust the grinding unit only while it is running. Otherwise the appliance may be damaged.
- Deploy the appliance fully (see "Deployment system").
- In the drink selection menu, select Espresso.
- Press (6).
- While the grinding unit is running, adjust the rotary selector (11) from fine coarse or back as required.

The new setting will not become apparent until after the second cup of coffee.
Tip: For dark roast coffee beans, choose a finer grind, for lighter beans a coarser grind.
Checking and setting the water hardness
The water hardness setting can be adjusted on this appliance. It is important to set the water hardness correctly, so that the appliance indicates accurately when the descal-ing programme should be run. The factory setting for the water hardness is 4. You can check the water hardness using the enclosed test strip or by asking your local water supplier.
Dip the test strip briefly in water, gently shake off any drips, and check the result after one minute.
Water hardness levels and settings:
Level Water hardness
| German (°dH) | French (°fH) | |
| 1 | 1-7 | 1-13 |
| 2 | 8-14 | 14-25 |
| 3 | 15-21 | 26-38 |
| 4 | 22-30 | 39-54 |
Tips on energy saving
The fully automatic espresso machine switches to "energy saving mode" automatically after one hour (factory setting). The appliance uses very little power in "energy saving mode". The default time of one hour can be shortened (see "Auto off after" under "Displaying settings"). The appliance then uses even less power.
The appliance is put into "energy saving mode" by retracting the navigation button.
If the appliance is not being used, switch it off at the power switch.
If possible, do not interrupt coffee or milk froth dispensing. Stopping a process prematurely results in higher energy consumption and the drip tray fills up more quickly.
Always descale the appliance when Service -descale is displayed (see "Descaling") to avoid a build-up of limescale. Limescale residue results in higher energy consumption.
Daily maintenance and cleaning
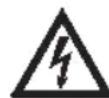
Risk of electric shock! Before cleaning the appliance, switch it off at the power switch.
Do not use a steam cleaner.
Daily maintenance
- Wipe the outside of the appliance with a damp cloth. Do not use scouring agents.
-
Do not use alcohol-based or spirit-based cleaning agents on the high-gloss surfaces.
-
Rinse out the water tank (8) with water only.
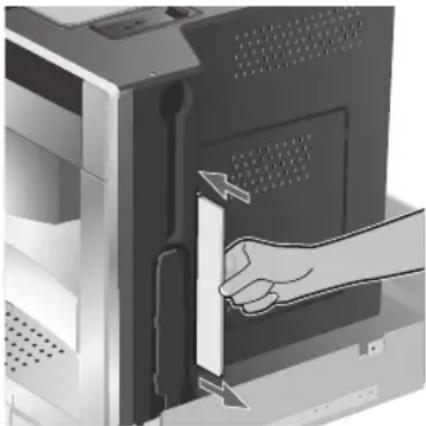
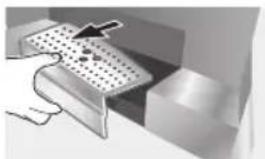
- Take off the grate (18 a). Pull out the drip tray (18 c). Take off the drip tray panel (18 b). Empty out any water and coffee grinds (18 d). Clean the drip tray or put it in the dishwasher. Do not put the grate (18 a) or the drip tray panel (18 b) in the dish washer.
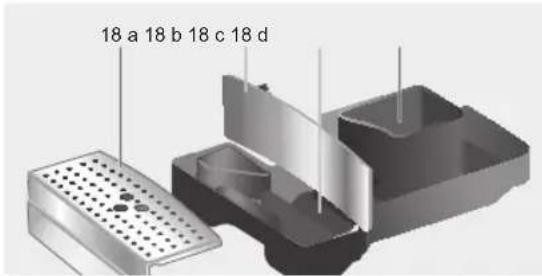
- Wipe out the inside of the tray holders.
- Clean the milk system (procedure described below).
- Replace all the parts again.

If the appliance is cold when switched on, or if it is set to "energy saving mode" after dispensing coffee, it rinses automatically. In other words the pipework inside the appliance is cleaned by the machine itself.
Cleaning the milk system
Risk of burns! The milk frother (19) gets very hot. After use, allow to cool down
first before touching.
Clean the milk system immediately after use.

All the parts can also be put in the dishwasher.
Short rinse:
- In the menu for drink selection, select Short rise and press
- Place a cup under the milk frother (19) and the end of the milk tube in the cup.
- Press The appliance now fills the cup automatically with water and draws it in again through the milk tube for rinsing. The rinse procedure takes about 1 minute.
- Empty the cup and clean the milk tube.
Cleaning the milk system:
- Dismantle the milk frother for cleaning. Slide the coffee outlet (20) downwards. Remove the cover and take out the milk frother (19):
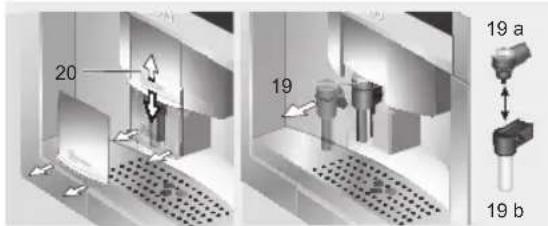
- Clean the holder of the milk frother (19) with a soft cloth.
- Dismantle the milk frother (19a and 19b).
- Clean the components either by hand or in the dish washer (put them in the cutlery basket).
- Reassemble the individual parts and replace them in the appliance. Press back in fully.
Cleaning the brewing unit
In addition to the automatic cleaning programme, the machine offers the option of removing the brewing unit for cleaning.

Warning: Clean the brewing unit without detergent and do not put it in the dishwasher.
- Deploy the appliance fully (see "Deployment system").
- Switch the appliance to "energy saving mode" with (14).
- Switch the appliance off completely at the power switch 0/1 (7); there should no longer be any buttons lit.
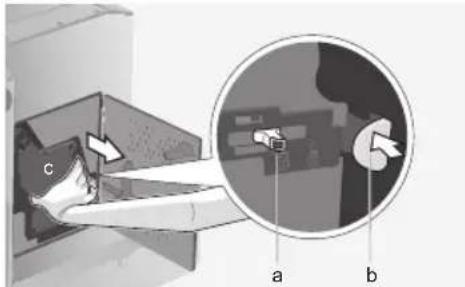
- Slide the door opener (15) back and open the door (14) to the brewing unit:
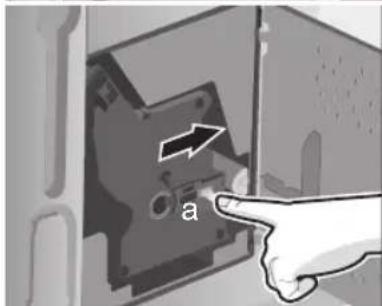
- Slide the red lock (a) on the brewing unit completely forward:
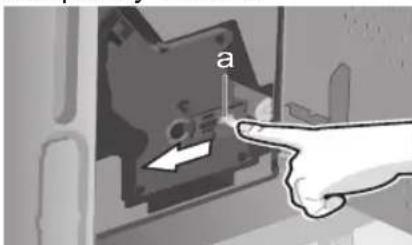
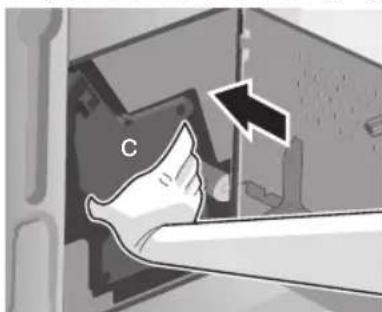
- Press the red button (b), grasp the brewing unit (c) by the recessed grips and remove carefully.
- Rinse the brewing unit under running water.
- Wipe out the inside of the appliance with a damp cloth.
- Allow the brewing unit and the inside of the appliance to dry.
- Reinsert the brewing unit (c) fully into the appliance. Slide the red lock (a) back fully and close the door (14).
Service programmes
At certain intervals, depending on how the appliance is used, the display will show one of the following texts instead of the coffee selection:
Service - change filter i - button 3 sec.
Service - clean i - button 3 sec
Service - descale i - button 3 sec.
Service - Calc'nClean i - button 3 sec.
Then the water filter should be changed immediately or the appliance cleaned or descaled using the corresponding programme (described on the next pages). Otherwise the appliance may be damaged.

The service programmes can also be started manually in the settings menu (see "Displaying settings").
Do not drink the liquids. Never use vinegar, vinegar-based products, citric acid or citric acid-based products for descaling. For cleaning and descaling use only the tablets included with the appliance. They were specially developed for this fully automatic espresso machine, and replacements are available from retailers or customer service (see "Accessories").
Never put descending tablets or any other descending agents in the drawer for ground coffee.
Important: If there is a filter in the water tank (8), it needs to be removed before the service programme is run.
Never interrupt the service programme. If one of the service programmes is interrupted, e.g. by a power outage, proceed as follows:
- Rinse the water tank (8) and refill it with fresh water up to the "max" mark.
- Press (6). The descending programme now runs for about 1 minute, followed by the cleaning programme for about seven minutes, and rinses the appliance:
Dscaling
Cleaning
Empty drip tray
Empty the drip tray (18).
Replace drip tray
Replace the drip tray.
The appliance is ready for use again.
Dscaling
If the prompt Service - descale is displayed or if you have selected Service - descale in the settings menu, press and hold down i (1) for at least three seconds.
The display shows:
Descale > Start
Press 6. The display will guide you through the programme.
Empty drip tray
Empty the drip tray (18).
Replace drip tray
Replace the drip tray.
Place container under milk frother >
Start
Place a container with a capacity of 0.5 litres under the milk frother (19). Press / (6).

If the water filter is activated, the following message is displayed:
Remove water filter > Start Remove the water filter and press 6
Add 0.5 I water + descaler > Start
Pour lukewarm water into the empty water tank (8) up to the 0.5 litre mark and dissolve two descending tablets in it. Press / (6). The descending programme now runs for about 20 minutes:
Dscaling

If there is not enough descending fluid in the water tank, the following message is displayed:
Not enough descending fluid Refill fluid
Pour lukewarm water into the empty water tank (8) up to the 0.5 litre mark and dissolve two descending tablets in it. Press 6. The descending programme will continue.
Clean and refill water tank > Start
Rinse the water tank and refill it with fresh water up to the "max" mark. Press (6). The descending programme will now run for about 1 minute:
Dscaling
Empty drip tray
Empty the drip tray.
Replace drip tray
Replace the drip tray.
The appliance is ready for use again.
Cleaning
If the prompt Service - clean is displayed or if you have selected Service - clean in the settings menu, press and hold down i (1) for at least three seconds. The display shows:
Clean > Start
Press The display will guide you through the programme.
Empty drip tray
Empty the drip tray (18).
Replace drip tray
Replace the drip tray.
Open drawer
Deploy the appliance and open the drawer (10).
Insert cleaning tablet and close drawer
Drop a cleaning tablet in the drawer and close the drawer again.
Press start
Press 6. The cleaning programme will now run for about seven minutes.
Cleaning
Empty drip tray
Empty the drip tray (18).
Replace drip tray
Replace the drip tray.
The appliance is ready for use again.
Calc'n'Clean
Calc'nClean combines the separate functions of descending and cleaning. If the two programmes are both due to run soon, the fully automatic espresso machine suggests this service programme automatically. If the prompt Service - Calc'nClean is displayed or if you have selected Service - Calc'nClean in the settings menu, press and hold down i (1) for at least three seconds. The display shows:
Calc'n'Clean > Start
Press (6). The display will guide you through the programme.
Empty drip tray
Empty the drip tray (18).
Replace drip tray
Replace the drip tray.
Place container under milk frother >
Start
Place a container with a capacity of at least one litre under the milk frother (19).
Press 6. The appliance rinses twice:
Cleaning
Open drawer
Deploy the appliance and open the drawer (10).
Insert cleaning tablet and close drawer
Drop a cleaning tablet in the drawer and close the drawer again.

If the water filter is activated, the following message is displayed:
Remove water filter > Start
Remove the water filter and press
Add 0.5 I water + descaler > Start
Pour lukewarm water into the empty water tank (8) up to the 0.5 litre mark and dissolve two descending tablets in it. Press / (6). The descending programme now runs for about 20 minutes:
Dscaling

If there is not enough descending fluid in the water tank, the following message is displayed:
Not enough descending fluid Refill fluid
Pour lukewarm water into the empty water tank (8) up to the 0.5 litre mark and dissolve two descaling tablets in it. Press (6). The descaling programme will continue.
Clean and refill water tank > Start
Rinse the water tank and refill it with fresh water up to the "max" mark. Press
The descending programme will now run for about 1 minute:
Dscaling
The cleaning programme then runs for about seven minutes and rinses the appliance:
Cleaning
Empty drip tray
Empty the drip tray.
Replace drip tray
Replace the drip tray.
The appliance is ready for use again.
Simple troubleshooting
| Problem Cause Solution | ||
| Display shows Refill bean container. Although the bean container is full, the appliance does not grind the coffee beans. | Beans are not falling into the grinding unit (beans too oily). | Change the type of coffee if necessary. Wipe out the empty bean container with a dry cloth. |
| No hot water dispensed. The milk frother or its holder is blocked. | Clean the milk frother or its holder. | |
| Milk froth insufficient or too runny. The milk frother does not draw the milk in. | The milk frother or its holder is blocked. | Clean the milk frother or its holder. |
| Milk unsuitable for frothing. Use low-fat milk (1.5% fat). | ||
| Coffee dispensing slows to a trickle. | Coffee is ground too finely. Pre-ground coffee is too fine. | Adjust the grinding unit to a coarser setting. Use coarser pre-ground coffee. |
| Build-up of limescale in the appliance. | Descale the appliance. | |
| Coffee has no "crema" (creamy foam). | Unsuitable type of coffee. Change the type of coffee. | |
| The beans are no longer fresh. | Use fresh beans. | |
| The grinding setting is not suitable for the beans. | Adjust the grinding setting to fine. | |
| Grinding unit makes a loud noise. | A foreign object in the grinding unit (e.g. grit, which can be found even in superior types of coffee). | Call the hotline; do not prepare any more coffee from beans. Pre-ground coffee can still be used. |
| Coffee is too "acidic". The grinding setting is too coarse or the pre-ground coffee is too coarse. | Adjust the grinding unit to a finer setting or use finer pre-ground coffee. | |
| Coffee is too "bitter". The grinding setting is too fine or the pre-ground coffee is too fine. | Adjust the grinding unit to a coarser setting or use coarser pre-ground coffee. | |
| Unsuitable type of coffee. Change the type of coffee. | ||
| Display shows Error Please call the hotline | The appliance has a fault. Call the hotline (see rear cover). |
If you are unable to solve the problem, do not try to find the fault yourself or dismantle the appliance or repair it yourself. Call the hotline (see rear cover).
Accessories, storage, disposal, guarantee
Accessories
The following accessories are available from retailers or customer service:
| Accessories | Ordering number | |
| Retail | Customer service | |
| Cleaning tablets | TZ60001 | 310575 |
| Descaling tablets | TZ60002 | 310967 |
| Water filter TZ70003 | 467873 | |
Storage
To avoid frost damage during transport and storage, the appliance must be completely emptied first.

Before emptying it as follows, the appliance must be ready for use and the water tank (8) filled.
- Place a large, narrow receptacle under the milk frother (19).
- Select the Milk froth setting on the display, press and release steam for about 15 seconds.
My Coffee Milk froth Hot milk
-
Switch the appliance off at the power switch 0/1 (7).
-
Empty the water tank (8) and the drip tray (18).
Disposal

This appliance is labelled in accordance with the European Directive 2002/96/EG relating to waste electrical and electronic equipment - WEEE. The directive provides the framework for the EU-wide take-back and disposal of end-of-life appliances.
Please ask your specialist retailer about current disposal facilities.
Guarantee
The guarantee conditions for this appliance are as defined by our representative in the country in which it is sold. Details regarding these conditions can be obtained from the dealer from whom the appliance was purchased. The bill of sale or receipt must be produced when making any claim under the terms of this guarantee.
Right of modification reserved.
Toutes nos félicitations...
Sous reserve de modifications.
Congratulations...
CoBET.OCTaBnB 3Tu CTpaHnUy pa3BepHyToI, Bb I NIO6oN MoMeHT MOKeTe BOCNoJIb3OBAtbcR eI, He3aBnCmO OT TOrO, B KaKOM MeCTe INHCTpyKUnn HaxOJNTecb.
HnkaHa dnCnnee H noDnnc K KHonKam OTo6pKaAOTcB DaHHo INHCTpyKuIN Dpym Wpntom, OTNHybIM OT Wpnta OctaJbHO ee qactn. NoTOMy MoXHo JERKO onpeJeNTb, YTO peYb NDeT O TeKCTe, KOtOpBb I OTo6pKaAETcHa dnCnnee Hn HaneYaTaH Ha yctpoiCTBe:
Приимер: 3cnpecco
K npnbopny npnilaraetc KpaTkay HnctpyKu, B KOtOpO MoXHO 6bICTpo CnpaBntbcra O HanboJee BaXhblx yHKunyx. OHa haxoDNTcR B OTceKe, paCNOJoxeHHOM cnpaba Ha yCTpoNCTBe.
Copepkanhe
110 Yka3aHnno TeXnKe 6e3OpacHOCTN
111 KoHcTppyKzIy n coCTaBhbIe qactn
111 3nementbI ynpaBneHnNnHnKaun
111 CeteBOB BbIKIOuOaTeNb O/
111 MeHIO n dncnnei
112 CnCTema n3BneueHna
113 PpHaJdJeKHOCTN
113 Coo6ueHnHa dncnnee
114 BbOdB 3KcNpyaTuH
114 O6uue cBeDeHnra
114 Haayano pa6oTbI c np6opom
KoHcTpPyKzIaNcoCTaBhIe Yactn
(CM. pucyHKn Ha packnaIbIbAIOueiCnpeDHeuactn OboKKn B HauJaI daHHoINHCTpyKun)
1 Khonka i (nHopmaun/naCTpOIKN)
2 KhoNka Bb6opa ABBepx)
3 Duscpnei
4 YtannnaeMbni NOBOPOTbI peryJrTOp
5 Khonka Bb6opa 7BHN3)
6 Khonka Start/Stop
7 CeTeBOB BbIKNIOuATEJIb O/I
8 CbeMHbIK KOHTeINHep IJIa BOdbI
9 EmKocTb IJIa KoΦeHbIX 3epeH c coXpa-HIOUeApOMaT KpbIuKOJ
10 BbBnXHOn OTCek dna MoNtOro KoFe (MOJtbi Kcpe/TabneTka dna ouNCtK)
11 NobopoTHbI peyJIArTOP cTeNEHn NOMOJa
12 ⅢnHaHrДЯ MoJOKa
13 Mepna loxka dnn MOJOTORO kope
14 DBePca 3aBapOuHoro 6JIOka
15 OtkpbBaTeIb DBepuI 3aBapOuHoro 6Joka
16 Khonka n3BneHn
17 EMKoCTb Jnra MoJOKa
18 OtceK noDOnHa dny kaneJb
19 Cbemna HacaKa Inn npuroToBneHnmoJOnHnIeHbI (MOJOKo/Topraa BOda)
20 Perynnpyemoe no Bicote yctpoiCTBO dna pa3nBa Kope
Злем entblу npablenny nHHdkaця
CeteboB BBIKJIOUaTeJB O/I
CeteboB BbIKNoCuTeIb 0/1 (7) cnyknt dna BkIOueHn yCTpoiCTBa nnn noNHO erO BbIKNoUeHn (OTKIOueHne nOdaun 3JKeKtpoNTaHn).

Baxho:3aipueaetcnaHaxmatab ceTeBO BbIKIOuAteIb BO Bpema pa60tkiKoPemaunHb.Ipnbop cJeDyET OTKNUOaTb TOJIbKO nocTe TOR, KaK OH 6bln nepeBeDeH B 3KOHOMNUHbI peXIM nyTem yTaNINBaHnIOBOpOTHO peryJrTopa. Pn 3Tom 6yDet 3anyeHa ABToMaTHUeCKa IpombIBKa np6opa.
MeHIO nDnCnJIeN
YTO6bIMAKCIMMaJIbHO ynpocHTb 3KcNlyatauIIO np6opa n OJHOBpeMeHHO oEeNeHTb BO3MOXHOCTb NcNOJIb3OBaHnRA MHOXKeCTBa cyHKn, KOeMaunHa OCHAeHa NOHrTHOH CNCTeMoH ynpabHeHHa B pexime MeHo. KpaTKO O3HaKOMUBWncb C Hei, C NOMUbu HecKOJIbKnx WaorB Bbl cMOxTe BOCNoJIb-3OBaTbcra Bcem pa3Hoo6pa3nEm DoCTyINbIX FOHKn. Ha DnCnIee yka3bIBaETcra Tekyuza IporpAMMA, a TaKxe OTo6paXaETcra NHΦOpMaunr O Heo6xOJIMoCTn BblONHeHHre ee WaorB, HanPImep, ecNIOTpe6yETcra 3aJIITb BODy, 3acBInaTb KoPe INN BBINOJHHTb cepBnCHyIO npOrpAMMy.
Hnke daetc onncahne ochoBhix npHHIO NOB 6cbKbAHnC NOMOuMo MeHO.
1 i:Пи КраТКOBрЕмEHOM Hажатин HaДИСПЛEE OTOБРаЖаETсЯ рAZINЧАнHФОмAUЯ (cM.«ИнФОрMaцянHaДИСПЛEE»).EcNуDEpXINBaTь HaЖATOI 6OJIe Tpex cekyH,OTKpoETcMeHIO HAcTpOй (cM.«HAcTpOйC nOMOцьOДИСПЛЕ»).
2:KHONKa nepemeueHnB BBePx npnnpocMOtpe nyHKToB MeHo Ha DnCnnee (3).TeKyu nA kTINBbIyNHT MeH0 oTo6paXaETc8 BoJee KpynHbIM Wpnp-TOm.
3 DnCnne: C nOMOuBcMBOJOB n TeKCTa Ha dncnnee oTo6paKaOTcHa- cTPOkN, a TAKKe TEkyuine npoueccbl N coo6uHn.
4 YtanJIINBaEMbI NOBOPOTbI peYJrTop:
He yToIpeH: np6op BkIoueH. Pocne BkIIOUeHnBbIIOJIHReTcPpOMbIBKa np6op, 3a NckIIOUeHnEM Tex ClyuaeB, KOrda OH eue He OCTbI INocNe IocJeD-Hero NCIOJIb3OBAHn. YToIpeH: np6op HaxOHTcB B ekOHOMnUHOM pexime. KOrda np6op nepeKIIIOUaETcB 3KOHOmUHbI peXIM, NaunHaETcEro IpombIBKa, 3a NckIIOUeHne Tex ClyuaeB, KOrda KoFe He pa3NlBaNoCb.
Ipi6op roTOB K pa6ote, ecn Ha dncn-nee oTo6paKaetc MeHb Bbl6opa HAnITka (3).BpaaJ anOBOpOTbI peryIaTOp,MOXHO BblONHrTb HAcTpOuKN I BHOCHTbB HIX n3MeHHeN (HaNPmEp, peryInpoBaTb KpeIOCTb NIN KOJIueCTBO KoΦe).
5:KhONka nepemeueHnBn3 npnpocmOTpe nyHKTOB MeHIO Ha DnCnnee (3).Tekyusn aKTNBbI NyHK TMeHIO OTo6paXaETc6OJee KpynhIM UpnpTOM.
6 KhoNka Start/Stop Anyckaet npouecn npiroTOBHeHn HAnrKa nIkn KaKyIO-Hn6yDb cepBnCHyIO nporpaMMy. Pn IOBtOpHOM HaxaTN>6 BO Bpem npiroTOBHeHn HAnrKa MoXHO npexDeBpeMeHHo npepBaTb npocccn OTk3aTbcrOT HaINBaHn HAnrTa.
CnCTema n3BneHnA
Pnp6op moKet aBtOMaTnueckn n3BNeKaTbCn 13 KyxOHHO raphNtpy. DnA 3TO
HaxMITE KhoNky N3BneueHnra (16) (npn 3TOM np6Op DoJxKeH 6bITb BkJIoueH) IIN
CHIMTE pa6oyuIO NOBepxHocTb IN NOTAHTE 3a pyky, pacnoJIOKeHHyIO NOI Hei:
Ppnbop aBtOMaTnueckn nepemecNTcB nnoJoxHne n3BnueHn 1. B 3tom noJoxHn MoXHO 3aINBaTb BODy, 3acbInaTb KoPeHbIe 3epHa, MOlOTbIM KoPe I KlaCTb Ta6JIeTKn IJa YdaJIeHn HaKnn, a TAKKe BblHMaTb
PnHaJnxHocTn C npaBoi cToPOhbl np6opa.
Cho6bl noJIHOCTbIO BbIDBnHyTb np6Op,prn60mMIMO yKa3aHnRA TeKyIero COCTOHNHa
eue pa3 HaxMMTE KHOJky N3BneyeHH
(16) n BpyHyIO BbIDBnHbTe np6Op B DnCpnee OTO6paXaOTcra pa3NnHbIe COOB-
noJoxHe 2 nn
IIIN NOHOCbIO BbITaUNTe erO 3a pyuKy. MOCTn BbINOJHnRA KaNX-Jn6O DeiCTBNI.
B noJoxHeHH N3BneyeHH 2 MoXHO BbIHyt b TBN COO6UeHNE NCye3aET n CHObA OTO6pa-
PnEB NOMOA. XaETcMeHIO BbIbopa HAnrKa.
NoJoxeHne NoJoxeHne n3BneHn1 n3BneHn2
Iocne 3toro cHOBa 3aDbHbTe npnbop B Kxohhbnr rapHnTp do ynopa.

Bo Bpem npoecca 3abapubHnA yHKnA ABTomatueckoro n3Bne- ueHn6IokpoBaHa.
PnHaJneXHocTn
A B T O M A T N U E C K A K O F E M A S H I N A 3 C N P E C C O N M E E T C N E L A N B H B I E O T C E K N D J X P A H E H N I P R N H A N L E X H O C T E N (12, 13) N K P A T K O N I N C T P Y K U N. O H N P A C N O L O X E H B I C N P A B O N C T O P O H B I N D O C T Y N H B I P P N B B D B U R A H N I P P N 6 O P A B N O L O X E H N E I 3 B N E U E H N I 1.
Coo6eHna dnncnnee
ФOMMO yka3aHnY TeKUeRO COCTOHNHa
DINCNIIe OTO6paXaOTcPa3NHyIe COo6-
UHNE, PpeIOCTABnIooNe INHOpMaunIO O
COCTOHNn IIN COo6uaOuJe O Heo6xOnIMOCTN BbINOJIHeHn KaKnx-Jn6o DeJCTBNI.
PocIe BbINOJIHeHn Heo6xOIMbIX DeJcTBI N COo6ZeHne NCye3aET n CHOBA OTO6paXaETcMeHIO Bbl6opa HAnNTKa.
HcOpMa:
daIbHeHWeM 6yDeT NcNoIb3OBA TbCpN OTo6paKeHH TeKCTOB Ha DcCnlee. MoKHO Bbl6paTb OINH n3 CNeDyUOxN x3bIKOB:
Deutsch
English
PYCCKM
Nederlands
Francais
Italiano
Espanol
Polski
- HaxmTe KhoNky>6; BbIbpaHbIy3bIK 6yJeT coXpaHeH, npnbOp HaxOHT-CB B «3KOHOMuHOM peXIme>.
BnocJIeIcTBm MOxHO B IIO6oe BpeMn3MeHHTb J3bIK (CM. «HaCtpoNc n NOMOu bIO dncnpeJ) - BbIbHbTe np6op (cM. «Cnctema n3BneueHnra»).
- BbInbTe KOHTeHep IINB OBObl (8) B HApaBHeHn BBepx, IpomOnTe N 3aJeTBe H Hero CBexkyo, XOIOdHyIO BOyU. YUnTbIBaIte OTMeTKy yPOBn 3aONHeHn «max» (MaKc.).
- POBHO yCTaHOBnTe KOHTeHep dIy BObI Ha MeCTO, HAdaBnB Ha Hero dJIa QNKCaUIN.

Heo6xOIMO exeJHbHO haNnBaTb B KOHTeHep CBexyO BDOy. B KOHTeHep NoCToHNO DoJHKHO 6bITb HeKOTOpoe KOnuYeCTBO BObl, DOcTaTOUHoe dIra pa60tbi np6opa.
HacbInbTe 3epHa B emKocTb dIra KoPeHnBix 3epeH (9) (npriroTOBneHne HAnITka n3 MoJToRo KoPe: cm. cTp. 116).
- 3aBnHbTe npu6Op BkyxOHbI raphN-Typ.
- Haxmte KhoNky 6), Ha dncnnee NOBtCJIOROTIN KOMnAHn.I Pn6op BbIOJHHT HarpeB BObl INPOMbIKy CNTeMbI, n3 ycTpoiCTBa pa3JIbBA KoFe BBITEuyET He6OJIbWoe KOJIueCTBO BoDbl. Ha dncnnee IONBtCJ MeHIO BbIbopa HAnITKa:
3cnpecco Kope
MaKNaTo
HopMaIbHbI
cpeHnHaUaHa
- YctaHOBInTe XeCTKoCTb BObl.
PpuroToBJIeHne HAnNTka n3 MoJOTOro KoΦe
C NOMOUIIO 3TOI aBTOMaTHUeCKo KOFeMa- UINHbI 3cPiPeCCo MOXHO TaKKe IpiROTOBHT HAnITOK IV3 MoNOTOrO KoPe.ДЯdo3nPoBAHHoJ 3acBInKn MOJOTOrO KoPe npINaRaETcRc MepHaJ IOxKa (pN NOCTABKe NOMEuaTeTcRc c npaBoi CTOpOBbl pN60pa, [13]).
-
BbIbINbTe npnbop n BbInbTe MepyIO JnOxKy.
-
OTKPOIte BbIDBnKHOIOTcEKdIa MoIOTOrO KoPe (10).
- 3acbInbTe He 6Oonee DByx IOnKe MOnoToro KoOe C BepxOM.

He pekomeHdyeTcra 3acbinaTb HN KoPe B 3ephax, Hn paCTBOpumbl KoPe.
- 3aKpoIe BblBnXHOn OTcEK dIa MoIOToro KoPe.
- 3aBnHbTe np6Op B kxyoHHbI raphNtyp.
- C nOMOUsbIO NOBOPOTHO peryIaTopa (4) BbIepeHTe HAnITOK I erO KOJIueCTBO:

PnroToBJIeHne ropyeB BoIbI

Onachoctb noIyueHn oXora! HacaKa dJa npiroToBneHn MoIooHoi neHi (19), n3
KOTOPO BbITEKaET RopyA B0da, CnIbHO HarpeBaetc. Nocne nCnoJIb3OBaHn CHaUaIa DOxkDInTecb OxJaXdEHHa HacaIKN, IpexKe Yem 6paTbcr 3a Hee.
B KoΦeMaunHe MoXHo TaKKe rOToBnTb rOpRyUO BODy, HApPmEp, dIa qar.
- NocTaBbTe yawky nIIn cTakAn noD yCTpoiCTBO pa3nBa KoPe.
- C nomoubIO nobopoTHoro peryIaTopa () (4) BbI6epnte 3NaueHne Topraa Boda.

- C nomoubIO V(5) nepeiDnTe B OKHO peryInpOBKn TemnepaTpybl. C nomoubIO NOBOPoTHoro peryIaTopa (4) yctaHO-BITE HxKHyO TemnepaTpy:

- Haxmte KhoNky D; B TeueHneB TeueHne npimepno 40 cekynd ropaar bOda 6y-DeT BbIXoNDtb N3 BbIXoHDoro OTBepCTn HaCaADN dIra npriROTOBHeHn MoIOUHOI neHbl.
IOBTOHPbIM HaxkaTHeM 6 MOxHO npeXDeBpemeHHO npepBaTb daHHbI pOuecc.
HnΦopMaçnI n HacTpoiKn
C NOMOu i (1) MOXHO Bb3bIBaTb pa3NHyHIO HOpMaUHO (HaKaTb) N BblONHrTaHAcToi (ydepKnBaTb HaKaToB TteHneI NO MeHbWeMpe 3cekyHd).
HΦopMaunHa dnCnJee
B MeHIO INΦopMaUIN (OTKpbIbAeTc HaxaTneM KHOIIi [1]) MOXHO Bbl3bIbTaB CNeIyOuYIO INΦopMaUIO:
Hoe6xoIMOCbIeKaJIbUHaU
Heo6xoDnMoCTbOuNCTKIN
Heo6xoDnMOCTb 3aMeHbIΦNJIbTpA
KOLINUcTBOKOFe,NPNIROTOBJIeHHORO C MOMENTA NEPBOrO BKNIOUeHnI npN6opa
KOLINUcTBO INPINOTOBJIeHHbIX MOJOnHbIX HANITKOB
KOLINUeCTBO pNIROTOBJIeHHoI TOpAeH BOIDbl
Hactpoikn c nomoosbu Dncnpea
YdepxnBaTe HaxaToN KhONky i (1) B TeueHne No MeHbWeMpe 3 cekyH; OTKpoETcCJeDyUoee OKHO BapnaHTOB dIra HAcTPOIN:

C NOMOJIbIO KHOJKN (2) n 75)MOXHO IPOCMATPnBaTb pa3JIuHbIe BapnaHTbI HaCTPOIKN; TeKUIN aKTNBHbI BapnaHT 6ydet OTO6paKaTbCra Ha DnCnJee 6oJee KpyNHbIM Wpntom. HAcTPOiKy TeKUeRo BapnaHTa MOXHO N3MeHNTb C NOMOJIbIO NOBOPOTHOrO peryIaTopa0(4).
YTO6bI BBInTN IN3 MeHIO, HaxMnTe i (1) eue pa3.

BHeceHHbIe N3MeHEnH coXpaHnHTcra ABTomaTnueckn. DOnonHnTeJIbHOe NOITBePKeJHne npN 3tOM He Tpe6ByETcra.
B npnbope nmeoTc cneDyUOuNe BapnaHTbI BBINONHeHn HAcTPOkN:
A3bIK: NOBopaunBa nOBopoTHbI peryJrTop MOxHO Bbl6paTb Heo6xoDmBbI A3bIK.
XecKocTb BObl: XecTKOCTb BObl: NOBopaunBa nOBopoTHbI peYnAToP MOxHO BblpaTb HxKyHIO XecTKoCTb BObl (1, 2, 3 n4) (cM. TaKke «OnpeJeHne n HaCtpoKa XecTKOCTN BObl)).
TemnepaTypa Kofoe: NOBopauHbA NOBOpHTbI peYJrTop MOxHO OTperyNipoBaTb TemnepaTypy Kofoe.
AbootKn. uee3: NOBopaunBaJ noBopoTnHbI peYJrTop MOxHO 3aDaTb npomeKytOK BpeMeHN, NO nCTeueHn KOTOPoR np6Op nocne nocJeHero npiroTOBHeHn HAnITka 6ydt ABTomaTHueCKn nepeKlHOaTcBcB R 3KOHOmUHbI pExHM. MoXHO yCTaHOBHTb 3NaHeHne BpeMeHN OT 5 MInHTdo 8 YacOB. PpeDbapntJIbHO yCTaHOBNeHHOE BpeM CoCTaBJIeT OINH Yac, B cIeJX 3KOHOmN 3JIeKTPO3HepRn erO MOxHO yMeHbIHTb.
KoHTpact: C nOMOuBIO NOBOPOTHO peryIaTopa MOxHObTu KoHTpactHOCTb DnCnpe B dnaNa3OHe oT -20 do +20; npedBapuTeNbHa HAcToPka CoCTabJrae 0.
OcBeueHne:Bo3MOxHbI cJeDyUoUne HacTpoiKn OcBeueHnra:BkN.,BbIK. nII
BbIK. uepe3 10 MIn. (cTaHdapTHaHa-CTpOiKa).
B daHHOM npi6ope moxho yctaHaBnBaTb XeCTKoCTb BObl. PpaBnHna HaCtpoKa XeCTKOCTN BObl BaxHa IJIA oBeCneHEnra CBOeBpeMeHHoro HAnOMnHaHnO O Heo6XoDnMOCTn ydaIeHnHaKnn. Ha 3aBoJe ycTaHOBHeHa CTyIeHb XeCTKOCTN BObl 4.4. XeCTKOCTb BObl MOxHo ONpeJeNTb C NOMOsbIO npiNaRaemOn IHdNKaTOpONOCKn INn y3HaTbe ee Ha MeCTHO CTaHcIN BODOChA6XeHn..
HehaoJro onyctnte HndkaTopHyo noIocky B Body, NOTOM CJIerKa CTpXHnTe, N yKe uepe3 MInHyTu MOxHO 6yJeT BnDeTb pe3yNb-TaT TcTnpOBaHna..
TpaDycbI JeCTKOCTN BOdbI N CTypeHn Ha-CTpOJKN::
IIOJXHTe B BbIDBnKHOIOTCEK IJIa MOJOTOrO KoPe Ta6NeTky IJIa OUNCTKN I CHOBA 3aKpOITe OTCEK.
Haxatb Start
Haxmte KhoNky;BbINOJHeHne nporpaMMbl ONUCTKN PpOJNTc npMepHo 7 MNHyT:
Pporpamma ounstka IeT
Onyctowntb noDOnH nA Kanelb
OnopoknHe npdoH dny kaneIb (18).
YcTaHOBntb NODOnDnKaNeIb
YCTaHOBNTe NODDOH INaJIb Ha MECTO.
Pn6op cHOBa rOToB K pa6ote.
Calc'n'Clean
B nporpamme Calc'n'Cleana 6bEeHHeBl Calc'n'Cl
fynkun ydaJeHnHaKnnn OoNCTKn. Ecn. Ecn
cPOK N BInONHeHnOBeHX 3TNX nporpaMM
no BpeMeHN OueHb 6JIm3Kn Dpyr K dpuyy,
ABTOMaTnuecka Ka oepMaunHa 3Cnpcecco
ABTOMaTnueckn PpeJaaraet 3Ty cepBnCHyU
nporpaMMy..
Pn OTo6paXeHNn HndkaCnN 3anyctntb
Calc'n'CleAn nn noCne BbIbopa onu
3anyctntb Calc'n'Clean B MeHIO HactpoiKn ydepKnBaIte HaxaToN KhONky i (1) nonoMehbSeMpeB TeueHne Tpex CeKYnd..
IOnBntcHnDnkaCua
Calc'n'Clean > Start
HaXMMTe KhoNky>6; oTo6paxKae-; oTo6paxMaBle Ha dncnnee coo6uEHHa NOMyT BbINOJHHTb nporpaMMy::
Onyctowntb noonn kaneB Onopoxhnte noonn nna kaneB (18). (18).
YctaHOBtB NOIOH DnRA KaneIb YCTaHOBTe NOIOH DnRA KaneJIb Ha MecTO.
YCTAHOBNTb EMKOCTb NOB BCNEHBATeNb MOJOKa > Start
YCTAHOBNTe EMKOCb OBemOM NO MeHb-Wei Mepe 1 NnOJ HacaKOJ DnI npiroTOBHeHr MOIOHOr NeHbI (19).
HaXMMte KONKyD;6yJeT DBAxDbI
npo3BeDeHa npomblkApnp6opa:
Pporpamma ounctka IeT
OTkpblbIOTOKcNopoWKOM BbIDBnHbTe npnbOp n OTKpoTte BblBnK-HoIOTcEKdIaMOJToRo Kope (10).
Iobabntb uNCTaune TaBneTKn 3akpbTb IOTOK
IIOXHTe B BbIDBHXH0NOTCEK DnMOnOTOro KoPe Ta6NeTky IJRA ONUCTKN ICHOBa 3aKpOte OTCEK.

EcnnФильТРДЯВODыakTNBnPOBaH,NOBNTcAJIeDyUOueecoo6uHHe:
CHaTbΦnIbTpДЯBOdBi>Start
CHIMMTE qnIbTp dIy BOdbI n HaxMMTe KHONKy 6
Iobntb 0,5n BObl + cpeCTBO nna DekaBunHaun > Start
3anonHnTe npCToKoHTeHep dIa BODbI (8) TeTNOBODO IO OTMeTKN 0,5 n I pactBOPTE B Hei DBe Ta6neTKN dIydaJIeHnHaKUnn.HaXmITE KHOKy D/口 (6); BblONHeHne nporpaMMbl ydaJIeHn HaKUnn npoDJIntc npImepHo 20 MNHyT:
Pa6oTaet nporpamMa Indet deKaIbCuHaLcUa
e-TOB B KOHTHepe DnB BoDbl CnIuKOM MaNo pactBopa Dnay ydaJIeHna HAKIN, NOaBNTc co- o6ueHne:
Cnukom MaNo cpectBa nna deKaIbUHaun
3aONHnTe nycToKoHTeHep dIy BoDbl (8) TeNIOBATO BDOI DO OTMeTkn 0,5 n I pactBOpTE B Hei DBe Ta6JIeTKn dIy ydaJIeHnHaKnII. HaxMITE KhONkY>6).
BbInonHeHne nporpaMMby ydaJIeHna HAKn nn npoJnxntc.
PpOmbIb n 3aONHHTb KOHTeHep dHa BOdbI > Start
PpOMoTe KOHTeHep DnA BObI n 3a-
nonHnte erO CBexeB BODo IO OTMeTKN
HaXMMte KHOKnY D6; BbINOnHeHne
nporpaMMbl ydaJeHnra HAKnPi npOJNT.
CpnpMepHo 1 MNHyTu:
Pa60taeT nporpaMa DeKaIbUHaUu 3aTeM 6yDet BblOnHeHa nporpaMa OunchKn (npim.7 MInHy),nocne yero 6y- Det npoN3BeDeHa npomBIBka npnbopa:
Pporpamma ouncTkau Ndet
OnyctoWntb noDOnH nKaenb OnopoxHnTe noDOnH nJa Kane
YcTahOBuTb NODOn DnKaNeB YcTahOBuTe NODOn DnKaNeB Ha MecTo.
Pn6op cHOba roTOB K pa6Ote.