Oh Expresso 112 - Coffee machine Solis - Free user manual and instructions
Find the device manual for free Oh Expresso 112 Solis in PDF.
User questions about Oh Expresso 112 Solis
0 question about this device. Answer the ones you know or ask your own.
Ask a new question about this device
Download the instructions for your Coffee machine in PDF format for free! Find your manual Oh Expresso 112 - Solis and take your electronic device back in hand. On this page are published all the documents necessary for the use of your device. Oh Expresso 112 by Solis.
USER MANUAL Oh Expresso 112 Solis
Instructions for use

natural_image
Abstract black and gray line drawing resembling a stylized letter or symbol (no text or symbols present)EXPRESS
Typ/Type/Tipo 112
ESPRESSO-
PORTIONEN-AUTOMAT
AUTOMATE PORTIONS
ESPRESSO
MACCHINA PER
Elimination....Page 10
Sommario
Installation....Side 16
Making coffee ....Side 16
Care and cleaning ....Side 17
Descaling....Side 17-18
Faults and possible causes....Side 18
Disposal....Side 18
text_image
EXPRESS 9 3 6 4 8 1 7 5 2(Abb.1)

natural_image
Hand pouring powder into a container on a machine (no visible text or symbols)natural_image
Close-up of a curved mechanical component with a small icon and arrow pointing to it, no visible text or symbols.natural_image
Close-up of a robotic vacuum cleaner operating a white cylindrical device on a metal base (no visible text or symbols)natural_image
Close-up of a mechanical device with a white arrow pointing to a component, labeled 'Abb. 4' in the top-left corner (no other text or symbols visible)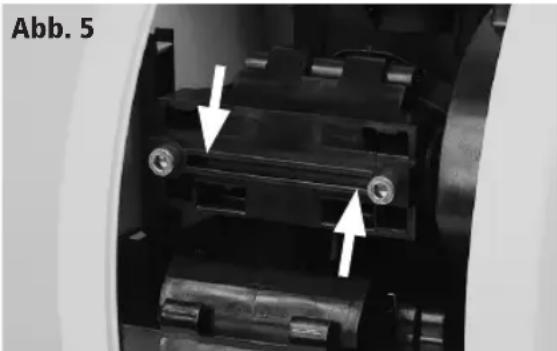
natural_image
Close-up of a mechanical assembly with two white arrows pointing to specific components (no text or symbols visible)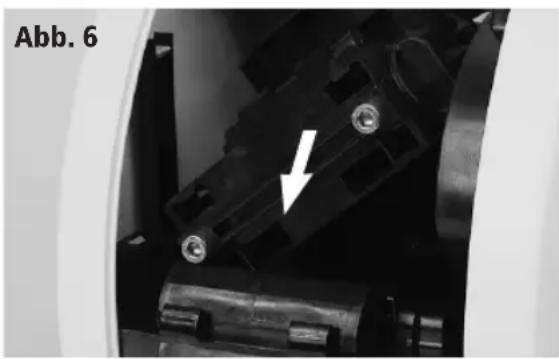
natural_image
Close-up of mechanical components with a white arrow pointing to a component (no text or symbols visible)
text_image
Dnatural_image
Close-up of a medical device with a white arrow pointing to a circular opening, labeled 'Abb. 7' in the top-left corner (no other text or symbols)natural_image
Hand pouring powder into a container on a machine (no visible text or symbols)Introduisez la portion (ill. 2)

text_image
F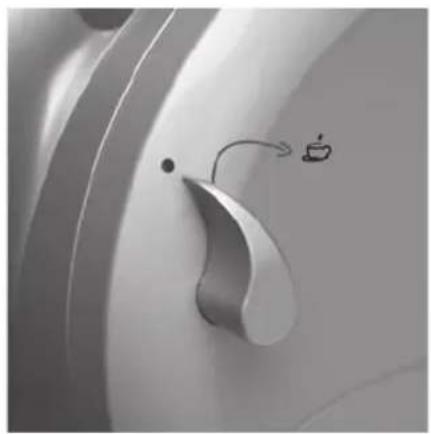
natural_image
Close-up of a metallic mechanical component with a curved handle and a small icon emitting a fan (no text or symbols visible)natural_image
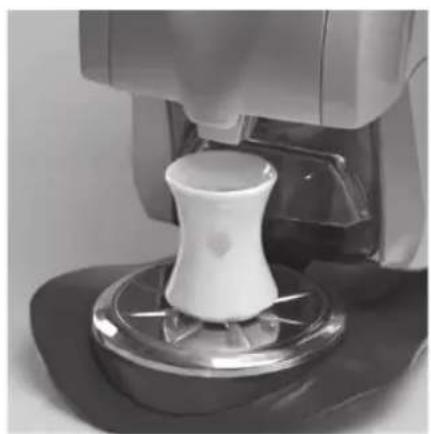
Close-up of a robotic vacuum cleaner operating a white ceramic presser on a metal base (no visible text or symbols)natural_image
Close-up of a mechanical device interior with a white arrow pointing to a component (no visible text or symbols)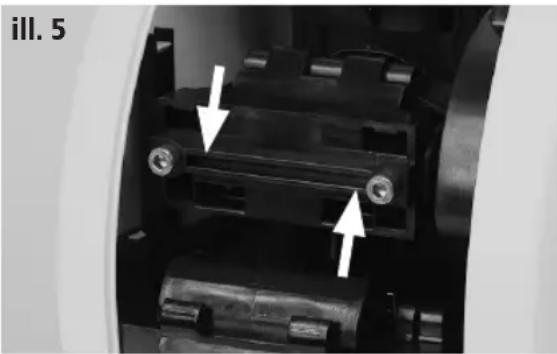
natural_image
Close-up of mechanical components with arrows indicating assembly or movement (no visible text or symbols)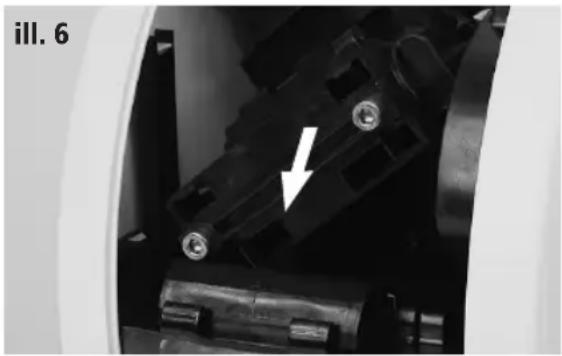
natural_image
Close-up of mechanical components with a white arrow pointing to a black component (no visible text or symbols)natural_image
Close-up of a medical device interior with a white arrow pointing to a circular opening (no text or symbols visible)natural_image
Hand pouring powder into a container on a machine (no visible text or symbols)Introducete la cialda (fig. 2)
natural_image
Close-up of a curved mechanical component with a small boat icon and motion arrow (no text or symbols)natural_image
Pure black vertical rectangle with a small white cutout and a small crosshair symbol on the right (no text or labels)natural_image
Close-up of a robotic vacuum cleaner operating a white cylindrical device on a metal base (no visible text or symbols)natural_image
Close-up of a mechanical device component with a white arrow pointing to a connector (no visible text or symbols)
natural_image
Close-up of a mechanical assembly with two white arrows pointing to specific components (no text or symbols visible)
natural_image
Close-up of mechanical components with a white arrow pointing to a component (no visible text or symbols)natural_image
Pure black vertical rectangle with a small white vertical bar and a small crosshair symbol on the right (no text or labels)natural_image
Close-up of a medical device interior with a white arrow pointing to a circular opening (no text or symbols visible)natural_image
Pure black rectangle with a vertical white line and a small crosshair symbol at the top-left corner (no text or symbols)
text_image
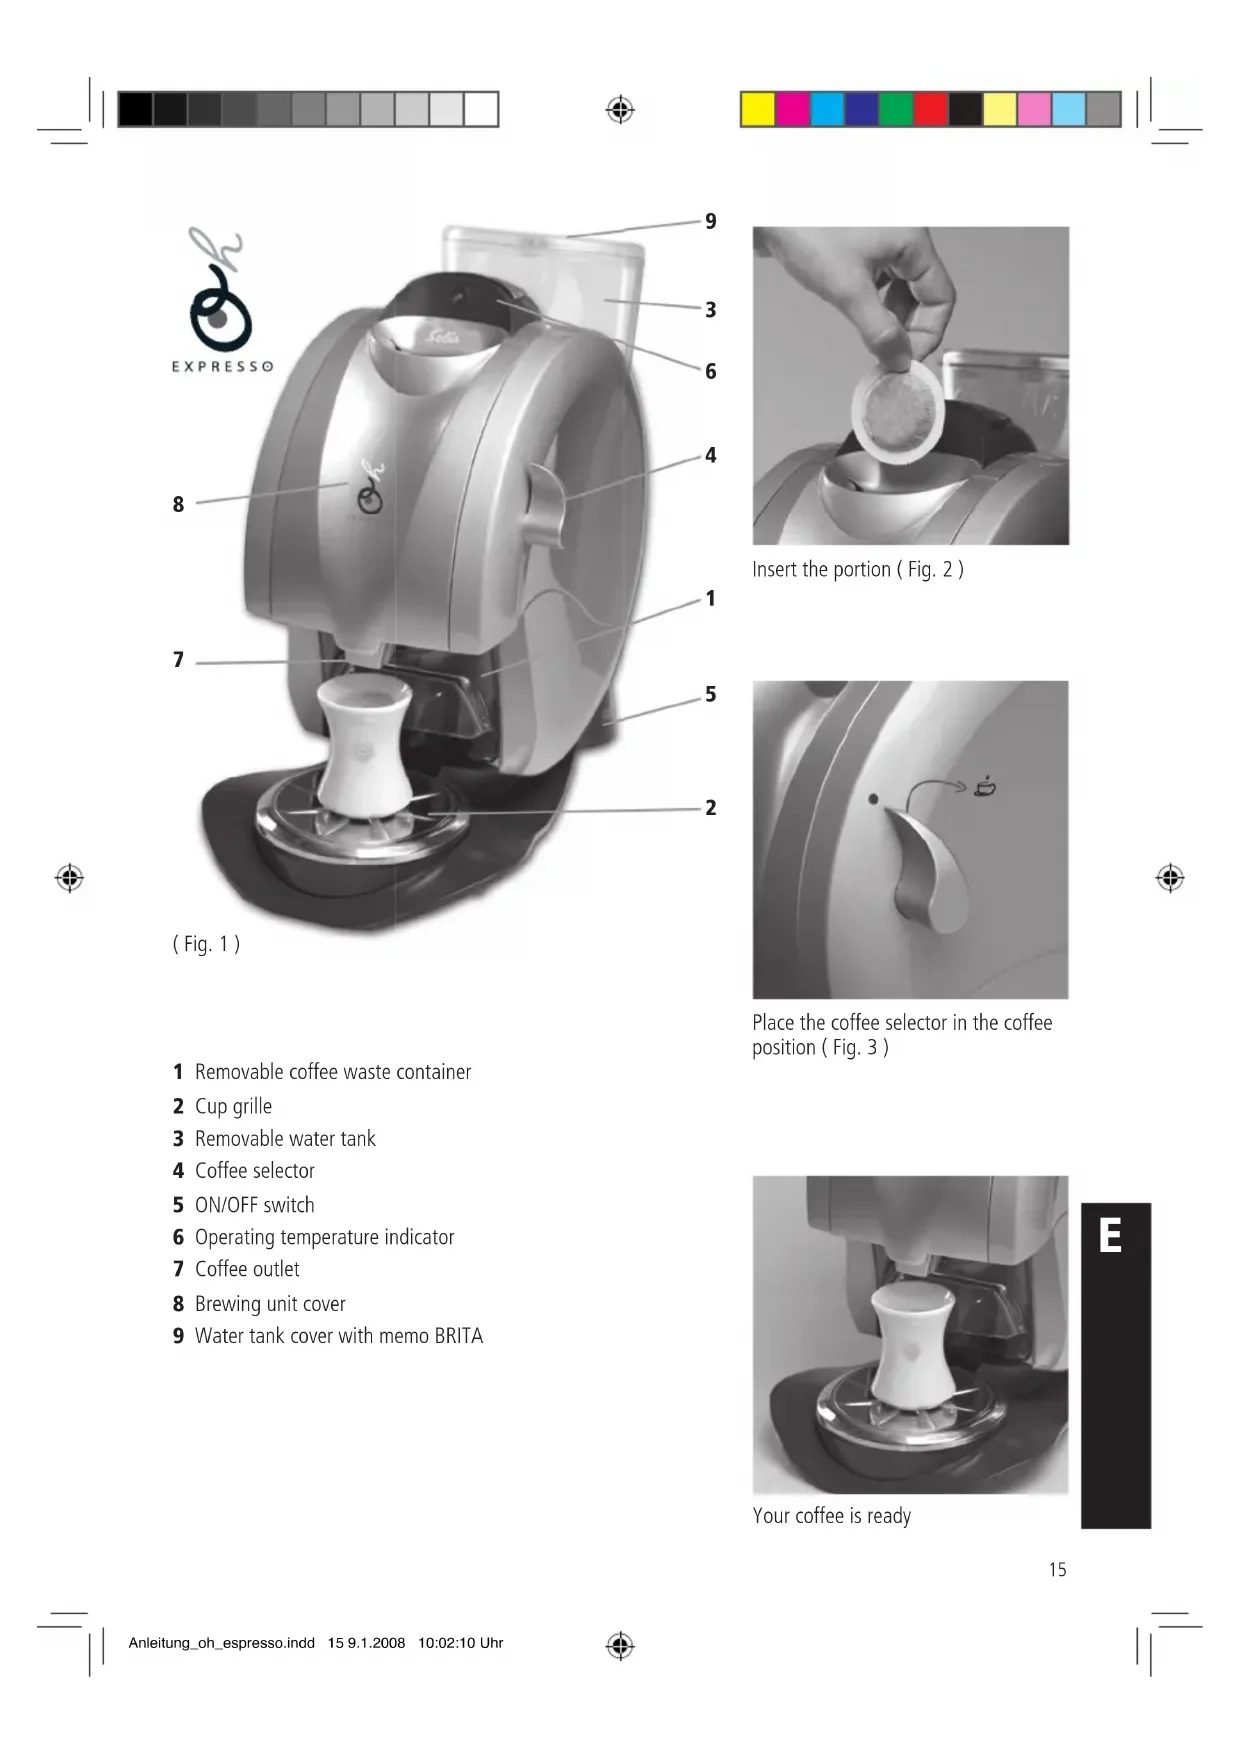
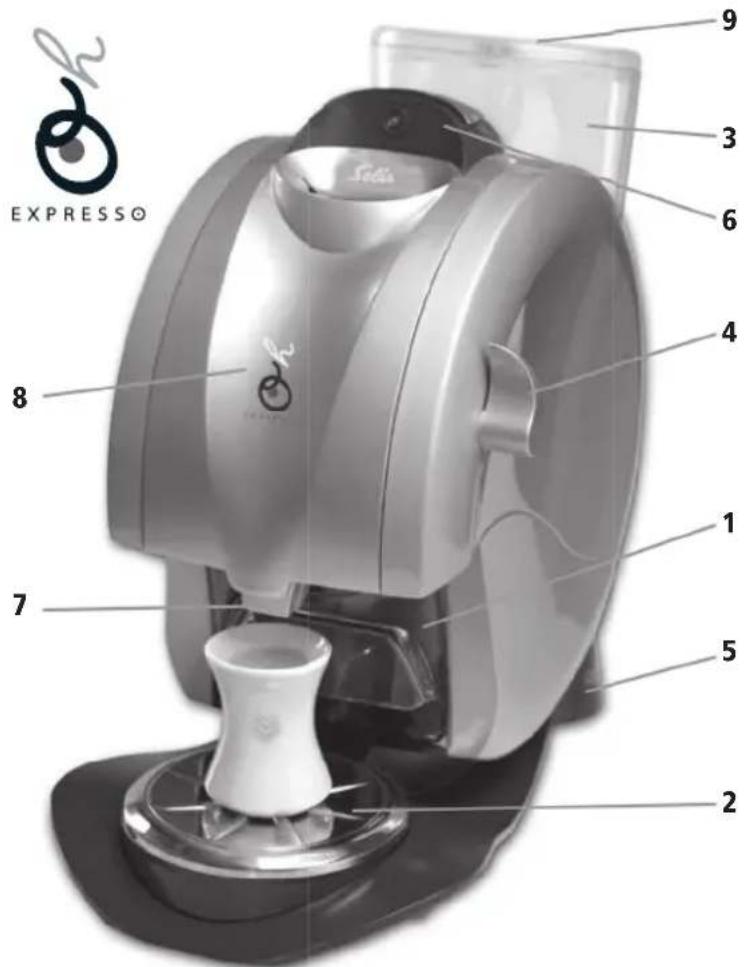
EXPRESS 9 3 6 4 8 1 7 5 2(Fig. 1)
natural_image
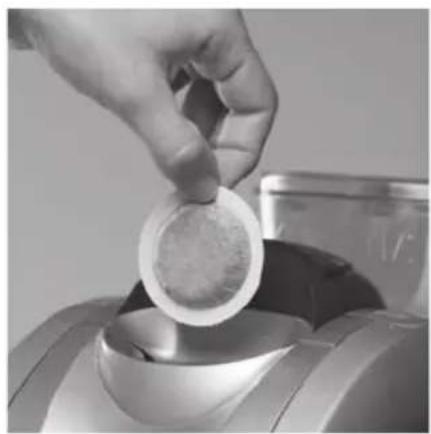
Hand pouring powder into a container on a machine (no visible text or symbols)Insert the portion (Fig. 2)
natural_image
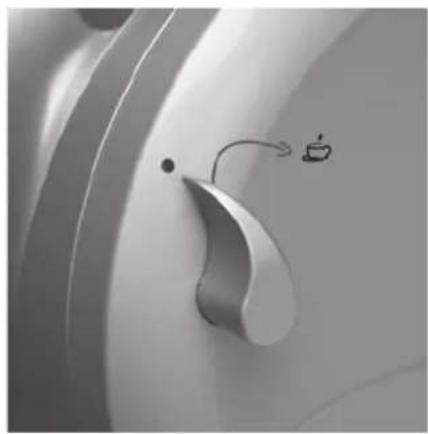
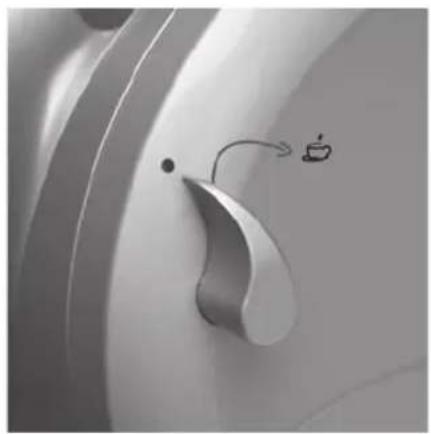
Close-up of a curved mechanical component with a small icon and arrow pointing to it, no visible text or symbols.Place the coffee selector in the coffee position (Fig. 3)
1 Removable coffee waste container
2 Cup grille
3 Removable water tank
4 Coffee selector
5 ON/OFF switch
6 Operating temperature indicator
7 Coffee outlet
8 Brewing unit cover
9 Water tank cover with memo BRITA
natural_image
Close-up of a robotic vacuum cleaner operating a white cylindrical device on a metal base (no visible text or symbols)Your coffee is ready

text_image
EBefore using
Please read the following instructions carefully. They contain important information about operating and caring for your appliance, as well as about safety. We recommend you retain these notes for future use.
1. General information
- Before connecting the appliance, check that the voltage indicated on the appliance information plate matches your mains voltage.
- Always clean the appliance with a dry or at most a slightly damp cloth.
- All repairs must be carried out by approved service centres (e.g. SOLIS Customer Service). Non approved repairs pose a risk for the user.
- No liability for any damage or injury can be accepted if the appliance is used or operated in any way that does not conform with these instructions, or if an unapproved repair is carried out. All warranty claims will also be invalid.
- Protect the appliance from frost; do not leave overnight in the car in winter as this may damage your machine.
Safety advice
- Never operate the appliance with a defect power cord.
- Never operate the appliance without the coffee wast container, without water or without the drip tray and cup grille.
- Only use original SOLIS-1,2,3 SPRESSO coffee portions. Normal coffee portions may damage the appliance, in which case no liability can be accepted. All warranty claims will also be invalid.
- Never unplug the appliance by pulling on the cord; never handle the plug with wet hands.
— Never immerse the appliance in water. - Children do not realise the risks associated with electrical equipment – never leave children unsupervised with electrical appliances.
2. Installation / Before first use
2.1 Open water tank cover (9), remove water tank (3), fill with cold water and replace.
Replace water tank cover.
2.2 Set coffee selector (4) to position 0.
2.3 Set the ON/OFF switch (5) to position I. Wait until the operating temperature indicator (6) shows green.
2.4 Insert an original SOLIS-1,2,3 SPRESSO coffee portion in the opening provided and place a coffee cup under the coffee outlet.
2.5 Turn the coffee selector (4) from position 0 to position 1 and allow cup to fill. When full, turn the coffee selector back to position 0. The used coffee portion will automatically fall into the coffee waste container when switch is returned to position 0. The first coffee you make when using your appliance for the first time will «clean» your factory-new machine and should not be drunk.
3. Making coffe
Note: This appliance will only function with original SOLIS-1,2,3 SPRESSO coffee portions.
3.1 Open water tank cover (9), remove water tank (3), fill with cold water and replace.
Replace water tank cover.
3.2 Check that the ON/OFF switch (5) is in position I and the operating temperature indicator (6) shows green.
3.3 Place an original SOLIS-1,2,3 SPRESSO coffee portion in the opening provided for this purpose. Position a coffee cup under the coffee outlet.
3.4 Turn the coffee selector (4) from position 0 to position I (Fig.3) and allow cup to fill. When full, turn the coffee selector (4) back to position 0. The used coffee portion will automatically fall into the waste coffee container when coffee selector (4) is returned to position 0.
4. Care and cleaning
Keeping your SOLIS 1,2,3 SPRESSO clean and well maintained will ensure optimum coffee quality and prolong the service life of your appliance.
Always switch your appliance off and unplug at the mains for cleaning.
4.1 Clean the water tank (3), drip tray, cup grille (2) and waste coffee container (1) daily using hot water and a nonscouring detergent if needed.
4.2 We recommend cleaning the brewing unit on a monthly basis. The brewing unit is very easy to remove.
natural_image
Close-up of a mechanical device component with a white arrow pointing to a small component (no visible text or symbols)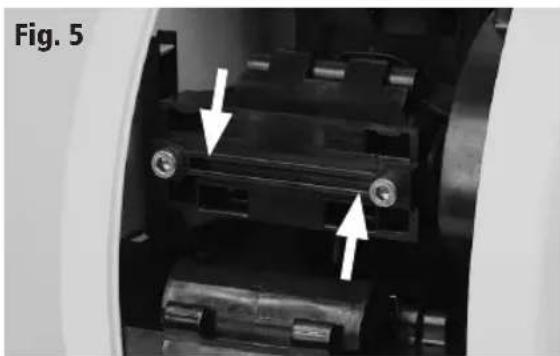
natural_image
Close-up of a mechanical assembly with two white arrows pointing to specific components (no text or symbols visible)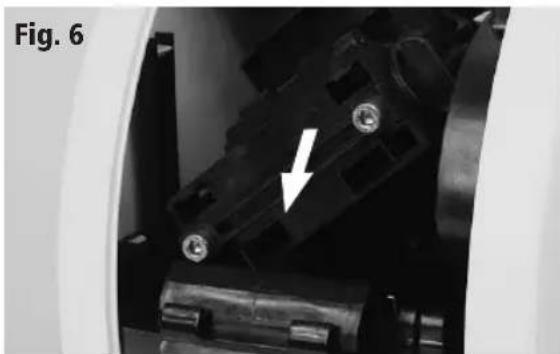
natural_image
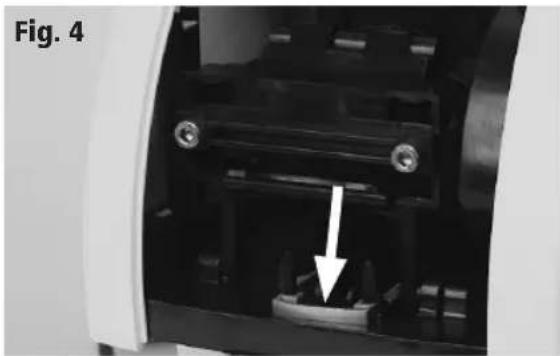
Close-up of a mechanical component with a white arrow pointing to a specific part (no text or symbols visible)4.3 Open brewing unit cover (8). Open brewing unit lock (Fig.4)
4.4 Turn brewing unit to the left as far as it will go (Fig.5). Carefully pull the brewing unit forward, keeping it level (Fig.6). Clean with hot water only. Dry brewing unit.
4.5 Carefully replace clean brewing unit.
4.6 Shut the brewing unit cover.
5. Descaling
Depending on the hardness of your water supply, the machine should be descaled regularly (even if you use a water filter), i.e. every 4-6 months at least. In areas with very hard water, descaling should be more frequent.
Descaling should only be carried out using the SOLIS tablets made especially for the SOLIS 1,2,3 SPRESSO automatic portion machine.
Important: Regular descaling helps to prevent expensive repairs. Damage due to failure to carry out the required descaling, improper handling or non-compliance with these descaling instructions is not covered by the guarantee.
Please note that you must not, under any circumstances, use vinegar or any conventional descaling agents containing amidosulfuric acid as these would destroy the plastic.

text_image
EDescaling instructions :
5.1 Turn machine on and heat up.
5.2 Add 2 Solis descaling tablets and 12 litre of lukewarm water to the water tank.
Important: Please remove the water filter BRITA from the water tank. Leave to stand for approx. 15 minutes until the tablets have dissolved completely.
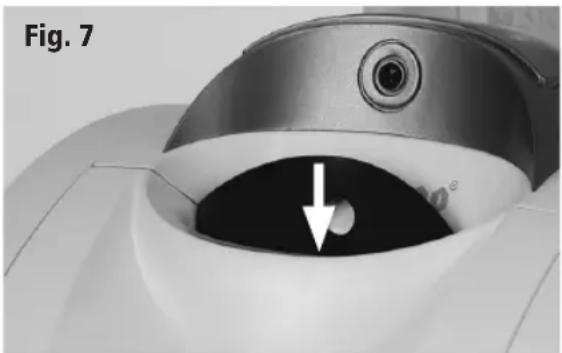
5.3 Insert the descaling seal into the top oft he coffee portion slot (Fig.7). The seal should remain inserted in the machine throughout the descaling and rinsing process.
natural_image
Close-up of a medical device component with a white arrow pointing to a circular opening (no text or symbols visible)5.4 Place a container under the coffee outlet.
5.5 Briefly turn the coffee selector (4) to the coffee position and turn the coffee selector back to the position 0 when approx. 1 dl water is in the container. Leave machine to stand like this for approx. 10 minutes.
Important: The descaling solution must
flow from the «Coffee outlet» (7). Should this not be the case, carefully re-position the descaling seal (Fig. 7).
5.6 Repeat this procedure 3 times.
5.7 Rinse out water tank.
5.8 Fill water tank half full with cold water and place in position.
5.9 Turn the coffee selector (4) to position I until the water tank is empty.
If the pump stops operating during the rinsing cycle, turn the Coffee selector switch (4) to position «0» and then again to position «Coffee». The pump will restart.
5.10 Turn the coffee selector (4) back to position 0.
5.11 Pull descaling seal upwards and clean.
5.12 Replace the water filter BRITA in the water tank, Fill the water tank with fresh water. Machine is now ready to use again.
6. Faults and possible causes
Please read the following points carefully before sending in your appliance for repair. You will often find you are able to resolve the problem yourself, saving yourself trouble and inconvenience.
6.1 Coffee is not hot enough :
- Wait for the green operating temperature indicator to come on.
– Cup ist too cold: Pre-heat.
6.2 No coffee comes out of the machine:
- No water in the tank
– The water tank is not properly inserted.
6.3 The appliance will not switch on:
- Appliance is not properly connected to power supply/check fuse.
— Brewing unit cover is not shut properly.
6.4 Water pump makes a loud noise:
- Not enough water in the tank
6.5 The pod is not ejected:
- Clean the brewing unit shown on point 4, «Care and cleaning»
- Check that the coffee waste container is empty
If you cannot resolve the problem after checking these points please return the appliance in its original packaging, with details of the defect, to our Customer Service Unit or approved Service Center.
7. Disposal of appliance
EU 2002/96/EC
Disposal:
In conformity with Directive 2002/96/EC on waste electrical and electronic equipment (WEEE), at the end of its life the unit should be taken to an electrical appliance collection point for its environmentally friendly disposal.

natural_image
Two horizontal color bar segments with grayscale shades and a central crosshair symbol (no text or labels)


text_image
SoleisOF SWITZERLAND


002.43