
CDR1000 - Cd player/recorder DENON - Free user manual and instructions
Find the device manual for free CDR1000 DENON in PDF.
| Product type | CD player/recorder |
| Brand | Denon |
| Model | CDR1000 |
| Dimensions (W × H × D) | 424.11 × 100.5 × 285 mm |
| Weight | 4.5 kg |
| Power supply | 120 V AC, 60 Hz, 26 W |
| Compatible discs | Audio CD, CD-R, CD-RW |
| Sampling frequency | 44.1 kHz |
| Quantization | 18-bit linear |
| Frequency response | 2 Hz - 22 kHz (playback), 21 Hz - 22 kHz (recording) |
| Dynamic range | 100 dB (recording), 108 dB (playback) |
| Signal-to-noise ratio | 103 dB (playback) |
| Harmonic distortion | Less than 0.001% (playback), less than 0.009% (recording) |
| Analog output voltage | 2.0 V (RCA) |
| Analog inputs | 2 × RCA (L/R) |
| Analog outputs | 2 × RCA (L/R) |
| Digital inputs | 1 × optical (TOSLINK), 2 × coaxial (RCA) |
| Digital outputs | 1 × optical (TOSLINK), 1 × coaxial (RCA) |
| Headphone jack | Yes, with level adjustment |
| Recording functions | Manual, synchronized, track synchronized, synchronized with auto finalize |
| Playback functions | Programmed, random, repeat (track/disc), intro scan |
| Fader | Adjustable fade-in and fade-out |
| Remote control | Infrared, 2 × AAA batteries (supplied) |
| Supplied accessories | User manual, RCA cable, optical fiber cable, remote control, batteries, power cord, technical test list |
| Maintenance and cleaning | Use a disc cleaning kit or a soft cloth. Do not use benzene, thinner, or volatile chemicals. |
| Spare parts and repairability | Do not open the unit. Contact an authorized DENON dealer for any repairs. |
| Safety | Unplug during extended absence. Do not block ventilation slots. Avoid humidity and high temperatures. Use a grounded power outlet. |
Frequently Asked Questions - CDR1000 DENON
User questions about CDR1000 DENON
0 question about this device. Answer the ones you know or ask your own.
Ask a new question about this device
Download the instructions for your Cd player/recorder in PDF format for free! Find your manual CDR1000 - DENON and take your electronic device back in hand. On this page are published all the documents necessary for the use of your device. CDR1000 by DENON.
USER MANUAL CDR1000 DENON
The lightning flash with arrowhead symbol, within an equilateral triangle, is intended to alert the user to the presence of uninsulated "dangerous voltage" within the product's enclosure that may be of sufficient magnitude to constitute a risk of electric shock to persons.
The exclamation point within an equilateral triangle is intended to alert the user to the presence of important operating and maintenance (servicing) instructions in the literature accompanying the appliance.
WARNING: TO REDUCE THE RISK OF FIRE OR ELECTRIC SHOCK, DO NOT EXPOSE THIS APPLIANCE TO RAIN OR MOISTURE.
LABELS (for U.S.A. model only)
FOR U.S.A. & CANADA MODEL ONLY
CERTIFICATION
HIS PRODUCT COVILIES WITH DHHS RULES 21 CR SUBCHAPTER J APPLICABLE AT DATE OF MANUFACTURE.
CAUTION
TO PREVENT ELECTRIC SHOCK, MATCH WIDE BLADE OF PLUG TO WIDE SLOT, FULL INSERT.
CAUTION:
USE OF CONTROLS OR ADJUSTMENTS OR PERFORMANCE OF PROCEDURES OTHER THAN THOSE SPECIFIED HEREIN MAY RESULT IN HAZARDOUS RADIATION EXPOSURE.
THE COMPACT DISC PLAYER SHOULD NOT BE ADJUSTED OR REPAIRED BY ANYONE EXCEPT PROPERLY QUALIFIED SERVICE PERSONNEL.
This device complies with Part 15 of the FCC Rules Operation is subject to the following two conditions: (1) this device may not cause harmful interference, and (2) this device must accept any interference received, including inforcoherence that may cause undesired operation.
- Read Instructions - All the safety and operating instructions should be read before the appliance is operated.
- Retain Instructions - The safety and operating instructions should be retained for future reference.
- Heed Warning - All warnings on the appliance and in the operating instructions should be adhered to.
- Following Instructions - All operating and use instructions should be followed.
- Water and Moisture - The appliance should not be used near water - for example, near a bathtub, washbowl, kitchen sink, laundry tub, in a wet basement, or near a swimming pool, and the like.
- Carts and Stands - The appliance should be used only with a cart or stand that is recommended by the manufacturer.
6A. An appliance and cart combination should be moved with care. Quick stops, excessive force, and uneven surfaces may cause the appliance and cart combination to overturn
- Wall or Ceiling Mounting - The appliance should be mounted to a wall or ceiling only as recommended by the manufacturer.
- Ventilation - The appliance should be situated so that its location or position does not interfere with its proper ventilation. For example, the appliance should not be situated on a bed, sofa, rug, or similar surface that may block the ventilation openings; or, placed in a built-in installation, such as a bookcase or cabinet that may impede the flow of air through the ventilation openings.
- Heat - The appliance should be situated away from heat sources such as radiators, heat registers, stoves, or other appliances (including amplifiers) that produce heat.
- Power Sources - The appliance should be connected to a power supply only of the type described in the operating instructions or as marked on the appliance.

- Grounding or Polarization - Precautions should be taken so that the grounding or polarization means of an appliance is not defective.
- Power-Cord Protection - Power-supply cords should be routed so that they are not likely to be walked on or pinched by items placed upon or against them, paying particular attention to cords at plugs, convenience receptacles, and the point where they exit from the appliance.
- Cleaning - The appliance should be cleaned only as recommended by the manufacturer.
- Power Lines - An outdoor antenna should be located away from power lines.
- Outdoor Antenna Grounding - If an outside antenna is connected to the receiver, be sure the antenna system is grounded so as to provide some protection against voltage surges and built-up static charges. Article 610 of the National Electrical Code, ANSI/NFPA 70, provides information with regard to proper grounding of the mast and supporting structure, grounding of the lead in wire to an antenna discharge unit, size of grounding conductors, location of antenna discharge unit, connection to grounding electrodes, and requirements for the grounding electrode. See Figure A.
- Nonuse Periods - The power cord of the appliance should be unplugged from the outlet when left unused for a long period of time.
- Object and Liquid Entry - Care should be taken so that objects do not fall and liquids are not spilled into the enclosure through openings.
- Damage Requiring Service - The appliance should be serviced by qualified service personnel when:
A. The power-supply cord or the plug has been damaged; or
B. Objects have fallen, or liquid has been spilled into the appliance; or
C. The appliance has been exposed to rain; or
D. The appliance does not appear to operate normally or exhibits a marked change in performance; or
E. The appliance has been dropped, or the enclosure damaged.
- Servicing - The user should not attempt to service the appliance beyond that described in the operating instructions. All other servicing should be referred to qualified service personnel.
ENGLISH FRANCAIS ESPANOL
FRONT PANEL
PANNEAU AVANT
PANELFRONTAL
REAR PANEL
PANNEAU ARRIERE
PANEL TRASERO
DISPLAY
AFFICHAGE
VISUALIZADOR
ENGLISH FRANCAIS ESPANOL
NOTE ON USE / OBSERVATIONS RELATIVES A L'UTILISATION / NOTAS SOBRE EL USO
EXPOSE THIS APPLIANCE TO RAIN OR MOISTURE.
CAUTION:
- Handle the power supply cord carefully
Do not damage or deform the power supply cord. If it is damaged or deformed, it may cause electric shock or malfunction when used. When removing from wall outlet, be sure to remove by holding the plug attachment and not by pulling the cord.
- Do not open the top cover
In order to prevent electric shock, do not open the top cover.
If problems occur, contact your DENON DEALER.
- Do not place anything inside
Do not place metal objects or spill liquid inside the CD recorder.
Electric shock or malfunction may result
Please, record and retain the Model name and serial number of your set shown on the rating label. Model No. CDR1000 Serial No.
Thank you for purchasing this DENON Compact Disk Recorder. Please read the operating instructions thoroughly in order to acquaint yourself with the CD recorder and achieve maximum satisfaction from it.
Be sure to keep: this manual for future reference, should any questions or problems arise.
Please check to make sure the following items are included with the main unit in the carton:
| (1) Operating Instructions | 1 |
| (2) Connection Cord | 2 |
| (3) Optical Fiber Cord | 1 |
| (4) Remote Control Unit RC-278 | 1 |
| (5) RCD/AAA Dry Cell Battery | 2 |
| (6) AC Cord | 1 |
| (7) Service Station List | 1 |
NOTE:
This CD recorder uses the semiconductor laser. To allow you to enjoy music at a stable operation, it is recommended to use this in a room of 10^ , 150^ , 30^ , 168^ .
- Place of installation
To ensure sufficient ventilation, leave a space of at least 10 cm between the front, sides and back of the unit and walls or other objects which may obstruct ventilation.
TABLE OF CONTENTS
1 FEATURES 5
[2] ABOUT CDROW DISCS. 5, 6
4 DISC HANDLING AND PRECAUTIONS 6,7
5 RESTRICTIONS RELATED TO THE
CD-IMRWSTANDARDS 76
6CONNECTIONS 78
7 PART NAVES AND FUNCTIONS 8,9
8 REMOTE CONTROL UNIT 9,10
[9]RECORDING 10-13
10 PI VNG 13,14
11 PROGRAMMING 15
12 MENU MODE 15-18
13 TRUBLI FISHOTING 16
14 MAIN SPECIFICATIONS 15
1 FEATURES
1. Various Recording Modes
This unit is equipped with three convenient synchrorecording functions: Disc Synchro-recording records one album from the source side, Track Synchro-recording records your desired tracks one at a time, and Auto Finalizo Synchro-recording automatically performs finalization upon completion of Disc Synchro-recording. Manual recording is also permitted with manual operation. Fade-in and fade-out recording is also supported, enabling you to create your own original discs.
2. Wide Variety of Playback Functions
- Various playback modes are provided for your enjoyment including programmed play, shuffle (random) play, single track or all track repeat play, as well as intro scan play which allows you to listen to the initial portion of successive tracks.
3. Rich Variety of Digital Input Jacks
- In addition to the analog input jecks, this unit is equipped with a total of three digital input jecks. There is one optical digital input jeck for use with digital sources such as CD, MD and satellite broadcasts, and there are two digital coaxial input jecks.
4. Equipped with Sampling Rate Converter
- The converter permits direct digital input recording from DAT or satellite broadcast (32 kHz, 48 kHz) which have sampling frequencies that differ from that of the 44.1 kHz used with CD and MD.
5. Text Entry and Display Function
The album title, artist name, and the track title and artist names for individual tracks can be entered and displayed for recorded CD/R/W discs.
2 CAUTIONS DURING USE
- During track selection, during search and when the recorder sustains a strong impact, the discoa rotational speed changes greatly, causing a small noise to be emitted. This is not a metachron of the recorder.
If the CD recorder is operated while an FM or AM broadcast is being received, there may be noise in the FM or AM reception. Please switch the power to the CD recorder off at such times. - The CDR 1000 has a broad dynamic range. Please exercise caution when turning up the volume on the amplifier in cases when the playbook volume is low, if the volume is turned up too high, it could damage the speakers.
- Placing this recorder on its connection cords near a TV or other audio device could cause a humming sound to be emitted. If this occurs, relocate the recorder or reroute the connection cords.
- Be sure to remove the disc from the recorder before moving it. The disc could be damaged if left in the recorder while it is being moved.
- Do not place any object in the tray in the position where the disc is loaded, or open and close the tray with anything inside. Foreign objects in the tray could damage the play mechanism.
- On not move the recorder from a cold place to a warm place suddenly. If the recorder is cold when brought into a warm room, condensation could form, preventing proper operation of the recorder. If condensation does form on the recorder when it is brought into a warm room, wait at least 30 minutes before use.
3 ABOUT CD-R/RW DISCS
Discs that Can Be Used with this Unit
CD-R Discs and CD-RW Discs
Ee sure to use disc that bear either of the following marks when recording with this unit.
CD-RDiscs CD-RWDiscs
Recording will not be possible with discs that do not bear the aforementioned marks.
CD Discs
This unit uses CDs (optical digital audio discs) which beer the mark located at the right. Note that specially shaped CDs, for example, heart shaped or hexagonal cannot be played. Do no attempt to use such CDs since doing so may cause breakdown of this unit.


CD Text Discs
This unit can display text information on the display when playing CD text discs which contain text information in English category.
The CD text disc includes the marks shown at the right.

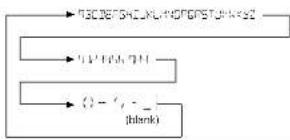
NOTE:
- This unit can provide a text display of the following types of characters. Other types of characters will result in "..." being displayed.
- Alphaet
H
Numbers
10 - Symbols
()-1isapank
Methods of Recording to Disc
CD-R Discs
- CD-R discs incorporate a pigment layer for recording. When exposed to the recording laser, a change in form occurs at the boundary of the layer and the plastic layer resulting in the recording of the signal. The recorded information is maintained until the end of the life of the disc.
After recording, finalized discs can be played on ordinary
CD-RW Discs
- CD/RW discs incorporate a phase change layer. The recording process causes this layer to change from a crystal (reflective) condition to an amorphous (non-crystall) condition.
- Recorded information can be erased from CD-RW/ discs.
- Disk can take the form of deleting all of the disc tracks or only the specified tracks working back from the last track of the disc.
- Finalized CD-RW discs can be played on CD players designed for use with CD-RW discs as well as on CD recorders.
ENGLISH
Digital Copies
A CD-RWV disc onto which has been recorded using the digital input cannot be further digitally recorded (i.e., copied) onto a separate CD-RWV disc or V/D, etc. This is a standard established by the SCVS (Seris Copy Management System).
Track Numbers: Auto Track Function
- Recording in the Synchro-recording mode (e.g., disc Synchro-recording, track Synchro-recording, and auto finalization recording), results in the track numbers being automatically associated. The manner in which the track numbers are associated will differ as follows for digital recording and for analog recording depending on the conditions:
Recording from a digital input
When making a digital recording from a CD, MD or DAT, a track number that is the same as the original track number will automatically be associated. (This system automatically detects the track switching number that has been recorded to the CD, MD or DAT and switches the track number.)
- When recording from a satellite broadcast or other digital equipment, the detection of a blank portion of about 2.7 seconds or longer, the same as when making recordings with an analog input, will result in the operation of the auto track function and the automatic association of the track number:
A blank portion is regarded as having a recording level of -55 dB or less.
The track number might not switch correctly when there is a lot of noise in the blank
portion between tracks
The track number might change when the signal level is very low within the track.
Recording from an analog input
Track numbers will automatically be associated when a blank portion of about 2.7
seconds or longer is detected
- When the input signal is affected by noise or there is some other interference,
the track number might not change at the correct position.
The track number might change when the signal level is very low within the
track.
The on/off setting of the auto track function is possible in manual recording. (See "Auto track movement" on Page 17.1
NOTES:
- DAT track selection signals (Start ID) are recorded slightly after the beginning of tracks, so when DATs are recorded as such, the beginning of the first track may be missing and the track numbers may only change after the tracks begin. In such cases, move the DAT Start ID to the proper positions before recording the DAT.
- When recording an analog source that contains a very low level signal within the track, or a digital source other than CD/MODDAT switch off the sum track function then make a manual recording and associate the track numbers manually.
- When the recording level is set too low while recording an analog source or a digital source other than CD/MQDAT, the track numbers might not be associated at the correct position. Please set a suitable recording level. See "Setting of the Recording Level" on Page 11.)
Finalization Processing of CD-R Discs
After the recording of a CD-R disc is completed, finalization processing is required to ensure it to be played on an ordinary CD player.
NOTES:
Once a CD-R drive has been finalized, optional recording will no longer be possible.
The information that has been recorded to a CD-R disc cannot be erased.
Finalization Processing of CD-RW Discs
CD-RW discs cannot be played on an ordinary CD player, even with finalization processing. Playback is possible only on CD recorders or players suited for use with CD-RW discs. They can only be played on a player that is suited for use with CD-RW discs. Also note that CD-RW discs can be crossed after being finalized.
4 DISC HANDLING AND PRECAUTIONS
Disc Handling
Avoid touching the surface of the disc when inserting or removing it.
The characteristic of the frigerin is the signal receiving surface.
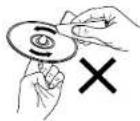
Disc Cleaning
When the disc has become marked with fingerprints or dirt, wipe it clean before use. The dirt will not affect the signal of the disc, but the sound quality may drop and there may be breaks in the sound. Note that when the surface of a CD-RW/HD disc is dirty, it may not record properly.
I wo wipe the disc clean, use one of the disc cleaning sets available on the market or a soft cloth.
I quietly went in the direction from here to outside.
De novo values in the model.
Storage Precautions
- Be sure to eject the disc after playing.
Always return the disc to its case to avoid dust, scratches, and mashing.
Do not leave the disc in the following places: -
Where it will be exposed to direct sunlight for long periods
-
Where there is a lot of dampness and dust.
- Where it will be exposed to heat such as from a heater.
NOTES:
- Do not attach commercially available disc labels or other seals on the disc. Doing so may make it impossible to record or play the disc properly.
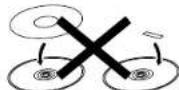
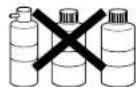
- Do not use record spray or static electricity prevention products. Do not use benzene, thinner, or other volatile chemicals.
Handling Precautions
Do not allow fingeringpents, ol, or dirt to adhere.
- Be careful not to scratch the surface, especially when removing or returning the die to the case.
Do not bend the disc. - Do not heat the disc.
Do not write on the label surface (i.e., primed side with a pallet pen or pencil).
- Weter droplets may form on the surface of the disc when it is suddenly brought from a cold place such as outdoors to a warm place. If this happens, do not try the disc with a hair dryer.
Precautions When Loading Discs
- Only load one disc. Loading two or more discs in a layer will cause breakdown and may also scratch the discs.
- Discs of the 8cm size should be carefully aligned with the recessed disc guide axes and carded without the use of an adapter. If not properly loaded, the disc may fall out or the disc holder may cease to open.
-
Be careful not to get your finger caught when the disc holder is closing.
-
Do not place anything other than a disc on the disc tray.
- Do not use discs that are cracked, misshapen, or have repaired with an adhesive, etc.
- Do not use discs that have adhesive coming out from cellphore tape or the label of a rental disc, or adhesive remaining after removal of the label. Use of a disc in this condition may result in the disc not being ejected or in breakdown.
5 RESTRICTIONS RELATED TO THE CD-R/RW STANDARDS
* Standards concerned with CD recorder playback have been established based on the existing standards of CD players; however, for recording, the method differs from that used with existing cassette decks and VD recorders, etc. In view of this, please gain a good understanding of the following restrictions associated with CD-R/WR disks and enjoy the medium.
Restrictions of Audio CD-R/RW Discs
Only audio CD/R/W disc can be recorded with this unit. "FJ15" will be displayed when a disc other than one for use with audio such as a CD-R/W disc for use with a personal computer or another type of disc is loaded. (See "Discs that Can Be Used with this unit" on Page 5.)
- CCH discs can be recovered to only once. The recorded information cannot be erased.
The recorded information of CD-RwD discs can be erase. When this disc has been finalized, erase after the finalization removal operation has been performed. (See "Unfinishing CD-RwD Discs" on Page 1.2.)
- Recording mistakes made with CD-R discs cannot be erased; therefore, it is recommended that a CD-RW disc be used until you are accustomed to the recording operation.
Restrictions in Recording with this Unit
The recording operation procedure is the same for CD-R discs and CD-RW discs.
- When making additional recording to a previously recorded disc, the end of the last track is detected and recording is started from there.
The record sterily mode cannot be set for CD R/RF disks with a recorded time of about 7 seconds or less remaining. "T" FUL will be displayed at this time.
Songs with a recording time of less than 4 seconds cannot be recorded. Stepping the recording within 3 seconds of starting will result in no recording
A maximum of 99 tracks can be recorded to one CD-R/WH disc. When the recording reaches the 99th track, "DISC FULL" is displayed and recordings beyond this track will not be possible.
- Digital recording is not possible from CD-Rw/Discs onto which have been digitally recorded, normal is it possible from MD or DAT, etc. When a digital recording is attempted from such sources, "CDR/PROTECT" is displayed. To record from these digital sources, make the recording from the analog input. (See "Digital Copies" on Page 6)
This unit cannot record CD-HOM and other non-audio signal sources. When an attempt is made to record from such sources, "H1 H2 H3" is displayed.
- When a recording is made from a disc that includes data other than audio signals such as CD graphics or CD TEXT, only the audio signal is recorded; other data is not recorded.
DvD (Dolby Digital, DTS, and other compressed audio signals) cannot be recorded.
Compatibility with Other CD Players and Discs
Finalization processing on a CD-R disc that has been recorded with this unit will permit that disc to be played on ordinary CD player. (See "Finalization Processing on CD-R Disc" on Page 6.)
Finalization processing on a CD-RW disc that has no record disc with this unit will permit disc to be played only on a CD-ovar designed to be used with CD-RW discs or on another CD recorder. (See "Finalization Processing of CD-RW Discs" on Page 6.)
NOTES:
To assure accurate recording, record with an ambient temperature of 30^ or less.
Do not obstruct the ventilation holes on the top and side.
- Recording may stop if the unit is subject to shoots during recording. If recording stops, it may no longer be possible to use the disc normally.
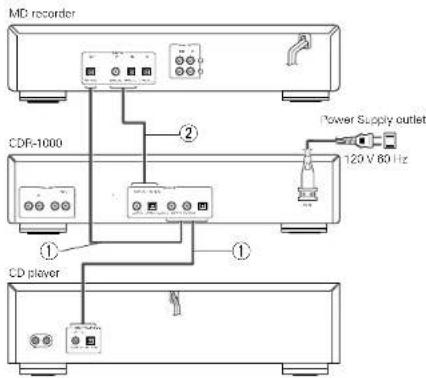
6 CONNECTIONS
(1) Analog Input/Output Jack Connections
- Use the supplied plug cable when making connections with the analog input/output jocks.
Input:
Connect the analog input jacks (ANALOG IN), of this unit with the output jacks of the amplifier (IMD or TAP).
Output:
Connect the analog output jacks (ANALOG OUT) of this unit with the input jacks of the amplifier or VD or TAPE).

(2) Connection of Digital Input/Output Jacks
Please use the supplied optical fiber cables when making connections to the digital (OPT.CAL) input/output joints. Use 792/6chms on plug cable, which is available on the market, when making connections to the digital (COAXIAL) input/output joints.
Input:
Connections with Playback Equipment such as the CD Players
The digital input lacks of this unit neither DIGITAL (N OPTICAL OR DIGITAL IN COAXIAL) should be connected with the digital output lacks of the CD player (OPTICAL OR COAXIAL).
Up to three pieces of digital playback equipment can be connected.
Output:
Connections with Equipment having a Digital Input such as the MD Recordset
The digital output jecks of this unit (lother DIGITAL OUT OPTICAL or DIGITAL OUT COAXIAL) should be connected with the digital input jecks of the MD recorder or other equipment (I/OPTICAL or COAXIAL).
NOTES:
- Do not plug the power plug into the power outlet until all connections have been completed.
Connect the red bug of the pin plug cable into the R (right) jack and the white plug into the L (left) jack
Do not make a connection to the PHONO jack of the amplifier. Doing so will lead to breakdown
Firmly plug in the power plug. An imperfect connection will cause noise to be generated.
Bund ng the conn nction cable toget h wth the power cable will cause hum or other noise. - When the power plug is disconnected from the power outlet, wait about 5 seconds before reinserting.
ENGLISH
(3) Connection of the AC Cord
① Plug the power cord supplied into the AC IN on the CD recorder, then into a mars socket.
PART NAMES AND FUNCTIONS
Front Panel
Power button
Turns the CF records ON and OFF.
When the power in ON, ON/Smiththy switching is possible with the power button of the remote control.
2 Phones jack (PHONES)
Jack for headphones.
3 Phones level control (PHONES LEVEL)
Adjust the headphone volume
Remote control sensor (REMOTE SENSOR)
- Receives signals from the remote control.
5 Disc tray
6 Display button (DISPLAY)
- Selects display in
Scroll button (SCROLL)
Use to display the text information once only.
Input button (INPUT)
- Switching will be as follows each time the button is
preased
DIGITAL DIGITAL OPTICAL ANALOG
C
Switching is not permitted during recording
9 Erase button (ERASE)
- Selects erasing
10 Shuffle button (SHUFFLE)
Plays CD, CD-RW or program in random order
Finalize button (FINALIZE)
- Selects finalize mode.
Cancel/Delete button(CANCEL/DELETE)
- Deleted tracks from a program
- Deleted text in Menu mode.
- Returns to a higher level in the menu.
Store/Menu button (STORE/MENU)
-
Enters Menu mode.
-
Stores Menu settings
Multi Jog dial (MULTI JOG)
Beginning of the current next track Play and Program
mode).
- Recording level control [Recording].
- Selects settings [Menu model]
Enter button (ENTER) (push)
- Plays selected tracks.
- Select settings 一 Menu mode.
Programs track numbers.
15 Rec button (REC)
- Start recording iManual REC Model finalizing, erasing.
16 Program button (PROGRAM)
Openleases progs
7 Rec Mode button (REC MODE)
- Selects recording modes
Repeat button (REPEAT)
- Selects repeat mode
- Switching will be as follows each time the botulin is pressed.
- REPEAT TRACK REPEAT+ALL
(OFF)
19 Stop button (STOP)
- Stippsclears a program.
Manual search forward button
Searches forward.
Use this to fast-forward in Menu/Program.
Play/Pause button / / PLAY/PAUSE
- Starts play/Interrupt
Manual search reverse button
- Searches backword
Use this to fast reverse in MenuProgram.
2 Open/Close button (OPEN/CLOSE)
Open/close discs tray
Display
·Information screen
Standby indicator (STANDBY)
Rear Panel
Analog output Jacks (ANALOG OUT)
- Connects to the line input of an amplifier left and right.
Analog input jacks (ANALOG IN)
- Connects to the line output of an amplifier (left and right).
Digital output jack
(DIGITAL OUT COAXIAL)
- Connects to the digital coaxial input of e.g. amplifier or
Digital output jack
(DIGITAL OUT OPTICAL)
- Connects to the digital optical input of e.g. amplifiers or recording device.
(DIGITAL IN OPTICAL)
- Connects to the digital optical out of an external digital source.
ACinlet(ACIN)
Connect the supplied power cable.
Display indications
1 Input source display
DIGITALI
DIGITAL IN COAXIAL-1 selected for external
record
DIGITALI
DIGITAL IN COAXIAL 2 selected for external
recording
- OPTICAL I:
DIGITAL IN OPTICAL selected for external recording
ANALOG:
ANALOG IN SCHEDULE
Music calendar display
- Tracks on a disc or in a program
Tark in aywrsipine
The sign is displayed when there are 21 or more.
track numbers
3 Mode display
·品
CIP
CD 14 pre-14000 CD or m1920 CD w/ CD-AW
3c) is loaded
·品
An unfinalized CP-B disc is loaded.
1
A. 100mg/ml 250IU/次 IV injection is added.
.
Lights during recording.
·
Lights during phyterceding
.
Figure 2. Functional active
·PROGRAM:
Farrer during programmatic activities in program meetings
1
- Manual recording action: Intra-trach insertion
muae
SYNC:
Synchronizerd recording active.
SHUFFLE:
Plays tracks in random order.
REPEAT TRACK/ALL:
Lights up when a trackcomplete disc (or program is repeated.
SCAN:
Light up when the first 10 seconds of each track are
pleyed.
STEP:
Indicates the number of tracks in a program.
FADE:
Eaepeoeactive
·
Balance Liants during balance adjustment
:
Bemotes control actions
Level meter
Record play level ber,indicates the audio signal levels.
Multiple display
This display indicates the number of tracks, track number, play time, recording time, various operational information, text messages, etc.
Time display
TOTAL REM/TRACK TIME:
Total or remaining time of disc or track.
- TRACK:
Track number
REMTIME:
Remaining recording time/recording time
Display messages
Messages, as listed and explained here, may appear on the display for your guidance.
General
PEITIS .Reading disc information.
GFCN .During tray opening
LLSe .......During tray closing
NO DISC .No disc inserted, disc unreadable
or disc ins
PULLEL Program full
TNTT 1
HRENGI.. ..Inserted disc is no audio CD.
USESQL>
105727370Unfrozen E
1000000000000000000000000000000000000000000000000000000000000000
monee
Recording
WRIT The specified operation is being
UPART. ..Updatng disc contents..
DSC FULL No more recording possible.
MICITR. Digital input coaxial 1 selected.
DICITR. 2 Digital input: coaxial 2 selected.
DFTR. Digital input optical selected.
Araaln
CD3 PROTEC. .No digital recording can be made of the connected source.
See "Digital Copies" on Page 6.
HPTPA 1
unfinalized disc inserted.
H
completlesdiscsAutoFirsize
function selected.
MlllH 1 Start of synchronized recording of a complete disc.
PRTPA TRNT. Start of synchronized recording of a single track.
Mrrnrnnn rannnnnne
Leve is being adjusted.
TPTY TAY h. When pressing one of more tracks, TPTY TAY t. When pressing a disc.
FAR 1
FIR 1700 When trying to fineze an already
finalized disc.
CIF:INPUP .When REC button is pressed while on digital image is displayed.
□□□□□□□□□□□□□□□□□□□□□□□□□□□□□□□□□□□□□□□□□□□□□□□□□□□□□□□□□□□□□□□□□□□□□□□□□□□□□□□□□□□□□□□□□□□□□□□□□□□□
□□F 时计
□□LIFTNRL Time countdown when unflazing
mntor mode (sample rate
converlal active.
RCCCGCCR... to start manual recording, finalizing or phasing
START COUPE... To start synchronised recording
from a source
FINCRCD 时,
CD-R or a pretecoed CD.
LIFIRLIC . When trying to record on a
PROF SOURCE When a professional source is
connected.
CCPCNCC Press the REC MODE button.
Play
PRLGRP.. Program mode selected.
11111111111111111111111111111
PC:111 111 111 111 111
TBB:BRTTI Will be followed by track artist.
A
Others
AC RUID 7F.........when the recorder enters a data
track during recording.
TATTTTNTNTDnndgntererree
uninlized ciscs.
ATTCNTTDRDnnd
faily
OPC failure during OPC procedure
CPC=Optimum Power
C
An error has occurred during
recording.
P
soluble due
AHCOPF.100 1
FTNRTTTO to the list, first lineze or else
a
Menu messages
Menu messages
Nt
disc which has no tracks
15.2.3.1 When entering Text Edit mode
When editing or crasing an art st
TLLLE When editing or crosing a title.
Vhen editing or erasing an artist
TILTE 10 Wnirng or erms a 1s pr
trock
13-0756 When entering Text Erase mode
Tt.
W
to be given with ENTER button.
e
with the ENTER button.
6755 1
WHEN EATING A CIDE
HUPF..When selecting text review per
unfllizer
H
selected while no text is in
mernory
1111 0
increment ON or OFF.
Auta Track Equipment or Ends off
made.
SET FRID When selecting FAD adjustment
When switching PADE on or off
SET FARE IN When setting the FARE in time.
TET No text stored for ciar
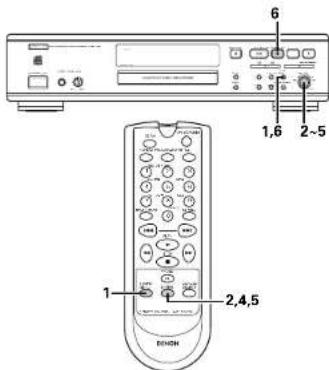
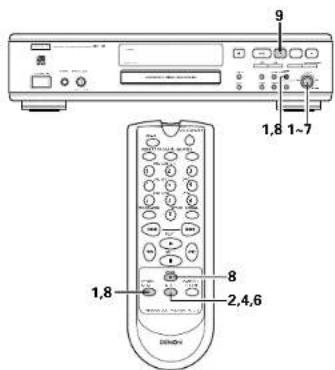
8 REMOTE CONTROL UNIT
Remote control unit can be used to control the CD recorder from a convenient distance
(1) Inserting Batteries
- Remove the battery cover on the back of the remote control unit.
- Insert two RO3/AAA dry cell batteries with correct polarity as indicated inside the battery compartment.
- Replace the battery cover
Notes On the Batteries
The remnate control unit uses R03/AAA dry cell batteries.
The batteries will need to be replaced approximately
once a year . Replacement may be necessary earlierdepending on how much the remaining control unit is used
- If, in less than a year from the time new batteries were
inserted, the remote control fails to operate the CD
recorder from a non-by position, it is time to replace the bottles.
The included battery is only for verifying operation.
Repece it with a new battery as soon as possible.
- Hesr the bacterae onedy, fowhing the pority
diagram inside the battery compartment, in other words, taking supp ( ) and 1 . It is interesting that it is properly placed .
- Batteries are prone to damage and leakage
therefore:
Do not combine new batteries with used ones
Do not combine different types of batteries.
Do not jump opposite poles of the batteries, expose
them to eat, break them open her expose of them in open fire.
If the remote control unit is not to be used for a long
period of time, remove the bacteria from the unit.
The batteries have leaked, remove any traces of
battery fluid from the battery compartment, wiping thoroughly with a dry cloth. Then insert new batteries.
(2) Using the Remote Control Unit
Operate the remote control unit while pointing it towards
The remote control sensor on the CD recorder (see eft).
where N denotes the control signal and is received, the FEMM contour indicator or (the set of the GD precoder) has a high
The remote control unit can be used at a distance up to 8
meters in a straight line from the CD recorder. This distance
decreases if there are obstructions blocking the signal path
or when the remote control unit is opened at an angle from the remote control sensor.
- Operation is possible in a range of up to 30^ left and right of the remote control sensor.
NOTES:
The remote control may cease to function when the
remote control is exposed to direct sunlight or strong artificial light.
- Do not press the operation buttons of the main unit and
the remote control at the same time. Doing so will cause a malfunction.
- Batteries contain chemical substances, so they should
be disposed of properly.
ENGLISH
(3) Names and Functions of Remote Control Unit Buttons
Buttons without descriptions have the same function as those on the main unit. See "ART NAMES AND FUNCTIONS" on Page 8.
(4) Inserting Dlscs
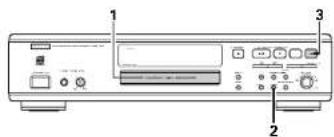
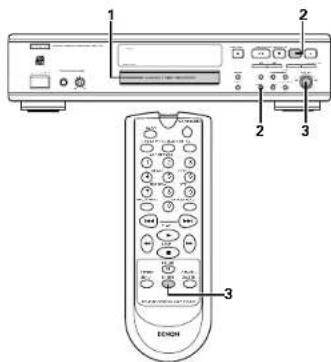
① Press the OPENCLOSE button (A) to open the disc tray.
② Insert a CD, CD-R or CD-PW in the appropriate recess in the tray, label side up.
Press the OPEN/CLOSE button to close the tray.
- F C^ * lights up, followed by ^ + F_1( H^ + ) and the disassembly will show the type of disc you inserted.
- If you insert a blank or porty recorded CD-R or unoptimized CD-RW, the CD recorder will calibrate the disc for optimum recording. During this process the disk will first show "IN" "TRLING" and then the number of audio tracks. Calibration can take up to 40 seconds.
- If a CD-R/RW is "malized" it will show "CD" on the disk.
If CD-text is available the TITLE/ARTIST will scroll by.
NOTES:
If your finger should get caught in the disc tray when it closes, press the OPENCLOSE button.
Only Audio CDs will be accepted. If a non-audio disc is inserted, the display shows "RTHG DISC". For recording it is important that the blank disc is completely free from dust particles or scratches. See "Disc cleaning" on page 6.
9 RECORDING
Remarks About Recording
To assure accurate recording, record with an ambient temperature of 30^ or less.
Recording stop, it may no longer be possible to use the disc normally.
Recording Modes
* Your recorder offers several recording modes.
NOTE:
Analog recording is not possible in the Make CD mode.
Some remarks on recording:
- When Auto track is ON (oefault settings), track numbers will automatically be increased during recording.
By programming the source first, a correlation can be recorded.
If a final CD-R disc is inserted in the CD recorder, "FIRELIFE CD" will be displayed when the FEC MODE button is pressed. Recording is not possible.
If a timed CD-RW disc is inserted in the CD recorder, "LTFURRIC" and "FRGSS ENTER" will be displayed when the FRC MODE button is pressed. If eNBH button is pressed, the disc will be unfralized.
ENGLISH
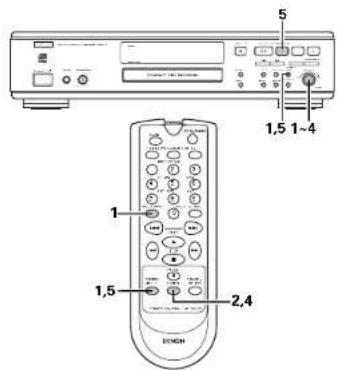
Setting of the Recording Level
Set the recording level as described below before recording.
The recording levels can be set separately for digital input and analog input.
The recording level is stored once it is set.
The recording level can be adjusted during recording.
Switch on the power
2 Load the CD R/FW disc in be recorded
Press the INPUT button and select the source to be recorded. (See "PART NAMES AND FUNCTIONS" on Page 8.)
4 Press the REC MODE button to display "FCC RANLP".
5 Start playing the source to be recorded. The recording level is displayed on the level meter (discrete).
Turn the MULTI-JOG dial end adjust to a suitable recording level.
The level value will be displayed as "1" Digital input: Adjustments can be made from -63 or 63 to 63 in 1D increments.
Analog input: Adjustments can be moved from -12 dB to 9.05 in 3 dB increments.
- Set so that the red portion of the level metal lights only when the largest signal is input.
A distorted sound will be recorded when the setting results in the red portion being it all the time.
7 Press the STOP button to exit the setting.
8 Stop the playback source.
NOTES:
- Be sure to perform the setting of the recording level in the Rec Manual mode. When the setting is made in a Synchro-recording mode, this unit will automatically start recording when playback of the source is started.
- Set the recording level to 0 dd to perform digital recording with the same level as the source (CD, MD, etc.).
- When the recording level is set too low while recording an analog source or a digital source other than CD/VID, the track numbers might not be associated at the correct position. Please set a suitable recording level.
- When recording on HDCC discs, set the digital recording level to 0 dB. Normal recording on HDCC discs is not possible if the level is set to anything other than 0 dB.
Autostart Recording
This feature enables you to make fast and easy recordings of a CD. Track increments are automatically detected from the source material. Track increments cannot be added manually.
In analog source material a silence of 2.7 seconds or more is automatically detected as a track increment.
Important:
- Recording from CD converters should always be started in the RECORD DISC. RECORD TRACK or X4KE CD mode.
- Make sure the disc is absolutely free of scratches and dust particles.

1 Perform the next setting before recording. See "Setting of the Recording I sum" on Page 11.
1)Setting the input to be recorded
2)Setting the recording eve
2 While the CD recorder stopped, press the PEC MODE button and select the recording mode.
Once To select "ECLU" JSC
Twice To select RCC50T79C1
Four times. To select: "IF-IF-IF"
and "SYNC" start to flash and the display
shows the selection.
- If "ITF1" and "ITF2" message also flashes, the digital connection is incorrect.
3 To start recoding, press the PLAY button on the selected source.
The CD recorder automatically starts to record and
lights continuously
To check the elapsed recording time, press the DISPLAY button. This can also be done during
recording
The recorder stops automatically.
- In the Main CD mode, the recorder will stop and then goes to finalizing.
When using digital input:
In the Record Disk mode and Make CD mode, for DAT and DCC, stop after a blank portion has continued for about 20 seconds.
In the Record Track mode, the unit will stop when the next track starts at the source side, or a bank portion continues for 20 seconds.
* Depending on the equipment of the source side, the recorder will stop and go to REC STANDEY for 1 minute and then goes to stop mode automatically, or some units will not stop automatically.
When using analog input:
Stop after the playbox has ended and a blank portion has continued for about 20 seconds.
In the Record Track mode, the unit will stop when the next track starts at the source side [a blank portion of about 2.7 seconds or longer detected], or a blank portion continues for 20 seconds.
NOTES:
Analog recording is not possible in the Make CD mode.
- In the Make CD mode, depending on the equipment of the source side, the recorder will stop and go to "RRT" mode for 1 minute and then goes to finalizing.
To stop recording manually, press the STOP button as the CD recorder.
-“i"i"ohrs up and "SYNC"and -no our
if STOP button was pressed within 3 seconds after pressing the PLAY button no recording will take place.
To interrupt recording, press the PAUSE button on the CD recorder.
To resume, press the REC button on the CD recorder.
After recording the display will show "IPRTIC" for several seconds.
Important:
- If you want to play the recorded CD-R disc on any regular CD player, it must first be finalized. See "Finalizing CD-R/KW Disks" on Page 12.
- Finalized CD-RW discs play only on CD-RW compatible CD players
OTES
f, however, you start the source during a track, recording starts at the beginning of the next track or after 2.7 seconds of silence in analog recordings.
Use Manual recording mode to record satellite precossta.
In the auto start recording mode, the auto track function is automatically activated regardless whether the auto track mode is set or off. If you wish to give track numbers on your own, record in the Manual recording mode with the auto track mode turned off. (See "Auto track increment" on Page 17)
20 second recording in the auto recording snap mode for mode other than CDs and VCDs is as follows:
- CD-R discs: A 20-second blank section is recorded at the final track.
- CD-Rw casks: No 20-second blank section is recorded.
ENGLISH
Manual Recording
Important:
- Recording from CD-changers should always be started in the same way as recording from CD-CDs.
- Only reuse analog recordings when digital recording is not possible.
- Make sure the disc is absolutely free of scratches and dust particles.
Manual recording
1 Perform the next setting before recording. See "Setting of the Recording Level" on Page 11.
Setting the input to be recorded
Setting the recording level
Seling of The Auto Track Vioze
-
when Auto Track is ON (default setting), track numbers will automatically be increased during recording.
-
To switch off the Auto Track function you have to enter Menu mode.
If you wish to increase track numbers manually, press the TRACK MARK button on the remote
ON (AUTO):
The track increments are automatically taken over from the digital source material or after 27 seconds silence during analog recording
OFF (MANUAL):
Track numbers can be incremented manually by pressing the TRACK MAFK button on the remote control. (Minimum track length is 4 sets.) [This can also be done in Auto mode.]
- Track numbers cannot be changed after recording.
2 With the recorder stopped, press the REC MGDE button three times in order the Manual Record standing mode.
1
- MRCPC flashes when the auto track mode is turned off.
- IF "CHECK_INPUT" message also flashes, the digits connection is incorrect.
3 To start recording, press the FEC button on the CD recorder and immediately start the source from Stoo model.
- lights continuously. The track number and recording time appear on the display.
To check the elapsed recording time, press the DISPLAY button on the CD recorder. (This can also be done during the recording.)
4 To stop recording, press the STOP button on the CD recorder.
lightspand"goesout.
- After recording the display will show "UPDRSE" for several seconds.
- IF STOP button I was crossed within 3 seconds after RECORD, no recording will take place.
To interrupt recording, press the PAUSE button (1) on the CD recorder. 7 " stars to fast. Resun step2
To record a 3 second silence at the start of a track, press the PAUSE button on the CD recorder while the recording is paused.
NOTES:
- With Auto track mode OFF, the auto stop mode is disabled.
- With Auto track made ON, the recorder stops automatically. (See "Autostat Recording" on Page 11.)
Important:
If you want to play the recorded CD-R disc on any regular CD player, it must first be fine-touched. See "Finalizing CD-R/RW Disc" on Page 12.
Finalized CD RW disc play only on CD RW compatible CD players.
Finalizing CD-R/RW DLscs
Finalizing is a simple procedure, necessary to:
- Be able to play recordings on a CD player;
- Avoid further unwanted recordings on a card.
- Avcid erasure of tracks on a CD-RW
Auto finalizing
Auto filtering is possible when using the Make CD recording function. See "Automatic Recording" on Page 11.
Manual finalizing
Load the CD-R/Rw disc that is to be finalized.
With the recorder stopped press the FINALIZE button.
The display shows "FIRLIC" and "PHLIC RECCRPS".
Press the REC button.
FIR and the approxme tate inisizaton time appears
on the display.
The display counts down through the finalization.
On completion, the total number of tracks and the total time recorded appears on the display.
The disc indication of the display will become "CD".
NOTES:
- Make sure the disc is absolutely free of scratches and dust particles.
Finalizing will take at least 2-4 minutes. - During finalization, the CD terminator accepts no operating comments.
Unfinalizing CD-RW DLscs
FCD RVDds ony
If you want to make more recordings for measures of track(s) on a finalized disc you must unflag it first. The Table of Contents (TOC) will be removed. To unflag it:
1 Ioad the CD FW disc that is to be unfinalized.
2 With the CD recorder stopped, press the REC MODE button or PHASE button.
- "UNFINALITE" and "PRESS ENTER" will appear on the display.
Press the ENTER button.
- The remaining time of the unirization process is displayed.
- When the uninitialization process is completed, the disc synchro recording standby mode or the track erase standby mode is set:
- The first indication of the display will become "CD-RW".
NOTES:
- Make sure the disc is absolutely free of scratches and rust particles.
- Untilizing will take approximately 2 minutes.
- During unif-ization, the CD recorder accepts no operating commands
- When unflattering a CD-RW disc with text on it available, this text will be transformed to the CD record memory. It may occur that the text memory is full. The message "Hi Mii" "Hi I" "Hi J" "Hi K" will be displayed. You will now have to erase text, stored for other discs, or finalize another disc in order to obtain memory space.
Erasing CD-RW Discs
For unfinalized CD RW discs only.
★You can erase
- One or more tracks from the end,
The entire disc.
To erase one or more tracks from the end
1 Load the CD-RW disc that is to be erased
Press the ERASE button once.
The display shows "CRASE TRAC"
The number of tracks and their initial playing time and "M-H-1, M-H-110" lights up.
- If the disc is finalized, "CD" appears on the display after inserting a CD-RW in the recorder. The recorder will ask you to confirm unfinalizing first. Confirm by pressing the ENTER button.
3 Select the track(s) you wish to erase by turning the MULTI-JOG dial to the left.
The selected track numbers start onking on the track bar.
The display shows the remaining number of tracks and the remaining playing time after erasing the selected track list.
Press the REC button.
The display shows the total countdown time and "GGT".
After the selected tracks have eraseed, the display shows the remaining tracks and their total eleying time.
NOTE:
No operations will function while erasing
To erase the entire disc
1 Ioad the CD RW disc that is to be erased.
Press the ERASE button twice.
The display shows "HSS"
The number of tracks and their total playing time are "100" and "150" light up.
- If the disc is finalized, "CD" appears on the display after inserting a CD-FW in the recorder. The recorder will ask you to confirm unfinishing first. Confirm by pressing the FNTR button.
Press the REC button.
- The display shows the total countdown time and "WIND". The complete diagram will be generated.
Erasure of a complete disc may take up to 16 seconds.
The time display is set to "0:00" once crashing is completed.
10 PLAYING
Playing a CD
Selecting a Track
Selecting a track during play
1 Lnd the cia to be played.
2 Press the PLAY/PAUSE button OK or PLAY button on the remote control to start CD play
- "lights up and the track number and track time of the track in play appear on the display.
- Press the DISPLAY button once twice or three times to 10:00
Remaining track time, total remaining time, text information.
To interrupt play temporarily, press the PLAY/PAUSE button again or press the PAUSE button on the remote control.
- "I" light on the display.
To continue play, press the PLAYPAUSE button (▶) again or press the PLAY button▶) or the PAUSE button ▪ on the remote control.
To stop pay, press the STOP button.
- The number of tasks and the total playing time appear on the display.
1 Turn the MULTI JOE dial until the required track number appears on the display.
Play skis to the beginning of the selected track.
or
Button in the required track number using the numerical buttons on the remote control, for 2-digit track numbers, press the buttons in repurchase.
- track: Press the 3 button and then 5 button on the remote control.
or
Process the automatic search reverse button or the automatic search forward button on the remote control one or more times.
ENGLISH
Selecting a track when CD play is stopped
1 Turn the MULTI-JOG dial until the required track number appears on the display.
2 Press the ENTER button to confirm or press the PLAY button 1: to start playing.
or
1 Button in the required track number using the numerical buttons on the remote control. For 2-digit track numbers, press the buttons in rapid succession. Play starts.
or
1 Brody press the automatic search reverse button (or automatic search forward button on the template control one or more times).
2 Start playback by pressing the PLAY button or ENTER button on the remote control.
Manual Search
1 Hold down the manual search reverse button (▶) or the manual search forward button (▶).
The player first searches backwards or forwards at 10 times normal speed with sound at low volume, the goes to 50 times normal speed with sound muted.
2 Release the button at the desired passage.
Play starts at the desired passage.
NOTES:
- During Shuffie, Repeat Track or Programmed play, search is restricted to within the track being played at the time.
- A press of the manual search reverse button | ↓ or mutual search forward button ↓▶ while paused will cause free up to generate quickly which in mode mode
-Boxing down the manual search forward button (▶) will result in the unit stopping upon reaching the end of the last recorded track.
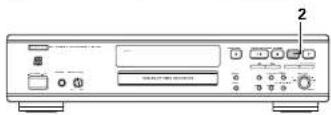
Shuffle [random order] Play
The tracks recorded on the disc can be listen to in random order.
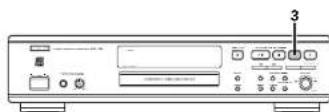
![DENON CDR1000 - Shuffle [random order] Play - 1](/content/2026/02/386410/images/904b45cbe86d19b4407a843b81b2369e5b523e26b70909489119f299c4cc0623.jpg)
1 Press the SHUFFLE button before or during CD play to start shuttle play.
- The tracks on the CD for program if still play in random order.
Press the PLAY button on the remote control to return to normal CD play.
NOTE:
Shuffle is also cleared if you open the door tray.
![DENON CDR1000 - Shuffle [random order] Play - 2](/content/2026/02/386410/images/d1b51b4289311fc52d1651fb0a5e1f2bfb61d809a3b33f4a7dfecde241205d4f.jpg)
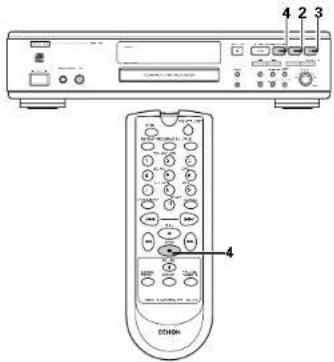
Repeat Play
1 Press the RCPAT button one or more times during CD play.
- When "REPEAT TRACK" lights up, the current track plays repeatedly. When "REPEAT ALL" lights up, the disc or program plays repeatedly.
2 To return to normal pay, press the PPPTAT button one or more times until:
The "REPEAT" label disappears from the display.
NOTES:
- You can use shuffle in combination with "REPEAT ALL" or programmed plev.
- Hopest play will be cancelled when the disco holder is opened or when the STOP button is pushed when the unit is stopped.
ENGLISH
11 PROGRAMMING
- You can program up to 89 tracks to play in any desired sequence.
- Tracks can be programmed more than once, but each time counts as a track (STEP).
1 In Stop mode press the PROCHAM button to enter Program mode.
- PROGRAM" flashes and "PROGRH" appears on the display.
2 Select the required trace number by turning the MULTI JOG dial left or right and store by pressing the ENTER button.
of
Button in a track number with the number buttons and store by pressing the ENTER button. For 2-digit numbers, press the buttons in rapid succession: The track will be stored in the program: The track number, total program time and the number of programmed tracks [STEP] are displayed: Repeat step 2 for all tracks to be programmed.
3 Press the STOP button or PROGRAM button to end programming. "PROGRAM" lights continuously.
4 Press the PLAY button to start programmed play.
NOTES:
To review the program press the PROGRAV button followed by manual search reverse button (▶) or manual search forward button (▶) with the CD recorder in Stop mode.
To add more tracks to the program, repeat steps 1 to 4.
- if you try to store more than 90 tracks, "TIPS FULL" appears on the display
- The total program time will not be displayed when it exceeds 199 minutes. Neither will the program remaining time be displayed when the remaining time of programmed play exceeds 198 minutes.
Program operations will not be possible during any or
Clearing a program
1 Press the STOP button if necessary to stop programmed play.
2 Press the STOP button again to clear the program. "PROGRAM" disappears from the dialysis.
The program is also cleared if you open the discry tray.
Erasing a track from a program
1 In Stop mode press the PROGRAM button to enter Program mode.
Use the manual search reverse button or the manual search forward button to select the track from which to delete.
- The track number and program step will be shown on the display.
3 Press the CANCELFUITE button to erase the track from the program.
The remaining program steps and the remaining playing time of the program will be displayed.
Intro Scan Play
★ The first 10 seconds from the beginning of the track can be listened to in succession for the tracks recorded on the disc.
Press the SCAN button while the unit is stopped.
- The "SCAN" display will light. The time display will count down from 0.1.3 to 0.25.
- Into Scan pay will start from the first track
Play will stop when all of the recorded tracks have ended.
I to listen to a track all the way to the and during into Scene, press the SCAN button or the PLAY button on the remote control once.
A press of the SCAN button during program setting will result in Intro Scan play beginning in the order of programmed tracks.
12 MENU MODE
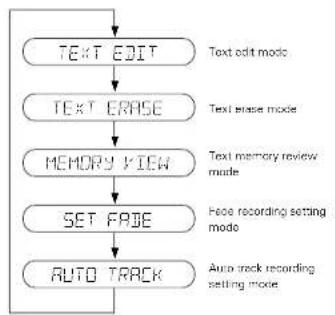
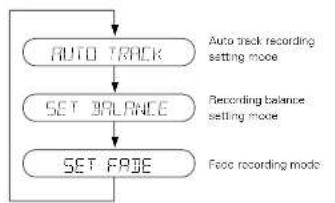
Remarks About Menu Mode
- In Menu mode you will have access to a number of features which are not available via the regular buttons (on the deck's front and the terminal control).
- THE TEXT submener sllow you to give names to discs and tracks. The disc and track names will be displayed during daytime.
- in the RECORDING submenus you can set Auto Track, Balancos and Fade.
- All settings (except Balance) made in Menu mode will be stored in the deck's memory and can be called up and changed at any time.
General Operation
1 Press the Store/Menu button to enter Menu mode.
2 Turn the MULTI JOG dial to select the required submenus.
■Menu Structure
Turning the MULTI-OGD dial cockwise will cause the menu to change as follows.
Structure of the menu mode while stopped
Structure of the menu mode while recording is paused
Press the ENTER button to confirm selections.
Turn the MULTI JO3 dial to select options in the menus.
Press the ENTER button to confirm selections.
6 Press the Store/Menu button to store settings and return to the menu.
Press the STOP button to store settings and exit View menu.
NOTES:
Text can only be edited for unfinalized discs.
Finalized CD-RW discs must be unfinalized first.
- The Auto track recording setting mode is not displayed in the auto start recording mode.
ENGLISH
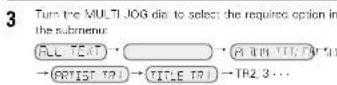
Text Editings
In text edit mode various information such as the album title, artist name, and individual track titles and associated artist names can be copied and corrected.
忍 Entry of the text data is not recorded directly in the disc, but is first stored in the memory of this unit. [Text for up to 30 discs can be stored in the memory.] By finalizing the disc, the text data of the disc is automatically recorded to the disc.

1 Select the TXT EDIT submenu. "TERT E221" appears on the display.
Press the ENTER button to confirm.
3 turn the MULT JOG dial to select the required option in the submertor: 4111111111111111111111111111111111111111
4 Press the FNTER button in confirm
5 Select the characters by turning the MULTI-JOG dial or by pressing the corresponding number/alphabet button on
- Turning the MULTI-JOG dial clockwise will result in the display of characters changing as follows (Turning the control counter-clockwise will result in the opposite arrangement.)
Display Characters
6 Press the ENTER button to store the characters and move to the next cursor position.
- Repeat operations 5 and 6 and enter the characters, one after another.
7 Press the STOReMnuN button to store a name you have entered and return to the submenu or STOP button to exit.
NOTES:
Text coding is not possible with commercial audio CDs or with ill-organized CD/R/W discs.
Maximum of 60 characters can be stored per item. Approximately 2,000 characters can be input per disc. By pressing the ENTER button without selecting a character first, you can insert a space between characters
- With the manual search reverse button (▶) and manual search forward button (▶) you can move to e required cursor position.
With the CANCE button you can delete a character.
- When an artist's name has been stored for a certain trace, the name will automatically be copied for the next trace.
The name can be confirmed by pressing the STOREMENU button or a new name can be entered as descibod above.
Erasing names
In the text, state mode, the entire text of the album can be erased at once, or the album title or artist name, or the individual track titles and associated artist names can be erased separately.
1 Select the TEXT ERASE submnu
TCCPPC appear on the display.
- Press the ENI E F button to confirm.
4 Press the ENTER button to confirm.
The display will ask you to reconfirm your selection.
Press the ENTER button to reconnirm.
6 Press the STOP/MEENU button to return to the submenu or the STOP button.
NOTE:
- Measure of text is not possible with commercial audio CDs or with finalized CD-R/RW discs.
Text memory review/erase text memory
HOPYIC
In the text memory review mode, the text data that is stored in the unit can be checked and the text can be erased for each disc.

1 Select the MEMOY VIEW submnu
- "HrC?FIC" appears on the display
Press the ENTER button to confirm.
The initial album title is displayed.
Turn the MULTI JO5 dial clockwise to display the
- After the check is completed, press the STORE/MENU RTRT button to return to the menu display.
3 Select the disc you wish to erase.
4 Press the ENTER button in confirm. "ERRPEE [R]07" appears on the assay.
5 Pross the ENTER button to reconfim
6 Press the ENTER button to confirm the erasure of the text for that particular disc.
7 Press the STOPMNTN button to return to the submission of STOP button.
ENGLISH
NOTES:
- If there are no discs in the memory, the message "ID" "IDP" "IDP" appears on the display.
It is not possible to check or erase the text of a disc that has been finalized. When the disc is finalized, the text stated in the memory of this unit is moved to the disc.
When the text memory of your CD recorder is full, the message "FINGER FULL" will soon, followed by "LITTLE LIT." If you want to add a CD to the list of discs for which text is stored, you have to erase a disc from this list or delete another disc. ("for whom text is stored") - "Unfertilizing CD-RW disc" may also appear when unfinishing a CD-RW disc for which text was stored (see "Unfertilizing CD-RW discs"). The same action(s) should be taken in order to obtain memory space.
Recording Settings
The recording setting mode permits the setting of fade recording, the auto track function, and recording balance.
Details of the recorning settings are stored in this unit. The next time a recording is made, it can be made with the same settings. To use different settings, change those settings when required.
Note that settings details are not stored only for the recording balance setting mode. Make settings as required.
Fade
This unit permits fast recording, where the recording level gradually increases from the start of the recording, as well as fade out recording, where the recording level gradually decreases from the where the 510^ button was pressed and the recording ends, or from where the PLAY/PAUSE button or the PAUSE button on the remote control was pressed and the recording was paused.
1 Select the SFT FADF submission. SET FADF appears on the display.
2 Press the ENTER button to confirm. ^ 一 -11-1111 appears on the display.
3 Press the ENTER button and turn the MULTI-JOG dial to select "CA" or "OFF".
4 Prose the ENTER button to confirm.
Tum the Multi JCG deal to select "CET 100" or "SET 100"
6 Press the ENTER button to confirm. The currently set fade time is displayed.
By turning the MULT. JOG dial you can get the FADE IN or FADE OUT time.
The late time can be adjusted from 0 to 10 seconds in 0.05 second increments. It will be displayed in the form of "0.15 - 10333" s.
- FADE IN automatically starts when you press RECORD to start recording. Your recording will automatically be fed out when you press the STOP button or the PLAY/PAUSE button or the PAUSE button on the remote control.
8 Press the STOPF/VENU button to store settings and return to the menu or STOPF button.
NOTES:
- Fade in and Fade out but will not function in Synchro recording mode. However, the sound fades out if the STOP button or the PAUSE button is pressed during synchronized recording.
- Use manual recording when performing fade in recording.
Auto track Increment Auto TRAP!
The auto track function setting can be switched in the menu using recording mode. It is also possible to give track numbers manually as you record.
The operation conditions of the auto track function will differ depending on the input source. For details, see "Track Numbers" or Page 6.
The set mode is stored and this allows the set information to also be used the next time a recording is made.
1 Select the AUTO TRACK submnu
- "u" appears on the display.
Press the ENTER button to confirm.
3 Select the Auto track "D" or "O"
4 Press the ENTER button to confirm.
- When "UN" is selected, track numbers will be automatically incremented during recoding.
- when "CRF" is selected, you can number the record also tracks yourself. (Press the TRACK MARK button on the remote control.)
5 Press the STORE/MENU button to store settings and return to the menu or STOP button to exit.
NOTES:
- In the AutoStart recording mode, the track number cannot be associated manually.
- In the Autostart recording mode, the auto track function is automatically activated regardless of whether the auto track mode is set ON or OFF.
The track number cannot be changed after the recording.
The track number cannot be changed for 4 seconds following the last change. (See "Restrictions in Hocoming with this Unit" on Pega 7.)
ENGLISH

Balance can be adjusted between the left and right recording levels.
1 Select the SET BALANCE submenu.
- "CIT RIC" appears on the display.
Press the ENTER button to confirm
and 100 appear on the display.
- Initially, the left and right levels are the same.
Adjust recording balance by turning the MULTI JOG die.
-urn right: left counts up, right counts down
Turn left: right counts up, left counts down.
4 Press the ENTER button to confirm.
E. Enerre hhe STOBEMNIL puiig to riee reine and
return to the submener or STOP button: in exit.
NOTE:
The balance setting will not be stored.
Sample Rate (Monitor Mode) Converter
- The sample rate converter is used to convert input signals into CD-standard digital output signals.
1 Connect the non-digital source to one of the input connector of the recorder.
2 Connect the optional recording device to the digital output connector (DIGITAL OUT COAXIAL or DIGITAL OUT OPTICAL).
3 Press the REC MODE button (without a disc inserted in the recorder).
- "DNTCR NDC" is displayed. The signal will now be
converted into a CD-standard digital output signal (M.1)
图4
Use the MULTILOG dial to set the recording level.
TROUBLESHOOTING
Check Again Before Assuming The Player Is Malfunctioning
Are all the connections correct?
Are you following the instructions in the manual?
Are the amplifier and speakers operating property?
If the CDF-1000 does not seem to be functioning properly, check the table below. If this does not solve the problem, the CDF-1000 may be damaged. Turn off the power, unplug the power cord from the power outlet, and contact your store of purchase or nearest DVFON sales office.
| Symptom | Check | Pepc |
| No power. | • Ensure that the POWER button is on. • Ensure that the main cable is plugged in correctly. | 8 7 |
| Auto track does not work. | • Check if auto track is selected. • Check if there are 2.7 seconds silence in between the tracks. • Check if the source is a computer source with the digital output according to the IEC audio standard. | 17 6 - |
| No sound. | • Check the motor connection. • If using an amplifier, try using a suitable source. | 7 7 |
| Amplifier sound is discontinued. | • Check that the CD recorder analog output is not connected to the amplifier Precord input. | 7 |
| Play will no start. | • Ensure that the basol of the CD is recording as. • Check the disc. | 10 6 |
| Remote control does not work. | • Point the remote control directly at the CD recorder. • Check the barfas and replace it necessary. | 9 9 |
| Will not record. | • Check the min. • Check if CDH is unrialized data. • Check that the disc is recordable and replace it necessary. • Check whether there is time remaining on the disc. • "TIN" "PPT" is displayed. • Check whether there is an attempt to digitally record a digitally recorded recording. "CCPU" "CDICE" is displayed. • Check whether the recording has been saved to a suitable • The disc is not an AUDIO disc ("AUDIO DISC") is displayed. • Wrong input source chosen, Input label having "CD:CDH = CDH" is displayed. • Clear memory full "CD:CDH = CDH = CDH = CDH" is displayed. What a CD-RN was to be used for recording. Else test for other discs or "clear" after clear is shown in memory space. | 6,7 6,7 11 5 7 17,18 |
| Recording is distorted. | • Wake up the recording oval is correct. | 11 |
| 20 second pulse between recordings. | • See booklet reading. | 11 |
| "JSSC RCDEN" on the display. | • A power failure has occurred during recording, the CD recorder is attempting to repair the disc. | |
| "JSSC EPSP" on the display. | • "T" "TSS" "RPP" then appears on the display, the disc cannot be mounted further, and cannot be finished. But it can still be played on the CD recorder or another CD recorder. | 10 |
| A recorded CD-H disc cannot be played on another player. | • Print the disc. • In playbook process on another CD player? If so then the pickup of the player on which this disc could not be used. CD-H disc cannot be played on some CD players and some EVD players. | 8,7,12 - |
14 MAIN SPECIFICATIONS
■AUDIO
Frequency Response: 2 Hz~22.05 kHz
Dynamic Range: During digital recording/playback: 100 dB
Signal-to-noise Ratio: During digital recording playback: 108 dB
Harmonic Distortion: During digital recording/payback: 0.003% (1 kHz)
Separation: During digital recording playback: 105 dB
Digital Input recording/playback performance: Same as for CD playback
Analog Input recording sensitivity: 500 mV
Wow and Flutter: Below measurable limit: 0.001% W.pakd
Output Voltage: 2.0 V
DISCS CD-DA (Compact DisC-Digital Audio) tomet
CD-R Disco for Audio consumer use
CDRW Discs for Audio consumer use
■SIGNAL FORMAT
Sampling frequency: 44.1 kHz
Quantization bits: 16 bits linear/chans
Transfer bit rate: 4.3216 Mbps
DIGITAL OUTPUT SIGNAL FORMAT
Format: Digital Audio Interface
Coaxial output voltage: 0.5 Vp-p / 75 Ω/ohms
Optical output:
Emisslon wavelength:
-15dBm--21dBm
660 nm
GENERAL CHARACTERISTICS
Power Supply:
Power consumption:
Dimensions:
Weight: 4.5 kg (8.921 lbs.)
AC 120V,60Hz
26W
434Wx100.5Hx285Dmm(17-1/6"x3-15"6"x11-3/16")
■REMOTE CONTROL UNIT
BC-276
Remote Control System:
Power Supply:
External Dimensions
Weight: 70 g (0.1543 lbs.) (including batteries)
Infrared pulse system
3V,DC, two R03 (standard size AAA) dry cell batteries
50 m×144H×24D mm 15/16°×558°×15/16")
Design and specifications are subject to change without notice in the course of product improvement.
FRANCAIS
IMPORTANT REMARQUES CONCERNANT LA SECURITE
MISE EN GARDE:
AFIN DE REDUIRE LES RISQUES D'INCENDIE OU DE DECHARGE ELECTRIQUE, NE PAS EXPOSER CET APPAREL A LA PLUIE OU A L'HUMIDITE.
ATTENTION:
- Mavar 'Kepverma' is a doctor from the Department of General practice in Boros, India.

No paas ayar yantant in.
torto
- Attachments of formalities (in Mio.):
Prunal fasiver is moe affarement
10 Touche SHUFFLE (SHUFFLE)
1 Touche d'annulation/effacement (CANCEL/DELETE)
DIGITALINCOAXNAL2Ntionsnoe
1
OPTICALI
DIGITAL IN OPTICAL salesianes
DIGITAL IN SPACING selection mode
- ANLG:
ANALOG:
·FADE
Mode is forpactf
□□2 Nwaeun en 60s 66
B15:11C Apparnt pendafteraceament
1 1
1
S11000000000000000000000000000000000000000000000000000000
actvou desve
SET/7E2E IN Lrs du regace de la dune FACEIN.
F
out
No limiter of does any bounded operator.
- Paresecionarajutes (mode Verc).
(DIGITAL OUT COAXIAL)
(DIGITAL OUT OPTICAL)
(DIGITAL IN OPTICAL)
Manda distance activs.
Medidor denivel
Inccrt NCC Inp#n under a htpo
correctamente.
Exe 1000000000000000000000000000000000000000
ulimrds
Grabacion
3 Pulsc ot boton REC
1-15/16-x5-5/8x16/16


- WARNING: TO REDUCE THE RISK OF FIRE OR ELECTRIC SHOCK, DO NOT EXPOSE THIS APPLIANCE TO RAIN OR MOISTURE.
- CERTIFICATION
- CAUTION
- CAUTION:
- ENGLISH FRANCAIS ESPANOL
- NOTE ON USE / OBSERVATIONS RELATIVES A L'UTILISATION / NOTAS SOBRE EL USO
- NOTE:
- - Place of installation
- TABLE OF CONTENTS
- FEATURES
- Various Recording Modes
- Wide Variety of Playback Functions
- Rich Variety of Digital Input Jacks
- Equipped with Sampling Rate Converter
- Text Entry and Display Function
- CAUTIONS DURING USE
- ABOUT CD-R/RW DISCS
- Discs that Can Be Used with this Unit
- CD-R Discs and CD-RW Discs
- CD Discs
- CD Text Discs
- Methods of Recording to Disc
- CD-R Discs
- CD-RW Discs
- ENGLISH
- Digital Copies
- Track Numbers: Auto Track Function
- Recording from a digital input
- Recording from an analog input
- NOTES:
- Finalization Processing of CD-R Discs
- Finalization Processing of CD-RW Discs
- DISC HANDLING AND PRECAUTIONS
- Disc Handling
- Disc Cleaning
- Storage Precautions
- Handling Precautions
- Precautions When Loading Discs
- RESTRICTIONS RELATED TO THE CD-R/RW STANDARDS
- Restrictions of Audio CD-R/RW Discs
- Restrictions in Recording with this Unit
- Compatibility with Other CD Players and Discs
- CONNECTIONS
- Analog Input/Output Jack Connections
- Connection of Digital Input/Output Jacks
- Connection of the AC Cord
- PART NAMES AND FUNCTIONS
- Front Panel
- - REPEAT TRACK REPEAT+ALL
- Rear Panel
- Display indications
- Display messages
- Menu messages
- REMOTE CONTROL UNIT
- Inserting Batteries
- Notes On the Batteries
- Using the Remote Control Unit
- Names and Functions of Remote Control Unit Buttons
- Inserting Dlscs
- RECORDING
- Remarks About Recording
- Recording Modes
- Setting of the Recording Level
- Switch on the power
- Autostart Recording
- When using digital input:
- When using analog input:
- Important:
- OTES
- Manual Recording
- ON (AUTO):
- OFF (MANUAL):
- Finalizing CD-R/RW DLscs
- Auto finalizing
- Manual finalizing
- Unfinalizing CD-RW DLscs
- Erasing CD-RW Discs
- To erase the entire disc
- PLAYING
- Playing a CD
- Selecting a Track
- Selecting a track during play
- Shuffle [random order] Play
- PROGRAMMING
- Clearing a program
- Erasing a track from a program
- Intro Scan Play
- MENU MODE
- Remarks About Menu Mode
- ■Menu Structure
- Press the ENTER button to confirm selections.
- Text Editings
- Erasing names
- Text memory review/erase text memory
- HOPYIC
- Recording Settings
- Fade
- Auto track Increment Auto TRAP!
- Sample Rate (Monitor Mode) Converter
- TROUBLESHOOTING
- Check Again Before Assuming The Player Is Malfunctioning
- MAIN SPECIFICATIONS
- ■AUDIO
- ■SIGNAL FORMAT
- DIGITAL OUTPUT SIGNAL FORMAT
- GENERAL CHARACTERISTICS
- ■REMOTE CONTROL UNIT
- FRANCAIS
- IMPORTANT REMARQUES CONCERNANT LA SECURITE
- MISE EN GARDE:
- ATTENTION:
- Pulsc ot boton REC
Brand : DENON
Model : CDR1000
Category : Cd player/recorder