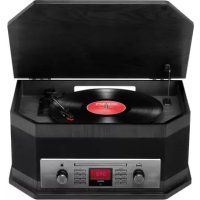
LP2CD USB - Turntable ION - Free user manual and instructions
Find the device manual for free LP2CD USB ION in PDF.
| Product Type | Turntable with CD recorder and internal flash memory |
| Brand | ION |
| Model | LP2CD USB |
| Playback formats | 33, 45, 78 RPM |
| Digitization | USB to computer, recording to CD-R, internal flash memory |
| Flash memory capacity | 99 tracks or 80 minutes (approx. 700 MB) |
| CD burner | Compatible with blank CD-R (Digital Audio) |
| Audio outputs | Line Out (RCA), headphone output 1/8" |
| Audio inputs | Line In (RCA) for external sources |
| Power supply | Included AC adapter (wall plug) |
| Dimensions (W x D x H) | Approximately 430 x 350 x 150 mm (estimated) |
| Weight | Approximately 5 kg (estimated) |
| Box contents | Turntable, platter, counterweight, dust cover, USB cable, power cable, 45 RPM adapter, software CD, quick start guide |
| Included software | EZ Vinyl/Tape Converter (PC), EZ Audio Converter (Mac), Audacity (PC and Mac) |
| System compatibility | Windows XP/Vista, Mac OS X |
| Cartridge type | Pre-installed standard cartridge (replaceable) |
| Drive belt | Included, to be installed (factory pre-installed) |
| Automatic track separation | Yes (Auto Split) with disable option |
| Additional functions | CD playback, CD to flash copying, track splitting, deletion, burning |
| Maintenance | Clean the needle, replace belt if worn, dust the cover |
| Safety | Use the slipmat, remove the stylus protector before use, lock the tonearm for transport |
| Repairability | Cartridge and belt user-replaceable |
Frequently Asked Questions - LP2CD USB ION
User questions about LP2CD USB ION
0 question about this device. Answer the ones you know or ask your own.
Ask a new question about this device
Download the instructions for your Turntable in PDF format for free! Find your manual LP2CD USB - ION and take your electronic device back in hand. On this page are published all the documents necessary for the use of your device. LP2CD USB by ION.
USER MANUAL LP2CD USB ION
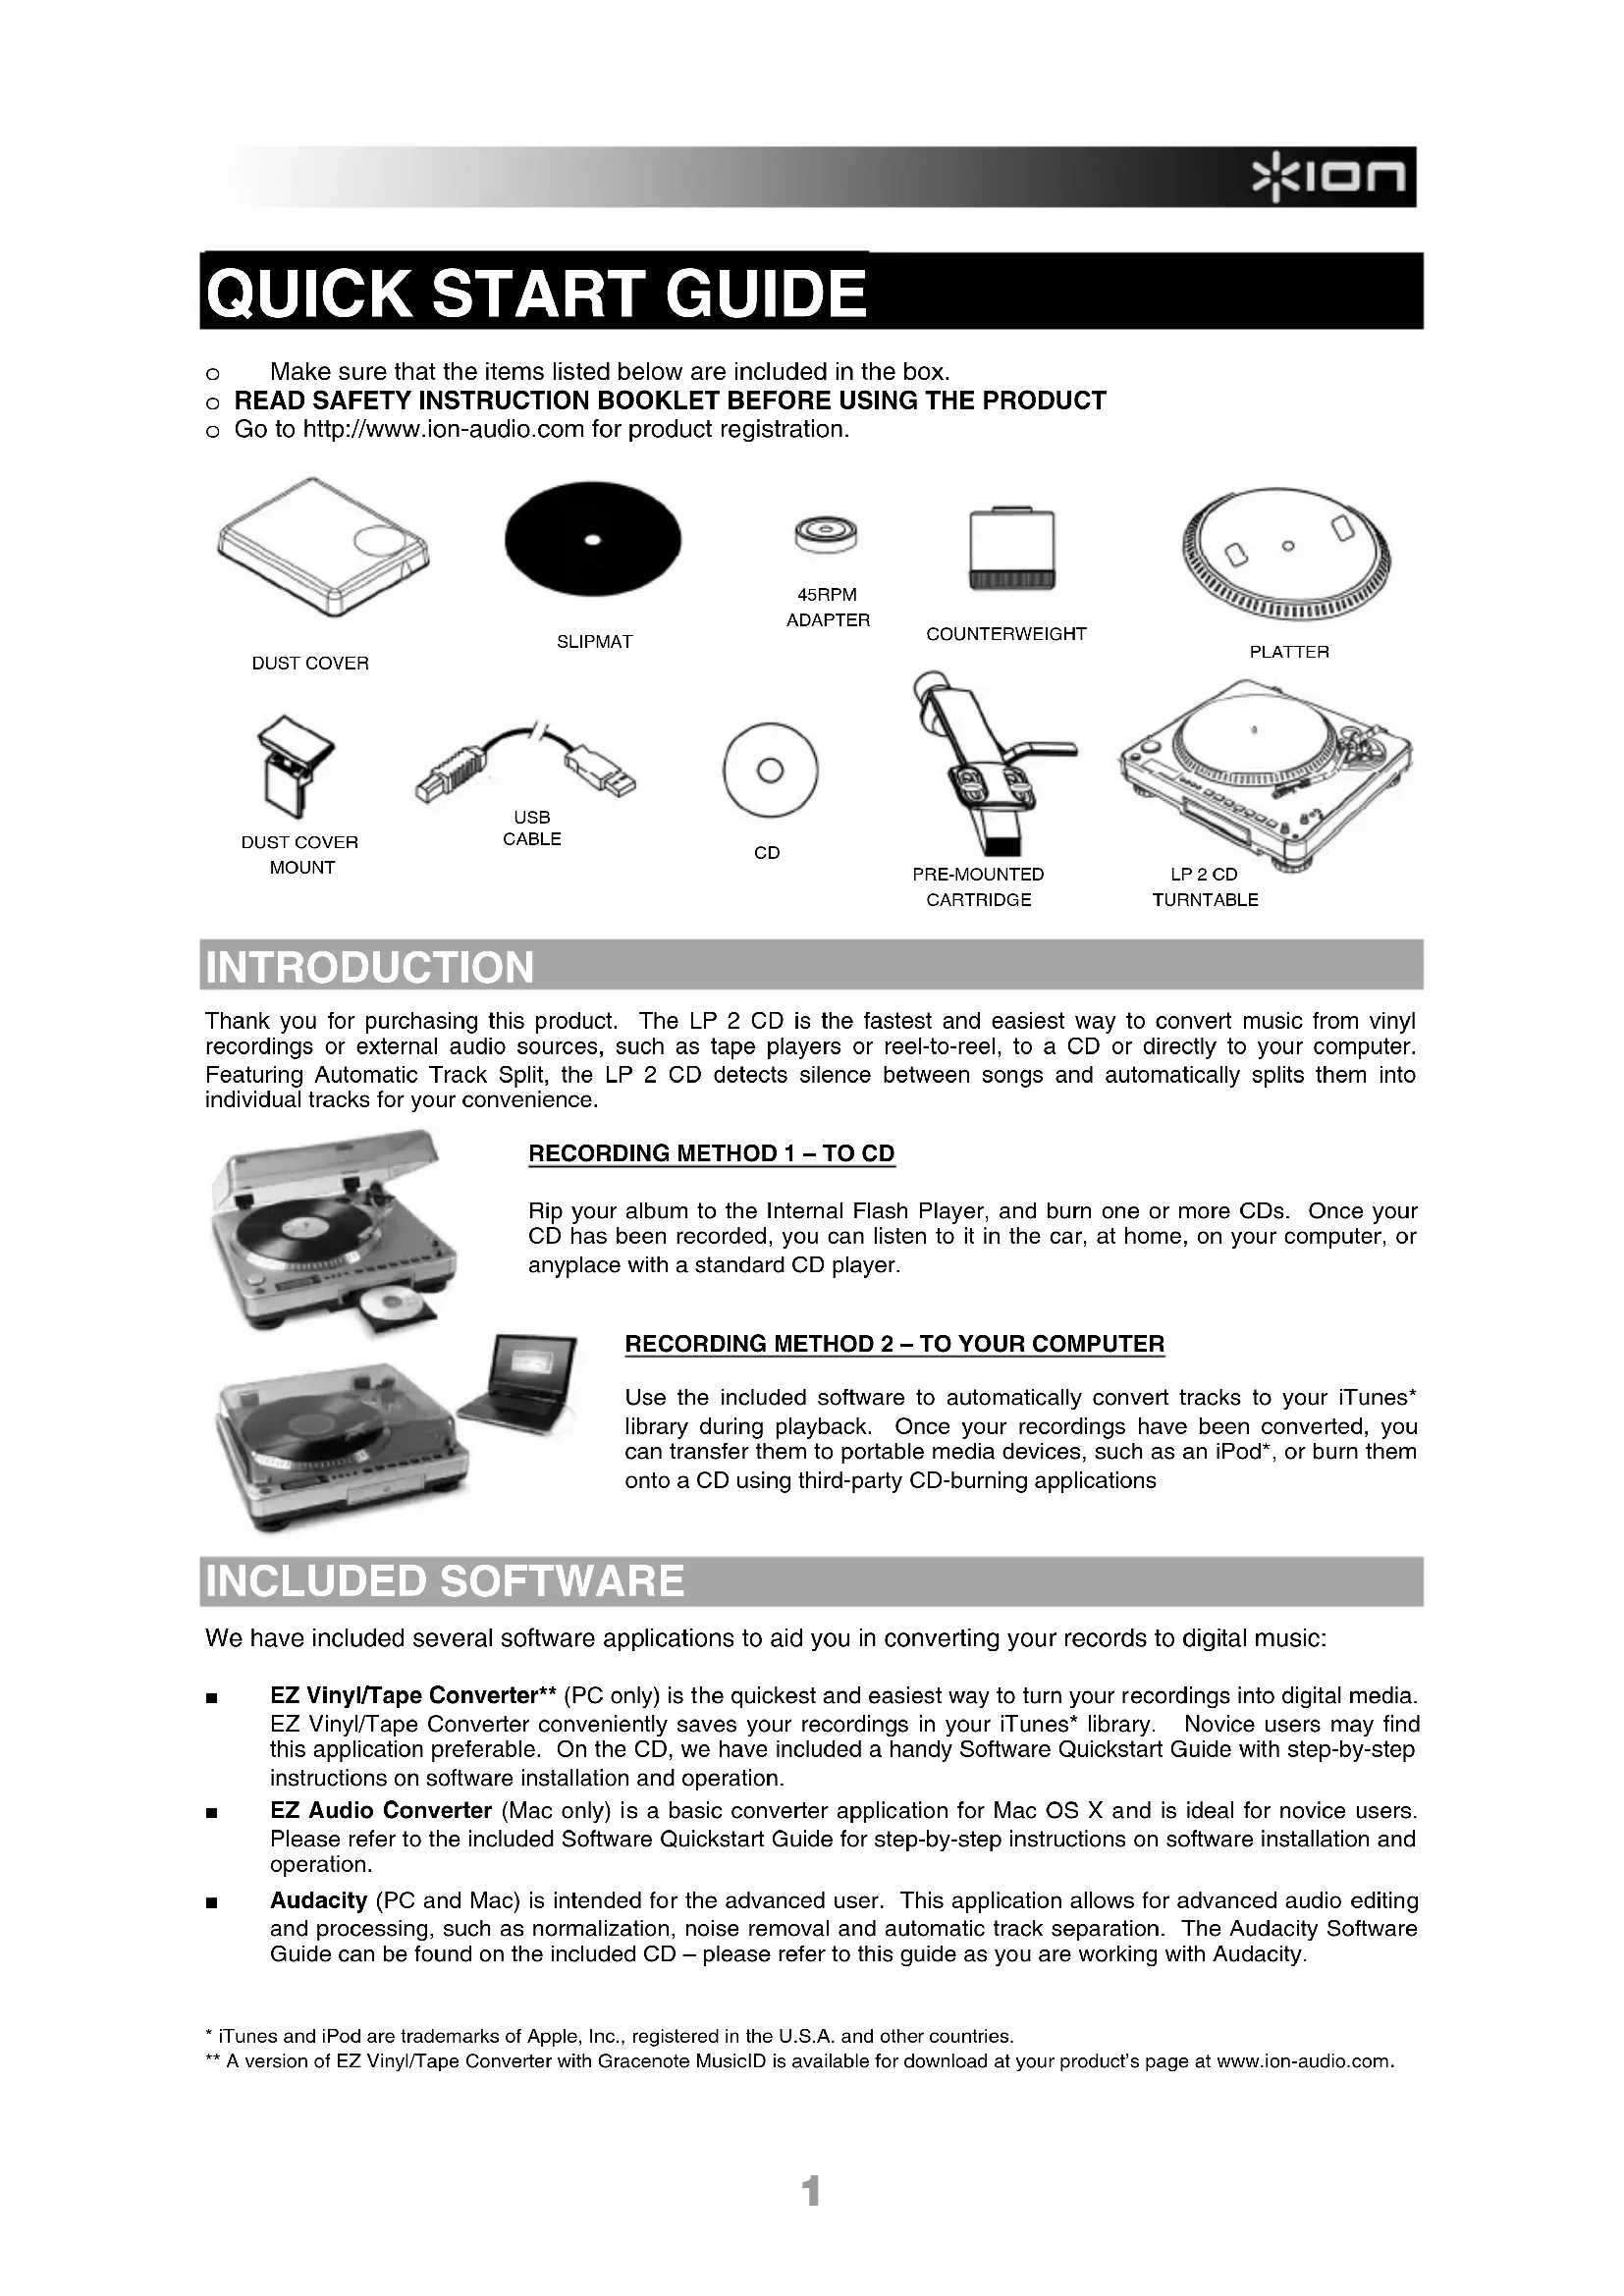
Make sure that the items listed below are included in the box.
READ SAFETY INSTRUCTION BOOKLET BEFORE USING THE PRODUCT
Go to http://www.ion-audio.com for product registration.
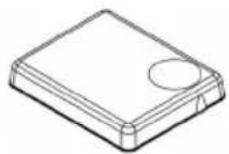
DUST COVER

SLIPMAT

45RPM ADAPTER

COUNTERWEIGHT
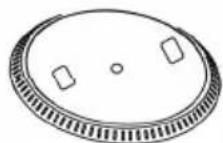
PLATTER
DUST COVER MOUNT

USB CABLE

CD
PRE-MOUNTED CARTRIDGE
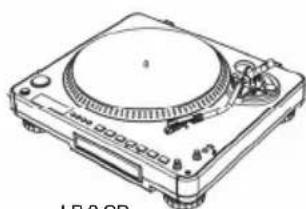
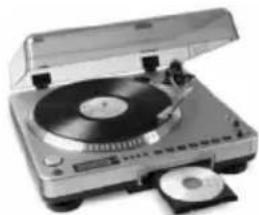
LP 2 CD TURNTABLE
INTRODUCTION
Thank you for purchasing this product. The LP 2 CD is the fastest and easiest way to convert music from vinyl recordings or external audio sources, such as tape players or reel-to-reel, to a CD or directly to your computer. Featuring Automatic Track Split, the LP 2 CD detects silence between songs and automatically splits them into individual tracks for your convenience.
RECORDING METHOD 1-TO CD
Rip your album to the Internal Flash Player, and burn one or more CDs. Once your CD has been recorded, you can listen to it in the car, at home, on your computer, or anyplace with a standard CD player.
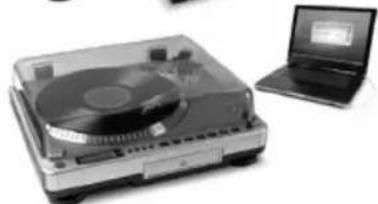
RECORDING METHOD 2-TO YOUR COMPUTER
Use the included software to automatically convert tracks to your iTunes library during playback. Once your recordings have been converted, you can transfer them to portable media devices, such as an iPod, or burn them onto a CD using third-party CD-burning applications
INCLUDED SOFTWARE
We have included several software applications to aid you in converting your records to digital music:
EZ Vinyl/Tape Converter* (PC only) is the quickest and easiest way to turn your recordings into digital media. EZ Vinyl/Tape Converter conveniently saves your recordings in your iTunes library. Novice users may find this application preferable. On the CD, we have included a handy Software Quickstart Guide with step-by-step instructions on software installation and operation.
EZ Audio Converter (Mac only) is a basic converter application for Mac OS X and is ideal for novice users. Please refer to the included Software Quickstart Guide for step-by-step instructions on software installation and operation.
Audacity (PC and Mac) is intended for the advanced user. This application allows for advanced audio editing and processing, such as normalization, noise removal and automatic track separation. The Audacity Software Guide can be found on the included CD - please refer to this guide as you are working with Audacity.
REAR PANEL OVERVIEW
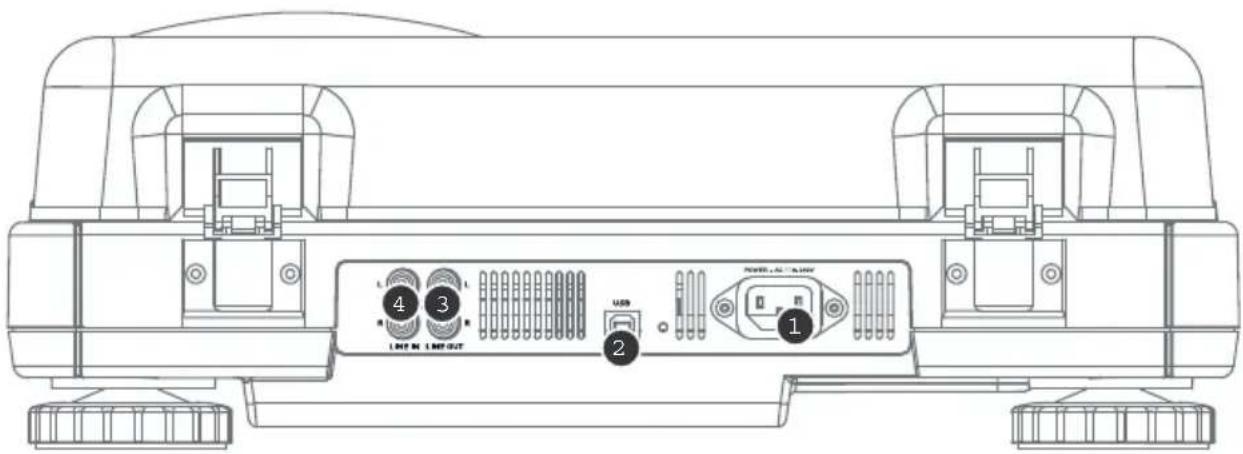
- Power Input: Connect the included power cable from the turntable to a live power source.
- USB Audio Output: Use the included USB cable to connect your turntable to your computer. The USB connection will provide audio from the turntable (or the Line In inputs, if the Line/Phono switch on the top panel is set to Line) to your computer. The USB connection will also output audio from your computer through the turntable's RCA outputs. For transferring your vinyl records to your computer, we have provided several software applications on the included CD. Please refer to "Included Software" section for details on the bundled software applications.
- Line Out: Use a standard stereo RCA cable to connect these outputs to the audio inputs of your home stereo system. (Please note: you can still copy music to a CD or to your computer even if the audio outputs of the turntable are not connected to a stereo system).
- Line In: Connect tape players, reel-to-reel, or any other line-level audio source to these RCA inputs.
FRONT PANEL OVERVIEW
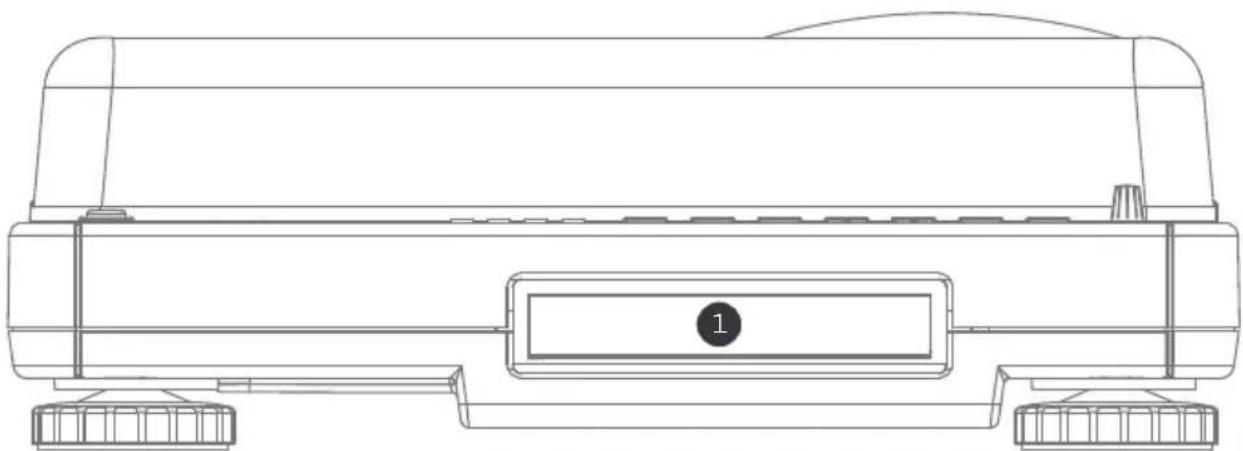
- CD Drive: The turntable's CD drive functions as a CD player or burner, depending on the type of disc inserted into the tray. When using non-blank, finalized CDs, the drive will function as a CD player, allowing you to play music through the turntable's Line Out or to rip tracks to the Internal Flash Player. When using blank CD-R discs, the drive functions as a CD burner allowing you to burn audio from the unit's Internal Flash Player (i.e. audio ripped from the turntable or from external sound sources connected to the Line In).
TOP PANEL OVERVIEW
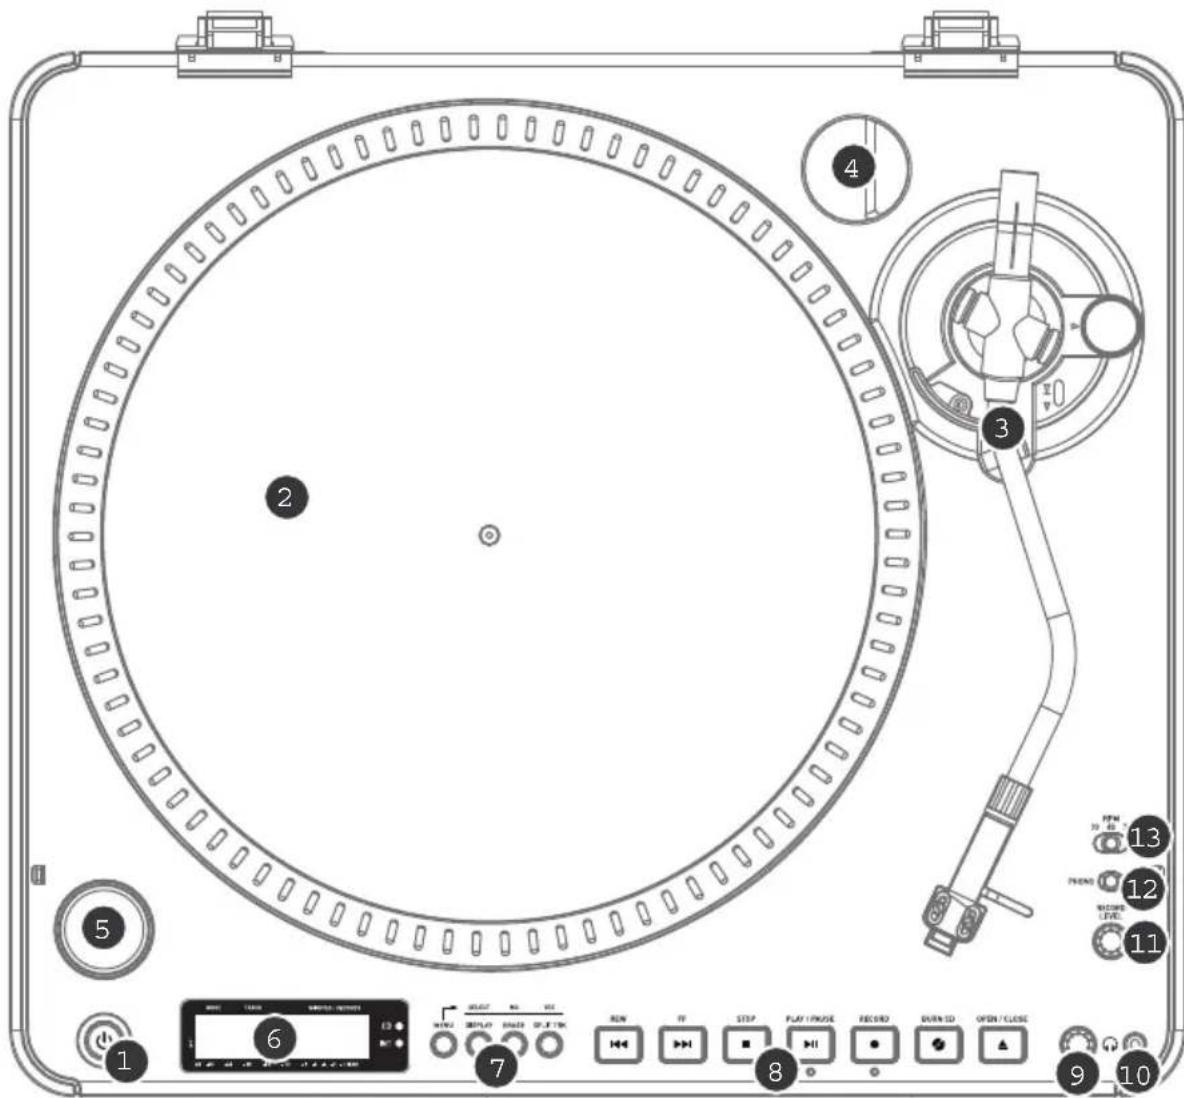
- POWER BUTTON: Press this button to turn the unit on and off.
- PLATTER: This platter must be securely fastened to the turntable prior to operation. The Motor Drive Belt can be found on the drive ring underneath the platter. See "Platter Setup" section for detailed information on installing the Motor Drive Belt.
- TONEARM ASSEMBLY: See "Tonearm Overview" section for a detailed description of the tonearm.
- 45 RPM ADAPTER HOLDER: You may place the 45 adapter here when it is not in use.
- START/STOP BUTTON: This button starts and stops the turntable motor. If the button doesn't seem to be functioning, check to make sure that the Motor Drive Belt is properly installed, as described in the "Platter Setup" section. Please note that the tonearm needs to be moved away from resting position (arm clip) for the turntable motor to activate.
- DISPLAY: The display helps you access menu options and information relevant to the operation of the unit.
- MENU AND FUNCTION BUTTONS: See "Menu and Function Buttons" section for a detailed description of these buttons.
- CD CONTROL BUTTONS: See "CD Control Buttons" section for detailed information.
- HEADPHONE VOLUME: Adjust the volume of the headphone signal with this knob.
- 1/8" HEADPHONE OUTPUT: Connect your 1/8" headphones to this output.
- RECORD LEVEL: This knob adjusts the level of the audio signal from the turntable or from audio sources connected to the Line In inputs on the rear panel.
- PHONO / LINE SWITCH: This switch selects the input audio signal. Set this switch to Phono when playing and transferring your vinyl records to CD or to your computer. Set this switch to Line if you would like to transfer or listen to music from external audio sources connected to the Line In inputs on the rear panel.
- 33/45/78 RPM SELECTOR SWITCH: Set this switch to the appropriate position when playing back records. If the music plays at a strange or unusual pitch, this may be a good indication that the wrong RPM setting has been selected.
MENU AND FUNCTION BUTTONS
- [MENU]: This button enters the menu options for the current Mode of operation. CD Player Mode menu options include Switch Mode, Copy Track, Copy All, Repeat, System Info. Internal Flash Player Mode menu options include Switch Mode, Move Track, Repeat, System Info.
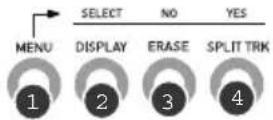
- [DISPLAY]: Press this button to cycle through different time display settings on the LP 2 CD: Elapsed (default), Track Remain, Total Remain. This button also functions as a [SELECT] button while selecting Menu options.
- [ERASE]: This button allows you to erase tracks from the Internal Flash Player. This button also functions as a [NO] button while selecting Menu options.
- [SPLIT TRK]: The LP 2 CD features Auto Split, which automatically detects silence between songs and splits the recording into individual tracks. By default, Auto Split is enabled. If you choose to disable this feature and manually split your tracks, then you can use the [SPLIT TRK] button in between songs to create a new track. You can also perform this operation after you've recorded your music (see "Splitting Tracks In Internal Flash Player" section). This button also functions as a [YES] button while selecting Menu options.
CD CONTROL BUTTONS


- [REW]: Press this button to skip to the previous track. Hold down this button while playing a track to quickly scan backward.
- [FF]: Press this button to skip to the next track. Hold down this button while playing a track to quickly scan forward.
- [STOP]: Press this button to stop playback and go back to the first track. This button also stops recording when ripping your music to the Internal Flash Player.
- [PLAY/PAUSE]: Press this button to play the currently selected track; the green LED below the button will light. Press again while the track is playing to pause; the green LED will blink while paused. Press again to resume playback. This button also initiates recording while in Record Ready Mode.
- [RECORD]: Press this button to enter Record Ready Mode. This mode allows you to record audio from the turntable platter or from external audio sources connected to the Line In inputs to the Internal Flash Player (see "Recording Music to the Internal Flash Player" section for more details). When you press [RECORD], a red LED below the button will begin to blink to let you know that you are ready to record.
- [BURN CD]: Once you have recorded your music to the Internal Flash Player, press this button to burn the player contents directly to a compatible, blank CD-R (see "Burning Internal Flash Player Contents to CD" section for more details).
- [OPEN/CLOSE]: This button opens and closes the CD tray.
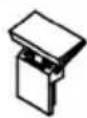
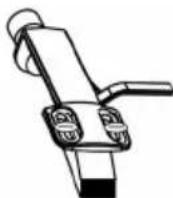
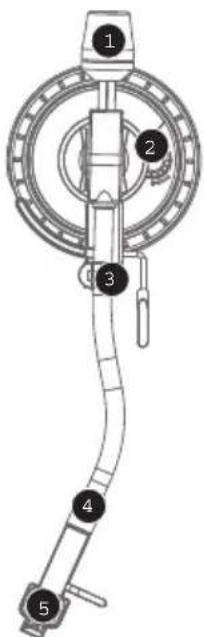
TONEARM OVERVIEW
- Counter Weight and Scale Ring: The Counterweight is used to balance the head shell and cartridge assembly so that the proper amount of stylus pressure is applied to the record.
- Anti-Skate Adjustment: This knob is used to compensate for inward tracking forces. See "Tonearm Setup" section for more details.
- Arm Clip: This specially designed arm clip secures the tone arm while at rest or when not in use. The arm clip has been designed to remain in the up position while unlocked.
NOTE: When transporting the turntable, it is always recommended that the headshell be removed and the arm clip secured to prevent tonearm or turntable damage.
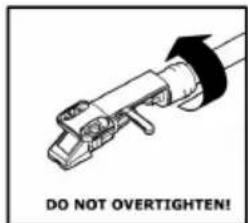
- Tone Arm Lock Nut: This Aluminum nut is used to secure the head shell and cartridge assembly to the tone arm tube. See Cartridge Setup for more details.
- Cartridge and Headshell: The cartridge is pre-mounted on a standard headshell. The cartridge is user replaceable and compatible with a variety of standard cartridges. Be sure to remove the clear plastic cover before operating the turntable from the cartridge.
TONEARM SETUP
-
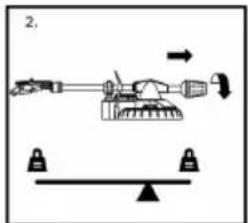
Begin by rotating the counterweight counter-clockwise until it is in the complete forward position (NOTE: this is also the maximum amount of pressure that can be applied to the cartridge.)
-
Now there should be a feeling of weight and resistance when the head shell is raised and lowered. Begin rotating the counterweight clockwise away from the pivot point until the weight and resistance feeling is gone. If done properly, the tone arm will pivot with very little resistance back and forth indicating that there is exactly 0 grams of stylus pressure.
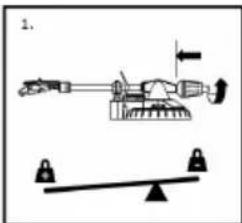
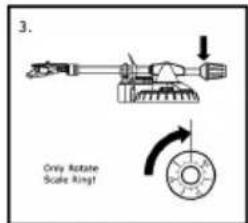
- With the counterweight in its new
position further away from tone arm pivot point, grasp the scale ring of the counter weight and rotate it until "0" is in the vertical position.
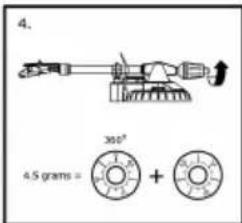
- Finally, rotate the counterweight (and scale ring) counter-clockwise (towards the pivot point) until the desired amount of weight is reached. If the scale rotates 360 degrees beyond the zero point, the new scale ring reading should be added to 3.5.
*The included head shell and cartridge assembly requires a minimum of 3 grams and no more than 5 grams for optimum performance.
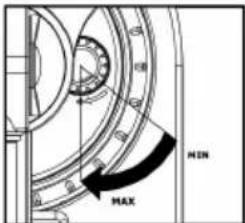
Setting the Anti-Skate Adjustment
In most cases, the Anti-Skate should be set to its minimum setting. Anti-Skate compensates for inward tracking forces that occur with certain cartridges when the stylus nears the center of the record. If the turntable is experiencing excessive skipping while nearing the center spindle, try increasing the Anti-Skate in the increments indicated on the dial. Start by adding an increment of 1, test its performance, then increase it more, and so on.
IMPORTANT
Make sure that the felt slipmat is always placed on top of the platter while using the turntable. Failure to use the slipmat may cause damage to your media as well as damage to the turntable.
Please remove the plastic cartridge cover (needle cover) before operating the turntable.
The tonearm needs to be moved away from resting position (arm clip) for the turntable motor to activate.
PLATTER SETUP
WARNING: Incorrect Platter setup can lead to poor turntable performance, platter instability or permanent motor damage.
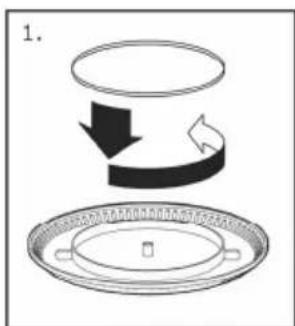
- Start by placing the rubber drive belt around the inner bottom ring of the turntable platter. This should come preinstalled, but check to make sure that it is not twisted or damaged.
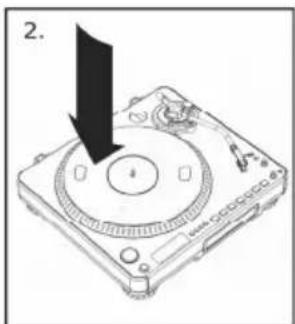
- Install the platter on the center spindle and press it down firmly. Check to make sure that it rotates uniformly and does not wobble excessively.
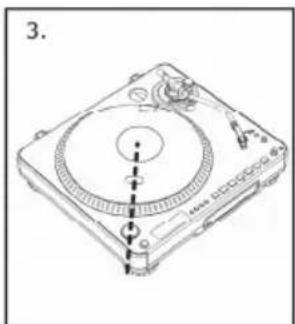
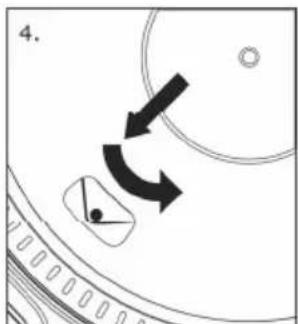
- Rotate the platter so that the one of the holes is aligned with the Start Stop button on the front corner of the turntable. The brass motor spindle should be visible through this hole.
- Reach into the hole and pull the rubber drive belt off of the inner ring, and install it over the motor spindle. Be careful not to twist the rubber drive belt during this step. Check to make sure the platter rotates uniformly. If the drive belt is properly installed, there should be a slight amount of tension that brings the platter to a stop after spinning it freely.
MOUNTING THE DUST COVER
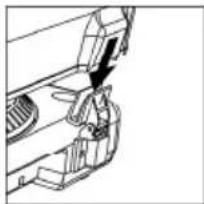
- Attach the included dust cover mounts to the turntable.
- Attach the dust cover to the mounts as shown in illustration on the left.
THE TWO MODES
The LP 2 CD features two general modes of operation: CD Player Mode and Internal Flash Player Mode. The currently selected Mode will be indicated by the two LEDs (CD and INT) located to the right of the display, as shown here.
CD Player Mode allows you to:
- Play music from non-blank CDs using standard transport controls (Play, Pause, Stop, Skip, Fast-Forward and Rewind)
- Copy a specific CD track to the Internal Flash Player
- Copy the entire CD contents to the Internal Flash Player
Internal Flash Player Mode allows you to:
Rip tracks from an audio source (vinyl or external source connected to Line In)
- Play tracks stored in the Internal Flash Player, using standard transport controls (Play, Pause, Stop, Skip, Fast-Forward and Rewind)
- Erase recorded tracks from the Internal Flash Player
- Split a recorded track into multiple tracks
Burn Internal Flash Player contents to a blank CD-R
CD PLAYER MODE
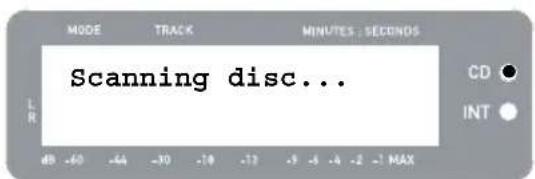
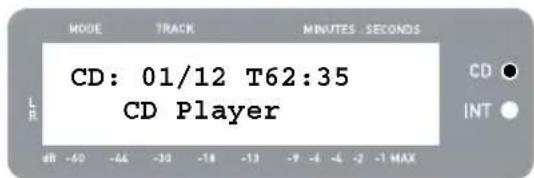
In this mode, you can play or rip music from a non-blank CD. When you first insert your CD, the screen will display the information shown on the right:
- The track which will be played when you press [PLAY] (01 in this example).
- The total number of tracks on the CD (12 in this example).
- The total duration of the CD in MM:SS (minutes:seconds) format (62:35 in this example).
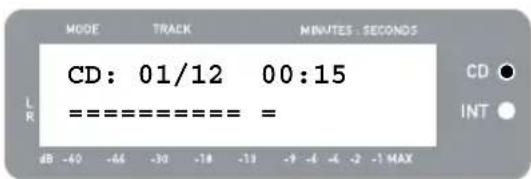
To play music from the CD, simply press the [PLAY] button. Once the CD is playing, the top line of the display will show the elapsed track time and the bottom line will show stereo level metering with peak hold, as shown in the illustration on the right.
- You can cycle through different time display options by pressing the [DISPLAY] button. Options include 'Elapsed', 'Track Remain' and 'Total Remain'.
- Press [FF] or [REW] to skip to the next or previous track, respectively. Press and hold either button while playing a track to quickly scan forward or backward.
- Press [PAUSE] while a track is playing to pause playback. Press again to resume.
- Press [STOP] to stop playback.
CD PLAYER MODE MENU OPTIONS
To access different menu options while in CD Player Mode, press the [MENU] button. To step through menu options, continue to press the [MENU] button. After cycling through all available menu options, the unit will return to the default CD Player Mode screen. The available menu options are described below:
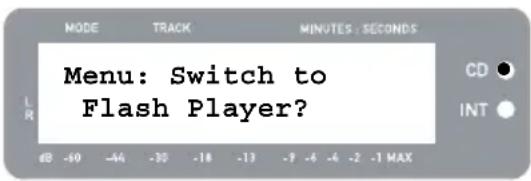
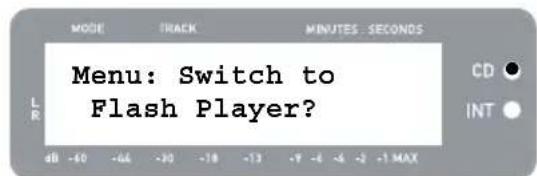
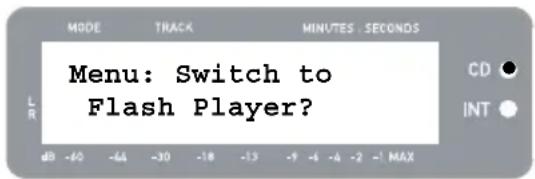
Switch to Internal Flash Player Mode
This option allows you to manually switch to Internal Flash Player Mode. Press [YES] to switch.
Copy Track
This option allows you to copy a single CD track to the Internal Flash Player. You will see the screen displayed on the right. The track which will be copied is the track which was selected before entering the menu options. (Track "01" in the example on the right).
Use [REW] and [FF] to select the destination for the copied track ("03" in the example on the right). Press [YES] to copy the track to the selected destination. Press [NO] to cancel the operation.
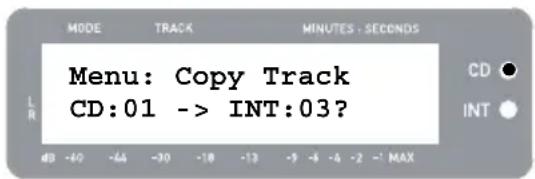
Please note that the unit's Internal Flash Player has a 99 track or 80 minute maximum capacity.
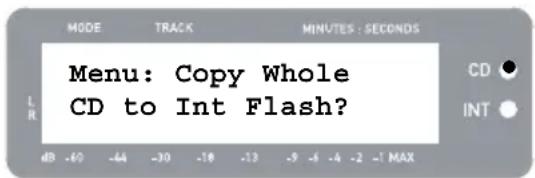
Copy All
This option allows you to copy an entire CD to the Internal Flash Player. Press [YES] to copy the entire CD.
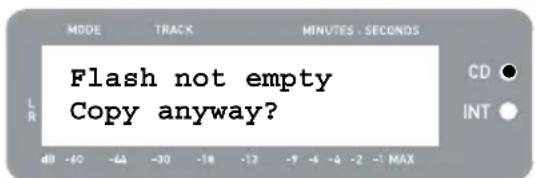
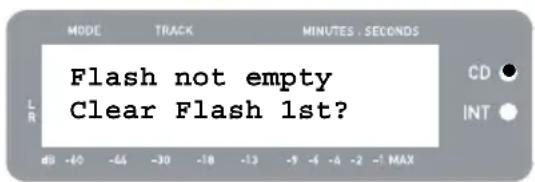
If the Internal Flash Player already contains data, you may see the screen displayed on the right. Press [YES] if you would like to copy the contents of the CD anyway.
Again, please note that the unit's Internal Flash Player has a 99 track or 80 minute maximum capacity.
You will then see the screen shown on the right. If you would like to erase Internal Flash Player contents before proceeding, press [YES]. If you would like to keep the contents, press [NO]; in this case, the new tracks will be copied starting at the next available location. (For example, if there are 8 tracks currently stored in the player, the new tracks will begin at 9).
Repeat Mode
This option allows you to repeat playback of a single track or the entire CD. Options include Repeat Off, Repeat Track, Repeat All. Use the [SELECT] button to cycle through the different options.

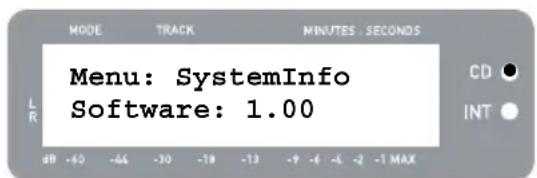
System Info
This page displays various system information. While on this page, press [SELECT] to cycle through the information fields.
Note: System information may be required when contacting our Technical Support team.
INTERNAL FLASH PLAYER MODE
The LP 2 CD features an Internal Flash Player. This player is used to rip music from the turntable or from an external source connected to the line inputs on the rear of the unit. The process is illustrated below:
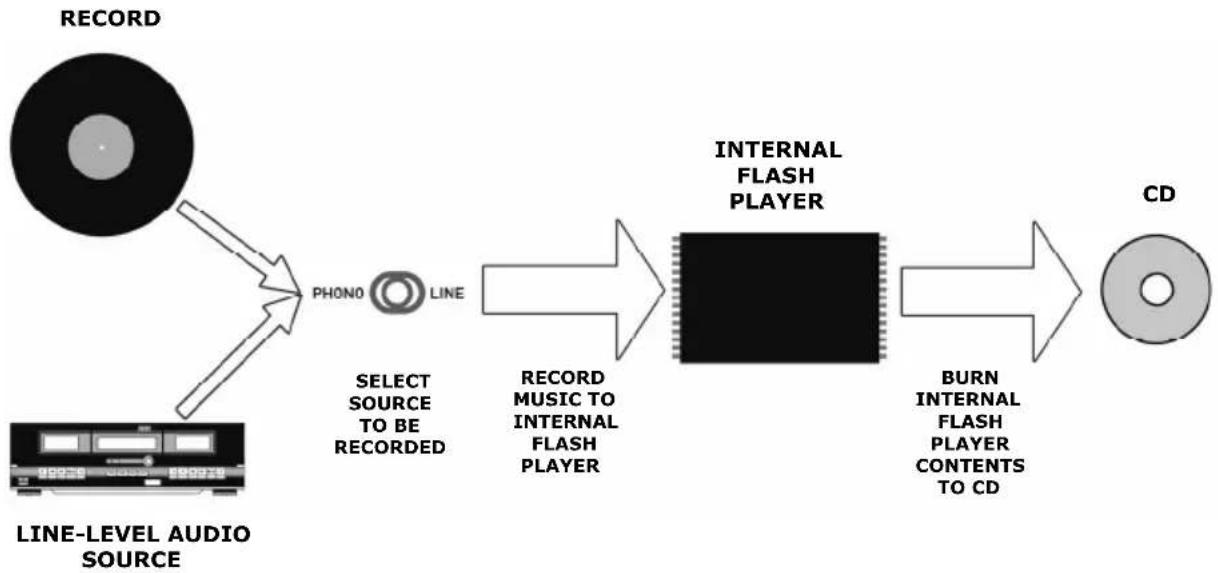
You might ask "why not burn my music directly to CD?" There are a couple of reasons why we have chosen this approach:
- Recording to the Internal Flash Player first allows you to correct any mistakes and perfect your track transitions before committing your recording to a CD.
The spinning of a CD drive produces mechanical noise which can leak into your recordings. Recording to the Internal Flash Player prevents this noise from entering your recordings, ensuring the highest possible audio fidelity.
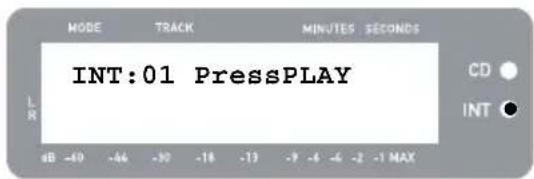
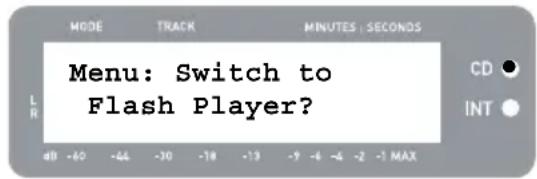
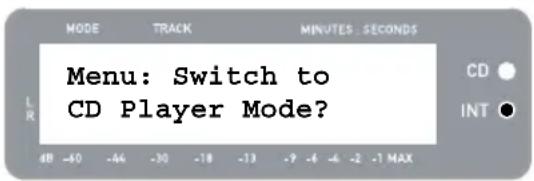
- First, make sure that you are in Internal Flash Player Mode (an orange LED next to "INT" should be lit). If the unit is in CD Player Mode (green LED next to "CD"), press [MENU] once and press [YES] when you see the screen shown on the right to switch to Internal Flash Player Mode.
-
Select which source you would like to record by flipping the PHONO / LINE switch to the appropriate position. Set the switch to PHONO if you would like to record vinyl from the turntable platter, or set the switch to LINE if you would like to record from an external source, such as a tape or personal music player, connected to the LINE IN on the rear of the LP 2 CD.
-
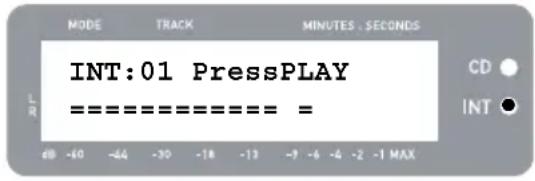
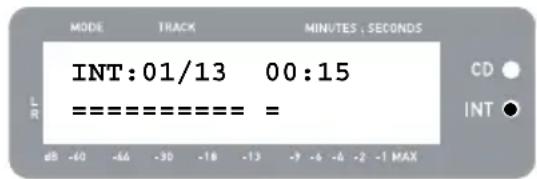
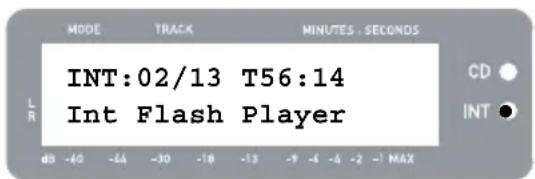
Press the [RECORD] button. The red LED below the button will begin to blink to let you know that you are ready for recording and you will see the screen displayed on the right. The number after 'INT' is the location where the recording will be saved.
- Cue the music which you would like to record. If recording vinyl from the turntable platter, put the needle on the vinyl record, at the beginning of the section which you would like to record.
-
Play the music which you would like to record. If recording vinyl from the turntable platter, press the turntable's [START/STOP] button to begin playing the record.
-
Use the RECORD LEVEL knob to adjust the level of the audio signal. The recording level will be displayed on the screen. It is important to set your recording levels correctly during this step, otherwise you may end up with a recording that is too soft or is too loud and distorted. Try to set the RECORD LEVEL knob such that the peaks hit the (-4) or (-2) mark but never reach MAX ("!" will be displayed if the recording level is too loud and clipping).
-
Once you have adjusted your recording level to its optimal setting, stop the music. If recording vinyl from the turntable, press the [START/STOP] button to stop the turntable platter.
-
Cue the section which you would like to record. If recording vinyl from the turntable, put the needle back to the beginning of the section you wish to record.
-
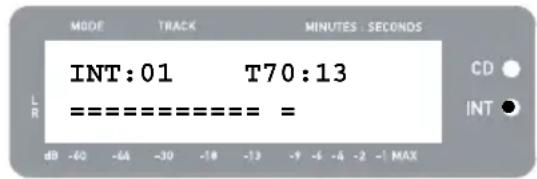
When you are ready to begin recording, press [PLAY] and then play the music you wish to record. If recording vinyl from the turntable, immediately press the [START/STOP] button to begin playing the record. The red LED will be lit continuously to let you know that recording is in progress. On the right of the display, you will see a readout of the remaining recording time.
- By default, the LP 2 CD will detect silence between songs and automatically split them into individual tracks (Auto Split).
If you have not disabled Auto Split, then proceed to the next step.
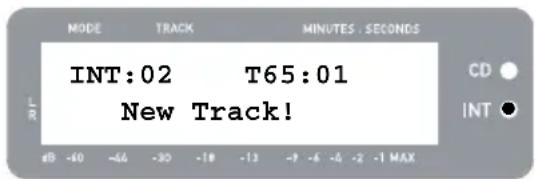
However, if you have disabled Auto Split, you will need to manually insert track markers in between songs. To insert a track marker, press the [SPLIT TRK] button between songs. The 'INT' number will increment to let you know that a new track was started. Inserting track markers will allow you to burn songs as individual tracks when burning to CD.
Note: Redbook CD specification requires a 4 second minimum track length. The [SPLIT TRK] will become active again 4 seconds after it has been pressed.
- If recording music from a vinyl record, you may wish to pause recording while you flip the record:
a. Press [PAUSE] to temporarily pause recording once you reach the end of Side A.
b. Flip your record to Side B.
c. Press [SPLIT TRK] to insert a marker for the first track on Side B.
d. Press [PLAY] to begin recording Side B.
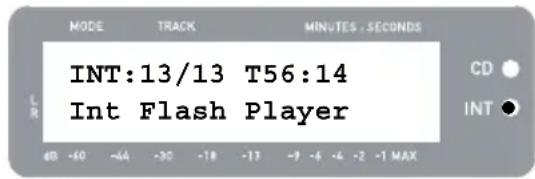
- Once you have finished recording, press the [STOP] button. The display will return to the default Internal Flash Player screen, as shown on the right.
For information on burning the recordings onto a CD-R, please refer to "Burning Internal Flash Player Contents to CD" section.
Once you have recoded your music to the Internal Flash Player, press the [PLAY] button to hear the recordings.
- You can cycle through different time display options by pressing the [DISPLAY] button. Options include 'Elapsed', 'Track Remain' and 'Total Remain'.
- Press [FF] or [REW] to skip to the next or previous track, respectively. Press and hold either button while a track is playing to quickly scan backward or forward.
- Press [PAUSE] while a track is playing to pause playback. Press again to resume.
- Press [STOP] to stop playback.
SPLITTING TRACKS IN THE INTERNAL FLASH PLAYER
The Internal Flash Player allows you to split a selected track into two tracks, in case you may have missed the transition when you first recorded your music to the Internal Flash Player. This is applicable if you have disabled Auto Split and have chosen to split your tracks manually.
- Make sure that you are in Internal Flash Player Mode (an orange LED next to "INT" should be lit). If the unit is in CD Player Mode (green LED next to "CD"), press [MENU] once and press [YES] when you see the screen shown on the right to switch to Internal Flash Player Mode.
- Locate the track which you would like to split, using the [REW] and [FF] buttons.
- Press [PLAY] to play the selected track.
- Press and hold [FF] to locate the position where you would like to split the track. If you go too far, you can press and hold [REW] to scan backward.
- Once at the location where you would like to make the split, pause the music.
- Press the [SPLIT TRK] button.
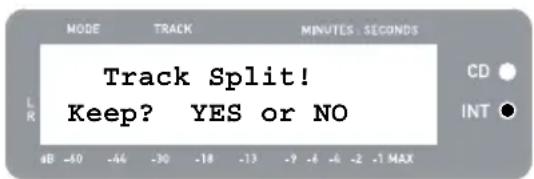
- You will see the screen displayed on the right. You can preview the 2^nd track resulting from the split by pressing [PLAY] while on this screen. Hold down [FF] or [REW] to quickly scan forward or backward in the track. Press [STOP] to stop the preview.
Press [YES] to keep or press [NO] to cancel the split.
ERASING MUSIC FROM THE INTERNAL FLASH PLAYER
In situations where you might have made a mistake during the recording process, or if the unit's flash memory becomes filled to capacity, you have the option to erase songs.
To erase a single track:
- Make sure you are in Internal Flash Player Mode.
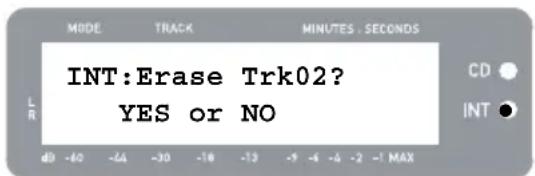
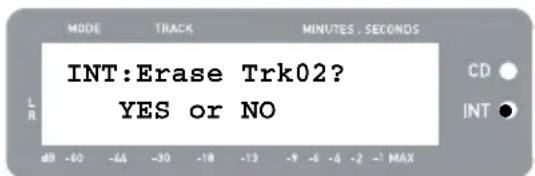
- Use [REW] or [FF] to select the track you wish to erase. The currently selected track will be displayed in the upper left corner ('02' in this example).
- Press [ERASE]. You will see the screen shown on the right.
- Press [YES] to erase the currently selected track or press [NO] to cancel the operation.
To erase all tracks:
- Make sure you are in Internal Flash Player Mode.
- Press [ERASE]. You will see a screen similar to the one shown on the right.
- Press [SELECT] and you will see the screen change as shown on the right.
- Press [YES] to erase all tracks currently stored in the Internal Flash Player, or press [NO] to cancel.
Please note that there is no way to "undo" this operation! If you press [YES], all tracks stored in Internal Flash Player will be erased permanently.

INTERNAL FLASH PLAYER MENU OPTIONS
To access different menu options while in Internal Flash Player Mode, press the [MENU] button. To step through menu options, continue to press the [MENU] button. To change the selected setting, press the [SELECT] button. The available menu options are described below:
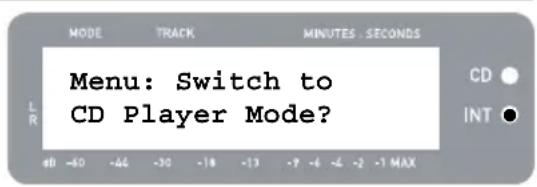
Switch to CD Player Mode
This option allows you to manually switch to CD Player Mode. Press [YES] to switch.
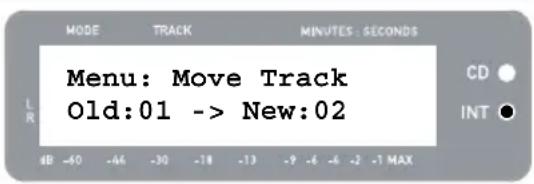
Move Track
This option allows you to re-organize stored recordings by moving a track to a new location. The track which will be moved is the track which was selected before entering the menu options (Track "01" in the example to the right).
The destination track is indicated in the 'New' field and can be incremented and decremented with [FF] and [REW], respectively. Once you have selected the desired destination, press [YES] to move the track.
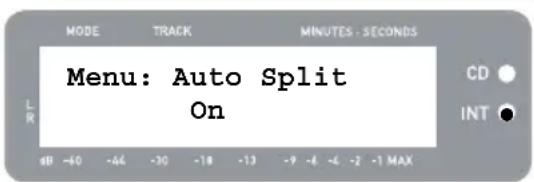
Auto Split
Auto Split is a feature which automatically detects silence between songs and splits the recording into tracks in real-time. By default, this option is enabled. However, you may choose to disable this option and set track markers manually.
Press [SELECT] to enable or disable Auto Split.
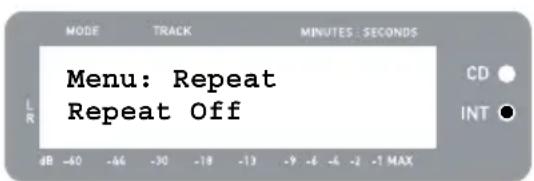
Repeat Mode
This option allows you to repeat a single track or the entire collection of recordings stored in the Internal Flash Player. Options include Repeat Off, Repeat Track, Repeat All. While on this menu page, press [SELECT] to toggle between these options.
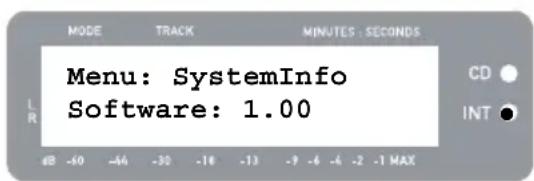
System Info
This page displays the unit's firmware version. While on this page, press [SELECT] to cycle through the information fields.
Note: System information may be required when contacting our Technical Support team.
BURNING INTERNAL FLASH PLAYER CONTENTS TO CD
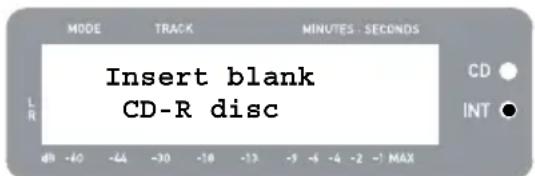
Once you have recorded your music to the Internal Flash Player, you can burn it to a CD-R. Please note that the LP 2 CD allows recording only to a blank CD-R. Please ensure that the proper logo (shown on the right) appears on the CD you intend to use.

- First, make sure that you are in Internal Flash Player Mode (an orange LED next to "INT" should be lit). If the unit is in CD Player Mode (green LED next to "CD"), press [MENU] once and press [YES] when you see the screen shown on the right to switch to Internal Flash Player Mode.
- Press the [BURN CD] button.
- Insert a blank CD-R into the unit's CD drive. If a non-compatible blank CD is inserted, the unit will eject the CD and ask you to insert a blank CD-R.
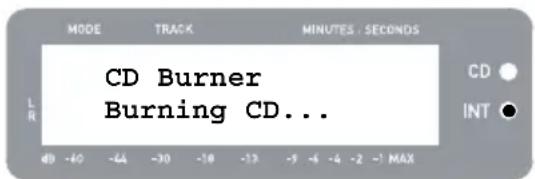
- Once a blank CD-R has been detected, the burning process will begin automatically. You will see the screen displayed on the right. Please allow this process to complete
Note: To cancel the burn process, press [STOP].
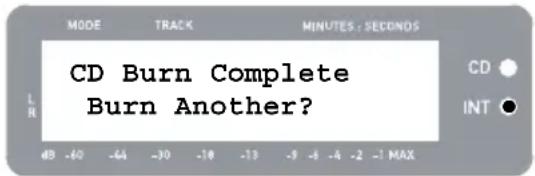
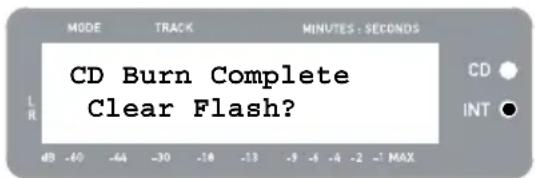
- Once the burning process has completed, the LP 2 CD will eject the CD and you will see the screen displayed on the right. If you would like to burn another copy, insert another CD-R and press [YES]. If you do not wish to burn another copy, simply press [NO].
- When you select [NO], you will see the screen displayed on the right. Select [YES] if you would like to erase all tracks currently stored in the Internal Flash Player, or press [NO] if you wish to keep the tracks.
Note: For most applications, you may wish to erase Internal Flash Player contents after each successful transfer to CD. However, please ensure that the CD was burned to your expectations before clearing the Internal Flash Player contents.
FREQUENTLY ASKED QUESTIONS
Question: Can I record from the turntable and from external audio sources simultaneously?
Answer: No. The LP 2 CD can only record from the turntable or from audio sources connected to the Line In inputs, but not both simultaneously. This is to prevent unwanted mixing of audio signals. The Phono / Line switch selects which source will be routed to the internal recorder.
Question: Can I burn my vinyl records directly to CD?
Answer: You will need to record your music to the unit's Internal Flash Player before you can burn it to a CD. This approach allows you to correct any mistakes and perfect your track transitions before committing your recording to a CD. It also as ensures that the spinning of the CD drive does not introduce mechanical noise into your recordings.
Question: What CD formats is the LP 2 CD compatible with?
Answer: The LP 2 CD can play music from virtually any CD containing audio data. The LP 2 CD can only record music to CD-R. Please ensure that the CD you wish to record contains the proper "Digital Audio Recordable" logo.
Question: How much data can the Internal Flash Player hold?
Answer: The Internal Flash Player on the LP 2 CD can hold about 700Mb of data; this equals roughly 80 minutes of music. Please note, however, that the Internal Flash Player also has a 99 track limit. We recommend that you wipe the player contents after each successful transfer to CD.
Question: Can I listen to my music while recording it?
Answer: Yes, you can listen to your music while recording by connecting the unit's Line Out to a line-level input on a home stereo receiver. Alternatively, you can connect headphones to the 1/8" headphone jack on the lower right corner of the top panel.
Question: Can I record audio from other devices?
Answer: Yes, you can record audio to the unit's Internal Flash Player from virtually any line-level audio source, such as tape or reel-to-reel players, connected to the Line In on the rear panel.
Question: What is the purpose of the USB port?
Answer: The USB port allows you to connect the turntable to your computer and use the included software to transfer music from vinyl or external line-level audio sources directly to digital music. Please consult the included MixMeister Software Guide for information on recording audio from the LP 2 CD into your computer.
Question: Do I need special software drivers when connecting the LP 2 CD to my computer?
Answer: No, the LP 2 CD is a plug-and-play device. This means that there are no special drivers to install. When you connect the unit to your computer for the first time, it will automatically load all the necessary components onto your system.
Question: With what operating systems is the LP 2 CD compatible?
Answer: The LP 2 CD is a plug-and-play device under Windows XP/Vista and Mac OSX operating systems. If you would like to transfer your music to your computer, please refer to the MixMeister Software Guide.
TROUBLESHOOTING
| PROBLEM CAUSE SOLUTION | ||
| My recordings sound loud and distorted. | Recording level was too loud. | It is important to carefully set your recording level prior to recording. When you first press [RECORD] to enter Rec Ready Mode, please check the level metering on the display. Use the RECORD LEVEL knob to adjust the level. At the loudest moments of the music, the meters should hit the (-4) or (-2) mark but should not reach (MAX). If the level of the audio signal is too "hot", you will see (!) flash on the right side of the display. |
| I can barely hear the recorded audio when I play it back. | Recording level was too soft. | |
| My records are playing at an unusual pitch. | RPM switch not set correctly. | Please set the RPM switch as appropriate for the record you wish to play (33/45/78). |
| I don't hear anything when I try to play or record audio from my vinyl records. | PHONO / LINE switch set to Line, instead of Phono. | Set the PHONO / LINE switch to Phono to play and record audio from the turntable. |
| I don't hear anything when I try to play or record external sources connected to the Line In. | PHONO / LINE switch set to Phono, instead of Line. | Set the PHONO / LINE switch to Line to hear and record audio from the external sources connected to the Line In. |
| I get a "Not enough space on blank CDR" message. | Internal Flash Player contents exceed the maximum capacity of the CD-R you are attempting to burn. | Erase tracks from Internal Flash Player which may have already been burnt to a previous disc. In general, we recommend that you erase the player contents after each successful burn. |
| Try a higher capacity CD-R. If using a 74min CD-R, please try an 80min CD-R. | ||
| I get a "Too many tracks in Flash to REC" message. | Internal Flash Player is filled to capacity. | Erase tracks from the Internal Flash Player to free up space. |
| I get a "Can't Record Flash is Full" message. | Burn Internal Flash Player contents to CD-R, then erase all tracks. | |
| I can't hear my record playing. | LP 2 CD is already playing audio from CD or from the Internal Flash Player. | Press the [STOP] button to ensure that the unit is not actively playing back or pausing a song. |
| I am experiencing poor sound quality. | Cartridge connection is not secure. | Cartridge must be securely connected to the tonearm whenever you are using the turntable. |
| Vinyl record is dirty or scratched. | Try dusting off and gently wiping the surface of the record before playing it. | |
| My recording came out as one continuous, long track, instead of individual tracks. | Auto Split menu option was disabled. | Enable Auto Split in the Menu options and try again. See "Internal Flash Player Menu Options" section for details. |
| Use the [SPLIT TRK] to manually split your recordings into individual tracks. See "Splitting Tracks in the Internal Flash Player" section for details. | ||
LP 2 CD HOT KEYS
BUTTON COMBINATION DESCRIPTION
RECORD + STOP Forces system to load an OS (Operating System) upon startup. Please visit www.ion-audio.com regularly for updates.
RECORD + PLAY Restores the default system parameters.
GUIA DE INICIO RAPIDO
Switch to Internal Flash Player Mode
Estaopsisle permite comutar manualmente al modo de reproductordflash interno.Pulse [YES]para comutar.

Copy Track
Switch to CD Player Mode
Estaoptionlepermitecommutarmanualmentealmode de reproductordeCD.Pulse[YES]para commutar.
Move Track
Switch to Internal Flash Player Mode
OPNAMEMETHODE 1 - NAAR CD
Type: Redbook CD and CDR
SNR: 96dB
THD+N: 0.007%
CD burning
Type: CDR
Speed: 12X
Computer audio playback via USB
SNR: 94dB A-weighted
THD+N: 0.008%
Flash recording
Size: 1GB internal flash memory
Quality: 16 bit, 44.1kHz sample rate
Line-in recording to internal flash memory at unity gain
SNR: 96dB
THD+N: < 0.008%
Line-in recording to internal flash memory at max gain
SNR: > 86dB A-weighted
THD+N: < 0.01%
USB interface
Type: USB1.1 or higher, Plug and Play, Mac and PC compatible
Quality: 16-bit, 44.1kHz sample rate
Computer recording via USB at unity gain
SNR: > 86dB A-weighted
THD+N: < 0.05%
Computer recording via USB at max gain
SNR: > 86dB A-weighted
THD+N: < 0.05%
www.ion-audio.com