
MY.GO - Baby products CYBEX - Free user manual and instructions
Find the device manual for free MY.GO CYBEX in PDF.
| Product Type | Baby Carrier |
| Brand | CYBEX |
| Model | MY.GO |
| Weight Range | 3.5 - 20 kg (from birth to approximately 5 years) |
| Carrying Positions | Front facing adult (with and without infant insert), hip, back |
| Infant Insert | Integrated, recommended up to 6 kg |
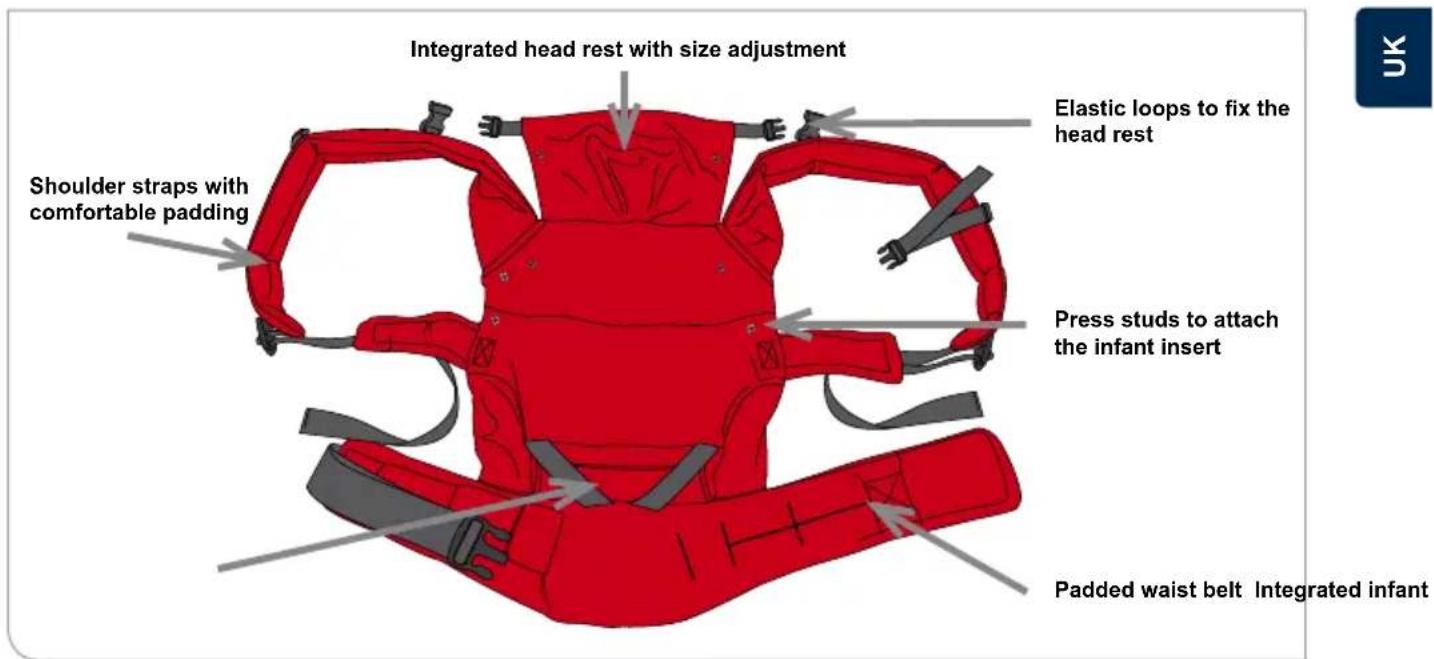
| Integrated Headrest | Yes, adjustable and removable |
| Safety | Elastic safety loop on waist belt, adjustable belt connector in height and length, chest strap |
| Adjustments | Waist belt height, shoulder straps length and width, belt connector |
| Materials | Soft and breathable textiles, padded base |
| Care | Machine wash separately before first use, fasten all buckles, do not tumble dry, do not expose to direct sunlight, do not iron |
| Warranty | 2 years against manufacturing and material defects |
| Standards | EN 13209 |
| Usage | For adults only, not for sports activities |
| Recommended Age | From birth (3.5 kg) to approximately 5 years (20 kg) |
Frequently Asked Questions - MY.GO CYBEX
User questions about MY.GO CYBEX
0 question about this device. Answer the ones you know or ask your own.
Ask a new question about this device
Download the instructions for your Baby products in PDF format for free! Find your manual MY.GO - CYBEX and take your electronic device back in hand. On this page are published all the documents necessary for the use of your device. MY.GO by CYBEX.
USER MANUAL MY.GO CYBEX
Riedinger Str. 18, 95448 Bayreuth, Germany
Tel.: +49 921 78511-0, Fax.: +49 921 78511-999
IMPORTANT! KEEP FOR FUTURE REFERENCE!
TO GUARANTEE YOUR CHILD'S SAFETY, IT IS VERY IMPORTANT THAT YOU USE CYBEX MY. GO IN ACCORDANCE WITH THIS INSTRUCTION MANUAL. SHOULD YOU HAVE ANY QUESTIONS, PLEASE FEEL FREE TO CONTACT US AT ANY TIME.
DEAR CUSTOMER
Thank you very much for purchasing the CYBEX my.GO! We assure you that in developing the CYBEX my.GO safety, comfort and easy operation were our main focus. The product was subject to strict quality controls and meets all safety standards.
CONTENTS
OVERVIEW 10
CARE INSTRUCTIONS 10
GENERALWARNINGS 10-11
GENERAL INFORMATION 11
FRONT POSITION WITH INFANT INSERT (3.5 KG - APPROX. 6 KG) 11
FRONT POSITION WITHOUT INFANT INSERT (6 KG - 12 KG) 12
HIP POSITION (6 KG - 12 KG) 12
BACK POSITION (8 KG - 18 KG) 12 - 13
HOW TO USE THE INTEGRATED HEAD REST 13
WARRANTY 13
CYBEX MY.GO baby carrier
CARE EN 13209-2:200


Note! Please wash the product separately before using it for the first time. Do not tumble dry and do not expose to direct sunlight! Do not iron! Fasten all buckles when washing.
Made in China
CYBEX my.GO - baby carrier
from birth to 5 years
Weight: 3,5 - 20 kg / 8 - 44,09 lbs
GENERALWARNINGS!
Please pay special attention to the following aspects when using the CYBEX my.GO BABY CARRIER:
WARNING!
YOUR BALANCE MAY BE ADVERSELY AFFECTED BY YOUR MOVEMENT AND THAT OF YOUR CHILD.
WARNING!
TAKE CARE WHEN BENDING OR LEANING FORWARD.
WARNING!
THIS CARRIER IS NOT SUITABLE FOR USE DURING SPORTING ACTIVITIES.
WARNING!
PLEASE ENSURE THAT A SECOND PERSON SECURES THE BABY WHEN PUTTING ON THE BABY CARRIER.
WARNING!
PLEASE ENSURE THAT THE MALE PART OF THE BUCKLE IS ALWAYS FED THROUGH THE ELASTIC SAFETY LOOP BEFORE CLOSING THE BUCKLE. THE MALE PART OF THE BUCKLE MUST BE COMPLETELY HOOKED INTO THE ELASTIC SAFETY LOOP.
WARNING!
THE INTEGRATED INFANT INSERT IS RECOMMENDED FOR CHILDREN UP TO 6 KG. THIS SECURES YOUR CHILD IN A BETTER POSITION AND INCREASES SAFETY.
Make sure you read and fully understand the instructions before using the BABY CARRIER.
The BABY CARRIER has to be optimally adjusted to the baby's size before each use.
The BABY CARRIER is for adult use only. A damaged BABY CARRIER must NOT be used!
- Always check that all buckles, loops, straps, buttons and clips are securely fastened and in perfect functioning condition; if this is not the case, or when in doubt, do NOT use the carrier.
Always make sure that there is sufficient space around the head to ensure proper air- flow.
- Do not dress your baby too warmly and check regularly to ensure that a comfortable temperature is maintained.
- Never unbuckle the waist belt while the baby is in the carrier.
PREPARATION:
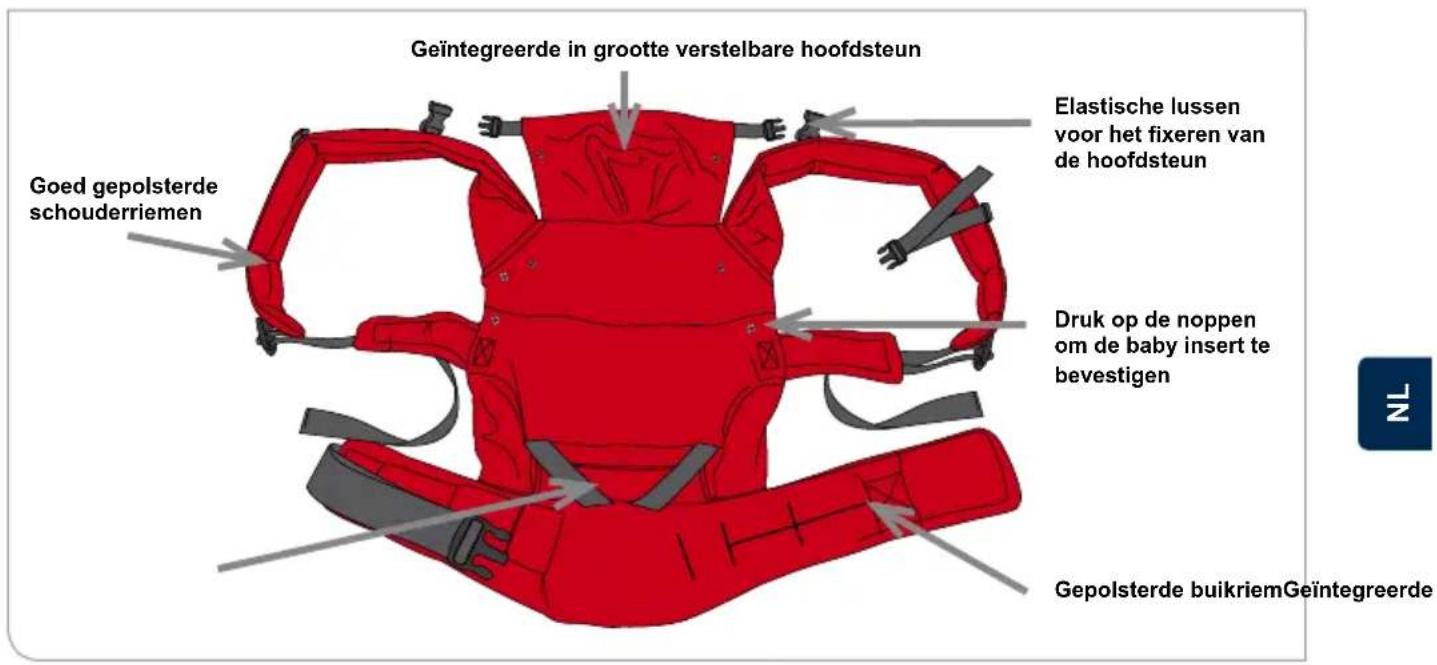
I. Position the waist belt around your waist/hips, fasten the buckle and adjust the length until it sits tightly. Please ensure that the male part of the buckle is always fed through the elastic safety loop before fastening the buckle.
la. When closing the buckle of the waist belt keep pushing until you hear a loud "CLICK".
II. Height adjustment: The waist belt also functions as a height adjustment system. (a) To carry smaller children, the belt should be placed around the waist, allowing the child to sit in an elevated position. (b) For larger children the belt should be placed around the hips. The child is sitting at the right height when the adult can kiss the child's head; the child's position should be adjusted accordingly.
III. Connector belt: (a) For ease of use, the connector belt on the shoulder straps can be adjusted both in length and height. (b) It can be fastened across the chest or across the top of the back.
IV. Width adjustment: Tighten the shoulder straps until they are comfortable for yourself and your baby. By changing the width, you also adjust the support your child's back. Tuck the excess lengths of belt in the storage loops.
PLEASE ENSURE YOUR CHILD'S BACK IS SLIGHTLY ROUNDED WHILE SITTING IN THE CARRIER AND DO NOT, THEREFORE, FASTEN THE SHOULDER STRAPS TOO TIGHTLY.
FRONT POSITION FACING PARENT WITH INFANT INSERT
(3.5 KG - APPROX. 6 KG):
- Fasten the waist belt as described under "Preparation". Push the waist belt buckle around your back and pre adjust the length of the shoulder straps. Sit down on a chair and spread the back section of the carrier across your lap. Unfold the infant insert.
WARNING:
THE BUCKLE MUST ALWAYS BE FED THROUGH THE ELASTIC SAFETY LOOP AND BE POSITIONED ON THE PADED BASE.
- Position your child on the back section of the carrier. The upper edge of the back section should meet the neck of your baby – if necessary, use the head rest.
- Similar to a nappy, pull the infant insert up between your child's legs which should be slightly tucked up.
-
Close the press studs and ensure that the child's feet do not get caught in the waist belt.
-
Now hold your child upright in the carrier. Your baby's feet should remain tucked up in the carrier in the required "spread-squat position".
Continue as described under Point 10.
FRONT POSITION FACING PARENT WITHOUT INFANT INSERT (6 KG - APPROX. 12 KG):
- Close the waist belt as described under "Preparation" and push the waist belt buckle around your back. Pre adjust the length of the shoulder straps and leave the back section of the carrier hanging down.
WARNING:
THE BUCKLE MUST ALWAYS BE FED THROUGH THE ELASTIC SAFETY LOOP AND BE POSITIONED ON THE PADED BASE.
- Lift your child and hold him with legs spread in front of your belly.
- Now use one hand to pull the back section of the carrier across and up your child's back whilst supporting your child with the other hand.
- Let your child slide all the way down into the CYBEX my.Go until there is no space between your baby's bottom and the carrier fabric.
- Now slip your arms through the closed shoulder straps one after the other, whilst always supporting your child with your free hand.
- Fasten the connector belt behind your neck.
- Pull the short ends of the shoulder straps only until your child is positioned close to your body.
HIP POSITION (6 KG - APPROX. 12 KG):
WARNING:
- Fasten the waist belt as described under "Preparation" and let the back section of the carrier hang down in front of you.
THE BUCKLE MUST ALWAYS BE FED THROUGH THE ELASTIC SAFETY LOOP AND MUST BE POSITIONED ON THE PADED BASE. - If you want to carry your child on your left hip, enlarge the right shoulder strap and shorten the left one. For carrying on your right hip please do vice versa. Close the sternum strap
- Now slip through the shoulder straps with both arms.
- Move the carrier to your left ( right ) hip
- Let your baby slide from the top all the way down into the carrier. Ensure your child is placed in the middle of the carrier right on your hip.
- Adjust the shoulder straps by pulling its short ends only until your child is positioned tightly to your body.
BACK POSITION (8 KG - 20 KG):
This carrying position should only be used when your baby is able to support its own head safely.
- Put on the waist belt as described under "Preparation". Push the baby carrier onto your back. Slide your left arm through the left shoulder strap.
WARNING:
ALL BUCKLES MUST ALWAYS BE FED THROUGH THE ELASTIC SAFETY LOOPS AND BE POSITIONED ON THE PADED BASE.
- Lift your baby onto your right arm, then place your left hand on your back and take hold of your baby's left foot and then shift your baby into the carrier. To do so, bend forward slightly and hold and support your baby at all times. As soon as your baby is sitting safely, slip on the right shoulder strap.
- Close the sternum strap at the height of your chest and if necessary adjust the width.
PLEASE ENSURE THAT YOUR CHILD'S BACK IS SLIGHTLY ROUNDED WHILE SITTING IN THE CARRIER AND DO NOT, THEREFORE, FASTEN THE SHOULDER STRAPS TOO TIGHTLY.
HOW TO USE THE INTEGRATED HEADREST:
- For using the integrated headrest simply coast it and fix both side parts to the buckles on the shoulder straps. If use in back carrying position please fix the headrest before you put on the carrier.
WARRANTY
The following warranty applies solely in the country where this product was first sold by a retailer to a customer. The warranty covers all manufacturing and material defects, existing and appearing at the date of purchase or appearing within a term of two (2) years from the date of purchase from the retailer who first sold the product to a consumer (manufacturer's warranty). In the event that a manufacturing or material defect should appear, we will – at our own discretion – either repair the product free of charge or replace it with a new product. To invoke the warranty the product must be taken or shipped to the retailer, who first sold this product to a customer together with the original proof of purchase (sales receipt or invoice) containing the date of purchase, the name of the retailer and the product designation. This warranty shall not apply in the event that this product is taken or shipped to the manufacturer or any person other than the retailer who first sold this product to a consumer. Please check the product with respect to completeness and manufacturing or material defects immediately at the date of purchase or, in the event that the product was purchased in distance selling, immediately on receipt. In case of a defect stop using the product and take or ship it immediately to the retailer who first sold it. In a warranty case the product has to be returned in a clean and complete condition. Prior to contacting the retailer, please read this instruction manual carefully. This warranty does not cover any damages caused by misuse, environmental influence (water, fire, road accidents etc.) or normal wear and tear. It only applies if the product was always used and handled in compliance with the operating instructions, if any and all modifications and services were performed by authorized persons and if original components and accessories were used. This warranty does not exclude, limit or otherwise affect any statutory consumer rights, including claims in tort and claims with respect to a breach of contract, which the buyer may have against the seller or the manufacturer of the product.

IMPORTANT! CONSERVARE ASCOPO DI RIFERIMENTO FUTURO!
PER GARANTIRE LA SICUREZZA DEI BABBINI, É FONDAMENTALE UTILIZZARE CYBEX MY. GO SEGUENDO IL MANUALE DI ISTRUZIONI. POTETE CONTATTARCI IN QUALSIASI MOMENTO PER EVENTUALI CHIARIMENTI.
GENTILE CLIENTE
ALGEMENE WAARSCHUWINGEN 28-29
ALGEMENEINFORMATIE 29
FRONT POSITIE MET BABY INSERT (3.5 KG - CA. 6 KG) 29
FRONT POSITIE ZONDER BABY INSERT (6 KG - 12 KG) 30
HEUP POSITIE (6 KG - 12 KG) 30
RUG POSITIE (8 KG - 18 KG) 30 - 31
HOE DE GEINTEGREERDE HOOFDSTEUN IS TE GEBRUIKEN 31
WAARBORG 31
CYBEX MY.GO babydrager
ONDERHOUD EN 132


Riedinger Str. 18, 95448 Bayreuth, Germany
Tel.: +49 921 78511-0, Fax.: +49 921 78511-999

FONTOS! A HASZNÁLATI UTASÍTÁST ÖRIZZE MEG!
GYERMEKE BIZTONSÁGA ERDEKÉBEN FONTOS, HOGY A MY.GO-T A HASNZÁLATI UTASITÁSBAN LEÍRTAK SzerINT HASZNÁLJA. HA KÉRDESE VAN, KÉRJÜK, FORDULJON HOZZÁNK BIZALOMMAL!