
PR 642 I - Cooker INDESIT - Free user manual and instructions
Find the device manual for free PR 642 I INDESIT in PDF.
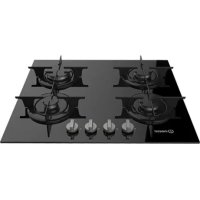



| Product type | Built-in gas hob |
| Brand | Indesit |
| Model | PR 642 I |
| Number of burners | 4 gas burners |
| Maximum power | Rapid burner: 3.00 kW, semi-rapid: 1.65 kW, auxiliary: 1.00 kW |
| Ignition type | Automatic integrated ignition (by control knob) |
| Safety | Flame failure safety device (thermocouple) |
| Table dimensions (W x D x H) | Approximately 580 x 510 x 45 mm (standard estimate) |
| Cutout dimensions (W x D) | Approximately 560 x 480 mm (estimate) |
| Power supply | 230 V ~ 50 Hz |
| Gas supply | Natural gas (G20/G25) or LPG, adaptable via injectors |
| Surface material | Stainless steel or enameled (depending on version) |
| Installation class | Class 3 (built-in) |
| Destination countries | France, Belgium, Netherlands (depending on settings) |
| Cleaning | Removable grates and burners, clean with hot water and mild detergent |
| Maintenance | Check injectors and safety device |
| Net weight | Approximately 8 kg (estimate) |
Frequently Asked Questions - PR 642 I INDESIT
User questions about PR 642 I INDESIT
0 question about this device. Answer the ones you know or ask your own.
Ask a new question about this device
Download the instructions for your Cooker in PDF format for free! Find your manual PR 642 I - INDESIT and take your electronic device back in hand. On this page are published all the documents necessary for the use of your device. PR 642 I by INDESIT.
USER MANUAL PR 642 I INDESIT
Operating Instructions HOB
Contents
Operating Instructions, 1
Warnings, 3
Assistance, 8
Description of the appliance, 10
Installation, 19
Start-up and use, 23
Precautions and tips, 23
Maintenance and care, 24
Troubleshooting, 24
PT
Portuguese
Operating Instructions, 59
Precautions and recommendations, 59
Technical service and maintenance, 60
Faults and methods of repair, 60
IT
Warnings
WARNING: The appliance and its accessible parts become hot during use. Care should be taken to avoid touching heating elements. Children less than 8 years of age shall be kept away unless continuously supervised. This appliance can be used by children aged from 8 years and above and persons with reduced physical, sensory or mental capabilities or lack of experience and knowledge if they have been given supervision or instruction concerning use of the appliance in a safe way and understand the hazards involved. Children shall not play with the appliance. Cleaning and user maintenance shall not be made by children without supervision.
WARNING: Unattended cooking on a hob with fat or oil can be dangerous and may result in fire. NEVER try to extinguish a fire with water, but switch off the appliance and then cover flame e.g. with a lid or a fire blanket.
WARNING: Danger of fire: do not store items on the cooking surfaces.
Never use steam cleaners or pressure cleaners on the appliance.
Remove any liquid from the lid before opening it. Do not close the glass cover (if present) when the gas burners or electric hotplates are still hot.
The appliance is not intended to be operated by means of an external timer or separate remote control system.
CAUTION: the use of inappropriate hob guards can cause accidents.
CAUTION: In case of hotplate glass breakage:
- shut immediately off all burners and any electrical heating element and isolate the appliance from the power supply
- do not touch the appliance surface.
FRNL
Warnings
Never use the services of an unauthorized technician.
Please have the following information to hand:
- the type of problem encountered.
- the appliance model (Mod.). the serial number (S/N).
The latter two pieces of information can be found on the data plate located on the appliance.
The following information is applicable only for the UK and Republic of Ireland.
Repairs and After Sales
For product help and advice, repairs, spare parts or accessories, we're here to help.
For local repair engineers - 03448 111 606
ROI-0818313413
For Parts and Accessories visit:
parts.hotpoint.co.uk/shop
Please remember to register your appliance at www.hotpointservice.co.uk to activate your 10 year parts guarantee.
NL
Assistance
Indicate to him/her:
Description of the appliance
Overall view
- Support Grid for COOKWARE
- GAS BURNERS
- Control Knobs for GAS BURNERS
- Ignition for GAS BURNERS
- SAFETY DEVICES
- GAS BURNERS differ in size and power. Use the diameter of the cookware to choose the most appropriate burner to cook with. Control Knobs for GAS BURNERS adjust the size of the flame.
- GAS BURNER IGNITION enables a specific burner to be lit automatically.
- SAFETY DEVICE stops the gas flow if the flame is accidentally extinguished.
Before operating your new appliance, please read this instruction booklet carefully. It contains important information for safe use, installation, and care of the appliance.
Please keep these operating instructions for future reference. Pass them on to possible new owners of the appliance.
Positioning
Keep packaging material out of the reach of children. It can become a choking or suffocation hazard (see Precautions and tips).
The appliance must be installed by a qualified professional according to the instructions provided. Incorrect installation may cause harm to people and animals or may damage property.
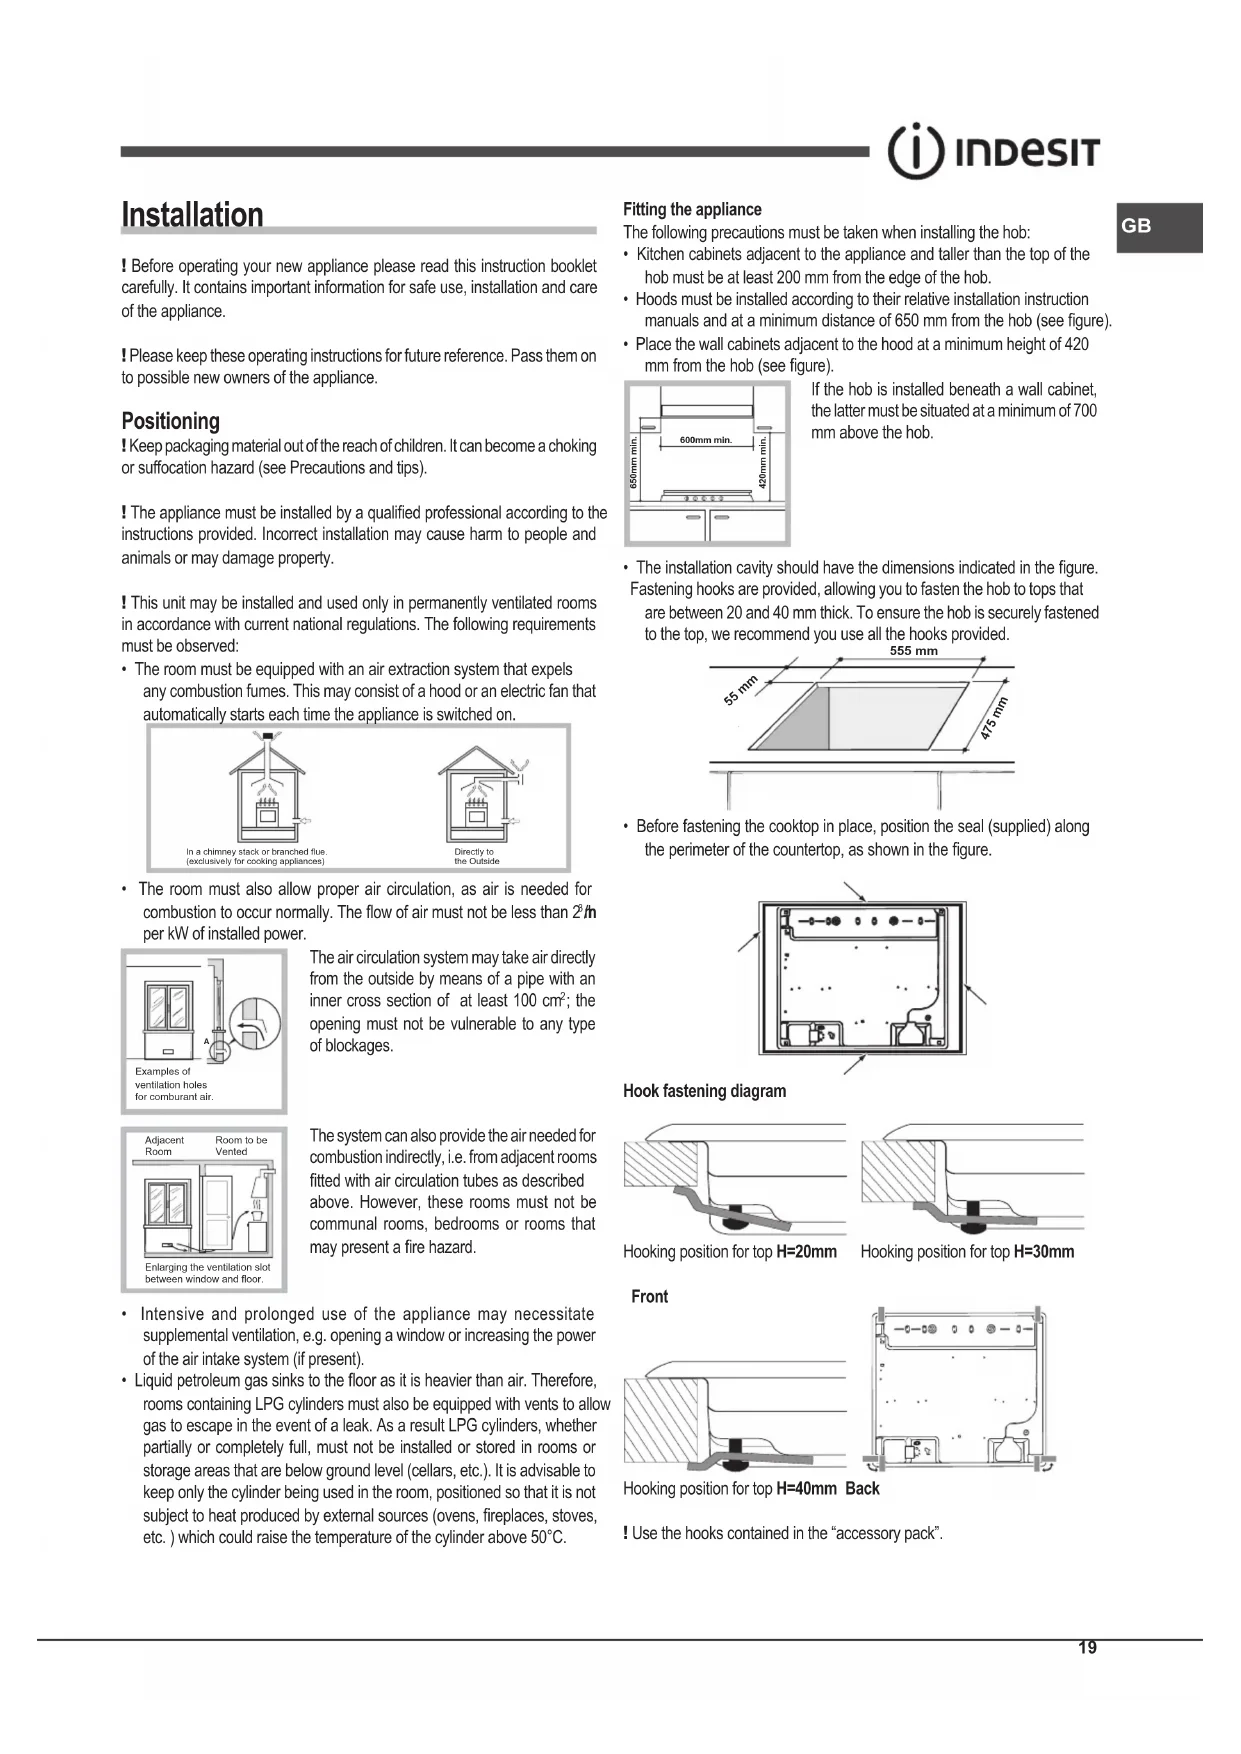
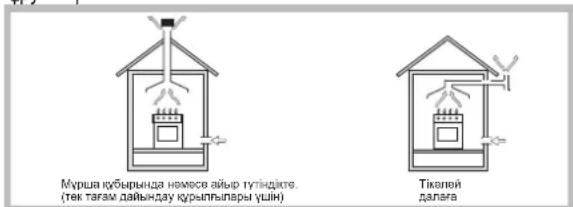
This unit may be installed and used only in permanently ventilated rooms in accordance with current national regulations. The following requirements must be observed:
- The room must be equipped with an air extraction system that expels any combustion fumes. This may consist of a hood or an electric fan that automatically starts each time the appliance is switched on.
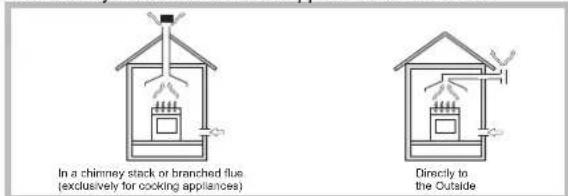
- The room must also allow proper air circulation, as air is needed for combustion to occur normally. The flow of air must not be less than 2 m³ per kW of installed power.
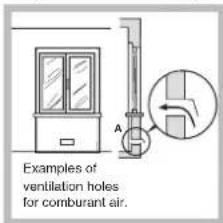
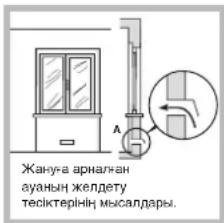
The air circulation system may take air directly from the outside by means of a pipe with an inner cross section of at least 100 cm²; the opening must not be vulnerable to any type of blockage.
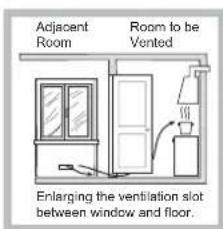
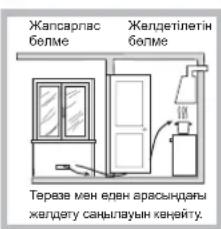
The system can also provide the air needed for combustion indirectly, i.e., from adjacent rooms fitted with air circulation tubes as described above. However, these rooms must not be communal rooms, bedrooms, or rooms that may present a fire hazard.
- Intensive and prolonged use of the appliance may necessitate supplemental ventilation, e.g., opening a window or increasing the power of the air intake system (if present).
- Liquid petroleum gas sinks to the floor as it is heavier than air. Therefore, rooms containing LPG cylinders must also be equipped with vents to allow gas to escape in the event of a leak. As a result, LPG cylinders, whether partially or completely full, must not be installed or stored in rooms or storage areas that are below ground level (cellars, etc.). It is advisable to keep only the cylinder being used in the room, positioned so that it is not subject to heat produced by external sources (ovens, fireplaces, stoves, etc.) which could raise the temperature of the cylinder above 50°C.
Fitting the appliance
The following precautions must be taken when installing the hob:
- Kitchen cabinets adjacent to the appliance and taller than the top of the hob must be at least 200 mm from the edge of the hob.
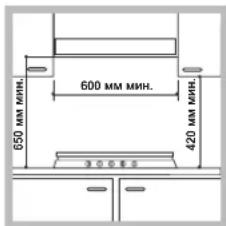
- Hoods must be installed according to their relative installation instruction manuals and at a minimum distance of 650 mm from the hob (see figure).
- Place the wall cabinets adjacent to the hood at a minimum height of 420 mm from the hob (see figure).
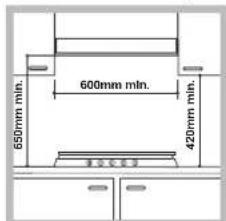
If the hob is installed beneath a wall cabinet, the latter must be situated at a minimum of 700 mm above the hob.
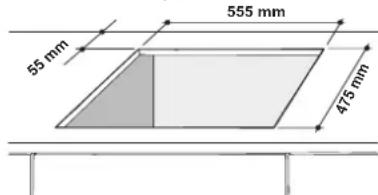
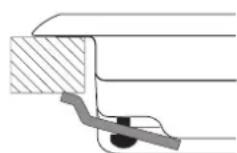
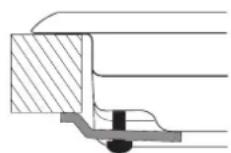
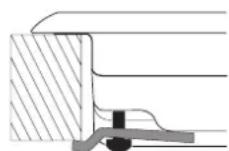
- The installation cavity should have the dimensions indicated in the figure. Fastening hooks are provided, allowing you to fasten the hob to tops that are between 20 and 40 mm thick. To ensure the hob is securely fastened to the top, we recommend you use all the hooks provided.
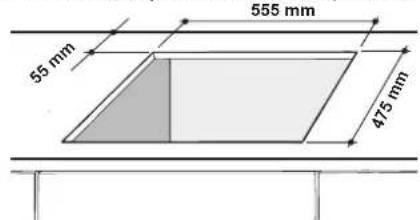
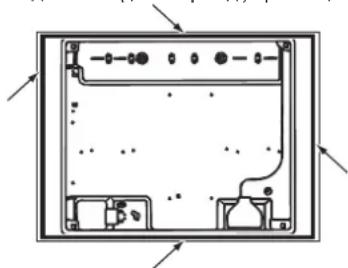
- Before fastening the cooktop in place, position the seal (supplied) along the perimeter of the countertop, as shown in the figure.
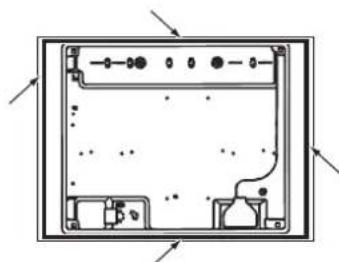
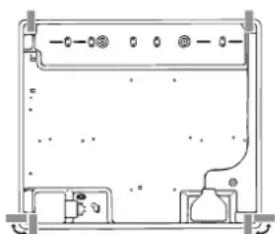
Hook fastening diagram
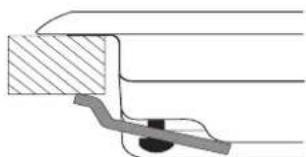
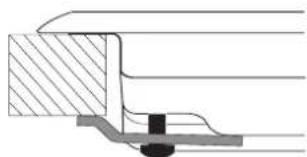
Hooking position for top H=20mm
Hooking position for top H=30mm
Front
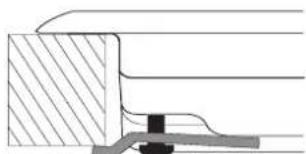
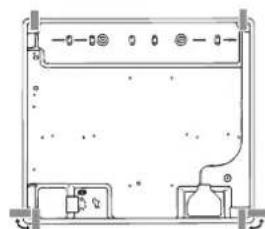
Hooking position for top H=40mm Back
! Use the hooks contained in the "accessory pack".
- Where the hob is not installed over a built-in oven, a wooden panel must be installed as insulation. This must be placed at a minimum distance of 20 mm from the lower part of the hob.
Ventilation
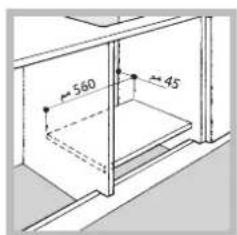
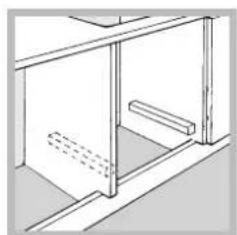
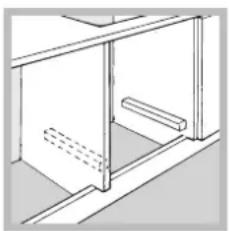
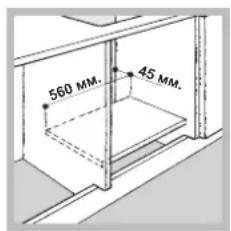
To ensure adequate ventilation, the back panel of the cabinet must be removed. It is advisable to install the oven so that it rests on two strips of wood, or on a completely flat surface with an opening of at least 45 x 560 mm (see diagrams).
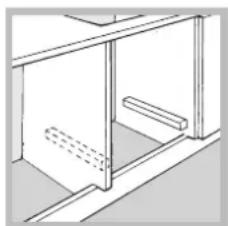
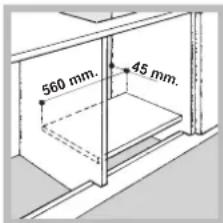
The hob can only be installed above built-in ovens with a cooling ventilation system.
Electrical connection
Hobs equipped with a three-pole power supply cable are designed to operate with alternating current at the voltage and frequency indicated on the data plate (located on the lower part of the appliance). The earth wire in the cable has a green and yellow cover. If the appliance is to be installed above a built-in electric oven, the electrical connection of the hob and the oven must be carried out separately, both for electrical safety purposes and to make extracting the oven easier.
Connecting the supply cable to the mains
Install a standardised plug corresponding to the load indicated on the data plate.
The appliance must be directly connected to the mains using an omnipolar circuit-breaker with a minimum contact opening of 3 mm installed between the appliance and the mains.
The circuit-breaker must be suitable for the charge indicated and must comply with current electrical regulations (the earthing wire must not be interrupted by the circuit-breaker). The supply cable must not come into contact with surfaces with temperatures higher than 50°C.
The installer must ensure that the correct electrical connection has been made and that it is compliant with safety regulations.
Before connecting to the power supply, make sure that:
- the appliance is earthed and the plug is compliant with the law.
- the socket can withstand the maximum power of the appliance, which is indicated on the data plate.
- the voltage is in the range between the values indicated on the data plate.
- the socket is compatible with the plug of the appliance. If the socket is incompatible with the plug, ask an authorised technician to replace it. Do not use extension cords or multiple sockets.
Once the appliance has been installed, the power supply cable and the electrical socket must be easily accessible. The cable must not be bent or compressed. The cable must be checked regularly and replaced by authorised technicians only (see Assistance). The manufacturer declines any liability should these safety measures not be observed.
Gas connection
The appliance should be connected to the main gas supply or to a gas cylinder in compliance with current national regulations. Before carrying out the connection, make sure the cooker is compatible with the gas supply you wish to use. If this is not the case, follow the instructions indicated in the paragraph "Adapting to different types of gas."
When using liquid gas from a cylinder, install a pressure regulator which complies with current national regulations.
! Check that the pressure of the gas supply is consistent with the values indicated in Table 1 ("Burner and nozzle specifications"). This will ensure the safe operation and longevity of your appliance while maintaining efficient energy consumption.
Connection with a rigid pipe (copper or steel)
! Connection to the gas system must be carried out in such a way as not to place any strain of any kind on the appliance.
There is an adjustable L-shaped pipe fitting on the appliance supply ramp and this is fitted with a seal in order to prevent leaks. The seal must always be replaced after rotating the pipe fitting (seal provided with appliance). The gas supply pipe fitting is a threaded 1/2 gas cylindrical male attachment.
Connecting a flexible jointless stainless steel pipe to a threaded attachment
The gas supply pipe fitting is a threaded 1/2 gas cylindrical male attachment. These pipes must be installed so that they are never longer than 2000 mm when fully extended. Once connection has been carried out, make sure that the flexible metal pipe does not touch any moving parts and is not compressed.
! Only use pipes and seals that comply with current national regulations.
Checking the tightness of the connection
! When the installation process is complete, check the pipe fittings for leaks using a soapy solution. Never use a flame.
Adapting to different types of gas
To adapt the hob to a different type of gas other than default type (indicated on the rating plate at the base of the hob or on the packaging), the burner nozzles should be replaced as follows:
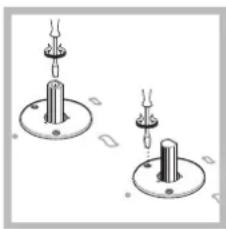
- Remove the hob grids and slide the burners off their seats.
- Unscrew the nozzles using a 7 mm socket spanner, and replace them with nozzles for the new type of gas (see table 1 "Burner and nozzle characteristics").
- Reassemble the parts following the above procedure in the reverse order.
- Once this procedure is finished, replace the old rating sticker with one indicating the new type of gas used. Stickers are available from any of our Service Centres.
- Adjusting the burners' primary air
Does not require adjusting.
- Setting the burners to minimum
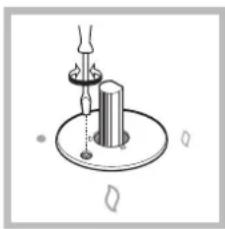
- Turn the tap to the low flame position;
- Remove the knob and adjust the adjustment screw, which is positioned in or next to the tap pin, until the flame is small but steady.
- Having adjusted the flame to the required low setting, while the burner is alight, quickly change the position of the knob from minimum to maximum and vice versa several times, checking that the flame does not go out.
- Some appliances have a safety device (thermocouple) fitted. If the device fails to work when the burners are set to the low flame setting, increase this low flame setting using the adjusting screw.
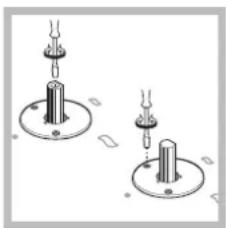
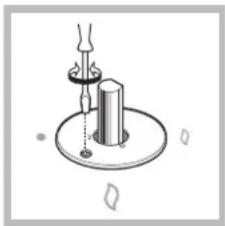
- Once the adjustment has been made, replace the seals on the by-passes using sealing wax or a similar substance. ! If the appliance is connected to liquid gas, the regulation screw must be fastened as tightly as possible. ! Once this procedure is finished, replace the old rating sticker with one indicating the new type of gas used. Stickers are available from any of our Service Centres. ! Should the gas pressure used be different (or vary slightly) from the recommended pressure, a suitable pressure regulator must be fitted to the inlet pipe (in order to comply with current national regulations).
| DATA PLATE | |
| Electrical connections | see data plate |
| ECODESIGNThis appliance conforms to the EU Regulation no. 66/2014implementing Directive 2009/125/EC的标准 EN 30-2-1 | |
Burner and nozzle specifications
| Table 1 | Liquid Gas | Natural Gas | |||||||
| Burner | Diameter (mm) | Thermal Power kW (p.c.s.*) Nomin. Reduc. | By-pass 1/100 (mm) | Nozzle 1/100 (mm)** | Flow* g/h | Nozzle 1/100 (mm) | Flow* I/h | ||
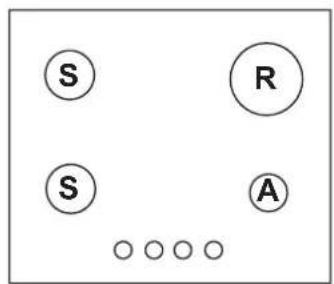
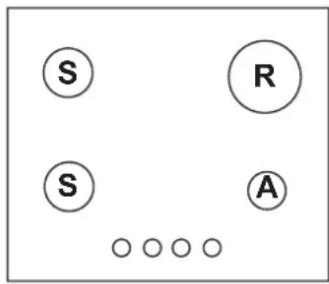
| Rapid (R) | 100 | 3.00 | 0.70 | 39 | 86 | 218 | 214 | 116(Y) | 286 |
| Semi Rapid (S) | 75 | 1.65 | 0.40 | 28 | 64 | 120 | 118 | 96(Z) | 157 |
| Auxiliary (A) | 55 | 1.00 | 0.40 | 28 | 50 | 73 | 71 | 79(6) | 95 |
| Supply pressures | Nominal (mbar)Minimum (mbar)Maximum (mbar) | 28-302035 | 372545 | 201725 | |||||
- At 15°C and 1013.25 mbar - dry gas ** Propane P.C.S. = 50.37 MJ/Kg ** Butane P.C.S. = 49.47 MJ/Kg
Natural P.C.S. = 37.78 MJ/m
3
PR 642 /I(BK)
Start-up and use
! The position of the corresponding gas burner is shown on every knob.
Gas burners
Each burner can be adjusted to one of the following settings using the corresponding control knob:
- Off

Maximum

Minimum
To light one of the burners, hold a lit match or lighter near the burner and, at the same time, press down and turn the corresponding knob anti-clockwise to the maximum setting.
Since the burner is fitted with a safety device, the knob should be pressed for approximately 2-3 seconds to allow the automatic device keeping the flame alight to heat up.
Models are equipped with an ignition button incorporated into the control knob. To light a burner, simply press the corresponding knob all the way in and then turn it anti-clockwise to the "High" setting, keeping it pressed in until the burner lights.
If a flame is accidentally extinguished, turn off the control knob and wait for at least 1 minute before trying to relight it.
To switch off the burner, turn the knob clockwise until it stops (when it reaches the "●" position).
Practical advice on using the burners
To ensure the burners operate efficiently:
- Use appropriate cookware for each burner (see table) so that the flames do not extend beyond the bottom of the cookware. Always use cookware with a flat base and a cover.
- When the contents of the pan reach boiling point, turn the knob to minimum.
| Burner | Ø Cookware Diameter (cm) |
| Rapid (R) | 24 - 26 |
| Semi Rapid (S) | 16 - 20 |
| Auxiliary (A) | 10 - 14 |
To identify the type of burner, refer to the designs in the section entitled, "Burner and Nozzle Specifications".
- For maximum stability, always make sure that the pan supports are correctly fitted and that each pan is placed centrally over the burner.
- Pan handles should be positioned in line with one of the support bars on the pan support grid.
- Pan handle should be positioned so as not to protrude beyond the front edge of the hob.
greatest stability.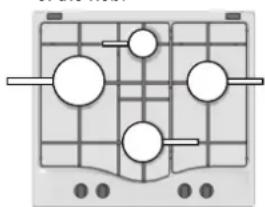
The more variable aspect in terms of pan stability can often be the pan itself, (or the positioning of that pan during use). Well balanced pans, with flat bases that are placed centrally over the burner, with the pan handles aligned with one of the support fingers obviously offer the
Precautions and tips
! This appliance has been designed and manufactured in compliance with international safety standards. The following warnings are provided for safety reasons and must be read carefully.
General safety
- This is a class 3 built-in appliance.
- Gas appliances require regular air exchange to maintain efficient operation. When installing the hob, follow the instructions provided in the paragraph on "Positioning" the appliance.
- These instructions are only valid for the countries whose symbols appear in the manual and on the serial number plate.
- The appliance was designed for domestic use inside the home and is not intended for commercial or industrial use.
- The appliance must not be installed outdoors, even in covered areas. It is extremely dangerous to leave the appliance exposed to rain and storms.
- Do not touch the appliance with bare feet or with wet or damp hands and feet.
- The appliance must be used by adults only for the preparation of food, in accordance with the instructions outlined in this booklet. Any other use of the appliance (e.g. for heating the room) constitutes improper use and is dangerous. The manufacturer may not be held liable for any damage resulting from improper, incorrect and unreasonable use of the appliance.
- The openings used for ventilation and dispersion of heat must never be covered. Always make sure the knobs are in the "●"/"c" position when the appliance is not in use.
- When unplugging the appliance always pull the plug from the mains socket, do not pull on the cable.
- Never carry out any cleaning or maintenance work without having detached the plug from the mains.
- In case of malfunction, under no circumstances should you attempt to repair the appliance yourself. Repairs carried out by inexperienced persons may cause injury or further malfunctioning of the appliance. Contact a Service Centre (see Assistance).
- Do not close the glass cover (if present) when the gas burners or electric hotplates are still hot.
- The appliance should not be operated by people (including children) with reduced physical, sensory or mental capacities, by inexperienced individuals or by anyone who is not familiar with the product. These individuals should, at the very least, be supervised by someone who assumes responsibility for their safety or receive preliminary instructions relating to the operation of the appliance.
- Do not let children play with the appliance.
- The appliance is not intended to be operated by means of an external timer or separate remote-control system.
Disposal
- When disposing of packaging material: observe local legislation so that the packaging may be reused.
- The European Directive 2012/19/EU on Waste Electrical and Electronic Equipment (WEEE), requires that old household electrical appliances must not be disposed of in the normal unsorted municipal waste stream. Old appliances must be collected separately in order to optimise the recovery and recycling of the materials they contain and reduce the impact on human health and the environment. The crossed out "wheeled bin" symbol on the product reminds you of your obligation, that when you dispose of the appliance it must be separately collected.
Consumers should contact their local authority or retailer for information concerning the correct disposal of their old appliance.
GB
Respecting and conserving the environment
- Cook your food in closed pots or pans with well-fitting lids and use as little water as possible. Cooking with the lid off will greatly increase energy consumption.
- Use purely flat pots and pans.
- If you are cooking something that takes a long time, it's worth using a pressure cooker, which is twice as fast and saves a third of the energy.
Maintenance and care
Switching the appliance off
Disconnect your appliance from the electricity supply before carrying out any work on it.
Cleaning the hob surface
- All the enamelled and glass parts should be cleaned with warm water and neutral solution.
- Stainless steel surfaces may be stained by calcareous water or aggressive detergents if left in contact for too long. Any food spills (water, sauce, coffee, etc.) should be wiped away before they dry.
- Clean with warm water and neutral detergent, and then dry with a soft cloth or chamois. Remove baked-on dirt with specific cleaners for stainless steel surfaces.
- Clean stainless steel only with soft cloth or sponge.
- Do not use abrasive or corrosive products, chlorine-based cleaners or pan scourers.
- Do not use steam cleaning appliances.
- Do not use flammable products.
- Do not leave acid or alkaline substances, such as vinegar, mustard, salt, sugar or lemon juice on the hob.
Cleaning the hob parts
- Clean the enamelled and glass parts only with soft cloth or sponge.
- Grids, burner caps and burners can be removed to be cleaned.
- Clean them by hand with warm water and non-abrasive detergent, removing any food residues and checking that none of the burner openings is clogged.
- Rinse and dry.
- Refit burners and burner caps correctly in the respective housings.
- When replacing the grids, make sure that the panstand area is aligned with the burner.
- Models equipped with electrical ignition plugs and safety device require thorough cleaning of the plug end in order to ensure correct operation. Check these items frequently, and if necessary, clean them with a damp cloth. Any baked-on food should be removed with a toothpick or needle.
! To avoid damaging the electric ignition device, do not use it when the burners are not in their housing.
Gas tap maintenance
Over time, the taps may become jammed or difficult to turn. If this happens, the tap must be replaced.
! This procedure must be performed by a qualified technician authorised by the manufacturer.
Troubleshooting
It may happen that the appliance does not function properly or at all. Before calling the service centre for assistance, check if anything can be done. First, check to see that there are no interruptions in the gas and electrical supplies, and, in particular, that the gas valves for the mains are open.
The burner does not light or the flame is not even around the burner.
Check whether:
- The gas holes on the burner are clogged.
- All the movable parts that make up the burner are mounted correctly.
- There are draughts near the appliance.
The flame dies in models with a safety device.
Check to make sure that:
- You pressed the knob all the way in.
- You keep the knob pressed in long enough to activate the safety device.
- The gas holes are not blocked in the area corresponding to the safety device.
The burner does not remain lit when set to minimum.
Check to make sure that:
- The gas holes are not blocked.
- There are no draughts near the appliance.
- The minimum setting has been adjusted properly.
The cookware is unstable.
Check to make sure that:
- The bottom of the cookware is perfectly flat.
- The cookware is positioned correctly at the centre of the burner.
- The pan support grids have been positioned correctly.
Installation
Clean the parts of the hob
4.4.11
45x560 4
1
3
1.2
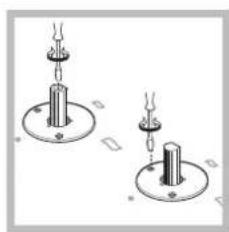
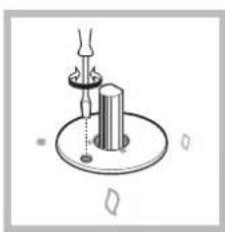
Therefore, 1/2 + 1/3 = 2
| الإستعمال | |
| (R) ↗26-24 | |
| (S) ↗20-16 | |
| (A) ↗14-10 |
Installation
! It is important to keep this manual for future reference. In case of sale, transfer, or moving to a new place of residence, it is necessary to ensure that the manual remains with the product, so that its new owner can familiarize themselves with the operating instructions and corresponding warnings.
! Read the instructions carefully: they contain important information about installation, operation, and safety.
Location
! Do not allow children to play with packaging materials. Packaging materials must be disposed of in accordance with the rules for separate waste collection (see Precautions and recommendations).
Installation of this appliance must comply with the instructions and be carried out by qualified specialists. Incorrect installation may cause damage to property and injury to people and domestic animals.
This appliance may be installed and used only in rooms with permanent ventilation in accordance with the provisions of current regulations. The following requirements must be observed:
The room must have an air extraction system, made in the form of an exhaust hood or an extractor fan, which automatically turns on every time the appliance is switched on.
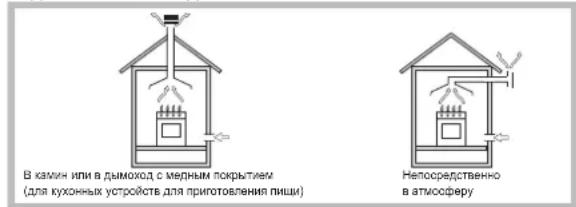
The room must have a system that ensures a sufficient supply of air for reliable combustion. The air flow required for combustion must be no less than 2 m³/h per kW of installed power.
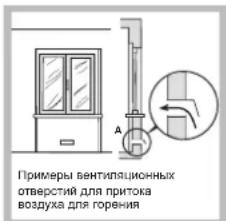
The air supply can be provided directly from outside through an air duct with a cross-section of no less than 100 cm² and a diameter that prevents accidental blockage.
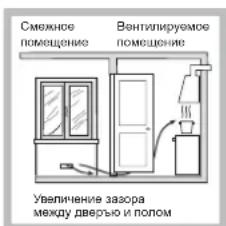
The air intake can be carried out from adjacent rooms equipped with a ventilation opening communicating with the outside, as described above, provided that this is not a bedroom, a fire hazard area, or a bathroom.
- Intensive and prolonged use of the appliance may require additional ventilation, for example, opening windows or more effective ventilation with increased mechanical extraction power, if it already exists.
Liquefied gas is heavier than air and therefore settles at the bottom. For this reason, rooms where appliances with LPG (liquefied petroleum gas) are installed must have ventilation openings at the bottom, communicating with the outside, to allow for possible gas leaks. Therefore, appliances with LPG must be installed or remain partially open; they must not be placed or stored in basements or storage rooms (cellars, etc.). Only the appliance in use should be kept in the room, positioned in such a way that it is not exposed to direct heat sources (ovens, fireplaces, etc.) that could heat the appliance above 50°C.
Built-in installation
For correct installation of the hob, the following precautions must be observed:
Kitchen elements adjacent to the hob, whose height exceeds the level of the hob, must be at a distance of no less than 200 mm from the edge of the hob. The hood must be installed in accordance with the hood's instruction manual and in any case at a height of no less than 650 mm from the kitchen top (see figure). Place wall cabinets adjacent to the hood at a height of no less than 420 mm from the work surface of the kitchen (see figure).
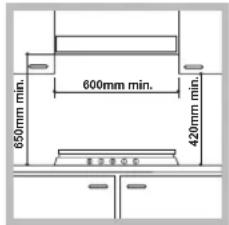
If the hob is installed under a wall cabinet, the latter must be positioned at a height of no less than 700 mm from the kitchen top.
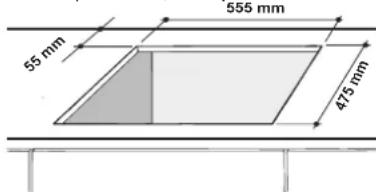
The dimensions of the kitchen element must correspond to the figure. The fixing kit includes fixing hooks for securing the hob to the kitchen work surface with a thickness of exactly 20 to 40 mm. For secure fixing of the hob, it is recommended to use all the hooks provided.
- The hob must be installed (attached) around the perimeter of the hob, as shown in the diagram.
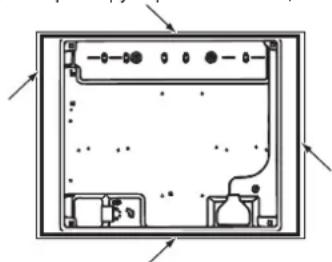
Diagram of bracket installation
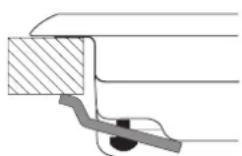
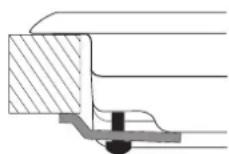
Mounting the bracket for support beams H=20mm Mounting the bracket for support beams H=30mm
RU
Front
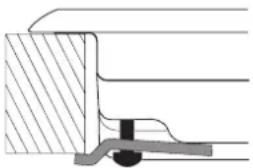
Mounting the bracket for support beams H=40mm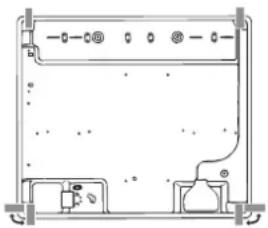
! Use the clamps from the "Accessories" kit
- If the hob is not installed above a built-in oven, it is necessary to insert a wooden panel as insulation. This panel must be installed at a distance of no less than 20 mm from the lower part of the hob.
Ventilation
To ensure proper ventilation, it is necessary to remove the panel or any elements. It is recommended to install the oven on two wooden beams or on a solid base with an opening of at least 45x560 mm (see drawings).
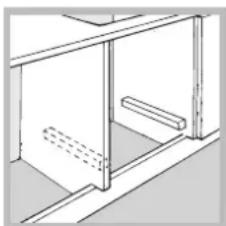
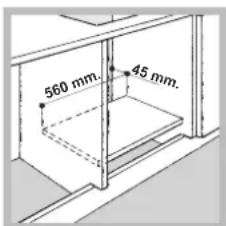
! The hob can only be installed above built-in ovens with cooling ventilation.
Electrical connection
The hob, equipped with a power cord and plug, is designed to operate with alternating current at the voltage and frequency indicated on the rating plate (located on the bottom of the hob). The grounding wire in the cable has a yellow-green color. In case of installing the hob above a built-in oven, the electrical connection of the hob and the oven must be done separately according to safety regulations, and also for easy removal of the oven.
Connection of the power cord to the mains
Install a standardized plug on the power cord, rated for the load indicated on the rating plate. In case of direct connection to the mains, an omnipolar switch with a minimum contact gap of 3 mm, rated for the given load and complying with current standards, must be installed between the appliance and the mains (the switch must not break the grounding wire). The power cord must be positioned so that its temperature never exceeds the room temperature by more than 50°C
The appliance is responsible for correct connection to the electrical network and for compliance with safety regulations.
Before connecting the appliance to the electrical network, check the following:
The socket must be connected to an earth and comply with standards; - the socket must be rated for the maximum power consumption of the appliance, as indicated in the technical data table; - the mains voltage and frequency must match the electrical data of the appliance; the socket must be compatible with the plug of the appliance. Otherwise, replace the socket or the plug; do not use extension cords or adapters.
The appliance must be installed in such a way that the electrical cord and the socket are easily accessible. The electrical cord of the appliance must not be twisted or pinched. Regularly check the condition of the power cord; if necessary, have it replaced only by authorized technicians (see Technical Service). The manufacturer is not responsible for the consequences of non-compliance with the above requirements.
Connection to the gas supply
This appliance may be installed and used only in rooms with permanent ventilation in accordance with the provisions of current standards, only after checking the conformity of the appliance to the type of gas to which it will be connected. In case of non-conformity, perform the operations described in the paragraph "Adjustment for different gas types". In case of using liquefied gas, use pressure regulators that comply with standards and their subsequent amendments.
For safe operation, rational use of energy and longer service life of the electrical appliance, check that the gas supply pressure corresponds to the values indicated in Table 1 "Characteristics of gas burners and nozzles".
Attention! Before connecting, remove the transport cap from the gas inlet pipe of the hob.
Connection with a rigid pipe (copper or steel)
The connection to the gas supply must not exert any load on the appliance.
On the gas inlet pipe of the appliance there is a threaded fitting "L" with a sealing gasket. If necessary, turn the elbow; be sure to replace the sealing gasket (supplied with the appliance). The gas inlet pipe of the appliance has a cylindrical external thread 1/2 gas.
Connection with a flexible pipe made of stainless steel with thick walls and threaded connections.
The gas inlet pipe of the appliance has a cylindrical external thread 1/2 gas.
The connection of such hoses must be made in such a way that the length of the hose at maximum extension does not exceed 2000 mm. After completing the connection, check that the metal flexible hose does not touch moving parts and is not pinched.
Use exclusively pipes that comply with the standard, and sealing gaskets that comply with current state standards.
Check the tightness
After completing the connection, check the tightness of all pipes using a soap solution, but never with a flame.

Preparation for different types of gas
To convert the burner to a different gas type, for which the burner is not originally designed (as indicated on the label on the upper part of the burner or on the packaging), it is necessary to replace the injectors as follows:
- Remove the support grids from the burner and pull the injectors out of their seats.
- Unscrew the injectors using a 7 mm wrench and replace them with injectors designed for the new gas type (see Table 1 "Characteristics of injectors and nozzles").
- Reinstall the parts in their places, performing the operations in reverse order.
- After completing the operation, replace the old rating label with a new one corresponding to the new type of gas used. The label can be ordered from our technical service centers.
Adjustment of primary air of the burners
The burners do not require any adjustment of primary air.
Adjustment of minimum flame 1. Turn the control knob to the minimum flame position. 2. Remove the knob and turn the adjustment screw, located inside or next to the valve stem, until a stable small flame is obtained. 3. Make sure that when turning the knob sharply from the maximum flame position to the minimum, the burners do not go out. 4. For burners equipped with a safety device (thermocouple), in case of malfunction of this device at minimum flame, increase the gas flow of the minimum flame using the adjustment screw.
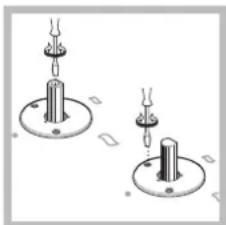
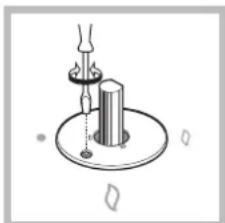
- After adjustment, restore the seals or any seals on the gas train. In case of using liquefied gas, the adjustment screw must be tightened to the stop. After completing the operation, replace the old rating label with a new one corresponding to the new type of gas used. The label can be ordered from our technical service centers. If the pressure of the gas used differs from the prescribed pressure (varies), it is necessary to install on the gas train a corresponding pressure regulator (according to current regulations).
Characteristics of injectors and nozzles
- Off Maximum power Minimum power
For burners with injectors and nozzles, bring a lit match or lighter to the burner, press the knob all the way and turn it counterclockwise to the corresponding position for maximum flame.
In fields equipped with a protective device, it is necessary to hold the knob pressed for approximately 2-3 seconds until the device heats up, which automatically maintains the flame.
In fields equipped with a flame ignition, it is sufficient to press the knob all the way and turn it counterclockwise to the maximum flame position, holding it pressed until the flame ignites.
If the flame goes out, turn the control knob to the off position and try to relight the burner only after a minute.
To turn off the burner, turn the knob clockwise to the off position (position marked with the symbol "
Practical tips for using gas burners
For maximum efficiency, remember:
- For each burner, use a suitable pan (see table) so that the flame does not extend beyond the bottom of the pan. Always use pans with a flat bottom and a lid. When lighting, turn the knob to the low flame position.
Precautions and recommendations
The appliance is designed and manufactured in accordance with international safety standards. It is necessary to carefully read this manual, prepared for your safety.
General safety requirements
This device is a household electrical appliance of class 3. For proper functioning of gas appliances, it is necessary to ensure air exchange. Make sure that when installing these devices, the requirements specified in the "Location" paragraph are met. - The instructions apply only to the countries whose designations are given in the guide on the nameplate table of modifications. - This product is intended for non-professional use in domestic conditions. It is forbidden to install the product outdoors, even under a canopy, as exposure to rain or moisture can be dangerous. Do not touch the product with wet hands, barefoot, or with wet feet. - The product is intended for preparing food products and may only be used by adults in accordance with the instructions given in this technical manual. Any other use (for example: heating rooms) is considered improper and therefore dangerous. The manufacturer is not responsible for possible damage caused by improper, incorrect, or unreasonable use of the product. Make sure that the cords of other household electrical appliances do not come into contact with the hot parts of the appliance. Do not cover the ventilation grilles or heat dissipation openings. Always check that the controls are in the "0" position when the product is not in use. Do not pull the cord to disconnect the plug from the socket; take hold of the plug. - Before cleaning or servicing the product, always unplug it from the mains socket. In case of malfunction, it is strictly forbidden to open the internal mechanisms of the product for the purpose of self-repair. Contact the service center (see Service). Do not close the glass lid of the appliance (if it has one) while the gas or electric burners are still hot. Do not allow operation of the product by persons with limited physical, sensory, or mental capabilities.
RU
(including children), by inexperienced persons or by persons who have not been instructed in the use of the product without supervision by a person responsible for their safety or after proper training in the use of the product.
Do not allow children to play with the household appliance. - The product is designed to be controlled via an external synchronizer or a separate remote control system.
UTILIZATION
- Disposal of packaging materials: Follow local regulations for the purpose of reuse of packaging materials. According to European Directive 2012/19/EU regarding the recycling of electronic and electrical appliances, appliances should not be disposed of with regular household waste. Appliances taken out of service must be collected separately for recycling and recovery of their components and materials, as well as for the safety of the environment and health. The symbol of a crossed-out waste bin, present on all appliances, serves as a reminder of separate disposal. For more information on the correct disposal of household appliances, owners should contact their local authorities or retailer.
Energy saving and environmental protection
Store products in closed pots or pans with tightly closing lids, using the minimum amount of water. In case of cooking without a lid, there will be a significantly higher energy consumption. - Use pots and pans with perfectly flat bottoms. In case of cooking for a long time, it is recommended to use a pressure cooker, which cooks several times faster and allows saving a third of the energy.
Transport and storage.
The vapor panels must be transported in their original packaging in a horizontal position. - During transport and storage, protect the vapor panels from atmospheric influences and mechanical damage. - The panel must be stored packaged, indoors, at a temperature from minus 50°C to plus 40°C
Maintenance and care
Decommissioning of the appliance
Before any operation of maintenance or cleaning, disconnect the appliance from the power supply.
Cleaning the surface of the vapor panel
All enameled and glass parts should be washed with warm water with the addition of a neutral detergent. After prolonged contact with water containing limescale, or with acidic detergents, stains may remain on stainless steel surfaces. All splashes (water, sauces, coffee, etc.) that fall on the vapor panel should be removed before they dry.
Wash the panel with warm water with the addition of a neutral detergent, then wipe it with a soft cloth or sponge. Burnt-on dirt should be removed with special products for cleaning stainless steel surfaces. - Clean stainless steel surfaces only with a soft cloth or sponge. Do not use abrasive or corrosive products, chlorine-based cleaners, or metallic pads for cleaning pans. Do not use abrasive sponges. Do not use aggressive substances. Do not leave acidic or alkaline substances on the vapor panel, such as vinegar, tomato sauce, salt, sugar, lemon juice, etc.
Cleaning the components of the vapor panel
- Wash enameled and glass parts only with a soft cloth or sponge.
- The grates, burners and burner caps can be removed. Pull them out and wash them in hot water with a non-abrasive cleaning agent. When doing this, carefully remove all food residues and make sure that the burner holes are not clogged.
- Rinse them, dry them thoroughly and carefully.
- Carefully insert the burners and burner caps into their corresponding seats.
- When installing the grates in place, make sure that they are correctly positioned relative to the burners. For normal operation of the burners, it is necessary to keep the burner caps and the flame spreader rings clean. Check the condition of these parts frequently and, if necessary, clean them with a damp cloth. Burnt-on food residues should be removed with a toothbrush or a needle.
To avoid damaging the electric igniter, do not use it when the burners are removed from their seats.
Care of the control knobs of the gas burners
The control knobs of the gas burners can be removed for cleaning by pulling them off. To replace them, simply push them back on.
This operation must be carried out by a technician authorized by the manufacturer.
Malfunctions and how to fix them
It may happen that the burner does not work or works poorly. Before contacting the service center, check what you can do yourself. First, make sure that there are no breaks in the gas supply, and in particular that the gas taps and the burner are open.
The burner does not ignite or the flame is uneven.
Make sure that:
The burner nozzles are not clogged. All the parts of the burner are correctly installed - there are no gaps between the burner and the burner cap.
On burners equipped with a safety device, the burner ignites and then goes out.
Make sure that:
- Press and hold the button for a sufficient amount of time to activate the safety device.
- The openings for gas outlet at the location of the safety device are not blocked.
The hob must not be placed less than the minimum distance.
Make sure that:
The gas outlet openings are not clogged. The burner caps have no cracks. The adjustment of the minimum value is correct.
Unstable pans
Make sure that:
The bottom of the pan is perfectly flat. The pan is placed in the center of the gas or electric hob. The support grids on the burner are not installed incorrectly.
KZ
Ophaty
The burner caps must be cleaned regularly. If the burner caps are dirty, the flame may not be uniform and the appliance may not work properly. In case of prolonged use, the burner should be checked. If the burner is not working properly, contact the service center.
Ophanaactbipy
The burner parts must be cleaned with care. Do not use sharp or abrasive objects (see "Cleaning and Maintenance"). If the burner caps are not properly positioned, the flame may be irregular. If the burner is not working properly, contact the service center. The burner must be checked regularly for proper operation. The following must be checked: - The burner flame must be blue and stable. The burner can be adjusted automatically or manually.
For proper operation, the gas pressure must be at least 2 mbar when the appliance is in use.
The gas pressure must not exceed 100 cm². The appliance must be connected to a gas supply with a pressure regulator.
CoHda-ak, Jyue Jxayra KaKeTTi ayaHbI KaHama XoJlmEn KaMTamacb3 eTe aIaNbI, RaHn Kofapbda CnATTanFAh aya aiHaNbIMb TyIKTepeIme JxabkTaNfAH kancaplac 6emepen. DereHMeH, 6yN 6emeneop optak 6emE, XataTBH 6emHeMece ept Kayni 6ap 6emep 6omaybl Tnic.
KpybIbHbI KApkBnbl XaHe 3aK naJaIaNy yuIN KocMbua KEJNDEty KaKeT 6Olyb MyMKIn, MbIcaIb, Tepe3eHi aUy Hemece TmIMdIniri Ke6Ipek eJicnE - MexAHKnblA aya kipri3y KyeciH (6ap 6oJc) KyatbH apTbIpy apkbl. Cbfbinra3 ayadah aybp 6onfaHbIKTah eHeRe tycei. CoHbIKTan, cbfbinra3 6annohapbl TypaTbH 6nMeep ra3bH bHyj bKaFdaBbHa, on 6enMeDe HbFbn Ketyi yuih BeHTnIaunBbIK TecikTepeMHNK6bIKTanybTnic. Con c6eBNTi, cbfbinra3 6anNoHapbl XapTbN a Hemece ToBbKoCaJa, Jep DeHreInHen TeMeH 6nMeep He caTay aymakTapbHda (TeNe Xane T.5.) opHaTbIMaybl Hemece cakTaImaybl Tnic. Tek naDanaHbInyda 6onFaH 6annohDb, OHb 50°C -TaH
Korapb TemnepaTpa DaH bCtBIn Xi6epyIMyMki CbPTkKAHAp K3depi (neWtep, kAMHHep XeHe T.6.) 1hFapatbIKIb3yaH ayNak opHaNASTbPbIN, cKaTaH a63aJ.
KypbIINfblHbOpHaty
Плпаны opнатkan ke3de TeMeHderi caKtBik shapanap opbHdnybl TIC:
KypbIbI MaHbHa TpyFaH XaHe NnTaHbH YcTInI XaBHa KaPafHaDa 6nIK ac yu IkaFapbI PnTaHbH WetHe H KEM DereHe 200 MM-Te aNbc opHanacByI Tnic. Kaknap Tnicti opaty HcyckaynbtkapbHa cKeKc XHe nnTadaH KEm derehne 650 MM apa KaabkTBkTa opatbIyBtnic (cypetti Kaapb3). KaikKaHbMaBHaTpyaBtKabipara iInHeiWkaFapnTTaHaKEM derehne 420 MM6NkTKe TpehAnactbIpybTmC (cpeTti KapaB3).
ПлNTа Каблрага IniHETIshkaФтбИн actbIHDA opHaTbIaTbIb 60nca, coI WkaF ПЛNTaJaH KEM DereHde 700 MM apa KaWbIKtBkTa opHaJIacByI Tnic.
Opahy KybcI cpeTKepeTInre enWeMdePne 60nyTmC. YcIHIN KAnbHdbfb2rO MeH 40 MM apacbHdaBf WkaDapra nnTaHbOpHAty MyMKHdk 6epTeH 6eKITy INMeKTePi KaMTamAcb3 etinreH. TnTA WkaF yCTHe MblkTaN 6eKITInReHHe Ke3 KeTki3y yuH 6apbIK INMeKTePi naDaanhy KepeK.
- Ac yin neiHnIaTap aIbIHna KecTe KepeTInreH nicipy naHeni BoHHa HfB3daFbHTb (KoCA 6epine) opHaTBH3.
ImMeKti 6eKty cb36acbl
Imek opHbI WkaF yCTiHIN Imek opHbI WkaF yCTiHIN KaIbIHdbfB H=20MM YUH IN KaIbIHdbfB H=30MM YUH
Anbi
ImekOpHbI WkaΦ yCTHHApTbI KaBnBbFbH=40 MM yUHH
!"Kepek-kapaKaTap"opamacbHaIaftbInMeKTeepi KOnlaHbHbI3. - PInnta eHdipinreH neu yctHe opHaTbImaHaH kafdaIa, Okwaynay yuH aFaW taKaTaHbI opAty KaKeT. OHbI PInntaHbI acTbIHfbl KaBbHah KEM dereHne 20 MM apa KaabkTbKta opHaNactbIpy Kepek.
Xengety
The device must be connected to the mains supply through a socket with a grounding contact. Before connecting, make sure that the mains voltage matches the value indicated on the rating plate (230 V ~ 50 Hz).
The device must be connected to a socket with a grounding contact. The plug must be inserted into the socket only after the installation is completed.
Electrical connection
Before connecting the device to the mains, check that the rating plate data correspond to the mains voltage and frequency, and that the socket is equipped with a grounding contact. The device must be connected to a socket with a grounding contact.
The electrical connection must be made with a cable of the appropriate cross-section. If the device is installed in a place where the plug is not accessible, a disconnecting device must be provided in the fixed wiring in accordance with the wiring rules.
Connecting the device to the mains
The device must be connected to the mains through a socket with a grounding contact, in accordance with the rating plate data. The electrical connection must be made with a cable of the appropriate cross-section. The distance between the device and the socket must be at least 3 mm. The socket must be accessible after installation. The cable must be routed so that it does not touch hot parts of the device. The ambient temperature must not exceed 50 °C.
The electrical connection must be made by a qualified electrician in accordance with the safety regulations.
Before connecting the device, check the following:
The socket must be grounded and comply with the standards. The maximum power consumption of the device must not exceed the rating plate value. The plug and the socket must be compatible. The socket must be easily accessible. Do not use adapters or extension cords. Do not touch the plug with wet hands.
The device must be installed in a place where the plug is accessible.
Do not immerse the device in water or other liquids. Do not touch the plug with wet hands. If the device is damaged, it must be repaired only by qualified personnel (contact a service center). Do not use the device if the power cord is damaged.
Gas connection
The gas connection must be made in accordance with the standards and regulations in force. The device must be connected to the gas supply through a shut-off valve. The gas supply must be checked for leaks. Do not use the device if there is a gas leak. In case of gas leak, close the valve and ventilate the room. Do not use the device if the gas supply is not properly connected.
13heprnKbImetieceHimdi60ny,ohbI dypbic konlanyu wih JxHe 6yblmbiy3ak naDanaham DeceH3,ra3db6pey KbcimblTg3 KOHOpkaapanbe MeHΦopcyHKanapb ciNaTbi"KeCTeciHde KepcTeirre Hmimmettrep ceHkecKenyi kepek.
Ha3ap ayapbHbI3! Kocnac 6pybIH ra3 nnITacbIbIH Ky6bIPbIH TaBImaIarbl 6iteyih anbHbI3.
TbIbI3 Tpy6ka Kemerimeh Xanray (MbIc XeHe 6oNaT)
!ra3kybiphaJkaIaray6yibIMraeKaHdAnKyKTeMeTycipMeyKepek. 5yibMHbIHra3KeNETHtpyBaHdaTbIF3daaTBIH TceMi KocaBeipireh, 6ypaBnTpyaBH“L"6byHbIb6ap.Erep6yihDaaybictbipyKepek6oNfah KaadnaDA,ObIH TBIF3dayTeCEmi aybICTbpyKepek(6yibIMFA Koca 6epinTeIH).BymbdaRa3KeNETHtpyBaHbUunmnpriyppteri iuki % ra3KImacbl6onada.
BypaHdAmenKaIraHbIn, teric opanraH, tot 6acnaTbH 6oJatAn HkacanFaH wHaH apKbInr Ra3DbKocy.
Bmybda ra3 kenetin TpybaH uHHnpi Typeri iwi 1/2 ra3 KImacbi bona.
Byndai wnahrinepi jkaflaHaJOnapdbi MaKcMaIbIK Ka3blny y3blHbIb2000 MM acnaybi Kepe. Onapdbi KaIanf BonfahH KeiH, MeTaNdH KacanFAH mriu wlaHI Ko3FaMbnJI 3aTTapfa Tmme typybH XaHe 6yKTeIN KaMbayIB TEkcepin anBbI3.
HopmatNBtepre cKeKc Tpy6kanaapbI, coI enDiH MemnekeTTIK HopmatNBtepine CKeKc KeNeti TbIfbiDarbiu Tecemdepi naDanahy KepeK.
Tbfb13dbfb1h Tekcepy
!KaIraayabiaaKaTafahHaeiH,6apbikTyTikTeepHtBifb3bIK6epikTirH ca6bI epitihicHHKemimerTEkcepiH3,bipakOTne TEkcepmH3.
Optpni ra3 Tpyneipine Kyire KeiTipy
BmybH ericiH eepweneHt Hra3 tyPihe Kapai Kyre KeTipinei (KaKnakTaBkyire KeTipy 3nKetInHe kepcetinre).KohΦopka opcyHKanapbH KeIeci TepInte aybCTbpy KaKeT:
- Iicipy naHeniHderi TopdbI aIbIHb3 XaHe KaHaPfblbI e3 YraBbIFbHaH aIbIHb3;
- opcyHKanapdb7 MM KITTIH KEMERImE 6ypan (cyp.Kapa), OJAPdb JkaHa ra3 Tpynepe H ecENTeIeH opcyHKanapra aybCTbIPbHB3 (XaHapfb XHeopcyHK CnattamacbKeCTecineKapa);
KZ
Kanran Jepnepine Baca KaabkaptbH Koraapda KepeTInre H Tepinke KepicHwe Kapai KoBbI WbFbHb3.
OnepaunHbI aKrTaHaHH KeIH TectineyIDiEck 3nKeTkacBih OcbI naIaHaBInatbI ra3 TypHe Caikec KeNETIH KaHAcBHa ayBCTbIPbIH3. 3nKeTkaHb I63iH TexHnKaNbIK KbIMET KepCety optaBkTapbih Tancbipbc6pe anacB3nap.
KoHΦopKaadaBb6actaikbayahbpeTey
KoHΦopKanap 6actankblyaayabI petteydi kaxet etnei.
MmHmamdbayahbpeTey
- PeTteriIu-TyTKaHbMIHNMaMnblO T KyIiHe KapaB dypaHb3.
- TytKaHbI aIbn, kpan tyiriHin iHIne Hemece XaHbHa opHaJacn peTteriH BnHTTI TpaKbI a3 OT KyHHe KeJIreHne 6paHbI3.
- T-YTKaHbMakcImaNDbik KyIeH MmHMaJIdbIK KyIre OkBic 6ypaHaJ KAFdaJa KOHΦOpKaHbIH eWIn KaMMaybH 6aKaHbI3.
- KopfahBic KpybIYbCbOpHaTbIyH 6yHbIMapda, KOHNbIPbI ICTEH bIKKaH KaDaJa KOHΦopKa OTbMIHIMaJIbI BoJFaH KaFdaJa, MNHMaJIbI ra3 KyIH peTteriW BINT KEMeIMHe3reptIH3.
- PeTeyi aRrTaHann KeIH r3 Ky6bIbHbI aHaIaBcHdaFbI cypriuTik XeHe cOn CnKbTI NmO6aIapDbI KaNbHa KeNTipiH3. CytbIbnFaHra3blnaindaHaHKardaJa,peTteriBnHT6apbHwa KaTbIb6ypanybiKepeK. ! Oenapua aarktafahanh KeiH, eck 3TKKeTkaHb Ra3dbH tyPihe cKeKc Kenetih KaHaTypHe aybICTbIPbIH3. 3TKKeTkaHb 63diH TexHkAnbIK kbI3MeT KepcTepy OptaikltapbHa TancbIpc6epy apkbln anyra 60laabl. !KoJaHaBnFaHra3KbCbMbYcBnHnFaH KbCbMnHae3reWe(HeMece cAn e3rewe)6onca,Kipic Kb6bpra Tmicti KbCbIM peTteriIi 6ekitinyKepek (aBIMdaFbyyTTtbKepexepepre CaiKec).
KZ
OTtbIK neH fOpcyHaJapdbIH cHnataTapbl
| 1-keCTe | Сухиные re3 | Таби ra3 | |||||||
| OTbIK | Диаметр (MM) | Жылу чьагу MУМКИндігі kBТ (p.c.s.) | Байпас 1/100 (MM) bICK. | Форсунka 1/100 (MM) | Шыfcьн* r/carf. | Форсунka 1/100 (MM) | Шыfcьн* r/carf. | ||
| *** | ** | ||||||||
| Жылдам (R) | 100 | 0.70 | 3.00 | 39 | 86 | 218 | 214 | 116(Y) | 286 |
| Жарылай жылдам (S) | 75 | 0.40 | 1.65 | 28 | 64 | 120 | 118 | 96(Z) | 157 |
| Косьимsa (A) | 55 | 0.40 | 1.00 | 28 | 50 | 73 | 71 | 79(6) | 95 |
| ΘTKi3y кысьмы HOMInHa | dby (Mбap) | 28-30 | 37 | 20 | |||||
| Ен темен (Mбap) | 20 | 25 | 17 | ||||||
| Ен joогары (Mбap) | 35 | 45 | 25 | ||||||
- 15°C xéHe 1013,25 m6app KaFdaBbHda - Kypfak ra3 Пponан P .C.S. = 50,37 MДж/кг * BytaH P.C.S. = 49,47 MДж/kr
Ta6l. P.C.S. = 37,78 MJ/m³
PR 642 /I(BK)
Do not use the device for purposes other than those specified.
These devices
The device is designed to operate with the parameters specified in the technical data sheet.
- First

ENKogary
ENTOMEN
To turn on the device, press the button on the device body, not the switch on the power cord, and hold it for at least 2 seconds until the device starts.
To prevent accidental activation, the device must be held for 2-3 seconds to turn it on.
To turn off the device, press and hold the button until the device turns off, then release it.
If the device does not turn on, check the power cord connection and the fuse.
To replace the fuse, turn the device off and unplug it from the power source.
For further information, contact the manufacturer.
The device must be operated within the following parameters:
The device is intended for indoor use only.
- Byn KpybInrBf3 Knacka XataTbH Kocankbl TypMbICtbK 3neKtp KpybInrbcbl 60bn Ta6bnadbl.
- Ra3 KpybIfblnapbI Dypbc Kbi3Met aTkapy yuH aya aHaHbIMBH petke Kentipy Kepek. OcbI KOHdbIpfbInapDbI opHaTkAn Ke3de "OpHanactbipy" naparpaibHa dCnataTaNFaH TanaTAP caKtanybIH Tekcepini3. Backapy6yibIMbIHnacnopTbIK KectecHde XHe HycKaMaCbHaKeTTipinre enepre fanaXapamdbI 60bn TabJaDbI.
- Byn 6yibm yu wapTTapbHda KcciBn eMec Tpyfbla naJaIaNHyra apHanfaH.
- BybIMdbkweere, bactbIpMa actbHda opHaTyfa TbIbIM caIbHaDbbl, eHTkeHi oFaH xaHbip xeHe HaxkaaIdbH ecepI eTe kayinti 6oIbn caHanaDbbl.
- BybIMFa cy KOJIMeH, JKAaHaJaR KHeMeCe DbIMbU aKaJIeH XaKaBHdAmHaB3.
- BybIM TaFAMdbIK eHIMDepdi daBihDayfra apHaIraH, OHbl OcbI TexHkAJIbIK HcKayNbIKA TKePcETInreH epExepepre Caikec TeK epecek aadMdap rHa naaDaHa anaDbI. BaCKaTyPbMbICTbIK3JIeKTPoKa6bIbKTapDbH3JIeKTPKyaTbI eTKiTIsePteIMeh, 6yIbIMHbH bICTbIK 6JIeKTepeIMeH XaKaBH 6aJIaHaBcKa TycNeH3.
- XeIeTeKIIu TOpnpIbI XeHe bIcTbIbI 6acatbH TeicKeTpdi XaHaNaHbI3. BiybIMnaiDanaHbINMaHaHda,TyTKaIapbl“/”O"kaFdaBbHda60nybH bJfNTEKcepij3. BbIMHbIN BnKAcbIH TOK KEiHeH Cybipy yIiH XeNi LHypbIH HapTnAHb3, BNKaHbIH e3iHeH YCTAN CybPbIH3.
- EiybIMhIH Ta3anay Hemece texHnKaNbIK XyMbICTap Xacay yuH hTENCEJI BUNKaHbTOK Ke3iHeH cyIpbHb3. XeHdEmeiTih XaFdaIa, 6yBIMbHIn iKMI mexHaHm3Mepin e36etIHwe XeHDeY XyMbCTapBH Xpyri3y yuH aUyra TBnBIM cAIBHaDbl. TexHnKaJIbK Kbi3Met Kepcety optaikTapbHa xa6apnacbHb3nap (TexHnKaJIbK Kbi3Met Kepcetyi kappa). Erepra3xhe3neKtp KOHΦopkanaPbI bCTbIK 60bnTypca,nicipy naHeHHiHbHbKaKnFaBHn (erep on 60nca) xannah3. KypbIbIbIΦm3nKaIbIKcεIMTaIbIKxHeNCnxNkabIkbKa6IeTepi TEme H aamap (6aanap da kipei), Toxipu6eci Hemece eHimHen Xaapbl KOK Ke3 KeTRe H aAMHbIH KOJaHa6aybl Tnic. MyHdA aamapfa, KEM DeRHeDe, Kayinc3dikTePi H KamTaMaCbI3 etetih 6ipeyIep xeTeKui 6onybl KepeK Hemece KypbIbHbIH KMybIcblHa KaTbIcbl Kipicne Hyckaynapbl Bepiyi Tnic. -Балларра Крьллфимен Oинayура ркcat ettneH3. KypbIfblcIbTbI TaHMePmH HeMece 6eek KaibkTaH 6ackpy Kyeeci apkbIbI backapbya phanmaFaH.
Xo10
- OpaybI MATEpnaIbI KJorHan Ke3e: opaybIbI KaIa Ta naIaIaHyra 6oIaTbHdai etin XepriniKTI 3aHaMaHbI yCTaHbHb3. JKapamcb3 3nEeTpiK jHe 3neKToHbIK k6a6bIK 60bHwa (WEEE) 2002/19/EU Eyponaibk DnpeKTNbAcbl Ecki TpyMbICTbIK KpybIbIbnapbl KaIbITbI cypIbITaIMAfAH TyPmbICTbIK KObIC KybIbIbHa XoObI TaIan etedi. Ecki KpybIbIbnap IuiHderi MATEpnaIaNapdbIH KannbHa KeTIpiYiH JxHe KaIbTa eHdEnyIH OHTaIIaNbIpy JxHe aAM DeHCayblfMeH Kopwafah opTarbl acepiH 3asyTu yuHc Eckl KpybIbIbnapbl 6BeNek XnHAY YcBHLnbAbl. EtHMderi yctCb3bINFAH «Kokbc Ce6eTl» BeNtici KpybIbIbHb JKoiRan Ke3de 6eNek XnHay KaKeTTiniri typanbl eceptedi.
TybHybIap e3iH ecky KpybIbIbIaBpIH KOIO TpaJIb MAnIMETeP ap yuH JxeprinikTI YKIMETKe He denDaIIra Xa6apnacyIkepeK.
Kopwarah opTaHbI caKray XHe Kopray
Do not operate the device without the cover or with the cover open. If the cover is damaged, contact the energy supplier. The device must be connected to the mains and the cover must be closed. If the device is damaged, disconnect it from the mains and contact the energy supplier immediately.
Read the instructions.
- The device must be installed in a well-ventilated area. Read the instructions and keep them for future reference. The device must be protected from atmospheric agents and mechanical damage.
- The device must be stored in a place with a temperature between -50°C and +40°C.
Read the instructions.
- The device must be installed in a well-ventilated area. Read the instructions and keep them for future reference. The device must be protected from atmospheric agents and mechanical damage.
- The device must be stored in a place with a temperature between -50°C and +40°C.
Maintenance and cleaning
Cleaning the device
Before cleaning, disconnect the device from the power supply.
Cleaning the hob
Clean the hob with a damp cloth and a mild detergent. If the hob is very dirty, use a scraper. Do not use abrasive sponges or harsh chemicals. Clean the hob with a damp cloth and a mild detergent, then dry it with a soft cloth. If the hob is very dirty, use a scraper. Do not use abrasive sponges or harsh chemicals. Do not use steam cleaners or high-pressure cleaners. Do not use sharp objects or metal scrapers. Do not use harsh chemicals or abrasive cleaners.
Cleaning the hob
The hob and its parts can be cleaned. Remove the parts and clean them with a damp cloth and a mild detergent. Do not use abrasive sponges or harsh chemicals. Rinse and dry.
The hob and its parts must be cleaned regularly. Do not use abrasive sponges or harsh chemicals. Do not use steam cleaners or high-pressure cleaners. Do not use sharp objects or metal scrapers. Do not use harsh chemicals or abrasive cleaners.
I have not been able to properly identify the type of malfunction that occurred at the place of installation of these devices.
For technical service
If you close, it is possible to turn off the device or its parts. If you take these actions, the device may be damaged.
I have been given a list of instructions for installation
Actions for malfunctions
If the device does not work as expected, it is necessary to contact the service organization. Before that, you can take the necessary measures yourself. However, be careful when handling energy and gas, especially if there is a gas leak.
Dangerous or harmful.
For temperature:
Gas pressure must be checked. All gas connections must be tight. - Panel front part
Safety structures are available in some models.
For temperature:
Press the button to set the temperature. To ensure safety, press the button again. - The adjustment knob must be turned to the required gas pressure.
The lamp is minimal in power.
For temperature:
- Gas pressure must be checked. - Panel front part. Minimal with the device.
This appliance is not intended for use by persons (including children) with reduced physical, sensory or mental capabilities, or lack of experience and knowledge, unless they have been given supervision or instruction concerning use of the appliance by a person responsible for their safety. Children should be supervised to ensure that they do not play with the appliance.
KZ
Indesit Company S.p.A.
Viale Aristide Merloni, 47
60044 Fabriano (AN)
www.indesit.com
- OPERATING INSTRUCTIONS HOB
- IT
- WARNINGS
- REPAIRS AND AFTER SALES
- NL
- ASSISTANCE
- INDICATE TO HIM/HER
- DESCRIPTION OF THE APPLIANCE
- OVERALL VIEW
- POSITIONING
- FITTING THE APPLIANCE
- HOOK FASTENING DIAGRAM
- FRONT
- VENTILATION
- ELECTRICAL CONNECTION
- CONNECTING THE SUPPLY CABLE TO THE MAINS
- GAS CONNECTION
- CONNECTION WITH A RIGID PIPE (COPPER OR STEEL)
- CONNECTING A FLEXIBLE JOINTLESS STAINLESS STEEL PIPE TO A THREADED ATTACHMENT
- CHECKING THE TIGHTNESS OF THE CONNECTION
- ADAPTING TO DIFFERENT TYPES OF GAS
- BURNER AND NOZZLE SPECIFICATIONS
- START-UP AND USE
- GAS BURNERS
- PRACTICAL ADVICE ON USING THE BURNERS
- PRECAUTIONS AND TIPS
- GENERAL SAFETY
- DISPOSAL
- GB
- RESPECTING AND CONSERVING THE ENVIRONMENT
- MAINTENANCE AND CARE
- SWITCHING THE APPLIANCE OFF
- CLEANING THE HOB SURFACE
- CLEANING THE HOB PARTS
- GAS TAP MAINTENANCE
- TROUBLESHOOTING
- THE BURNER DOES NOT LIGHT OR THE FLAME IS NOT EVEN AROUND THE BURNER
- THE FLAME DIES IN MODELS WITH A SAFETY DEVICE
- THE BURNER DOES NOT REMAIN LIT WHEN SET TO MINIMUM
- THE COOKWARE IS UNSTABLE
- INSTALLATION
- CLEAN THE PARTS OF THE HOB
- LOCATION
- BUILT-IN INSTALLATION
- DIAGRAM OF BRACKET INSTALLATION
- RU
- CONNECTION OF THE POWER CORD TO THE MAINS
- CONNECTION TO THE GAS SUPPLY
- CONNECTION WITH A FLEXIBLE PIPE MADE OF STAINLESS STEEL WITH THICK WALLS AND THREADED CONNECTIONS
- CHECK THE TIGHTNESS
- PREPARATION FOR DIFFERENT TYPES OF GAS
- CHARACTERISTICS OF INJECTORS AND NOZZLES
- PRACTICAL TIPS FOR USING GAS BURNERS
- PRECAUTIONS AND RECOMMENDATIONS
- GENERAL SAFETY REQUIREMENTS
- UTILIZATION
- ENERGY SAVING AND ENVIRONMENTAL PROTECTION
- TRANSPORT AND STORAGE
- DECOMMISSIONING OF THE APPLIANCE
- CLEANING THE SURFACE OF THE VAPOR PANEL
- CLEANING THE COMPONENTS OF THE VAPOR PANEL
- CARE OF THE CONTROL KNOBS OF THE GAS BURNERS
- MALFUNCTIONS AND HOW TO FIX THEM
- THE BURNER DOES NOT IGNITE OR THE FLAME IS UNEVEN
- KZ
- OPHATY
- OPHANAACTBIPY
- KYPBIINFBLHBOPHATY
- IMMEKTI 6EKTY CB36ACBL
- ANBI
- XENGETY
- CONNECTING THE DEVICE TO THE MAINS
- TBIBI3 TPY6KA KEMERIMEH XANRAY (MBIC XEHE 6ONAT)
- BYPAHDAMENKAIRAHBIN, TERIC OPANRAH, TOT 6ACNATBH 6OJATAN HKACANFAH WHAH APKBINR RA3DBKOCY
- TBFB13DBFB1H TEKCEPY
- OPTPNI RA3 TPYNEIPINE KYIRE KEITIPY
- THESE DEVICES
- FOR FURTHER INFORMATION, CONTACT THE MANUFACTURER
- THE DEVICE IS INTENDED FOR INDOOR USE ONLY
- XO
- KOPWARAH OPTAHBI CAKRAY XHE KOPRAY
- READ THE INSTRUCTIONS
- MAINTENANCE AND CLEANING
- CLEANING THE DEVICE
- CLEANING THE HOB
- FOR TECHNICAL SERVICE
- ACTIONS FOR MALFUNCTIONS
- DANGEROUS OR HARMFUL
- SAFETY STRUCTURES ARE AVAILABLE IN SOME MODELS
- THE LAMP IS MINIMAL IN POWER
Brand : INDESIT
Model : PR 642 I
Category : Cooker