Comfort Vision 9011 - Built-in kit Bury - Free user manual and instructions
Find the device manual for free Comfort Vision 9011 Bury in PDF.
| Product Type | Car hands-free kit for mobile phones |
| Brand | Bury |
| Model | Comfort Vision 9011 |
| Category | Built-in kit |
| Power supply | 12 V (cigarette lighter socket); possibility 24 V (truck) with adapter |
| Connection technology | Bluetooth |
| Supported Bluetooth profiles | Hands-free, OPP |
| Phone memory | 5 mobile phones |
| Display | Screen with connection info, Bluetooth name, signal strength, battery |
| Remote control | Wireless, to be paired via specific procedure |
| Microphone | Included, can be attached to A-pillar, sun visor or rearview mirror |
| Main functions | Hands-free calls, phonebook (100 SIM entries), call log, voice command, volume adjustment |
| Menu languages | Multiple (default English) |
| Software update | Possible via bury.com website (firmware) |
| Warranty | 2 years on all parts |
| Standards | CE, E1 |
| Installation | By user or professional garage; follow manufacturer's instructions |
| Supplied accessories | Cleaning cloth, cables, mounting bracket |
| Safety instructions | Avoid impact zones and airbags, do not obstruct visibility, no unqualified repairs |
| Maintenance | Avoid moisture, extreme temperatures, shocks; clean with dry cloth |
Frequently Asked Questions - Comfort Vision 9011 Bury
User questions about Comfort Vision 9011 Bury
0 question about this device. Answer the ones you know or ask your own.
Ask a new question about this device
Download the instructions for your Built-in kit in PDF format for free! Find your manual Comfort Vision 9011 - Bury and take your electronic device back in hand. On this page are published all the documents necessary for the use of your device. Comfort Vision 9011 by Bury.
USER MANUAL Comfort Vision 9011 Bury
Scope of supply & dimensions 9
Accessories 11
Installation instructions 12
Security guidelines 32
Installation and handling of the components 33
Operation instructions 34-37
Caption 62-63
1 4
Introduzione 7
Congratulations on purchasing a Bury hands-free car kit. You have chosen a high quality product that is extremely easy to use. All aspects of Bury production through to sales and service are subjecttostrictqualitymanagementacceedingtoDINENISO9001.
AllBuryhands-freecarkits meetCEande1securitystandards.
Furthermore, we provide two-year warranty on all components.
Please read the operating manual carefully so that you can fully enjoy your Burry hands-free car kit.
If you have any further questions concerning installation or operation of your carkit, please contact your dealer. He will be happy to give you reliable advice.
Please contact our hotline in especially urgent cases. You will find the telephone and fax number onebottomofthetitlepageoftheoperatingmanual.
Havea goodtrip!

If your vehicle is equipped with a concave A-pillar, ambient noise due to resonancececanoccur. T henplacethemicprohomeneartheirdivingmirror.
Attention! important information
Avoid airbag and impact zones
Voltage transformer required
- Podlact, pilota (CV 9011).
Theinstallationofthissystemcanbecariedthroughbymyourselfbutplease observe the installation requirements of the automotive manufacturer (VAS 1978). During the installation, park the car at a place where the road traffic is not impaired. We recommend to let a specialized workshop perform the installation.

Thisssystemhasbeendesignedfortheuseinvehicleswithanon-boardsupply system of 12 volts (passenger car). Prior to installing the device in a vehicle with anon-boardsupplysystemof24volt(truck),pleasecontactinycaseour hotlinebyphone.

Install the components of the device in the vehicle so that your field of vision is not impaired and the components a renotmountedintheimpactzoneoffthe passenger compartment or in the airbag inflation zones. The removal of coverings (with and without airbags) or components of the dashboard requires insomecasespecialtcoolsandspecialknowledge.

Do not commission the device if you detect or assume a defect. In this case, contact our hotline. Improper repair efforts can be dangerous for you. Therefore, onlyskilledpersonnelmayperforminspections.

We shall not be liable for damages or malfunctions due to improper use of the navigationsystem. Therefore, donotexposethedevice moisture, extreme temperatures or shocks and carefully follow the procedure described in the installationandoperatingsguidelines.

Operate the system only when the situation allows it and when you do not endanger, harm, constrain, or annoy other road users. The volume of the device has to be carefully controlled by the operator.
A mobile phoneisconnected,anincomingcall:
Intheupperline'call'isdisplayedandthephonumberisdisplayedinthemiddleline.
(2)=Acceptcall
(3)=Turndownvolume
(4)=Turnupvolume
(5)=Rejectacall
Otherkeys=nofunction
Amobilephoneisconnected,duringanactivecall:
Intheupperline'connected'isdisplayedandthephonenumberisdisplayedinthemiddleline.
(3)=Turndownvolume
(4)=Turnupvolume
(5)=Hangup
Otherkeys=nofunction
A mobile phone is connected, menu calling lists or directory:
In the upper line, the type of calling list or the term 'directory' is displayed. If a name is available it is displayed in the middleline and thephonenumberinthethirdline.
(1)=SKiptotheprecedententry
(2) = Dialingthenumber
(4)= Skiptothefollowingentry
(5)=Exitcallinglistordirectory
Otherkeys=nofunction
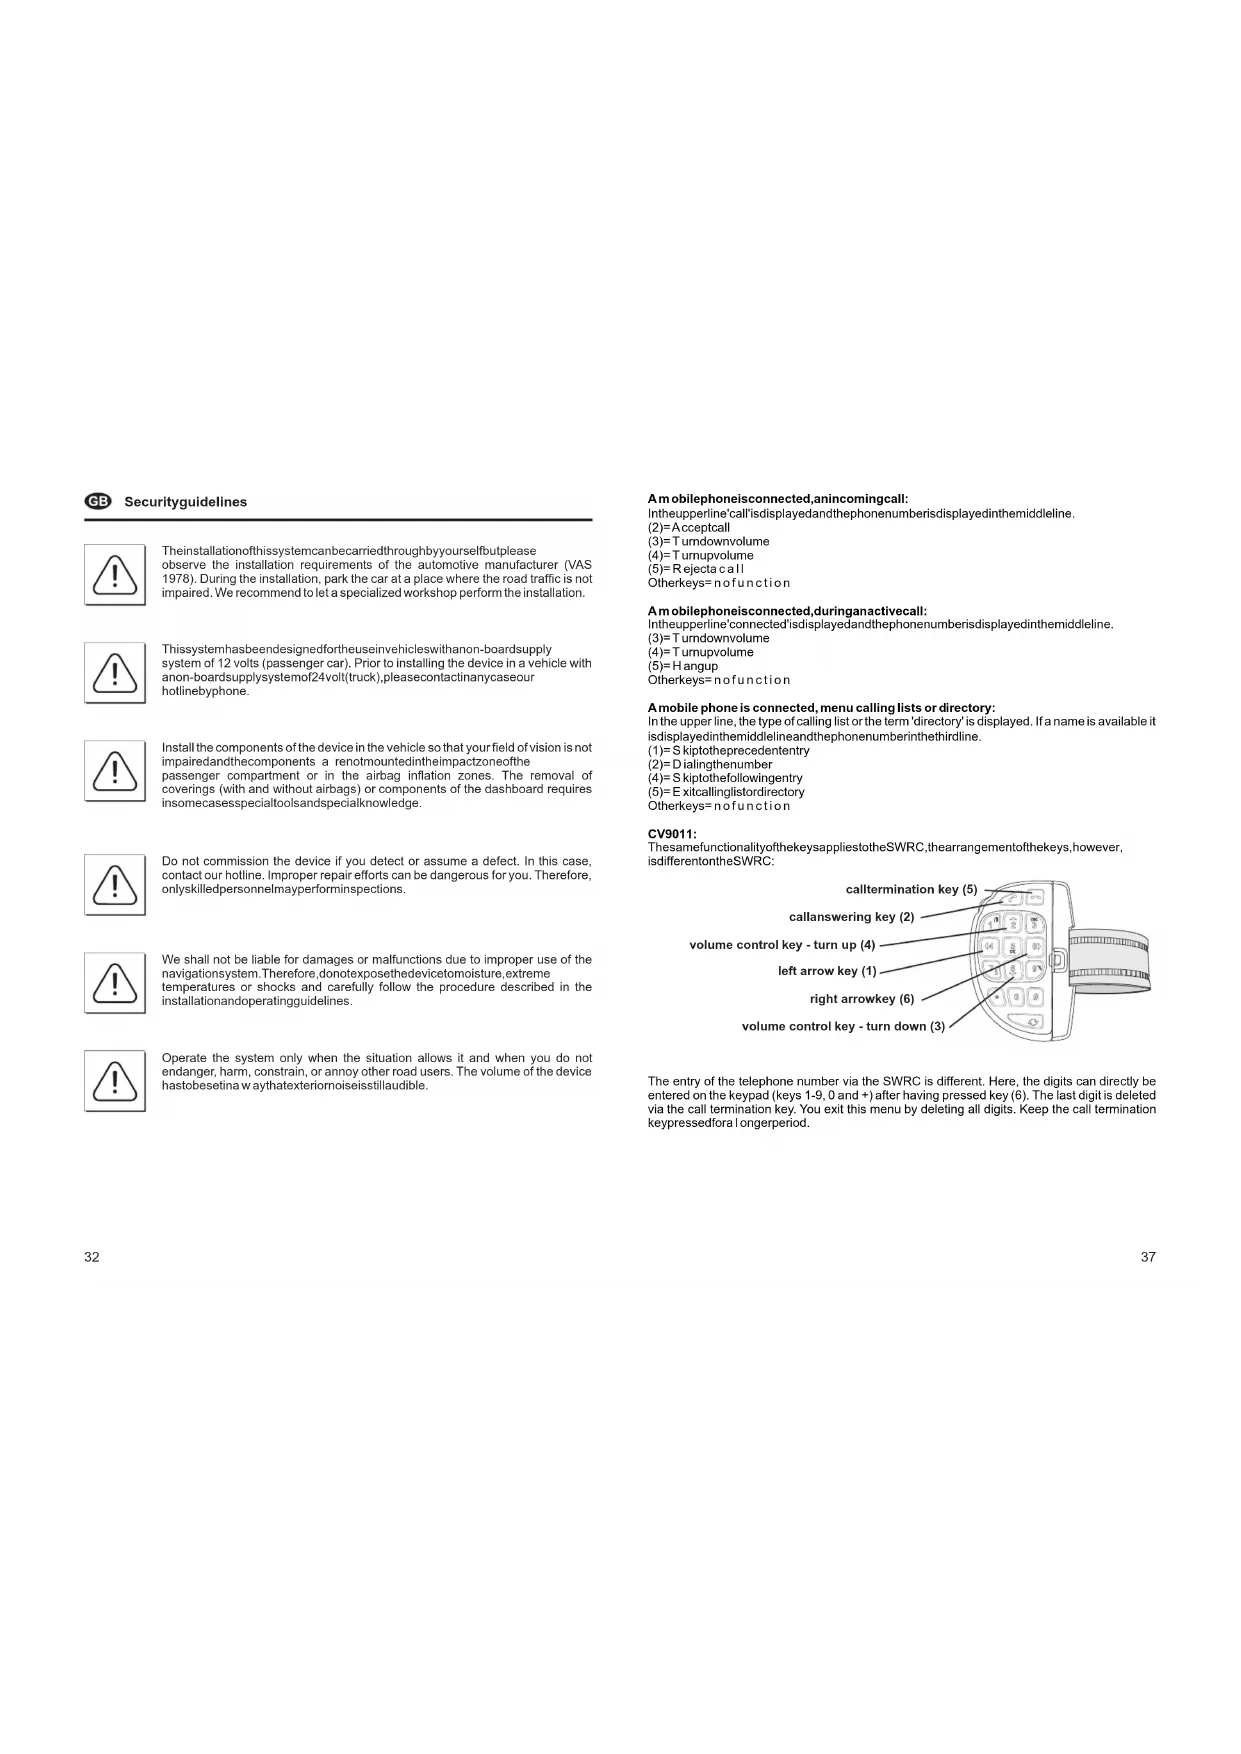
CV9011
ThesefunctionalityofthekeysappleslotheSWRC,thearrangementofthekeys,however, isdifferentontheSWRC:
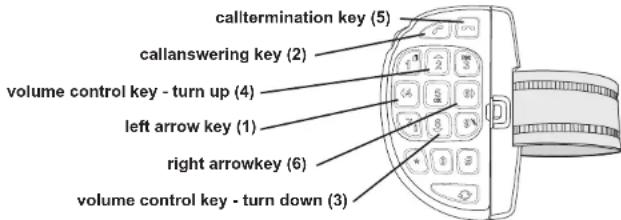
The entry of the telephone number via the SWRC is different. Here, the digits can directly be entered on the keypad (keys 1-9, 0 and +) after having pressed key (6). The last digit is deleted via the call termination key. You exit this menu by deleting all digits. Keep the call termination keyedpressedforalongerperiod.
Underthesub-item'SW-Version'theversionnumberofthecurrentlyuploadedsystemsoftware isdisplayed.
Thelanguageofthemenunnavigationcanbechangedunderthesub-item'Language'.Several languagesareatyourdisposalthere,ifyouoperatethehands-freesetforthefirsttime,the presetmenulanguageisEnglish.Inordertochangethemenulanguage,请aseperformthefollowingsteps:
Please press key 1 once and then consecutively key 6 until the menu item "language" is displayed. Then press key 2 once to access the submenu. The current menu language will then be displayed. By pressing key 6 several times you can now scroll to the language you want to use in future. You can scroll back by pressing key 1. If you want to select a language, please press key 2. By pressing key 5 several times you return to the main mask.
Useofvoicetags:
Inordertobetableousethevoicedialingfunctionsofyourmobilephonewiththehands-free set, you must correspondingly have identified the phone number in your mobile phone in advance. In most cases you can only include voice tags in the directory of your mobile phone for phone numbers already stored. In order to call up the voice tag function at the hands-free set please press key 2 in the main mask for 3 seconds. Please announce now the call identity of the desiredpartner.
Functionsofthekeys(x)duringoperationbypressingshortly:
Nomobilephoneisconnected,stand-by:
(1)=Enteringtothemenu
(6)= Conneclingtothemobilephoneconnectedlast
Otherkeys=nofunction
Amobilephoneisconnected,nocall/menuactive:
(1)=Enteringtothemenu
(2)=Callingupthelistofnumbersdied
(3/4) = Volume control key = volume turn up/down
Pleasednote: The volume adjustment to themobilephoneisadopted by the hands-free set. I.e., the option "silent" is activated (all acoustic signals are deactivated), nocal signal is heard from the loudspeakers of the hands-free set. It depends on the paired mobile phone whether the HFCK issues a call sign. In addition, the volume of some mobile phoneshouldnotbeenswitched to maximum inordertoavoidechoproblems at the hands-free creakpit.
(5) = nofunction (6) Inputofphonenumber
Amobilephoneisconnected,inputofphonenumbers:
Themiddleandthelowerlineindicatethephonenumberentered(max.30characters).
(1) Deletionofthelastcipher
(2)=Dialingnumber
(3)=Countdownlastcipher
(4)=Countuplecipher
(5)=Exitmenu
(6)=Enteringthenextcipher

Installationandhandlingofthecomponents
Step1:
Firstofall, please choose the most convenient position for themonitor and the installation pad in your vehicle by attaching the monitor to the pad and checking different positions in the vehicle. It is very important to observe impact areas for occupants (amongst others the airbag zone), surface consistency (depending on the type of fastening), freesight to themonitor (no impaired sight out of the windshield), removability of the monitor from the installation pad as well as a conveintion possibility for placing the cable.
After having found a suitable position for the monitor in the vehicle you can mount / attach the installation pad accordingly. Please use the enclosed cleaning cloth for degreasing the surfaces you want to attach the retainer to. Please note that in case of high variations in temperature - depending on the structure and the features - decolorizations of the surfaces can occur during the subsequent utilization.
Step2:
Connect the microphone to the left side of the monitor. If possible, please pass the cable in a waythatitdoesn'tleaveaboutunfastenedinthevehicleandthatimnotinfluencethe conductingoffhevehicle.
Whenpassingthecable,please takecarehatitisnotundertractionstressbuthatthassome tolerance. Avoid crushing the cable as damages of the insulation can be caused by friction/rubbing.
Step3:
Depending from the vehicle type and its equipment (e.g. airbags), it is reasonable to install the microphone either at the A-pillar, at the sun shield or at the roof interior. For details about the equipment features please refer to the documents of the vehicle. Please also observe the notes on distances to other components and to the driver / speaker, as specified in the installation manual.
Step4:
Insertthecigarettelighterplugincigarettlelighterjackinordertoestablishthepowersupply. If possible, please pass the cable in a way that it does not lie or hang about unfastened in the vehicleandthattimaynotinfluencestheconductingoffthevehicle.
CV9011-Step5:
Installthesteeringwheelremotecnol(SWRC)asdescribedinthemountingguidelines.In deliverystatustheSWRccontrolisnotpairedwiththehands-freecarkit.Pleasescallthesubmenu"Remote control pairing"(by pressing key 1 and pressing key 6 four times) at the handsfree car kit. When pressing key 2 a message appears which recommends pressing keys 7 and 3 on the SWRC simultaneously. Proceed for at least 3 seconds. The SWRC is now paired with the HFCK and ready for use. By pressing key 5 twice (or the call termination key on the SWRC) you returntothemainmask.

Operationinstructions
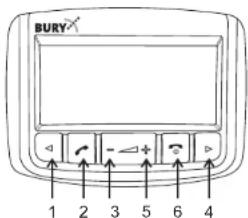
1 = Left arrowkey
2=callansweringkey
3 = v olumecontrolkey- t umdown
4 = v olumecontrolkey- t umup
5=callterminationkey
6 = rightarrowkey
Switch-on:
Insertthecigaretelghterplugothehands-freecarkit(HFCK)intothecigarettelghterjack(12 Volt) of your vehicle, if you have not realized the power supply of the HFCK otherwise. Now establish the power supply of the HFCK (e.g. by 'ignition on'). Please press key 5 for 3 seconds to activate the system. The HFCK then tries for tries for about 10 seconds to establish a connectionwiththemobilephoneconnectedlast.
Establishinga Bluetoothconnection(pairing):
If you wish to establish a Bluetooth connection for the first time, you have to activate the BluetoothfunctionofyourmobilephoneandsearchforBluetoothdevices. Inthiscase, search for a device labelled "Comfort VISION". If several devices were identified, please select the HFCK and enter the PIN number 1234. The Bluetooth connection (pairing) will then be established between your mobile phone and the HFCK. The HFCK supports the profiles "hands-freeoperation" and "OPP". Please set your mobile phone accordingly or check these profiles supported.
If it is not possible to establish a connection, please check and update the software release (firmware) of your mobile phone or of the hands-free set. You will find an overview dealing with thisissubjectintheinternetunderwww.bury.com.Inadditionitispossiblethayoumustdeleteall devices connected to your mobile phone first in order to enable a correct identification of the hands-free set and a connection can be established. If you have questions with regard to the menusnavigation, functionsandoperationofyourmobilephone,pleaserefertotheoperating guidelinesofyourmobilephone.Dependingonthemanufacurerandtype,thisscandiffer considerablybetweenphones.
The hands-free set has a memory for the storage of the identification of up to 5 mobile phones. In case a sixth mobile phone is connected, the oldest entry in the hands-free set memory is cancelled.
Disconnecta Bluetoothconnection:
If you wish to cancel a Bluetooth connection, you can either disconnect it conveniently at the hands-freesetoratyourmobilephone. Inaddition, theconnectionisdisconnected, ifyoumove too far away from the vehicle while taking your mobile phone with you and thus leave the receptionraduosofthehands-freeset. After 15 minutes without an active Bluetooth connection (stand-by), the hands-free set is switched-off automatically if it is still supplied with power. This serves to protect the main battery. If you come back to your vehicle within that period of time you can initiate a manual interconnectionbypassingkey5 forthreeseconds.
Pleasanotethatthecapacitofyourmobilephone'sstoragebatterycanquicklydecrease whentheBluetoothfunctionisactive. IfyoudonotwanttousetheBluetoothfunctionanymore, e.g. if you leave the vehicle for a longer period, it is recommended to deactivate this function.
Menunavigations:
Pleaseanotethatsomeofthefunctions/displayspecifiedsubsequentlyareonlypossibleifthey aresupportedbythemobilephone?
Afterswitchingonthehands-freesetthemainmaskpapears.ltinformsyouwhethera m o bile phone is connected via Bluetooth or not. If yes, its BT identification name appears on the display. Additionally, the field strength (the reception) is displayed as well as the storage capacityofthemobilephoneandthenameofthenetworkoperator.
With the left arrow key (key 1) and subsequently with the right arrow key (key 6) you access the submenustructure. Thisconsists of thesub-sub-menus:
- Call lists (Dialled calls, Received calls, Missed calls),
-Phonebook,
-Bluetooth(Disconnect,SW-Update,SW-Version),
-
Language,
-
P airremotecontrol(CV9011).
In order to call up a submenu or a function, please press key 2. In the first line of the display, the respective menu category is displayed and in the middle line the current menu item is displayed. Inordertoreturntothesuperordinatemenu,pleasepresskey5.Forthefurther keyboardlayoutintherespectivemodipleaseasereretothefollowingdescriptions.
Thestructureofthesubmenu'Callists'ssissimilartothermenunavigation,asyouareusedtoit frommobilephones.Itcanthustracethenumbersdialed,thecallsthatyouhaveneivedand thecallsthatyouhavenisseemed.
In the submenu 'Phonebook', the first 100 memory entries of the SIM card (phonebook) inserted in the mobile phone are displayed. The display of the hands-free set lists the entries in alphabetical order, it could however contain the storage memory numbers 16, 3, 78, 45 etc. If you have more than 100 entries (names + phone numbers) stored on your SIM card and you want the most important of them to be displayed, you should perform a relocation. Please refer totheoperationmanualofyourmobilephonefondetails.Pleasesonetethattheentriestoredon your mobile phone (addressbook) are not displayed. Exceptions are mobile phones transmitting data to the HFCK via the "Object Push Profile" (OPP). The data transmitted via this protocol are permanently saved by the HFCK. The memory can only be deleted after the function'softwareupdate'hasbeepen performed.Itsufficienttheretocalthefunctionwithout uploading an update. If the main mask appears after the "Please wait" message, please disconnect the power supply (e.g. by removing the monitor). After re-commissioning the memoryisdeleted.
Inthenextsub-menu'Bluetooth'thesubitem'Disconnect enablesyoutodisconnectanactive Bluetooth connectionfromtheHFCK.TheHFCKthenswitchesthatstand-bymode.In the subitem'SW-Update'youcanreplacesessionofthesystemsoftware(firmware)whichever transferredtothehands-freecarkitbyanupdatedversion.Foridentifyingthecurrentfirmware oftheHFCKandhowtoreplaceit,pleaserefertothecorrespondingproductcategoryonour homepageunderwww.bury.com.There,thecorrespondingfileswillthenbeatyourdisposal for downloadsoonasa newfirmwareisavailable.