
Cucina HD2423 - Croque monsieur clip PHILIPS - Free user manual and instructions
Find the device manual for free Cucina HD2423 PHILIPS in PDF.
| Product type | 3-in-1 appliance: sandwich maker, waffle iron and grill |
| Model | Philips Cucina HD2423 |
| Dimensions (W x D x H) | Approx. 28 x 25 x 15 cm |
| Weight | Approx. 2.5 kg |
| Power supply | 220-240 V ~ 50/60 Hz |
| Power | 900 W |
| Material | Plastic with non-stick coating on plates |
| Included plates | Rectangular sandwich plates, Nordic waffle plates (heart), grill plates |
| Main functions | Toasting sandwiches, baking waffles, grilling meat and vegetables |
| Adjustable thermostat | Yes, settings for sandwiches, waffles and grill (1-5) |
| Indicator lights | Red light (power on) and green light (ready to cook) |
| Safety | Auto-locking, heat-insulated handles, automatic shut-off not mentioned |
| Care and cleaning | Removable plates dishwasher-safe; wipe exterior with a damp cloth |
| Cord storage | Yes, wraps underneath the appliance |
| Spare parts and repairability | Additional plates available; replaceable cord at authorized service center |
| Warranty | International Philips warranty (see leaflet) |
Frequently Asked Questions - Cucina HD2423 PHILIPS
User questions about Cucina HD2423 PHILIPS
0 question about this device. Answer the ones you know or ask your own.
Ask a new question about this device
Download the instructions for your Croque monsieur clip in PDF format for free! Find your manual Cucina HD2423 - PHILIPS and take your electronic device back in hand. On this page are published all the documents necessary for the use of your device. Cucina HD2423 by PHILIPS.
USER MANUAL Cucina HD2423 PHILIPS
HD2423, HD2422, HD2421, HD2420
ENGLISH 6
DEUTsCH 12
FRANÇAIS 19
NEDERLANDS 26
ESPANOL 33
ITALIANO 40
PORTUGUES 47
SUOMI 54
EAAHNIKA 61
TÜRKÇE 68
74
86
93
Important
- Always follow basic safety precautions when using electrical appliances.
- Read these directions for use carefully before using the appliance and save them for future reference.
- Check if the voltage indicated on the bottom of the appliance corresponds to the mains voltage in your home before you connect the appliance.
Plug the appliance into an earthed wall socket. -
Position the appliance so that:
-
the mains cord does not hang over the edge of a table or worktop;
- children cannot touch the appliance when it is in use;
-
it stands on a flat, stable surface and is surrounded by sufficient free space.
-
Make sure the mains cord does not come into contact with or too close to the hot surfaces of the appliance.
- Put the appliance in a safe place, away from fire hazards such as curtains.
Always preheat the plates before putting any items between them. - Unplug the appliance after use.
- Do not let the appliance operate unattended.
- Avoid touching the metal parts as they become very hot.
- Let the appliance cool down completely before changing the plates, cleaning the appliance or putting it away.
- Make sure you mount the plates securely when you change them.
- Never touch the plates with sharp or abrasive items, as this will damage the non-stick surface.
Always clean the appliance after use.
Unplug the appliance and allow it to cool down completely before removing the plates and cleaning the appliance.
- Never immerse the appliance in water and prevent water from entering the appliance.
If the mains cord of this appliance is damaged, it must only be replaced by Philips or a service centre authorised by Philips, as special tools and/or parts are required.
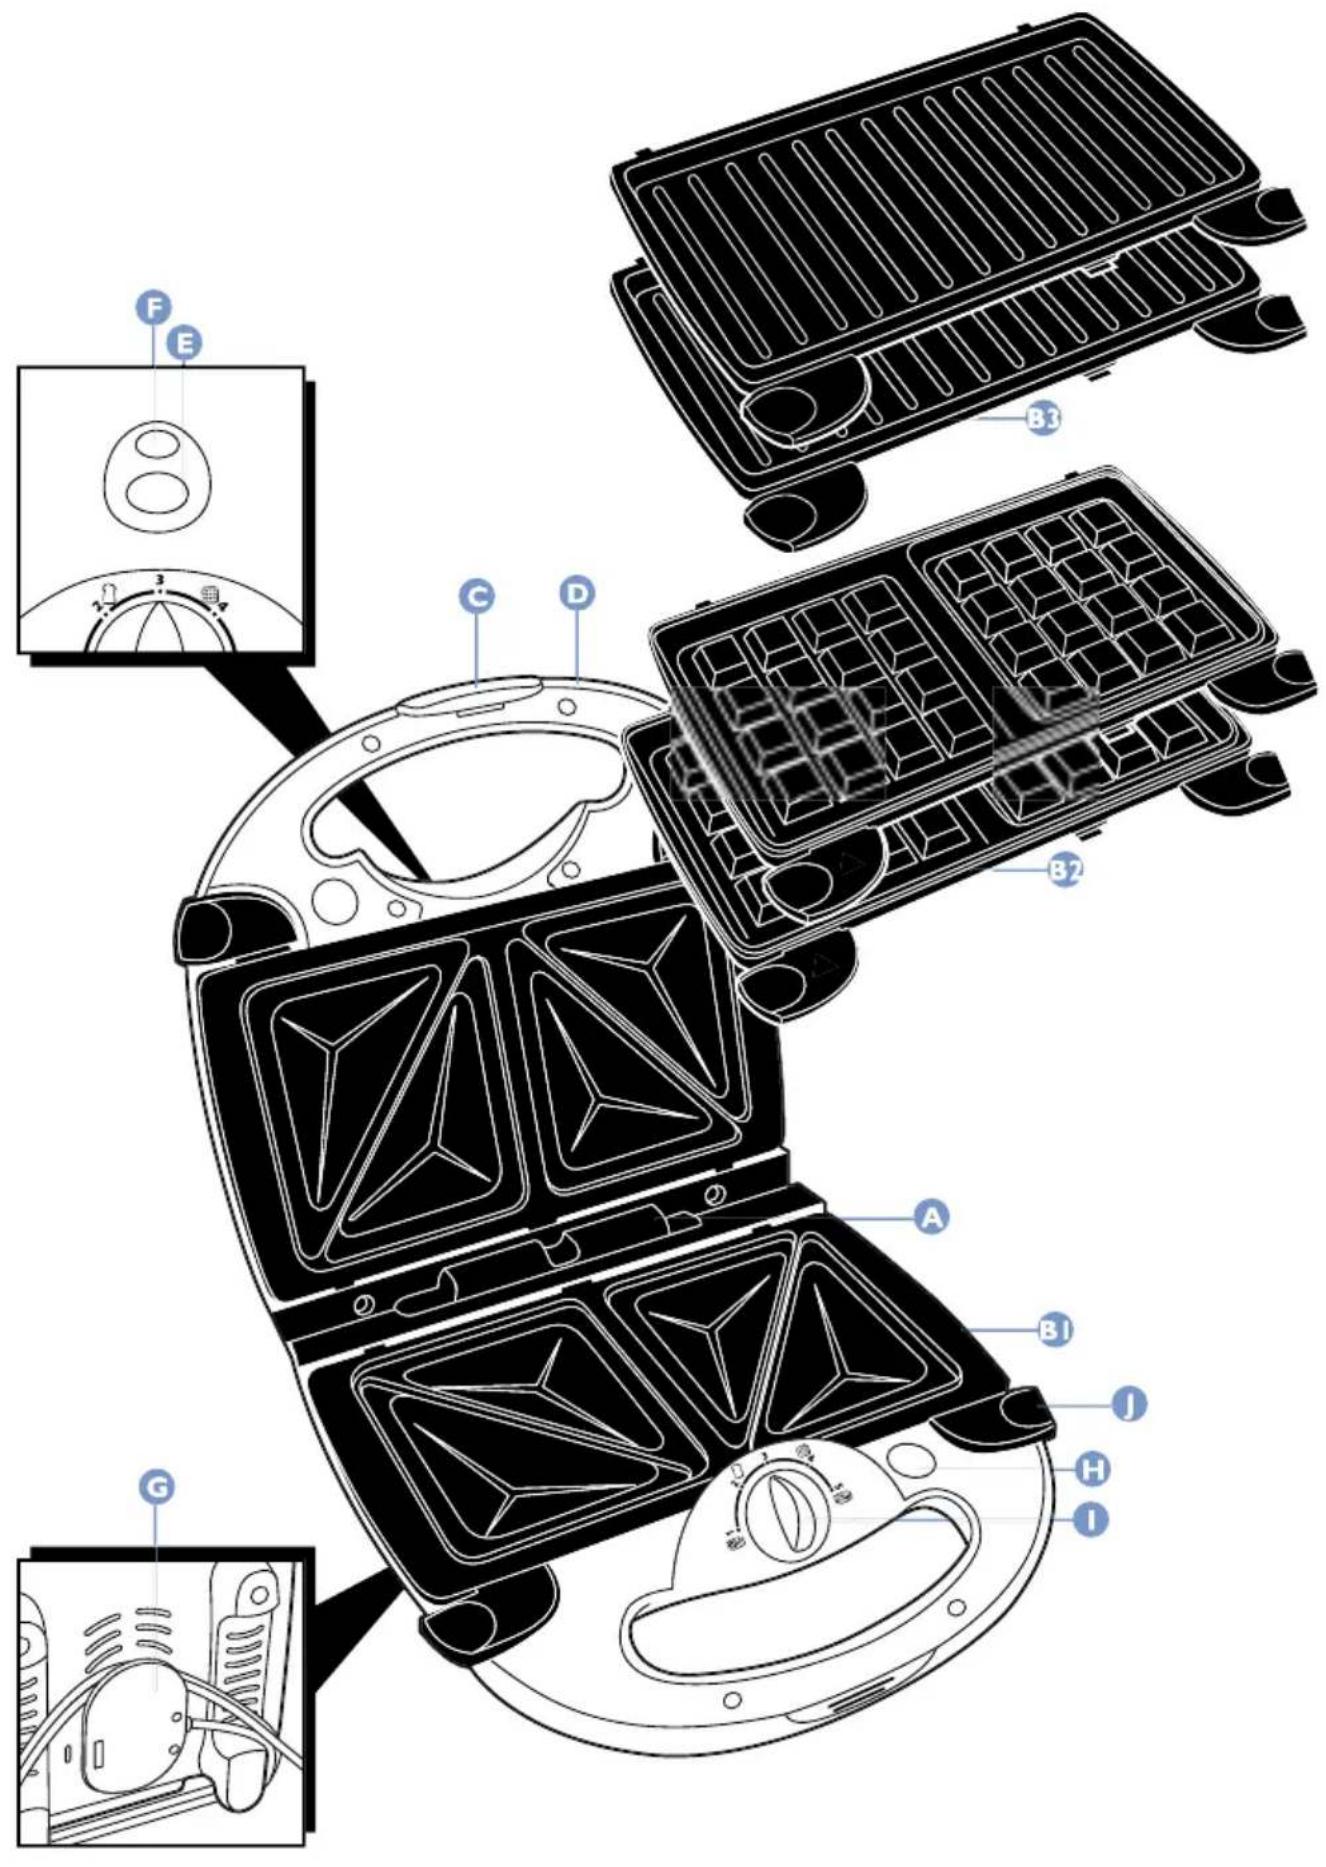
General Description
A Vario Lock™ The hinge system automatically adapts to the removable plates that are put in the appliance.
B Removable plates (dishwasher-proof) Sandwich plates (B1: cut & seal and rectangular-shaped), Waffle plates (B2: Belgian and Nordic), Grilling plates (B3):
- HD 2420 (Belgian waffle maker, cut & seal sandwich maker, contact grill).
- HD 2421 (Belgian waffle maker, rectangular-shape sandwich maker, contact grill).
- HD 2422 (Nordic waffle maker (heart shape), cut & seal sandwich maker, contact grill).
- HD 2423 (Nordic waffle maker (heart shape), rectangular-shape sandwich maker, contact grill).
Auto Lock
An automatic clamping mechanism that closes the 3-in-1 appliance. The auto-lock function should be deactivated when the Belgian waffle plate is inserted to allow optimal performance as a waffle maker.
Cool-touch handgrips
Power-on light
This red light is on as long as the sandwich maker is connected to the mains.
Ready-to-cook light
This green light is on when the 3-in-1 plates are being heated up. When the green light goes out, the appliance is ready for use.
Cord storage
Plates release button
Thermostat knob
0 Handles of plate
Before use
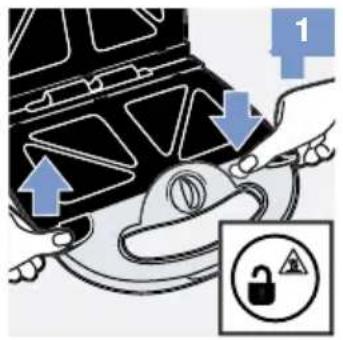
The plates can be removed by pressing the plate release button on the appliance, after which they can be lifted out of the appliance by means of the handles.
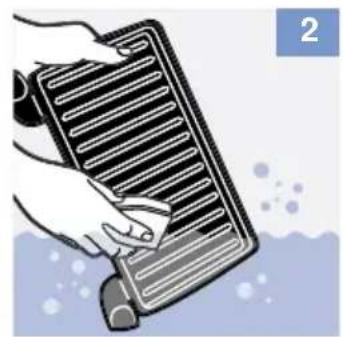
1 Remove the plates from the appliance (fig. 1).
2 Clean each plate with a soft cloth or sponge in hot soapy water or put them in the dishwasher (fig. 2).
3 Dry the plates and place them back in the appliance.
The appliance may produce some smoke when you use it for the first time. This is normal.
Making toasted sandwiches
Two different types of sandwich plates can be used for making sandwiches: the cut & seal plates and the rectangular-shaped plates. The cut & seal plates cut and seal the bread, producing triangular toasted sandwiches. The rectangular-shaped plates only seal the bread and produce rectangular-shaped toasted sandwiches.
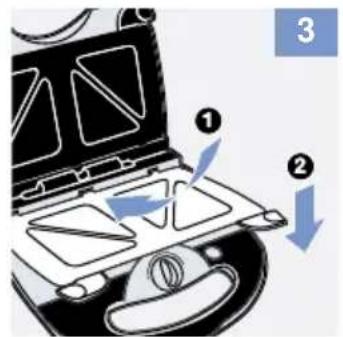
1 Place the sandwich plates in the appliance (fig.3).
When you place the plates into the appliance properly, you will hear a click.
2 Slightly grease the plates with a little butter or oil.
3 Select the sandwich setting by turning the thermostat knob to setting (fig. 4).
4 Insert the plug into the wall socket.
You can adjust the length of the cord by winding part of it round the brackets on the base of the appliance.
5 The red power-on light and the green ready-to-cook light go on.
6 Prepare the ingredients for your toasted sandwich.
For each sandwich you need two slices of bread and a suitable filling. Read the chapter 'Recipes for toasted sandwiches' for suggestions. Slightly butter the sides of the bread that come into contact with the plates to obtain an even, golden brown result.
7 The sandwich maker is ready for use as soon as the ready-to-cook light goes out (fig. 5).
Put two slides of bread with the buttered sides on the lower plate, spread the filling onto the bread and put two other slices of bread on top, with the buttered sides pointing up. You can also toast only one sandwich, if you wish. To ensure optimal sealing, fillings should not be spread too close to the edges of the slices of bread.
8 Close the appliance (fig.6).
Lower the upper plate carefully onto the bread until the auto-lock mechanism clamps it onto the lower plate.
Never leave the sandwich maker unattended when it is switched on.
While cooking, the green ready-to-cook light goes on and goes out from time to time as an indication that the heating elements are switched on and off to maintain the correct temperature.
9 Open the sandwich maker after 4-6 minutes
Check whether the toasted sandwich is golden brown. The cooking time required to obtain crispy brown sandwiches depends on the type of bread, the filling and your personal taste.
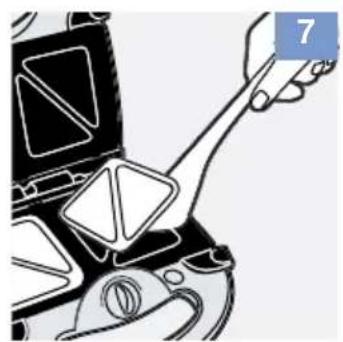
10 Removing the sandwiches (fig.7).
Use a wooden or plastic utensil (e.g. a spatula) to remove the toasted sandwiches from the sandwich maker. Do not use metal, sharp or abrasive kitchen utensils.
To continue making sandwiches, place two new slices of bread on the lower plate when the green ready-to-cook light goes out.
11 Unplug the appliance after use.
Recipes for toasted sandwiches
- Ham, cheese and pineapple sandwiches
4 slices of white bread
2 slices of cheese
2 slices of pineapple
2 thin slices of ham curry powder
Preheat the sandwich maker
Put the cheese, the pineapple and then the ham on two slices of bread. Sprinkle the ham with some curry powder and put the other two slices of bread on top.
Follow the instructions in the chapter 'Making toasted sandwiches'.
Tomato,cheese and anchovy sandwiches
4 slices of white bread
1 or 2 tomatoes (cut into slices)
2 tablespoons of grated Parmesan cheese
6 anchovies
paprika, marjoram
Preheat the sandwich maker
Put the slices of tomato, the anchovies and the grated cheese on two slices of bread. Sprinkle with some paprika and marjoram and put the other two slices of bread on top.
Follow the instructions in the chapter 'Making toasted sandwiches'.
Grilling(contact grill)
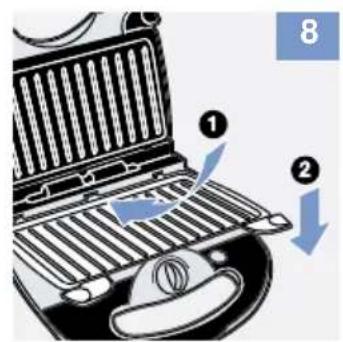
1 Place the grilling plates in the appliance (fig.8).
When you place the plates into the appliance properly, you will hear a click.
2 Slightly grease the plates with a little butter or oil.
3 Select the desired setting by turning the thermostat knob to the grilling setting (1-5) (fig. 9).
4 Insert the plug into the wall socket.
You can adjust the length of the cord by winding part of it round the brackets on the base of the appliance.
5 The red power-on light and the green ready-to-cook light go on.
6 You can place the ingredients on the lower grilling plate when the green ready-to-cook light has gone out (fig.10).
For an optimal result, the ingredients should be placed in the centre of the lower grilling plate.
While cooking, the green ready-to-cook light goes on and goes out from time to time as an indication that the heating elements are switched on and off to maintain the correct temperature.
7 Close the appliance (fig.11).
Lower the upper grilling plate carefully onto the ingredients until the auto-lock mechanism clamps the upper plate onto the lower plate. The upper grilling plate now rests on the food, causing it to be grilled evenly on both sides.
Do not lock the contact grill when grilling thick ingredients.
Never leave the operating contact grill unattended when grilling thick ingredients.
8 Open the contact grill after 3-5 minutes.
The grilling time depends on the type of ingredients, the thickness of the items and your personal taste.
See the table for the recommended grilling times.
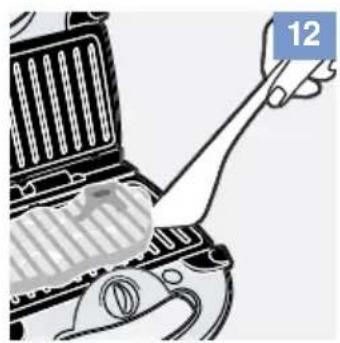
9 Removing the grilled food (fig.12).
Use a wooden or plastic utensil (e.g. a spatula) to remove the grilled food from the contact grill. Do not use metal, sharp or abrasive kitchen utensils.
To continue grilling, place the second batch of food on the lower plate when the green ready-to-cook light goes out.
For optimal results, remove excess oil from the plate with a piece of kitchen paper before placing the next batch of food on the grilling plates.
10 Unplug the appliance after use.
Grilling times
In the table you will find a number of dishes you can prepare with the contact grill. The grilling times indicated in the table do not include the time necessary to preheat the appliance.
During the grilling process, the green light goes on and out from time to time to indicate that the heating elements are switched on or off to maintain the correct temperature. When the light goes on or out, you can simply continue grilling.
You can adapt the grilling time and temperature to your own taste. The setting also depends on the kind of food that is being prepared (e.g. meat), its thickness and its temperature.
Tips
- The contact grill must not be used to grill meat with bones attached to it. The bones could damage the non-stick coating of the plates.
- Always cook small batches to get the best results.
Sausages tend to burst when they are being cooked. This can be prevented by punching a few holes in the skin with a fork. - Fresh meat gives better grilling results than frozen or defrosted meat.
- Do not put salt on the meat until after you have grilled it. This will help to preserve the meat juices.
- Do not grill pieces of meat that are too thick.
- Turn ingredients that are thinner than about 1cm at least once during grilling.
Grilling times
| Ingredient | Grilling time | Setting |
| Salmon or tuna steak | 7-9 minutes | 4-5 |
| Fish (small pieces) | 5-7 minutes | 4-5 |
| Sausage | 5-7 minutes | 5 |
| Hamburger (frozen, pre-cooked) | 7-10 minutes | 5 |
| Hamburger (fresh) | 5-7 minutes | 5 |
| Piece of meat | 5-7 minutes | 5 |
| Vegetables | 5-6 minutes | 5 |
| Mixed grill | 8-10 minutes | 5 |
| Pineapple slices | 3-5 minutes | 5 |
| Turkey/chicken filet (200 g) | 6-9 minutes | 5 |
Making waffles
Two different types of plates can be used for making waffles: the Nordic waffle plates (heart shape) and the Belgian waffle plates.
1 Make batter according to the instructions given in the chapter 'Recipes for waffles' in these directions for use.
To get optimal results, let the batter stand for half an hour before baking.
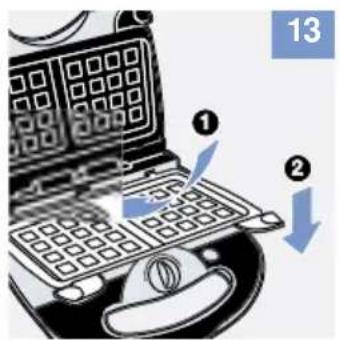
2 Place the waffle plates in the appliance (fig.13).
When you place the plates in the appliance properly, you will hear a click.
3 Slightly grease the plates with a little butter or oil.
4 Select the waffle setting by turning the thermostat knob to the waffle setting (fig. 14).
5 Insert the plug into the wall socket.
You can adjust the length of the cord by winding part of it round the brackets on the base of the appliance.
6 The red power-on light and the green ready-to-cook light go on.
Pour the batter onto the lower waffle plate when the green ready-to-cook light has gone out (fig. 15).
Pour about 100ml of batter onto the lower Nordic waffle plate and about 180ml of batter onto the lower Belgian waffle plate.
8 Close the appliance (fig.16).
Lower the upper plate carefully onto the batter WITHOUT clamping the plates. This will allow the waffles to expand and gives a better end result.
Never leave the waffle maker unattended when it is switched on.
While cooking, the green light goes on and goes out from time to time as an indication that the heating elements are switched on and off to maintain the correct temperature.
9 Open the waffle maker after 5-7 minutes
Check whether the waffles are golden brown. The cooking time required to obtain crispy, golden brown waffles depends on the type of batter and your personal taste.
10 Removing the waffles (fig.17).
Use a wooden or plastic utensil (e.g. a spatula) to remove the waffles from the waffle maker. Do not use metal, sharp or abrasive kitchen utensils. Let the waffles cool down on a wire rack so that they become crispy.
Longer cooking times will result in darker waffles, whereas shorter cooking times will give lighter results.
To continue cooking, place the next batch of batter onto the waffle plate when the green ready-to-cook light goes out.
11 Unplug the appliance after use.
Recipes for waffles
1 dl = 100 ml
1 tablespoons = 15ml
1 teaspoon = 5ml
1 spice measure = 1 ml
- Crisp waffles (6-10 pieces)
200 ml cold water
300 ml (200 g) wheat flour
300 ml cream (40% fat) - Mix flour and water. Stir well to obtain a smooth batter. Whip the cream until stiff and mix it through the batter. Cook the waffles.
- Traditional Waffles (6-10 pieces)
1.5 cup milk
3 eggs
7 tablespoons vegetable oil
1.75 cup flour
1 tablespoon sugar
2 teaspoons baking powder
1/2 teaspoon salt
Sift the dry ingredients into a medium-size bowl. Separate the eggs. Beat egg whites until stiff. Add the egg yolks, oil and milk to the dry ingredients at the same time. Beat until there are no lumps in the batter. Fold the egg whites into the batter using a spatula. Cook the waffles.
Variation: You can also use brown (wheatmeal) flour instead of white flour. Brown flour contains more fibre. Serve the waffles with cottage cheese and fresh berries.
Cleaning
1 Unplug the appliance.
2 Let the appliance cool down before removing the plates.
Always remove excess oil from the grilling plates with a piece of kitchen paper before removing them for cleaning.
The plates can be removed by pressing the plate release buttons on the appliance, after which they can be lifted out of the appliance by means of the handles.
3 Clean the plates with a soft cloth or sponge in hot soapy water or put them in the dishwasher.
Never use abrasive or scouring cleaning agents and materials, as this will damage the non-stick coating of the plate.
Residues can be removed by soaking the plates in hot soapy water for five minutes. This will loosen any caked food or grease.
4 Clean the outside of the appliance with a damp cloth
Never immerse the appliance in water.
5 Wind the cord (fig.18).
The 3-in-1 appliance has a cord storage feature on the base of the appliance.
6 The appliance can be stored in a vertical or horizontal position (fig. 19).
Replacing the mains cord
If the mains cord of this appliance is damaged, it must only be replaced by Philips or a service centre authorised by Philips, as special tools and/or parts are required.
Information & service
If you need information or if you have a problem, please visit the Philips Web site at www.philips.com or contact the Philips Customer Care Centre in your country (you will find its phone number in the worldwide guarantee leaflet). If there is no Customer Care Centre in your country, turn to your local Philips dealer or contact the Service Department of Philips Domestic Appliances and Personal Care BV.
Wichtig
10 Retire as totas (fig.7).
10 Retire as waffles (fig.17).
Zuvayegyia ymuéva aadvoutc
wauuunue uuaaauauauuuuuiu uuaaauuauuuuuuuuuuuuuuuuuuuuuuuuuuuuuuuuuuuuuuuuuuuuuuuuuuuuuuuuuuuuuuuuuuuuuuuuuuuuuuuuuuuuuuuuuuuuuuuuuuuuuuuuuuuuuuuuuuuuuuuuuuuuuuuuuuuuuuuuuuuuuuuuuuuuuuuuuuuuuuuuuuuuuuuuuuuuuuuuuuuuuuuuuuuuuuuuuUU
9 [a]
aannnnnne aannnnnne nnnnnnne ane annnnnnnnnne nnne nnnnnnne nnnnnnne nnnnnnne nnnnnnne nnnnnnne nnnnnnne nnnnnnne nnnnnnne nnnnnnne nnnnnnne nnnnnnne nnnnnnne nnnnnnne nnnnnnne nnnnnnne nnnnnnne nnnnnnne nnnnnnne nnnnnnne nnnnnnne nnnnn
10 unuaaunnaan (n7
Lnnnnaaannn nnnnnnnnnnnnnnnnnnnnnnnnnnnnnnnnnnnnnnnnnnnnnnnnnnnnnnnnnnnnnnnnnnnnnnnnnnnnnnnnnnnnnnnnnnnnnnnnnnnnnnnnnnnnnnnnnnnnnnnnnnnnnnnnnnnnnnn
11
1
yJ1m4
2u
山山山2
uunwhnnn 2
中
y 1
1
a a a a a a a a a a a a a a a a a a a a a a a a a a a a a a a a a a a a a a a a a a a a a a a a a a a a a a a
r
a b a b b a b b a b w w w w
E
Jai Jai jai jai
()
jllglaicil
[\text{、}]
(19)afojfofofofofofofofofofofofofofofofofofofofofofofofofofofofofofofofofofofofofofofofofo
L
1 1
LaIglaI
I www.philips.com 100000000000000000000000000000000000000000000000000000000000000000000000000000000
yds yds yds yds yds yds yds yds yds yds yds yds
↓
(10 p) jaiyjuiuui yie gao elabil iie Jauai qiuall ie aijnlls
V
(1) 1,2,3,4
J 1000000000000000000000000000000000000000000
J 1
$$ \left. \right.\left. \right\rvert\left. \right.\left. \right\rvert\left. \right.\left. \right\rvert\left. \right.\left. \right\rvert\left. \right.\left. \right\rvert\left. \right.\left. \right\rvert\left.\right.\left. \right. $$
$$ (a b i 1 \cdot - 7) a _ {i n o j e c t} j a l g - $$
$$ \therefore \text {l a l l} \text {l a l l} \text {j o} \text {j o} \dots $$
$$ \left. \sum_ {i = 1} ^ {n} \sum_ {j = 1} ^ {m} \sum_ {k = 1} ^ {r _ {i j}} \sum_ {l = 1} ^ {r _ {i k}} \dots\right) $$
$$ (j \neq 1) j = 0. 2 \times 1 0 ^ {3} \cdot (s g i n) i a _ {i} s l l j o j o r $$
gbl. aal 1gblal gol jll ayl sll acll iagc lgl alall g k .al
$$ (e b o 1 \cdot - 7) z _ {j} = \frac {1}{2} \frac {1}{2} \frac {1}{2} \frac {1}{2} \frac {1}{2} \frac {1}{2} \frac {1}{2} $$
$$ \mathrm {a l l} \mathrm {j o} \dot {\mathrm {a}} \dot {\mathrm {a}} \mathrm {g} \mathrm {y} \mathrm {s} $$
$$ \mathrm {s l a w} ^ {\prime} $$
$$ \mathrm {g i l b i t a j o p a l a b l e q u e l v e n s u r e m a t h {\cdot} \mathrm {d e f}} $$
$$ \left. \frac {1}{2} \sum_ {i = 1} ^ {n} \sum_ {j = 1} ^ {m} \sum_ {k = 1} ^ {p} \sum_ {l = 1} ^ {q} \sum_ {r = 1} ^ {s} \right} $$
$$ S u l l \quad j o \quad i d a l g p a c l b i e a l o $$
$$ \left. \right.\left. \right.\left. \right.\left. \right.\left. \right.\left.\left.\left.\left.\left.\left.\left.\left.\left.\left.\left.\left.\left.\left.\left.\left.\left.\left.\left.\left.\left.\left.\left.\left.\left.\left.\left.\left.\left.\right.\right.\right.\right.\right.\right.\right.\right.\right.\right.\right.\right.\right.\right.\right.\right.\right.\right.\right.\right.\right.\right.\right.\right.\right.\right.\right.\right.\right. $$
IFE°uf ¥éüadOd hÉg YENWC'G Aé°uZ E¶dG àaJ osa E¶Y Y ...fà- fô O°†ead £ù. eFEaedG J°†aC' EehO IO"U āE«ac»; É©Wácf°T a£°SGfh ÜfãadG c†©NHaé «aOé Wwde IOÉY fÉa. àHoe hCG aéäe føe 'oH aLREW f Góia°SG oæY J°†aCG. àèdG aboe Y ®EÖG y dP oYE'uj. AGf°ûdG oe Aéj'G o©H. àμ«aoûdG OZ aëdG TM£b AGf°ú
| á«@°VfdG | AGf°ûdG àbh | äÉffμ丫G |
| 5-4 | FébO 9 - 7 | (Iò°U Éfù)lG°Sà°S |
| 5-4 | FébO 7 - 5 | çfÉe |
| 5 | FébO 7 - 5 | (EaÑ°ue f;£e ,èquãe) òZÈeÉj |
| 5 | FébO \0 - 7 | (êRéW) òZÈeÉjdG |
| 5 | FébO 7 - 5 | °a©£b |
| 5 | FébO 7 - 5 | àGhGô†N |
| 5 | FébO 6 - 5 | áμ°üe ...hÉ°üe |
| 5 | FébO \0 - 8 | ¢SEfÉfCG iFGô° |
| 5 | FébO 5 - 3 | (ρGôZ 200) eÉLO ¬««a /»ehQ |
| 5 | FébO 9 - 6 |
S_ OBC = 12 · BO · CD = 12 × 2t × 5
.》μ«éNdG JaGfdG YENWCG h (Öb Jμ°T Y) 'Éfóæμ°S'G JaGfdG YENWCG :JaGfdG ð°†ëd Y
.àμdG Gog ' "JaGfdG āE°Uh" Iôsa ' Ioafá丫G āEa «J©àd É©, aæ «é .♂oDg ' Éi©°Vh JNb àYÉ°S ðüf Ió丫 aæ «é©dG »YO ,eFEaedG
.3°00SQ) REi÷G JaGfdG ¥E 2 VCG
".E0<ON EJf°U U©a°S,äe<eüdG ajoédEH RE÷G‘ Y
.¥ENWC'G JY ājōdG hCG IóHōd 3 ōe J«
JaGfdG a<@Vh G (aEà°SfêIdG) IQGôg °<J iÉaØe ojhoJ JONøe JaGfdG 4 ead E
.5FEJG G uNae ' cHuHEed 5 ^
. RE_i÷ G 'Eb ± GwCGJfM qOd JON 0e §jo'udG Jf£H
yiei jai yu uui yu uui yu uui yu uui yu uui yu uui yu uui yu uui yu uui yu uui yu uui yu uui yu uui yu uui yu uui yu uui yu uui yu uui yu uui yu uui yu uui yu uui yu uui yu uui yu uui yu uii
1-2 10000000000000000000000000000000000000000000000
(Vp) aaiuuiuill icjil
iabll no 1gaiy i j. jglll no aauoall taiuyiuull egjil (glo:xi) aykui y biyiaaiaea aaba ouiu
. pali pali lal bial k glaiaiaiaiae
plaii u ulaiw y sie albi iie gawll qal bI y ie jn nn jni jni bia gaa, caiuyiuill wiai aolgal
1

aas clgjnl alag
wlll g zjg jzjdz
j 1
iJ
Ji
jissalpal jno jiaeli jia
S
LgJUuJ 1
15 11 15 j11
a a a a a a a a a a a a a a a a a a a a a a a a a a a a a a a a a a a a a a a a
(0 p) jaiy plaiiuy uuiu yegie lalil ie Jaaauiuuiuia jaiy
(7 p0j) jglj
J 1
124 a 1000
i 1
-
-
-
-
-
-
-
-
-
-
-
-
-
-
-
-
-
-
-
-
-
-
-
-
-
-
-
-
- 1.
-
-
-
-
-
-
-
-
-
-
-
-
-
-
-
-
-
-
-
-
-
-
-
-
-
-
-
Jl jll lI J I J I J I J I J I J I J I J I J I J I J I J I J I J
aal lal
j k jk j 14
Joo Lai jol Jol Jieb 2
a
jlll llll bss 100000000000000000000000000000000000000
Jlssllk lhy jy jslalj 1j 1j 1j
Lg 1000
aoljai jooe gii 120000000000000000000000000000
a 1
-
-
-
-
-
-
-
-
-
-
-
-
-
-
-
-
-
-
-
-
-
-
-
-
-
-
-
-
-
-
-
-
-
- 3
-
-
-
-
-
-
-
-
-
-
-
-
-
-
-
-
-
-
-
-
-
-
-
-
-
-
-
-
-
-
-
-
aaijzjj jlgall aaii gai laljll jiljll jgl
1
JU 10000000000000000000000000000000000000000000000
jLoaiwJey Log Jgai
jlll lii y 11111111111111111111111
jlll lal lall lgl jy g llly jll
g 1 j 1 1 1 1 1 1 1 1 1 1 1 1 1 1 1 1 1 1
4.2.1olly
p_t 可以
jglj jglj g jg jg jg jg jg jg jg jg jg jg jg jg jg jg jg jg jg jg jg jg jg jg jg jg jg jg jg jg jg jg jg jg jg jg jg jg jg jg jg jg jg
a 14k k 11u) (B1 (jss)
(B3 1gJgJgJgJgJgJgJgJgJgJgJgJgJgJgJgJgJgJgJgJgJgJgJgJgJgJgJgJgJgJgJgJgJgJgJgJgJgJgJgJgJgJgJgJgJgJgJgJgJgJg
()HD2420
()HD2421
()HD2422
()HD2423
A
B
C
$$ \left. \right.\left. \right.\left. \right.\left. \right.\left. \right.\left. \right.\left. \right.\left.\left.\left.\left.\left.\left.\left.\left.\left.\left.\left.\left.\left.\left.\left.\left.\left.\left.\left.\left.\left.\left.\left.\left.\left.\left.\left.\right.\right.\right.\right.\right.\right.\right.\right.\right.\right.\right.\right.\right.\right.\right.\right.\right.\right.\right.\right.\right.\right.\right.\right.\right.\right.\right\rangle_ {1 0} ^ {1 0} $$
$$ \therefore \text {a} _ {1} \text {a} _ {2} \text {a} _ {3} \text {a} _ {4} \text {a} _ {5} \text {a} _ {6} \text {a} _ {7} \text {a} _ {8} \text {a} _ {9} \text {a} _ {1 0} \text {a} _ {1 1} \text {a} _ {1 2} \text {a} _ {1 3} \text {a} _ {1 4} \text {a} _ {1 5} \text {a} _ {1 6} \text {a} _ {1 7} \text {a} _ {1 8} \text {a} _ {1 9} \text {a} _ {2 0} \text {a} _ {2 1} \text {a} _ {2 2} \text {a} _ {2 3} \text {a} _ {2 4} \text {a} _ {2 5} \text {a} _ {2 6} \text {a} _ {2 7} \text {a} _ {2 8} \text {a} _ {2 9} \text {a} _ {3 0} \text {a} _ {3 1} \text {a} _ {3 2} \text {a} _ {3 3} $$
$$ (1 5 c l \leqslant 3) 2 \div 2 \dots 1, 2 = 1 5 = \dots $$
$$ g \Delta 5 \Delta_ {f} \Delta_ {i} g _ {i} \Delta_ {j} \Delta_ {k} \Delta_ {l} \Delta_ {m} \Delta_ {n} \Delta_ {o} \Delta_ {p} \Delta_ {q} \Delta_ {r} \Delta_ {s} \Delta_ {t} \Delta_ {u} \Delta_ {v} \Delta_ {w} \Delta_ {x} \Delta_ {y} \Delta_ {z} $$
$$ \therefore \frac {1}{2} \times 5 = 1 0 $$
$$ \begin{array}{l} g \dot {s} \dot {s} g, 1; l o s \dot {s} g \dot {s} \dot {s} \dot {s} \dot {s} \dot {s} \dot {s} \dot {s} \dot {s} \dot {s} \dot {s} \dot {s} \dot {s} \dot {s} \dot {s} \dot {s} \dot {s} \dot {s} \dot {s} \dot {s} \dot {s} \dot {s}, \ \text {a s} 2 0 0 0 0 0 0 0 0 0 0 0 0 0 0 0 0 0 0 0 0 0 0 0 0 0 0 0 0 0 0 0 0 0 0 0 0 0 0 0 0 0 0 0 0 0 0 0 0 0 0 1, \ g \dot {s} \dot {s} g \dot {s} g \dot {s} g \dot {s} g \dot {s} g \dot {s} g \dot {s} g \dot {s} g \dot {s} g \dot {s} g \dot {s} g \dot {s} g \dot {s} g \dot {s} g \dot {s} g \dot {s} g \dot {s} g \dot {S} g \dot {S} g \dot {S} g \dot {S} g \dot {S} g \dot {S} g \dot {S} g \dot {S} g \dot {S} g \dot {S} g \dot {S} g \dot {S} g \dot {S} g \dot {S} g \dot {S} g \dot {S} g \dot {S} g \end{array} $$
$$ 2. \div 5 j _ {1} 1, j _ {2} < 5 a \overline {{a}} \overline {{b}} \overline {{b}} V [ 0, j ] $$
$$ a _ {i} \in a _ {j} \text {a} \in b \quad s ^ {1} \text {s} g \quad a _ {i} \text {a} \in b \quad s ^ {2} \text {s} g \quad a _ {j} \text {a} \in b \quad s ^ {3} \text {s} g \quad a _ {i} \text {a} \in b \quad s ^ {4} \text {s} g \quad a _ {j} \text {a} \in b \quad s ^ {5} \text {s} g \quad a _ {i} \text {a} \in b \quad s ^ {6} \text {s} g \quad a _ {j} \text {a} \in b \quad s ^ {7} \text {s} g \quad a _ {i} \text {a} \in b \quad s ^ {8} \text {s} g \quad a _ {j} \text {a} \in b $$
$$ (1 1 v) (5 \div 3) \dots 5 \dots 5 \dots 5 \dots 5 $$
$$ \begin{array}{l} \text {i j}, \text {s i g m a} _ {j}, \text {s i g m a} _ {j}, \text {s i g m a} _ {j}, \text {s i g m a} _ {j}, \text {s i g m a} _ {j}, \text {s i g m a} _ {j}, \text {s i g m a} _ {j}, \text {s i g m a} _ {j}, \text {s i g m } _ {j}, \text {s i g m a} _ {j}, \text {s i g m a} _ {j}, \text {s i g m a} _ {j}, \text {s i g m a} _ {j}, \text {s i g m a} _ {j}, \text {s i g m a} _ {j}, \text {s i g m a} _ {j}, \text s 1 5 0 0 0 0 0 0 0 0 0 0 0 0 0 0 0 0 0 0 0 0 0 0 0 0 0 0 0 0 0 0 0 0 0 0 0 0 0 0 0 0 0 0 0 0 0 0 0 0 0 0 2, \end{array} $$
$$ \Delta \dot {g} \dot {s} \dot {s} \dot {s} \dot {s} \dot {s} \dot {s} \dot {s} \dot {s} \dot {s} \dot {s} \dot {s} \dot {s} \dot {s} \dot {s} \dot {s} \dot {s} \dot {s} \dot {s} \dot {s} \dot {s} \dot {S} \dot {S} \dot {S} \dot {S} \dot {S} \dot {S} \dot {S} \dot {S} \dot {S} $$
$$ \Delta \frac {1}{2} \frac {1}{2} \frac {1}{2} \frac {1}{2} \frac {1}{2} \frac {1}{2} \frac {1}{2} \frac {1}{2} \frac {1}{2} \frac {1}{2} \frac {1}{2} \frac {1}{2} \frac {1}{2} \frac {1}{2} \frac {1}{2} \dots $$
5 a 2j
$$ \begin{array}{l l} \dots m l = & \ & \end{array} $$
$$ \Delta 1 m l = \left(s, \frac {1}{2} + \frac {1}{2} - \frac {1}{2}\right) $$
$$ \Delta m l = (S) \frac {1}{2} \frac {1}{2} \frac {1}{2} \frac {1}{2} \frac {1}{2} $$
$$ 1 m l = a _ {2} g) a l o w 1 $$
$$ (a s i 1. L S) a \dot {a} _ {i} = c s l a s $$
$$ \geqslant \sum_ {i = 1} ^ {n} p _ {i} \dots m _ {i} $$
$$ 0 2 5 > 2 ^ {7} (1 \cdot g) r \dots m l $$
$$ (\cos \angle F O) a _ {0} \vert F ^ {\prime} \dots m l $$
$$ \begin{array}{l} g \geqslant \frac {1}{2} \sum_ {i = 1} ^ {n} a _ {i} b _ {i} \ \text {a l o} \quad \text {a l o} \quad \text {a l o} \quad \text {a l o} \quad \text {a l o} \quad \text {a l o} \quad \text {a l o} \quad \text {a l o} \quad \text {a l o} \quad \text {a l o} \quad \text {a l o} \quad \text {a l o} \quad a _ {i} b _ {i} \ \text {a l o} \quad \text {a l o} \quad \text {a l o} \quad \text {a l o} \quad \text {a l o} \quad \text {a l o} \quad \text {a l o} \quad \text {a l o} \quad a _ {i} b _ {i} \ \text {a l o} \quad \text {a l o} + 1, a _ {i} b _ {i} - 5. \end{array} $$
$$ (a s 1 \cdot 1. 5) \div a = 1 0 \dots 5 $$
$$ \frac {1}{2} \times 1 0 $$
$$ \dot {E} = 0 \dot {a} \dot {a} \dot {a} 2 a c r $$
$$ \left(\frac {1}{2} + \frac {1}{2}\right) \times 2 = \frac {1}{2} \times 2 = \frac {1}{2} \times 2 = \frac {1}{2} \times 2 = \frac {1}{2} \times 2 = \frac {1}{2} \times 2 = \frac {1}{2} $$
$$ 2, 1 \dot {0} 6 \dot {1} 5 1 / V C $$
$$ S \dot {=} (S) g \dot {=} 1 \dot {=} g \dot {=} 1 $$
$$ 2 2 \div 5: 5: 5, 5 \div 1 2 = 3. 5 $$
L0 a
21 × 22 × 9 =
1,15i,aa 1,laa aaaa aaaa aaaa aaaa aaaa aaaa aaaa aaaa aaaa aaaa
5 2,108-2j,825
(1) 5,6 ,2,5, 8,7 ,3,4, 9,8
1 1
(1)
200 1
a5 25 2g 2g 2g 2g 2g 2g 2g 2g 2g 2g 2g
s1g 502y2uL 3
g sJw valej g yu slalau 100000000000000000000000000000000000000000000000000000000000000000000
25
()20 1
2g 55 50
1
1
201 1
1 5
0
210 1
j 1 j 1 j 1 j 1 j 1 j 1 j 1 j 1 j 1 j 1 j 1 j 1 j 1 j 1 j 1 j 1 j 1 j 1 j 1 j 1 j 1 j 1 j 1 j 1 j 1 j 1 j 1 j 1 j 1 j 1 j 1 j 1 j 1 j 1 j
205 05 05 05 05 05 05 05 05
(05)cuiu 1
1 1 1 1 1 1 1 1 1 1 1 1 1 1 1 1 1 1 1 1 1 1 1 1 1 1 1 1
A
201 1 1 1 1 1 1 1 1 1 1 1 1 1 1 1 1 1 1 1 1 1 1 1 1 1 1 1 1 1 1 1 1 1 1 1 1 1 1 1 1 1 1 1 1 1 1 1 1 1 1
C
25 1
30
40
50
60
70
80
90
100
110
120
130
140
150
160
170
180
190


- Important
- General Description
- Before use
- Making toasted sandwiches
- Recipes for toasted sandwiches
- Grilling(contact grill)
- Tips
- Making waffles
- Recipes for waffles
- Cleaning
- Replacing the mains cord
- Information & service
- Wichtig
- Retire as waffles (fig.17).
- Zuvayegyia ymuéva aadvoutc
- L
- LaIglaI
- S_ OBC = 12 · BO · CD = 12 × 2t × 5
- aas clgjnl alag
- p_t 可以
- × 22 × 9 =
- s1g 502y2uL 3
- C
Brand : PHILIPS
Model : Cucina HD2423
Category : Croque monsieur clip